In this article let’s check how to create New Windows 365 provisioning policy in Microsoft Intune. Creating a Windows 365 Provisioning Policy in Intune for Windows 11 version 24H2 is an essential step in setting up Cloud PCs for end users.
This policy defines the configuration settings for the Cloud PCs, such as the Windows version, language, region, join type (Microsoft Entra join or hybrid join), and the image used. With the availability of Windows 11 24H2, you can now provision Cloud PCs with the latest OS build that includes enhanced security features, performance improvements, and AI-powered experiences.
Here am using Gallery images helps simplify deployment by eliminating the need to maintain custom images. It ensures that Cloud PCs start with a secure and updated OS baseline. Additionally, Microsoft automatically maintains these gallery images with the latest cumulative updates, which means less overhead for IT admins and a more reliable, secure user experience for your Windows 365 users.
Once the policy is created and assigned, Cloud PCs will automatically be provisioned based on the defined settings when licensed users log in. Using the 24H2 version ensures your organization is up to date with the latest Windows capabilities, including improved phishing protection, Copilot integration, and better hardware compatibility. Monitoring and managing these Cloud PCs can be done seamlessly through the Windows 365 and Intune dashboards, ensuring a consistent and secure cloud-based desktop experience.
Table of Contents
Windows 365 PC OS image gallery
The Windows 365 PC OS image gallery in Intune provides a curated list of Microsoft-managed operating system images that can be used when creating provisioning policies for Cloud PCs. These gallery images are regularly updated by Microsoft and include clean, ready-to-use versions of Windows 10 and Windows 11, such as Windows 11 Enterprise 24H2, with optional Microsoft 365 apps pre-installed. Here is the available list.
| Image | Version |
|---|---|
| Windows 11 Enterprise + Microsoft 365 Apps | 24H2 |
| Windows 11 Enterprise | 24H2 |
| Windows 11 Enterprise | 23H2 |
| Windows 11 Enterprise + Microsoft 365 Apps | 23H2 |
| Windows 11 Enterprise | 22H2 |
| Windows 11 Enterprise + Microsoft 365 Apps | 22H2 |
| Windows 10 Enterprise | 22H2 |
| Windows 10 Enterprise + Microsoft 365 Apps | 22H2 |
- How to Create Autopilot Device Preparation Policy for Windows 365 Frontline Devices using Intune
- How Microsoft Security Copilot Improves Intune Admin Center Efficiency
- Windows 365 Cloud PC Frontline Provisioning Policy Creation Process | 3 Cloud PC with One License
- Windows 365 Cloud PC Deployment Expands to Japan West
The five or six-step process to creating a new Windows 365 Enterprise Cloud PC. First, buy a Windows 365 Enterprise license. You can do this through a partner, or you can do this directly through the Microsoft 365 admin center.
Next, assign that license to a user in the Microsoft 365 admin center; create an on-premises network connection and provisioning policy. And lastly, once those licenses are assigned, you will have a Cloud PC created for that user.

Benefits of Entra Joined Cloud PC
Let’s check out the benefits of Entra Joined Windows 365 Cloud PC.
- Take full advantage of modern authentication and management.
- Reduce delay in provisioning.
- Reduce dependencies on Azure infrastructure.
- Provide more flexibility to have connectivity back to the on-premises network.
- Provide Cloud PCs for cloud-only users in your organization.
- More flexible options for single sign-on (SSO).
Architecture Diagrams for Windows 365 Cloud PC
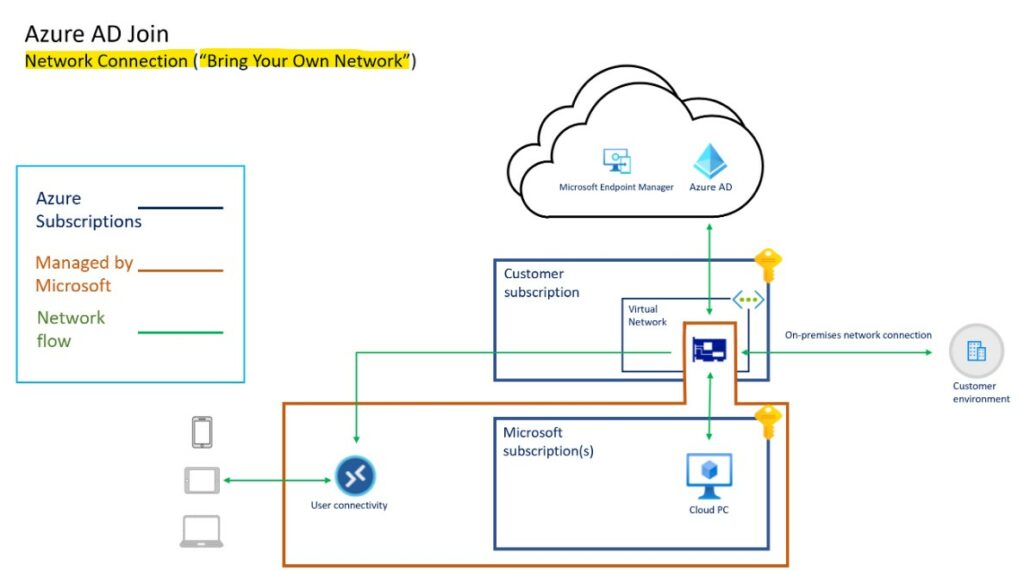
Let’s check out the Architecture Diagrams for Windows 365 Cloud PC. The following diagram talks about the high-level architecture and connectivity details of the Cloud PC Entra Joined scenario.
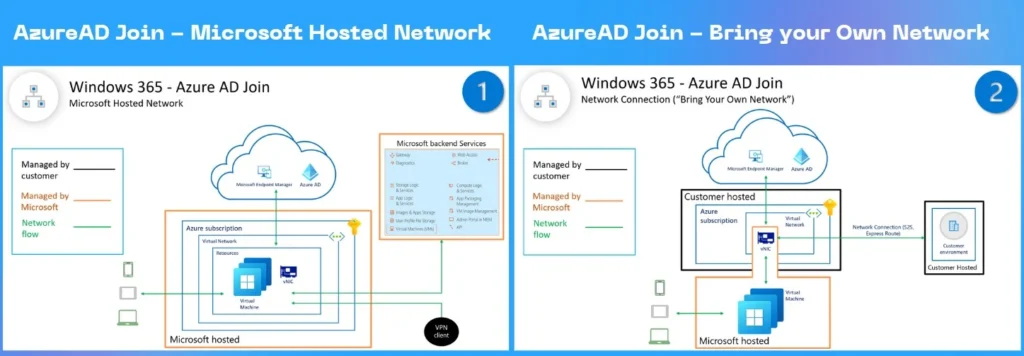
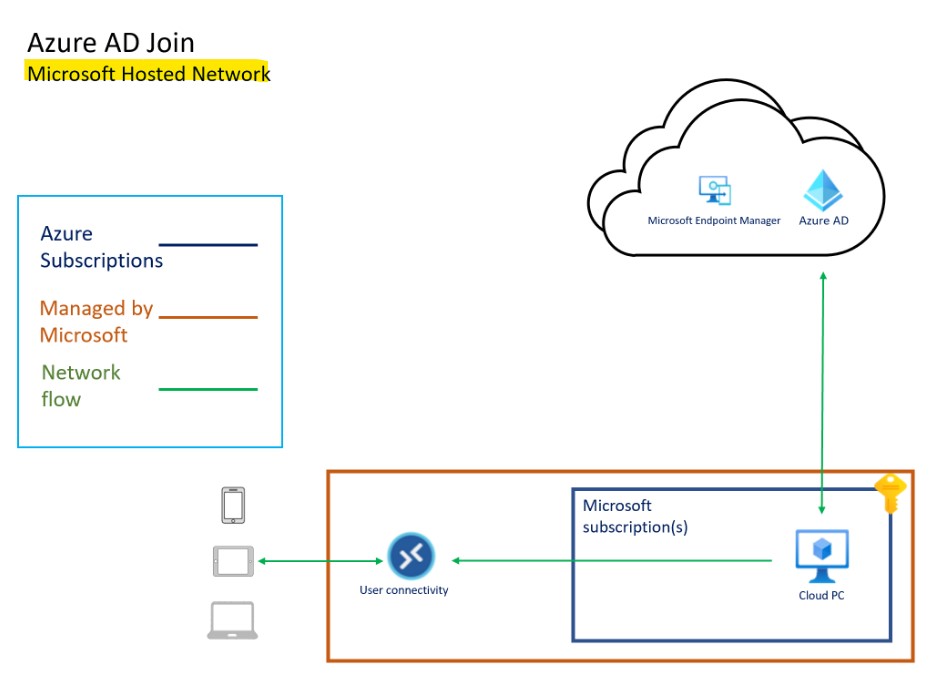
The scheme diagram is shared by Microsoft for Entra Joined Cloud PCs. The following diagram shows the connectivity when using Microsoft Hosted Network. The pure DaaS solution from Microsoft, everything from the infra side is managed by Microsoft.
The following diagram shows the connectivity when using Customers Azure Network connection for on-prem connectivity. In this scenario, the customer is responsible for managing the network and connectivity back to on-prem.
Internal Architecture of Windows 365 Cloud PC
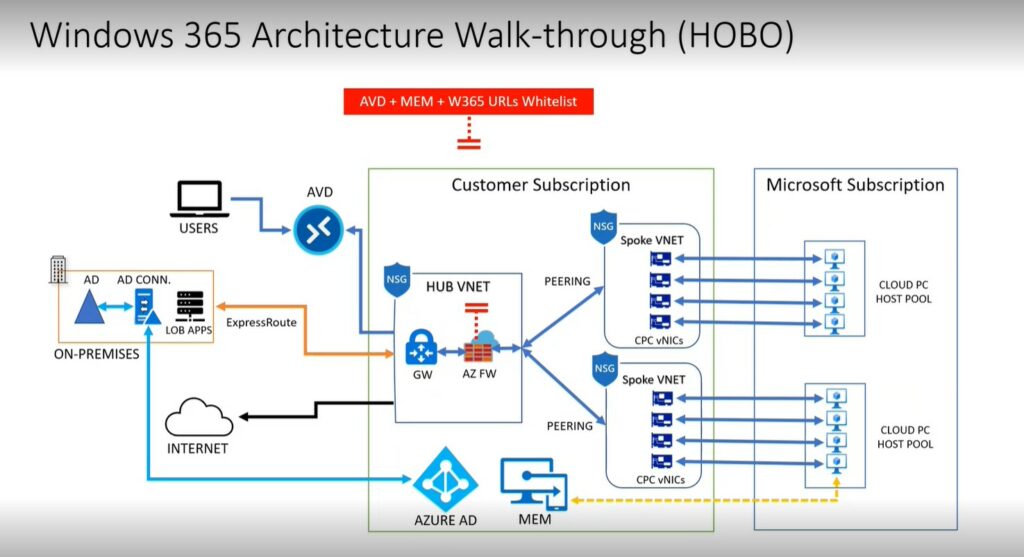
The following schema diagram will give you a quick idea about the internal architecture of the Windows 365 solution. How is connected with other Azure, Azure AD, and MEM components? The network connectivity between the hub and scope model, etc.
Thanks to Ravishankar N for these very useful schema diagrams to understand the flow of the data and internal process of the Windows 365 solution during his presentation at the APAC Windows 365 April UG event. This is a sample diagram to give you a better understanding of the connectivity.
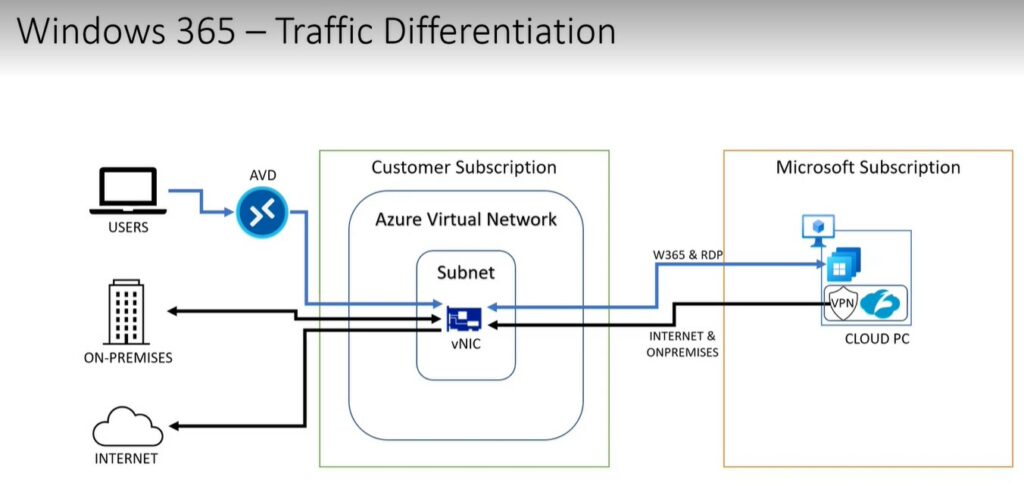
There is another schema diagram that is shared by Ravi that helps to understand the importance of segregating the traffic from Windows 365 Cloud PCs to the internet and internal network using proxy solutions, etc. This helps to have better use experience and better performance with Teams meetings, etc.
Entra Joined Cloud PC Prerequisites
The following are a quick list of prerequisite to set up Entra joined Cloud PCs.
- A valid and working Intune and Entra Tenant.
- Ensure that Intune device type enrollment restrictions are set to Allow Windows (MDM) platform for corporate enrollment.
- You must have an Intune license so that you can use Intune to manage the devices.
- Users must have licenses for Windows, Intune, Entra ID , and Windows 365 to use their Cloud PC.
- You must be an Intune Administrator in Azure AD to provision Cloud PCs.
- Azure virtual network (non-Microsoft hosted network scenario): You must have a virtual network (vNET) in your Azure subscription in the same region as where the Windows 365 Cloud PCs are created.
- Network bandwidth requirements should be considered.
- A subnet within the vNet and available IP address space.
You can check the additional network requirement in the following documentation Network requirements for Windows 365.
NOTE – Azure AD join, and Intune enrollment of Windows 365 Cloud PCs are handled by the Microsoft provisioning process. I think this is done in a similar way to how this happened for AVD provisioning.

Create a New Windows 365 Provisioning policy in Intune
Follow these below steps to create a new Windows 365 Provisioning policy in Microsoft Intune. Let’s go through the method step-by-step.
- Sign In to the Microsoft Intune admin center
- Navigate to Devices > Windows > Windows 365
- Click on > +Create policy
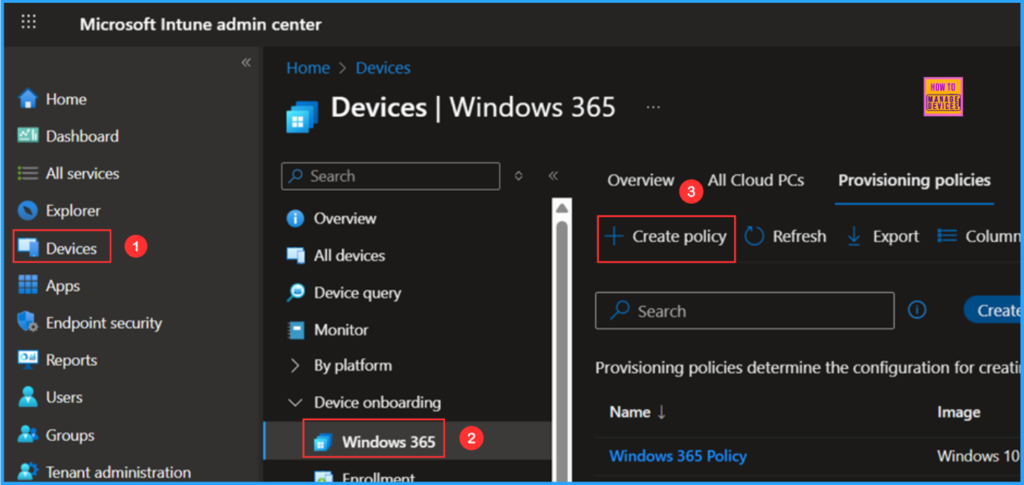
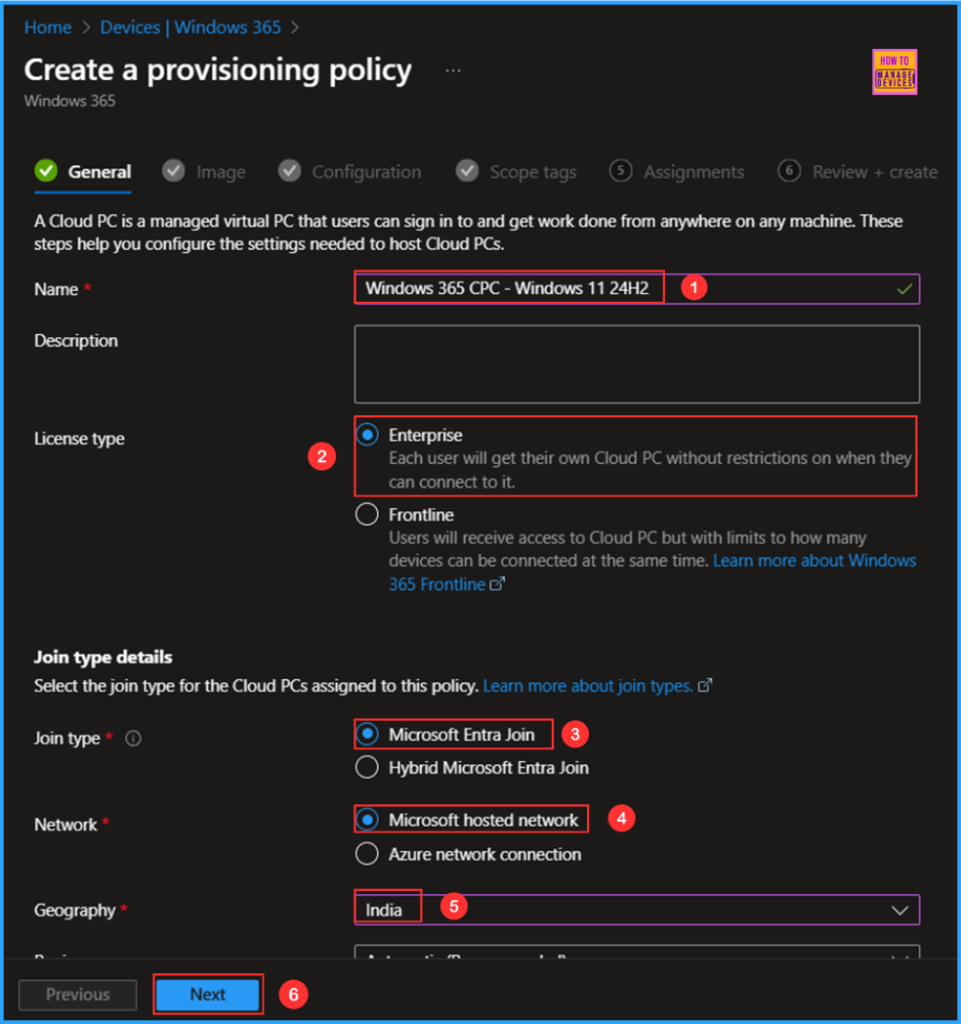
On the General tab, you can now add the settings mentioned below. A Cloud PC is a managed virtual PC that allows users to sign in and work from anywhere on any device. These steps will help you configure the necessary settings to host Cloud PCs.
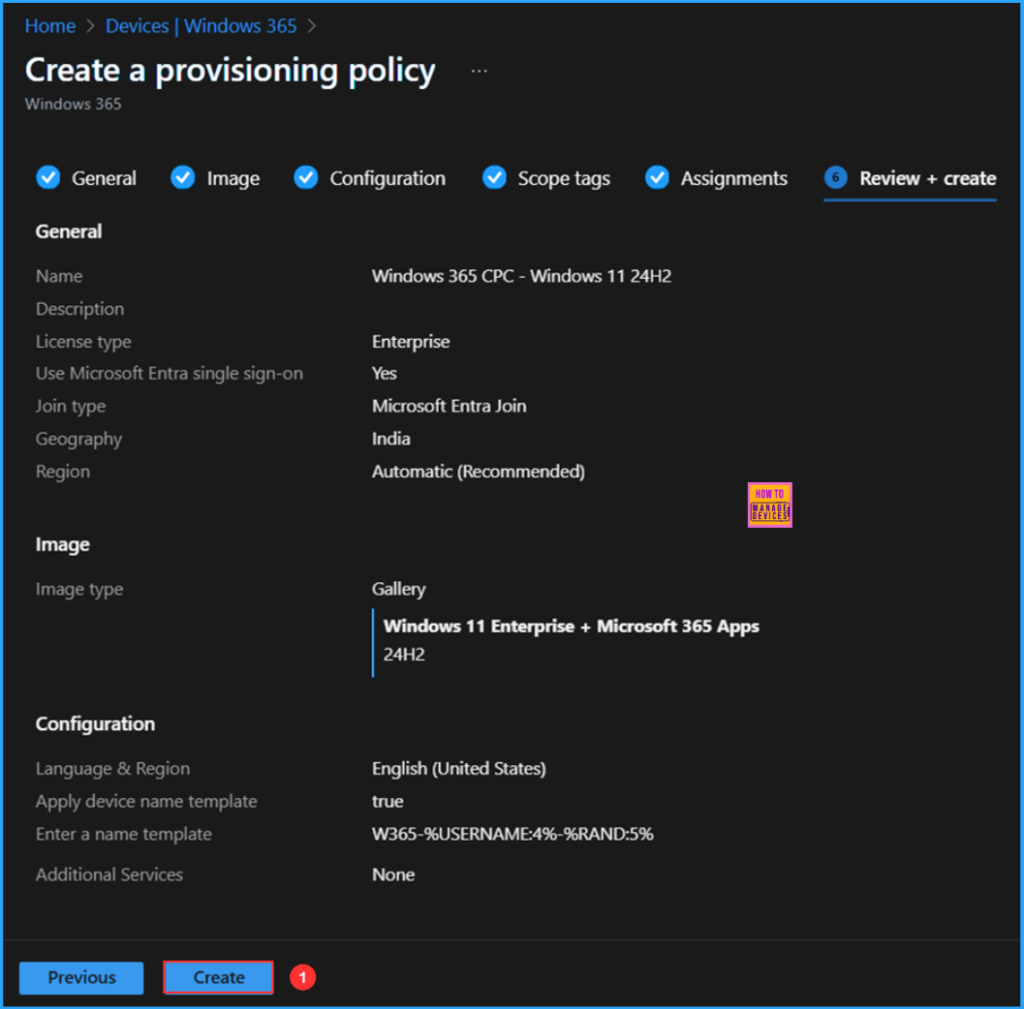
- Name: Windows 365 CPC – Windows 11 24H2
- Description: Optional
- License type: Enterprise (Each user will get their own Cloud PC without restrictions on when they can connect to it.)
- Join type: Microsoft Entra Join
- Network: Microsoft hosted network
- Geography: India
- Region: Automatic (Recommended)
- Use Microsoft Entra single sign-on: Yes (Check the box)
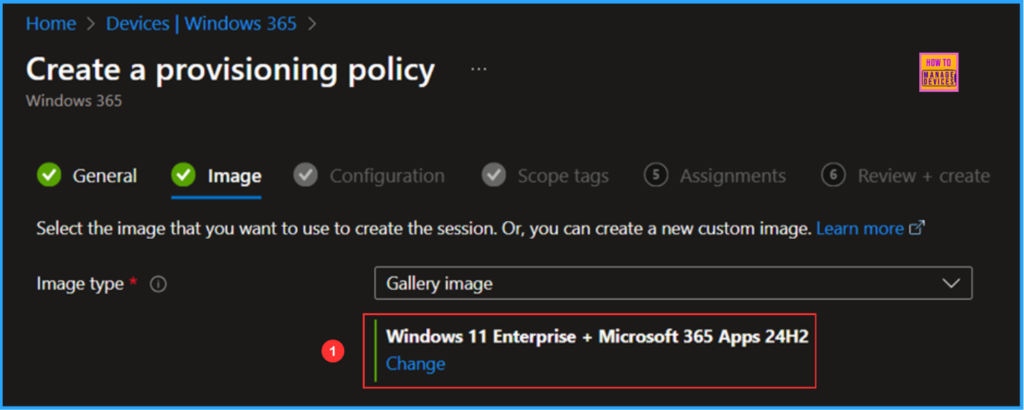
You can choose an image to create the session or create a new custom image. I will select the latest available Gallery image, which is Windows 11 Enterprise + Microsoft 365 Apps 24H2.
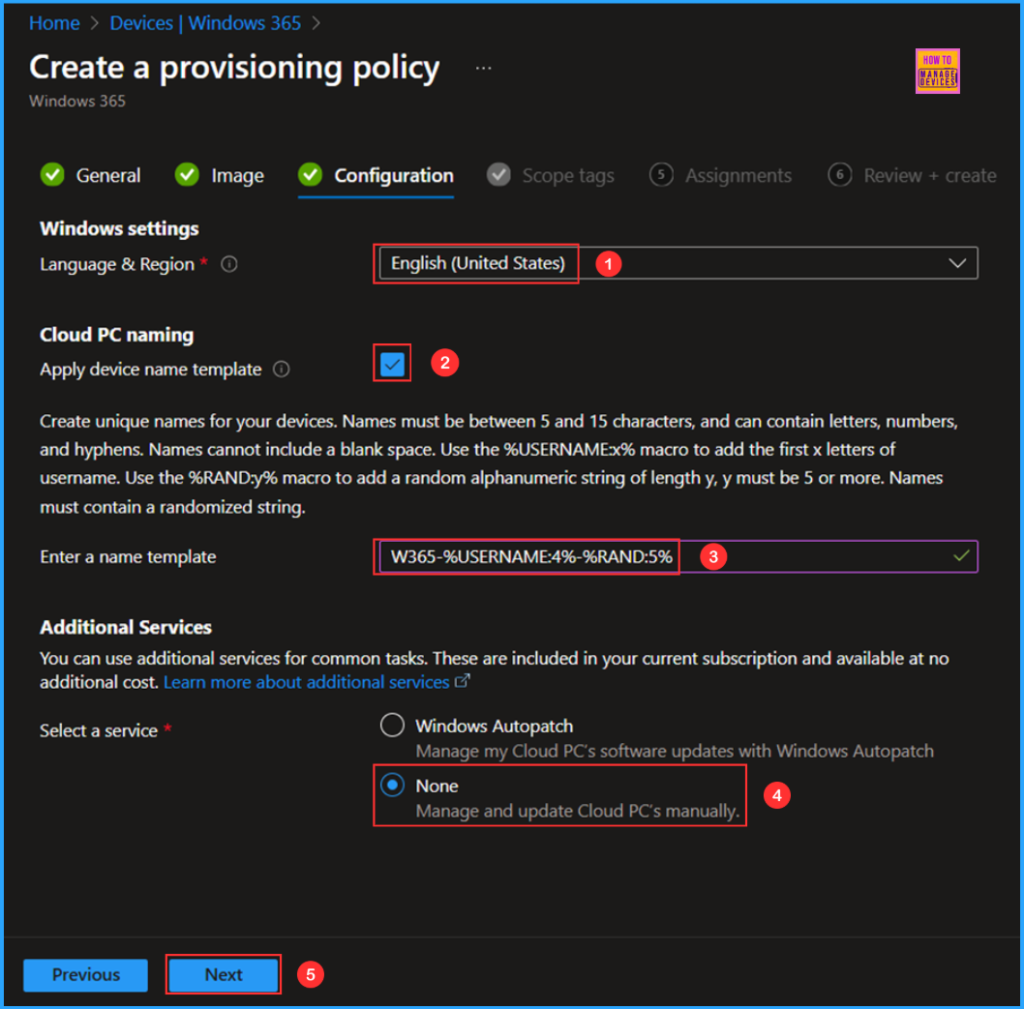
The next tab is mainly for Windows settings, Cloud PC naming, Additional Services Configuration. Choose the options metioned below.
- Language & Region: English (United States)
- Apply device name template: Yes (Check the box)
- Enter a name template: W365-%USERNAME:4%-%RAND:5%
- Select a service: None (Manage and update Cloud PC’s manually.)
Note: Create unique names for your devices. Names must be between 5 and 15 characters, and can contain letters, numbers, and hyphens. Names cannot include a blank space. Use the %USERNAME:x% macro to add the first x letters of username. Use the %RAND:y% macro to add a random alphanumeric string of length y, y must be 5 or more. Names must contain a randomized string.
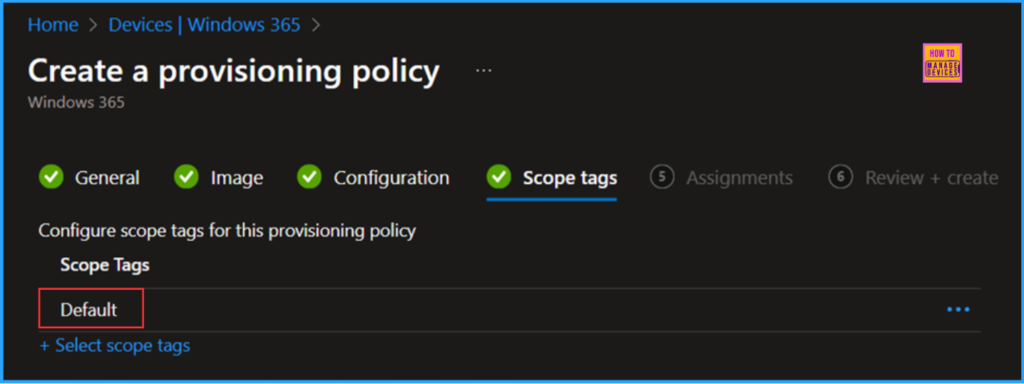
On the next page, keep the Scope tags set to Default. If your tenant has custom scope tags, you can select them according to your policy needs, then click Next.
In this section, select the group or groups containing users that you want to receive Cloud PCs. I will assign the policy to the Windows 365 – CPC Users group. To do this, click on Add groups and select the desired user group.
Note: Members of this group must have a valid license. Cloud PCs will only be provisioned for users who have Windows 365 licenses. The cloud PCs will be provisioned with the configurations specified in this policy (in this example: Windows 365 Enterprise 4 vCPU, 16 GB, 128 GB) assigned through the Microsoft 365 Admin Center.

On the Review + create page, examine all settings for the Windows 365 CPC – Windows 11 24H2 Provisioning Policy. Once confirmed, click Create to deploy the policy.
- New Windows Autopilot Device Preparation Experience using Intune
- Cross-Region Disaster Recovery Now Available for Windows 365 Frontline in Dedicated Mode
- Stop using Remote Desktop App for Windows 365 Cloud PCs
Monitor the New Windows 365 Provisioning Policy Deployment
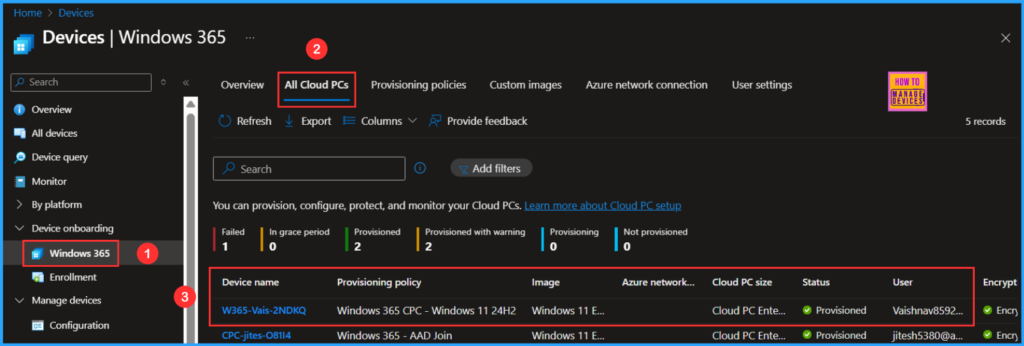
The new Windows 365 provisioning policy has been deployed to the Microsoft Entra ID user group, specifically for Windows 365 – CPC Users. Please allow some time for the policy to take effect. To monitor the status of the policy deployment, follow the steps outlined below in the Intune Portal.
- Navigate to Devices > Windows 365 > All Cloud PCs > Search for the “Windows 365 CPC – Windows 11 24H2” provisioning policy.
According to our configuration, the Cloud PC with Hostname “W365-Vais-2NDKQ” has been successfully provisioned.
End User Experience
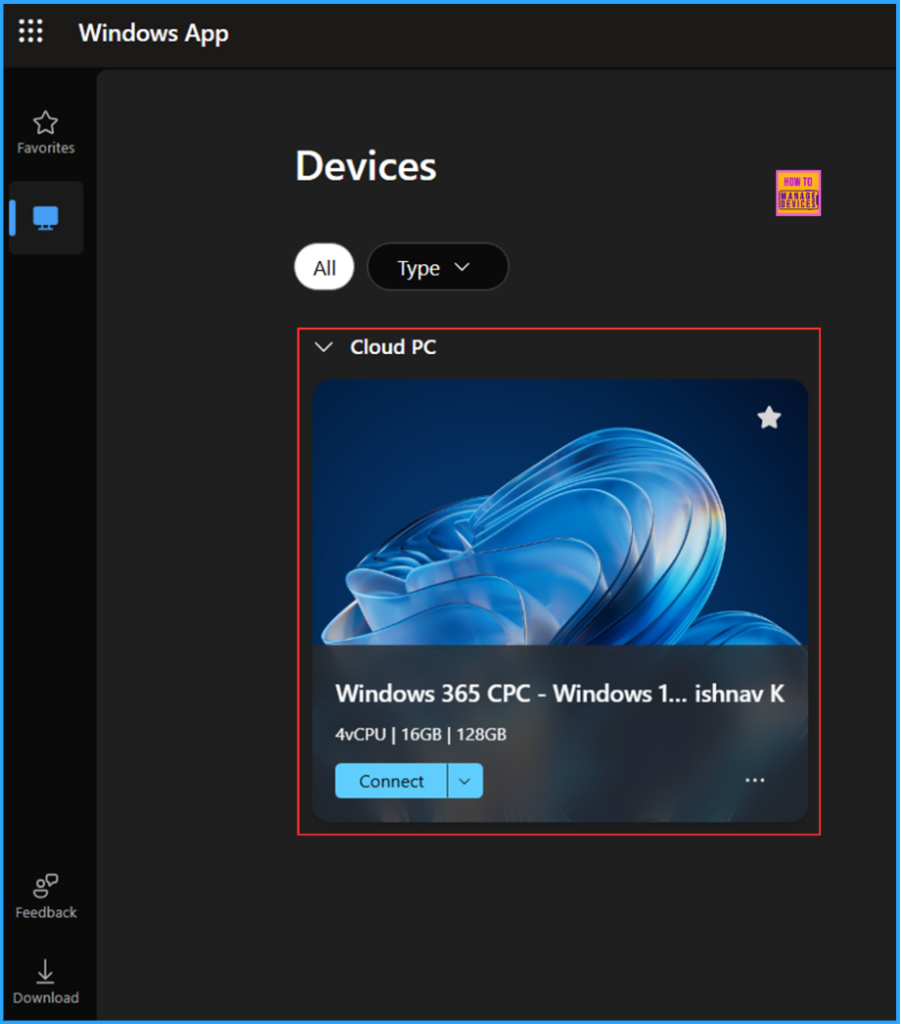
Now it’s time to check if the provisioned Cloud PC is accessible. To do this, you can use a Windows App or any web browser. In the browser, type https://windows365.microsoft.com and sign in with your account assigned to the CPC license. Once the authentication is successful, you will see the newly provisioned Windows 365 Cloud PC ready for use.
End Users Experience – Windows 365 Cloud PC Azure AD Joined
There will be the same end-user experience you will notice, like if you had explored the hybrid Azure ad joined cloud PCs.
You can use the Cloud PC URL – https://windows365.microsoft.com/ to launch Windows 365 service and start working on a personalized desktop in the cloud.
The first step is to get access to Cloud PC, The End users can access their Cloud PCs in three different ways, The end-user experience will be similar for the Cloud PC, either joined to Azure AD, or hybrid Azure AD joined cloud PCs.
- windows365.microsoft.com
- Windows 365 App
- Microsoft Remote Desktop Client
Let’s check more details about Windows 365 cloud PC web client end-user experience walkthrough – Windows 365 Cloud PC Web Client End User Experience
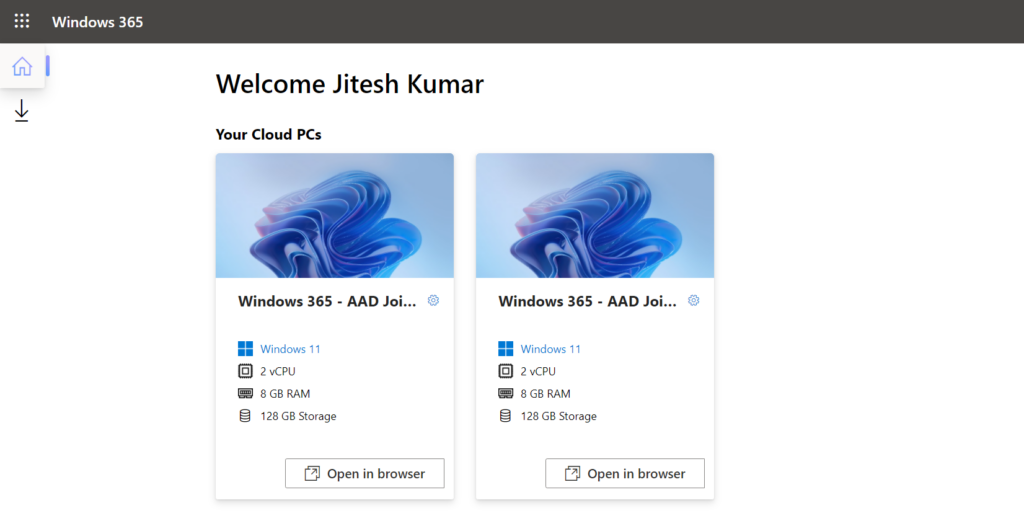
Here you can see the different Cloud PCs assigned to you in the Windows 365 web client portal. You will get two options Open in the browser and Open in the desktop app. Let’s select Open in the browser to see Windows 365 Cloud PC experience.
You will be prompted to select the desired level of access that the Cloud PC to your local resources. You can choose from the options Printer, Camera, Microphone, and Clipboard. Once you are done with the settings configuration, Click on Connect.
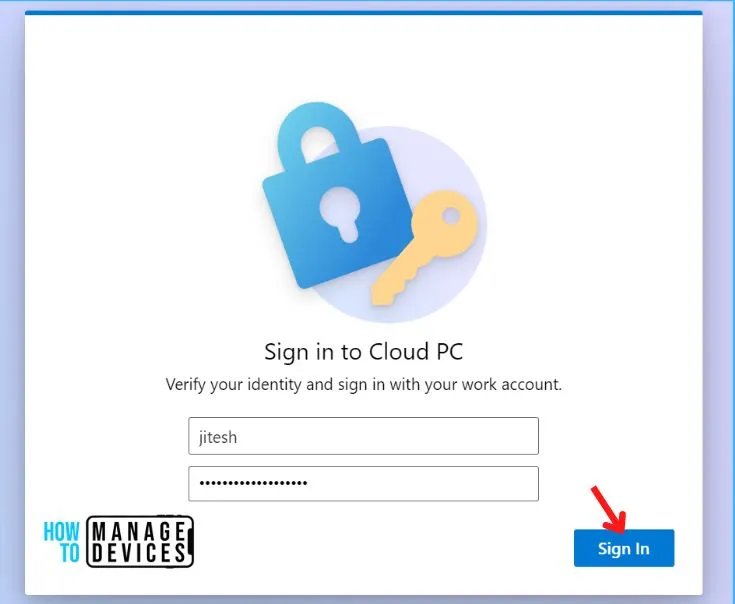
After that, you will see the login screen of Windows 365 Enterprise Cloud PC; provide your username and password. Click Sign In.
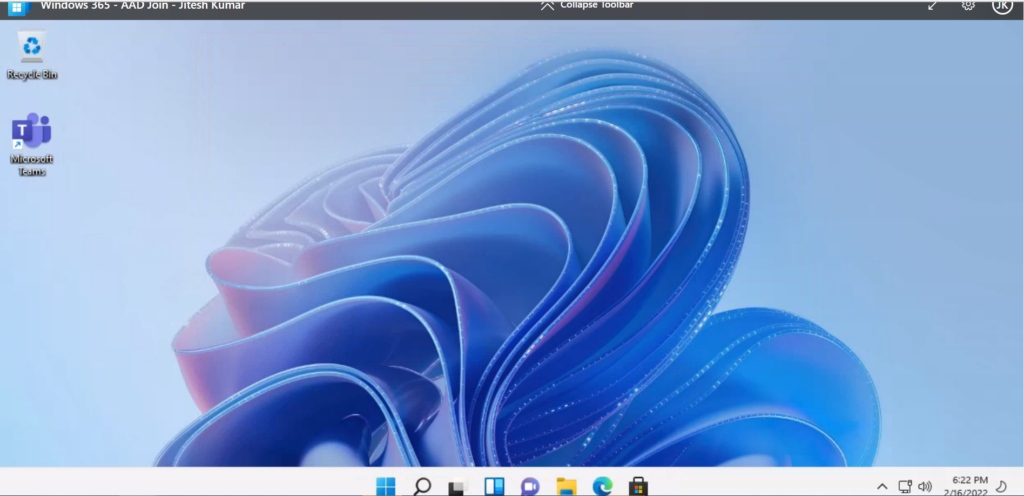
Once you log in successfully, You will be landed to Cloud PC Desktop. This is how the screen will appear for you. Cloud PC is ready for productivity.
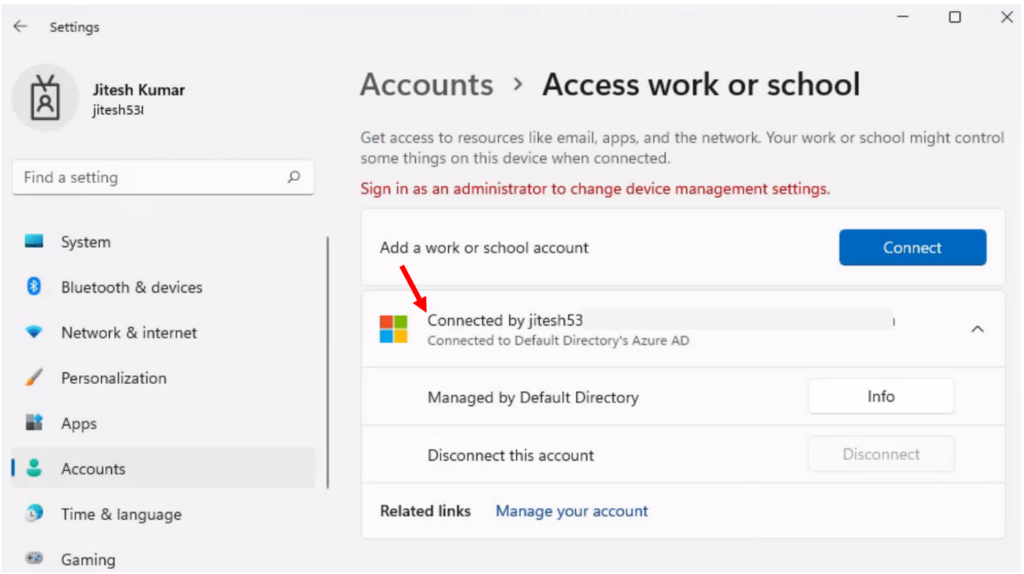
You can check the access to a user account, Navigating to Windows Settings > Account > Access work or school. If the device is joined to AAD, you should see the connection to your AAD domain listed. Connected to organization Azure AD.
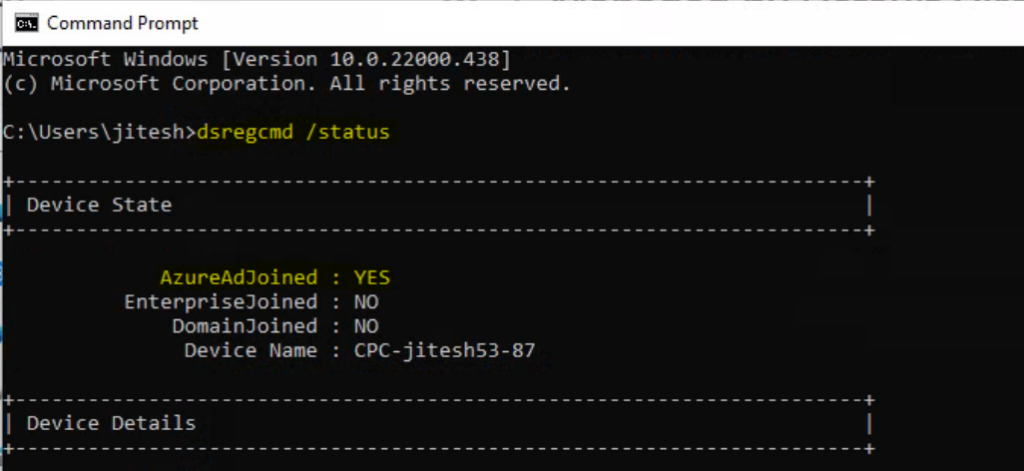
Verify Status – Command Line Option
Open the Command prompt and type dsregcmd /status. Here you will see AzureAdJoined field value should be YES.
Similarly, you want to validate the network configuration based on Network selection when creating cloud PC provisioning policies. You can run the command ipconfig /all and check the differences based on assigned IPs to your Cloud PCs.
Need Further Assistance or Have Technical Questions?
Join the LinkedIn Page and Telegram group to get the latest step-by-step guides and news updates. Join our Meetup Page to participate in User group meetings. Also, Join the WhatsApp Community to get the latest news on Microsoft Technologies. We are there on Reddit as well.
Author
Vaishnav K has over 11 years of experience in SCCM, Device Management, and Automation Solutions. Writes and imparts knowledge about Microsoft Intune, Azure, PowerShell scripting, and automation. Check out my profile on LinkedIn.

