Let’s learn about the Windows 365 Cloud PC Azure AD Joined Provisioning Process deployment. Microsoft recently enhanced the Windows 365 Cloud PC Enterprise Edition by adding the most awaited features to support Azure AD joined Cloud PCs.
In addition to the Azure AD Join feature, it also introduced the Microsoft Hosted Networks feature. This will allow you to create Cloud PCs in just a few minutes without a vNet.
Microsoft has also rolled out a localized first-run experience for Cloud PC. You can also configure the language and region to be installed on Cloud PCs while setting up a provisioning policy.
The five or six-step process to creating a new Windows 365 Enterprise Cloud PC. First, buy a Windows 365 Enterprise license. You can do this through a partner, or you can do this directly through the Microsoft 365 admin center.
Next, assign that license to a user in the Microsoft 365 admin center; create an on-premises network connection and provisioning policy. And lastly, once those licenses are assigned, you will have a Cloud PC created for that user.

- Windows 365 Cloud PC Deployment Provisioning Process Step by Step Guide
- Business Edition Windows 365 Cloud PC End User Provisioning Experience Walkthrough
- Windows in the Cloud Episode 3 Windows 365 Cloud PC
Benefits of Azure AD Joined Cloud PC
Let’s check out the benefits of Azure AD Joined Windows 365 Cloud PC.
- Take full advantage of modern authentication and management.
- Reduce delay in provisioning.
- Reduce dependencies on Azure infrastructure.
- Provide more flexibility to have connectivity back to the on-premises network.
- Provide Cloud PCs for cloud-only users in your organization.
- More flexible options for single sign-on (SSO).
Architecture Diagrams for Windows 365 Cloud PC
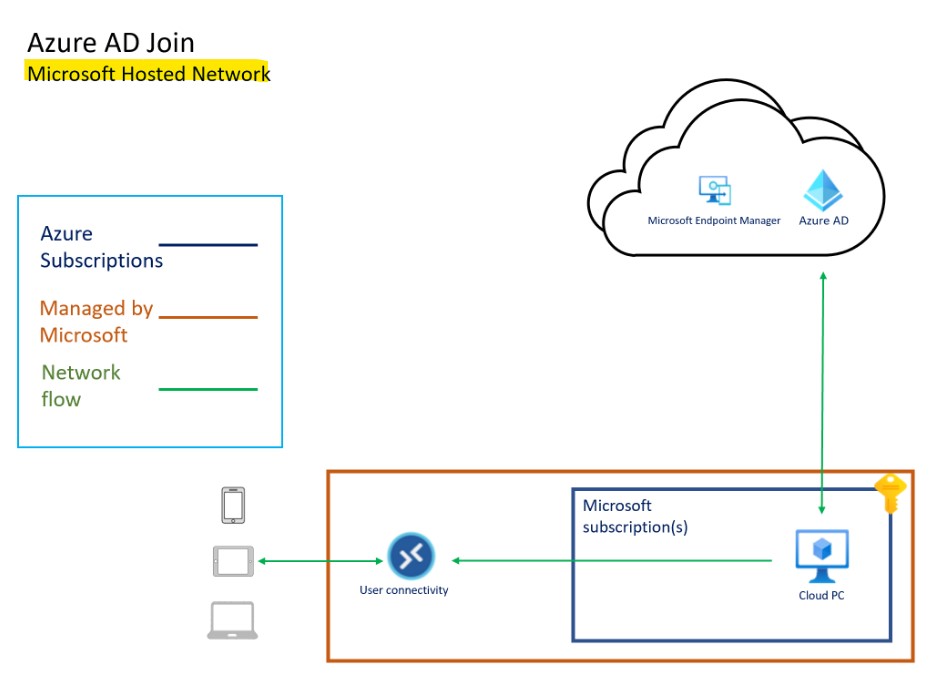
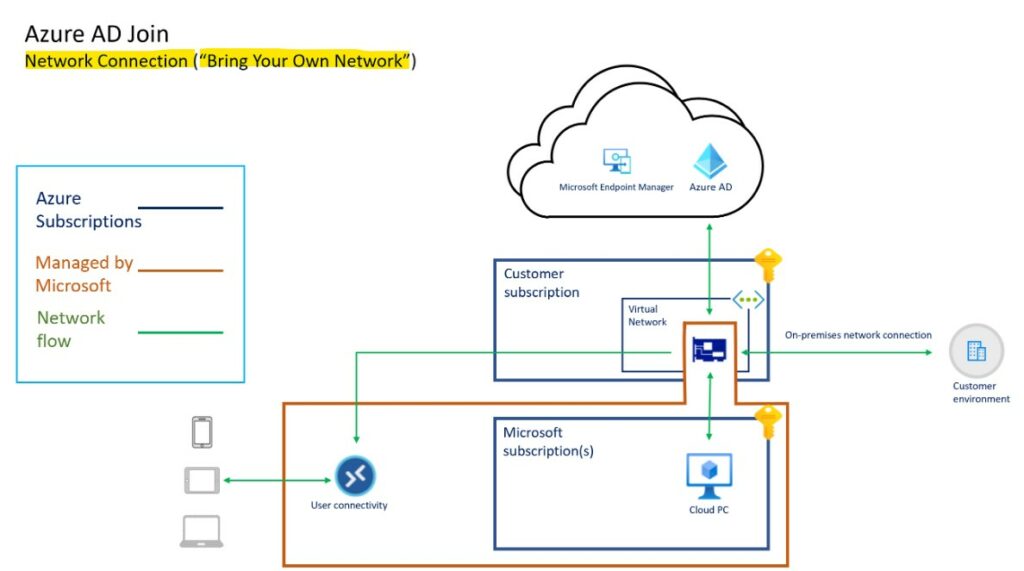
Let’s check out the Architecture Diagrams for Windows 365 Cloud PC. The following diagram talks about the high-level architecture and connectivity details of the Cloud PC Azure AD Joined scenario.
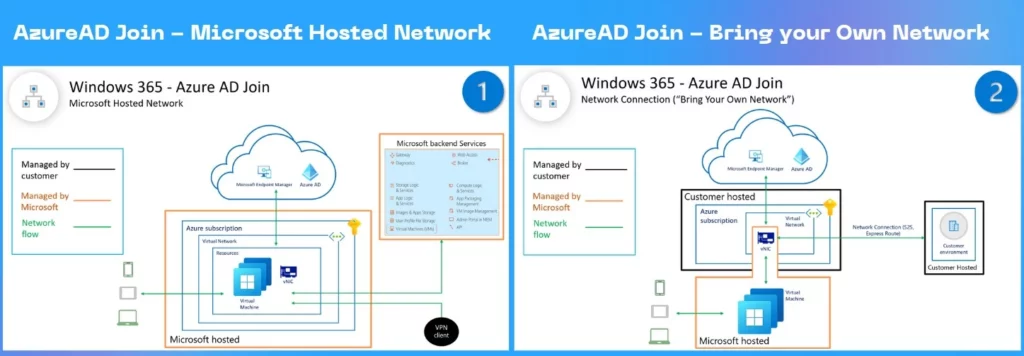
The scheme diagram is shared by Microsoft for Azure AD Joined Cloud PCs. The following diagram shows the connectivity when using Microsoft Hosted Network. The pure DaaS solution from Microsoft, everything from the infra side is managed by Microsoft.
The following diagram shows the connectivity when using Customers Azure Network connection for on-prem connectivity. In this scenario, the customer is responsible for managing the network and connectivity back to on-prem.
Internal Architecture of Windows 365 Cloud PC
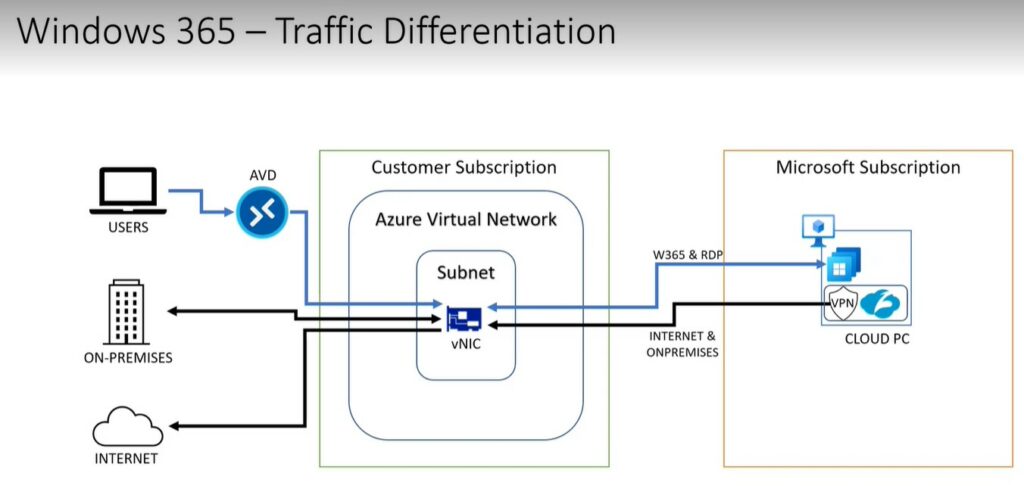
The following schema diagram will give you a quick idea about the internal architecture of the Windows 365 solution. How is connected with other Azure, Azure AD, and MEM components? The network connectivity between the hub and scope model, etc.
Thanks to Ravishankar N for these very useful schema diagrams to understand the flow of the data and internal process of the Windows 365 solution during his presentation at the APAC Windows 365 April UG event. This is a sample diagram to give you a better understanding of the connectivity.
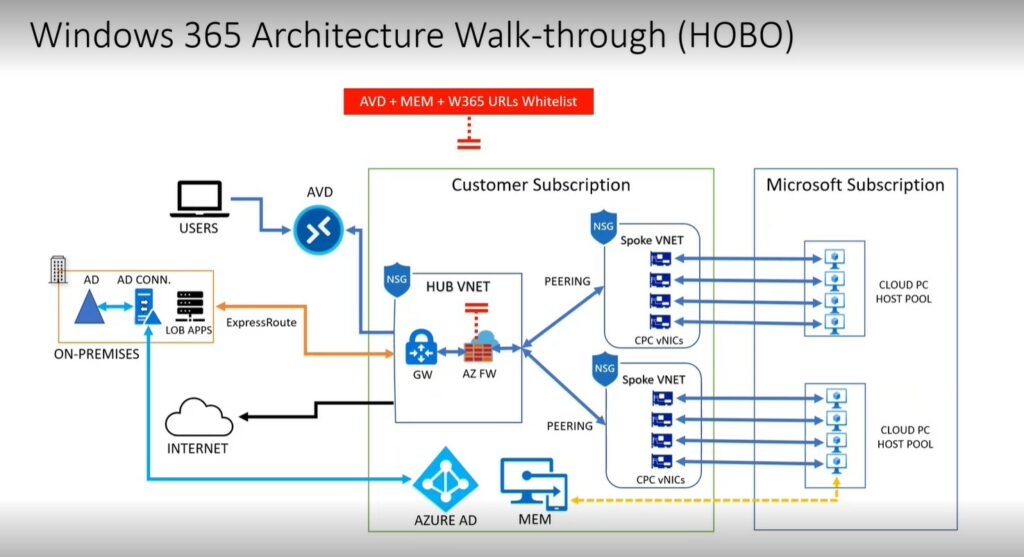
There is another schema diagram that is shared by Ravi that helps to understand the importance of segregating the traffic from Windows 365 Cloud PCs to the internet and internal network using proxy solutions, etc. This helps to have better use experience and better performance with Teams meetings, etc.
Azure AD Joined Cloud PC Prerequisites
The following are a quick list of prerequisite to set up Azure AD joined Cloud PCs.
- A valid and working Intune and Azure AD tenant.
- Ensure that Intune device type enrollment restrictions are set to Allow Windows (MDM) platform for corporate enrollment.
- You must have an Intune license so that you can use Intune to manage the devices.
- Users must have licenses for Windows, Intune, Azure AD, and Windows 365 to use their Cloud PC.
- You must be an Intune Administrator in Azure AD to provision Cloud PCs.
- Azure virtual network (non-Microsoft hosted network scenario): You must have a virtual network (vNET) in your Azure subscription in the same region as where the Windows 365 Cloud PCs are created.
- Network bandwidth requirements should be considered.
- A subnet within the vNet and available IP address space.
You can check the additional network requirement in the following documentation Network requirements for Windows 365.
NOTE – Azure AD join, and Intune enrollment of Windows 365 Cloud PCs are handled by the Microsoft provisioning process. I think this is done in a similar way to how this happened for AVD provisioning.

Create Provisioning Policies – Cloud PC Azure AD Joined Provisioning
Let’s create provisioning policies for Windows 365. You need to specify the connection, Windows 10/11 images, and user groups. The provisioning policy helps you configure the settings required to host and manage cloud PCs.
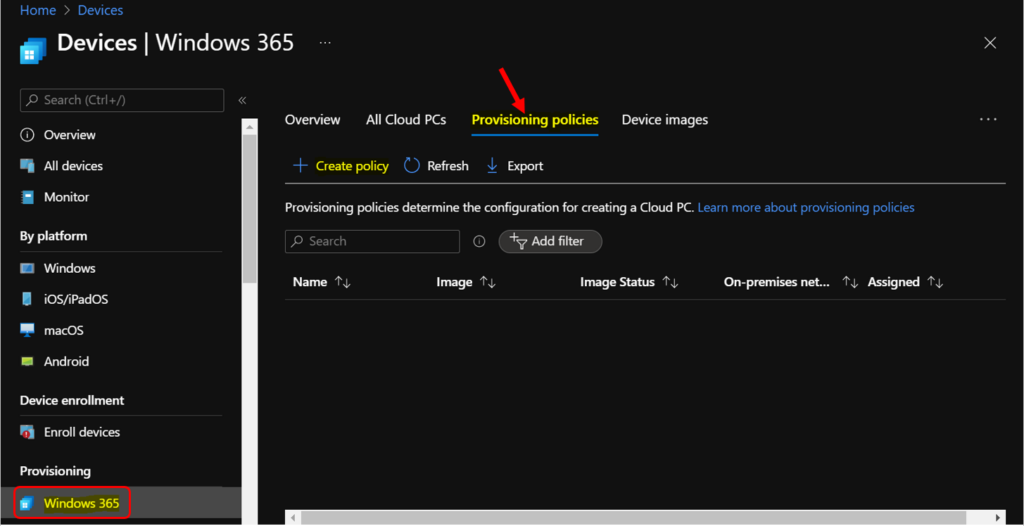
Select Devices > Windows 365 (under Provisioning) > Provisioning policies. Click on the +Create policy button.
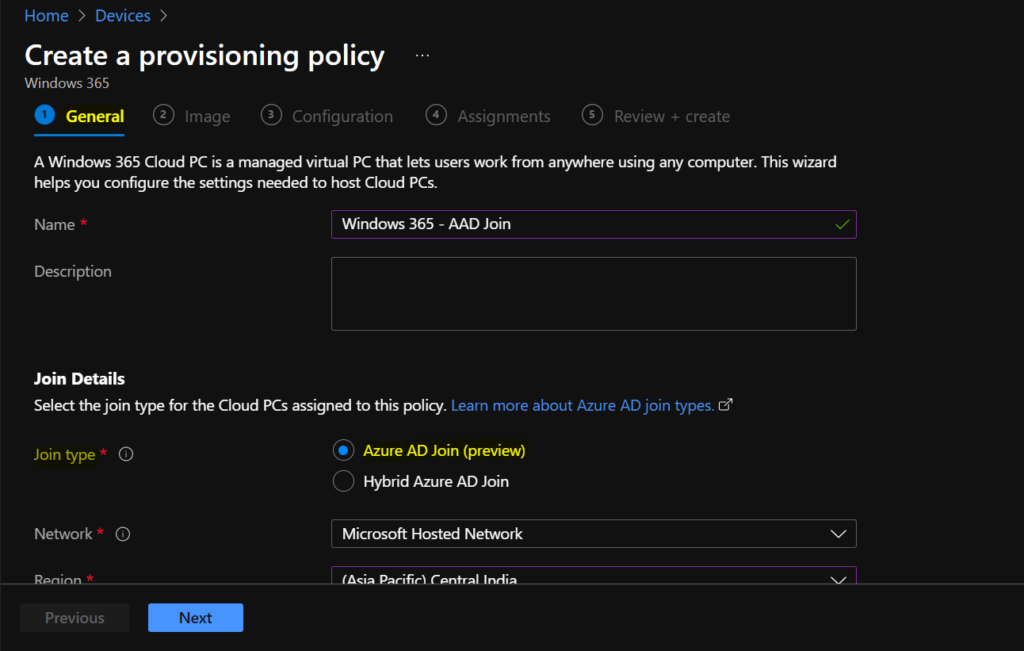
On the General page, enter a Name and Description (optional) for the new policy. (for example, Windows 365 – AAD Join)
Select the Join type Azure AD Join (preview). In the Network dropdown, you have the option to select “Micorosft Hosted Network” and “On-premises network connection” Select the network (Micorosft Hosted Network) and click Next.
- If you plan on provisioning Azure AD joined Cloud PCs on a Microsoft hosted network, You can do without an Azure or on-premises infrastructure.
- If you choose to provision Cloud PCs on your own network, an active Azure subscription with additional configurations is required.
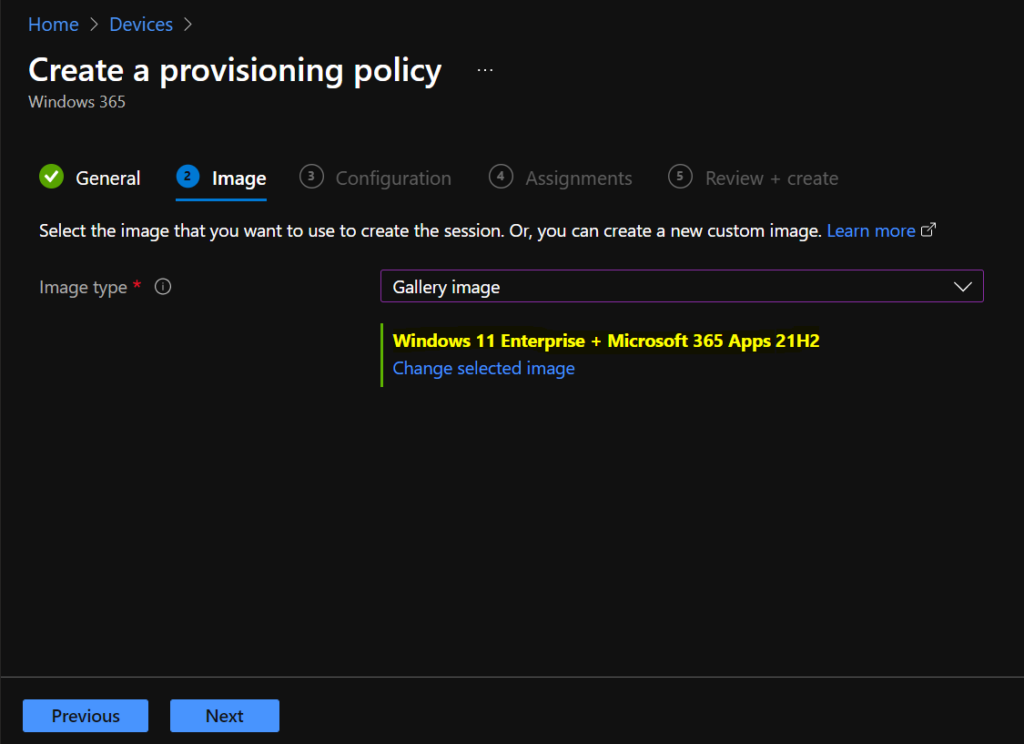
Select the image you want to use to create the session, or you can create a custom image. Image type -> Gallery image, and Click on the select button to select the image.
- Select the image type that you want to use to provision cloud PCs. Gallery images are optimized for Windows 10/11 images provided by Microsoft. Custom images are created and uploaded by you.
- Selected image -> Windows 11 Enterprise + Microsoft 365 Apps.
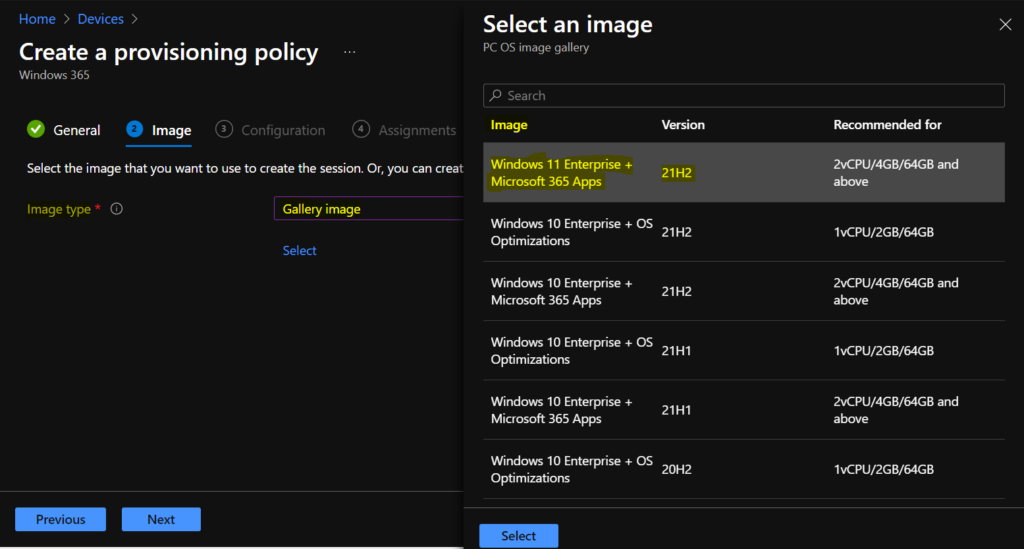
Once you select the image, it will appear as shown. If you want, you can change the selected image and click Next.
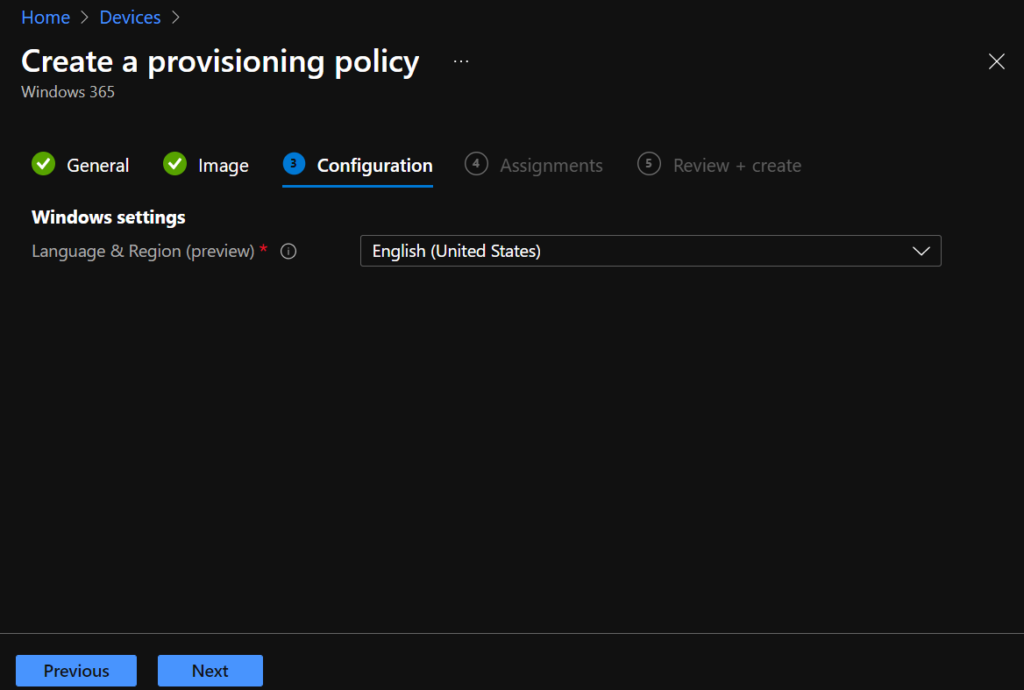
On the Configuration page, select the preferred language and Region or country for your Cloud PCs in the dropdown. The chosen language pack will be installed on Cloud PCs provisioned with this policy. Select Next.
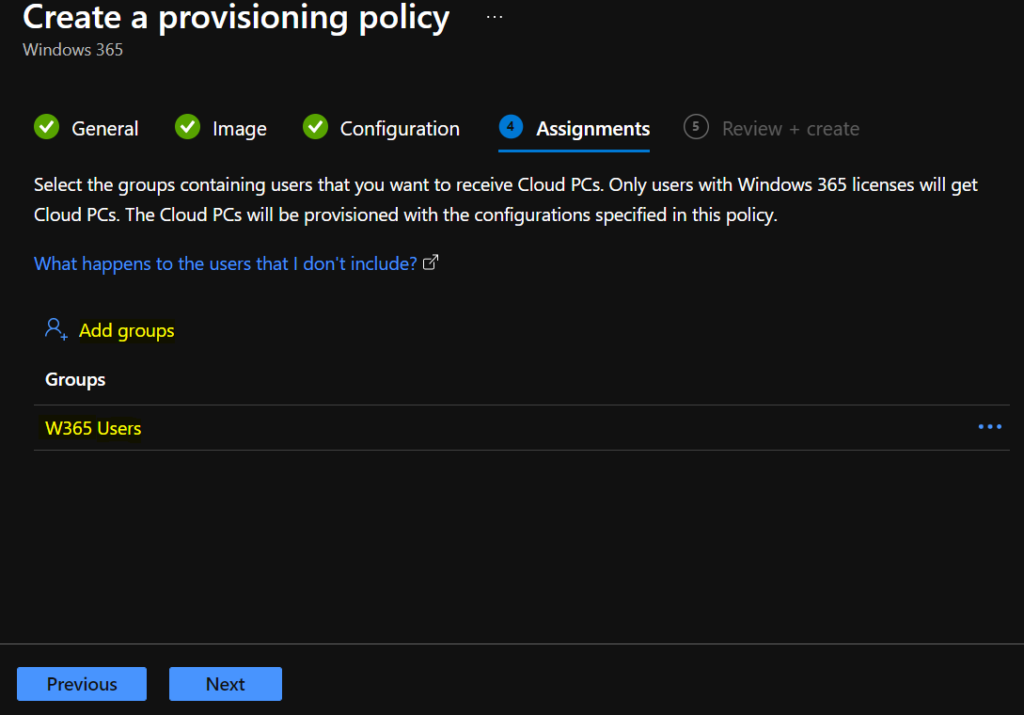
On the Assignments page, click on Add groups > choose the groups you want this policy assigned to > Select, then click on Next.
On the Review + create the page, select Create.

After clicking Create, the new Cloud PCs will start to provision directly for the AAD group members that you assigned to the provisioning policy.
The provisioning policies (Windows 365 – AAD Join) successfully added a new policy under the Provisioning policies tab.

The entire process could take approx 20-25 minutes, and Once the provisioning process will successfully get completed. Cloud PCs will appear under the All Cloud PCs tab.
Issue with Azure AD Cloud PC Provisioning – Missing Provisioning Policy?
The provisioning process may take time; you can check your assigned cloud PC under All Cloud PCs. But I couldn’t figure out why the Azure AD join provisioning policy (Windows 365 AAD Join) does not appear under Provisioning policies.
Later, I learned that this issue with Azure AD Cloud PC Provisioning – A lack of Windows 365 licenses could cause a missing Provisioning Policy? I have had only one Windows 365 license available for testing, and that license was used for Hybrid Azure AD Cloud PCs.
I have removed the assignment group from Hybrid Azure AD joined provisioning policy to free up the license. However, that didn’t help, and the provisioning policy still showed the Cloud PCs assigned are in a grace period before they get deleted.
To speed up the deprovisioning of Cloud PCs, I used the End Grace period option from the All Cloud PCs tab.

Even the process of decommissioning or removing the Cloud PC was taking time. And because of this reason, Azure AD join provisioning was not getting started. Hence, to speed up AAD Join provisioning, I assigned a new license to the user.

Related Topic – Extend Trial License Of Windows 365 Cloud PC Assign License To Azure AD Group
I have explained the license assignment process in a different blog post. You can refer to the post mentioned above to get more details on Windows 365 Trial license extension topic.

Immediately after the new license was assigned to the user, the new Azure AD joined provisioning policy for Windows 365 Cloud PC appeared under the All Cloud PCs tab.

Windows 365 Cloud PC Azure AD Join Provisioning
It’s important to understand the difference between provisioning and deprovisioning from the below screenshot.
- Hybrid Policy with Cloud PC_Standard License – Deprovisioning of the Cloud PC is in progress.
- Azure AD join policy with Cloud PC Standard License – Deprovisioning (and reprovisoning) is completed, and that is why its All Cloud PCs tab shows provisioning with the new Azure AD join policy with Cloud PC_Std license.
- Azure AD Join policy with Cloud PC Enterprise License – It’s a new license hence there is no deprovisioning or decommission scenario here. All Cloud PCs tab shows the provisioning of New Azure AD joined Cloud PC.

After a few minutes, the provisioning got completed successfully. The Azure AD joined cloud PC is ready to use.

Azure AD Joined Scenario with On-Prem Connection
Additional Permissions are required on Azure to create the network connection. If you don’t have these permissions, you will get the following error. As part of this flow, the Windows 365 service is granted the following permissions for this connection:
Reader permissions on the Azure subscription.
Network contributor permissions on the resource group.
Network Contributor permissions on the virtual network.
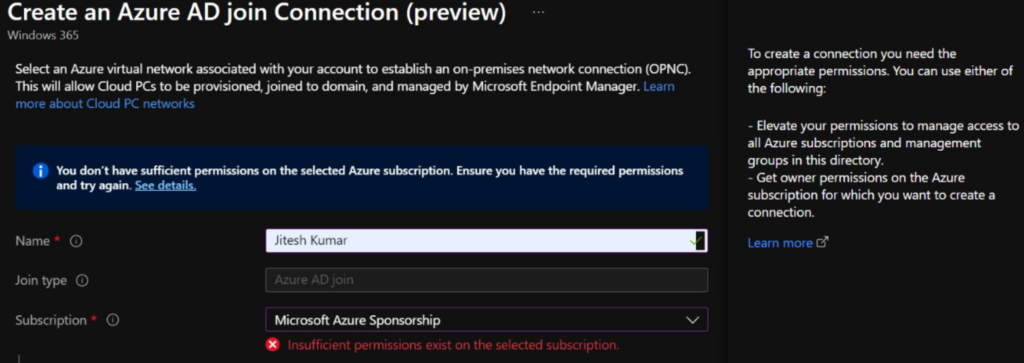
Once you have appropriate permissions as listed above, you can create an Azure AD join network connection for the AAD Joined scenario with on-prem network connectivity.
An on-premises network connection (OPNC) allows Cloud PCs to create your organization’s Azure Virtual Network.

Select an Azure virtual network associated with your account to establish an on-premises network connection (OPNC). This will allow Cloud PCs to be provisioned, joined to the domain, and managed by Microsoft Endpoint Manager.

Review the details and create a connection –
General
Name – HTMD W365 On-Prem for AADJ
Azure subscription – Microsoft Azure Sponsorship
Resource group – W365
Virtual network – MECMNet
Subnet – MEMCM

In the On-premises network connection tab, every OPNC created displays a status. This status helps you determine if new Cloud PCs can be provision successfully and that existing end-users have an optimal Cloud PC experience.
It’s showing status Running checks that indicate the health checks are currently running.

Here you can see Checks successful: All health checks passed. The On-premises network connection (OPNC) is ready for use.

Create Provisioning Policies for Windows 365 Cloud PC – Azure AD Join On Prem Connection
You can create new provisioning with an On-premises network connection option and complete the process.
- Select Devices > Windows 365 (under Provisioning) > Provisioning policies. Click on +Create policy button.
- On the General page, enter a Name and Description (optional) for the new policy. (for example, Windows 365 – AAD Join On Prem)
- Select the Join type Azure AD Join (preview), and In the Network dropdown, select On-premises network connection (HTMD W365 On-Prem for AADJ) and click Next.
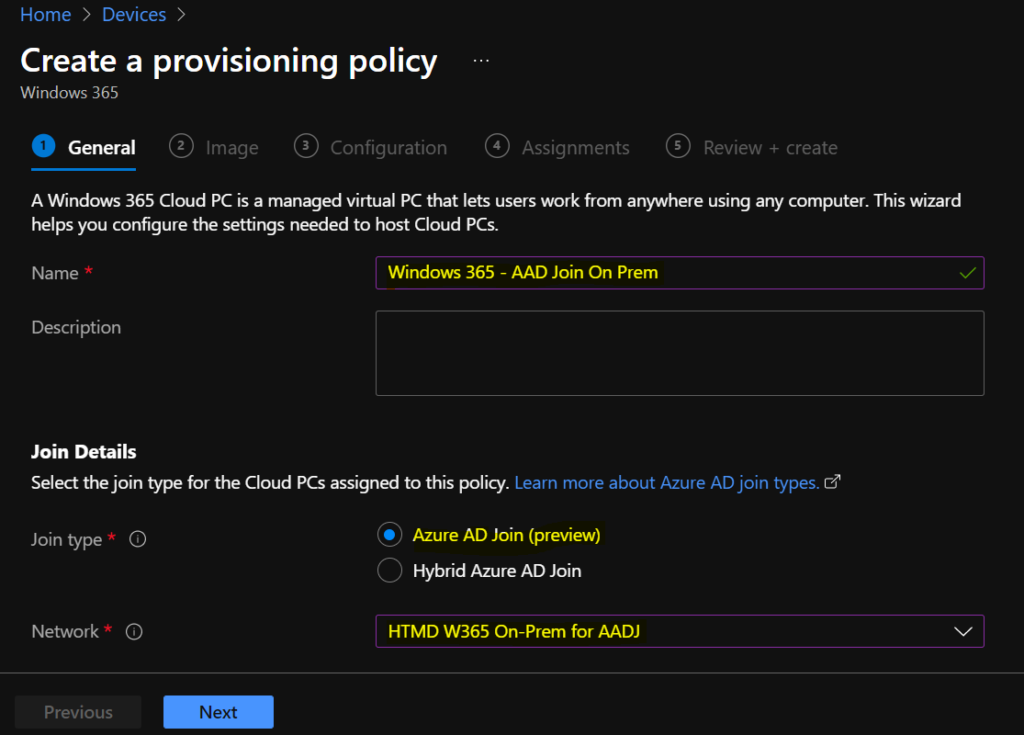
Select the image type > Gallery Image/Custom Image that you want to use to provision cloud PCs. Gallery images are optimized for Windows 10/11 images provided by Microsoft.
On the Configuration page, select the preferred language and Region or country for your Cloud PCs in the dropdown. Select Next.
On the Review + create the page, select Create.

The provisioning policies (Windows 365 – AAD Join On-Prem) successfully added a new policy under the Provisioning policies tab.

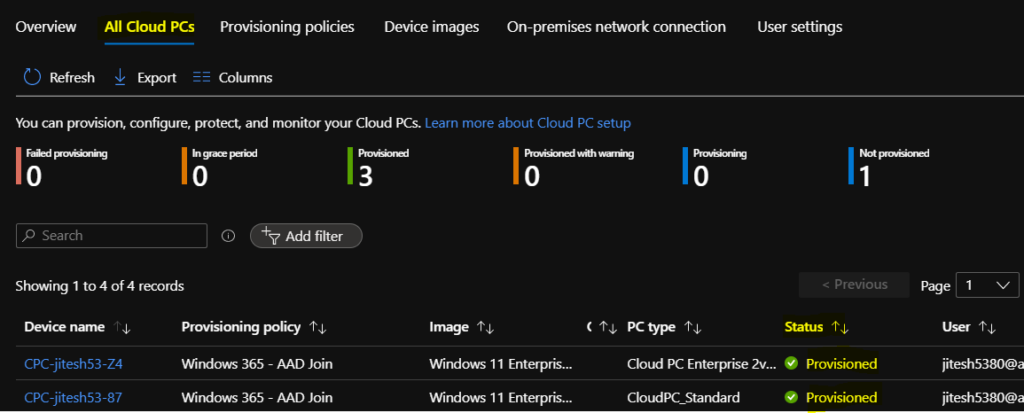
The entire process could take approx 20-25 minutes, and Once the provisioning process will successfully get completed. Cloud PCs will appear under the All Cloud PCs tab with the status shown as Provisioned.
End Users Experience – Windows 365 Cloud PC Azure AD Joined
There will be the same end-user experience you will notice, like if you had explored the hybrid Azure ad joined cloud PCs.
You can use the Cloud PC URL – https://windows365.microsoft.com/ to launch Windows 365 service and start working on a personalized desktop in the cloud.
The first step is to get access to Cloud PC, The End users can access their Cloud PCs in three different ways, The end-user experience will be similar for the Cloud PC, either joined to Azure AD, or hybrid Azure AD joined cloud PCs.
- windows365.microsoft.com
- Windows 365 App
- Microsoft Remote Desktop Client
👉Let’s check more details about Windows 365 cloud PC web client end-user experience walkthrough – Windows 365 Cloud PC Web Client End User Experience
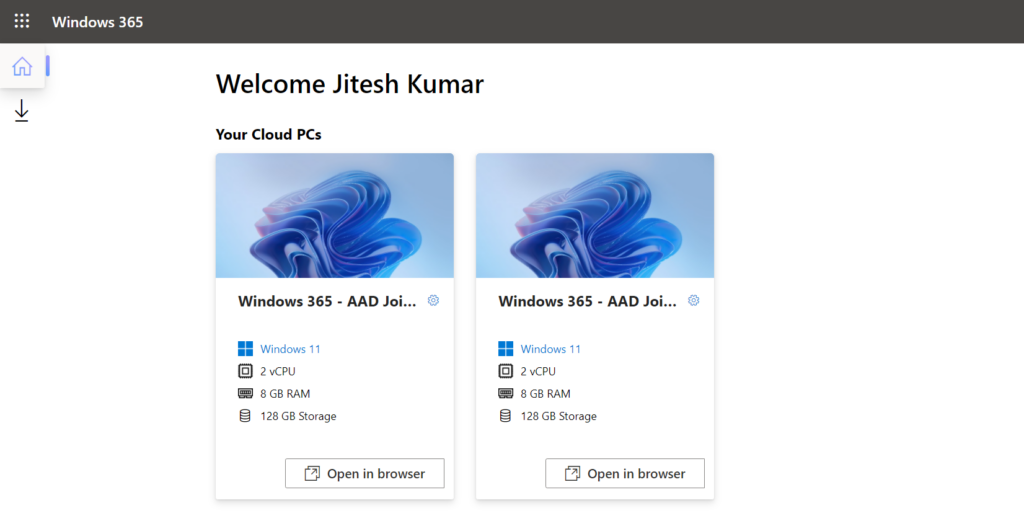
Here you can see the different Cloud PCs assigned to you in the Windows 365 web client portal. You will get two options Open in the browser and Open in the desktop app. Let’s select Open in the browser to see Windows 365 Cloud PC experience.
You will be prompted to select the desired level of access that the Cloud PC to your local resources. You can choose from the options Printer, Camera, Microphone, and Clipboard. Once you are done with the settings configuration, Click on Connect.
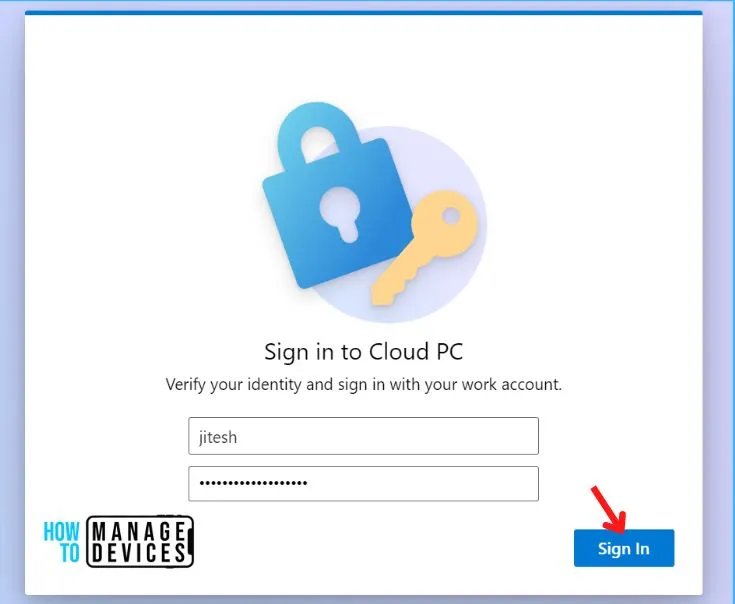
After that, you will see the login screen of Windows 365 Enterprise Cloud PC; provide your username and password. Click Sign In.
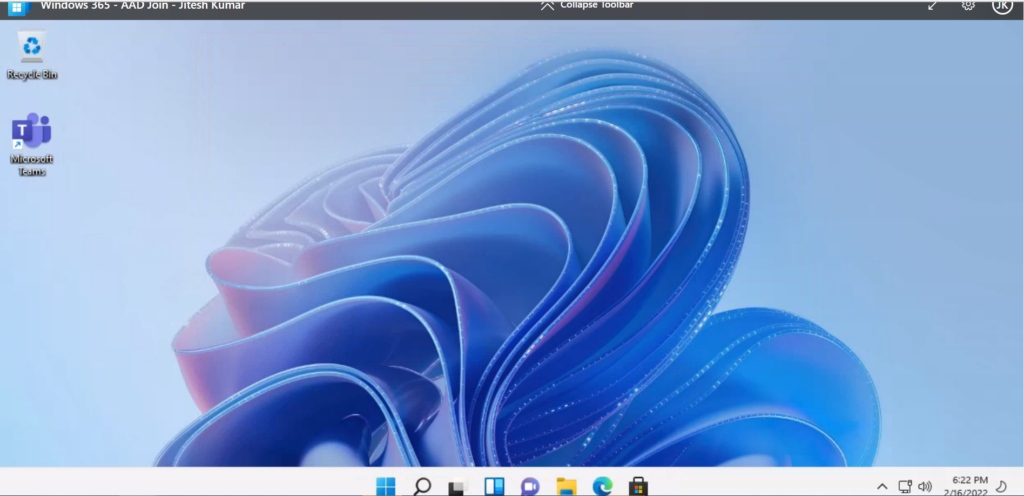
Once you log in successfully, You will be landed to Cloud PC Desktop. This is how the screen will appear for you. Cloud PC is ready for productivity –
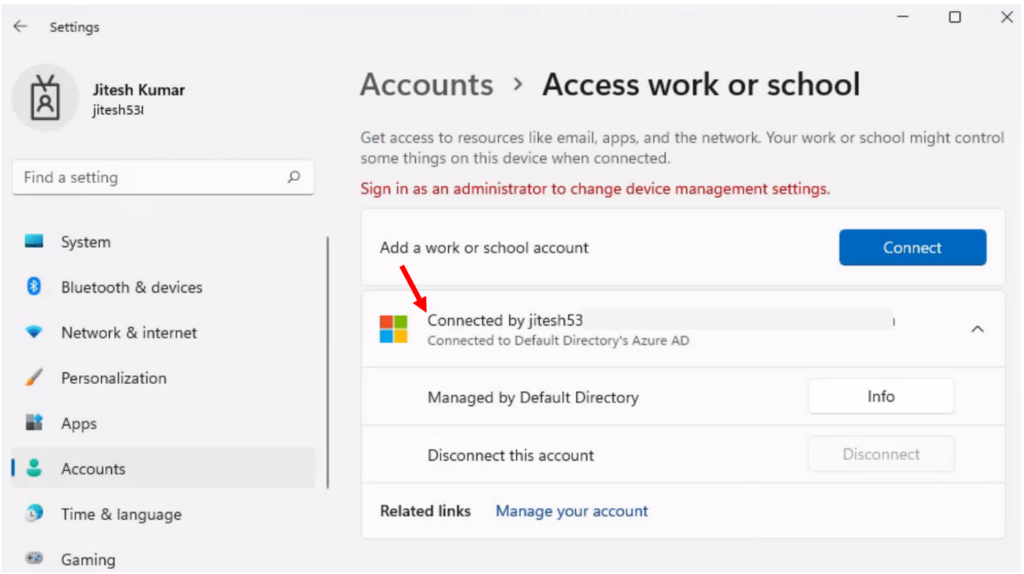
You can check the access to a user account, Navigating to Windows Settings > Account > Access work or school. If the device is joined to AAD, you should see the connection to your AAD domain listed. Connected to organization Azure AD.
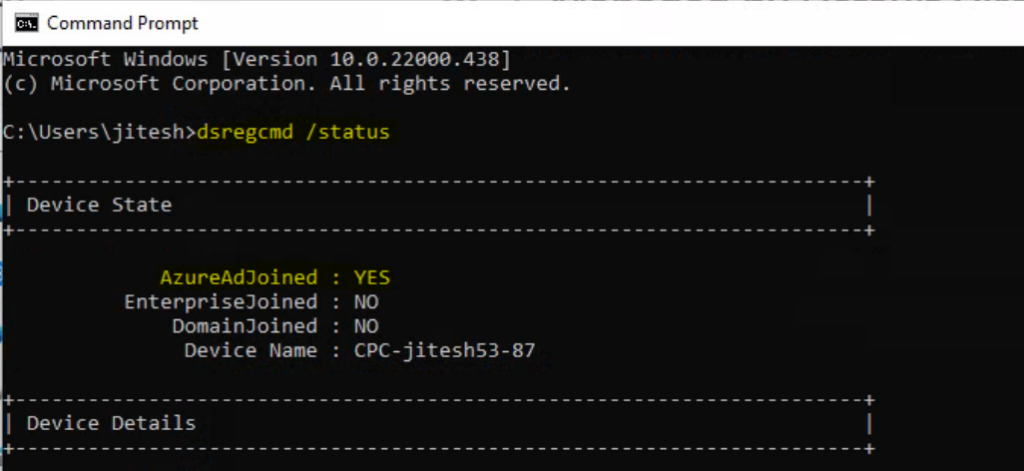
Verify Status – Command Line Option
Open the Command prompt and type dsregcmd /status. Here you will see AzureAdJoined field value should be YES.
Similarly, you want to validate the network configuration based on Network selection when creating cloud PC provisioning policies. You can run the command ipconfig /all and check the differences based on assigned IPs to your Cloud PCs.

We can use Site to site VPN and enable force tunnel for AVD?
Great Document.
The only one helped me