This post explains Windows 365 Cloud PC deployment provisioning process. Let’s learn how to deploy Windows 365 cloud PC in your organization. This is a SaaS offering from Microsoft to deliver a personalized Windows PC experience from the cloud.
You can access the Windows 365 cloud PC from any device. This offer is based on a user-based license, unlike Azure Virtual Desktop. The fixed-price licenses are based on the sizes and performance of the Cloud PC. AVD is based on the utilization of resources. More details about Windows 365 pricing.
Windows 365 makes provisioning dedicated, always available cloud PC’s in your organization easy. You have an option to upload custom Windows images or use optimized Windows 365 gallery images to enable your users to work from anywhere, on any device.
You can check out the Windows 365 Cloud PC Azure AD Joined provisioning process in the following blog post. Read more details from Windows 365 Cloud PC Azure AD Joined Provisioning Process.
Windows 365 Cloud PC Video Tutorials
[New #Video] How to Deploy Windows 365 Cloud PC – Admin Experience for Enterprise SKU #CloudPC #Windows365 #W365Community.
End-User portal experience of Cloud PC/Windows 365.
Windows 365 Cloud PC Architecture Schema Diagram
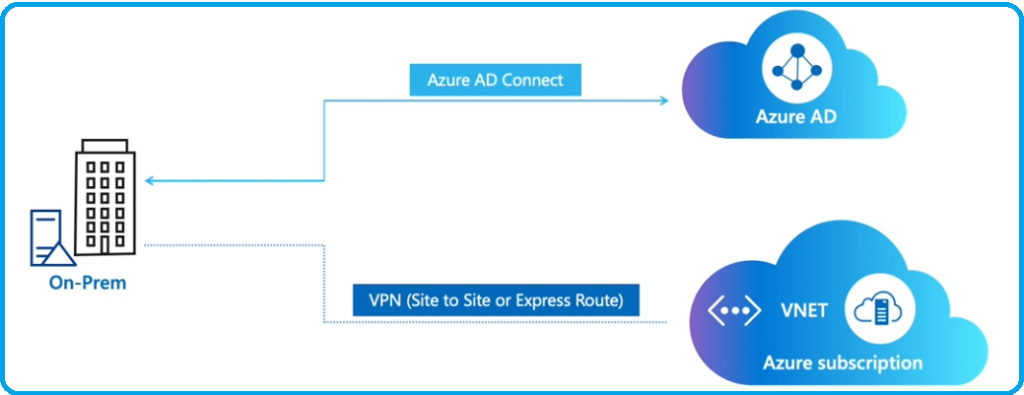
This is the very high-level architecture schema diagram for Windows 365 Cloud PC solution prerequisites. More details announced Windows 365 Cloud PC New Features From Microsoft Ignite 2021.
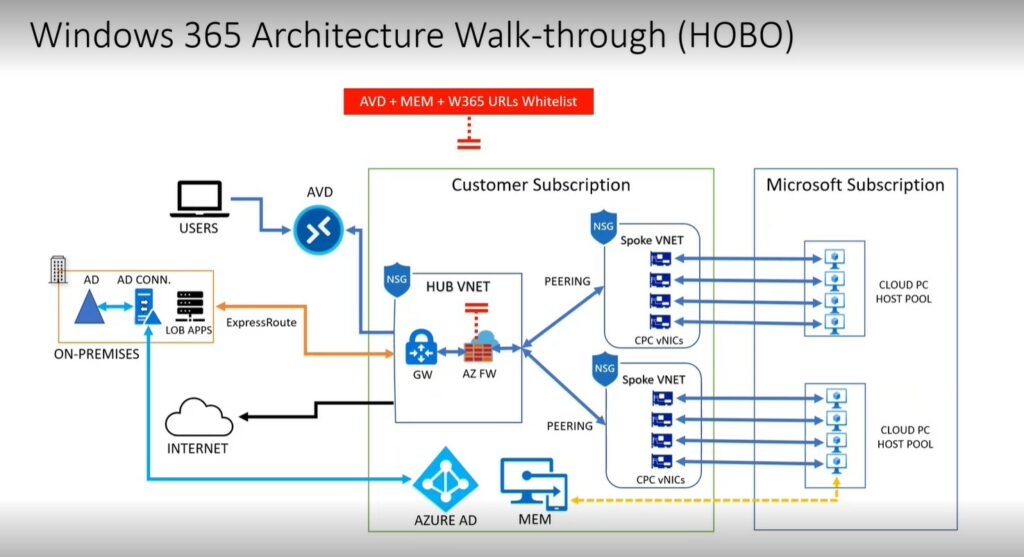
Internal Architecture of Windows 365 Cloud PC
The following schema diagram will give you a quick idea about the internal architecture of the Windows 365 solution. How is connected with other Azure, Azure AD, and MEM components? The network connectivity between hub and scope model, etc.
Thanks to Ravishankar N for these very useful schema diagrams to understand the flow of the data and internal process of the Windows 365 solution during his presentation at the APAC Windows 365 April UG event. This is a sample diagram to give you a better understanding of the connectivity.
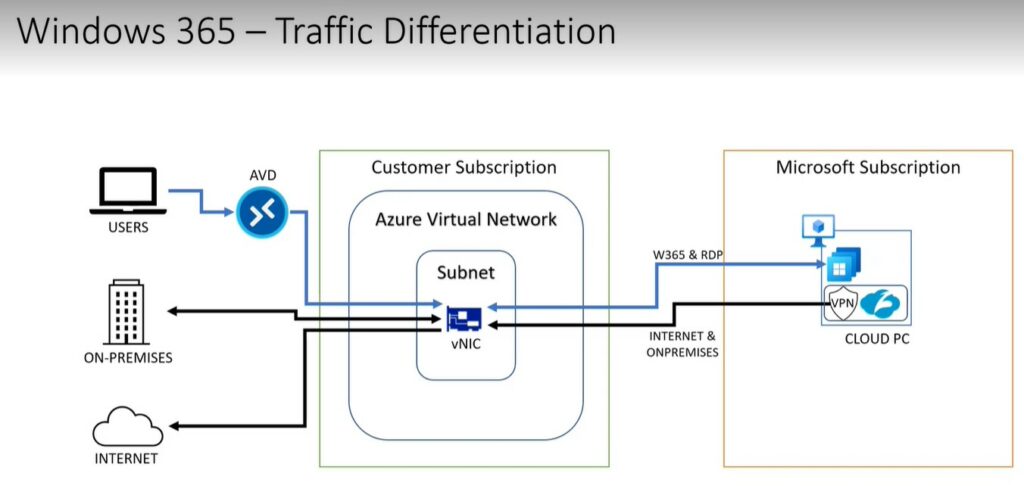
There is another schema diagram that is shared by Ravi that helps to understand the importance of segregating the traffic from Windows 365 Cloud PCs to the internet and internal network using proxy solutions, etc. This helps to have better use experience and better performance with Teams meetings, etc.
Prerequisite for Windows 365 Cloud PC
Let’s check the prerequisites for Windows 365 cloud PC. You can have more details from Microsoft docs. You can check all the prerequisites details from the following list.

Windows 365 Enterprise License (additional licenses for other components like Windows 10/11, Intune, Azure AD, etc…). More details are available in the resources below.
- Azure subscription should be created.
- A valid and working Intune and Azure Active Directory tenant.
Site-to-site VPN or Express route connectivity back to on-prem (if needed to access domain controllers, business apps, etc…). Azure Network configuration should be in place.
- A Hybrid Azure AD configuration should be in place with Azure AD Connect.
- Service account to join Cloud PCs to Active Directory Domain (domain join account).
- Azure AD Permissions to deploy components automatically:
- First party app permissions on Azure subscription.
- First party app permissions on the Azure resource group.
- First party app permissions on the Azure virtual network.
- Supported Azure Region:
- US East, US East 2, US West 2, US Southcentral, Asia Southeast, Australia East, Europe North, Europe West, UK South, Canada Central, India Central, Japan East, and France Central. (More regions were added recently)
- Azure vNet should be in a supported region.
- Free IP addresses are available in the Azure subnet.
- No Azure policy restrictions to automatically create resource groups.
- Active Directory domain DNS resolution should be in place.
- Active Directory domain join permission.
- Endpoint connectivity and access.
- Azure Virtual Desktop Connectivity is required from the vNets.
- Azure AD connectivity and MFA/Conditional Access related configurations/connectivity are also required.
NOTE! – Network connection to the on-prem data center is required for the Hybrid Azure AD join scenario. Also, this connection is required for on-prem application access, if there is any.
Permissions Requirements
The following are the Windows 365 access permissions required to perform the following steps covered in this post. There are two kinds of permissions required Intune and Azure.
- Intune Permissions:
- Cloud PC Administrator -> Cloud PC Administrator has read and write access to all Cloud PC features located within the Cloud PC blade.
- OS image management
- On-premises network connection configuration
- Provisioning
- Cloud PC Reader -> Cloud PC Reader has read access to all Cloud PC features located within the Cloud PC blade.
- Cloud PC Administrator -> Cloud PC Administrator has read and write access to all Cloud PC features located within the Cloud PC blade.
- Azure Permissions:
- A reader role on the subscription.
- Network contributor permissions on the resource group.
- A network contributor role on the vNet.
- Also, some special permissions are required while creating on-prem network connections (OPNC). More details are available in the below section.

Add Windows 365 Enterprise License
Let’s start Windows 365 cloud PC deployment by assigning a license to users. You can assign Windows 365 enterprise license using the https://admin.microsoft.com portal. You can also use the Azure AD Portal or automatically via the Azure AD group to assign licenses.

Start Windows 365 Cloud PC Deployment
I took a trial version of Windows 365. Once you have the appropriate license assigned to users, the magic happens between Azure AD, Endpoint Manager, and Windows 365. All the Windows 365 configurations and admin activities should be managed from the https://endpoint.microsoft.com portal.
- Login to the Endpoint portal with admin access.
- Navigate to the Device node.
- You can see the new node Windows 365.
- Agree to Windows 365 service agreement -> Accept.
NOTE! – This is the data handling message for Windows 365. Windows 365 integrates Customer Data from other Online Services (as that term is used in the OST), including Azure Active Directory, Microsoft Intune, Windows Virtual Desktop, and other Online Services (as that term is used in the OST), if any, as configured by you (collectively for purposes of this provision “Windows 365 Input Services”). The customer agrees that once Customer Data from Windows 365 Input Services is integrated into Windows 365, only the OST and DPA (as that term is used in the OST) provisions applicable to Windows 365 apply to that data.

Configuration Steps for Windows 365 Cloud PC
There are three fundamental configuration steps that you need to deploy Windows 365 cloud PC within your organization.
- On-Prem network connection.
- Provisioning policies.
- Device Images (optional). This is only required when you want to use custom images for Windows 365 Cloud PC Deployment.

Create an On-premises network connection for Windows 365 Cloud PC
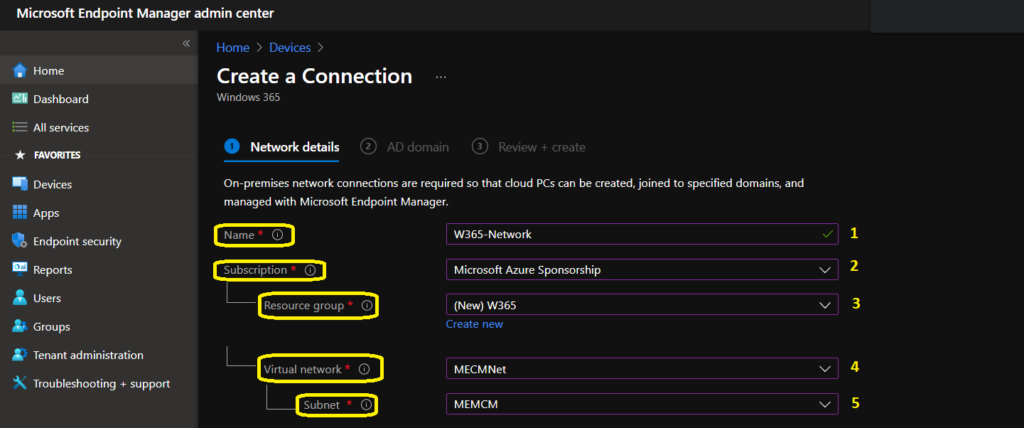
On-premises network connections are required so that cloud PCs can be created, joined to specified domains, and managed with Microsoft Endpoint Manager. This is a core prerequisite for the Windows 365 Cloud PC Deployment.
NOTE! – The Cloud PC admin should be an Intune Administrator in Azure AD. The admin should have Owner permissions on the Azure subscription that contains the virtual network with connectivity to your on-premises domain controller and network.
- Enter the Name for Windows 365 network connection – W365-Network – Use a connection name that can be easily identified when provisioning your cloud PCs.
- Select the Azure subscription that contains the virtual network connected to your on-premises domain controller and network.
- Select the Azure resource group (W365) that will contain the Network Interface Cards created by the Windows 365 service.
- Select Virtual Network (MECMNet) from the drop-down option -> the virtual network to which cloud PCs will be attached.
- Select the Subnet (MEMCM) for which cloud PCs will assign an IP address for. For provisioning to succeed, the subnet must be routed back to a network with access to a domain controller.
- Click on the Next button to continue.
NOTE! – You can maximum have up to 10 connections per tenant.
AD Domain Details for Windows 365
Active Directory domain information and credentials are required to create cloud PCs in the specified virtual networks, join them to the domain, and perform other service operations.
Enter AD DNS domain name -> Win365.com
The name of the domain that you want the cloud PC to join. The name must be in FQDN format (for example, ad.contoso.com). The domain must be resolvable on the network provided for the Network details step.
Enter Organizational Unit where you want to place the -> OU=W365,DC=Win365,DC=com
The Organizational Unit (OU) location for cloud PCs. After provisioning succeeds, the cloud PC computer objects will appear in this OU. The OU must be in Distinguished Name format (OU=Cloud PCs,DC=ad,DC=contoso,DC=com).
- Enter AD username UPN – anoop@w365.com
- An Azure Active Directory user with sufficient permissions to perform a domain join. The username must be in UPN format (for example, domainjoin@w365.com).
- Enter AD domain password – The password for the domain join user.
- Click on Review + Create to continue.

NOTE! – As part of this flow, the Windows 365 service is granted the following permissions for this connection: Reader permissions on the Azure subscription, Network contributor permissions on the resource group & Network Contributor permissions on the virtual network.
Create Provisioning Policies for Windows 365 Cloud PC
Let’s create provisioning policies for Windows 365. You need to specify the connection, Windows 10 images, and user groups. The provisioning policy helps you to configure the settings needed to host and manage cloud PCs.
- Click on the +Create policy button.
- Enter the Name -> Windows 365 Policy.
- Select the On-premises network connection from the below list -> W365-Network.
- More details -> Cloud PCs provisioned with this policy will connect to the vNet and domain defined in the selected on-premises network connection.
You can select the gallery image that you want to use to create the cloud PC. Or you can create a new custom image. New cloud PCs will be based on the image you select from the following option.
- Select Image type ->Gallery image
- Select the image type that you want to use to provision cloud PCs. Gallery images are optimized for Windows 10 images provided by Microsoft. Custom images are created and uploaded by you.
- Selected image -> Click on the select button to select the image.
- Click on Windows 10 Enterprise 21H1.
- Click on the Select button.
- Click on Next to continue.

Select the user group that contains users that has the Windows 365 cloud PC license. All my licensed users are part of W365 users. The selected group(s) will be provisioned with the configurations you make in these steps. The selected groups must contain existing cloud PCs.
- Search for the Azure AD user Group.
- Select the AAD group and click on the Select button.
- Click on the Next button to continue.
- Click on Create button to continue.
NOTE! – Every user in that group with a Cloud PC license assigned will receive a Cloud PC provisioned based on the image and on-premises network connection configuration.

After clicking Create, the new Cloud PCs will start to provision directly for the AAD group members that you assigned to the provisioning policy.
Results
I’ll share end-user experience in the next Windows 365 (cloud PC) blog post. Let’s find the results below:
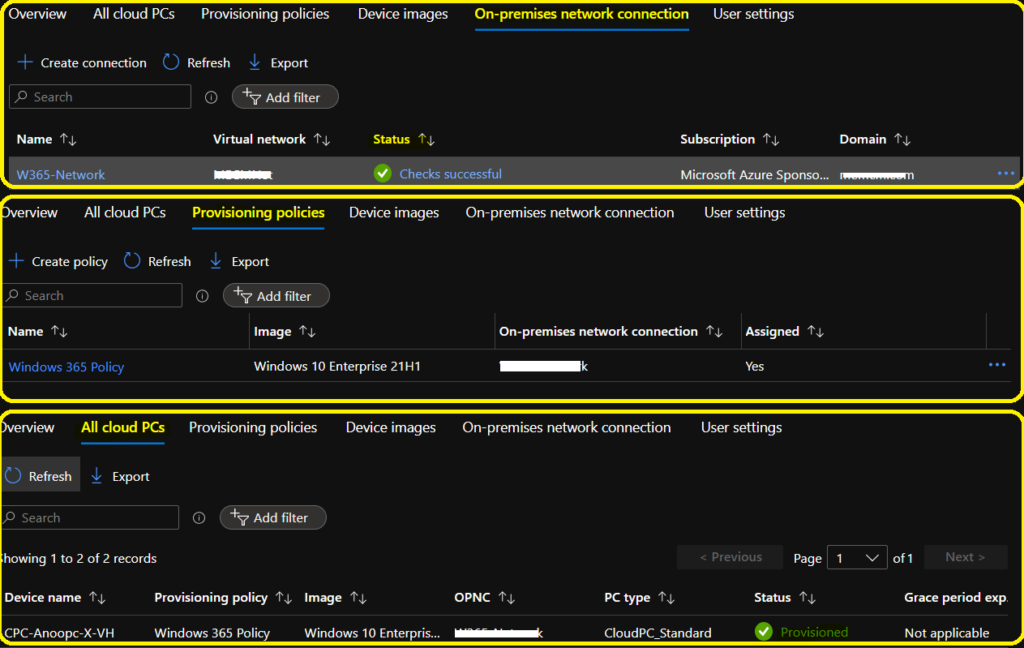
- On-premises network connection -> Checks Successful.
- Provisioning Policies ->Completed.
- All cloud PCs -> 2 Cloud PCs.
