How to Create SCCM Custom Report RDL file ConfigMgr Endpoint Manager. This is another long pending post. This post will provide a step-by-step guide to creating custom SSRS reports. We need to create an RDL file to create a custom SSRS report.
To create an RDL file, we can use Report Builder 3.0 (if you’re using SQL Server 2008 R2). You can start Report Builder 3.0 from the SSRS website. Follow the following 19 steps to create a custom report (.RDL file).
There is another post about Creating Custom RBA Enabled Reports in SCCM ConfigMgr 2012 R2, published on 14th July; more details – http://blogs.technet.com/b/configmgrdogs/archive/2014/07/14/creating-custom-rbac-enabled-reports-in-configmgr-2012-r2.aspx?
This post will teach you how to create a custom report RDL file using System Center Configuration Manager (SCCM), or ConfigMgr.
- Setup Configure SCCM Reporting Services Point
- Excellent Resource to Learn and Become an Expert in SCCM Reporting
- FIX Firefox Installation Failed SCCM Reporting Issue
- Setup Configure SCCM Reporting Services Point
- Fix SCCM Report Server Cannot Open A Connection Error
- SCCM Troubleshooting Tips On Reporting Server SSRS Issues
Table of Contents
How to Create SCCM Custom Report RDL File ConfigMgr Endpoint Manager
We will guide you through the process step-by-step, ensuring you understand each part, even if you’re new to SCCM reporting. This guide is designed to be straightforward, so you can easily follow along and create your custom reports.
- Launch Report Builder from the SSRS website.
2. To create a new report, Select Table or Matrix Wizard. This will help you create simple table-format reports.
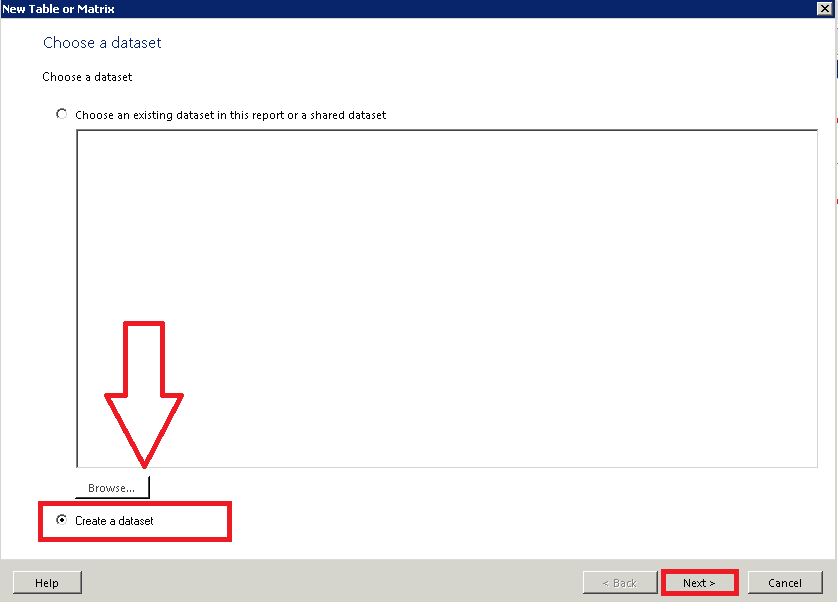
3. You can access an existing dataset or create a new one. The data set is used to create a query for columns and rows.
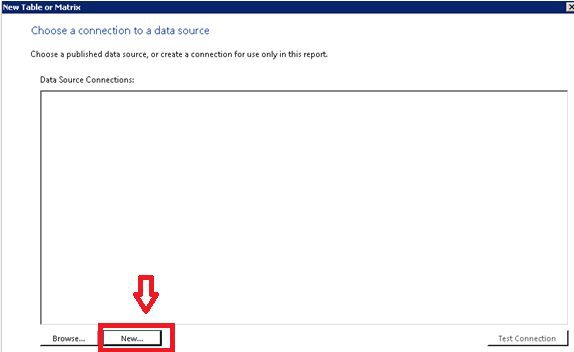
4. I will create a new data source for SQL DB connectivity.
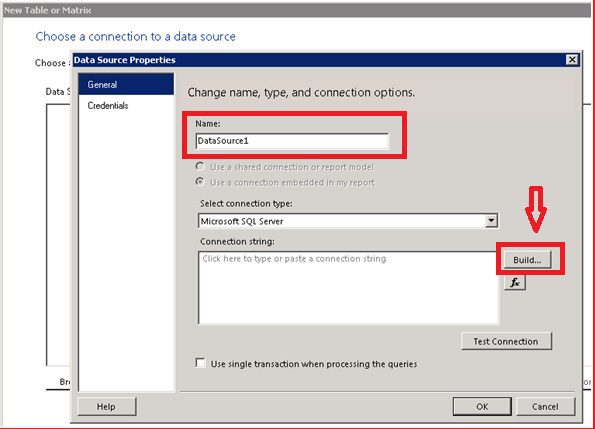
5. Connect to existing SQL DB using the Data Source connection setting. Create a new connection setting for DATA SOURCE. Click on BUILD to create a new Connection String.
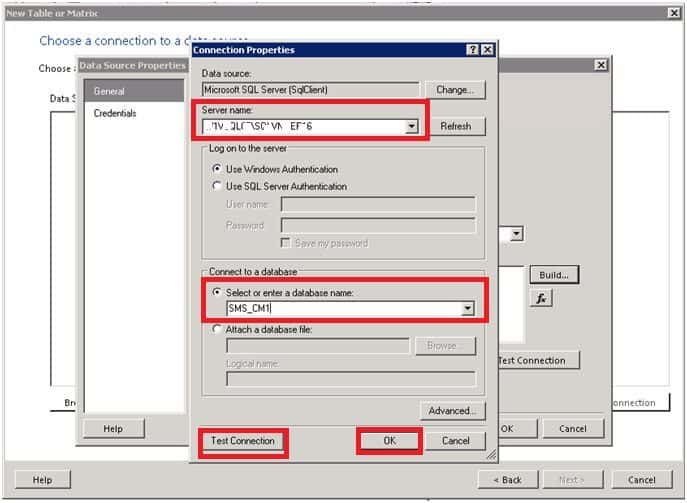
6. In the connection properties window, enter the SQL server instance Name. Select the Database from the drop-down menu below. You can use Windows authentication to connect to an SQL server and DB. You must have access to the DB. You can test the access using TEST CONNECTION. You can also directly type in a connection string in STEP 5.
- Connection String ==> Data Source=SQLSERVER\INSTANCE;Initial Catalog=CM_CAS.
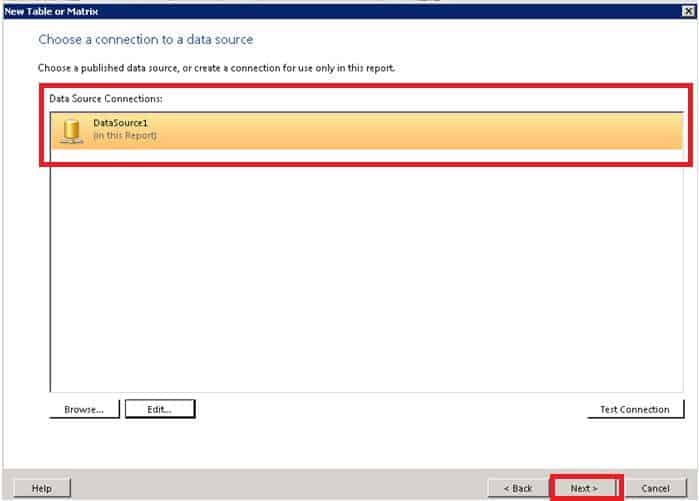
7. Choose a connection to a data source -> Select DataSource1 and click NEXT.
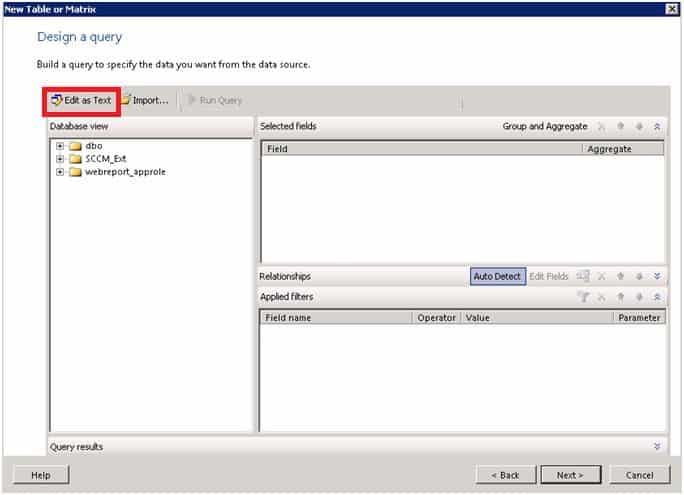
8. Build a Query to Specify the data you want from the data source. Click on Edit as text to test and design your query.
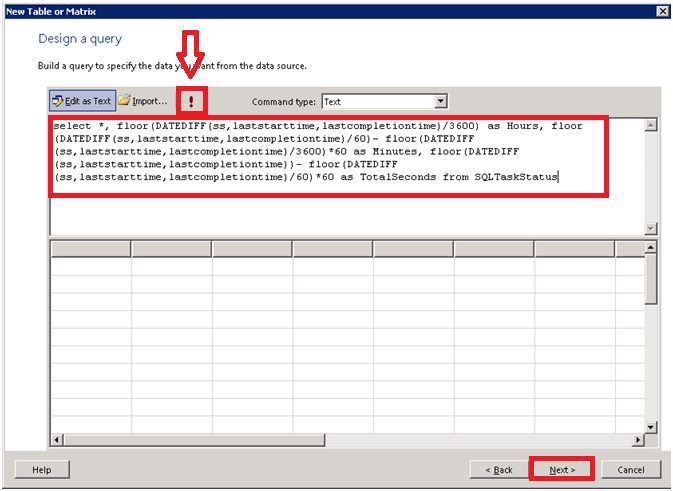
9. Design query from the following window. Run “!” to test your query. You can see the results in the 2nd pane of the window.
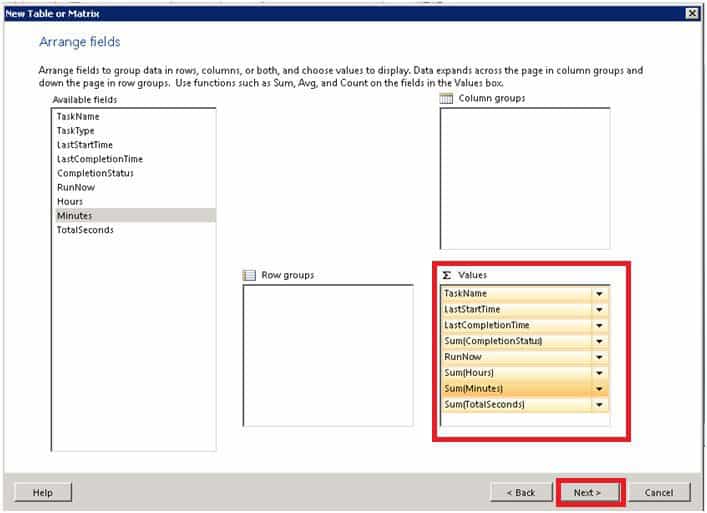
10. Arrange fields to group data in rows, columns, or both and choose values to display. Data expands across the page in column groups and down the page in row groups. Use functions such as sum, average, and count on the fields in the values box.
- Drag and Drop available fields to Values columns.
- Arrange the field’s SSRS report.
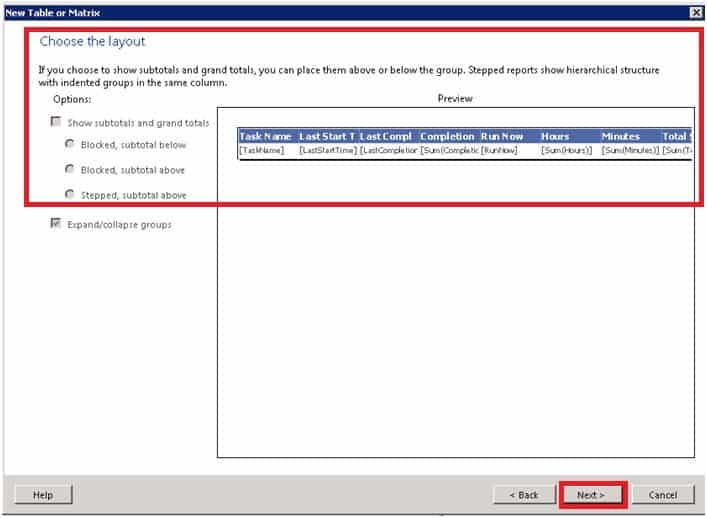
11. Choose the Layout
If you choose to show subtotals and grand totals, you can place them above or below the group. Stepped reports show a hierarchical structure with indented groups in the same column.
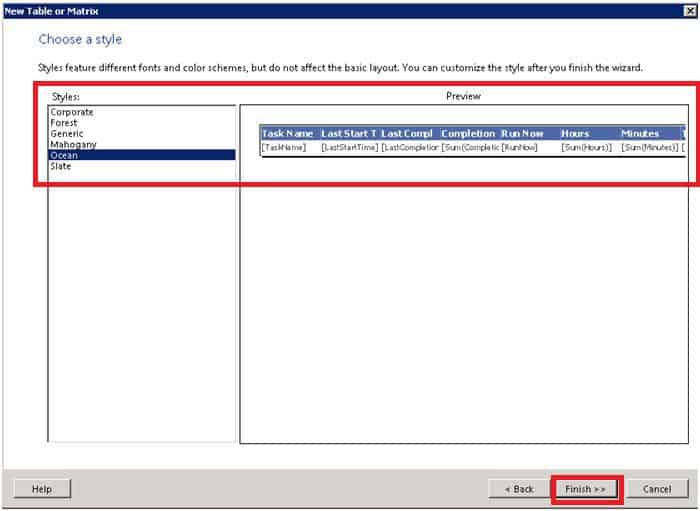
12. Choose a Style
Styles feature different fonts and colour schemes but do not affect the basic layout. You can customize the style after you finish the wizard.
| Styles Available by Default in Report Builder |
|---|
| 1. Corporate |
| 2. Forest |
| 3. Generic |
| 4. Mahogany |
| 5. Ocean |
| 6. Slate |
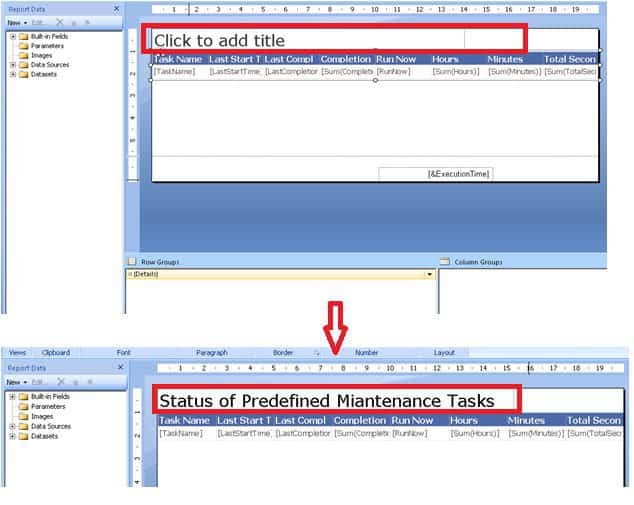
13. Change or Customize the Title of the SSRS report, as you can see in the screenshot below. Click to add a title to change the report heading.
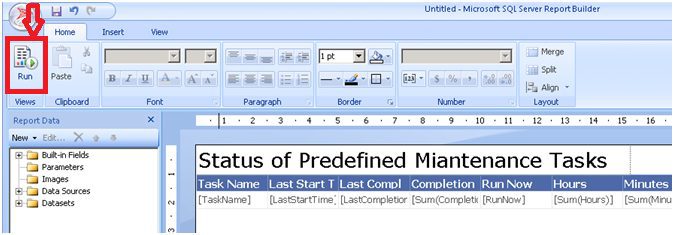
14. Test Run and Preview the created SSRS report before uploading the RDL file to the server.
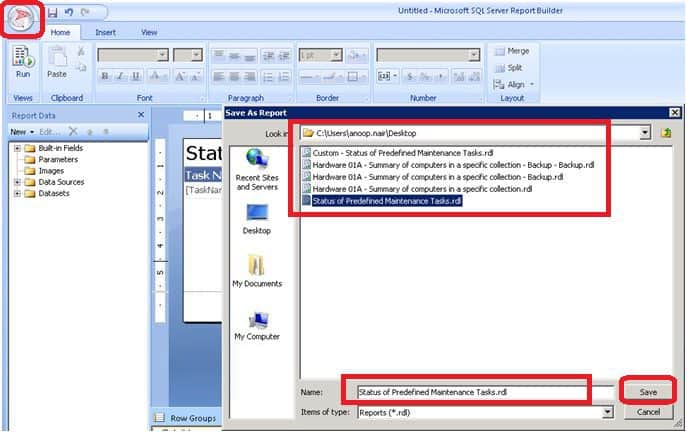
15. Save the created SSRS report as an RDL file.
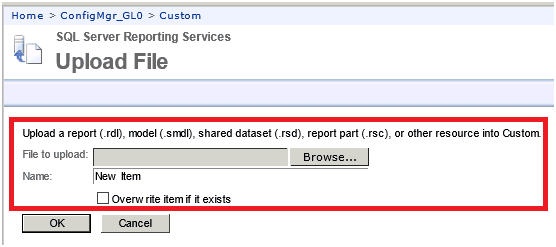
16. Upload the RDL file to the SSRS website.
17. Upload a report(.rdl), model (.smdl), Shared dataset (.rsd), Report Part (.rsc), or other resource into custom. Select the RDL File to Upload using the browse button. You can also Overwrite the existing report.
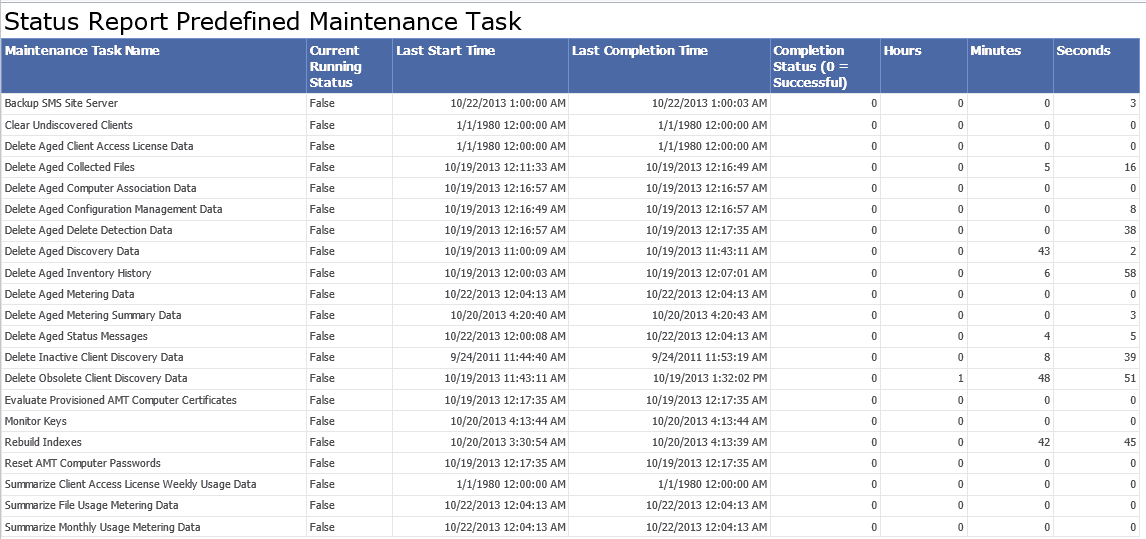
18. SSRS Custom Reports Uploaded Successfully.
19. Click on the report and check whether the report is working from the SSRS website.
We are on WhatsApp now. To get the latest step-by-step guides, news, and updates, Join our Channel. Click here. HTMD WhatsApp.
Author
Anoop C Nair is Microsoft MVP from 2015 onwards for consecutive 10 years! He is a Workplace Solution Architect with more than 22+ years of experience in Workplace technologies. He is a Blogger, Speaker, and Local User Group Community leader. His main focus is on Device Management technologies like SCCM and Intune. He writes about technologies like Intune, SCCM, Windows, Cloud PC, Windows, Entra, Microsoft Security, Career etc…




You Rock Dude
Thank you Dear 😉
Could you please help in understanding the linked reports in SSRS. I need to create a report in which I can click on each value and it drills down and runs another report which gives more details on that.
Hi Vino ! – I think, if you want to go in deep in SSRS custom reports for SCCM 2012 and SCCM 2007 then please start from some of the Training videos youtube creating custom reports SSRS
Regards
Anoop
Regards
Anoop
Hi Anoop,
WHere are these reports stored? How can we back them up?
Thanks
Sana
I don’t remember out of my head now. Can you try searching *.RDL files?
Anoop
I’ve been creating custom reports for months now using this method, but have just discovered they are not stored in the same place as the default reports on the RSP server. Where are they? I’ve tried searching for .rdl files on the whole server and they cannot be found??
Can we add filter.
Suppose we have 20+ Ad Groups and I want to look compliance for 1 selected AD group then how we will create report like this
Well, feel free to develop a solution to include a filter. I didn’t get time to research that part yet. And share it with the community here to help each other!