Let’s learn how you can set SCCM Software Center Icon for Task Sequences Packages to make a user-friendly Deployment. The addition of custom icons to task sequences or packages helps to avoid a lot of overheads and provides a better end-user experience.
Starting in SCCM version 2203, You can add custom icons for task sequences and packages. These icons appear in Software Center when you deploy the task sequence / Packages. Instead of a default icon, a custom icon can improve the user experience to identify the software better.
This feature has been a great addon in the SCCM. Previously, task sequences and legacy packages would always display a default icon in Software Center.
Custom Icons Requirements – Here are the requirements of Custom icon support for task sequences and packages –
- The custom Icons support the following file types:
- Programs (
.exe) - Libraries (
.dll) - Icons (
.ico) - Images (
.png,.jpeg,.jpg)
- Programs (
- The file doesn’t need to be on clients you target with the deployment. Configuration Manager includes the image with the deployment policy.
- The maximum file size for an image is 256 KB.
- Icons can have pixel dimensions of up to 512 x 512.
If you want to provide a better end-user experience from Software Center, you can check more branding options in the posts.
- Customize ConfigMgr Software Center Appearance | Best Branding Options
- SCCM Software Center Custom Tab Setup | ConfigMgr | Best Options
- Software Center Icon for SCCM Application Deployment
- SCCM 2203 Upgrade Guide with Top 5 Best New Features
SCCM Software Center Icon for Packages
You can follow the steps to add or change an icon associated with the selected package directly from the Properties pane of the Packages node in the Configuration Manager Console. Here’s how –
Note – If needed, create a task sequence or create a package and program.
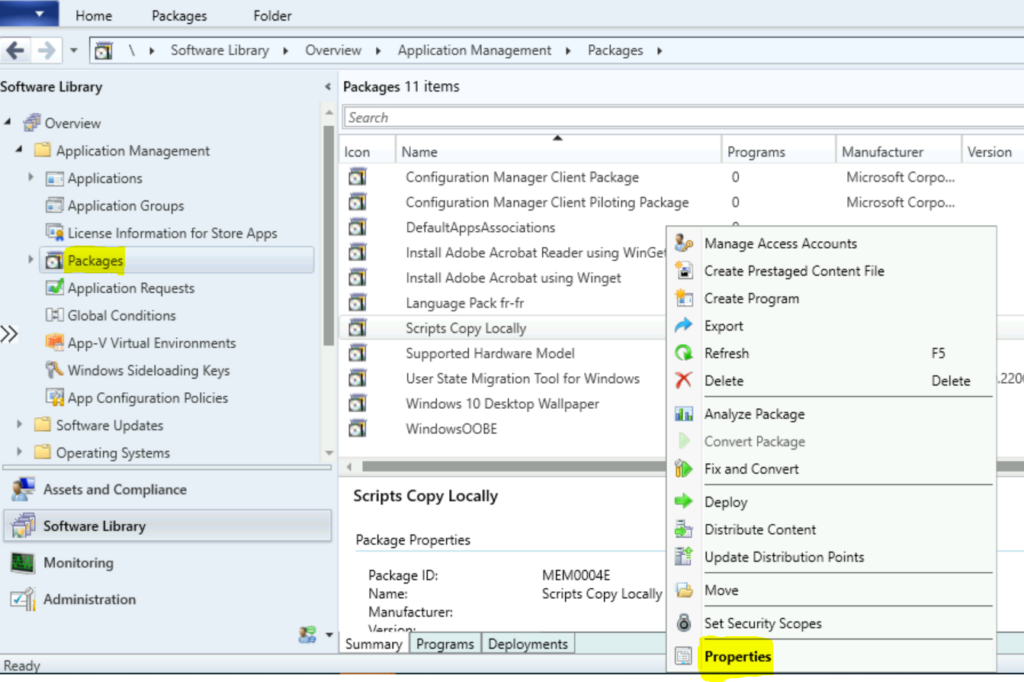
- In the Configuration Manager Console, Navigate to the Software Library workspace, expand Application Management, and select the Packages node.
- Select the existing package from the list if you want to specify an icon. Right-click on the package and select Properties.
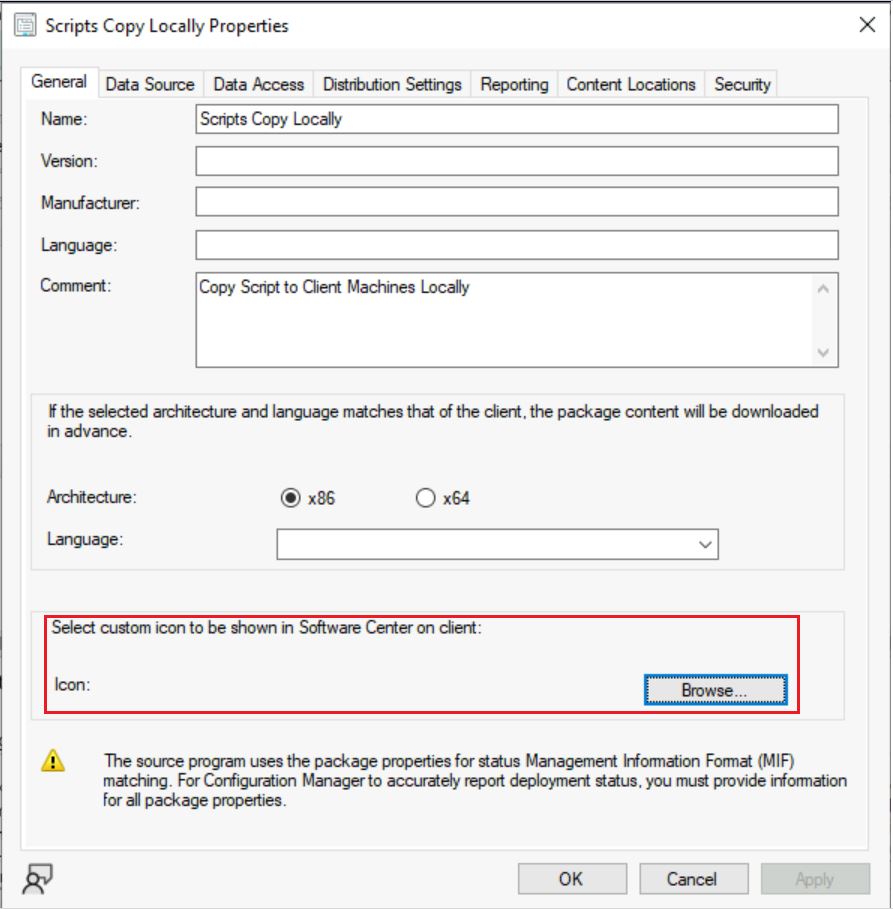
On the General tab of package properties, Click on Browse to select an icon from the default shell library, or browse to another file in a local or network path.
Note – The maximum file size for an image is 256 KB. Icons can have pixel dimensions of up to 512 x 512.
Ensure you have collected or downloaded the custom icon file (.ico) and copied it to the SCCM shared folder. Once you have your icons ready, you can now add them to your packages in SCCM. The custom icon will be shown in the Software Center for the users.
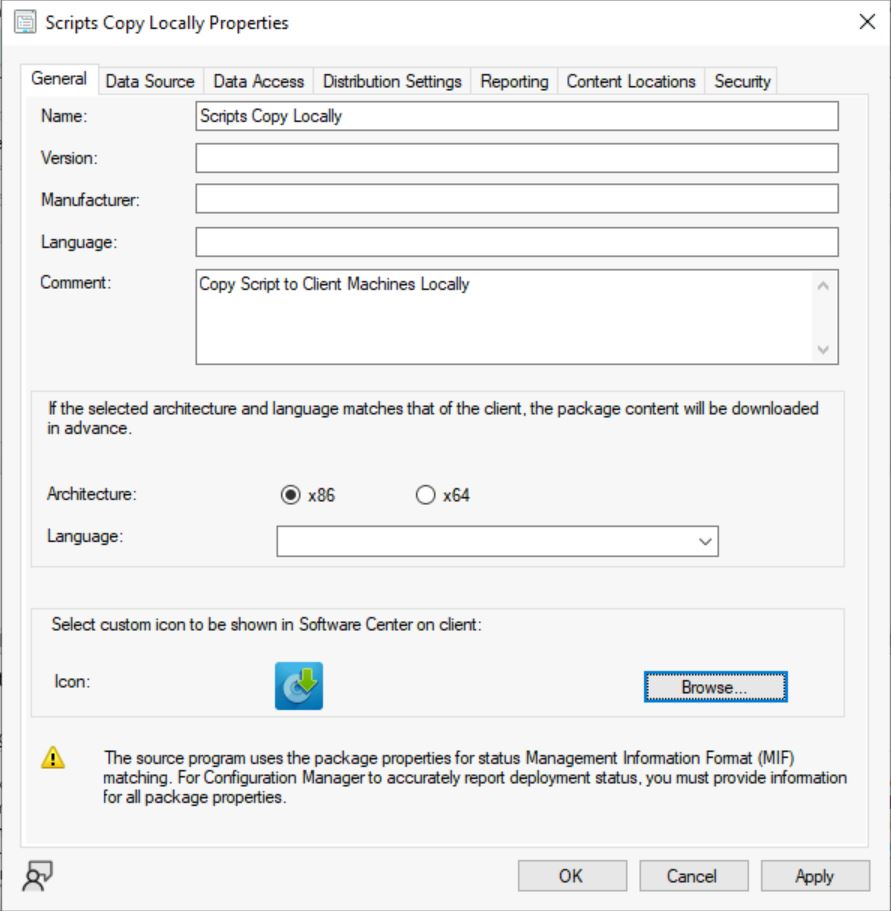
Once you have selected the custom icon file for your package, it should appear as shown below. Click Apply and OK to confirm.
After you save the properties, deploy the package, if it’s not already deployed.
SCCM Software Center Icon for Task Sequences
Here’s how you can add a custom icon for the existing SCCM Task Sequences from Properties –
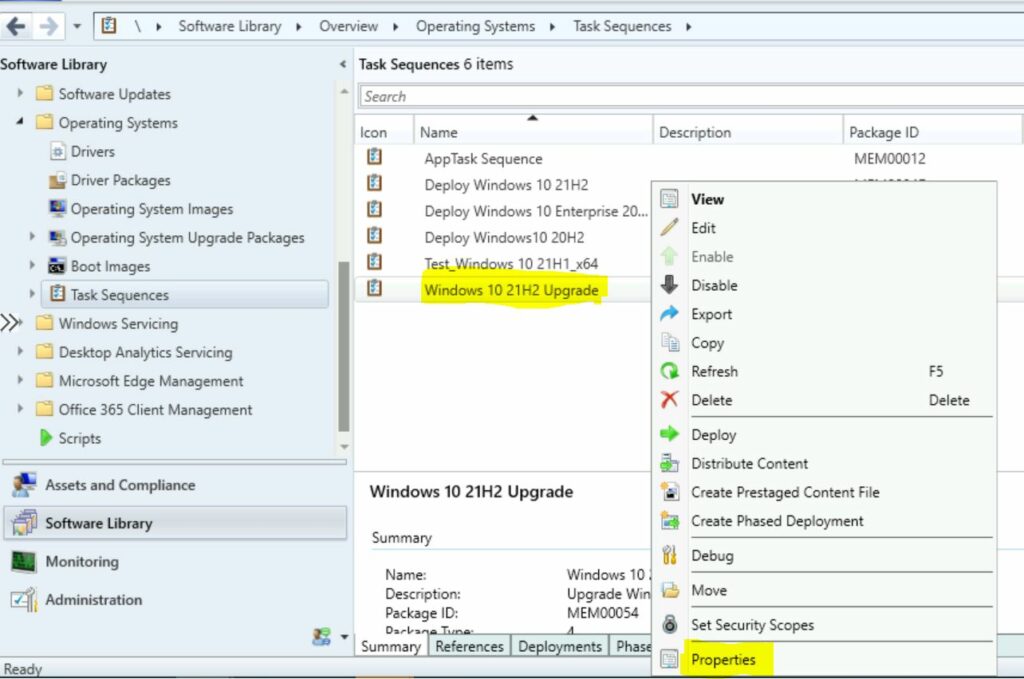
- In the Configuration Manager console, go to the Software Library workspace. Expand Operating Systems, and select the Task Sequences node.
- Choose an existing task sequence from the task sequence list for which you want to set up icons, and Right-click on the task sequence, then select Properties.
In Task Sequence properties, Move to the More Options tab. Click on Browse to select an icon from the default shell library, or browse to another file in a local or network path.
Note – The task sequence property page for Performance is now renamed to More Options. In SCCM version 2111 and earlier, this tab is named Performance. Let’s see how to run SCCM Task Sequence with High Performance Power Plan.
Ensure you have collected or downloaded the custom icon file (.ico) and copied it to the SCCM shared folder. Once you have your icons ready, you can add them to your SCCM Task Sequences. The custom icon will be shown in the Software Center for the users.
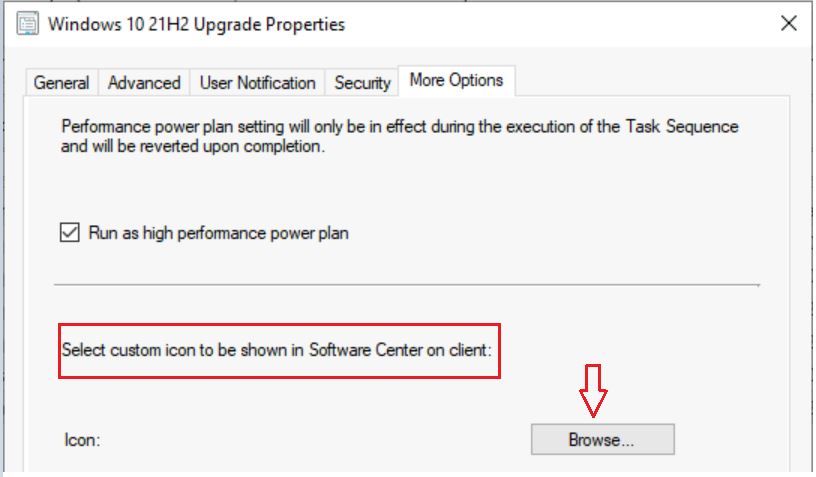
Once you have selected the custom icon file for your package, it should appear as shown below. Click Apply and OK to confirm.
After saving the properties, deploy the task sequence if it’s not already deployed.
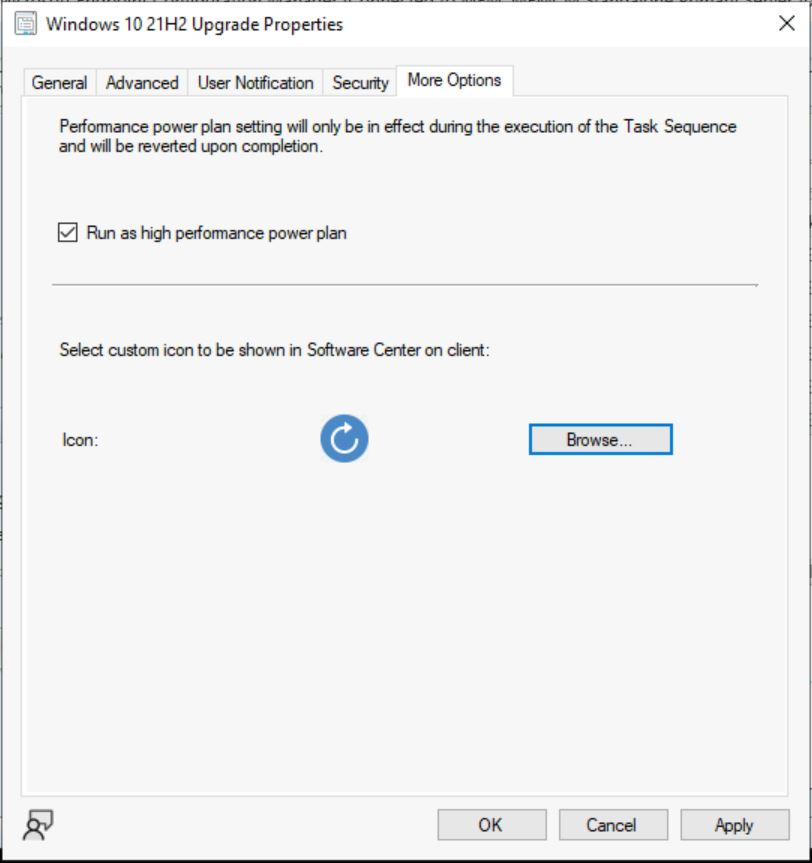
End-User Experience – SCCM Custom Icons for Task Sequences and Packages
Let’s check the end users’ experience with the SCCM Software Center Icon for Task Sequences and Packages –
To launch Software Center on Windows Device that you manage. Navigate the Start menu, and look under the Microsoft Endpoint Manager group for the Software Center icon.
Click on the Software Center Icon to launch.
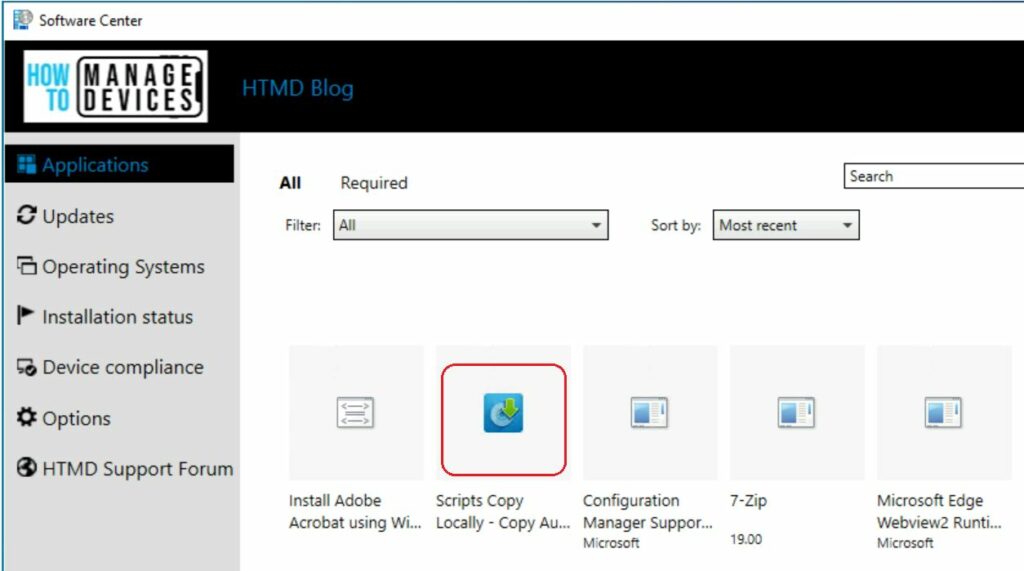
Select the Applications tab to find and install packages that your IT admin deploys to you or this computer. When clients receive the deployment policy, they’ll display the icon in Software Center.
Here you see the package with the proper icon configured above, providing the best visibility about the package, making it more user-friendly to use from Software Center.
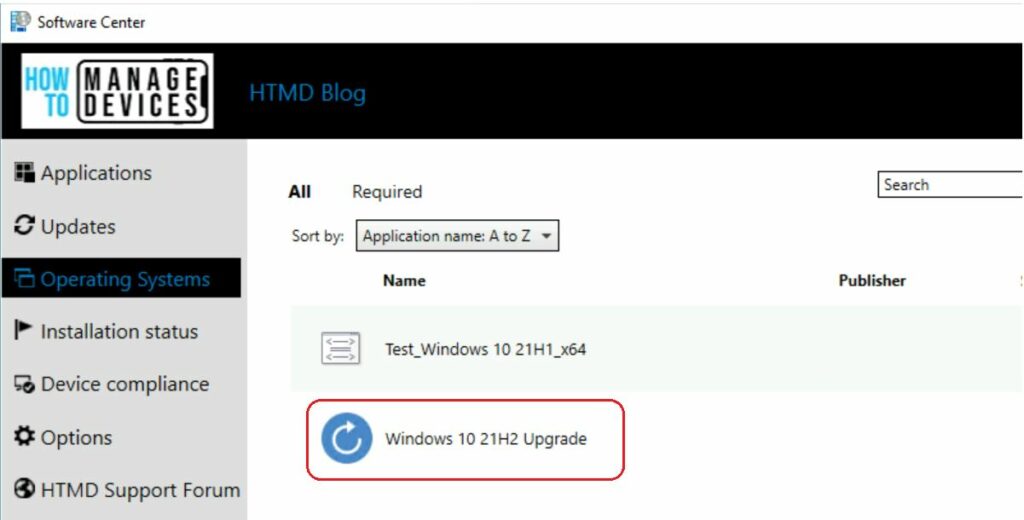
Select the Operating Systems tab to view and install versions of Windows that your IT admin deploys to this computer.
Here you see the task sequence with the custom icon configured above, making it more user-friendly from Software Center.

Do you have an information on how to create a task sequence to remove bloatware for Windows 11 in SCCM?