Today, we discuss the how to Enable Speech Recognition and Synthesis Model Updates with Intune Settings Catalog. As you all know, Microsoft Intune is a cloud-based service, and one of its best features is the Settings catalog option. With the settings catalog, admins can configure and manage device settings policies.
The setting catalog allows admins to easily navigate Settings. Here, we have to discuss a specific policy called Allow Speech Model Update. This policy is set for speech recognition and speech synthesis models. These technologies are crucial for many applications.
Keeping these technologies updated is important for their best performance and security. With the help of the Intune Setting catalog, it is very easy to manage these technologies. Keep update through Intune policy can manage update from single interface.
Maintain to allow Speech Model Update is very essential keeping up the updates always reduce the Vulnerabilities. So, in this post we can look how to allow Update for Speech Recognition and Speech Synthesis Models Using Intune Settings Catalog.
Table of Contents

What Should Administrators Consider When Creating Policies with Many Settings in Intune?
In Intune, admins may experience performance degradation when more than 400 settings are added to a single policy. Please consider this while we continue to make improvements.
How to Enable Speech Recognition and Synthesis Model Updates with Intune
Above discussed an overall view on the topic of Allow Update for Speech Recognition and Speech Synthesis Models Using Intune Settings Catalog. Microsoft Intune is one of the best ways to enable the policy. For this first you have to log in to the Microsoft Intune admin center.
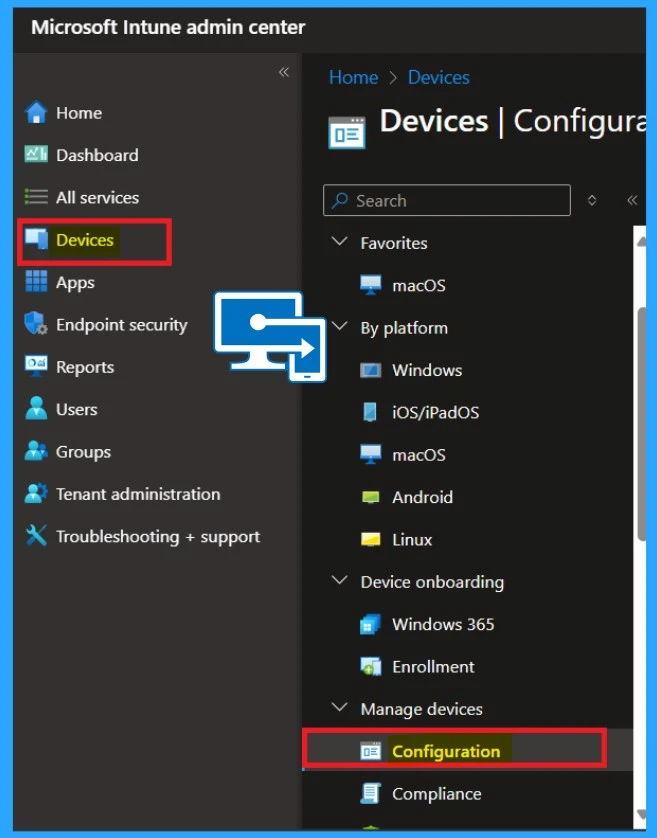
- Sign in to the Microsoft Intune admin center.
- Navigate through the Device > Configuration
- Enable Disable Speech Recognition in Microsoft Edge Through Microsoft 365 Admin Center Policy
- How to Enable or Disable Voice Access in Windows 11
- Turn Off Online Speech Recognition Using Intune MEM
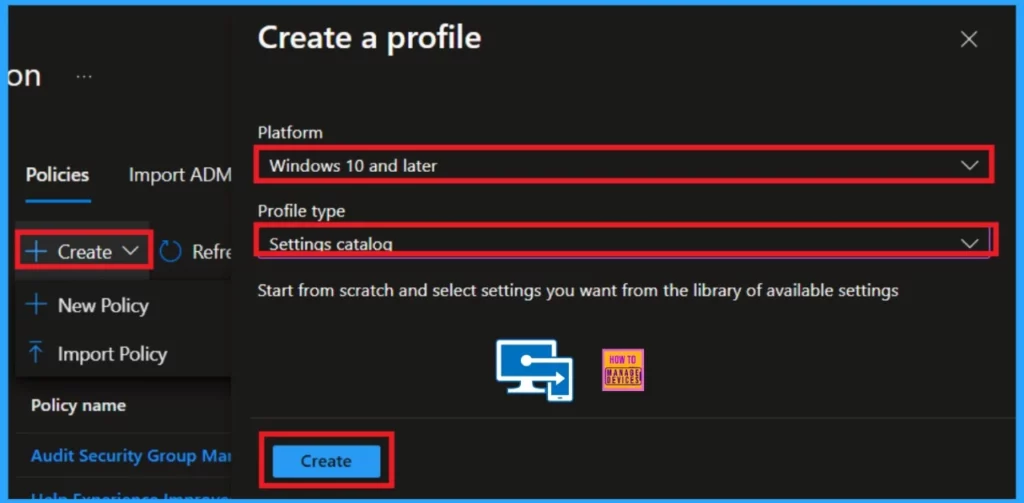
After clicking on the configuration, you will get the +Create policy option. There, you will get 2 options: a New policy and an Import policy. Now, we have to select the new policy and click on it. When clicking on the new policy, select the platform as Windows 10 and later
- Profile type as Setting catalog
- Then click on the Create option.
Basics
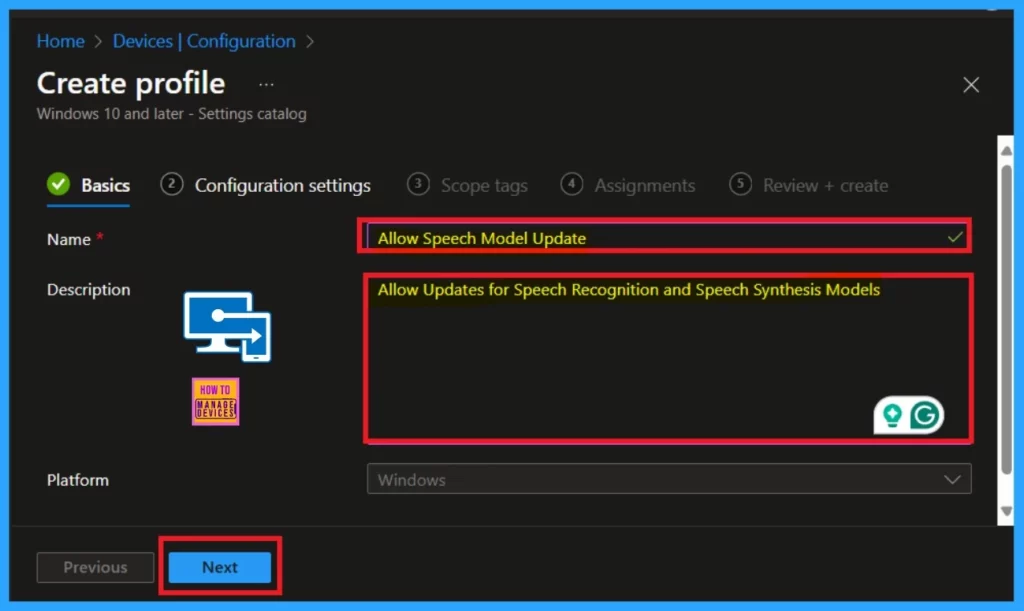
The Basics are the first important step. In this step, you need to enter the essential details of a policy, such as the name, description, and platform. In the Name section, I included “Allow Speech Model Update.” In the description, I provided detailed information about the policy, as this will help us understand why the policy was created later on.
- Click on the Next
Configuration Settings
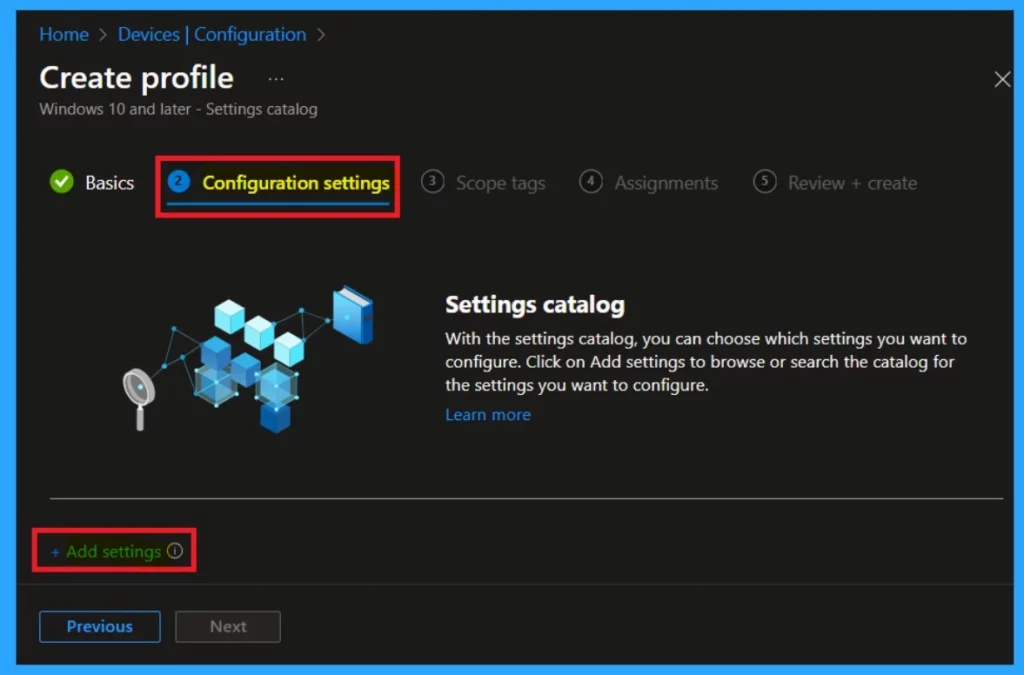
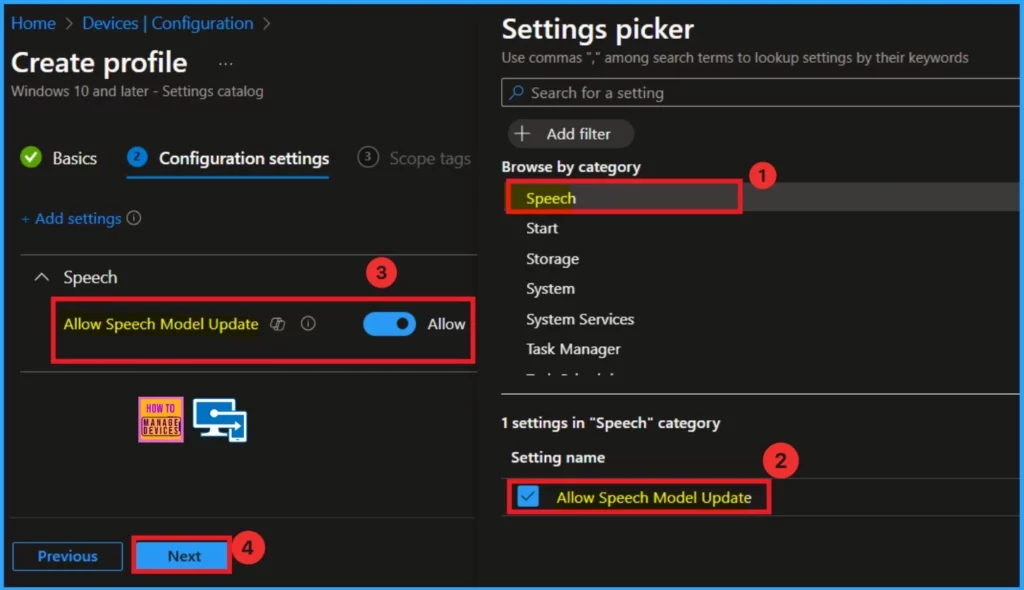
The next step is Configuration settings, where you can add settings to the policy. With the settings catalog, you can choose which settings to configure. You can click on the + Add Settings option to search the catalog for the settings you want to configure.
Settings Picker
When you click on the Add settings option, you will get the Settings picker option. Here, you can browse by category. When I scroll down, I get the Speech option, or you can search for Speech on the search. When you click on that, you will get the settings for that category (Allow Speech model update).
- Select the Allow Speech model update
- Now, you can close the settings picker, and, in the Configuration, you have to Enable Allow Speech model update. (Toggle the pane to left will Disable the policy.)
- Now you can click on the Next
| Settings Name | Info |
|---|---|
| Allow Speech model update | Specifies whether the device will receive updates to speech recognition and speech synthesis models. A speech model contains data used by the speech engine to convert audio to text (or vice versa). The models are non-executable data files periodically updated to improve accuracy and performance. |
| Allow Speech model update–Enabled | If enabled, the device will periodically check for updated speech models and download them from a Microsoft service using the Background Internet Transfer Service (BITS). |
Scope Tag
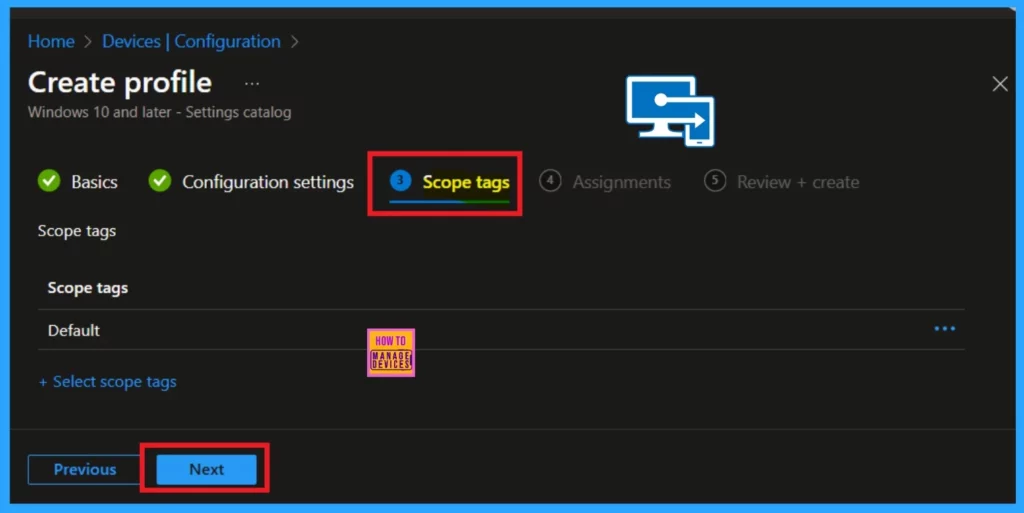
Scope tag is the next step after the configuration settings. In this step, I did not add anything. This tab is mandatory, so you can easily skip it. Click on the Next option.
Assignment
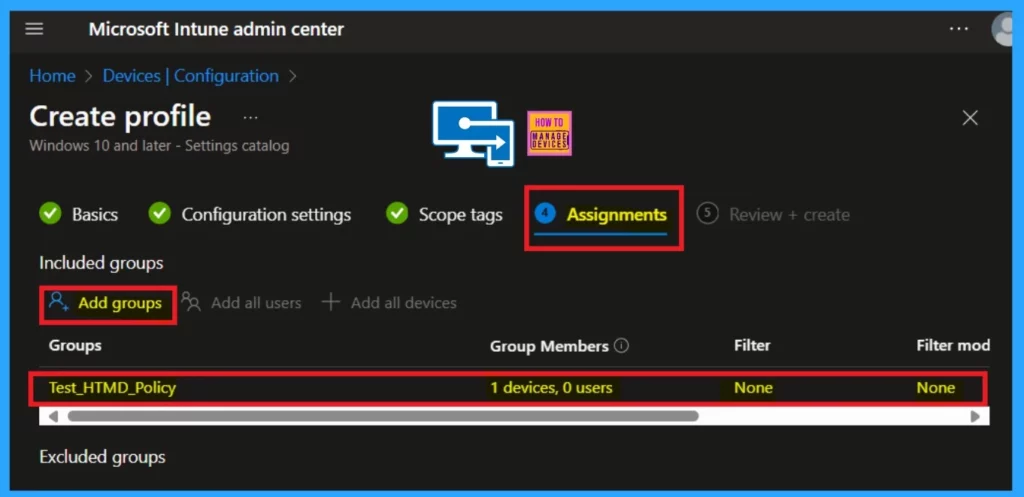
The assignment section is one of the most important parts of a policy. In the assignment tab, you can add the policy to specific groups. There are 2 sections available: Include and Exclude. Under the Include option, you will find an “Add Groups” button; click on that.
- Select the groups you want to include, then click on Select.
- After that, click “Next” to proceed to the next step.
Review and Create
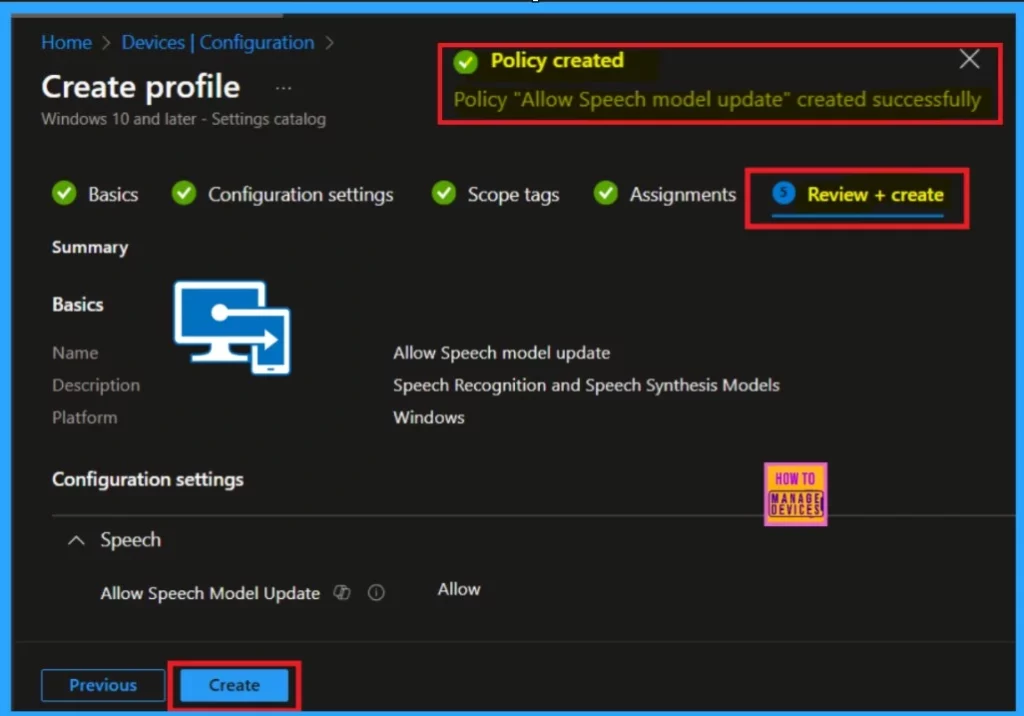
The “Review and Create” step is the final part of the policy process. In this section, you can review all the details and settings associated with the policy. This is your last opportunity to make any changes to the policy information provided. If everything looks good, click on the “Review and Create” option.
- You will then receive a notification confirming that the policy has been created.
- You can now close the “Create Profile” section.
Monitoring Status
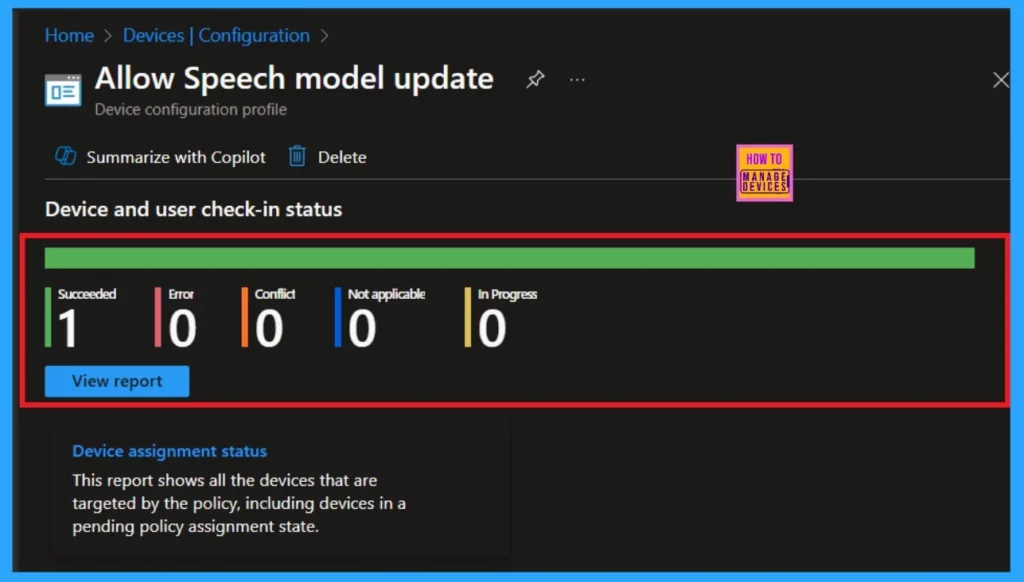
As you all know, when a policy is created, we must wait 8 hours for the policy to be succeed to a device. If you want to avoid this waiting period, you can easily sync the policy. To do this, follow these steps:
- Go to the Company Portal.
- Navigate to Settings.
- Click on Sync.
This process may take a few minutes. Once it is complete, log in to the Intune portal and check the monitoring status by going to Device > Configuration and selecting the policy.
Client Side Verification
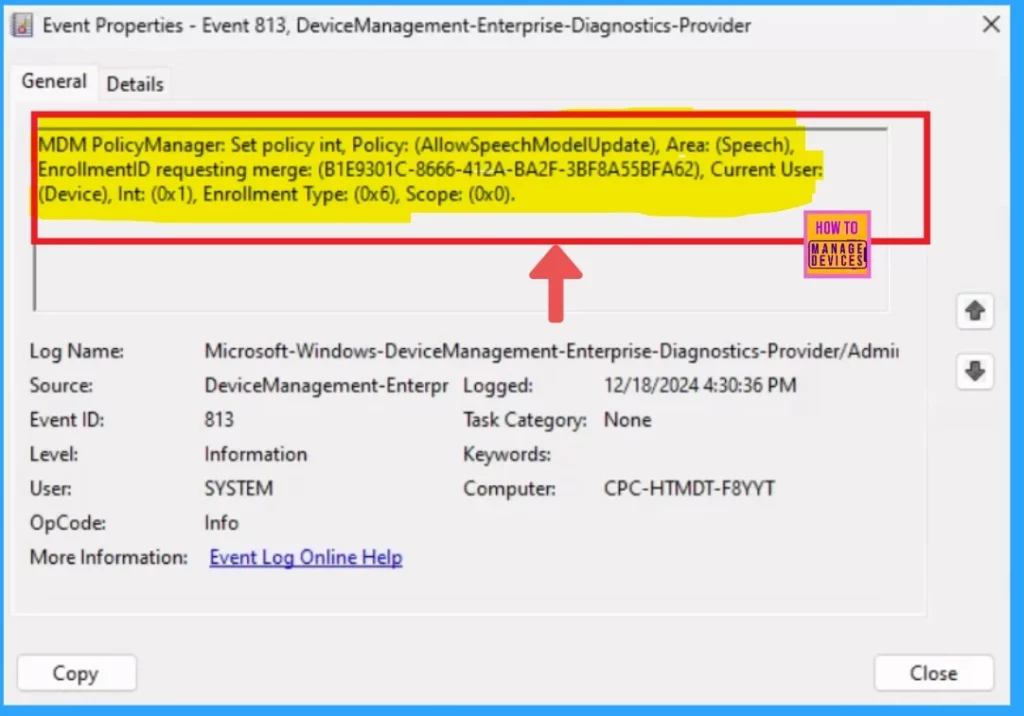
To check the status of the Allow Speech model update in Intune, open Event Viewer for that go to the Start and type “Event Viewer.” Then, navigate to Application and Services Logs > Microsoft > Windows > DeviceManagement–Enterprise–Diagnostics–Provider > Admin.
- In the right pane, click Filter Current Log, enter 813 in the Event IDs field, and click OK.
- This will filter logs related to the policy’s status, allowing you to quickly check its deployment and application without needing to access the Intune portal directly.
| Policy Staus |
|---|
| MDM PolicyManager: Set policy int, Policy: (AllowSpeechModelUpdate), Area: (Speech), EnrollmentID requesting merge: (B1E9301C-8666-412A-BA2F-3BF8A55BFA62), Current User: (Device), Int: (0x1), Enrollment Type: (0x6), Scope: (0x0). |
Need Further Assistance or Have Technical Questions?
Join the LinkedIn Page and Telegram group to get the latest step-by-step guides and news updates. Join our Meetup Page to participate in User group meetings. Also, Join the WhatsApp Community to get the latest news on Microsoft Technologies. We are there on Reddit as well.
Author
Anoop C Nair has been Microsoft MVP for 10 consecutive years from 2015 onwards. He is a Workplace Solution Architect with more than 22+ years of experience in Workplace technologies. He is a Blogger, Speaker, and Local User Group Community leader. His primary focus is on Device Management technologies like SCCM and Intune. He writes about technologies like Intune, SCCM, Windows, Cloud PC, Windows, Entra, Microsoft Security, Career, etc.
