Let’s learn about the different methods to enable Windows Sandbox in Windows 11 and also how to configure Sandbox policies using Intune and Group Policy Settings. Windows Sandbox feature is a lightweight desktop environment that runs applications safely in isolation.
The Windows sandbox’s benefit is protecting your device from insecure applications. Enabling/activating Windows sandbox in Windows 11 is very simple. With the help of the Command prompt, you can quickly access Windows Sandbox in Windows 11.
Another process is using a specific PowerShell command to activate the Windows Sandbox in Windows 11. The sandbox was introduced in Windows 10 earlier and was also added in Windows 11. Unfortunately, the sandbox activation is not available for Windows 11 home edition.
Windows Sandbox is a secure surrounding that separates the running apps from the main system. A sandbox is a temporary platform where all the files and documents are deleted when you close it. The methods to activate the windows sandbox and its uses and how to use it in your daily life are narrated below.
- 4 Methods to Enable Credential Guard on Windows Devices
- Microsoft Pluton Security Processor for Windows 11 and Enhancements
- Intune Security Baseline for Office Coming Soon
What is Windows Sandbox?
Windows sandbox is an environment used to run untrusted applications to test whether the application is harmful to your device. The software installed inside the sandbox window remains isolated; there is no connection with the host device.
Isolated means the app runs without accessing files, registry, and other resources of the main windows OS. When you close the sandbox, it clears all the data and reopens with a new window.
The sandbox cannot access any software and application installed on your device. Please install applications inside the sandbox to use.
Enable Windows Sandbox Using Windows Feature
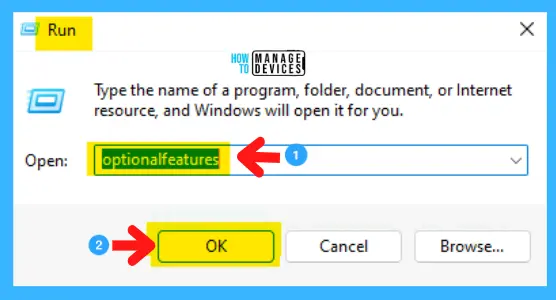
You can enable the Windows Sandbox in Windows 11 and follow the procedure to activate this service on your windows device. Open the Run command by pressing Win Key + R, then type optionalfeatures and press OK or hit the ENTER key.
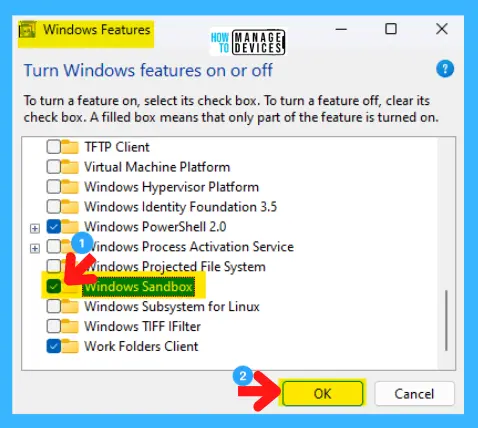
Next, the Windows features window opens, scroll down, find Windows Sandbox, check the box before it to active, and press OK.
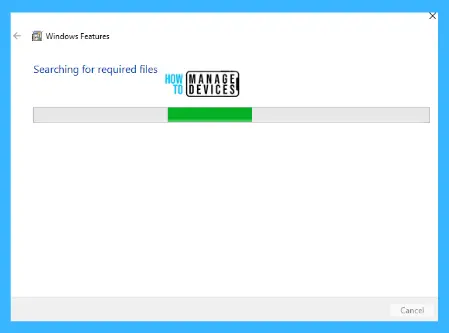
When you press ok, another window appears, searching for required files and making changes in the device.
Finally, the application is successfully activated, and a message appears to Restart the device in the Windows Feature to make some upgradation to your device for initiating the Sandbox app.
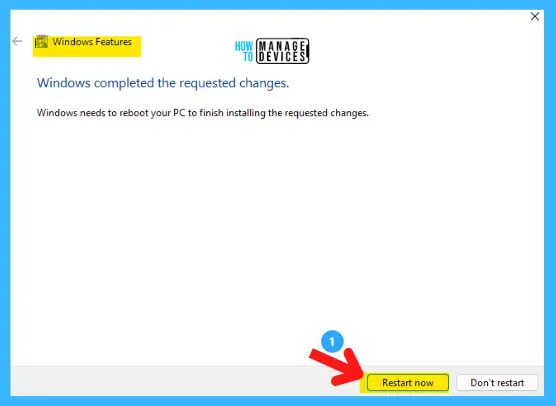
Click on Restart, and it will take some time to initiate the Sandbox application and update your device. To disable it, follow the above procedure and uncheck Windows Sandbox, and you are done.
Enable Windows Sandbox Using PowerShell
To activate the Sandbox using PowerShell, follow the procedure, click the Search option on the Taskbar, type “PowerShell (Windows Terminal),” and from the search results, select PowerShell and click on Run as Administrator from the right panel.
When the PowerShell terminal opens, type the command presented below and press ENTER. After some process, a message appears: Would you like to restart your computer to complete this process? Type Y, press ENTER, and it’s done. Your device restarts and the sandbox app is activated.
Enable-WindowsOptionalFeature -FeatureName “Containers-DisposableClientVM” -All -Online

Disable Windows Sandbox Feature
To disable sandbox using PowerShell, put the command shown below and, type Y, press Enter to restart your device and the sandbox app disabled.
Disable-WindowsOptionalFeature -Online -FeatureName “Containers-DisposableClientVM” -Online
Enable Windows Sandbox Using Command Prompt
To open the command prompt, there are different ways; the first method is to click on the search box in the taskbar and type Command Prompt; in the right panel, the command prompt app appears, and click on Run as Administrator.
The second is to press Win Key+R, type CMD, and Ctrl+Shift+Enter to Run as Administrator. The User Account Control window appears to click Yes to continue.
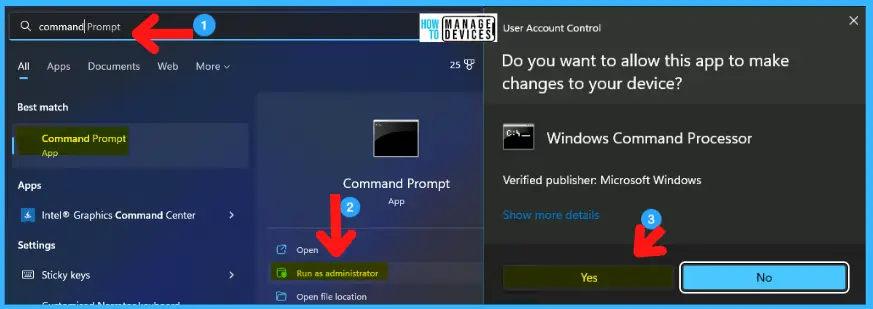
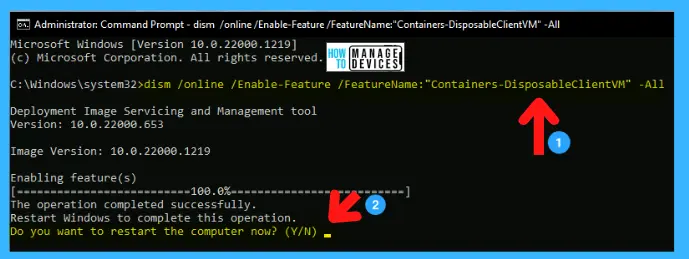
When the Administrator Command Prompt window appears, you can insert the following command and press ENTER. Then the activation was completed, and the message seemed to restart your device to apply the changes; type Y to continue.
dism /online /Enable-Feature /FeatureName:”Containers-DisposableClientVM” -All
Disable Sandbox Feature using Command Line
You can also disable the sandbox feature by using the command below and following the above process.
dism /online /Disable-Feature /FeatureName:”Containers-DisposableClientVM” -All
Group Policy to Control Windows Sandbox Features
Let’s check the Group Policy to Control Windows Sandbox Features. You can check the following group policies and let’s check each of these policies. There are 6 Windows Sandbox group policies for Windows 11.
You can configure this group policy from Domain controllers as explained in the following post or in the local group policy settings using GPEDIT.MSC. For more details on Domain Level and local group policy settings – Microsoft Edge ADMX Group Policy Templates.
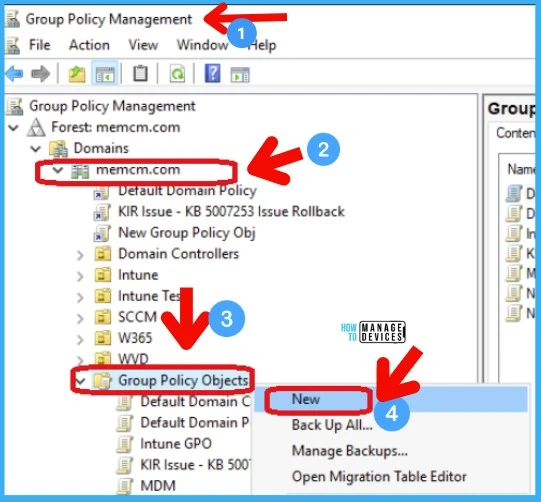
Group Policy Path for Windows Sandbox – “Computer Configuration/Administrative Templates/Windows Components/Windows Sandbox” to reach the proper location to perform the desired task.

Allow Audio Input in Windows Sandbox – This policy setting enables or disables audio input to the Sandbox. If you enable this policy setting, Windows Sandbox will be able to receive audio input from the user. Applications using a microphone may require this setting.
Allow Clipboard Sharing with Windows Sandbox – This policy setting enables or disables clipboard sharing with the sandbox. If you enable this policy setting, copy and paste between the host and Windows Sandbox are permitted.
Allow Networking in Windows Sandbox – This policy setting enables or disables networking in the sandbox. You can disable network access to decrease the attack surface exposed by the sandbox.
Allow Printer Sharing Windows Sandbox – This policy setting enables or disables printer sharing from the host into the Sandbox. If you enable this policy setting, host printers will be shared into Windows Sandbox. If you disable this policy setting, Windows Sandbox will not be able to view printers from the host.
Allow VGPU Sharing for Windows Sandbox – This policy setting is to enable or disable the virtualized GPU. If you enable this policy setting, vGPU will be supported in the Windows Sandbox. If you disable this policy setting, Windows Sandbox will use software rendering, which can be slower than virtualized GPU.
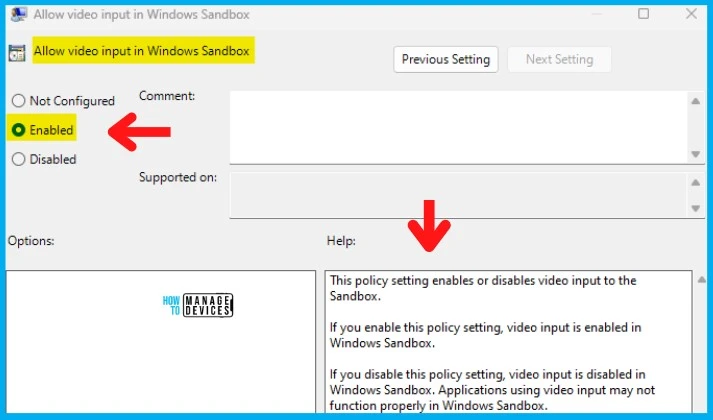
Allow Video Input in Windows Sandbox – This policy setting enables or disables video input to the Sandbox. If you enable this policy setting, video input is enabled in Windows Sandbox. If you disable this policy setting, video input is disabled in Windows Sandbox. Applications using video input may not function properly in Windows Sandbox.
Control Windows Sandbox Using Intune Policy
Let’s look at Intune policy options to control Windows Sandbox features. We have already seen how to disable or enable Windows Sandbox in this post using PowerShell, Command Prompt, and Manually.
Let’s check the Intune Setting catalog policy options to Enable or Disable Windows Sandbox on Windows 11 devices. You can go through Intune Settings Catalog Guide to create the policy in detail. However, for this context, search with the Sandbox keyword.
NOTE! – There is no direct Intune policy to control the Sandbox feature on Windows 11. However, there are some Microsoft Edge or Chrome browser settings for Sandbox.
NOTE! – More details on Intune settings catalog guide – Create Intune Settings Catalog Policy.
- Open Intune admin center portal, select Devices
- Select Configuration Profiles
- Select Create Profile -> Windows 10 and later -> Settings catalog -> Create
- Click on the + Add Settings link.
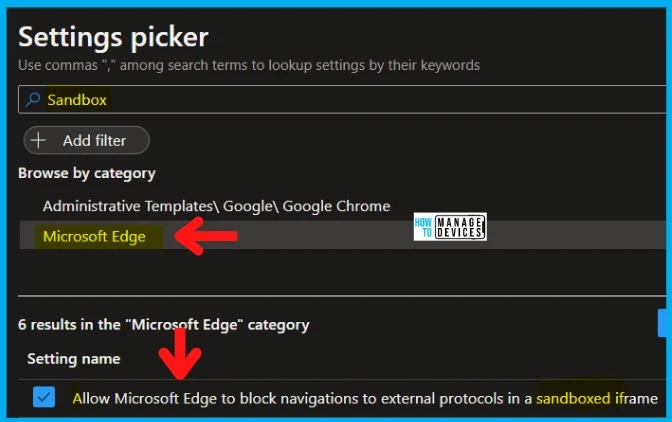
- Search with “Sandbox” in the Settings picker search box.
- Select the Microsoft Edge or Google Chrome Category.
- Microsoft Edge uses Sandbox feature options from the Settings name section.
- Keep the policy’s settings DISABLED or ENABLE if you want to.
- Go through the Settings Catalog creation guide above to complete the process.
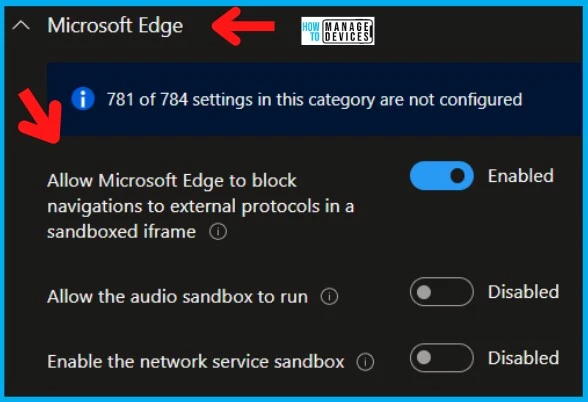
There are no Windows Sandbox policies available in Intune settings catalog. However, there are some Microsoft Edge policies that use Windows Sandbox features. The following is the list of MS Edge sandbox policies that you can configure from Intune.
- Allow Microsoft Edge to block navigations to external protocols in a sandboxed iframe
- Allow the audio sandbox to run
- Enable the network service sandbox
NOTE! – Microsoft Edge will block navigations to external protocols inside a sandboxed iframe. If you enable or don’t configure this policy, Microsoft Edge will block those navigations. If you disable this policy, Microsoft Edge will not block those navigations. This can be used by administrators who need more time to update their internal websites affected by this new restriction. This Enterprise policy is temporary; it’s intended to be removed after Microsoft Edge version 104.
Windows CSP to Control Sandbox Features
The following are the Windows CSPs available for controlling the use of Windows Sandbox. Even though you don’t have these settings in Intune as discussed above, you can try Intune Custom policies using OMA-URI.
WindowsSandbox/AllowAudioInput
WindowsSandbox/AllowClipboardRedirection
WindowsSandbox/AllowNetworking
WindowsSandbox/AllowPrinterRedirection
WindowsSandbox/AllowVGPU
WindowsSandbox/AllowVideoInput
Windows Sandbox Environment
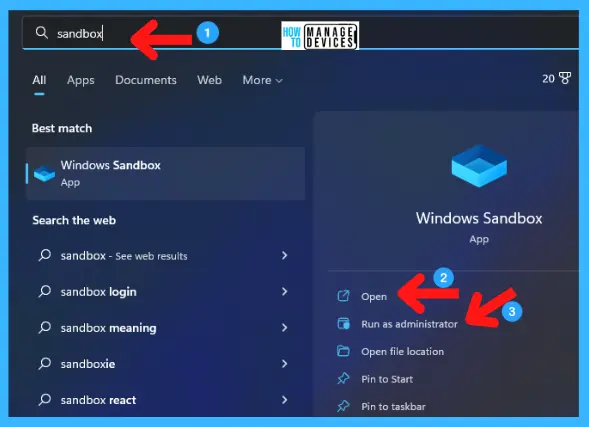
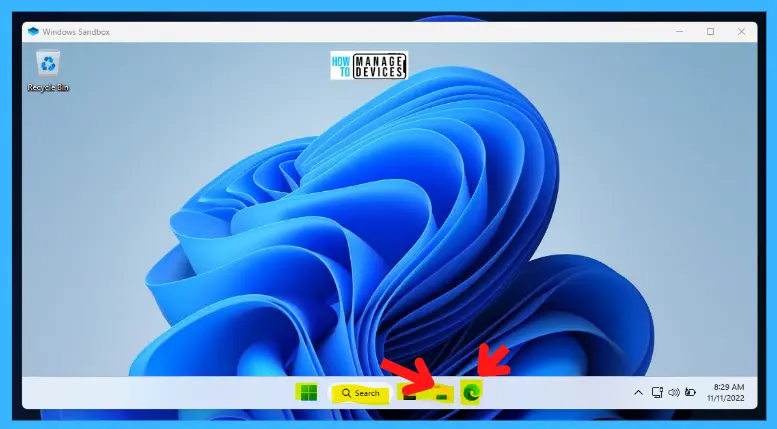
When you successfully install the Windows Sandbox app into your device, let’s check how it works. To open sandbox, go to Search Box on Taskbar and search for Windows Sandbox app by typing sandbox. The app appears, and click it to open.
Now the Windows Sandbox environment opens; it looks like a normal window containing folder app, Microsoft Edge, etc., preloaded. You can install a program in it to check, or you may download any program from its MS Edge Browser to examine the app.
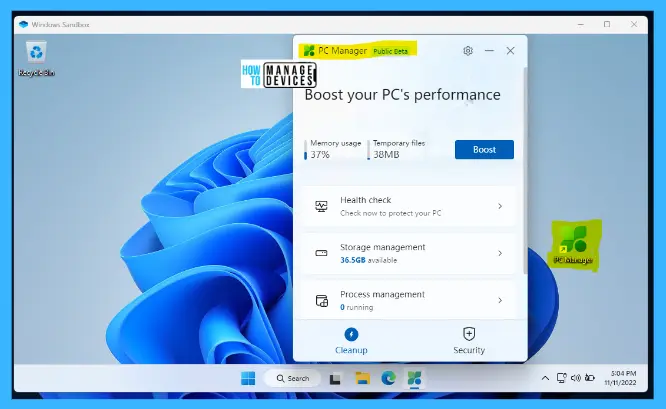
For testing purposes, install PC manager by downloading via MS Edge Browser. Install and run it in the sandbox environment to check whether it works perfectly. The application works perfectly in the sandbox environment.
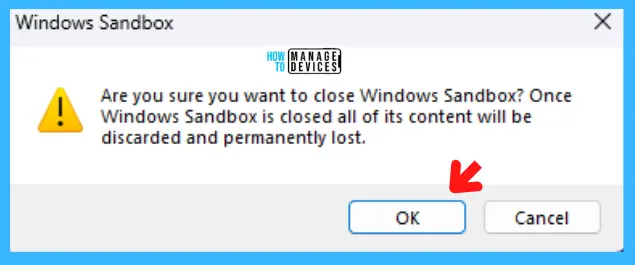
When you click on X on the right top corner to close the Windows Sandbox, a message pop-up will appear: Are you sure you want to close the Windows Sandbox? Once Windows Sandbox is closed, all of its content will be discarded and permanently lost; click on OK to close.
Basic Properties of Windows Sandbox
The Windows Sandbox has some basic properties, as it is an isolated system that does not affect any components of your device. The basic properties are:
- The basic requirement to active this feature is your device must Windows 10 Pro and Enterprise and Windows 11 (Windows 11 Home Edition does not have sandbox).
- Whenever you run Windows sandbox, it’s available with a new window.
- All the components or applications installed in the Sandbox were discarded when the application closed.
- Sandbox uses hardware-based virtualization for kernel isolation and relies on Microsoft hypervisor to run a separate kernel that isolates Windows Sandbox from the host.
- Uses the integrated kernel scheduler, smart memory management, and virtual GPU
Basic Requirements Activate Windows Sandbox
To run Windows Sandbox in your system there is some basic requirements needed, detailed below:
- Windows 10 Pro, Enterprise or Education build 18305 or Windows 11 (Windows Sandbox is currently not supported on Windows Home edition)
- Virtualization Capabilities enables in BIOS
- Minimum 4 GB of RAM required (8 GB recommended)
- Minimum 1 Gb of free disk space required (SSD recommended)
- Two CPU cores is the basic need (four cores with hyperthreading recommended)
- AMD64 or ARM64 architecture required
That’s about the procedure to enable or disable Windows Sandbox described above. Please follow us on Twitter HTMD Community and visit our website HTMD Forum if you like our content.
Author
Alok is a Master of Computer Applications (MCA) graduate. He loves writing on Windows 11 and related technologies. He likes to share his knowledge, quick tips, and tricks with Windows 11 or Windows 10 with the community.

I followed the procedures but when I launch sandbox I just get a white box with a giant red X in it, how would I resolve this, are there any registry settings I need to change to get this working?