Let’s learn the 11 New Features in Microsoft Teams – February Update. The new features are the greatest alteration that helps users carry on their Teams collaborations. The new features ease users’ communication and schedule meetings.
Microsoft Teams provide users with both group and individual messaging. Teams allow users to join and participate in meetings, webinars, etc., easily. Participants can work in Teams according to their time zone without any distractions.
Microsoft Teams gives options to contribute to a workspace and also allows you to reserve sections, share digital content and files, etc. Microsoft Teams is a business collaboration platform and also a cloud-based software.
Microsoft Teams introduced some new features in February. Microsoft Teams is a messaging app developed by Microsoft, and it is a part of the Microsoft 365 family of products. The latest updates are based on Meetings, chats, and collaboration.
What are the New Features in Microsoft Teams – February Update?

Microsoft Teams is a business communication platform. Teams offering workspace chat, videoconferencing, file storage, etc., and Microsoft Teams replaced other apps with their numerous features. The following are the new features sections in Microsoft Teams.
1. Meetings
2. Chat and Collaboration
- Enable Meeting Attendance Reports in MS Teams | View and Download
- 21 New Features in Microsoft Teams – January Update
What are the New Features of Microsoft Teams
Microsoft Teams launched many features in the February update regarding Meetings, Chat, and Collaboration. The new features enhance the capabilities of Microsoft Teams. The following are the new Features of Teams.
A. Meetings
Microsoft Teams Meetings are the main feature that helps the users to join in a meeting and that helps them continue their chats and collaborations. The following are the new features in the Meeting section.
- Co-manager Breakout Rooms
- Accessibility Settings
- Sign Language Prioritization
- Instant Poll Suggestions
- Multi Question Polls
- Add Images into Multiple Choice Question
Note! – New classic free version of the Microsoft Teams application to launch next month will get big performance improvements. The Performance improvements include an Improved video conferencing platform, improved system resource usage on PCs and laptops, use of 50 percent less memory, taxing the CPU less, and result in better battery life on laptops.
1. Co-manager Breakout Rooms
Microsoft Teams allows users to Co-manager Breakout Rooms. Breakout rooms are the facility Microsoft Teams provides to the users to gather people in small groups for lively conversations and brainstorming sessions.
It is difficult to have open discussions and meaningful exchanges of ideas during meetings, especially in small gatherings. Breakout rooms in meetings overcome this problem. The following screenshot and list show how to enable breakout rooms in meetings.
- Open Microsoft Teams on your PC
- Select the People option in the top navigation bar of the window
- Click 3 dots (More Options) menu from the meeting participant
- Click “make an attendee” from the below window
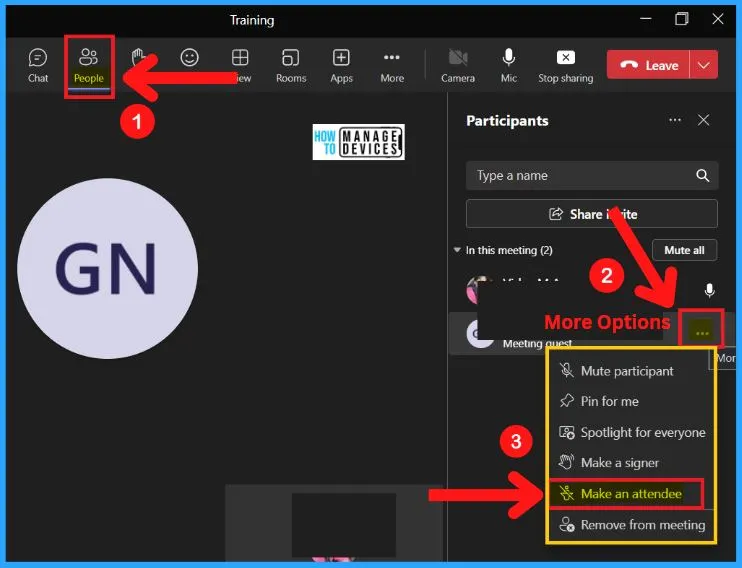
After selecting make an attendee from meeting participants, you can change the role of the participants from the below window. Microsoft Teams allow users to change their role in breakout rooms. It helps to share content, mute others, and more.

Breakout rooms can enable easily in Microsoft Teams. It helps to enhance your discussions and ideas in a meeting. The below list and screenshot show how to allow breakout rooms in Microsoft Teams.
- Select the Rooms option from the Teams meeting window
- Enable the “Automatically” option from the Breakout rooms
- Click “Create rooms” from Breakout rooms
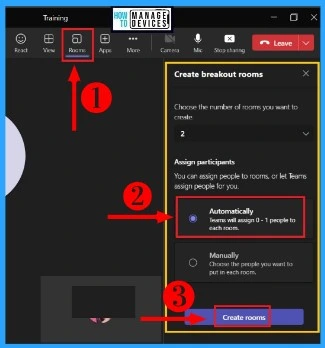
After creating spaces, you can easily change the settings of assigned participants. In settings, users can change the role of the participants at any time. The following steps and screenshot show setting up participants in breakout rooms.
- Select the Rooms option in Microsoft Teams
- Click the Settings icon of Breakout rooms
- Click on Open
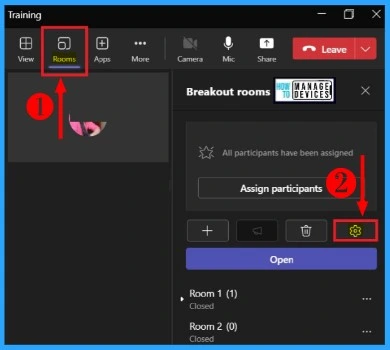
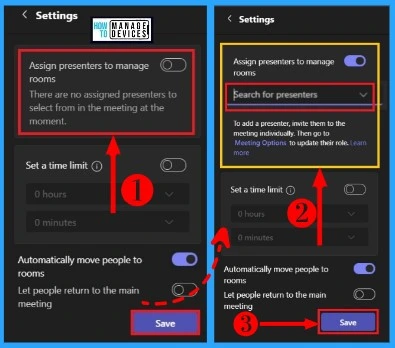
The below screenshot shows the settings features for assigning participants to breakout rooms. It includes assigning presenters to manage rooms, setting a time limit, automatically moving people to rooms, etc. The following screenshot shows how to give participants to breakout rooms.
- Rooms > Settings > Open
- Enable “Assign presenters to manage rooms” by toggle the pane to the right side
- Click on the Save button from the below window
- Clear Microsoft Teams Cache on Windows 11 | Android
- New Features in Microsoft Teams August September Update
2. Accessibility Settings
The accessibility option in Microsoft Teams helps users be inclusive in live events and will also help people with disabilities. Accessibility settings allow all types of participants to join easily in Team meetings.
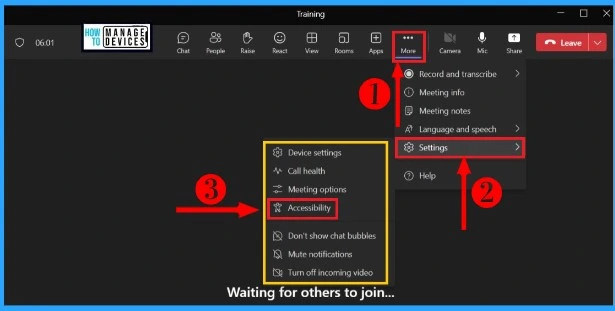
The accessibility option includes turning on captions and transcriptions for meetings and calls, live captions for meetings, transcription for calls, etc. The below list and screenshot show how to enable Accessibility settings in Microsoft Teams.
- Open the Microsoft Teams on your PC
- Go to Calendar > select a meeting and then click Meeting options
- Select the More option in the top navigation bar of the window
- Click on settings and select Accessibility
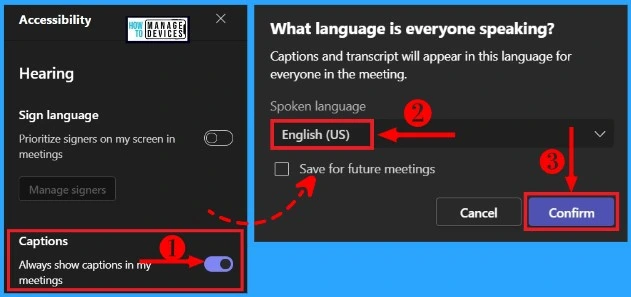
The Accessibility option helps you to enable sign language and Captions. You can easily Enable Captions by toggling the pane to the right side. It allows you always to show captions in your meetings. After enabling Captions, you can select your spoken language.
- Select your spoken language from the below window (by default English US)
- Click on Confirm
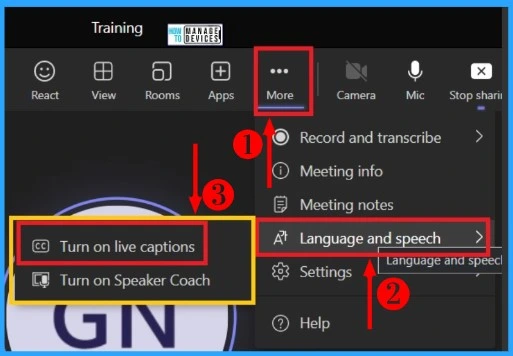
Accessibility options also enable live captions on your meetings in another step. The following steps help you to turn on live captions.
- Select the More option in the top navigation bar of the window
- Select Language and speech
- Click on Turn on live captions
3. Sign Language Prioritization in Teams Meeting
Sign Language Prioritization is the best feature Teams provides that helps users with disabilities. Prioritization in Sign Language helps them to understand and participate in meeting discussions easily.
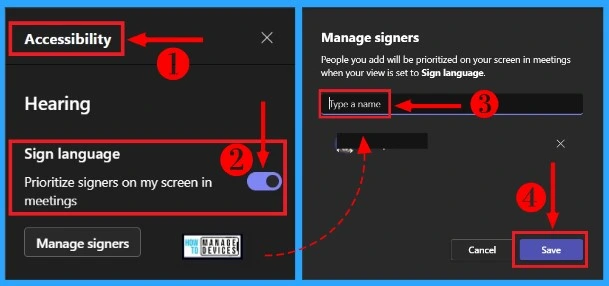
By enabling sign language prioritization, users can easily suggest people with disabilities. The below list and screenshot show how to allow Sign Language Prioritization in Teams.
- More options > Settings > Accessibility
- Enable Sign language by toggling the pane to the right side
- Select a Name to add people to prioritize in the meeting from the 2nd window
- Click on Save to enable prioritization
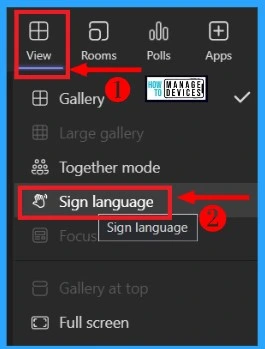
You can easily select Sign language also from the View menu. After selecting Sign language from the view menu, the screen will be more prioritized. The below window shows how to choose Sign Language from the View menu.
4. Instant Poll Suggestions
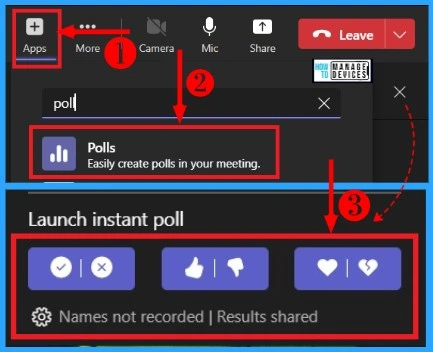
Instant Poll is the best feature of Microsoft Teams that helps users to launch polls immediately. It also helps to get an immediate answer. Instant polls include check mark- cross mark, thumbs up-thumbs down, heart- a broken heart, etc.
It helps to provide one-click instant binary polls. The below steps and screenshot show how to enable Instant polls.
- Open Microsoft Teams on your PC
- Select the Apps option from the top navigation bar of the meeting window
- Click on the polls App from the below window
- Select launch Instant polls options from the below window, such as checkmark- cross mark, thumbs up-thumbs down, heart- a broken heart, etc.
5. Multi Question Polls
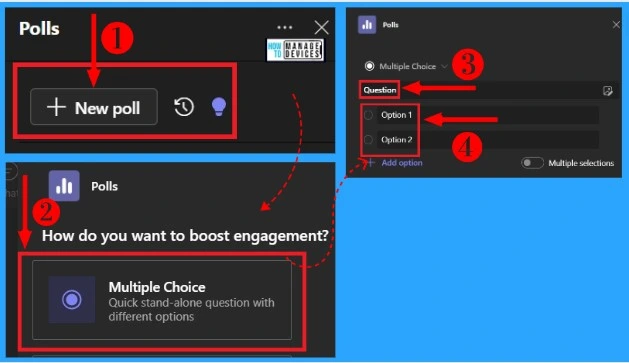
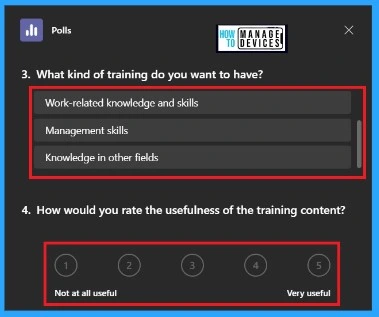
Multiple Questions polls in Microsoft Teams help to get an immediate answer to Multiple choice questions. It allows users to select various solutions to a single question. The below list and screenshot show how to enable multiple-question polls.
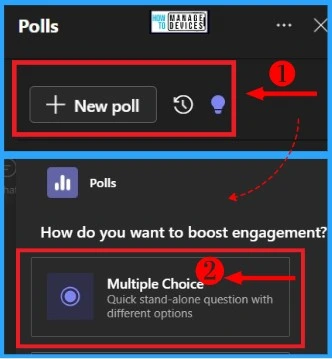
- Select a New poll from the polls App.
- Click on the Multiple choice option from the below window to quick stand-alone questions with different options
- Select any Question and click any options of your choice
Multiple Question polls also allow users to add questions from suggestions. You can select more questions from the below window as follows. The Multiple choice has different types of questions with other options.
- Select Add question from the below window
- Click on Launch now to add questions to the Poll
- Select Option 1 for the first question
- Select any Answer for the second question from the window
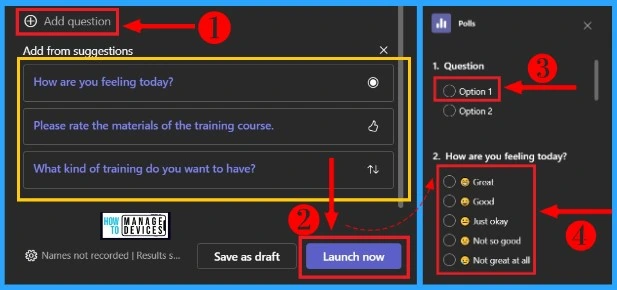
Select the Third and fourth questions from the below window. Different variety of different answer options is available for every question. Users can select answers as their choice.
6. Add Images into Multiple Choice Question
The poll option in Microsoft Teams helps you to provide Images for Multiple Choice Questions. It allows the users to understand the answers of the participants easily. The below steps and screenshots help you to add images for multiple-choice questions.
- Select New Poll from the below window
- Click on Multiple Choice from the polls App
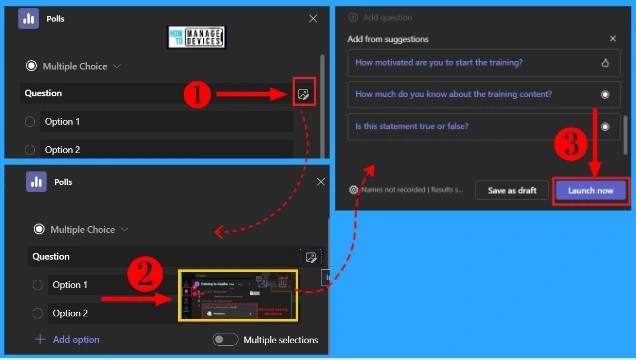
You can select Add image option easily from the below window. Select the image icon from the right side of the 1st screenshot. Clicking the image icon will lead you to the file explorer screen, and you can easily select the image from your File Explorer window.
- Click on Launch now option from the window
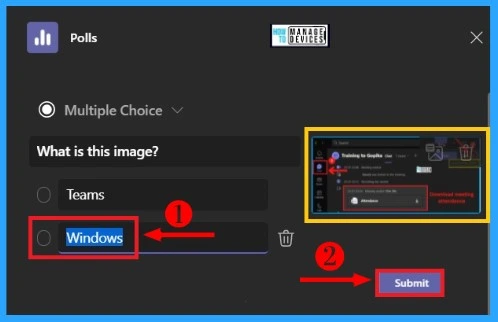
After selecting the image from your PC, type the question and provide different answer options. Here we are providing a picture and a question related to the image. Provide different answer options for the question.
- Click one of the Answer options from the below window
- Click Submit button from the Polls window
- Use Microsoft Whiteboard in Teams Meetings | Download and Install | Best Guide
- Region to Share Option in MS Teams for a Better Sharing Experience on Wider Monitors
B. Chat and Collaboration
Chat and collaboration in Microsoft Teams allow users to chat and collaborate. It helps the users to develop workforce conversation, collaborative teamwork, video chat, etc.
Chat and collaboration include Delete chat, Chat with the group or DL, quickly adding people to an existing chat, Auto suggests people for a chat, expanding reaction emoji types, etc.
- Delete Chat
- Chat with the Group or DL
- Quickly Add People to an Existing Chat
- Auto Suggests People for a Chat
- Expand Reaction Emoji Types
1. Delete Chat
Delete Chat is the facility Microsoft Teams provides to Delete chat conversations from your chat list. However, the deleted Chat will remain for the other group or meeting participants.
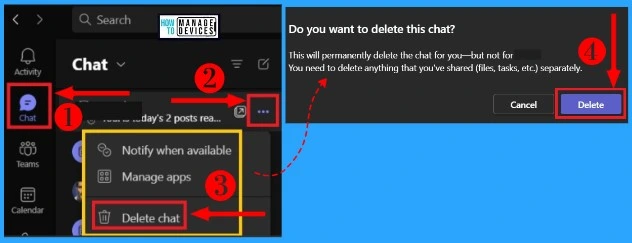
The other will see that you have left the meeting or group chat. The deleted Chat will be permanently deleted from all your devices. The following list and screenshot show how to delete a chat from your device.
- Start menu > MS Teams
- Select the Chat tab from the Left side of the Teams screen
- Select a chat from chat history that you want to Delete
- Click on 3 dots (More options) on the right side of a particular chat section
- Click on Delete chat from the below window
After clicking the Delete chat option, a window will appear and show that “This will permanently delete the Chat for you but not for the deleted person’s side. You can delete anything you have shared, such as files, tasks, etc., separately.
- Click the Delete button from the pop-up window to delete the Chat permanently
2. Chat with the Group or DL
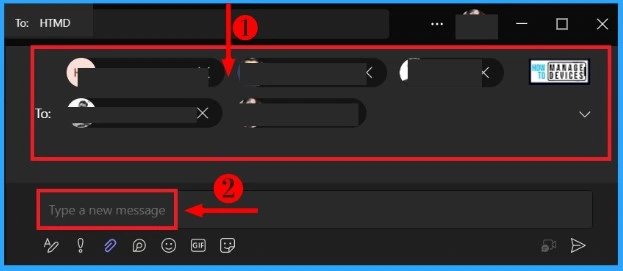
Chat with the Group or DL option in Teams allows users to chat with a group or distribution list. You can search for any chat in the search box easily. The below list and screenshot show how to chat with the Group or DL.
- Select the Chat tab from Microsoft Teams
- Click on the New chat icon on the top right corner of the chat window
- Search any chat in the search box and also add two or more to the chat group

In the below window, you can see the group members of your selected Chat. You can chat with the group members easily by typing the message in the Type a new message section and clicking the arrow from the below window to send the message.
3. Add People to an Existing Chat
Microsoft Teams allows users to add people to an existing chat quickly. Adding people to an Existing chat is an important feature in MS Teams. Adding a person to a meeting is sometimes very hard.
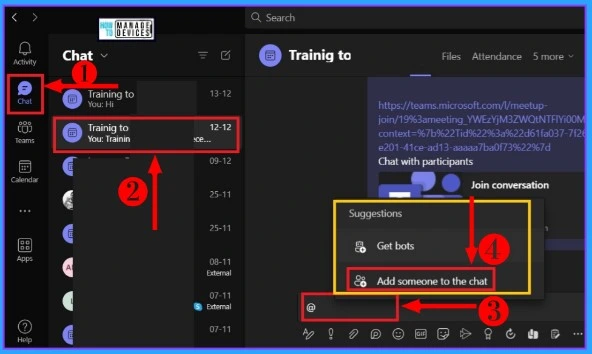
Adding people to an existing chat feature in Teams helps users easily enter a chat. The below list and screenshot show how quickly add people to a current chat.
- Select Chat from Microsoft Teams
- Search any group in the search box and open the group
- Type @ in the “Type a new message” section in Teams
- Click on the “Add someone to the chat” option from the below screen
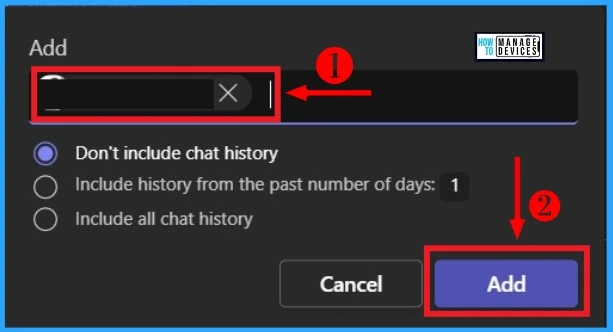
After clicking the “Add someone to the chat” option, the below window will appear and show the add section, and it also includes a set of Enable and Disable options shown in the table below. Quickly adding people to an existing chat is the best feature and helps save time.
- Turn ON “Don’t include chat history“
- Click the Add button to Add someone to the Chat
| Add someone to the chat option | Enable / Disable |
|---|---|
| Don’t include chat history | Enable |
| Include history from the past number of days | Disable |
| Include all chat history | Disable |
4. Auto Suggests People for a Chat
Auto suggests People for a Chat is a useful feature that helps users easily select a person in a chat. This feature allows the users to offer a person for a discussion. The below list and screenshot show how to auto-suggest a person for a chat.
- Select the Chat tab from Microsoft Teams
- Click on the New Chat icon on the top right corner of the chat window
- Select a person from the Suggested list

5. Expand Reaction Emoji Types
Expand Reaction Emoji is the best feature of Microsoft Teams. It helps the users to express their opinions, feedback, etc. The below list and screenshot show how to expand reaction emoji in Teams Chat.
- Select the Teams tab from Microsoft Teams
- Click on emojis from the window
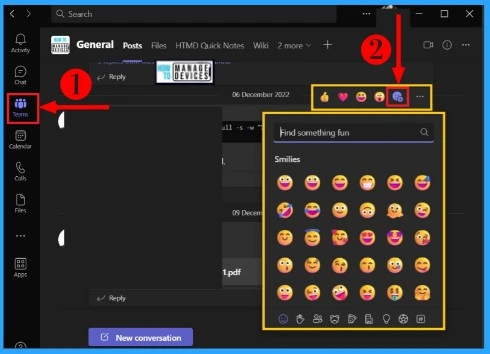
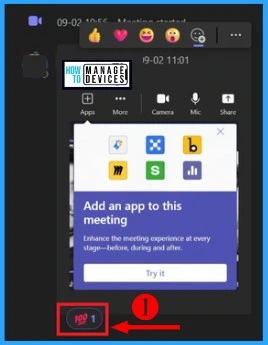
The below window shows the Reaction given in the Teams window. It helps to know the opinions of everyone. Expand Reaction Emoji is the best feature in Microsoft Teams. The below window shows my view (100%) about the message in Teams Chat.
Author
Gopika S Nair is a computer enthusiast. She loves writing on Windows 11 and related technologies. She is here to share quick tips and tricks with Windows 11 or Windows 10 users.
