Let’s learn how to Create a 3D Avatar in Microsoft Teams Meeting | Best Guide. Microsoft always introduces great updates; this time, Microsoft comes with a new update in Microsoft Teams. The Microsoft Teams introducing New Avatar is exciting news for you all. Avatar is a visual treat for all of us in an animated vision. Microsoft Teams give you much-needed camera breakthrough Avatars.
Here, you will get the complete guide for all about the Avatars. Microsoft has been testing avatars for quite some time, so Avatar has been in preview mode for the past few months. The Microsoft Mesh platform powers avatars. The team’s Avatar is going to be a wonderful experience for you.
Microsoft Teams, this time, allow avatars for Teams meeting. Avatar is now available in a public preview and is mainly for those who don’t want to show faces in meetings. It is entertaining for the look vise. You can add a new layer of choice to your meetings.
In Avatar, you can easily collaborate with people in 3D Avatars if the meeting is personal or professional. In team meetings, you can represent yourself how you want with your Custom-made Avatar. In this update, you can see many changes in avatar performance and Customization.
What are the Features of Avatar?
Avatar is the greatest feature introduced by Microsoft Teams recently. Users can easily participate in Microsoft Teams Meeting Using Avatar instead of showing their faces. The below list shows the advantages of Microsft Teams Avatar.
1. Helps to participate in Teams Meetings actively
2. Helps to represent themselves with Avatar
3. It allows you to Customize your Avatar
4. You can give a reaction in meetings
5. Support Different languages
How to Get Started 3D Avatar on Microsoft Teams
Microsoft Teams is introducing new features on the New update of Avatar. Avatar only aims to enhance the connection with people in the meeting and collaborate with them. If you are not interested in showing your face in meetings or your background is unsuitable for the video conference, you can quickly make your Avatars.
It is very easy to customize Avatars; you can use these avatars in your personal or work-related Meetings. The below list and screenshot show how to enable and Customize Avatars in Microsoft Teams.
- Select Microsoft Teams from Start Menu
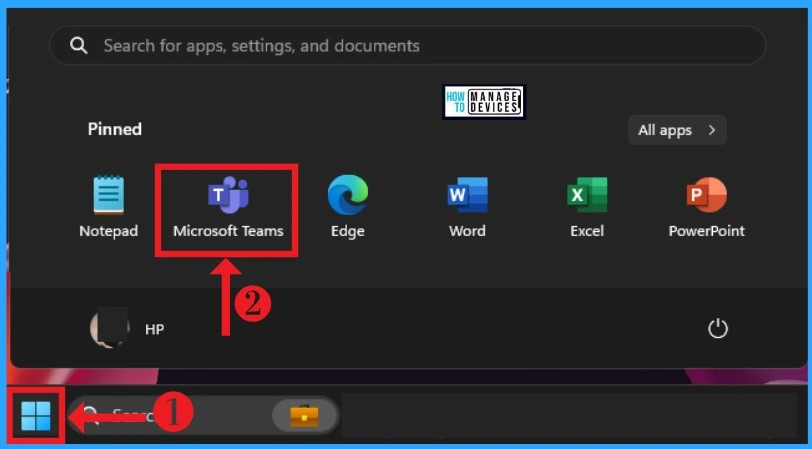
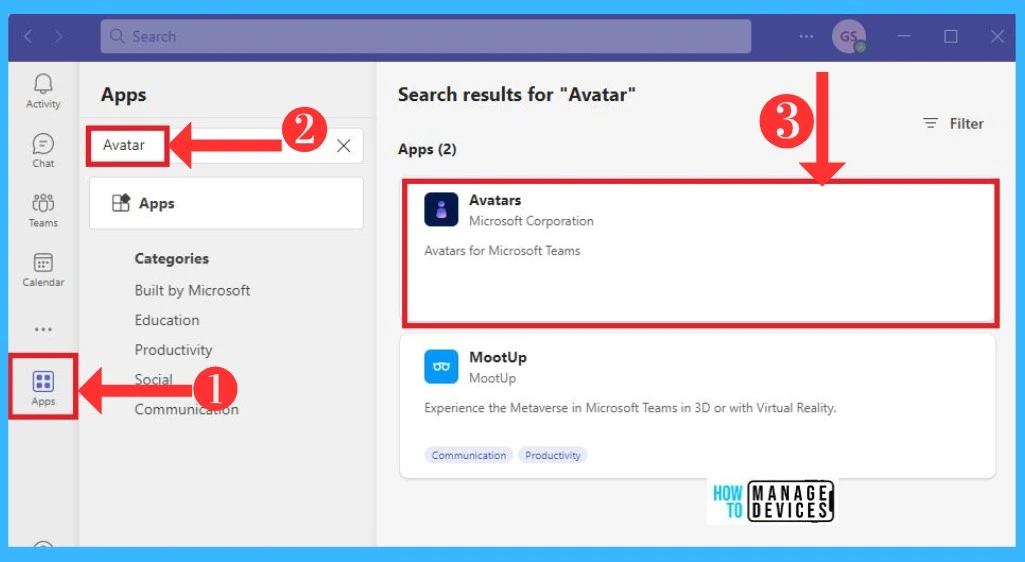
After Selecting Microsoft Teams from Start Menu, you can select the App option from the Teams App. In-app option, you can search for Avatars; it is very easy to find Avatars in the search box. The below screenshot guide you to Search for Avatar
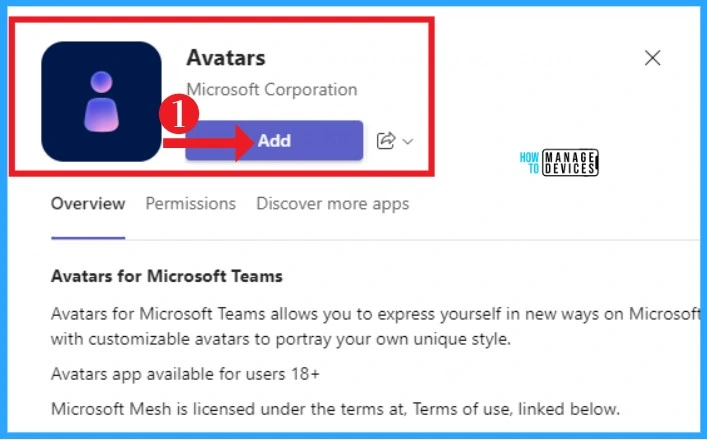
After searching, you can get the Avatar app. If you are not installed Aavatar, you can go through the Add option and install Avatar. The below screenshot will help you to Get Avatar in Microsoft Teams.
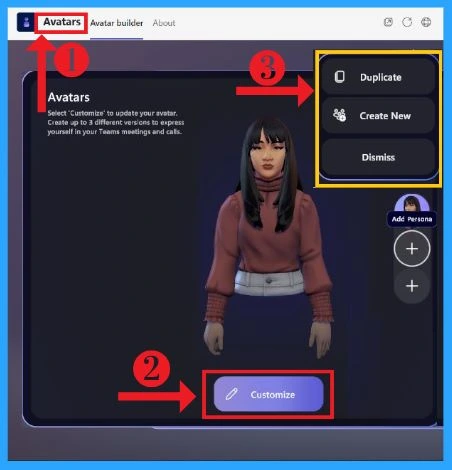
Avatar installing procedure is so easy; you can get the avatar window with a customization option after installing. You can get an Avatar already there by default in the customization window. If you are unsatisfied with that, you can customize your Avatar.
- The other option is a ”+” button to create Dupe Avatars, and you can create many other Avatars. The following screenshot will show you customizing the Window.
After Clicking on the Customize Button, you are ready for the Customization, and the other Window will display on your screen. The next Window contains the base step of an Avatar. That Window allows you to select your loved Avatar, and there are different kinds of Avatars you can use as a base for Avatars by clicking ” Use Avatar” The below screenshot will help you.
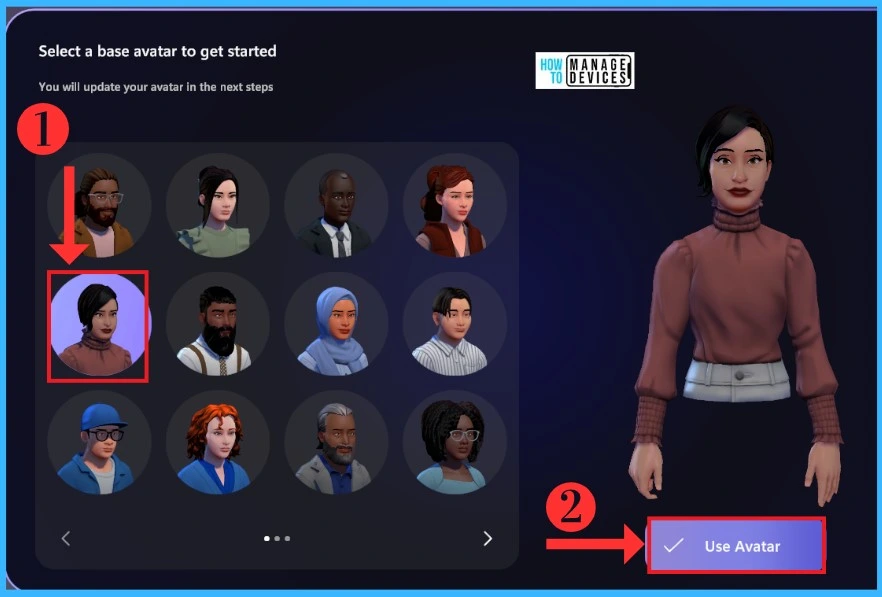
Get Start Customization
Avatar Customization is so easy and wonderful it will give you personal satisfaction in making your Avatars. The updated version of Avatars gives something new in their look vise and features vise.
In Customization, you can see many options and categories to enhance your Avatar’s look. The avatars’ new look gives you a realistic experience throughout the Customization. There are Five categories available for Customization; they are
- Body
- Face
- Hair
- Appearance
- Wardrobe
1. Body Feature on Customization
The body features always feature the Avatar’s body shapes, prosthetics, and skin tone. The Body shape option gives many body shapes for the Avatar. People have different body shapes; you can select your desired body shapes for your Avatar.
- The prosthetic option is used to give artificial hands to the Avatar.
- The other one is skin tone, and there are different kinds of skin tones available in this option.
- The body feature is the first step of your Avatar customization.
A. Body Shape
The body shape feature gives you a perfect look for your Avathar. With this feature, you can decide your body’s Appearance, and many body shapes are available. You can select any shape for your Avatar from the Body shape option and also customize the selected body shape. The below screenshot shows how to customize the body shape.
- Select Body Shape from the Left side of the Window
- Select any Body Shapes you want to customize
- Click on the Customizable option for Body Shape
- Click on the Save button
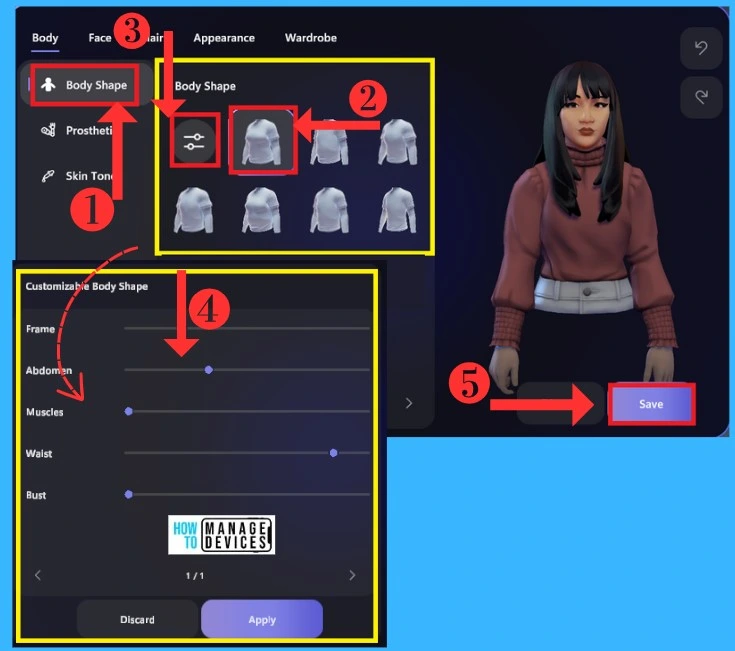
B. Prosthetic
The prosthetic option is used for an artificial hand in an avatar. There are many options for Prosthetics for hands. First, select the Prosthetic option from the left side of the Window and Select any prosthetic hand you want.
In this option, you can select any color for them; many colors are available in the Prosthetic Color Picker. The following screenshot shows a Prosthetic option for Customization.
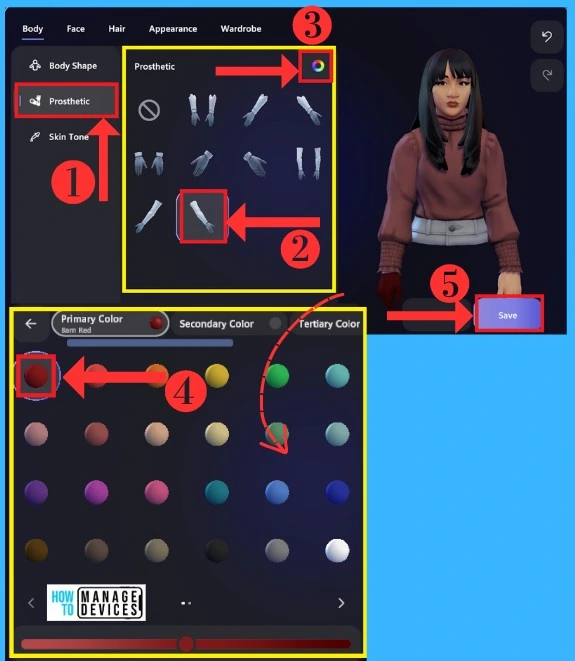
C. Skin Tone
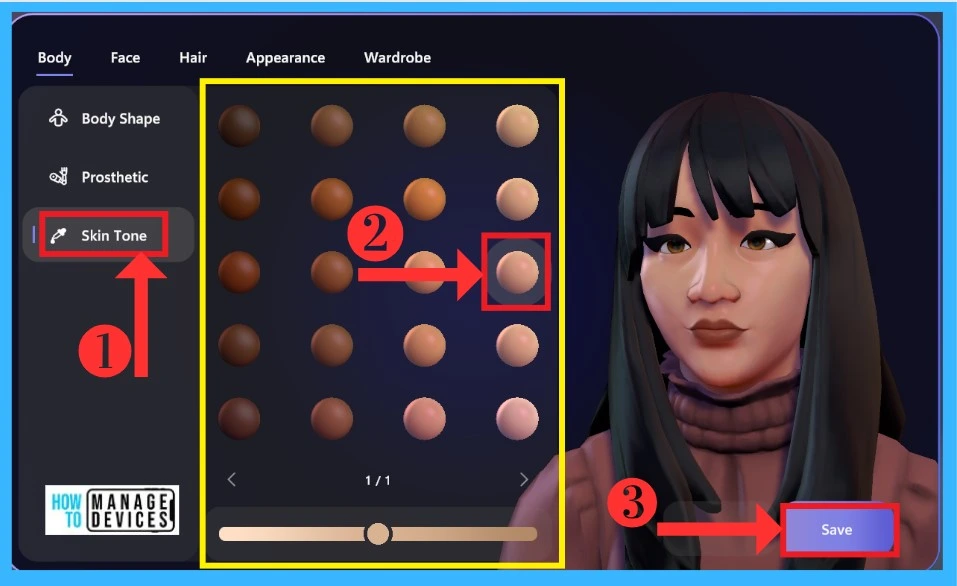
People worldwide have different Skin tones, the same as in Avatar. In this option, you can choose your skin tone, there are many options for you, and you can customize the selected Skin Tone. The following list and screenshot show the Skin Tone options.
- Select the Skin Tone option from the left side on the Window
- Select any Skin Tone you want for your Avatar
- Click on the Save Button from the below Window
- Microsoft Teams Meeting Disconnection CoreError Layout Loading Chung 7520 Failed
- Enable Disable Meeting Chat In MS Teams Meetings
2. Face Option on Customization
The face option is the second category in Customization; the Face option is the main step for creating an Avatar. It will change the entire look of an Avatar. There are six features in the face section, and You can customize them. This Section is all about Face Shape, Eyes, Nose, Mouth, Ears, and Hearing Aids
A. Face Shape
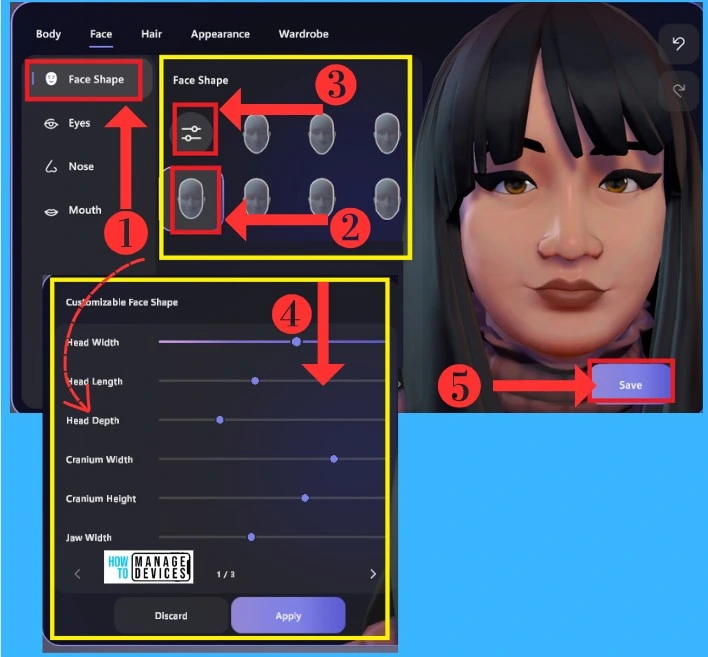
In this option, you can select your face shapes; many options are available in this Section. Peoples have different facial shapes, so this Section is helpful for you in selecting your facial shapes. You can tone your facial shape with the Customizable option after selecting your facial shape. The below screenshot shows how facial shapes are available in the face section and how to use it.
- Select the Face Shape option from the left side on the Window
- Select any face shape for your Avatar
- Click on the Customizable face shape option and Adjust face shapes to your preference
- Click on the Save Button
B. Eyes
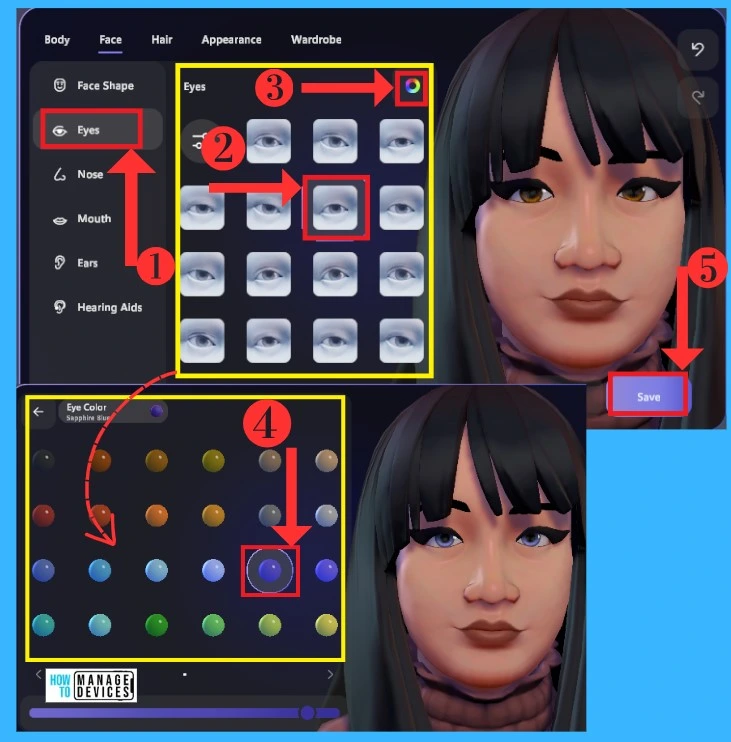
Eyes are the other option in the face section, and many eye shapes are available. You can select your Eye shapes for your Avatar. In this option, eye color could change on your choice; after Selecting an eye shape, you can make a change in eye shapes by using the Customizable option. The following list and screenshot will guide you.
- Select Eyes Section from on the left side of the Window
- Select Eyes to shape for your Avatar
- Click on the Color Picker
- Select a color for the eyes
- Click on the Save Button
C. Nose
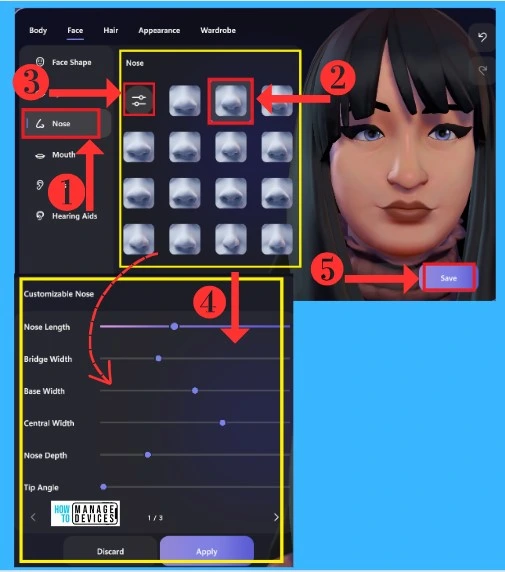
In the Nose section, you can allow to choose your Nose shapes. There are many options for nose shapes; you can edit the selected Nose shape. In the edit option, you can edit the Nose length, bridge width, etc. The following screenshot shows Nose features.
- Select the Nose option from the left side on the Window
- Select Nose shape from the Nose option available on Window
- Click on the Customizable option and adjust the selected Nose
- Click on the Save Button
D. Mouth
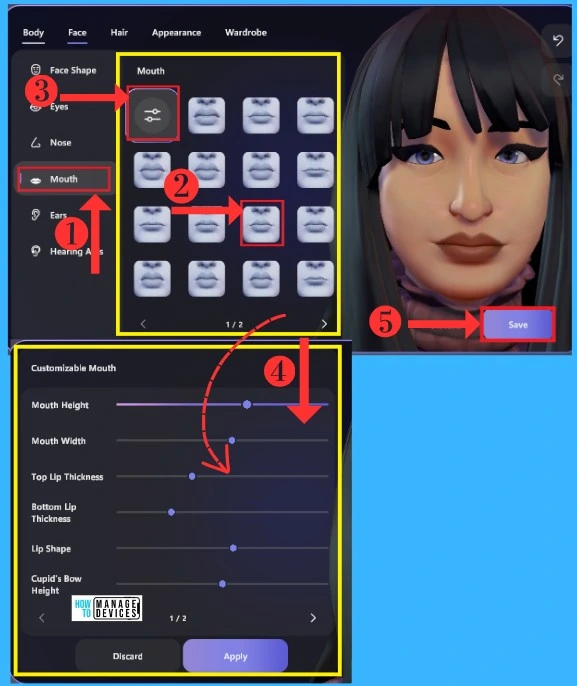
In the Mouth feature, there are many options for you to select your mouth shapes. Select any Mouth shape available from this option after selecting the Mouth section from the left side of the Window.
Your preference with the customizable option can adjust it. In Customizable options, it can adjust Mouth Height, Mouth Width, lip shape, etc. The below screenshot shows the Mouth section.
E. Ears
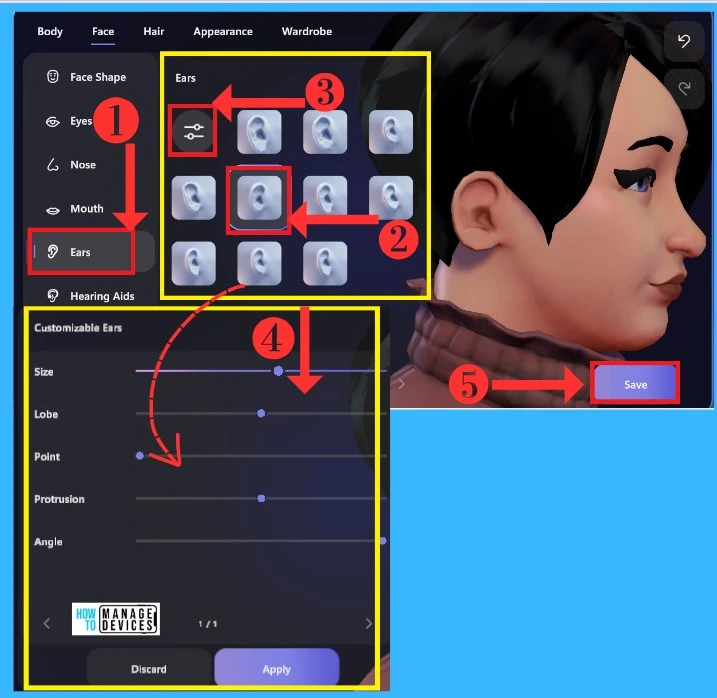
In this Section, you have to select your Ear shapes, and also you can adjust them. The adjustment window allows customizing Ear size, Ear Point, Ear Angle, etc. The following screenshot and list will help you how to adjust Ear shapes.
- Select Ears from the left side on the Window
- Select the Ears for your Avatar
- Click on the Customizable option and adjust the selected Ear
- Click on the Save button
F. Hearing Aids
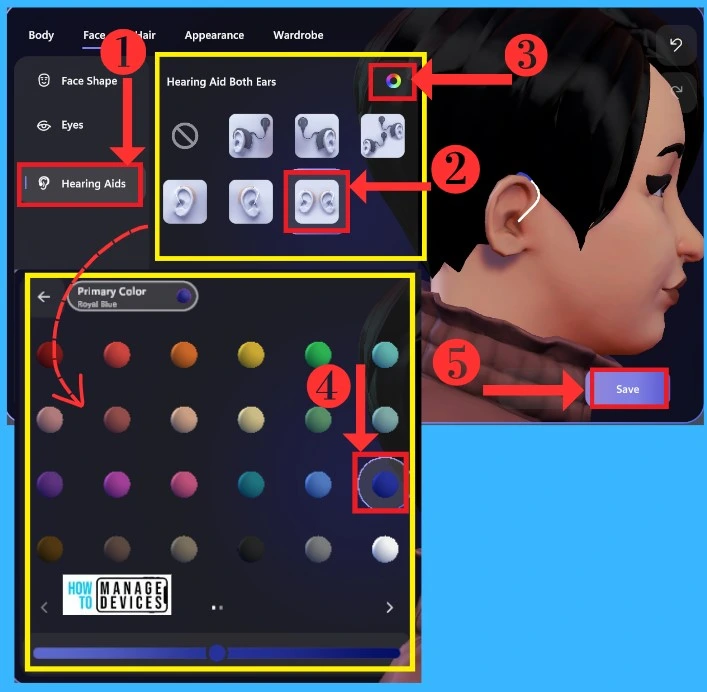
Hearing Aid is an important new feature in Avatar; if a person cannot hear well, wear these Hearing Aids. In Avatar it gave options to you to represent the way you are. There are many options for hearing aid colors. You can choose any of them. The following screenshot shows the Hearing Aid window.
- Select Hearing Aids from the left Side of the Window
- Select Hearing Aids for your Avatar
- Click on the Color picker and select the color you want for your Hearing Aid
- Click on the Save button
3. Hair Option in Customize
The hair option is cool Customization for those who love hairstyles. The Hair Section adds beauty to the whole look of your Avatar. In the hair option, three sections are available: Hair Style, Facial Hair, and Eyebrow. You can easily customize it to your preference.
A. Hair Style
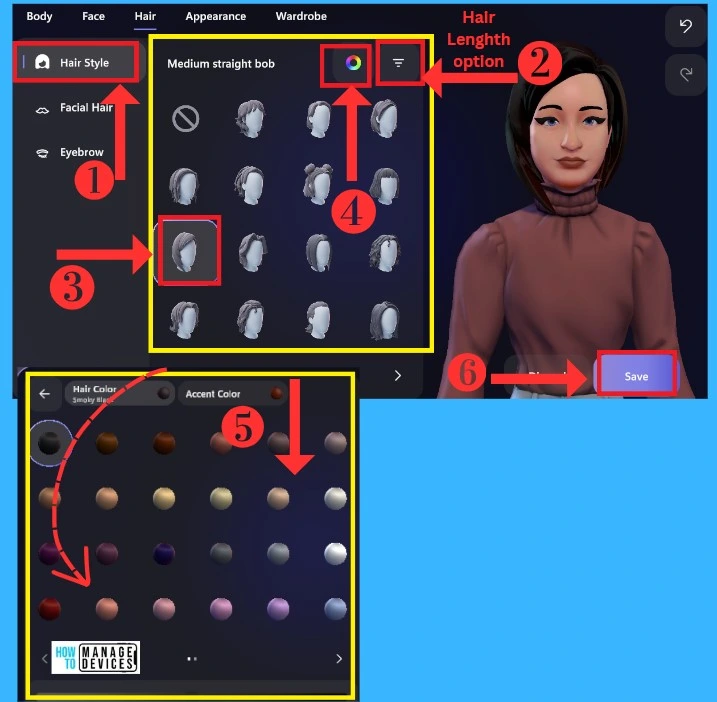
Hair style changes the Avatar look itself; its main specialty is that you can set your hair the way you like. Many hairstyles are available for men and women both. The best feature of this is you can select your hair length in the Filter option. You can also color your hair with your preferred choice of color. The following screenshot will help you.
- Select the Hairstyle section from the Left side of the Window
- Select the Hair Length Option and select any Hair Style you want
- Click on the Color picker and select any color you like for your avatar hairstyle
- Click on the Save Button
B. Facial Hair
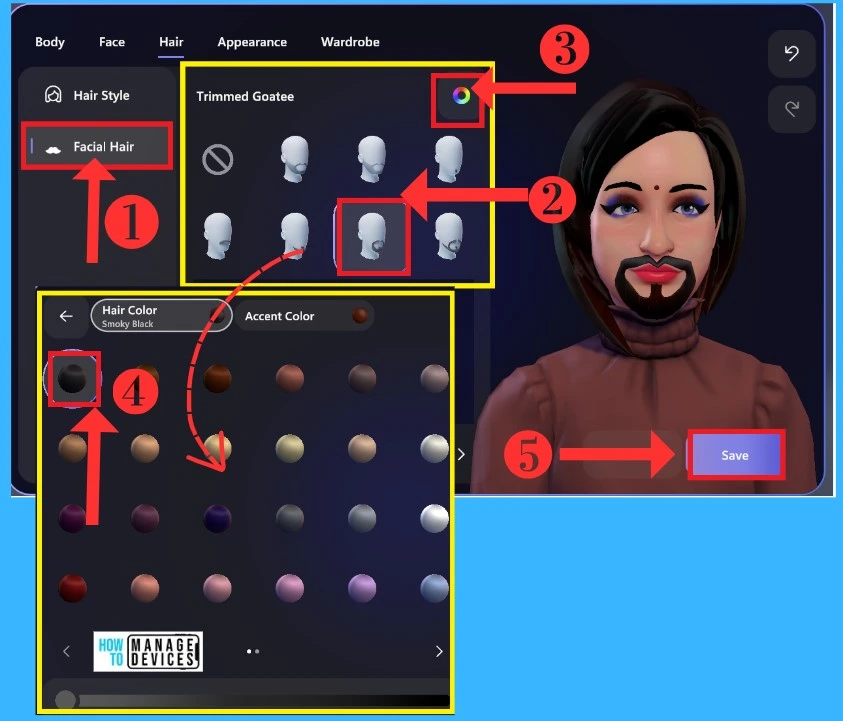
The facial hair section is used for men. In this section variety of Mustaches and beards are available. Facial hair gives a new look to the Avatar. It allows color options for facial hair. The following screenshot shows the facial hair window.
- Select the Facial Hair section
- Select any Facial Hair for your Avatar
- Select the Color Picker and select any color for Facial Hair
- Click on the Save Button
C. Eyebrow
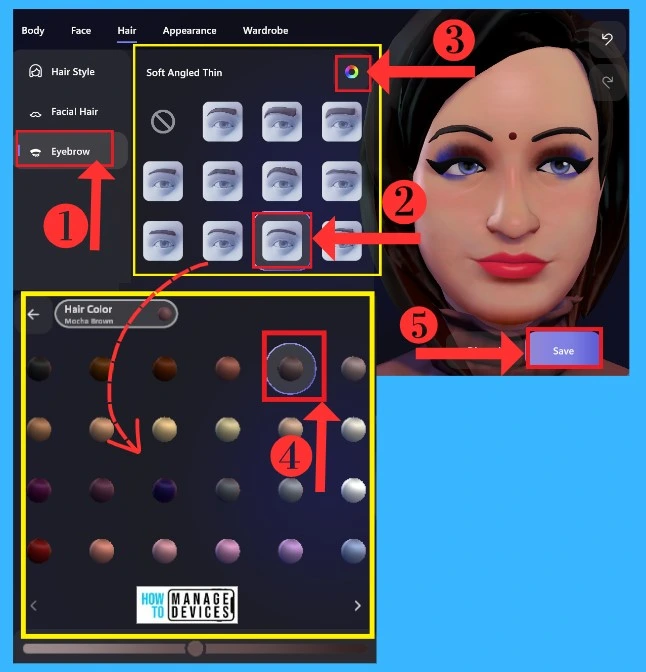
The Eyebrow section is the important part of your face. In hair options, there are various types of Eyebrows available. It allows you to enhance the beauty of your Avatar face. This Section includes all types of Eyebrows used for Men and Women, and you can choose any color.
First, you select the Eyebrow section on the left side of your Window, then select any eyebrows for your Avatar. You can add any colors to the Eyebrows from the Color Picker option. Save your Eyebrows Section after Customizing.
4. Appearance on Customization
Appearance Option on Teams Avatar allows the users to give a new appearance to your Avatar. The Appearance Option gives a new look to the Face of Avatar. You can easily Customize your Avatar with the Appearance option. It helps to enhance the beauty of your Avatar on Teams. The below list shows different options available on Appearance.
- A. Lip Color
- B. Blush
- C. Eyeshadow
- D. Lashline
- E. Face Line
- F. Bindi
A. Lip Color
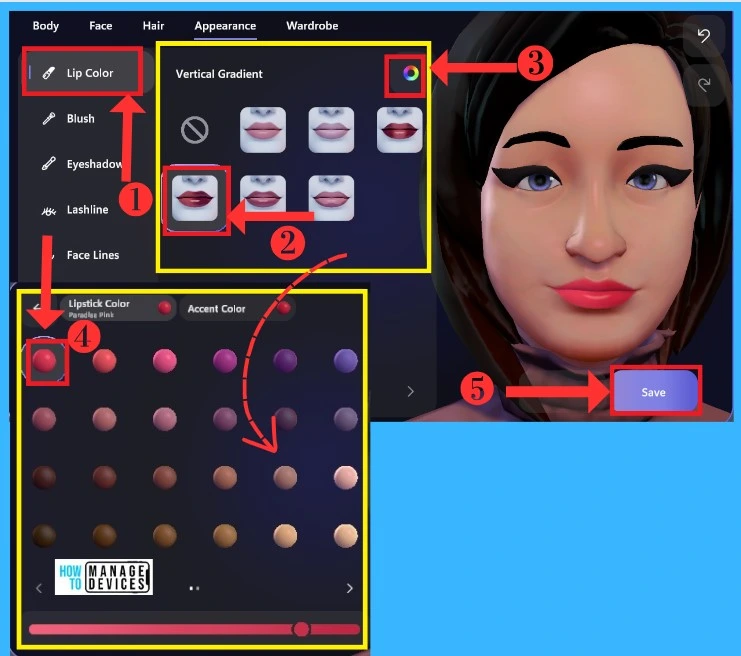
Lip Color is the first option of Appearance on Microsoft Teams Avatar. There are different types of Lip colors available. You can easily change the lipstick color and Accent Color from Color Picker. Lip color Shade also can be increased from Color Picker. The below table and screenshot show the Lip Color of the Appearance Option on Avatar.
| LIP COLOR | Used to |
|---|---|
| Full Lipstick | It helps to give faded color to the outside of the lips |
| Fade In | Used to give fade color to lips |
| Vertical Fade In | Allows giving vertical fade color to lips |
| Vertical Gradient | It is used to give vertical gradient color to lips |
| Fade Out | It helps to give faded color to the outside of the lips |
| Full heart Shape | Allows giving full heart shape to lips |
For adding Lip color go to the Lip color option on the left side of the below window and Select any lip color available on that lip color option. If unsatisfied, select the Color Picker option and add your favorite color to the lip. After completing your Customization, you can Save them
B. Blush on Appearance
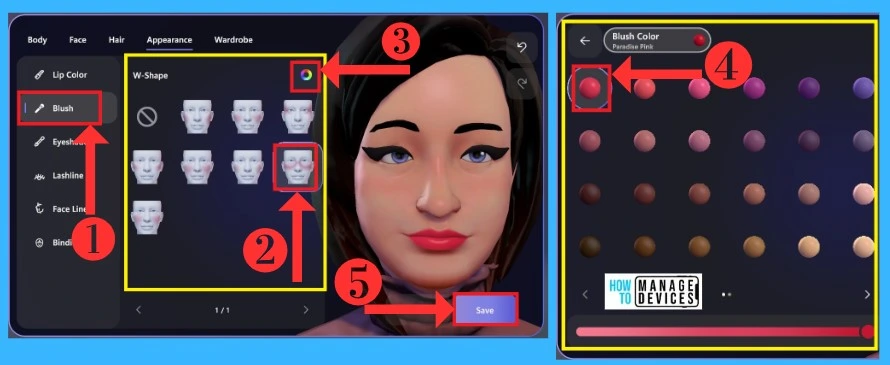
Blush is an important factor in makeup, giving you a fresh look on your Avatar Face. It is used to color your Cheeks. This Blush section gives the Avatar look youthful look. In this Section, you can add any color to the Blush. The below screenshot shows the blush-on Appearance option.
- Select the Blush section from the Left side of your Window
- Select any Blush options for your Avatar
- Click on the Color Picker and select any color for your Blush
- Click on the Save Button
C. Eyeshadow
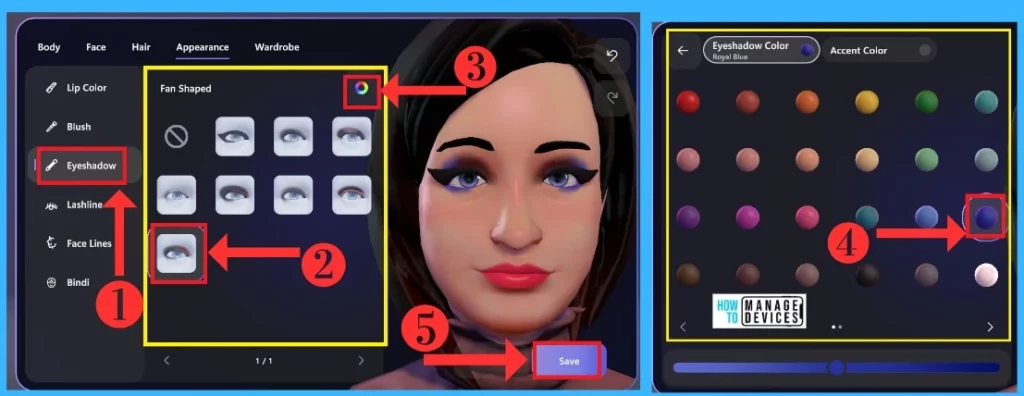
Eyeshadow helps your Avatar look more attractive. It gives attention to the wearers of your Eyes. In this Section, you can choose any color for your Eyeshadow from the Color Picker option for your Avatar.
You can give your preferred color to the Eyeshadow and also give additional colors to Eyeshadow in the Accent color option. The below screenshot shows Eyeshadow options.
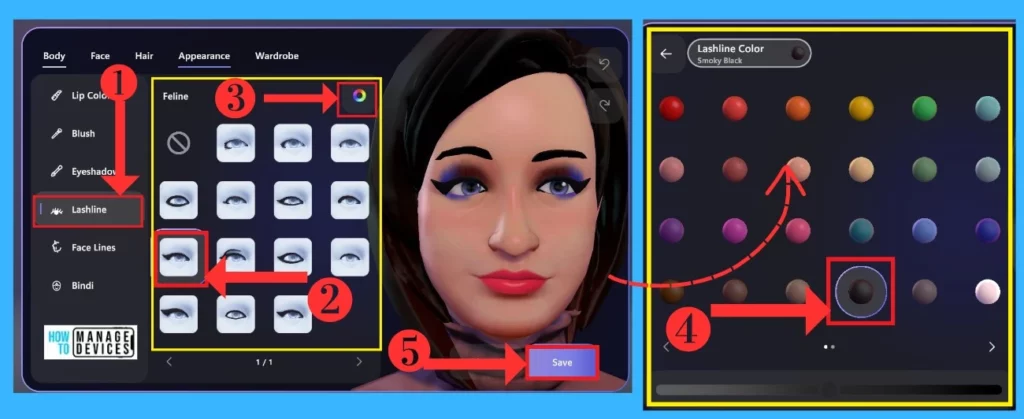
D. Lashline
This option helps you to be more attractive Eyes with these Lashlines. There are many shapes available in the Lashline option. You can select any lash options from the selection window and give any color to the Lashes. The below screenshot shows the Lashline option available
- Click on the Lashline from the left side of your Window
- Select any Lashline that suits your Avatar
- Click on the Color Picker and select any color for Lashline
- Click on the Save button
E. Face Line
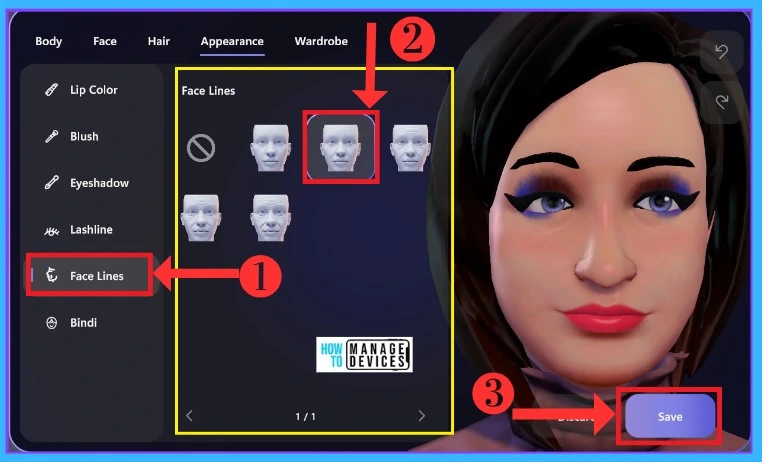
Face Lines on Appearance helps to give different types of Face lines to your Avatar Face. It helps to give age differences to the Avatar. Each face line allows you to give different effects to your Avatar. The below screenshot shows Face Line on Appearance.
- Click on the Faceline from the left side of the Window
- Select any Face line options available on the Window
- Click the Save button
F. Bindi
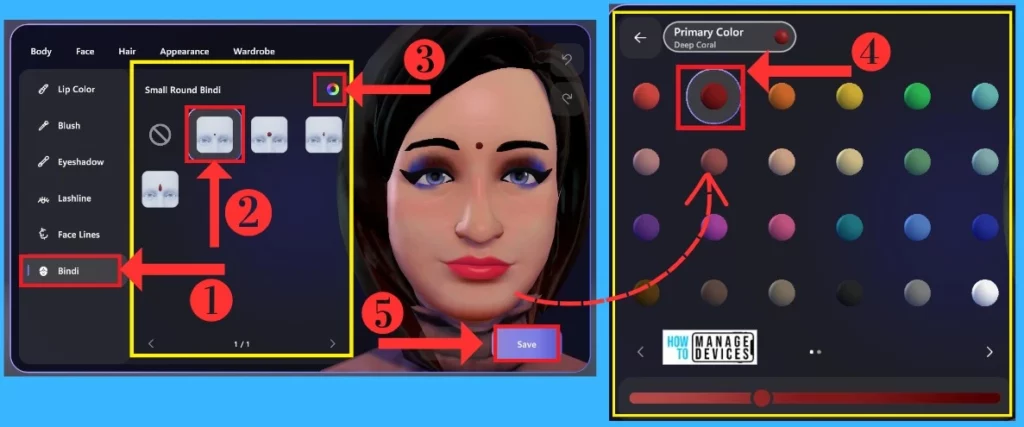
Bindi’s Appearance allows you to give different types of Bindis for your Avatar. It helps to enhance the beauty of your Avatar. Bindi Options Includes Small Round Bindi, Large Round Bindi, Small Teardrop Bindi, Large Teardrop Bindi, etc. You can easily change the color of your Bindi.
- First, select Bindi on the left side of your Window
- Select the Bindi shape you want for your Avatar
- Click on the Color Picker to color your Avatar Bindi and save them
- The below screenshot shows Bindis on Appearance.
- Enable Language Interpretation in Teams Meetings | Real-Time Translation
- 11 New Features in Microsoft Teams – February Update
5. Wardrobe on Customization
The Wardrobe in Avatar is the best feature; that feels like a real Wardrobe. This Wardrobe includes all the items for Avatar. It includes Underlayers, Outerwear, Headwear, and Eyewear. You can easily change the color of the wardrobe option from the color-selecting option on the Wardrobe. The below list shows Wardrobe Options on Avatar.
A. Underlayer
B. Outerwear
C. Headwear
D. Eyewear
A. Underlayer in Wardrobe
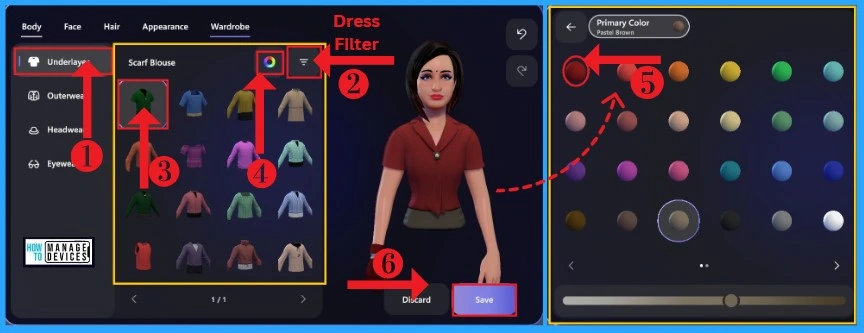
Underlayer Option on Wardrobe shows different underlayer dresses for all types of people using Avatar. You can easily choose the Underlayers from the Filter option as your preference. The filter option on Underlayer shows the different types of dresses for your Avatar.
You can easily change the color of your selected dress from the Color Picker. After that, you can Save the Customization. The table and the screenshot below show Wardrobe underlayers and how to select them.
| Dress option | Used to |
|---|---|
| All | It helps to dismiss your selected dress |
| Blouses | It includes different types of Blouses for your Avatar |
| Button-Ups | It includes different types of Blouses for your Avatar |
| Shirts | Allows different types of Shirts |
| Sweaters | Helps to give Sweaters |
| Tunics | It shows different types of Tunics |
| Dismiss | It helps to dismiss your selected dress |
B. Outerwear
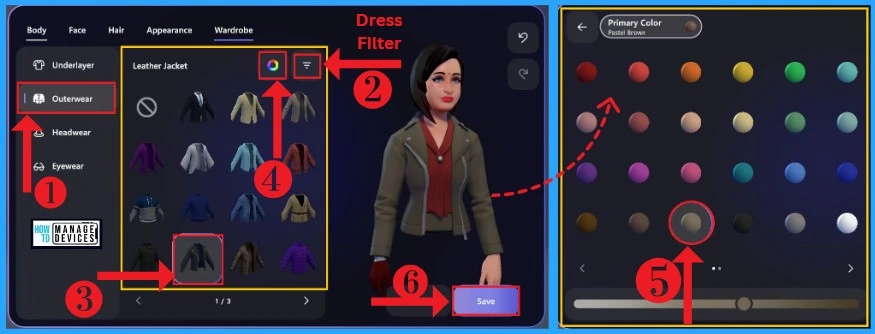
Outerwear on the Wardrobe helps to give Outerwear to your Avatar. It provides different types of Outerwear for your Avatar. You can easily select the Outerwear from the Filter option and change the Outerwear color from the Color options: the below list and screenshot show Outerwear in Wardrobe.
- Click on the Outerwear from the left side of the Window
- Click on the Filter option and select any Outerwear option available on the Window
- Click on the Color Picker and select Color for the Outerwear
- Click on the Save Button
C. Headwear
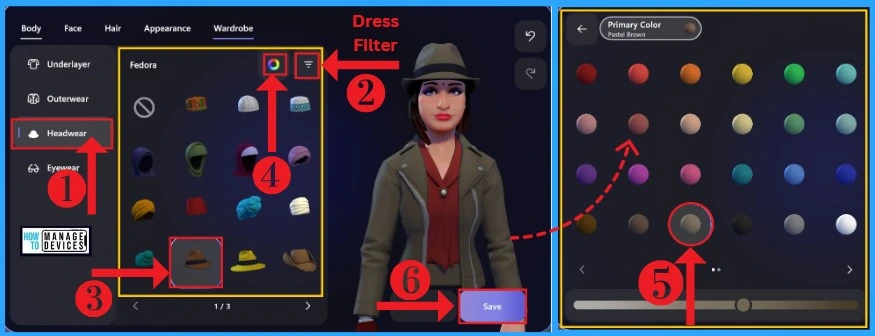
Headwear on Wardrobe allows the users to give different Headwears for their Avatar. You can easily select Headwear from the filter option. The Color of the Selected Headwear can be changed from the Color Picker.
- After customizing, you can Save them by clicking the Save button. The below table and the screenshot shows different Headwear and how to select it from your Wardrobe.
| Headwear | Used to |
|---|---|
| All | It shows all types of Headwears available in the Wardrobe |
| Caps | It allows giving Caps to Avatar |
| Hat | It shows Different types of Hats |
| Headwraps | It allows giving Caps to Avatar |
| Turbans | Used to give Turbans for your Avatar |
| Beanies | It shows different Beanies |
| Dismiss | Helps to dismiss the selected Headwear |
D. Eyewear
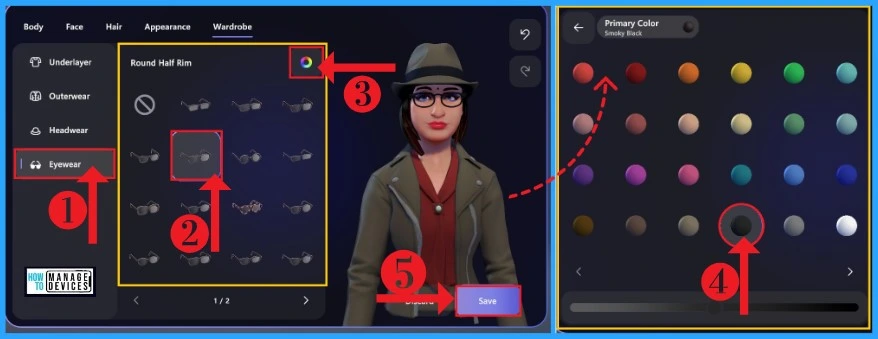
Eyewear on the Wardrobe helps to give different Eyewear for your Avatar. Eyewear on the Wardrobe helps to give a new look to your Avatar. You can easily choose your Eyewear as your wish. The color of the Eyewear can be easily changed from Color Picker. The below screenshot shows different Eyewear on Wardrobe.
The First step is to click on the Eyewear section from the Left side of your Window, then select any Eyewear for your Avatar and give color to the Eyewear from the Color Picker option. The last process you can Save your Customizable Eyewear by Clicking the Save button.
How to Join a Meeting with Avatar
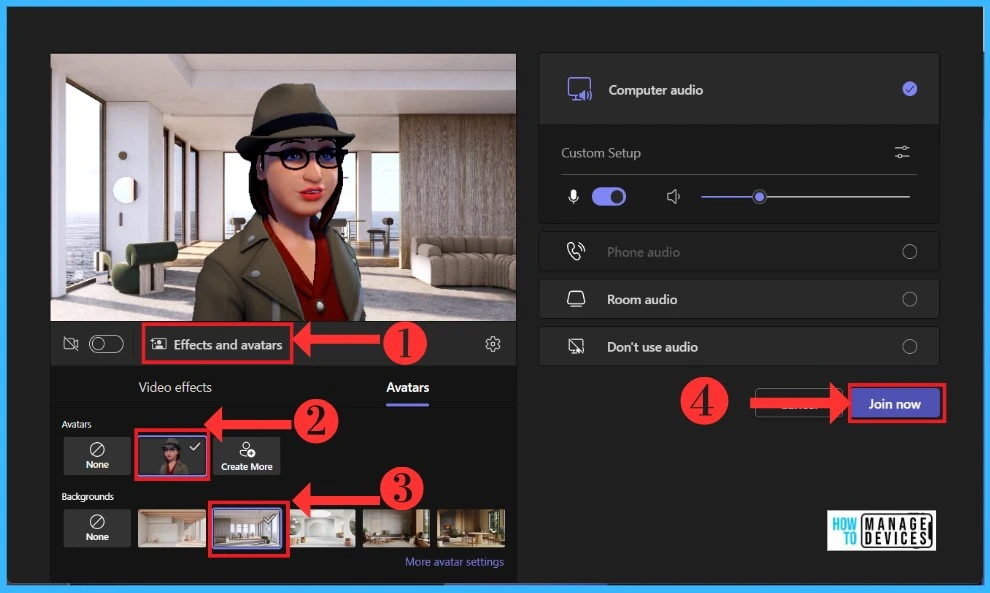
The main goal is to participate in a meeting as an Avatar look. It is a very easy process after creating your Avatar. First, you have to open the link for joining a meeting, then click on the Effect and Avatars button, then you can select your customized Avatar.
The main advantage is you can select a background for avatars with the help of the Background option. The following list and screenshot will guide you.
- Click on the Effect and Avatars
- Select your Customized Avatar
- Click on the Backgrounds for your avatar background
- Click on the Join Button
Enabling Avatar in Meeting
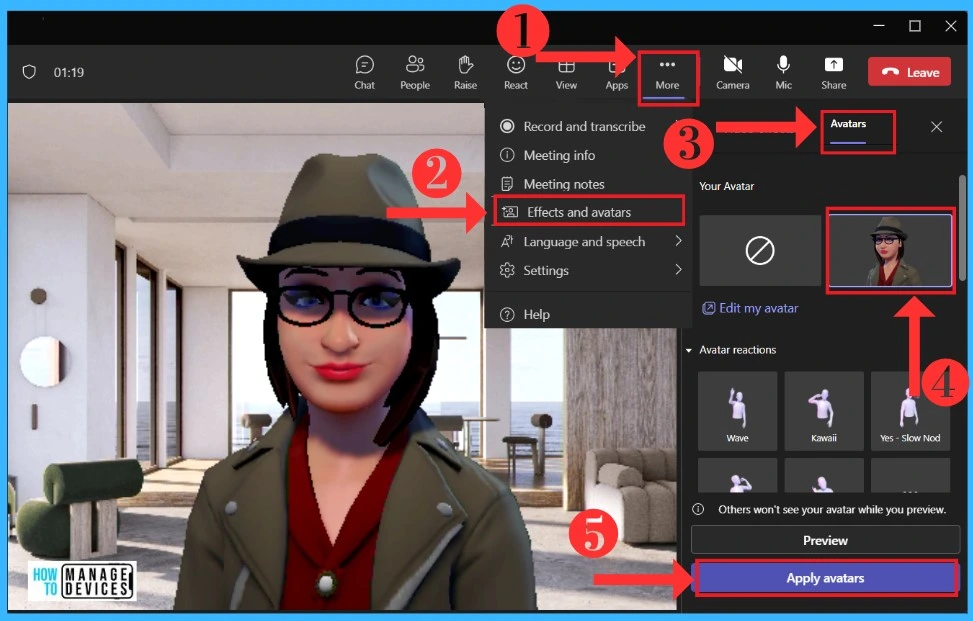
The main advantage is you can appear in an avatar form in ongoing meetings. If you forget to turn on the meeting starting, you can join as an Avatar with the help of the More option in the meeting Window. First, select More options from the teams meeting Window.
You can be able to select an option called Effects and Avatar. In this option, you can select Avatar to get more features for Avatars. The below, screenshot shows how to turn on Avatar while meeting.
Avatar Reactions
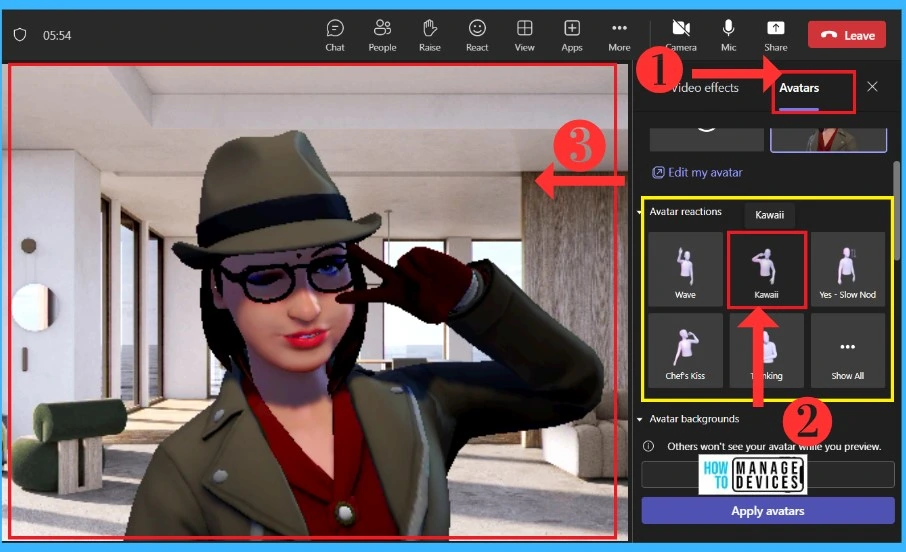
Reactions are the best feature of Avatars; in a meeting, you are unable to speak sometime, or you can express that you are still in the meeting, but on a mute, you can send reactions. There are many options available in the Avatar Reaction section. The reactions are filtered into many categories. The following list shows the category of Reactions in Avatar.
- Emotion – It allows us to show all types of Emotions.
- Greeting – It helps to welcome in certain ways.
- Celebration – This allows Reaction for a Joyous occasion
- Activities – It is used for Activity base reaction
- ASL – This is the sign language
- Misc – It gives miscellaneous reactions
- ALL – It allows all reactions to be visible in one Window
The Reaction will express the presence of you in a meeting. Reactions are sometimes really joyful. It will change the entire situation. First, you must select Avatars and then any Reaction for Avatar. The following screenshot shows how to send a reaction in the meeting.
Avatar Background and Avatar Mood in More Option
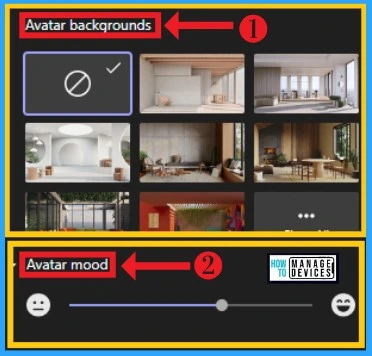
The Avatar Background is so interesting it changes the entire screen of your Avatar. The background is used for the whole look of an avatar. It gives a wonderful effect in an avatar. Sometimes your background isn’t good for a professional or any other meeting. This background option will help the users to change the entire look.
Avatar mood setting is very useful in meetings to show your Mood via the mood-setting option. You can increase or decrease mood levels. It will change avatar moods. The following screenshot will show you how background and mood Options in Avatar.
- More option > Effect and Avatar > Avatar
- Select Avatar background from Avatar
- Select Avatar mood from Avatar
Avatar Camera in More Options
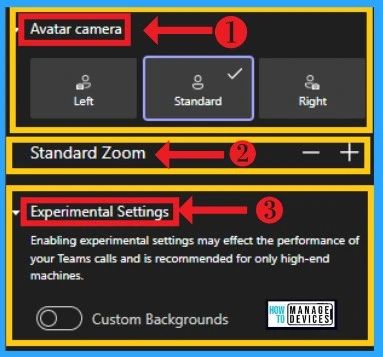
The Avatar Camera option is all about the camera-focused one; you can change the direction of your Avatar in three formats; one is Left, the second one is Standard, and the third one is Right. The other feature is it can be zoomed in or out from Standard Zoom. The following screenshot will guide you.
- Select Avatar Camera from Avatar
- Select Standard Zoom from Avatar
- Select Experimental Settings from Avatar
Experimental Setting
This feature enables a new setup for the meeting; it can affect your team’s meeting performance. It allows you the option to customize the background for the Avatar meeting. The above screenshot shows the Experimental settings.
Author
Krishna. R is a computer enthusiast. She loves writing on Windows 11 and related technologies. She likes to share her knowledge, quick tips, and tricks with Windows 11 or Windows 10 with the community.
