Let’s learn how to Use Live Reactions in MS Teams meetings. Microsoft is rolling out the Live Reactions feature in Microsoft Teams Meetings, available only on Teams Desktop and Teams Mobile apps.
The Live Reactions feature in MS Teams allows meeting participants to express their reactions to others during the meeting in real-time. It allows you to use emojis to convey your feelings or responses without interrupting the speaker or disrupting the flow of the conversation.
By using Live Reactions in Teams, participants can engage with each other more effectively, and it also helps you to add another layer of interaction to their virtual meetings.
Live reactions in Teams meeting is a useful and important feature as it encourages participants to stay focused on the live content and react quickly to what they see and hear. The presenters can receive real-time feedback from their audience and adjust their presentation accordingly.
- 11 New Features in Microsoft Teams – February Update
- 21 New Features in Microsoft Teams – January Update
What are the Advantages of Using Live Reactions in Teams Meetings?
With the Live Reactions feature in MS Teams, meeting attendees can provide immediate feedback and express their opinions during a presentation. The following are the Advantages of using Live Reactions during Teams meetings.
1. Make Teams meetings more inclusive, engaging, and fun
2. Receive real-time feedback from their audience
3. Keeps your attendees focused
4. Helps to express your reactions
5. Participants can engage with each other more effectively
6. Helps to express thoughts
How to Enable Disable Reactions in MS Teams Meetings
Microsoft Teams is a cloud-based team collaboration software with various meeting options, such as enabling Q&A, Providing CART Captions, Enabling language Interpretation, Allowing attendance reports,s, etc.
- Start menu > MS Teams
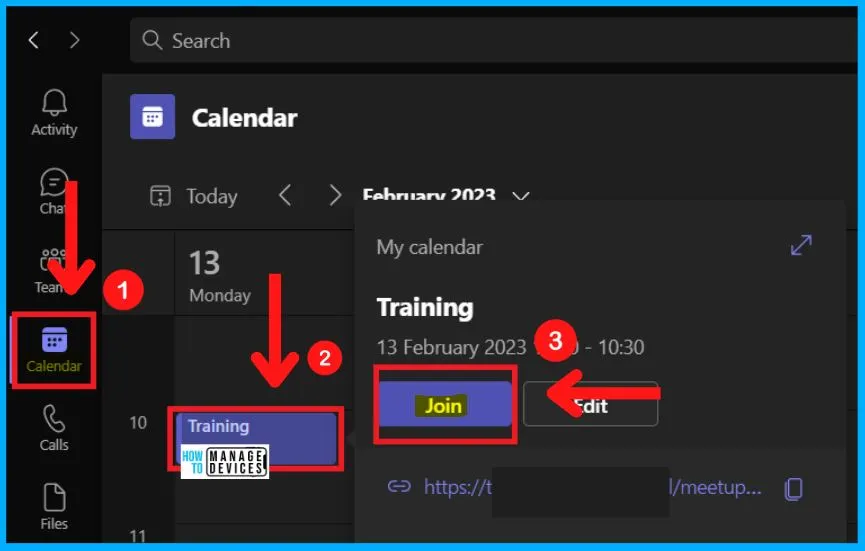
- Go to the Calendar tab and Join the Meeting
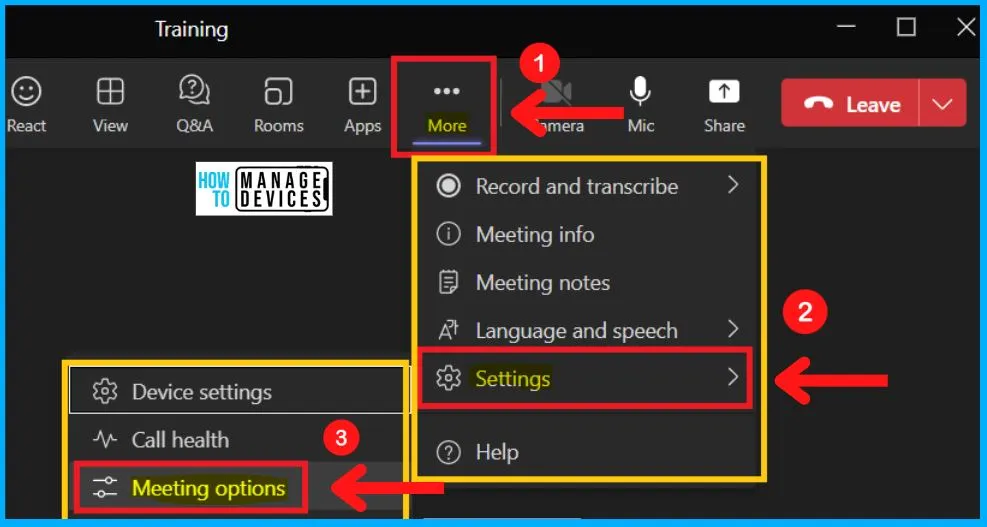
After joining the meeting, click the 3 dots menu and select settings. The Settings option in Teams includes a set of options such as Device settings, call health, meeting options, etc. The below screenshot shows how to open the Meeting Options in Teams.
- Select the Meeting options from Settings
You can easily Enable or Disable the Allow Reactions feature in Microsoft Teams. The Live Reaction feature in Teams is Enabled by Default. The below table and window show how to Enable or Disable the Allow Reactions in MS Teams.
Note! – If live Reactions aren’t available,Contact the meeting organizer or IT administrator to ensure the feature has been enabled for the meeting. Meeting organizers can easily turn off live reactions in participant settings.
| Meeting Options | Enabled/Disabled |
|---|---|
| Enable Allow Reactions | Toggle the pane to the Right side |
| Disable Allow Reactions | Toggle the pane to the Left side |

After Enabling the Allow Reactions, a new icon is available at the top right of the meeting Window. The Reactions help you to indicate your response to what’s being discussed. Select the Reactions icon from the Meeting window.
- It includes Reactions like Love, Applause, laughing, and Surprised.

- Use Microsoft Whiteboard in Teams Meetings | Download and Install | Best Guide
- Check the User’s Time Zone in Microsoft Teams
Applause Reactions
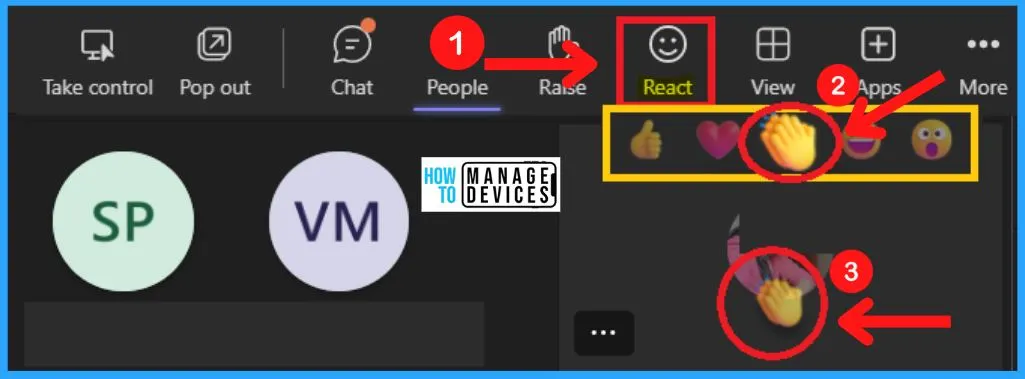
You can easily use the Reactions such as Like, Love, Applause, Laugh, Surprised, etc. Here we are showing how to use the Applause reaction in Teams meeting. First, Click the React icon from the top right side of the meeting window.
- Choose the Applause Reactions from a set of Reactions
- While clicking the Applause Reaction, it appears over your name or picture
Raise Hand Option in Meeting Window
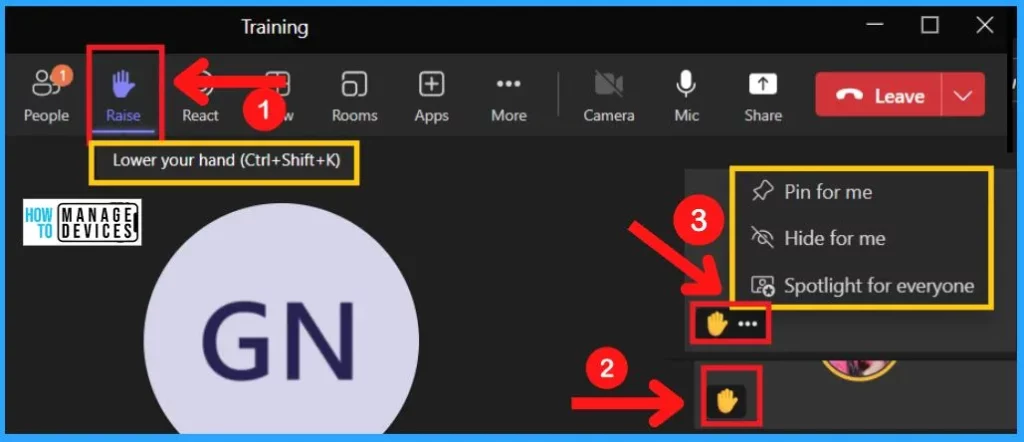
During the meeting, the “Raise Hand” option lets participants virtually signal to the presenter that they have a question, comment, or need to speak. The Raise hand icon appears at the top of the Meeting window.
- If you have something to say, you can use the “Raise Hand” feature in the meeting window to alert the presenter.
- After clicking the Raise hand icon, the Raised hand is seen over your name or picture.
- It helps the presenter to know that you have a question or comment
The 3 dots next to the Raise hand show the options such as Pin for you, Hide for me, and Spotlight for everyone. The Raise hand is the separate icon available in the meeting window.
The information shared above regarding Use Live Reactions in MS Teams Meetings is helpful. Please follow us on HTMD Community and visit our website HTMD Forum if you like our content.
Author
About Author – Vidya is a computer enthusiast. She is here to share quick tips and tricks with Windows 11 or Windows 10 users. She loves writing on Windows 11 and related technologies. She is also keen to find solutions and write about day-to-day tech problems.

