Let’s discuss Easy Methods for Enabling and Disabling AutoPlay in Windows 11. When the Windows shell detects the insertion of new media or the attachment of a hot-plug device, the contents of the device or media are determined.
Autoplay allows you to choose an action for different kinds of media. You can use Autoplay for photos, music, and video on drives, CDs, DVDs, cameras, and phones. For example, if you want to select an app that automatically opens photos on a removable drive when you plug it into your PC using AutoPlay.
AutoPlay depends on its current Settings, and you can easily enable and disable it on your Windows 11 PC. Enabling Autoplay in Windows 11 is primarily for automatically displaying content, simplifying the process of accessing various media types.
The autoplay option helps you to eliminate the need for manual intervention. So enabling this option is very useful for managing media. In this blog post, I will help you learn more about the Autoplay option and how to enable and disable it.
Table of Contents
What are the Advantages of AutoPlay in Windows 11?
Enabling AutoPlay in Windows 11 offers several benefits for users. It is one of the best options for Windows 11 PCs. The following are the advantages of AutoPlay.
1. Autoplay allows users to play media quickly
2. It allows Automatic Handling
3. It is very user-friendly
4. It enhances the user experience
Easy Methods for Enable Disable AutoPlay in Windows 11
There are 2 methods available for enabling and disabling Autoplay in Windows 11. Each of these methods is easy for you. The Autoplay option is enabled by default on Windows 11 PCs. The table below shows different easy methods for enabling and disabling AutoPlay.
| Methods for Enable Disable AutoPlay |
|---|
| 1. Enable Disable AutoPlay in Settings |
| 2. Enable Disable AutoPlay in the Control Panel |
- 6 Different way to Find File System of a Drive in Windows 11
- Different Methods for Deleting Files in Windows 11
- How to Check Drive Encryption Support in Windows 11
- Enable Disable Performance Mode for Dev Drive Protection in Windows 11
Enable Disable AutoPlay in Settings
Using the Settings Application is the simplest method for enabling or disabling the Autoplay option on Windows 11 PCs.
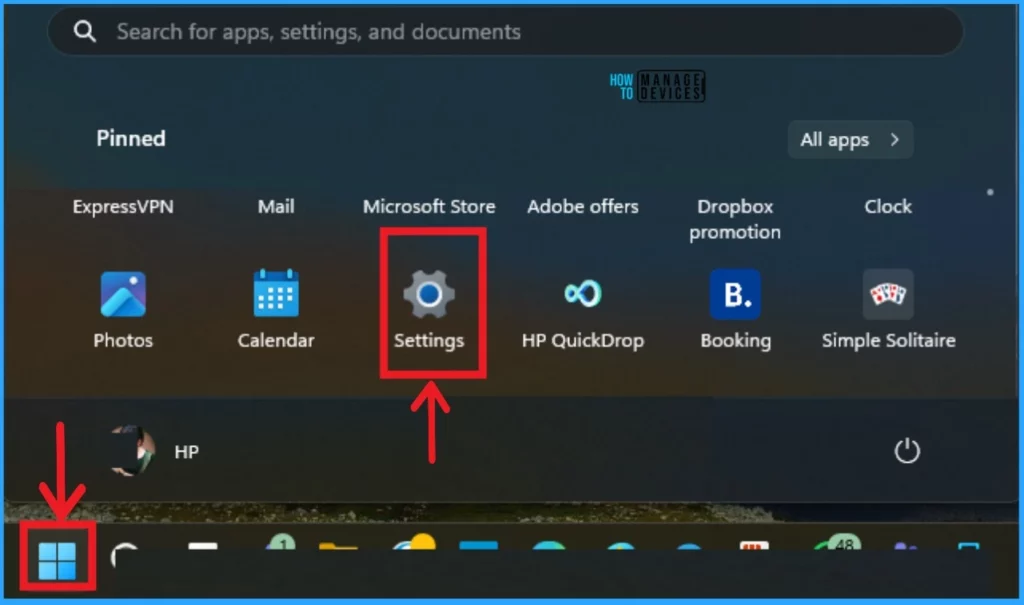
- Select Settings from the Start Menu
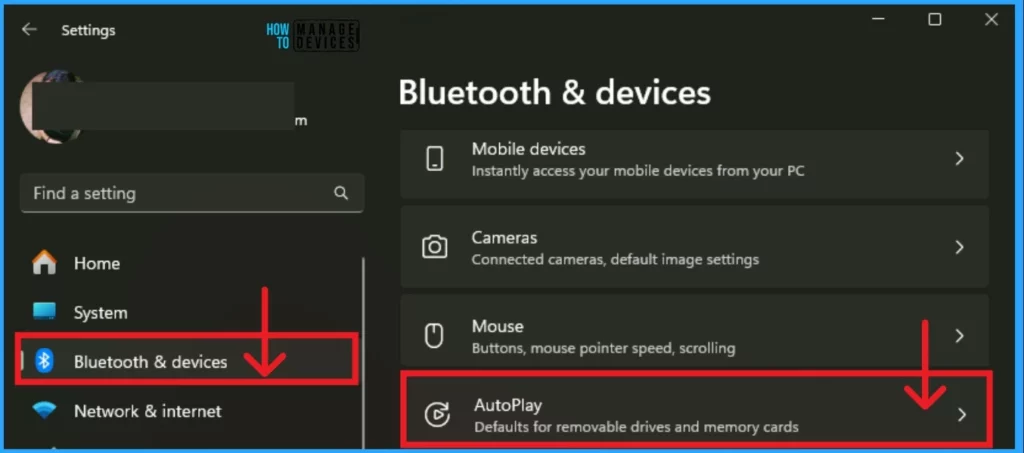
The Settings Application shows many settings on the left side. Select Bluetooth & device settings from the left side of the Settings window. Then select the Autoplay option from Bluetooth & device settings.
After selecting the AutoPlay option, the AutoPlay window shows different settings related to AutoPlay. The AutoPlay option is enabled by default. To disable it, toggle the pane to the left.

Enable Disable AutoPlay in the Control Panel
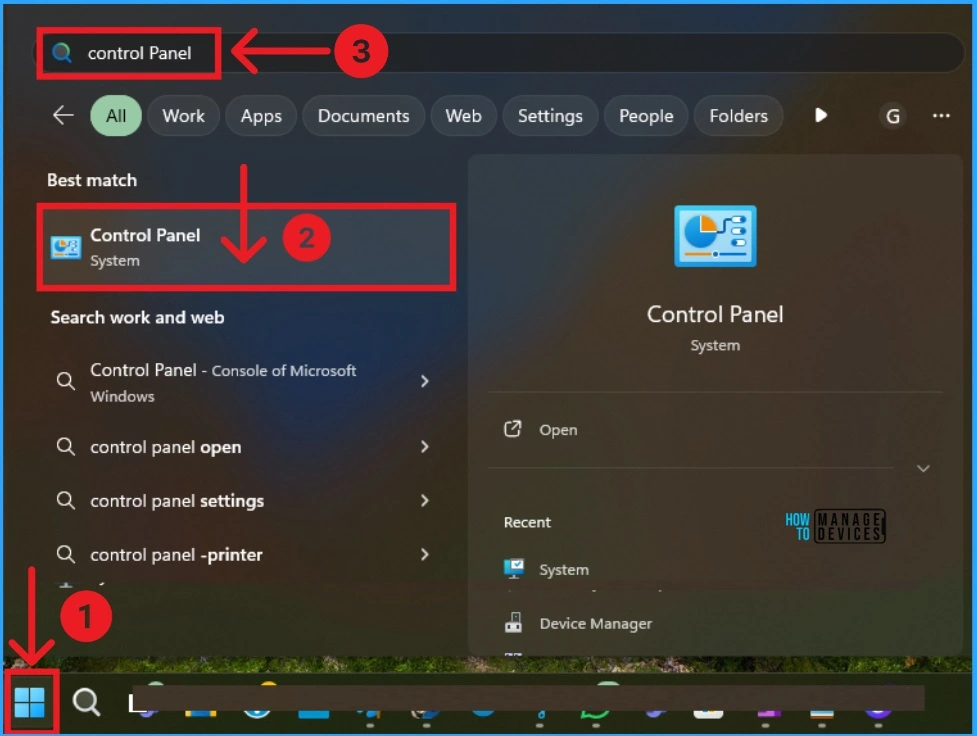
You can easily Enable and Disable AutoPlay via the Control Panel. To Access the Control Panel, Click on the Start Menu, search for Control Panel, and open it.
In the Control Panel window, you can see several options. Select the Hardware and Sound option from the Control Panel.
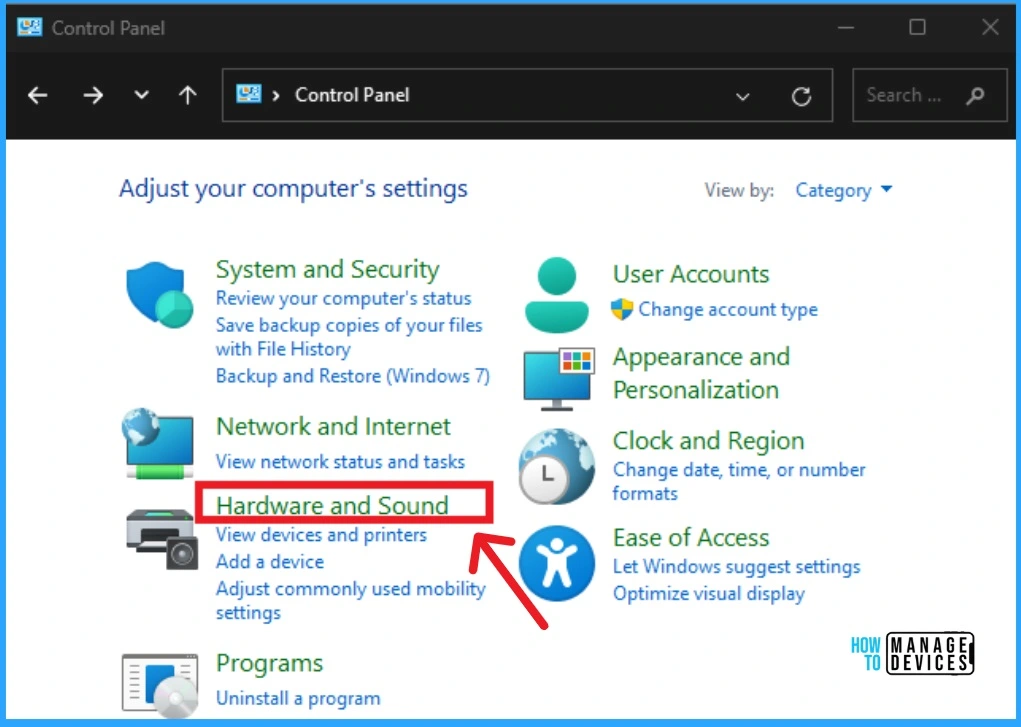
The next window shows many options related to Hardware and sound. Select the AutoPlay option that shows on this window. The below screenshot will help you.
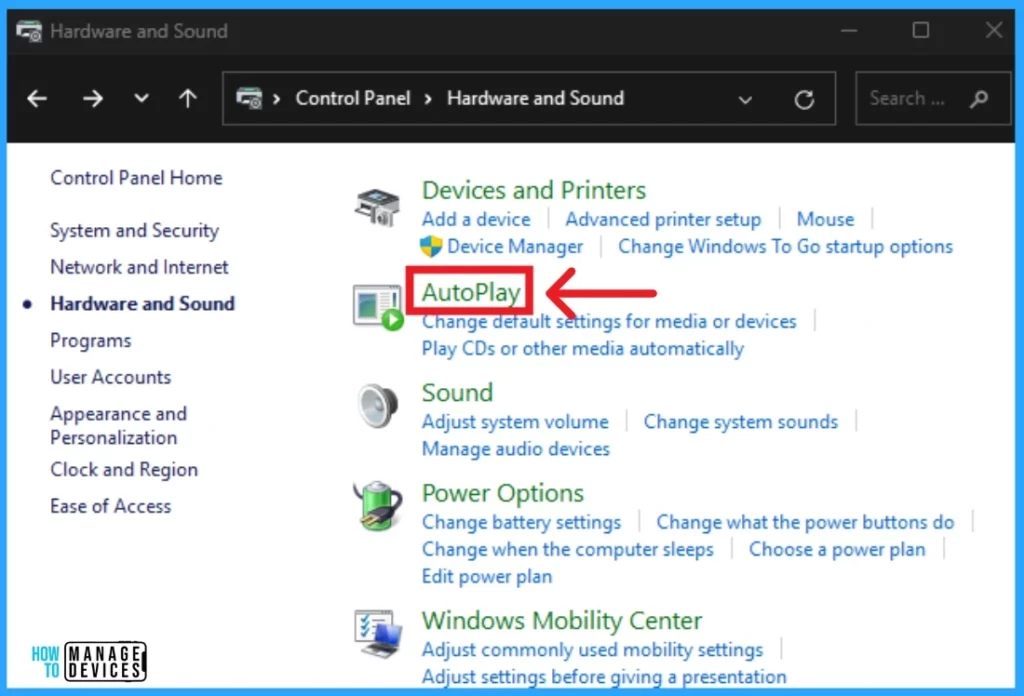
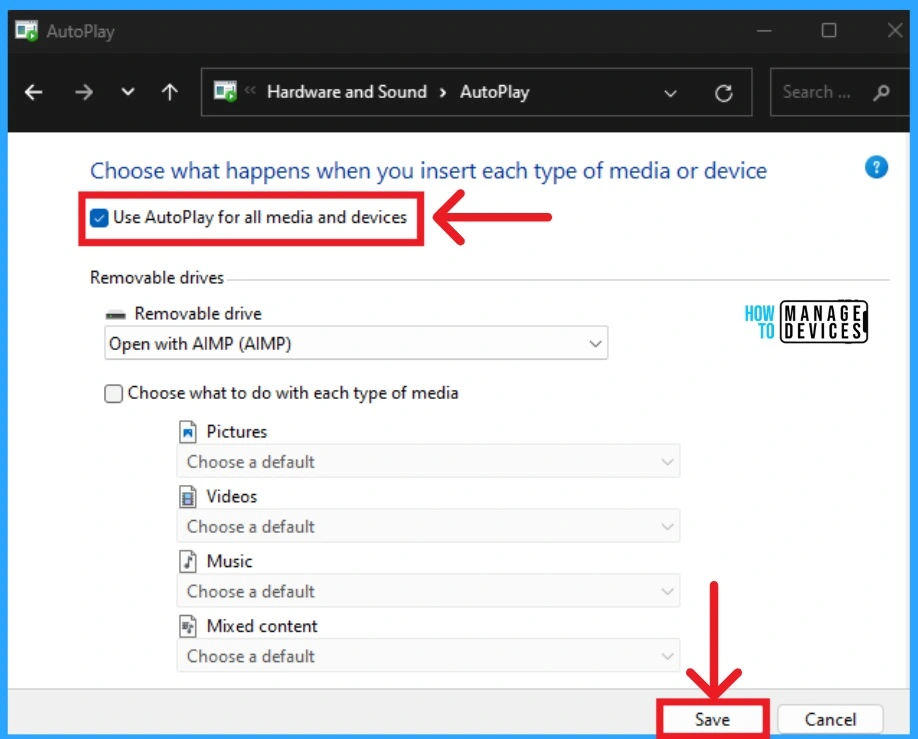
The below window shows Autoplay settings on the Control Panel. Here you can see the Use AutoPlay for all media and devices option. Click on the checkbox to enable this option. After clicking on this checkbox, it will be shown in blue color. Then click on the Save button to enable this option.
GPO to Enable or Disable AutoPlay for All Drives in Windows 11
I already mentioned that AutoPlay options help you manage drives on Windows 11. If you want to disable the AutoPlay option for Drives, you can easily do so with the Group Policy Editor.
In the Group Policy editor, you can easily enable or disable AutoPlay for drives. To do this, navigate to the policy location shown below.
- Computer Configuration\Administrative Templates\Windows Components\AutoPlay Policies
- Click on the Turn Off Autoplay option on the Group Policy Editor
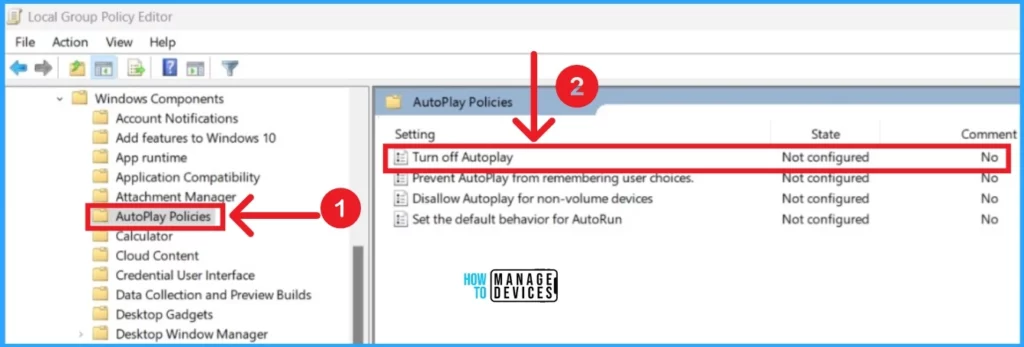
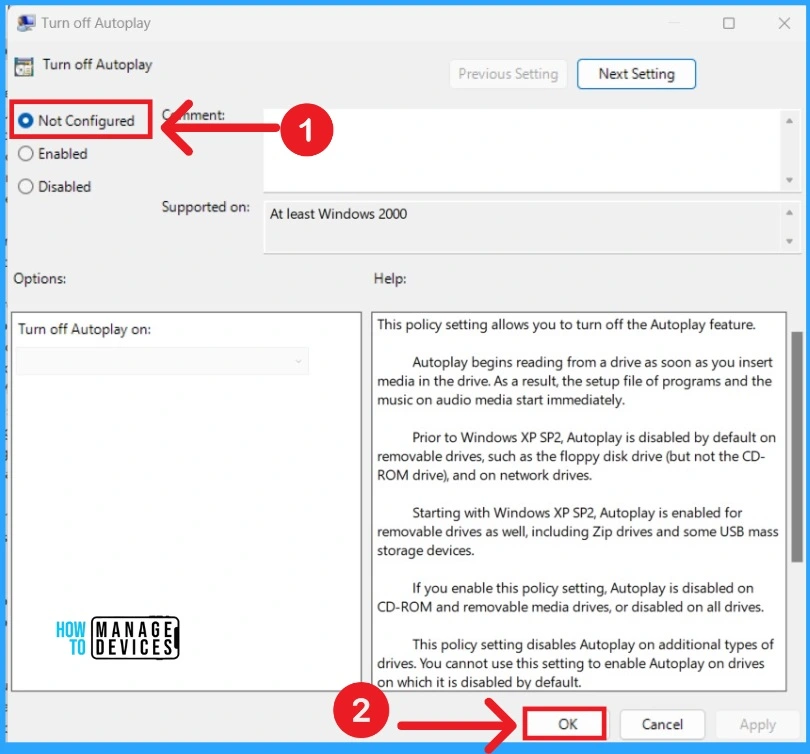
After that, you can see the window to Enable Disable AutoPay. By default, the Not Configured option is selected. Click the OK button if you want to continue on this default option (Not Configured).
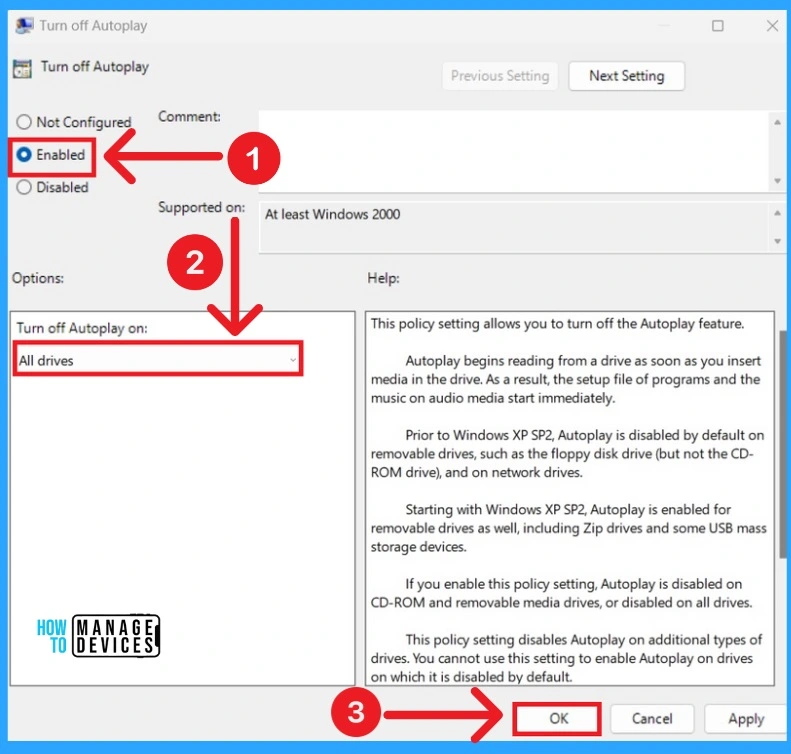
If you want to Enable the AutoPlay option for drives, click on the Enable option, select All drives and then click on the OK button.
Enable Disable AutoPlay in Windows 11 using Intune
Let’s use the Intune Settings catalog to create the policy to disable or enable the Autoplay feature option in Windows 11 devices. Let’s check the steps to create a policy and show how to search and filter the settings in Intune.
- Sign in to the Microsoft Intune admin center
- Select Devices > Configuration profiles > Create profile.
In Create Profile, select Platform: Select Windows 10 and later and Profile: Select Settings catalog. Then click on the Create button.
In Basics, specify a descriptive name for the profile and a description (optional), then select Next. The settings catalog contains thousands of settings. Use the built-in features to make it easier to find specific settings.
Use Add Settings> Search for Autoplay in your policy to find specific settings. You can search by category or keyword, as shown below. The following are the Autoplay related policies available in Intune Settings Catalog.
Disallow Autoplay for non-volume devices
Disallow Autoplay for non-volume devices (User)
Set the default behavior for AutoRun
Set the default behavior for AutoRun (User)
Turn off Autoplay
Turn off Autoplay on:
Turn off Autoplay (User)
Turn off Autoplay on: (User)
- Select Autoplay policies from the browse by category option.
- Enable the check mark on any of the following options –
- Turn Off Autoplay – This is for disabling the context menu for the device (all users).
- Enabling this policy enables the Autoplay feature in Windows 11.
So this is the process to disable the context menu option in Windows 11 using Intune. A more detailed post on creating Intune policies using Settings Catalog is explained in our previous post – Create Intune Settings Catalog Policy.

We are on WhatsApp now. To get the latest step-by-step guides, news, and updates, Join our Channel. Click here. HTMD WhatsApp.
Author
Anoop C Nair has been Microsoft MVP from 2015 onwards for 10 consecutive years! He is a Workplace Solution Architect with more than 22+ years of experience in Workplace technologies. He is also a Blogger, Speaker, and leader of the Local User Group Community. His main focus is on Device Management technologies like SCCM and Intune. He writes about technologies like Intune, SCCM, Windows, Cloud PC, Windows, Entra, Microsoft Security, Career, etc..
