Let’s discuss how to export Privileged Identity Management (PIM) role assignments in Entra ID using PowerShell. In addition to the script-based method, I’ll also explain how to manually export PIM role assignments from the Microsoft Entra portal in this article.
Microsoft Entra, formerly known as Azure Active Directory is a modern, cloud-native solution for identity and access management. As a robust directory and identity service, it delivers a comprehensive set of authentication and authorization capabilities across Microsoft services such as Office 365, Dynamics 365, Azure, and a wide range of cloud-based applications.
Privileged Identity Management (PIM) is a seucuiry service in Microsoft Entra that enables you to control, monitor, and manage access to the organization’s resources. These resources can be in Microsoft Entra ID, Microsoft Azure, Microsoft 365, or Microsoft Intune. It’s especially useful in large organizations or hybrid environments where security and compliance are top priorities.
Privileged Identity Management provides us with the flexibility to assign Roles explicitly. Let’s assume we want to provide Intune Role access to users only for a specific time period and make sure they specifically elevate access when needed. In that case, PIM can assign the role as an Active assignment.
Table of Contents
Key Capabilities of Privileged Identity Management
Privileged Identity Management (PIM) helps organizations cut down on standing admin access by introducing just-in-time (JIT) role activation. Instead of giving users permanent permissions, PIM lets them activate roles only when they actually need them and only for a set duration.
That way, the risk of misuse or accidental exposure is significantly reduced. You can also assign roles with specific start and end dates, which gives admins tighter control and ensures access aligns with actual project needs.

To add an extra layer of security, PIM supports approval workflows. That means role activation can require sign-off from designated reviewers before access is granted. You can also enforce multi-factor authentication (MFA) during activation, making sure only verified users can step into sensitive roles. These features not only strengthen access control but also help meet compliance requirements.
- Assign Azure AD Inbuilt Roles using PIM
- Intune Support for Endpoint Privilege Management
- Download Intune Configuration Spreadsheet Excel List of Policies Configurations
On the monitoring side, PIM offers real-time alerts when roles are activated and keeps detailed audit logs of who accessed what and when. These logs are especially useful for investigations and reporting. You can also schedule access reviews to regularly check whether users still need their assigned roles. It’s a smart way to keep your environment clean, secure, and aligned with least privilege principles.
Importance of Exporting Entra ID PIM Role Assignments
PIM role assignments matter because they let us control who gets elevated access, and more importantly, when they get it. Instead of handing out permanent admin rights, we can make roles eligible and let users activate them only when needed. That alone cuts down risk and gives us tighter governance, especially in environments where multiple teams are working across sensitive workloads.
- How to Restore Deleted Microsoft 365 Group using Microsoft Graph API and PowerShel
- Assign Azure AD Roles Using Privileged Identity Management PIM
- Create Custom Intune Role
With PIM, we can set time-bound access, enforce MFA, and even require approvals before someone steps into a privileged role. That kind of structure helps with compliance, audit readiness, and just keeping things clean. When we have visibility into who’s eligible, who’s active, and for how long, it’s easier to make decisions, run reviews, and keep the environment disciplined without slowing people down.
Manually Export PIM Role Assignments from Entra Admin Center
Let’s learn how to manually Export PIM Role Assignments from Entra Admin Center. Its pretty important to understand the GUI method before you automate it using PowerShell or MS Graph API.
- Sign in to the Microsoft Entra Admin Center.
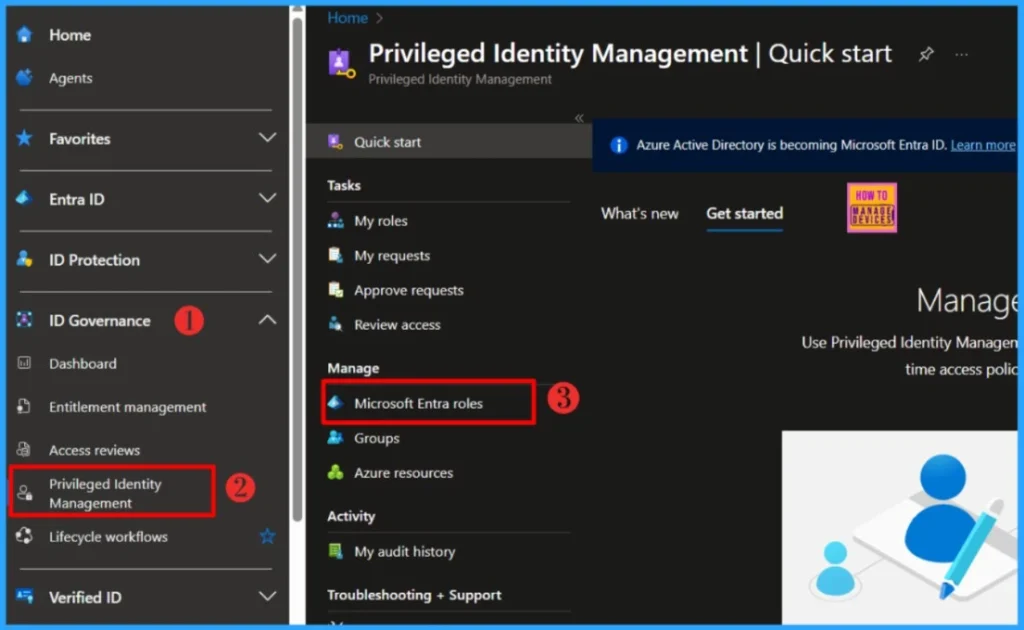
- Navigate to ID Governance > Privileged Identity Management > Microsoft Entra Roles.

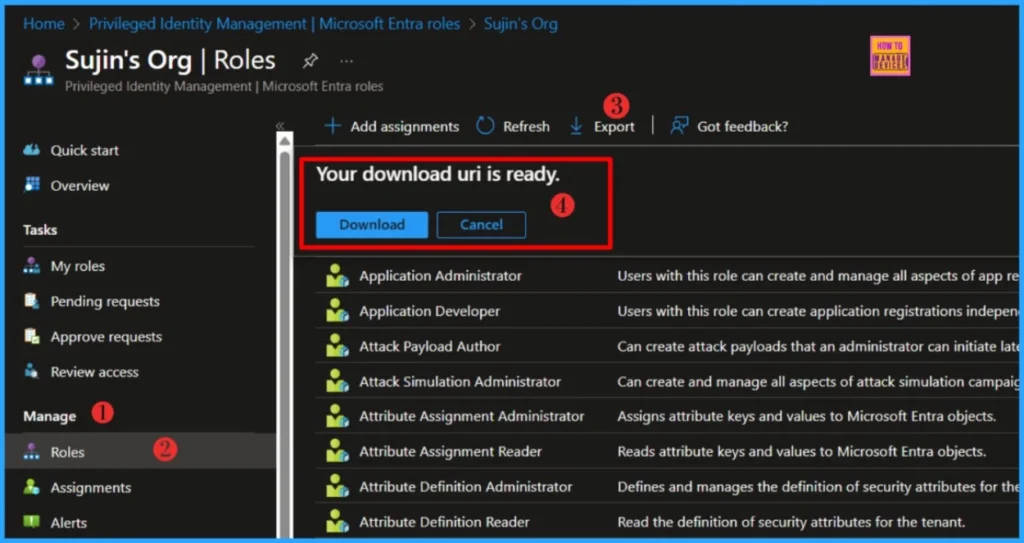
Go to the Manage section and click on Roles. You’ll see a list of all available PIM roles on the right. From there, just hit the Export button to download the assignments.

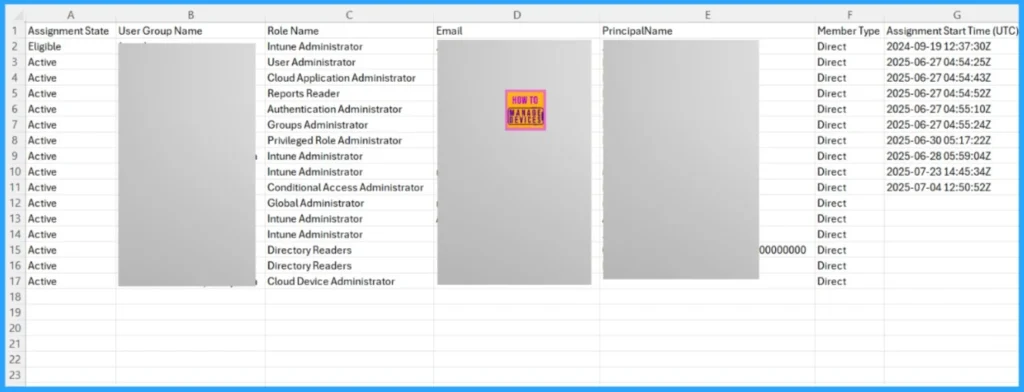
Once the file is ready, click the Download button. Your browser will then save a copy of RoleAssignments.csv, which includes all current Entra ID PIM role assignments. The CSV file typically contains:-
| What’s Included in the Export |
|---|
| Assignment State |
| User Group Name |
| Role Name |
| Principal Name |
| Member Type |
| Assignment Start Time |
| Assignment End Time |
- Easiest Method to Enable MFA for Admins using Azure AD Conditional Access
- What is the Face Check Feature in Entra
- Windows 10 Conditional Access with Azure AD Join Intune MDM Auto Enrollment Enforce Policies

Export Entra ID PIM Role Assignments using PowerShell Script
Well, you learned how to manually Export PIM Role Assignments from Entra Admin Center. Let’s automate it using the PowerShell script. Implementing an automated solution is key to streamlining operations, minimizing risk exposure, and maximizing time efficiency across the board
NOTE! Use the Connect-MgGraph command to sign in with the required scopes. You'll need to sign in with an admin account to consent to the required scopes.- Best Guide to Install Microsoft Graph PowerShell Modules
- Complete Guide to Install the New Microsoft Entra PowerShell Module
- How to Pause Intune Config Refresh Feature on Windows Device using Microsoft Graph API
##########################################################################

#Export-EntraIDPIMRole .ps1
#Author : Sujin Nelladath
#LinkedIn : https://www.linkedin.com/in/sujin-nelladath-8911968a/

##########################################################################

# Connect to Microsoft Graph
Connect-MgGraph -Scopes "RoleManagement.Read.Directory", "Directory.Read.All", "Application.Read.All" -NoWelcome

# Get role definitions and build a lookup table
$roleMap = Get-MgRoleManagementDirectoryRoleDefinition -All |
    Group-Object -Property Id -AsHashTable -AsString |
    ForEach-Object { $_.Value.DisplayName }

# Get eligible and active role assignments
$eligible = Get-MgRoleManagementDirectoryRoleEligibilitySchedule -All
$assigned = Get-MgRoleManagementDirectoryRoleAssignmentSchedule -All

# Build principal resolver

function Resolve-Principal

{
    param ($id)
    if (-not $id)

    {

      return @{Type='Unknown'; Name=$null; UPN=$null}

    }

    $user = Get-MgUser -UserId $id -ErrorAction SilentlyContinue

    if ($user)

    {

      return @{Type='User'; Name=$user.DisplayName; UPN=$user.UserPrincipalName}

    }

    $group = Get-MgGroup -GroupId $id -ErrorAction SilentlyContinue

    if ($group)

    {

      return @{Type='Group'; Name=$group.DisplayName; UPN=$group.Mail}

    }

    $sp = Get-MgServicePrincipal -ServicePrincipalId $id -ErrorAction SilentlyContinue


    if ($sp)

    {

      return @{Type='ServicePrincipal'; Name=$sp.DisplayName; UPN=$sp.AppId}

    }

    return @{Type='Unknown'; Name=$id; UPN=$null}
}

# Export function

function Export-PIMData

{
    param ($data, $filePath)

    $data | Select-Object `
        @{Name='RoleName'; Expression={ $roleMap[$_.RoleDefinitionId] }},
        RoleDefinitionId,
        @{Name='PrincipalType'; Expression={ (Resolve-Principal $_.PrincipalId).Type }},
        @{Name='PrincipalName'; Expression={ (Resolve-Principal $_.PrincipalId).Name }},
        @{Name='PrincipalUPN_Mail'; Expression={ (Resolve-Principal $_.PrincipalId).UPN }},
        DirectoryScopeId, MemberType, Status, StartDateTime, EndDateTime |
        Export-Csv -Path $filePath -NoTypeInformation
}

# Run exports
Export-PIMData -data $eligible -filePath "C:\Temp\PIM_Eligible.csv"
Export-PIMData -data $assigned -filePath "C:\Temp\PIM_Assigned.csv"

Write-Host "Export complete. Files saved to C:\Temp"
To export Privileged Identity Management role assignments from Entra ID using PowerShell, we start by connecting to Microsoft Graph with the necessary scopes. The script first builds a role map to translate role IDs into readable names. It then pulls both Eligible and Active role assignment schedules.
Download: Export-EntraIDPIMRole.ps1I trust that this article will significantly benefit you and your organization. I appreciate your patience in reading this post. I look forward to seeing you in the next post. Keep supporting the HTMD Community.
Need Further Assistance or Have Technical Questions?
Join the LinkedIn Page and Telegram group to get the latest step-by-step guides and news updates. Join our Meetup Page to participate in User group meetings. Also, Join the WhatsApp Community to get the latest news on Microsoft Technologies. We are there on Reddit as well.
Author
About the Author: Sujin Nelladath, a Microsoft Graph MVP with over 12 years of experience in SCCM device management and Automation solutions, writes and shares his experiences with Microsoft device management technologies, Azure, DevOps and PowerShell automation.


