Let’s learn how you can extend the SCCM task sequence error prompt duration. By default, when an error occurs in a task sequence, it displays a dialog box with the error. The task sequence automatically dismisses it after 15 minutes.
The user can see the common “task sequence error” message in case of any error occurs, but extending the duration allows for the IT or helpdesk admin to quickly see the error message instead of waiting in the front of the system to be complete the deployment, in case they’re engaged in n number of activities.
As the error message is short-lived, This is also more useful for the users to notify about the deployment status to IT admin, and if the user leaves the computer the error message will be shown for a longer time when the user gets back to the computer, they can quickly see what’s up there.
In order to extend this timeout period, you can use the variable SMSTSErrorDialogTimeout by specifying the time you want to display a dialog box with the error when an error occurs in a task sequence.
Starting in Configuration Manager version 2103, if the task sequence fails because the client doesn’t meet the requirements configured in the Check readiness step, the user can now see more details about the failed prerequisites.
- How to Improve SCCM Task Sequence Progress Bar End User Experience
- Display Message in SCCM Task Sequence Unsupported Hardware Model
- New Improvement with SCCM Task Sequence Check Readiness Step
Add Task sequence Variable – SMSTSErrorDialogTimeout
Let’s see the steps you can follow to extend task sequence error prompt duration –
Use the following steps to modify an existing task sequence to task sequence error prompt duration –
- In the Configuration Manager console, Navigate to the Software Library workspace, expand Operating Systems, and select the Task Sequences node.
- In the Task Sequence list, select the task sequence that you want to edit. Select Edit to modify.

Add Set Task Sequence Variable Step –
- Select Add, choose the General category and then select Set Task Sequence Variable. This action adds the step after the currently selected step.

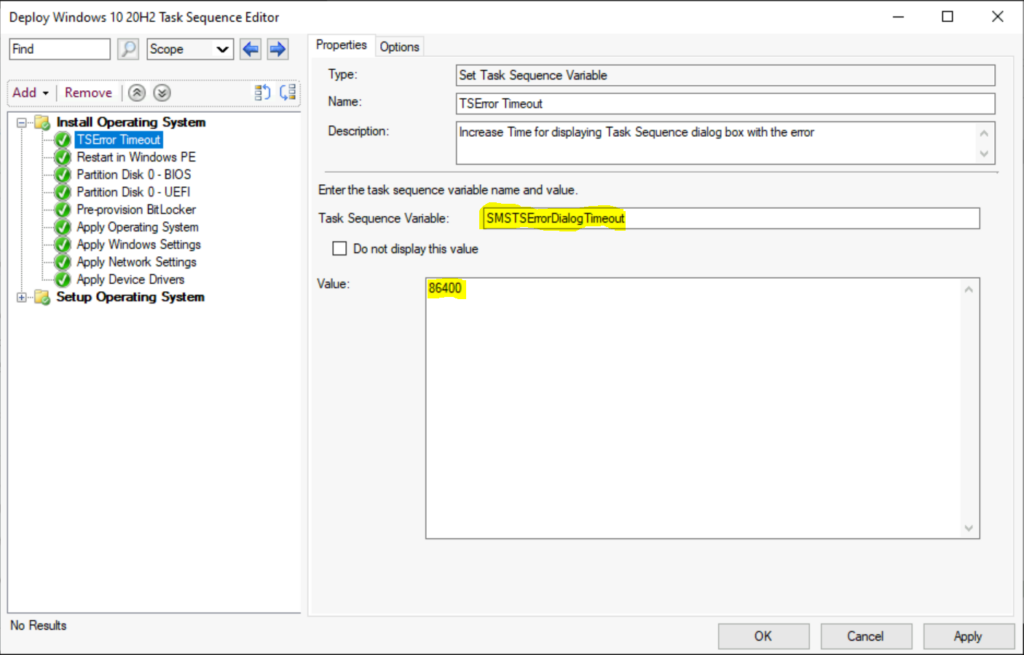
Specify the task sequence variable SMSTSErrorDialogTimeout to extend the time dialog box is displayed when an error occurs in a task sequence. It’s best to set these Task Sequence steps at the starting or in case of any issue. You can reorder the steps.
The value you can add is based on what you want to configure, For example, set the variable in your Task Sequence as 86400 (In Seconds) 86400/3600 = 24 hours
- Task Sequence Variable Name – <Steps Name>
- Task Sequence Variable – SMSTSErrorDialogTimeout
- Value – 86400

Select Apply and OK to save your changes and close the window.
End Users Experience – Task Sequence Error Prompt Duration
When you have started the task sequence for operating system deployment, If any circumstances if the task sequence failed. You can see the details showing the step Task Sequence fails with the following error message.
The error prompt will not be automatically closed before 24 hours based on the number of seconds specified in the variable inside the task sequence editor. This will allow the IT admin to have enough time for a quick check at the phase and collect the logs, in case you don’t want to stick in front of the system.
It’s always recommended to examine the SMSTS log for task sequence failure issues to help you get the inside about the failure prompt to troubleshoot the task sequence. More you can explore SCCM OSD Task Sequence Troubleshooting Steps by Step Ultimate Guide SMSTS.log.

End User Experience – Task Sequence Check Readiness Step
The following default options are available in the Check Readiness step for Upgrade Task Sequence, If you want to add this step in the task sequence editor, select Add, select General, and select Check Readiness –
On the client machine, I tried to run an upgrade Operating system. On the confirmation box, click Install.
If a task sequence fails because the client doesn’t meet the requirements of this step, the user can select an option to Inspect. This action shows the checks that failed on the device.

After reviewing the Task sequence check readiness failure, You can modify the existing step or make changes to the client machine to meet the specified deployment prerequisite conditions and for a smooth user experience.
