Let’s learn how to Find all Automatic Maintenance Tasks in Windows. Automatic Maintenance Tasks are the process that is run automatically at regular intervals to perform maintenance operations on your Operating System.
The Automatic maintenance task is the one that includes software updates, Windows updates and system diagnostics. This automatic maintenance is always done in Windows, and this maintenance always helps the system to run smoothly.
Automatic maintenance keeps your system in good condition. The Tasks are the tasks that start automatically at regular intervals to maintain operations for the database. The maintenance activity is an application or process to improve the performance and health of your Windows PC.
Windows 11 have an automatic maintenance feature like in Windows 10. Windows automatic maintenance performs various background tasks in a default period. The defaulted period is to be at 2 AM.
Do you know if you can start or stop Automatic maintenance manually? If you don’t know, we have written an article about start or stop automatic maintenance in Windows. This article will help you learn more about automatic maintenance.
What is an Automatic Maintenance Task?
The Automatic Maintenance tasks are the process that will start automatically to perform in regular intervals to maintain operations in Windows PC. The tasks are run daily. This task scans your virus for your system and other malicious software using Windows Defender or other antivirus software.
Find all Automatic Maintenance Tasks in Windows
Windows has automatic maintenance tasks that are running every day. This will help to keep the Windows operating system and all the applications in the OS up to date and secure and also do the scans for viruses. You can find all the tasks that are running in the background quickly.
- Open the Windows Terminal application
- Enter the Command Get-ScheduledTask | ? {$_.Settings.MaintenanceSettings} | Out-GridView and Enter
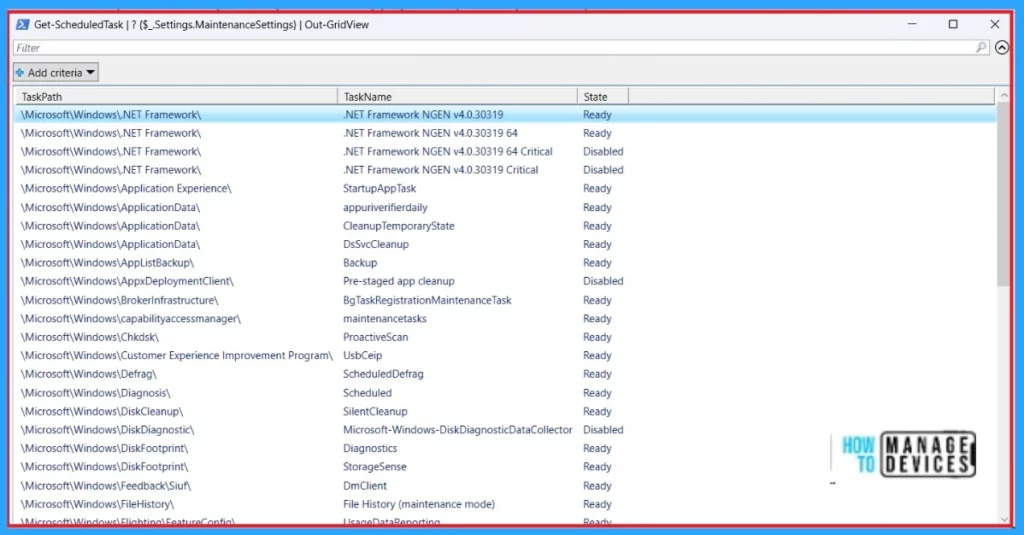
- The Result will shown in another window
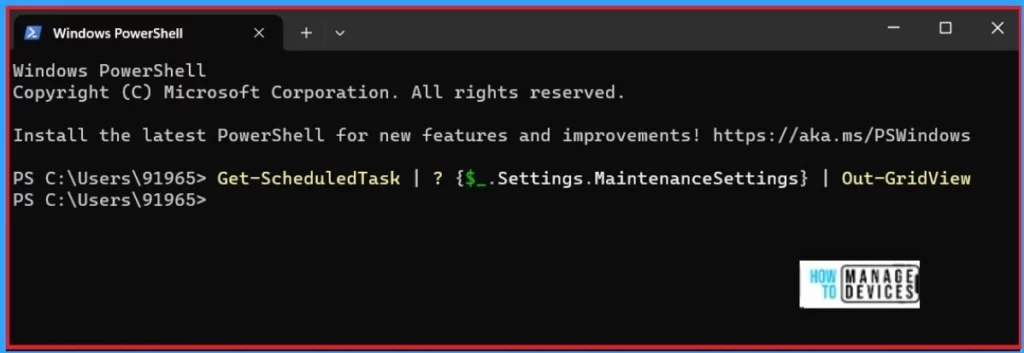
After Entering the Command, You will get all the Automatic Maintenance Tasks in Windows 11. When you enter this command, it will show the tasks in another window. With this, you can create to see the taskpath taskName and current State of all the scheduled tasks. The below screenshot will help you.
You can add another Command for the “MaintenanceTasks.txt” file on your desktop. If you enter this command, all the tasks will shown in the Command window. Also, you can see the TaskPath TaskName and the current State of all the scheduled tasks for automatic maintenance.
- Open The Windows Terminal
- Enter the Command Get-ScheduledTask | ? {$_.Settings.MaintenanceSettings} | Format-Table -AutoSize
| TaskPath | TaskName | State |
|---|---|---|
| \Microsoft\Windows.NET Framework\ | .NET Framework NGEN v4.0.30319 | Ready |
| \Microsoft\Windows.NET Framework\ | .NET Framework NGEN v4.0.30319 64 | Ready |
| \Microsoft\Windows.NET Framework\ | .NET Framework NGEN v4.0.30319 64 Critical | Disabled |
| \Microsoft\Windows.NET Framework\ | .NET Framework NGEN v4.0.30319 Critical | Disabled |
| \Microsoft\Windows\Application Experience\ | StartupAppTask | Ready |
| \Microsoft\Windows\ApplicationData\ | appuriverifierdaily | Ready |
| \Microsoft\Windows\ApplicationData\ | CleanupTemporaryState | Ready |
| \Microsoft\Windows\ApplicationData\ | DsSvcCleanup | Ready |
| \Microsoft\Windows\AppListBackup\ | Backup | Ready |
| \Microsoft\Windows\AppxDeploymentClient\ | Pre-staged app cleanup | Disabled |
| \Microsoft\Windows\BrokerInfrastructure\ | BgTaskRegistrationMaintenanceTask | Ready |
| \Microsoft\Windows\capabilityaccessmanager\ | maintenance tasks | Ready |

Other Features in Automatic Maintenence
Windows automatic system maintenance is enabled by default. There are 2 many other features in automatic maintenance, such as changing automatic Maintenance Time in Windows 11 and enabling or disabling automatic Maintenance to Wake Up Compute.
Change Automatic Maintenance Time in Windows 11
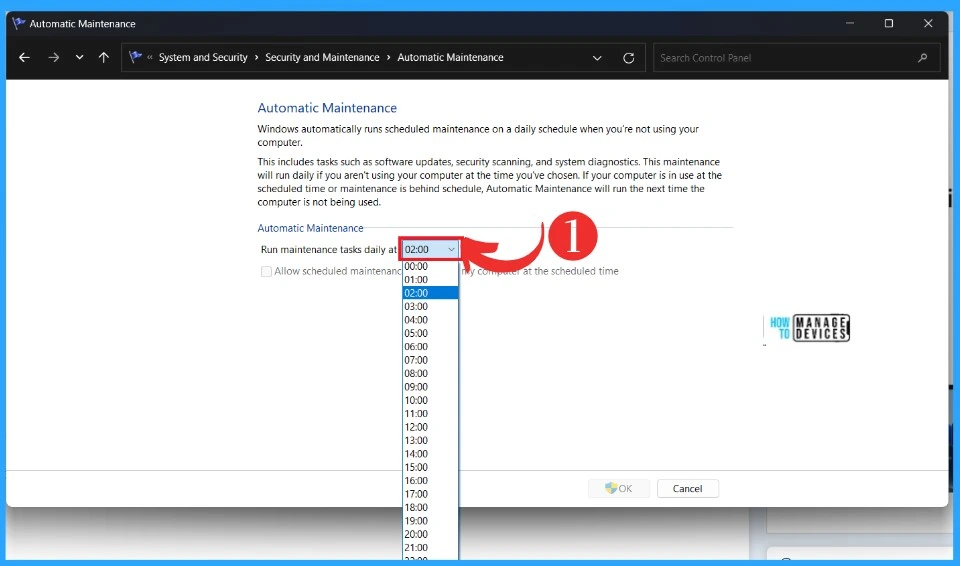
The Tasks are scheduled in the defaulted time of 2:00 AM. You can change the time on your PC if the user is usually not On. This maintenance can’t be stopped because this will affect the system’s performance. To change the default time, Use the Control Panel. The screenshot below will help you.
- Open the Control Panel and select System and Security
- Expand the Maintenance option in the Security and Maintenance
- Click on the Change Maintenence settings
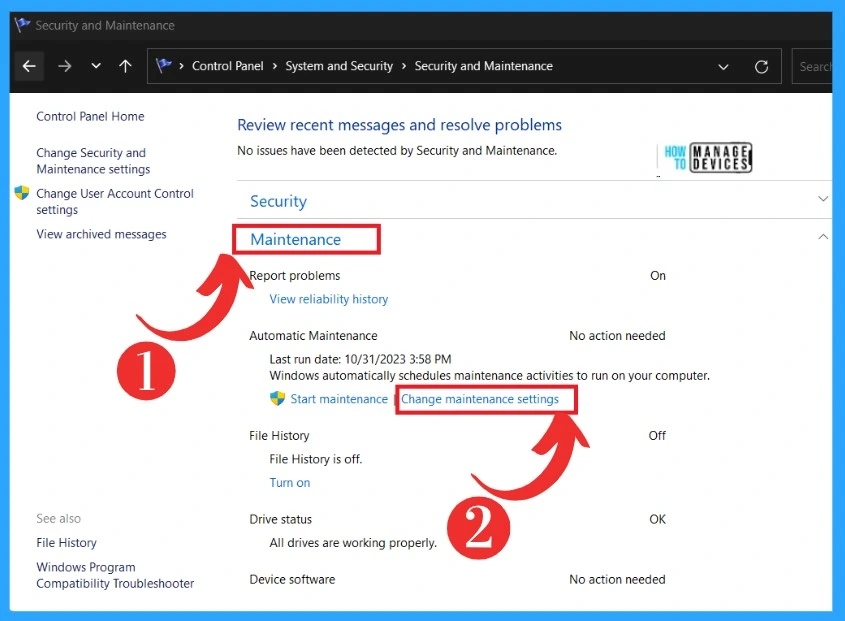
After clicking on the Change maintenance settings, you will get a window where you can select any time for default maintenance. That time will run in for the maintenance; the screenshot below will guide you.
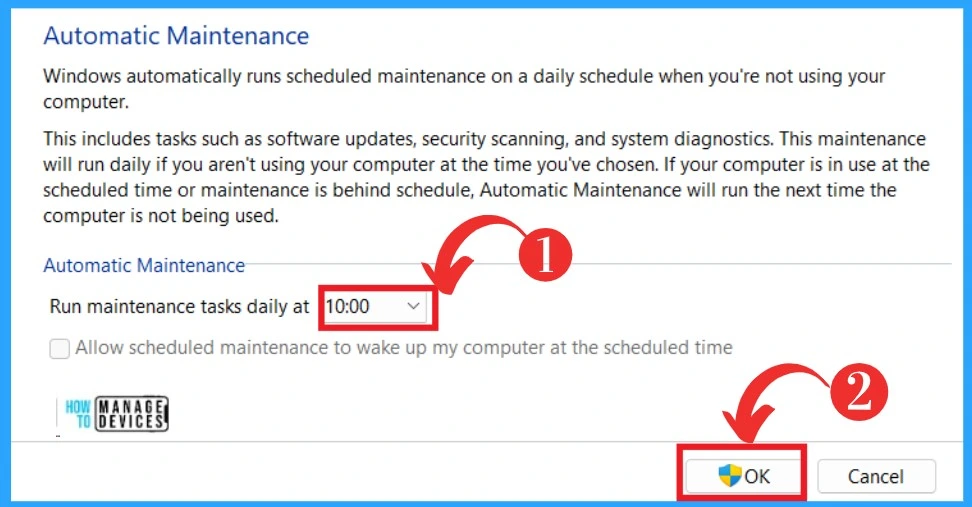
Here, I selected 10.00 A.M.; after choosing the time, you can click the OK button. Now, that time will be set as a default time for your PC’s Scheduled task Maintenance time.
Enable or Disable Automatic Maintenance to Wake Up Compute
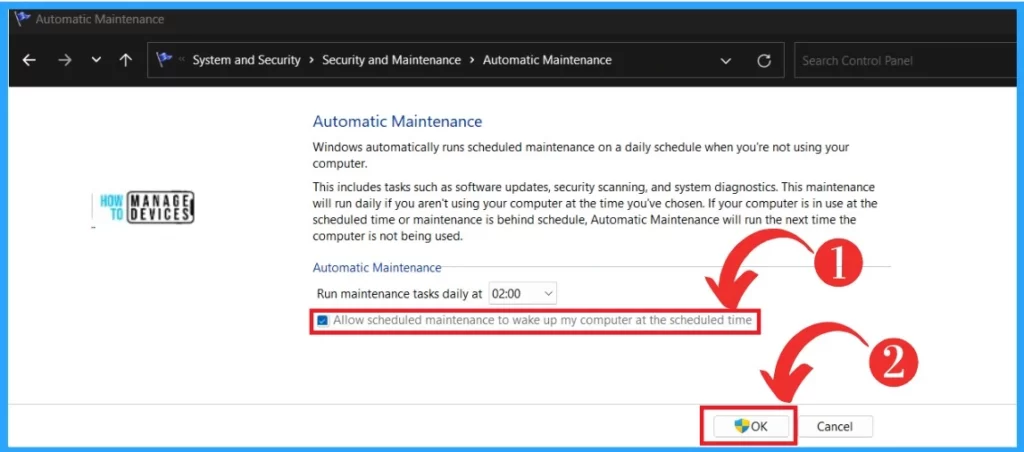
Enable or disable automatic maintenance to Wake Up Compute is another feature in Automatic Maintenance. You can set the scheduled maintenance to wake up your computer at the scheduled time. The easy way to set this is to use the Control panel.
- Open the Control Panel and select System and Security
- Expand the Maintenance option in the Security and Maintenance
- Click on the Change Maintenence settings
- On or Off the option ” Allow scheduled maintenance to wake up my computer at the scheduled time
- Click the OK Button
We are on WhatsApp. To get the latest step-by-step guides and news updates, Join our Channel. Click here – HTMD WhatsApp.
Author
Krishna. R is a computer enthusiast. She loves writing on Windows 11 and related technologies. She likes to share her knowledge, quick tips, and tricks with Windows 11 or Windows 10 with the community.
