Let’s learn 5 Methods for Finding Memory Size Speed and Type in Windows 11. Finding Memory Size, Speed, and Type in Windows 11 significantly depends on a PC’s smooth functioning. Users can improve a PC’s performance by knowing its Memory Size, Speed, Type, etc.
RAM(Random Access Memory) can also be called PC memory or just memory. It is your computer’s short-term memory. It’s where the data is stored, and your computer processor needs to run your applications and open your files.
Memory is an essential part of a laptop or a desktop. High speed and memory size will reflect a device’s performance. Knowing the Memory size, speed, Type, etc., will help users in different scenarios in the digital world.
If the user needs to troubleshoot the PC, you might need to determine basic information about your system’s memory (or RAM). This blog post will help you learn different methods for finding memory size, speed, and type in Windows 11.
- Check Empty RAM Slots Available In Windows 11 Laptop
- Turn On or Off Microsoft Vulnerable Driver Blocklist
What are the Advantages of Finding Memory Size, Speed and Type in Windows 11?
Finding a PC’s memory size, etc., is an essential factor. It depends on the PC’s healthy function. The Advantages of Finding Memory Size, Speed, and Type in Windows 11 are as follows.
1. It helps to tell you what kind of performance you can expect from your RAM
2. It allows us to know if the system needs Troubleshooting
3. It helps to find the usage of memory
5 Methods for Finding Memory Size, Speed and Type in Windows 11
Different methods are available for finding Memory size, Speed, and Type in Windows 11. All the methods are easy to use, and users can choose the methods that suit their preferences. The following are the different methods for finding Memory Size, Speed, and Type in Windows 11.
| Different Methods Finding Memory Size, Speed and Type in Windows 11 |
|---|
| Finding RAM/Memory Size in Settings |
| Different Methods Finding Memory Size, Speed and Type in Windows 11 Finding RAM/Memory Size in Settings |
| Find RAM/Memory Size in System Information |
| Find RAM/Memory Size in Command Prompt |
| Find RAM/Memory Size in PowerShell |
1. Finding RAM/Memory Size in Settings
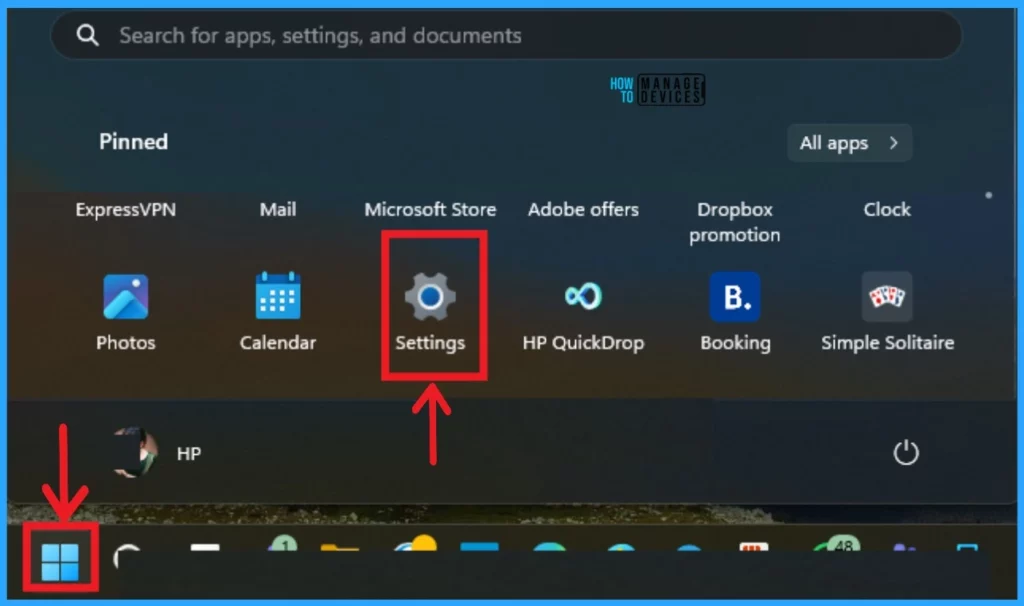
Finding RAM/Memory Size in Settings is the 1st Method. Finding the RAM/Memory Size for this is a very easy method. Select Settings from the Start Menu. You can also open the Settings application with (Win +I).
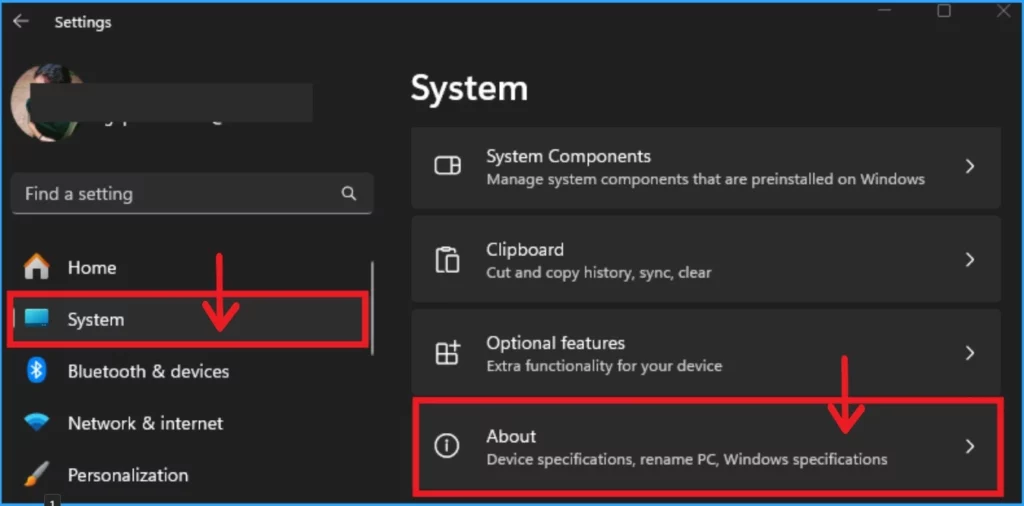
After that, Select System Settings on the left side of the Settings Window. Then select the About feature from the System settings.
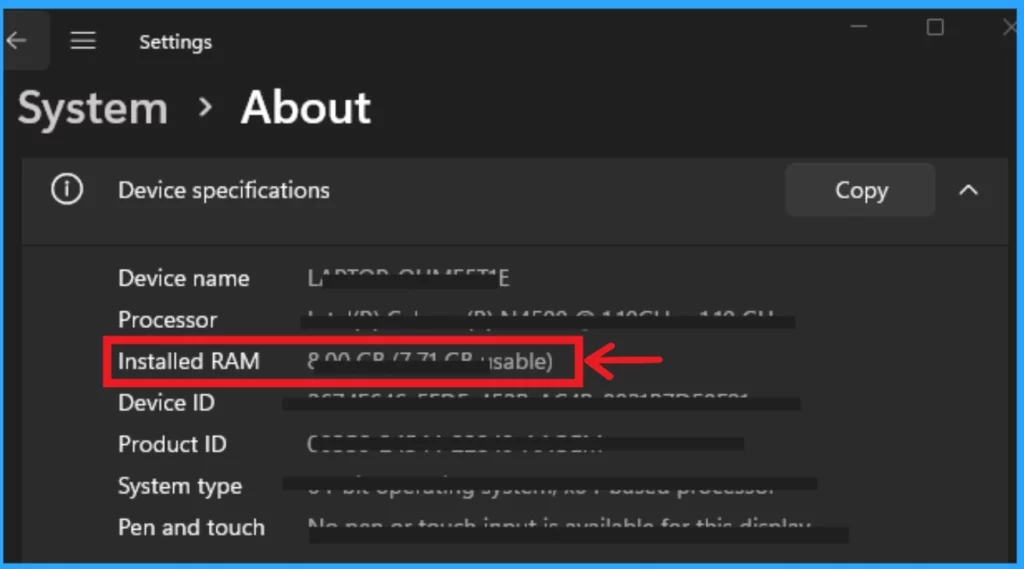
In the About window, you can see different options, including Device specifications and Windows specifications. In the Device specification, you can see the Installed RAM option.
- Turn On or Off Microsoft Defender SmartScreen for Microsoft Edge in Windows 11
- Guidelines for Setting up Kiosk in Windows 11
2. Finding RAM/Memory Size and Speed in Task Manager
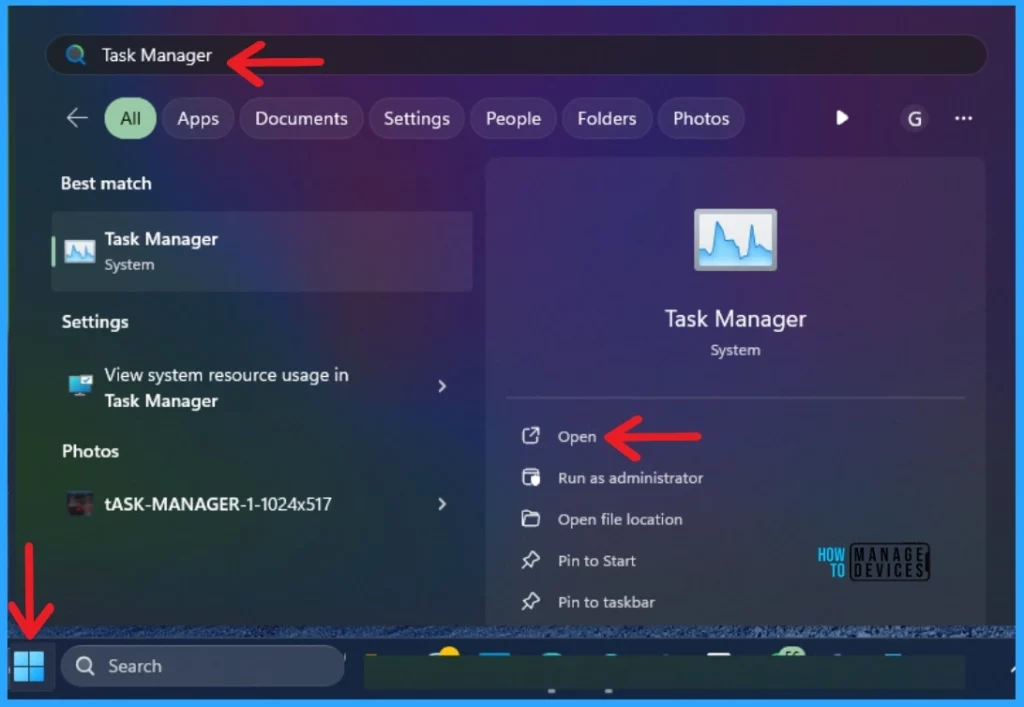
The 2nd method is to find RAM/Memory Size and Speed in the Task Manager. To do this, click the Start Menu and search for Task Manager in the search bar. Then, open the Task Manager.
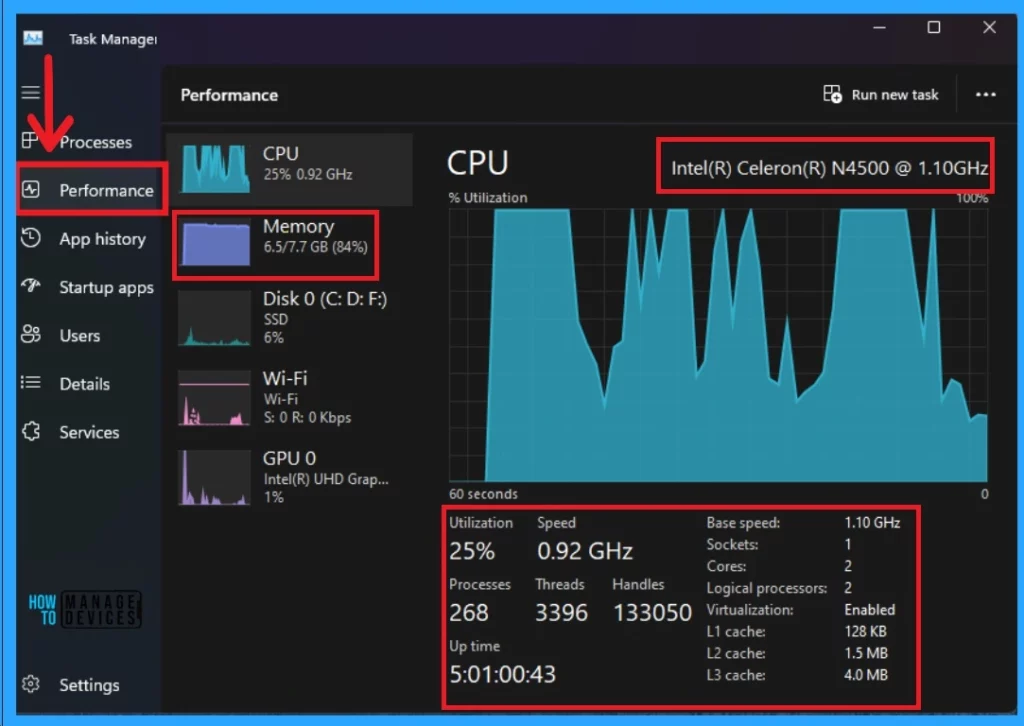
You can see different features in the Task Manager. You can see your device’s Speed and Memory in the performance feature. The screenshot below shows the screenshot.
3. Find RAM/Memory Size in System Information
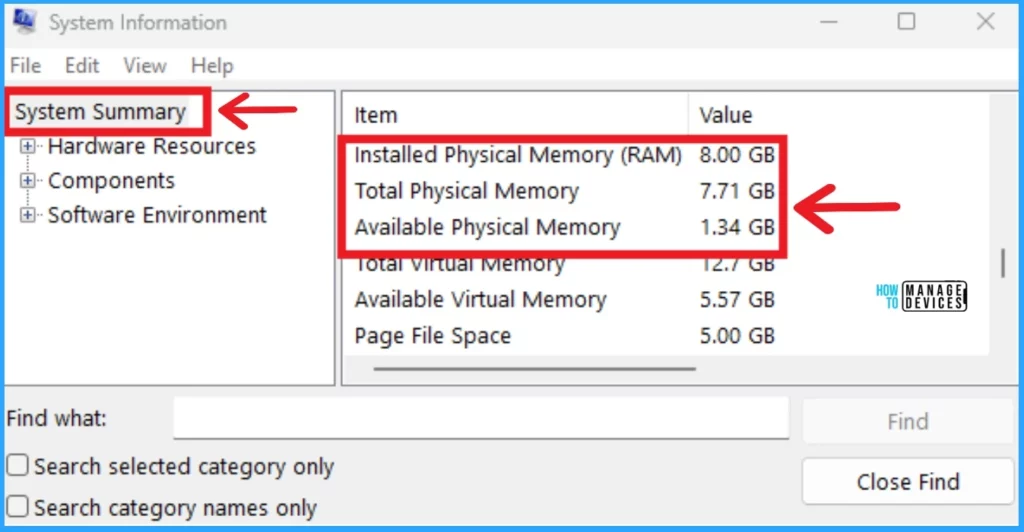
The 3rd method is to find RAM/Memory Size in System Information. System Information contains different features. Some items and their values are shown in the System Summary. Here you can find the Installed Physical Memory(RAM), Total Physical Memory and Available Physical Memory.
- 3 Best Ways to Disable Taskbar Thumbnail Preview on Windows 11
- Ways to Allow an App through Windows Defender Firewall
4. Find RAM/Memory Size in Command Prompt
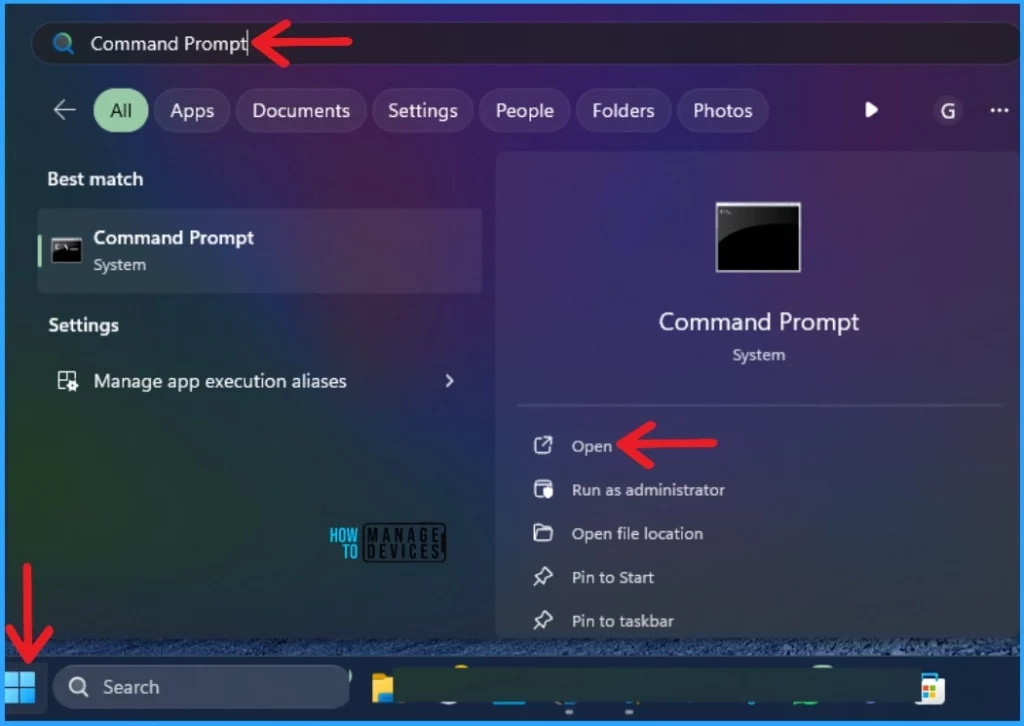
The 4th method is to find the RAM/Memory Size in the Command Prompt. Click on the Start Menu and search Command Prompt in the search bar. Then Open the Command Prompt.
The command prompt helps users perform entered commands and advanced administrative functions to easily find the RAM/memory size of the command prompt. The following command allows you to find specific details of your device.
Note:- wmic MemoryChip get Banklabel, Capacity, Configuredclockspeed, Devicelocator, FormFactor, Manufacturer, Serialnumber, Speed

5. Find RAM/Memory Size in PowerShell
5th method for finding RAM/Memory Size in PowerShell. Click on the Start Menu and search for Windows PowerShell in the search bar. Then open the Windows PowerShell.
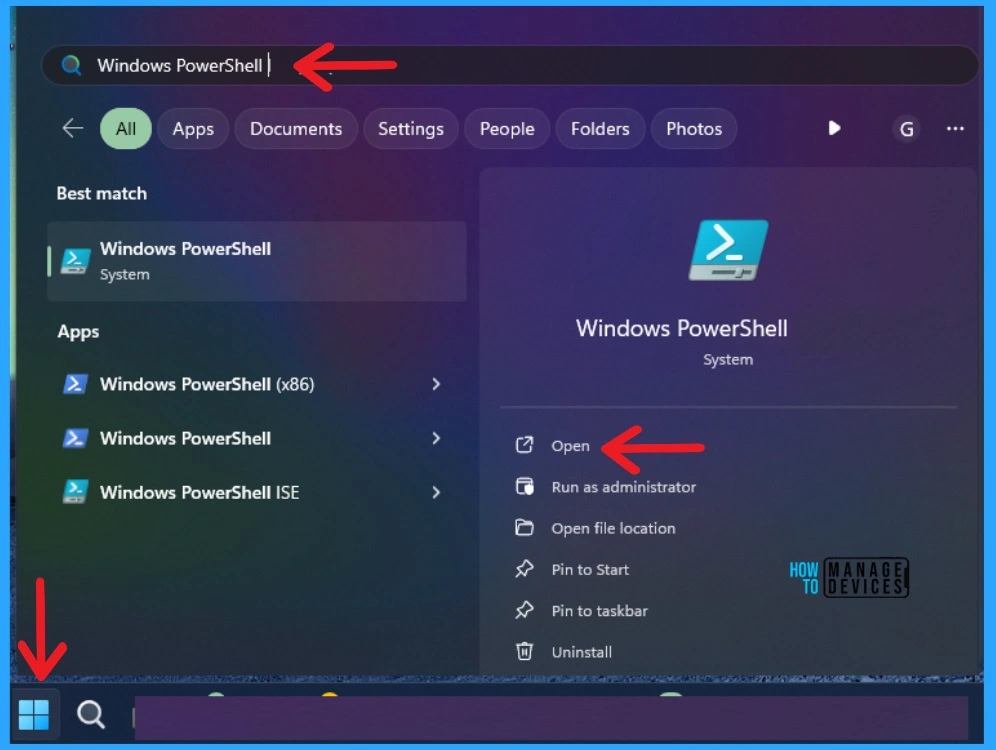
PowerShell is commonly used to automate system management. In PowerShell, users can find the RAM/Memory Size, etc. The command below helps you find the specific details of your device.
Note:- Get-WmiObject Win32_PhysicalMemory | Format-Table Capacity, Manufacturer, FormFactor, Banklabel, Configuredclockspeed, Speed, Devicelocator, Serialnumber -AutoSize

We are on WhatsApp. To get the latest step-by-step guides and news updates, Join our Channel. Click here –HTMD WhatsApp.
Author
Gopika S Nair is a computer enthusiast. She loves writing on Windows 11 and related technologies. She is here to share quick tips and tricks with Windows 11 or Windows 10 users. She is Post Graduate Diploma Holder in Computer Science.
