Let’s learn the Easy Steps to Enable Disable Copilot in Windows 11. Microsoft has released the Windows 11 2023 update that includes a lot of AI features. It can read the screenshots that clicked by you, perform any location actions, summarize web pages, etc.
Copilot is the biggest new feature of Microsoft, which was added in the September 2023 release is a new AI assistant as Windows Copilot, which uses the same technology that is used in Bing Chat, and the Microsoft 365 Copilot helps you to become more productive by understanding complex queries, commands, and clearly understand the context.
Windows Copilot replaces Cortana and can help users with changing settings on PCs. The Copilot can be shown as a button on the Taskbar, when clicked, it opens in a sidebar that features a chat box and conversation history between the user and the Copilot.
To access the Copilot in Windows 11, you need to pinch some system values to access the new, unified Copilot on your Windows 11 PC. You can download and install the Windows 11 2023 update on a stable channel without waiting for a full rollout.
- Windows Updates New Feature Get the Latest Updates as soon as They’re Available
- Desktop Live Wallpapers on Windows 11
Activate Windows Copilot by Upgrade Windows 11, Version 23H2
If a user gets the latest Windows update for version 23H2, then it automatically activates the Copilot preview in the Taskbar. To know more about how to upgrade to Windows 11, version 23H2, and avail of all new apps, click here.
How to Download Windows Copilot
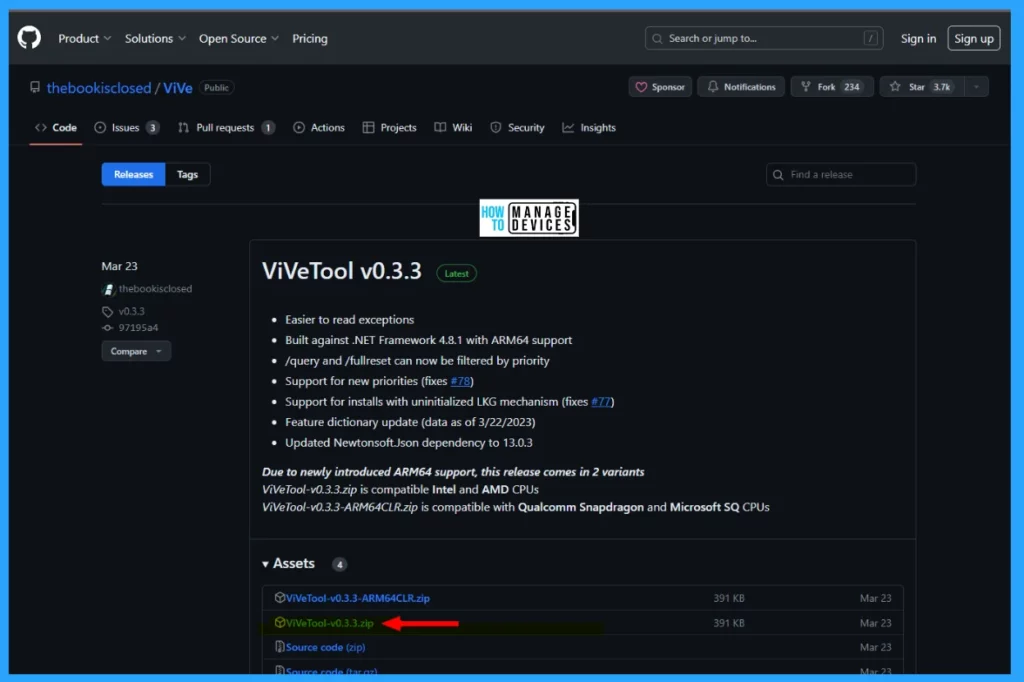
To download the Windows Copilot for Windows 11, go to the GitHub website to download the Windows Copilot zip file. You can download the extract file by clicking the Link here. When the website opens, click on ViVe Tool.v0.3.3.zip to download the patch.
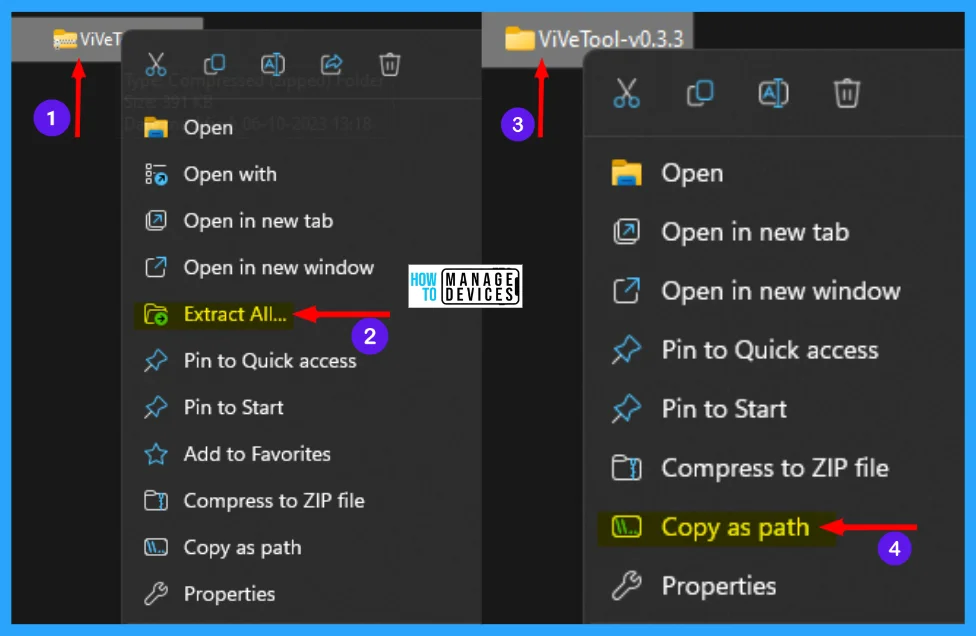
The ViVe Tool.v0.3.3.zip is downloaded and saved in your PC’s Downloads (default folder) folder. Right-click on that zip file and click on the Extract All option. Then browse and select where to save the extracted folder or save it in the default folder, i.e., Downloads.
When it is completed, you will see there is an extracted folder, i.e., ViVeTool-v0.3.3, right-click on this folder, choose Copy as path, and continue further process.
Install and Enable Disable Windows Copilot Using Command Prompt
As shown earlier, the path of the downloaded folder is copied. Now open the Elevated Command Prompt window to install the Copilot. When the command prompt in Administrator mode is opened, follow the process listed below. After completion of the process below, restart your device to enable Windows Copilot.
- Type cd and paste the path copied earlier cd “C:\User\mishr\Downloads\ViVeTool -v0.3.3”
- Now execute the command below to enable the Windows Copilot.
vivetool /enable /id:44774629,44776738,44850061,42105254,41655236

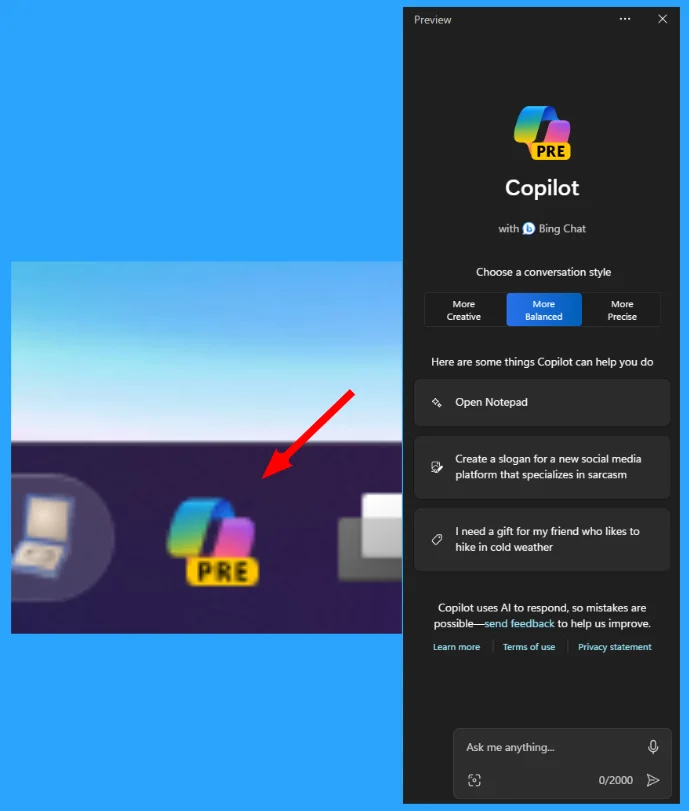
Now you can see the Windows Copilot icon available in the Taskbar. With a single click, you can able to access the Copilot, which is available in the sidebar of the desktop, as shown in the image below.
If you change your mood and disable the Windows Copilot, follow the step-by-step process. You must open the Elevated Command Prompt window to enter the Copilot. In the command prompt in Administrator mode, follow the process listed below. After completing the process below, restart your device to disable Windows Copilot.
- Type cd and paste the path copied earlier cd “C:\User\mishr\Downloads\ViVeTool -v0.3.3”
- Now execute the command below to disable the Windows Copilot.
vivetool /disable /id:44774629,44776738,44850061,42105254,41655236

Enable Disable Copilot Using Taskbar Settings
You can now enable and disable Windows Copilot using the taskbar settings. To do so, right-click on the space of the Taskbar and click on Taskbar Settings as illustrated below.
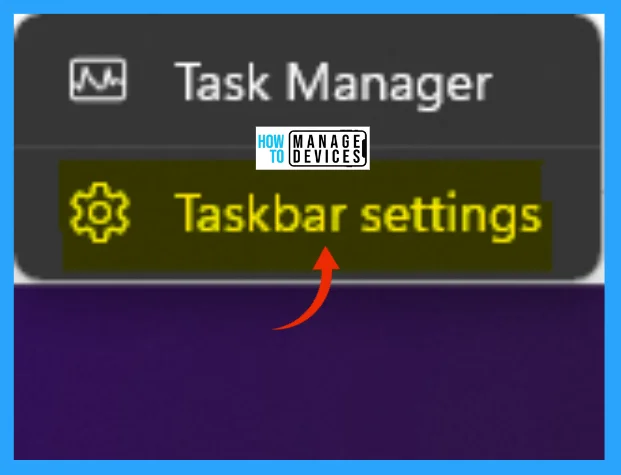
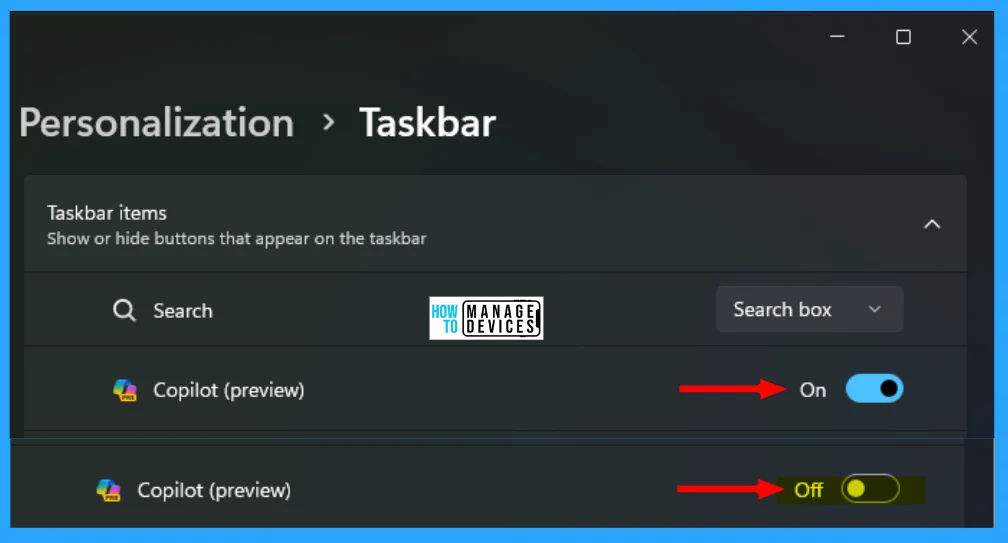
The Taskbar settings open directly, which is located under the route Settings>Personalization>Taskbar. Under the Taskbar, you can see an option as Taskbar items, which is used to show or hide buttons on the taskbar.
If you see the Copilot (preview) app, then toggle the button to ON to show the Copilot (preview) button on the taskbar or toggle the button to OFF to hide the Copilot (preview) button, as shown in the image below.
Enable Disable Windows Copilot Using Group Policy
Here is the process that allows you to access the Group Policy to enable or disable Windows Copilot, By following this method, you can enable or disable Copilot, which means to appear or disappear the Copilot icon from the Taskbar.
Open Local Group Policy Editor directly (Windows key + R and enter gpedit.msc) or open MMC and load the Local Group Policy Editor snap-in.
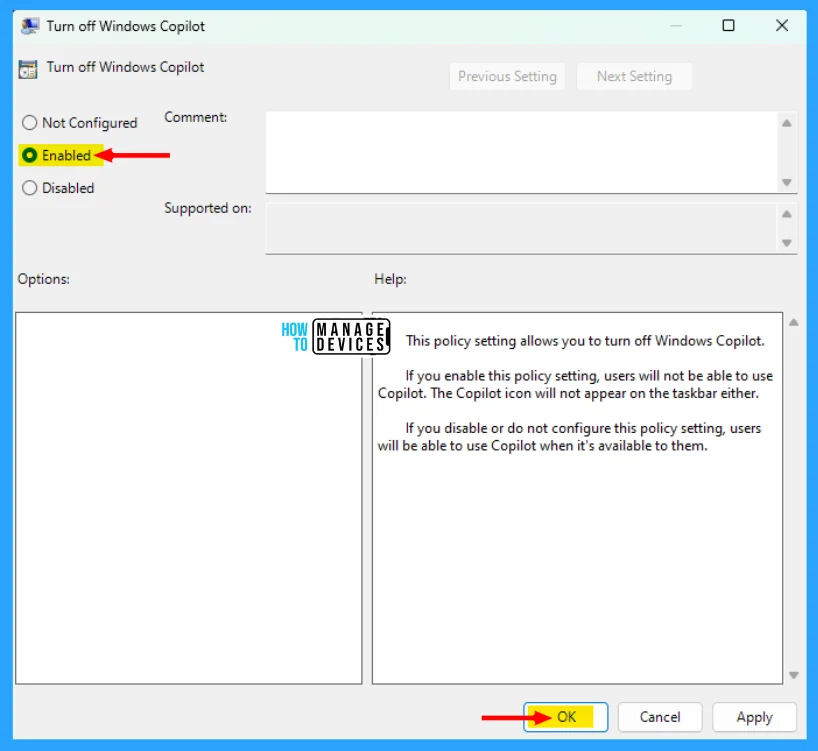
In Group Policy Editor, navigate to the User Configuration > Administrative Templates > Windows Components > Windows Copilot > Turn off Windows Copilot. In the Windows Copilot Settings, find the policy, Turn off Windows Copilot, and double-click on the policy to open and get the detailed view.
This policy setting allows you to turn off Windows Copilot. If you enable this policy setting, the user cannot use Copilot. The Copilot icon will not appear on the taskbar either. If you disable or do not configure this policy setting, users will be able to use Copilot when it’s available to them.
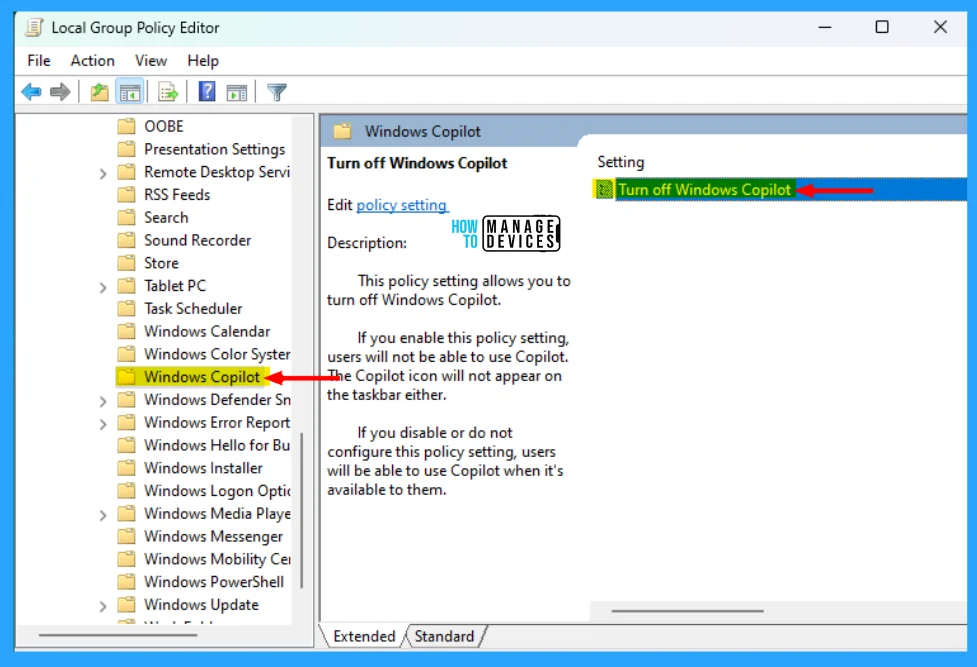
This policy setting allows you to turn off Windows Copilot. If you enable this policy setting, users cannot use Copilot. The Copilot icon will not appear on the taskbar either. If you disable or do not configure this policy setting, users will be able to use Copilot when it’s available to them.
The default setting for this is now Not Configured, which is equal to the Disabled setting. If you activate this, then the Copilot icon is shown in the Taskbar. Restart your PC to get the modified result.
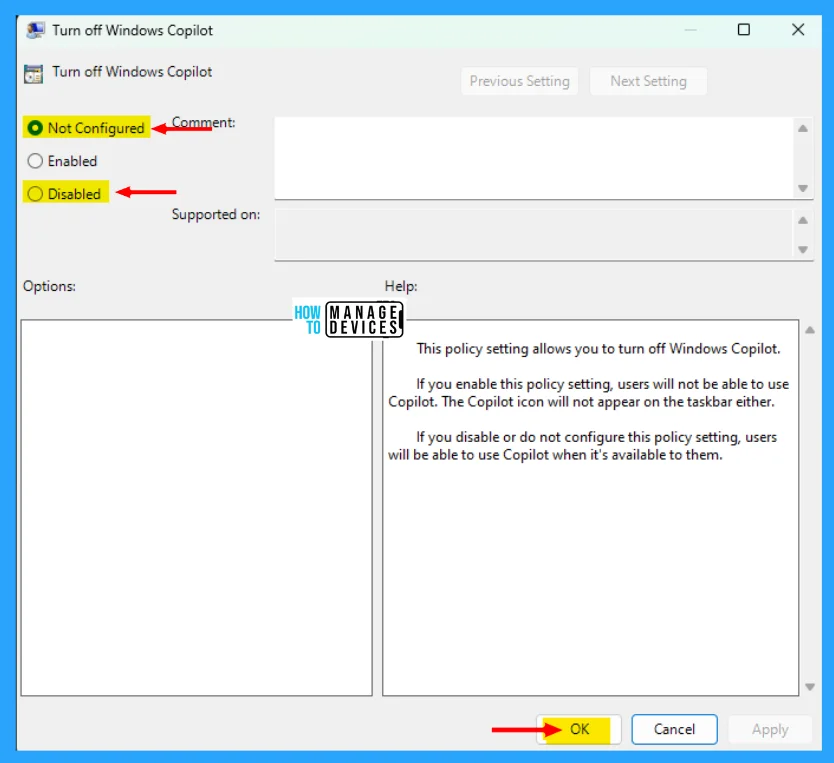
This policy setting allows you to turn off Windows Copilot. If you enable this policy setting, users cannot use Copilot. The Copilot icon will not appear on the taskbar either. If you disable or do not configure this policy setting, users will be able to use Copilot when it’s available to them.
Click to check the Enabled button, then the Copilot icon is hidden from the Taskbar. Restart your PC to get the modified result.
Enable Disable Windows Copilot Using Registry
Another way is to enable and disable Windows Copilot from the registry. This procedure is done using the Registry Editor. Let’s check how you can enable and disable Windows Copilot using Registry Editor.
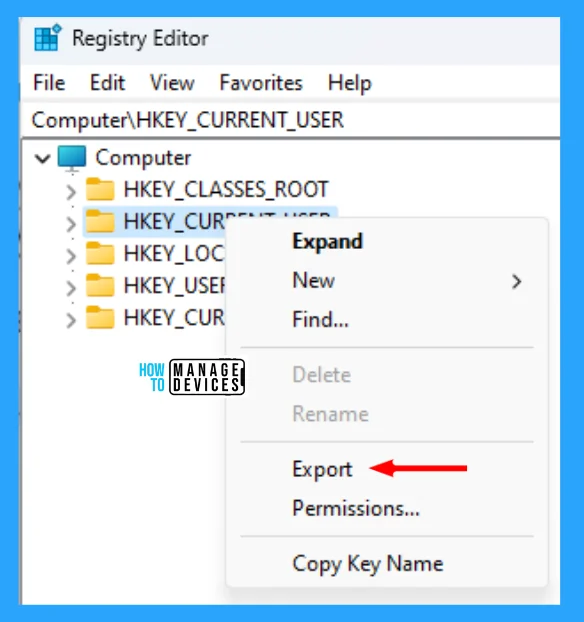
Note! take Backup – Registry Editor may affect the system if any mistake occurs. It is advisable to take a backup of the Registry before proceeding. In the Registry Editor, go to File in the left top corner for backup. Click on it, then select Export and save the backup.
- Go to File
- Right-click on HKEY_CURRENT_USER
- Click on Export
- Save it
After taking the backup for the HKEY_CURRENT_USER, you can now follow the process listed below to enter into the registry editor to modify changes.
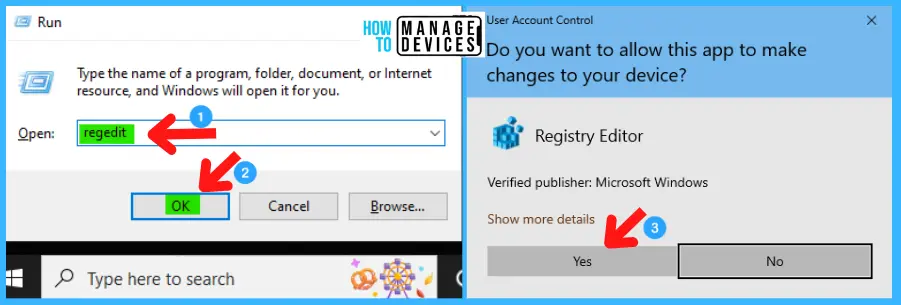
- Window Key + R (To open run command)
- Type ‘regedit‘ and press OK
- Administrator permission press Yes
Now, the Registry Editor opens. Find the path ‘HKEY_CURRENT_USER\Software\Microsoft\Windows\CurrentVersion\Explorer\Advanced.’ Following the trail, reach the required folder for further modification. Find the ShowCopilotButton by scrolling down.
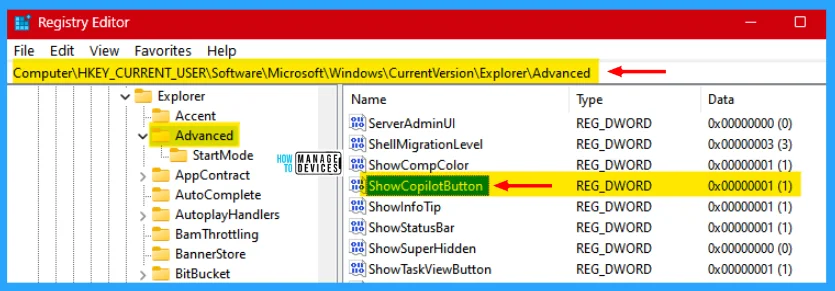
When you find the ShowCopilotButton, double-click on it to modify. The new window opens as edit DWORD. To disable ShowCopilotButton, set the value to 0 and enter. To enable ShowCopilotButton, set the value to 1 and enter.

Check the following table for a clearer picture of Enable Disable Windows Copilot registry options.
| Setting Type | Hive | Key | Value | Value Name | Value Data |
|---|---|---|---|---|---|
| Registry | HKEY_CURRENT_USER | Software/Microsoft/Windows/CurrentVersion/Explorer/Advanced | DWORD (32-bit) | ShowCopilotButton | 0 or 1 |
If you are looking to use the Intune policy to turn off Windows Copilot on Windows devices, You can use Intune CSP, For more details, click on the Turn Off Copilot in Windows using Intune and Group Policy.
I hope the information on the Easy Guide to Enable Disable Copilot in Windows 11 is helpful. Please follow us on the HTMD Community and visit our website HTMD Forum, if you like our content. Suggest improvements, if any, and we love to know which topic you want us to explore next.
Author
Alok is a Master of Computer Applications (MCA) graduate. He loves writing on Windows 11 and related technologies. He likes to share his knowledge, quick tips, and tricks with Windows 11 or Windows 10 with the community.

After following your procedure I get no icon and when going into gpoedit a popup dialog comes up stating the following :an appropriate resource file could not be found for file c:\windows\policydefinitions\searchOCR.admx (error = 2):The system cannot find the file specified
even vivetool didn’t turn on copilot for me, none of these solutions work, OS 23h2, Version 10.0.22631 Build 22631