Hello Everyone!!! Here we are with another deployment post for you. This post includes the Pidgin Deployment Using SCCM Application EXE Model. We will use the Pidgin EXE Installer to deploy on the Windows 10/11 client machines using Configuration Manager.
Pidgin is a language extension that uses simple grammar and vocabulary to communicate between two or more people who do not speak the same language. In this case, the pidgin language is a combination of several languages in which the vocabulary and grammar are restricted.
It is a chat program that allows you to log in to multiple chat networks simultaneously with a single account. Thus, it is possible to chat with friends on XMPP and participate in IRC channels at the same time. The Pidgin application runs on Windows, Linux, and other UNIX-like platforms. Are you looking for Pidgin for macOS? Take a look at Adium!
Pidgin supports many features of these chat networks, including file transfers, away messages, buddy icons, custom smileys, and typing notifications. Additionally, Pidgin’s functionality can be extended even beyond the standard features through a variety of plugins.
- Deploy Google Earth Pro Using SCCM Application MSI Model
- Cjwdev Group Manager Deployment using SCCM | 0x643 1603 Error
Prerequisites – Deploy EXE Application using SCCM
We have not seen any Pidgin MSI Application, so we need to use EXE Application to deploy and install the Pidgin Application. Now, before we proceed further, we must have these three things in advance, especially when we have a .exe setup:
- Installation Command/Uninstallation Command
- Detection Method
- Application Icon
All the details of the application are given below. The install and uninstall command line as well as the App install detection method is explained below. You can download Pidgin from the following link – Pidgin:: Pidgin, the universal chat client.
Pidgin Application Creation Using SCCM Console
To start with the Application creation part, copy the downloaded Pidgin .exe setup to the package source location of the SCCM Server.
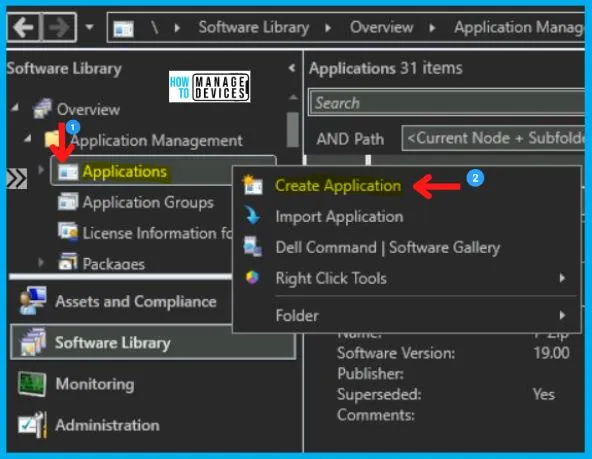
- Navigate to SCCM Console \Software Library\Overview\Application Management\Applications.
- Right-click on Applications and select Create Application.
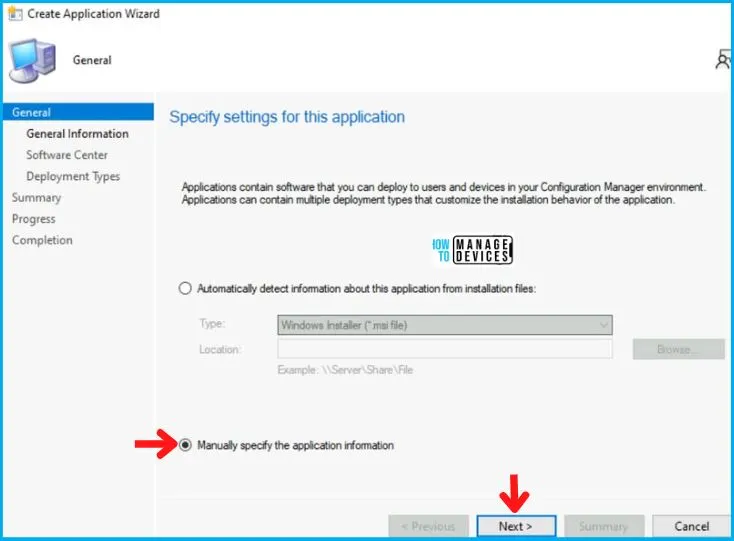
Whenever you have an EXE application, select the Manually Specify the Application Information option and click Next.
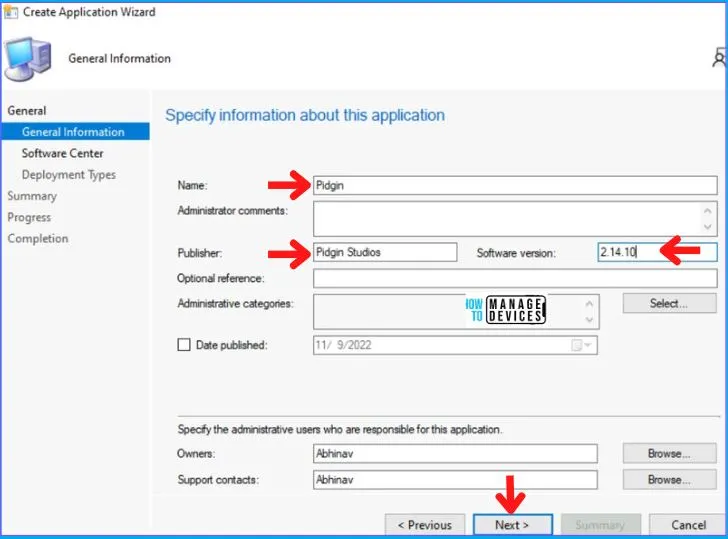
In the General Information Tab, you need to provide the metadata information of the SCCM Pidgin application. You need to enter the details like :
- Name, Publisher, and Software Version.
- And click on Next.
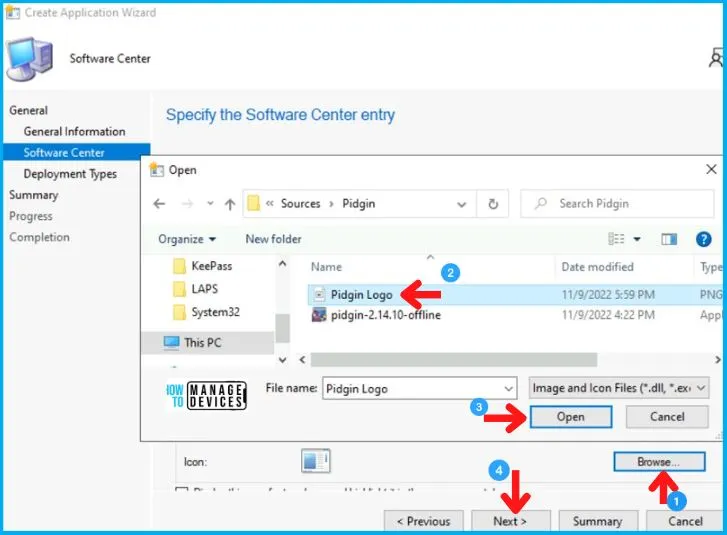
Then in the Software Center Tab, Enter the Application Name and upload the Icon by clicking on Browse. For more information about uploading icons, check the Easy Steps Software Center Icon for SCCM Application Deployment. After clicking on Browse, select the icon you downloaded earlier as I also mentioned at the start of the post. Then Click on Next as highlighted in the image.
The Deployment tab is where you need to specify the Pidgin Application installation command lines, detection methods, etc. This is a mandatory step for all SCCM EXE Application Deployments.
- In the Deployment Types Tab, Click on Add.
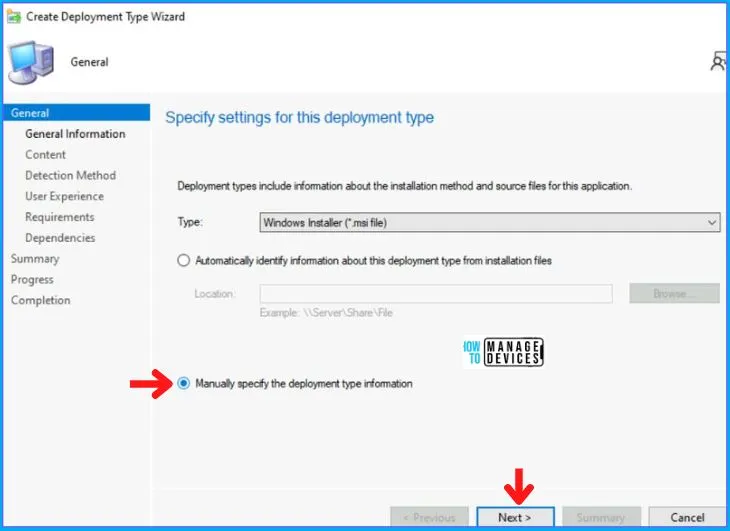
Now the Deployment Type Wizard will pop up, and in General Tab, select Manually Specify the Deployment type information and click on Next.
Silent Install Command Line for Pidgin
With the help of the internet, one can find an Install command for any application. In our case, we have to search the install command for the Pidgin Application. After searching, the install command for the Pidgin Application is pidgin-2.14.10-offline.exe /DS=0 /SMS=1 /L=1033 /S.
After you successfully installed Pidgin using the install command in your test environment. Now you have to look for the Uninstall command. For this, the Uninstall Command for Pidgin is “%ProgramFiles(x86)%\Pidgin\pidgin-uninst.exe” /S.
| Install Command | Uninstall Command |
|---|---|
| pidgin-2.14.10-offline.exe /DS=0 /SMS=1 /L=1033 /S | “%ProgramFiles(x86)%\Pidgin\pidgin-uninst.exe” /S |
Registry Details – Detection Method for Pidgin
After this, you have to check for the Detection Method. Here we try to use the Registry type for the detection method. For this, we need to go to Registry Editor and open the Find dialogue box and search for Pidgin. The below path directly navigates you there.
Computer\HKEY_LOCAL_MACHINE\SOFTWARE\WOW6432Node\Microsoft\Windows\CurrentVersion\Uninstall\Pidgin
We double-click on the DisplayVersion and copied the Value data, DisplayVersion = 2.14.10.
Pidgin Application Install or Uninstall Command Lines
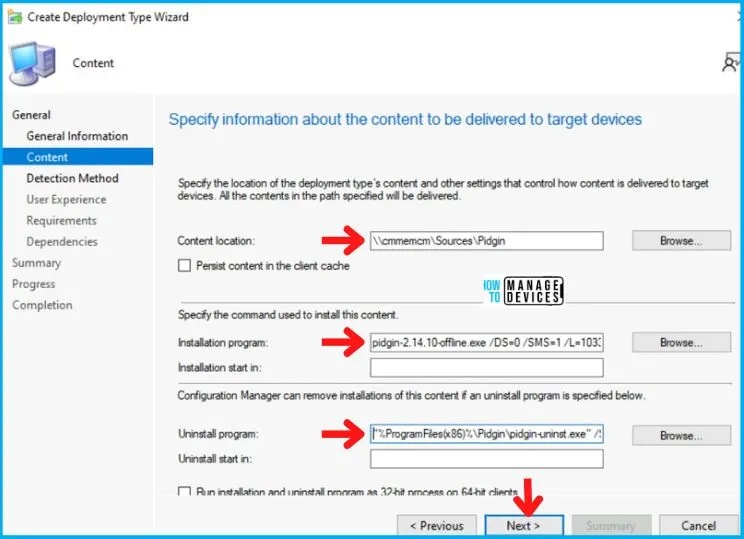
After this, the General Information Tab appears, in which you just have to enter the application’s name and click on Next. Now in Content Tab, enter the important details mentioned below and click Next.
- Content-Location (Browse for the UNC path where your setup is kept)
- Installation Program
- pidgin-2.14.10-offline.exe /DS=0 /SMS=1 /L=1033 /S
- Uninstall Program
- “%ProgramFiles(x86)%\Pidgin\pidgin-uninst.exe” /S
Detection Method for Pidgin Application
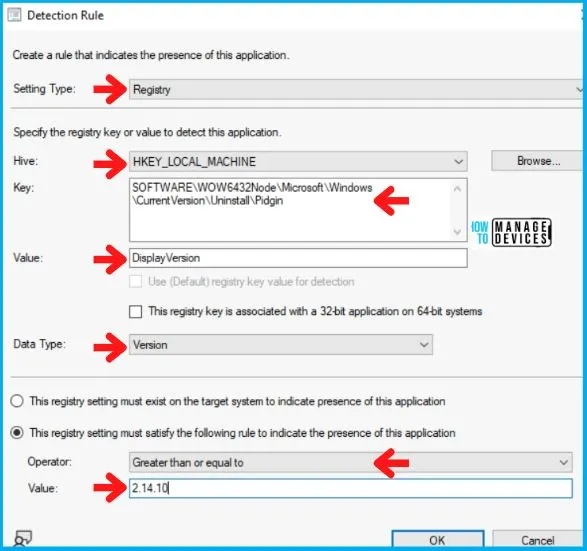
Now in the Detection Method Tab, click on Add Clause, and a new Detection Rule page will pop up. Fill in all the details very carefully as mentioned below:
- Select Registry in the Setting Type.
- Select Computer\HKEY_LOCAL_MACHINE in the Hive.
- Copy the rest path in the Key.
- SOFTWARE\WOW6432Node\Microsoft\Windows\CurrentVersion\Uninstall\Pidgin
- Enter DsipayVersion in Value.
- Choose Version as Data Type.
The following table provides clearer options for a detection method for an exe (Pidgin Application .EXE) file.
| Setting Type | Hive | Key | Value | Data Type | Operator | Value |
|---|---|---|---|---|---|---|
| Registry | Computer\HKEY_LOCAL_MACHINE | SOFTWARE\WOW6432Node\Microsoft\Windows\CurrentVersion\Uninstall\Pidgin | DisplayVersion | Version | Greater than or equal to | 2.14.10 |
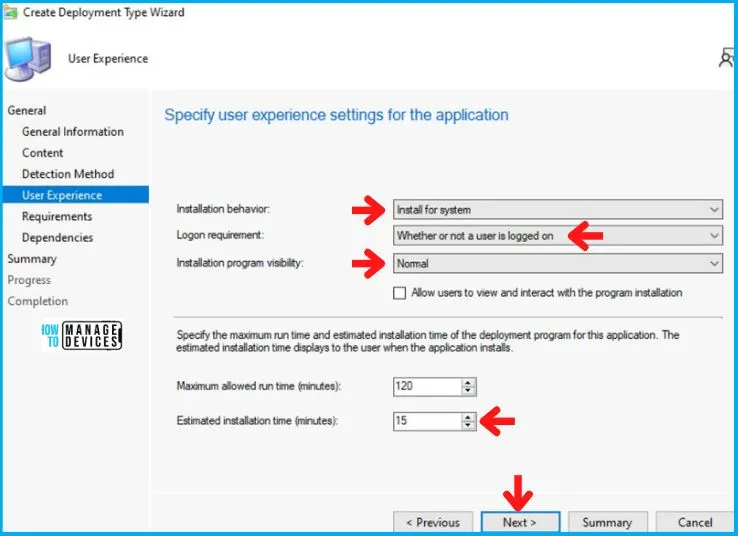
Now in the User Experience Tab, specify Install for the system in Installation behavior; in the Logon requirement, choose Whether or not a user is logged on and Set Installation Program Visibility to Normal. Also, provide the Maximum allowed run time and Estimated installation time as shown below and click on Next.
Click on Next in the Requirement, Dependencies, and Summary Tab. After this, in the end, Click on Close in the Completion Tab as shown below.
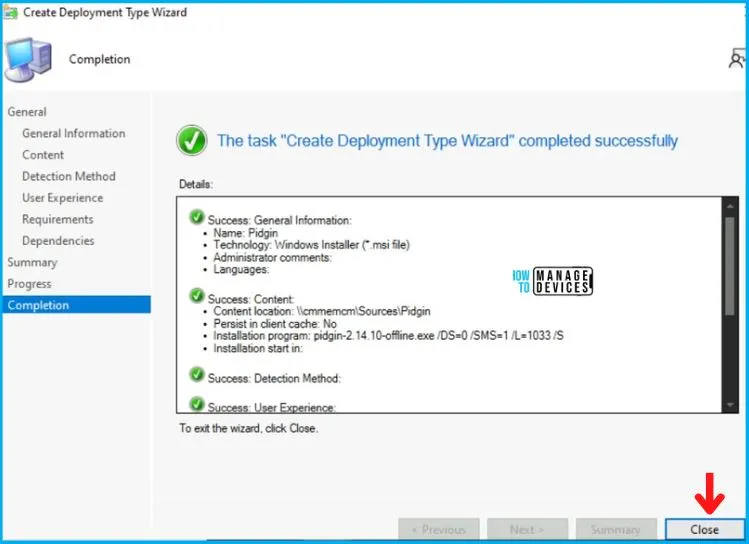
Then back in the Create Application Wizard, click Next in Deployment Tab and on the Summary Tab. Now end this Create Application Wizard by clicking on Close in Completion Tab.
Distribute Pidgin Application to the SCCM DP
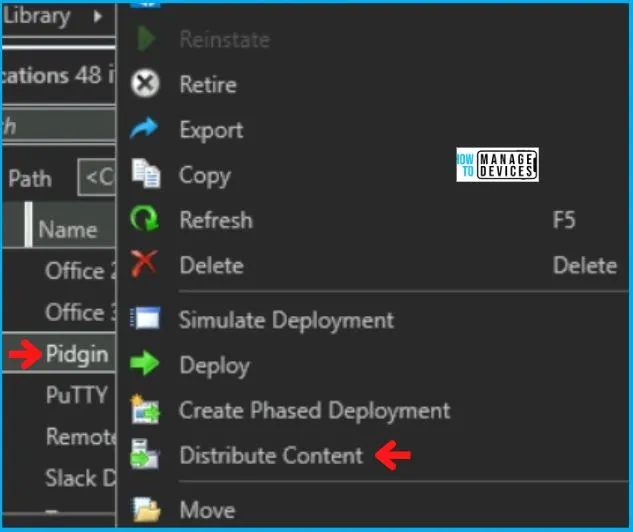
After creating the SCCM Application for Pidgin, it will appear in the Application Node. To begin with, the distribution right-click on the Pidgin Application and clicks on Distribute Content, as shown in the picture below.
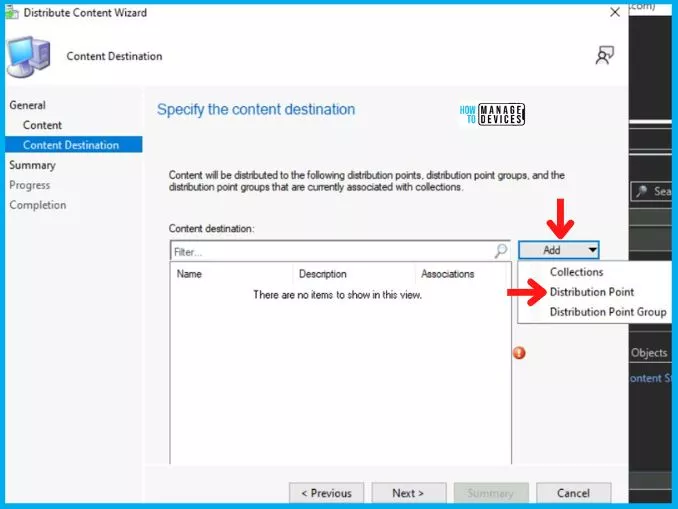
The Distribute Content Wizard will open, and click Next in the General Tab. Then select the Application Name in the Content Tab and Click on Next.
- After this, in the Content Destination Tab, Click on Add and select the Distribution Point option.
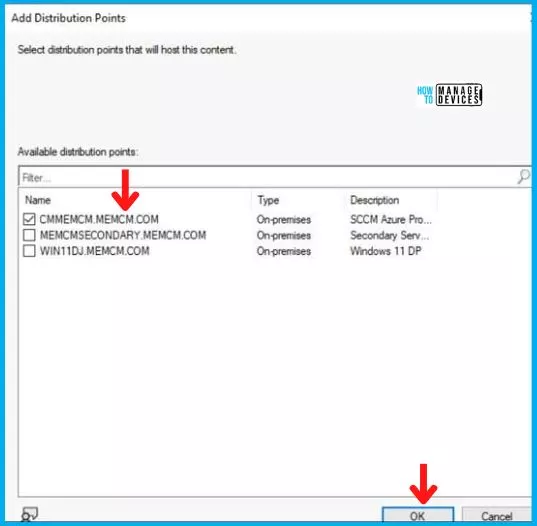
Then Add Distribution Point page will pop up, and choose the Distribution Point on which you want to distribute the Application.
After this, Click Next on Summary Tab and complete this Distribution process by clicking Close on Completion Tab.
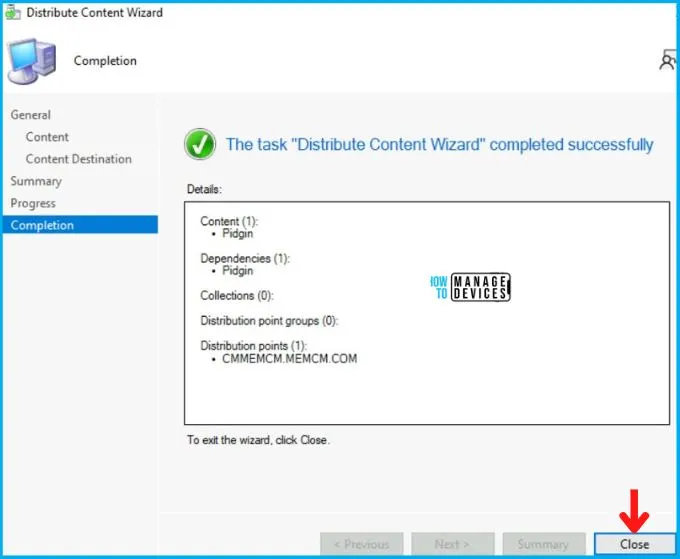
Deployment of Pidgin Application using SCCM
So far, we have accomplished two tasks, i.e., Application Creation and Application Distribution to the DP. Now all left is the Deployment of the Pidgin Application on the Device Collection.
- As you can see, your Application is displaying in Application Node, Right-click on Pidgin Application and select Deploy.
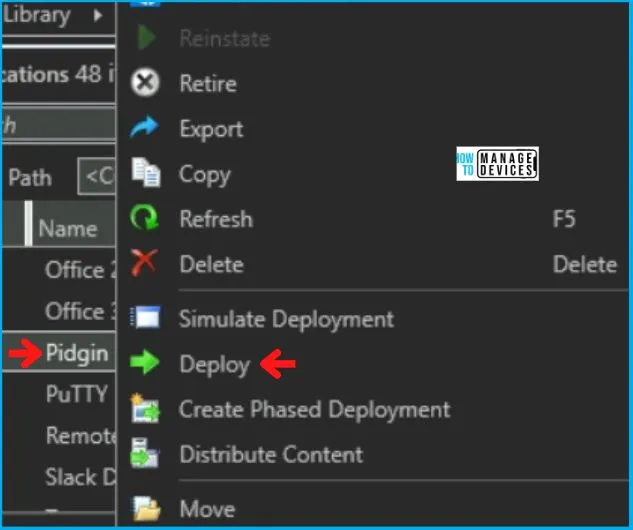
After this, Deploy Software Wizard opens, and in the General Tab, enter the Name of the Application and click on Browse to select the Collection.
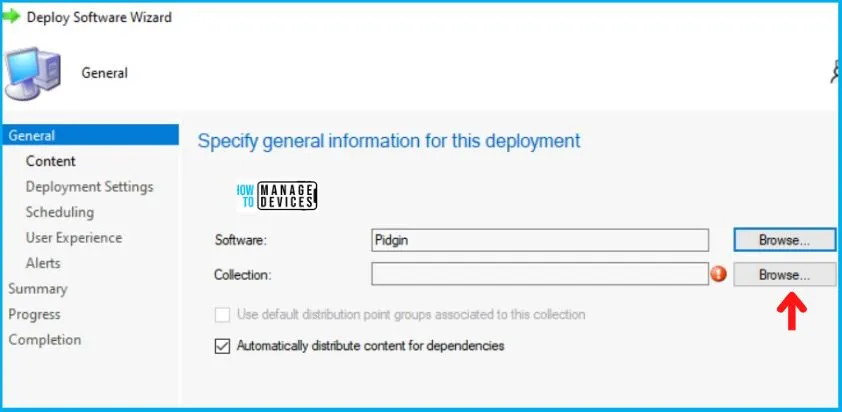
Now the Select Collection page will pop up; choose Device Collection from the drop-down menu, and then
- Select your targeted Device Collection and click on OK, and then Next.
- Here I choose All Windows 10 Devices.
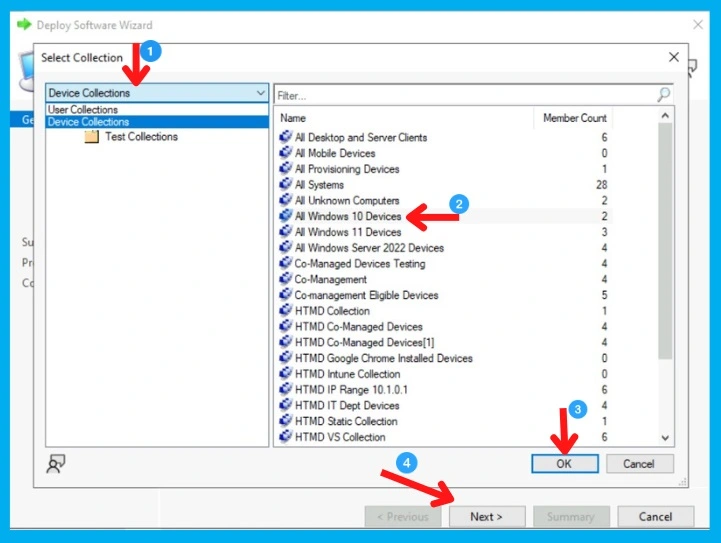
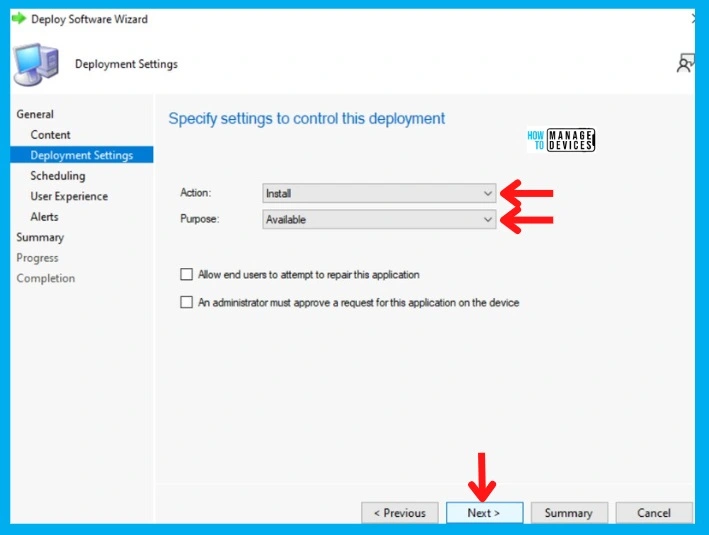
Now in the Content Tab, select the Distribution Point on which the Application is distributed and click on Next. Now in the Deployment Settings Tab, select:
- Install in the Action box
- And choose Available in the Purpose category.
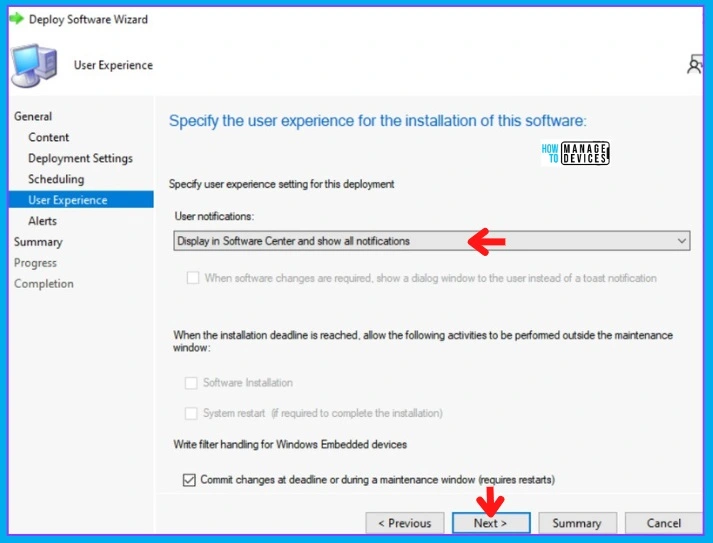
In the Scheduling Tab, enter the time details if you want it to be available at a specific time; otherwise, leave it as it is and click Next. After this, in the User Experience Tab,
- Select Display in Software Center and shows all notification options in the User notifications, and click on Next as shown below.
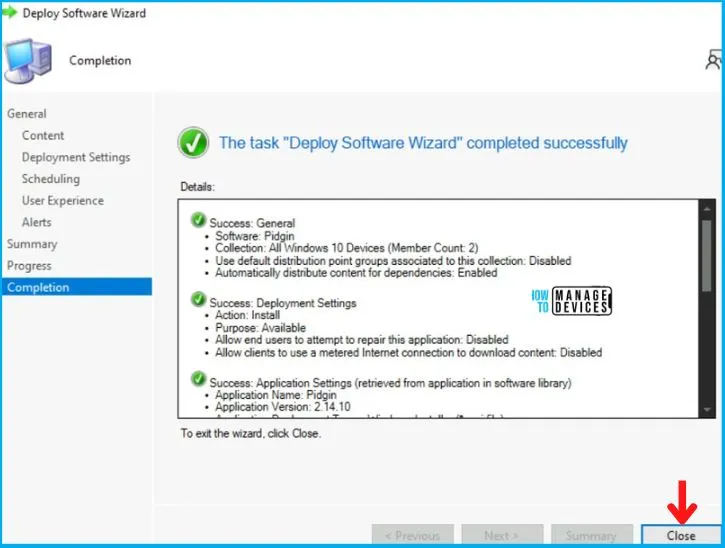
In the Alerts and Summary Tab, click on Next and to end the process, click on Close in the Completion Tab.
End User Experience
In this section, we will check the end-user experience for Pidgin Deployment and Installation. The Pidgin Application is Created, Distributed, and Deployed.
Now, if you check the Software Center of Windows 10 or 11 devices, you will see the application there in Available mode, and the user can install it as per the requirement.
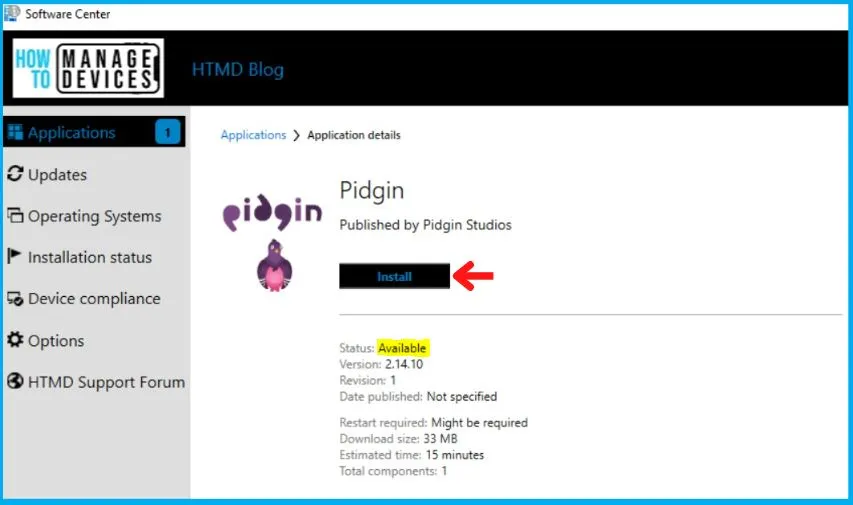
As you can see in the below screenshot, the Pidgin Application is installed successfully on Windows 10/11 devices. This proves that the above silent install and uninstall command and detection logic works fine for Pidgin Application Installation using SCCM.
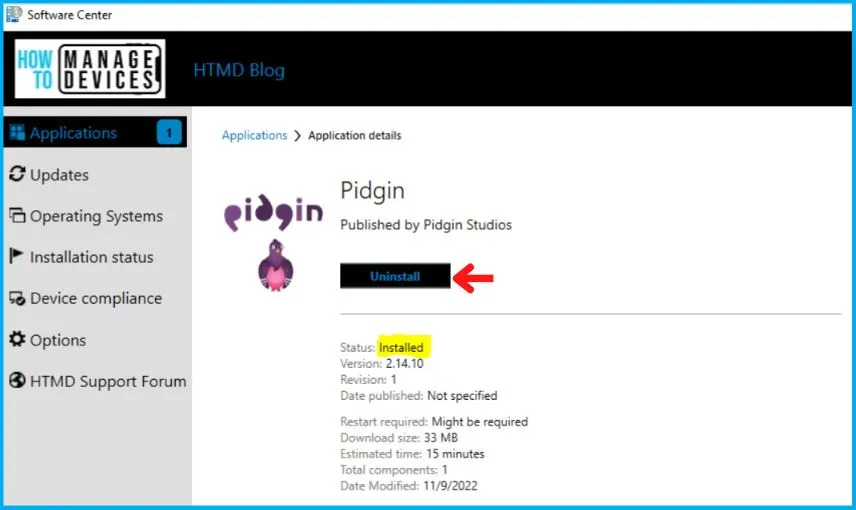
The installation was quick, and the Pidgin was installed successfully without any issues. To monitor the Pidgin Application installation, on the client computer verify the AppEnforce.log file in the C:\Windows\CCM\Logs folder.
- Client Side -> Deep Dive SCCM Application Model Troubleshooting
- Server Side -> Insiders Guide SCCM Application Model Troubleshooting (anoopcnair.com)
Kudos to all of you out there!! You have successfully created, Distributed, and Deployed the Pidgin as it is installed from the Software Center.
Author
Abhinav Rana is working as an SCCM Admin. He loves to help the community by sharing his knowledge. He is a B.Tech graduate in Information Technology.

why not package the app? At least with a PSADT wrapper…
how to trigger application in software center from command line
Can you please help us to understand more about your requirements?