Learn how to Backup and Restore Windows 365 Cloud PC. In this post, you’ll learn to configure and use point-in-time restore settings for Cloud PC. You can restore Windows 365 Cloud PC to its previous state.
Microsoft has introduced the exciting point-in-time restore feature that allows Administrators and end-users to restore a Cloud PC to the exact state it was earlier. The Point-in-time restore feature is available for Windows 365 Cloud PC, Enterprise, and Business Editions.
Point-in-time restore lets an administrator restore a Cloud PC to the exact state at an earlier point in time. Admins can also permit users to restore their Cloud PCs. It’s important to understand that you can’t restore Windows 365 Cloud PC without a backup.
Restoring your Cloud PC will delete any data saved to your Cloud PC between the specified time and now and remove any apps installed between the specified time and now. The backup of Cloud PC is made so frictionless with excellent engineering efforts by the Microsoft product group.
There are two options available to restore Windows 365 Cloud PC. You can Restore a single Cloud PC to a previous state, or you can use bulk restore multiple Cloud PCs from the Microsoft Endpoint Manager admin center.
Risks and Results of Restoring Windows 365 Cloud PC | Back & Restore Risks
It’s important to understand the risks involved with the point-in-time backup and restoration of the Cloud PC option. Cloud PCs have the same risks as all Windows PCs when performing a full disk restore. These risks and results include:
- All changes made to the Cloud PC between the saved restore point and when the restore is started will be lost.
- This lost information includes all data, documents, installed applications, configurations, downloads, and other changes. External data stored in cloud services, like OneDrive, won’t be lost.
- Various applications, agents and tools also use rolling passwords, secrets, certificates, and keys. If any of these credentials are updated between the current time and the restore point, the associated service or application will be impacted.
Recommended Posts
- Windows 365 Cloud PC Deployment Provisioning Process Step by Step Guide
- Windows 365 Cloud PC Azure AD Joined Provisioning Process
- Business Edition Windows 365 Cloud PC End User Provisioning Experience Walkthrough
Configure Backup or Point-in-time Restore Settings for Cloud PC
Before using the point-in-time restore feature, you must configure the appropriate settings in a new or existing user setting.
- Sign in to the Microsoft Endpoint Manager admin center.
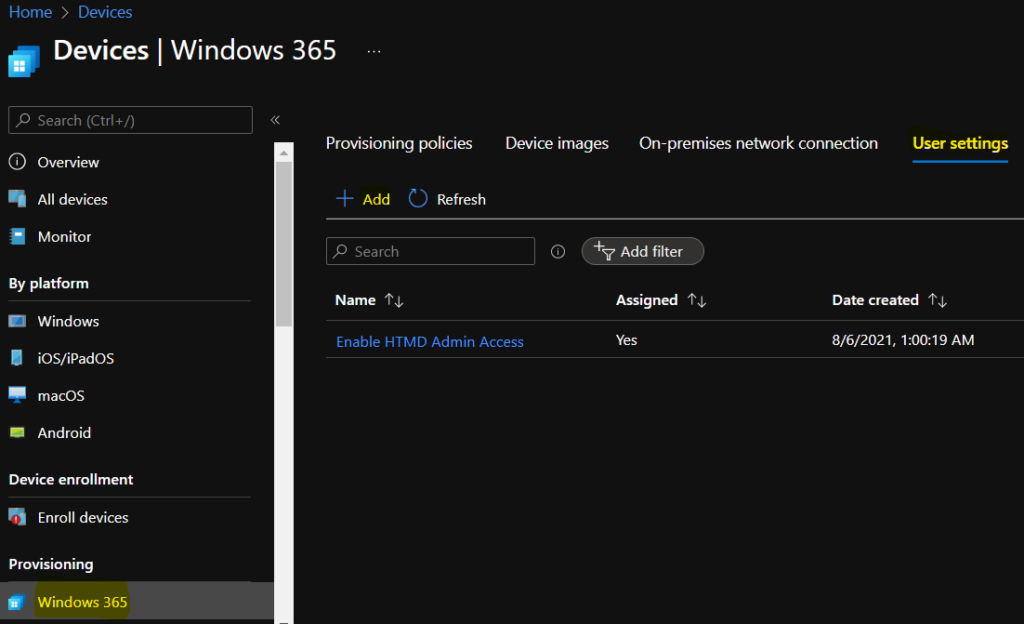
- Navigate to Devices > Windows 365 > User Settings. Click on the +Add button.
Here you can see we have already created a local admin policy, you can modify that existing one or create a new setting. Here I am creating new user settings.
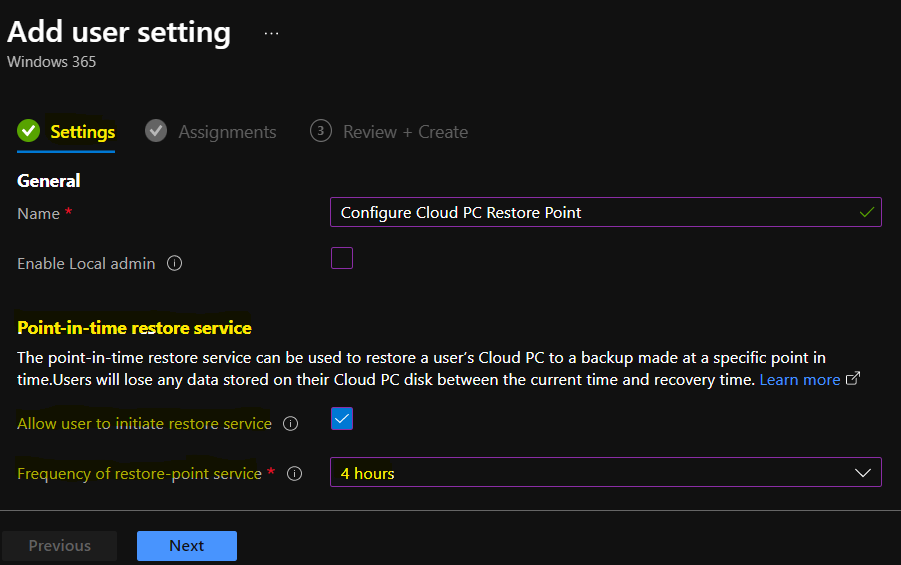
On the Add user settings page, you have three options.
- Enter the Name of the User Settings Policy (For example – Configure Cloud PC Restore Point)
- Enable Local Admin – If you want the users for this setting to have local admin rights, select Enable Local admin.
- Allow user to initiate restore service – If you want end users to have permissions to restore their own Cloud PCs, select Allow user to initiate restore service.
- Frequency of restore-point service – choose an interval for how often restore points will be created. There’s a limit of 10 restore points. So a shorter frequency results in a shorter overall history of restore points.
- You can choose to save short-term restore points every 4, 6, 12, 16, or 24 hours.
In addition to these configurable short-term restore points, four long-term restore points aren’t configurable. These long-term restore points are saved every seven days. As time passes and a new restore point is added, the oldest restore point is removed.
Click on the Next button to continue backup options for CLoud PC.
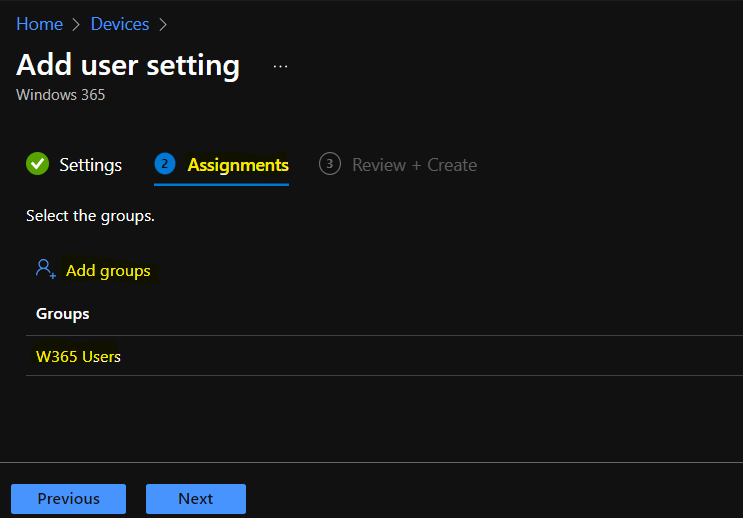
On the Assignments page, Here I have added the W365 Users Azure AD group, where I have two users as members. I used the same group during the Windows 365 provisioning guide.
Click on the Next button to continue with the back and restore Windows 365 Cloud PC option.
Note – All users in groups assigned to the user setting will have permission to use the point-in-time restore feature.
Review the specified settings on the Review + create page and click on Create. Now, your Cloud PC backup is scheduled for every 4 hours? What do you think? about the above configuration?

A notification will appear automatically in the top right-hand corner with a message. Here you can see that Successfully added new user setting. The newly created user setting is shown in the User Settings tab.
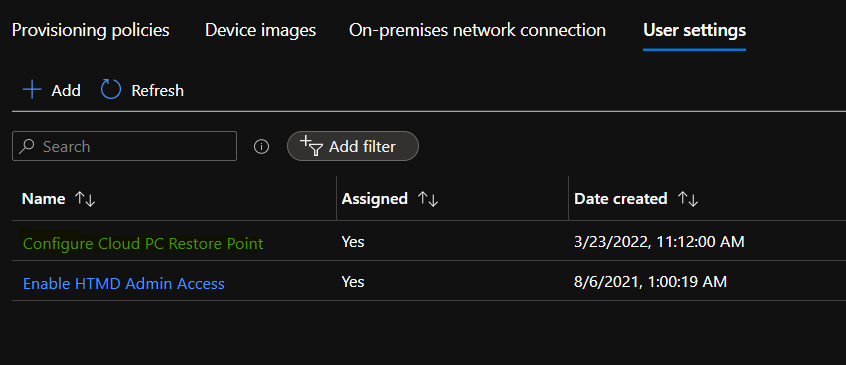
Note – Users in the groups assigned to this user setting will now be able to use the point-in-time restore feature.
How to Restore Windows 365 Cloud PC
Let’s follow the steps below to Restore a single Cloud PC to a previous state –
The first step is to log in Microsoft Intune admin center https://endpoint.microsoft.com/.
- Navigate to Devices > Windows 365.
- In the Windows 365 node, Click on the All Cloud PCs tab to view all the available cloud PCs.
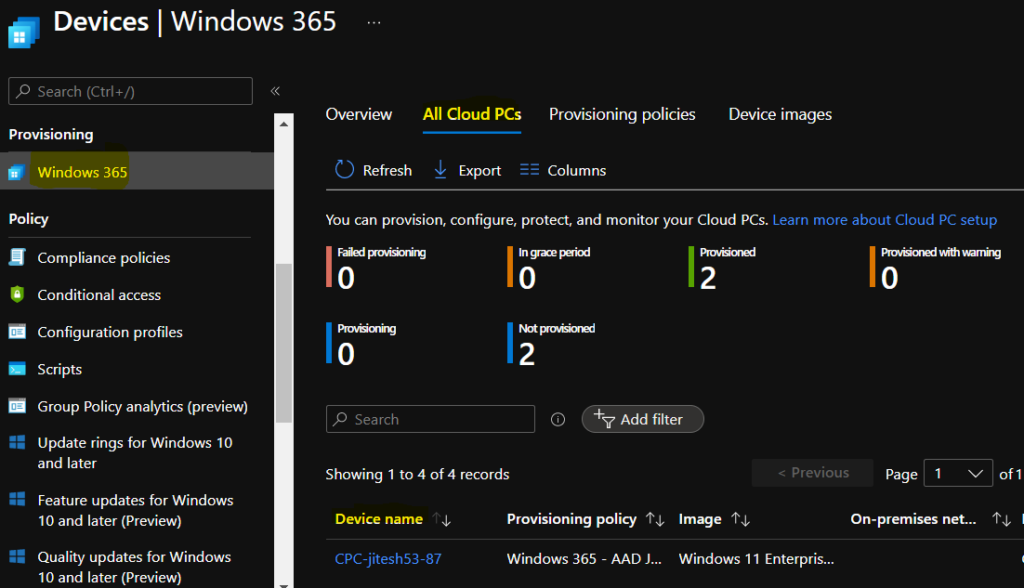
Select Restore (preview) > under Select restore point, select the point that you want to restore the Cloud PC to > Select.
A prompt will appear, Restore this Cloud PC to the selected point? – Any data saved between the selected restore point and now will be lost. Click on Yes to confirm your selection.
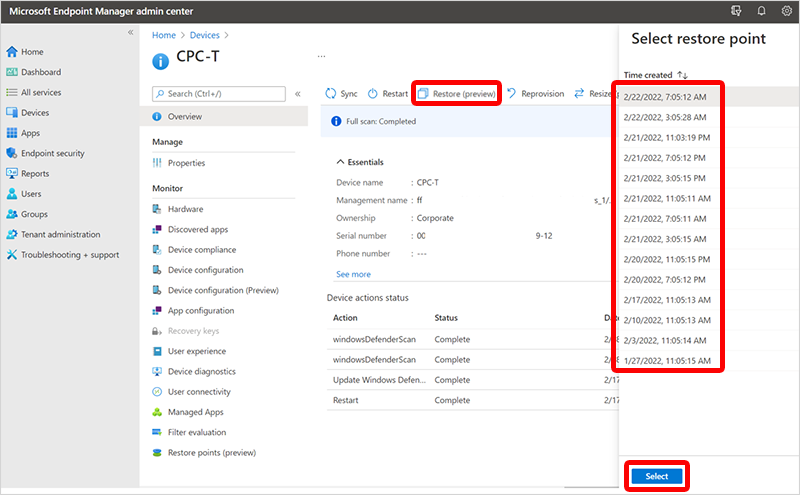
In the confirmation dialog box, select Restore. Select a restore point and click Select. You should see the following information displayed on the screen:
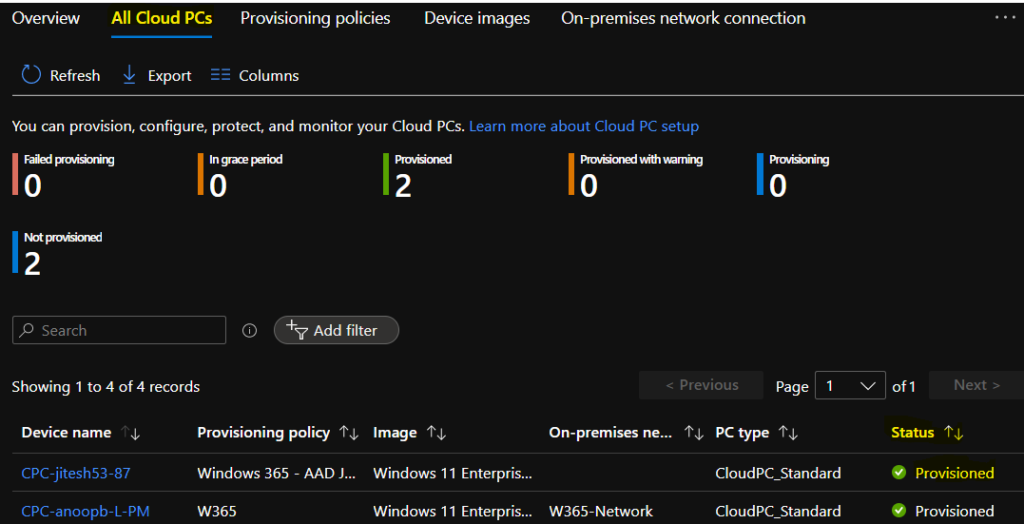
On the All Cloud PCs page, the device’s status will change to Restoring until it’s complete.
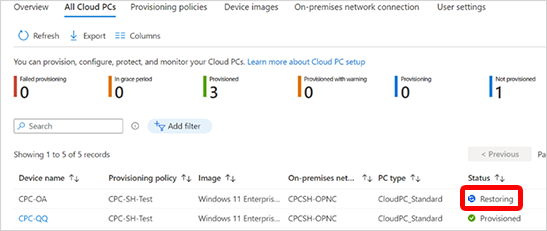
From the web portal, The Cloud PC will show as Restoring Cloud PC on the end-users until it’s complete. Open in the browser will be greyed out until the process is complete.

Here you can see, Your Cloud PC was restored successfully. The end user once again has the option to “Open in browser.” Let’s select Open in browser to see Windows 365 Cloud PC experience.
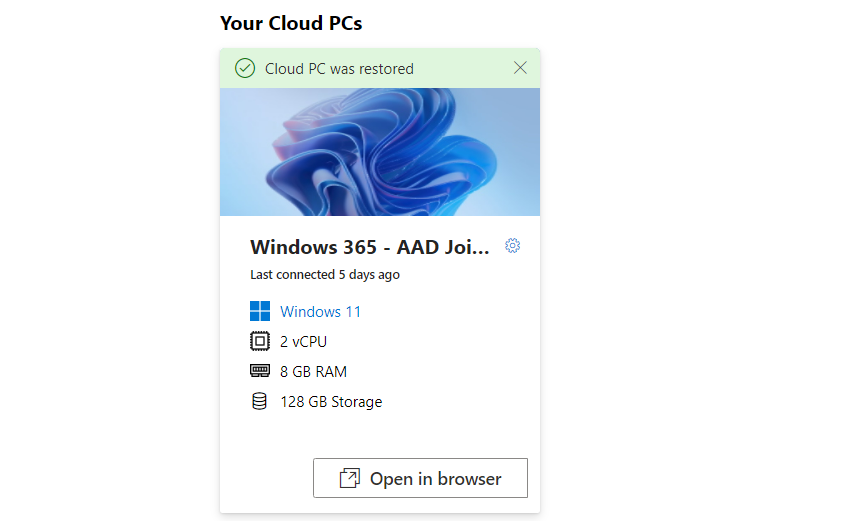
Once the Cloud PC restore process is complete, In the MEM portal, On the All Cloud PCs page, the device’s status will change to Provisioned.
Restore Multiple Cloud PCs in Bulk
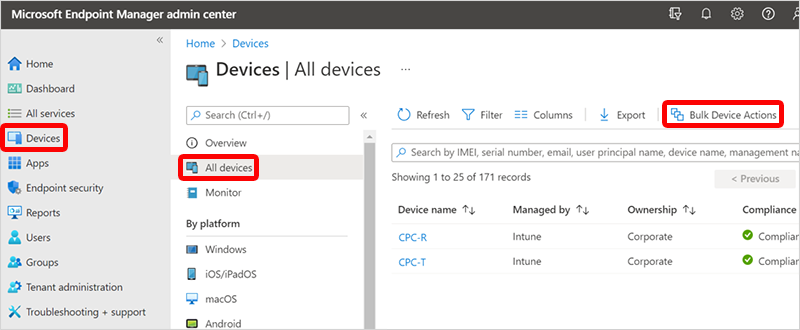
Let’s follow the steps to bulk restore multiple Cloud PCs from MEM Portal.
- Sign in to the Microsoft Intune admin center.
- Navigate to Devices > All devices > Bulk Device Actions.
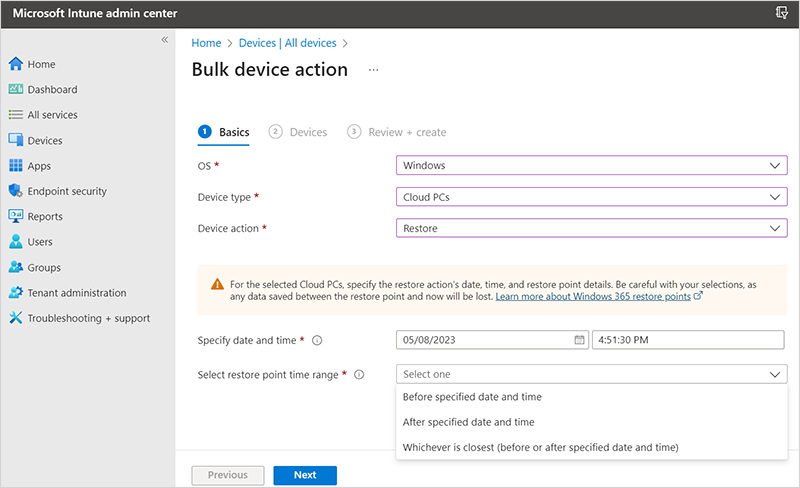
On the Basics page, select the following options:
- OS: Windows
- Device action: Restore (preview)
- Specify date and time: Choose a date and time. This setting defines the time that you’d like to restore the Cloud PCs to. The following options will help determine exactly which restore point will be used.
- Select restore point time range: Choose one of the following options:
- Before specified date and time: If you choose this option, the Cloud PCs will be restored to the closest restore point before the date and time you specified.
- After specified date and time: If you choose this option, the Cloud PCs will be restored to the closest restore point after the date and time you specified.
- Whichever is closest (before or after specified date and time): If you choose this option, the Cloud PCs will be restored to the closest restore point to the date and time you specified.
Once you have configured the options, click on Next.
- On the Devices page, select the Cloud PCs that you want to restore > Next.
- On the Review + create page, confirm your choices > Create.
Windows 365 Cloud PCs Action Status
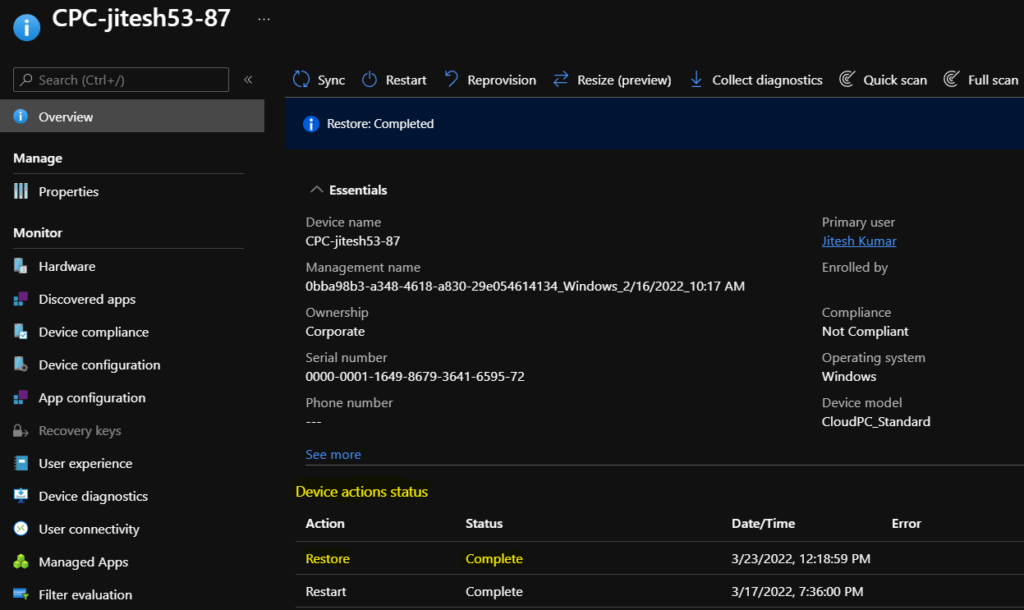
When the restoring process is completed based on Admin/User action, you will get an updated status under Device actions status for all performed actions.
Once the action “Restore” is completed successfully, the status will show as complete.
End Users Experience – Restore Windows 365 Cloud PC
If you configured the settings to allow users to initiate the service, your end users can opt to restore their Cloud PC themselves.
You can use the Cloud PC URL – https://windows365.microsoft.com/ to launch Windows 365 service and start working on a personalized desktop in the cloud.
The End users can access their Cloud PCs in two different ways –
- Windows365.microsoft.com
- Microsoft Remote Desktop Client (How To Deploy Remote Desktop Client Using ConfigMgr)
Here you can see the different Cloud PCs assigned to you in the Windows 365 web client portal. End users can easily perform maintenance on cloud PCs via the Windows 365 web portal.
There is a settings button (gear icon) in the portal to take some of the quick actions on the Windows PC assigned to you. Select the gear icon, and select Restore (preview).
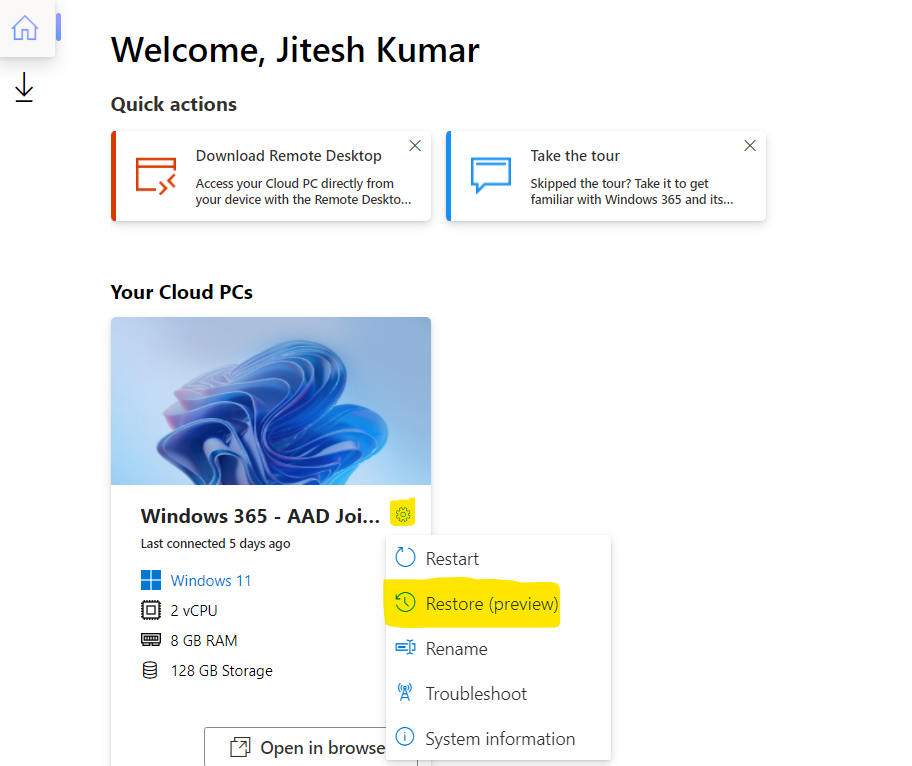
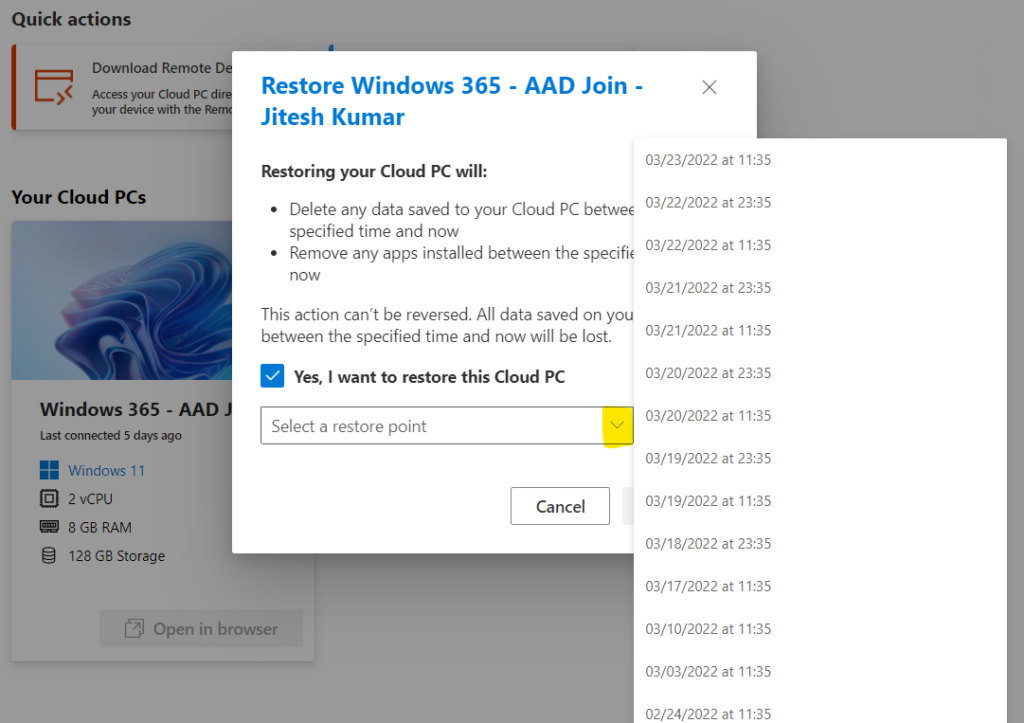
The end-user checks a box to confirm that they want to restore the Cloud PC. Select restore point. Check the box Yes, I want to restore this Cloud PC and click on the drop-down button to choose a restore point that you want to restore.
Important – Restoring your Cloud PC will:
- Delete any data saved to your Cloud PC between the specified time and now
- Remove any apps installed between the specified time and now
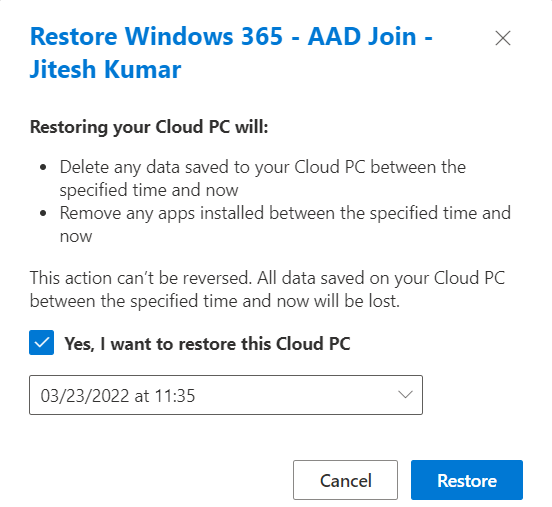
In the below example, I have selected the restore point close to the current time. Once you have confirmed your selection, click on the Restore.
Important – Choose a restore point close to the current time to minimize data loss and the risk of a rolling password conflict.
Note – The End User’s experience will be the same whether the Cloud PCs restore actions have been performed by Admins or the user. The users can only perform the activity if admins are granted permission to restore their own Cloud PCs.
Under Your Cloud PCs, You will be able to see the action performed for the selected Cloud PC and the message “Restoring Cloud PC”.
The Restoring Cloud PC may take around 10-15 minutes, and Please wait to complete the process. Once the operation is complete, “Open in browser” will be an active option.

Here you can see, Your Cloud PC was restored successfully. Let’s select Open in browser to see Windows 365 Cloud PC experience –
Note – After the restoration is complete, the user should immediately sign into their Cloud PC to verify that they can successfully connect.
If a user can’t connect or experiences unexpected behavior, try a second restoration to a different restore point that is more recent. You may need to reprovision/reset a Cloud PC on rare occasions if all restore points have obsolete rolling credentials.

👉Let’s check more details about Windows 365 cloud PC web client end-user experience walkthrough – Windows 365 Cloud PC Web Client End User Experience Walkthrough
Once you log in successfully, You will be landed on Cloud PC Desktop. This is how the screen will appear for you. Cloud PC is ready for productivity after restoring it successfully.

Windows 365 Business Restore Options
Let’s check what are the options to restore the Windows 365 Cloud PC business version. To restore their Cloud PC, an end-user must sign in to https://windows365.microsoft.com, select the gear icon, select Restore (preview), and follow the onscreen prompts.
The Windows 365 Cloud PC restore option is similar for both business and enterprise versions as you can in the below screenshot.


Hi – You mentioned – “The Point-in-time restore feature is available for Windows 365 Cloud PC, Enterprise, and Business Editions”.
How we can enable this for W365 Business? Those are not available in Windows 365 in Endpoint Manager.
Can find anywhere info regarding this.
End-user can perform this action from their login as Jitesh updated in the last section of the post now. The business version is not supported (officially) by the endpoint manager portal? Maybe restoring on time is why it’s not available for Windows 365 Cloud PC Business version. I don’t have a business version to test it.
An admin can also do a restore from the Windows 365 site.
Once logged in you can click on the Your organization’s Cloud PC’s link then a user name of someone that has a loud PC. When the User Detail side menu pops out from the right hand select Devices. Select Restore under the Cloud PC name. A window will pop up with the standard warnings then you will have to check a box and possible restore dates will pop up. Select one then proceed.