Welcome, everyone! We have a new article for you on How to Set Wallpaper in macOS using Intune. In this article, we will go through the necessary steps to set a specific desktop wallpaper on all organization-managed macOS devices using a configuration profile and shell script deployment on Intune.
In our last blog post, We provided an easy Method to Enable Tamper Protection for macOS devices using Intune, where we discussed the purpose of tamper protection and the requirements to enable it on Mac devices. Also, we have discussed how to configure in a test environment along with end-user experience in a step-by-step process.
Organizations often require their managed devices to display Organisation Set wallpapers that reflect their vision or goals. This presents a challenge for IT admins trying to achieve this using Intune. To address this issue, we have combined two separate steps that allow IT admins to set a specific wallpaper as designated by the organization.
For the initial approach, we developed a shell script that downloads the organization’s Standard wallpaper from the provided URL and saves it in a designated folder on the Mac. The second method deploys a configuration profile where the designated folder location path will be set as desktop wallpaper. Additionally, we have restricted any user from modifying the default wallpaper set by Admin.

To set the macOS desktop wallpaper with Intune, you’ll need a web server to publish the Desktop Wallpaper image. Azure Blob Storage can be the ideal option for it. However, any public web server will suffice. I will be setting the above image as the desktop wallpaper for all HTMD macOS devices.
- How to deploy Microsoft Defender for macOS using Intune
- Learn How to Configure macOS Antivirus Policy Using Intune
Pre-Requisites for Shell Scripting
Before IT Admins create shell scripts and assign them to macOS devices, they should also look into the prerequisites which should be met.
- MacOS versions supported on Big Sur or later
- Devices are managed by Intune
- Devices should be connected to direct Internet, as for now, proxy connections are not supported.
- Shell scripts begin with
#!and must be in a valid location ( e.g.,#!/bin/sh) - Command-line interpreters for the applicable shells should be installed.
How to create a Shell Script to Set Wallpaper in macOS using Intune
Without further ado, let’s delve into the steps to achieve this case. We’ll begin by creating a shell script with simple lines. We have created a shell script and saved it as a .sh file on our Mac. We have provided descriptions for each section, explaining their purpose below.
#!/bin/bash
#set -x
# Define variables
wallpaperurl=”<Provide file URL>”
wallpaperdir=”/Library/Desktop”
wallpaperfile=”<File Name>.jpeg”
log=”/var/log/<Log Name>.log”
# start logging
exec 1>> $log 2>&1
# Download the wallpaper
curl -L -o $wallpaperdir/$wallpaperfile $wallpaperurl
#!/bin/bash commands are used in shell scripting to instruct the OS to use bash as a command interpreter, and set command lets us set options, or flags, for the session. After that, we have defined variables where we have set the URL from where it should download the wallpaper and then save to which location in the Mac.
We also have run logging, so all the execution logs will be saved in the mentioned path. And the end, we have run the command Curl (which means Client URL), which will fetch the URL and download it to the location for each device/ User.
Once the .sh file has been saved, we can proceed to upload it into Intune and create a shell script that can be deployed to all macOS devices. To deploy the script, please follow the steps outlined below.
- Sign in to the Microsoft Intune admin center https://intune.microsoft.com/.
- Select Devices > macOS > Shell Scripts and click on Add to upload a new script.
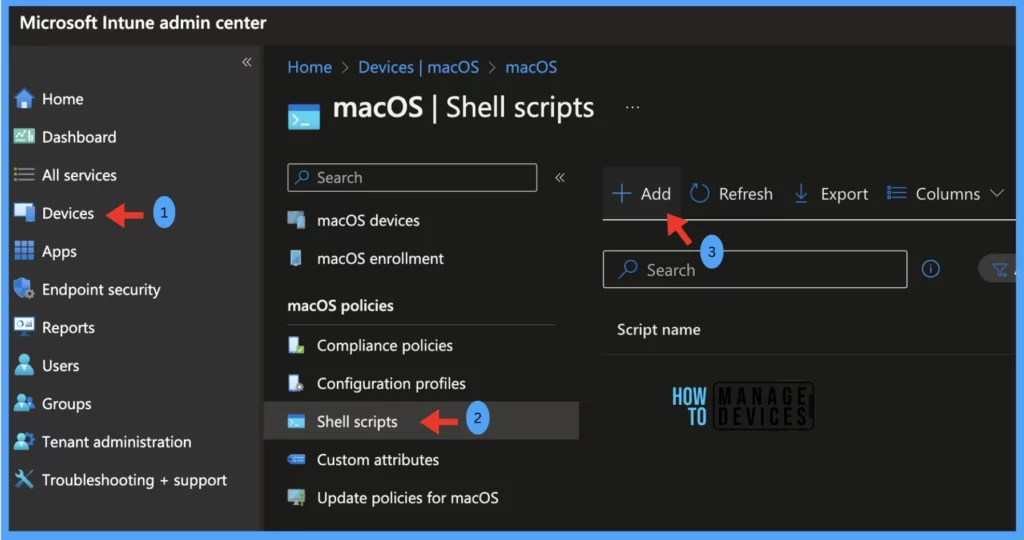
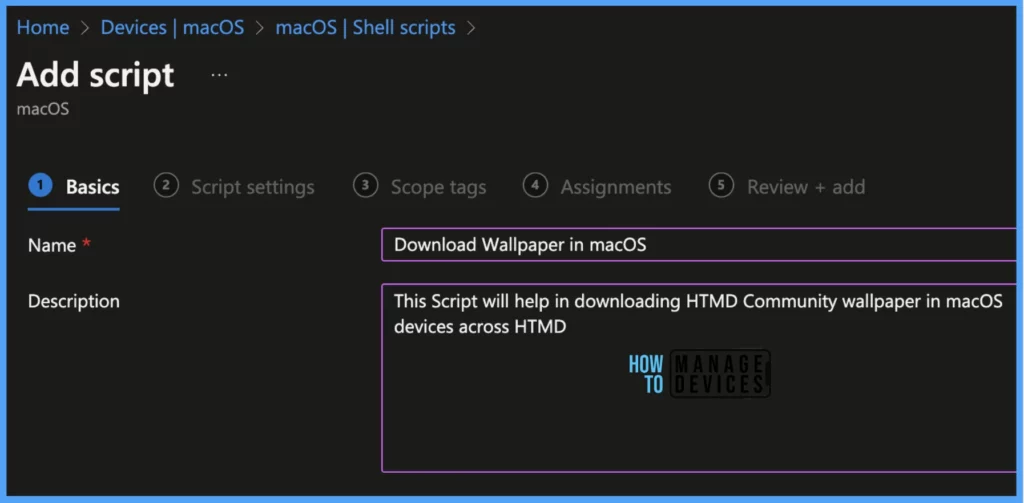
Once you click on Add button from the above page, Provide the Name and Description and click on Next.
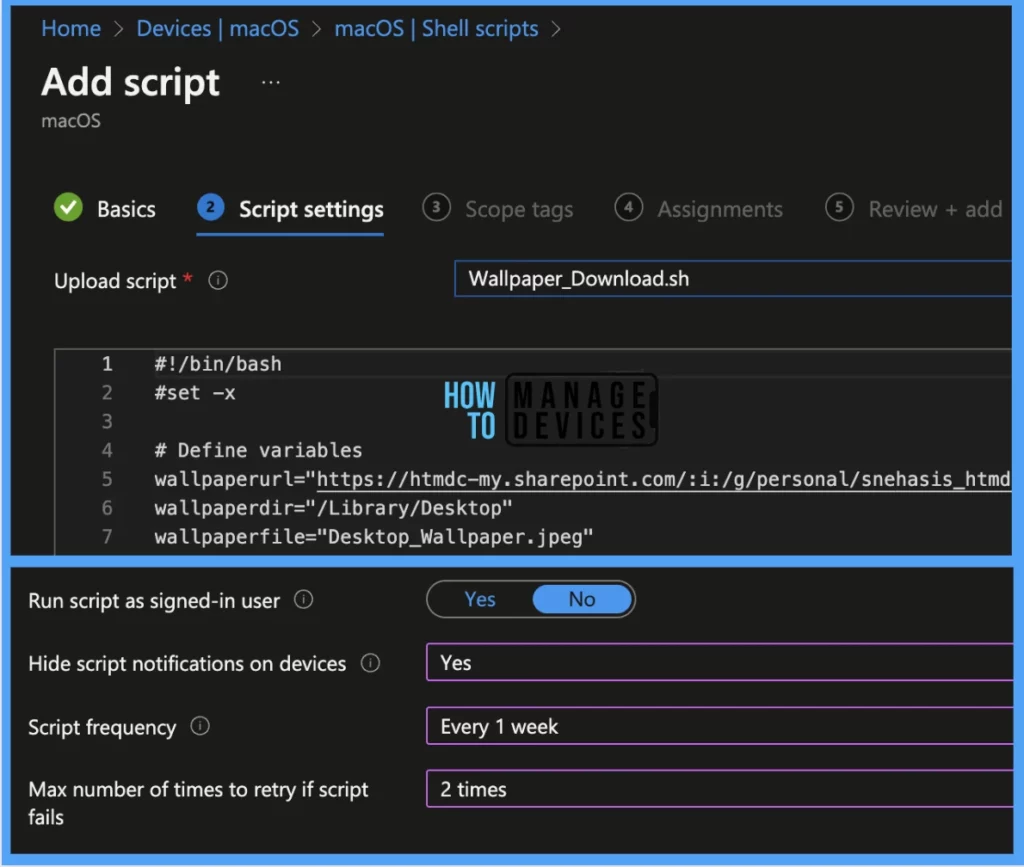
Under the Script settings tab, upload the Script with .sh extension, and once uploaded, should be able to view the commands in the text window below. Once everything is set, please make sure to set the below settings as well.
- Run Script as singed-in User: To run the script with the user’s credentials, select Yes. Or, to run the script as the root user, choose No (default option)
- Hide Script notifications on devices: Notifications for running scripts will appear on macOS devices, with a message from Intune about IT configuration
- Script Frequency: Select the script frequency. Choose “Not configured” for a one-time run (default option)
- Max number of times to retry the script: Select how often to run the script if it fails (not configured is the default).
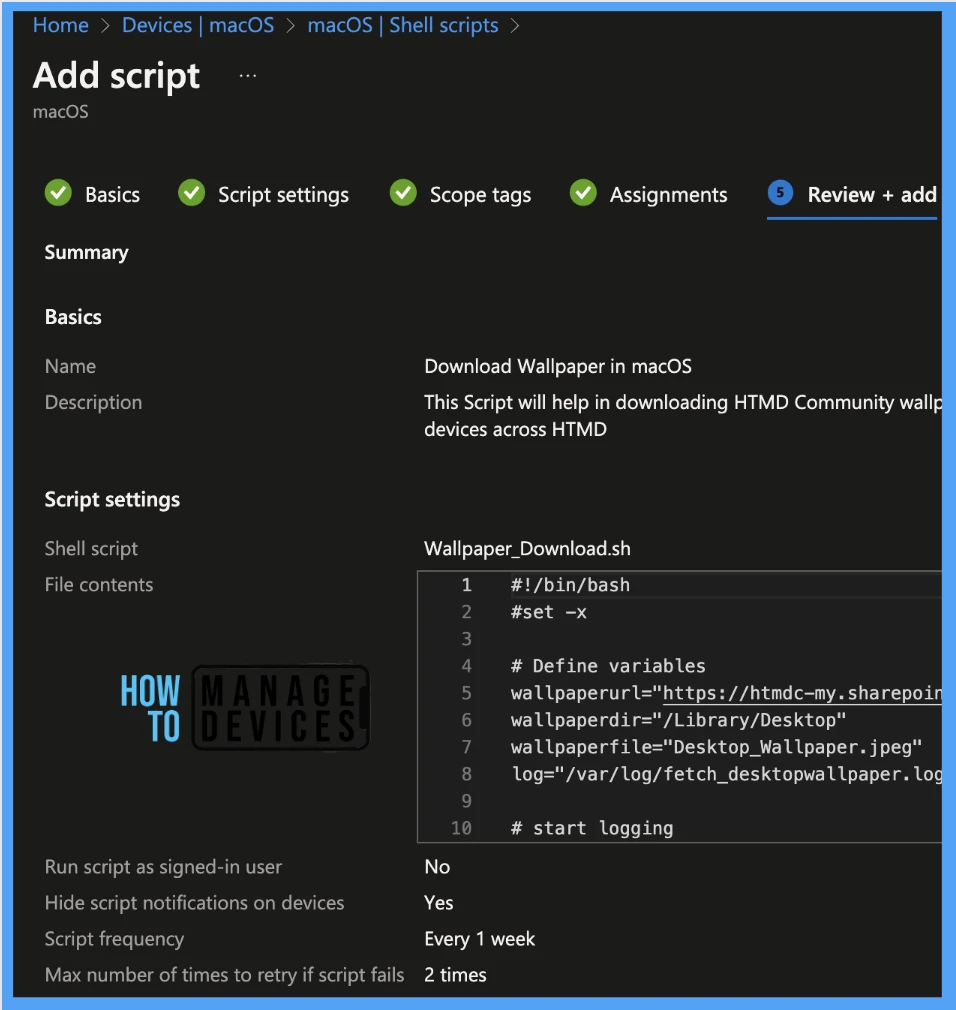
To deploy the Shell script on HTMD Mac devices, we have selected the options below:
| Settings | Value |
|---|---|
| Run Script as singed-in User | No |
| Hide Script notifications on devices | Yes |
| Script Frequency | Every 1 Week |
| Max number of times to retry if the script fails | 2 times |
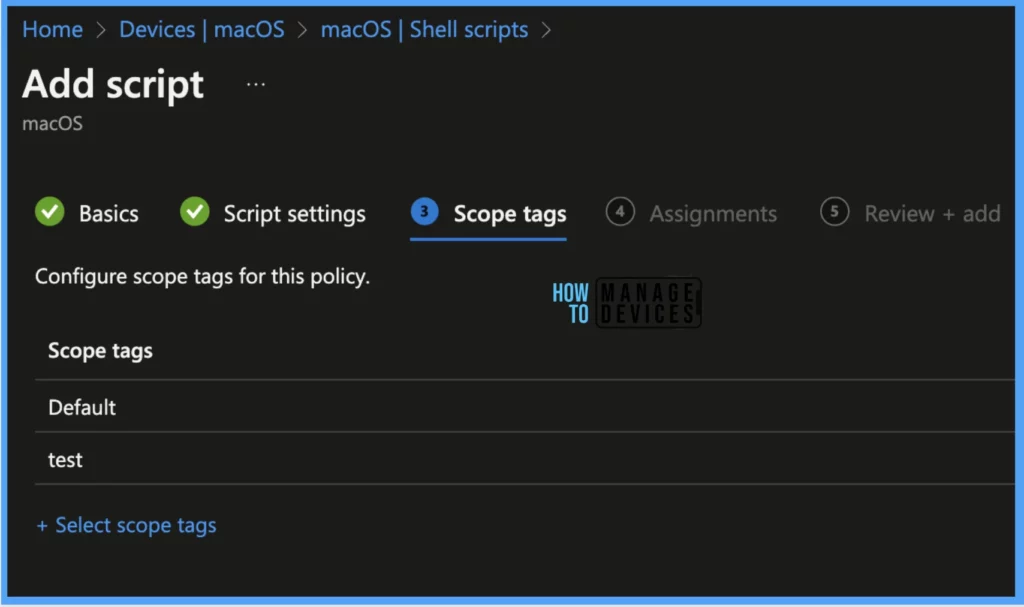
Scope tags are filtering options provided in Intune to ease the admin jobs. In the scope tag section, you will get an option to configure scope tags for the policy. Click on Next.
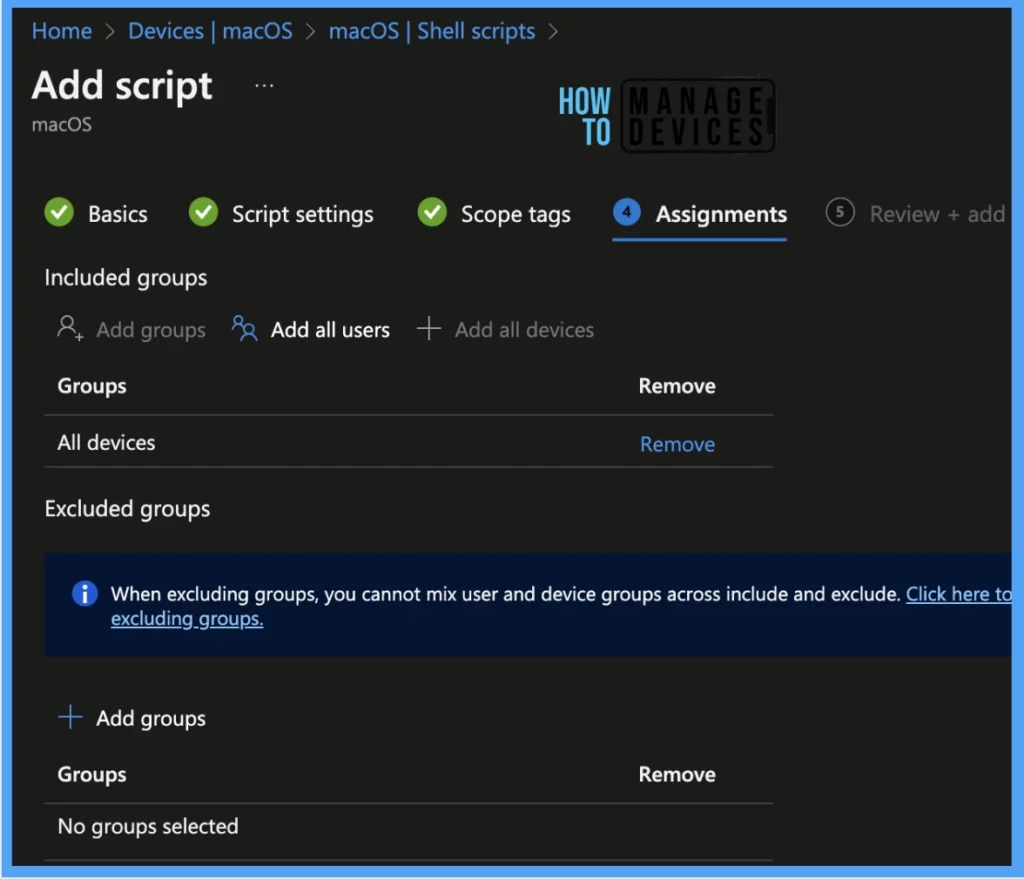
On the next page, select Assignments group (Included groups and Excluded groups) and click Next.
Note! Assignment Group: It determines who has access to any app, policy, or configuration profile by assigning groups of users to include and exclude. In this case, we have selected All Devices under Assignments.
On the Review+create page, please review if any settings need to be changed, or else go ahead and create the Script.
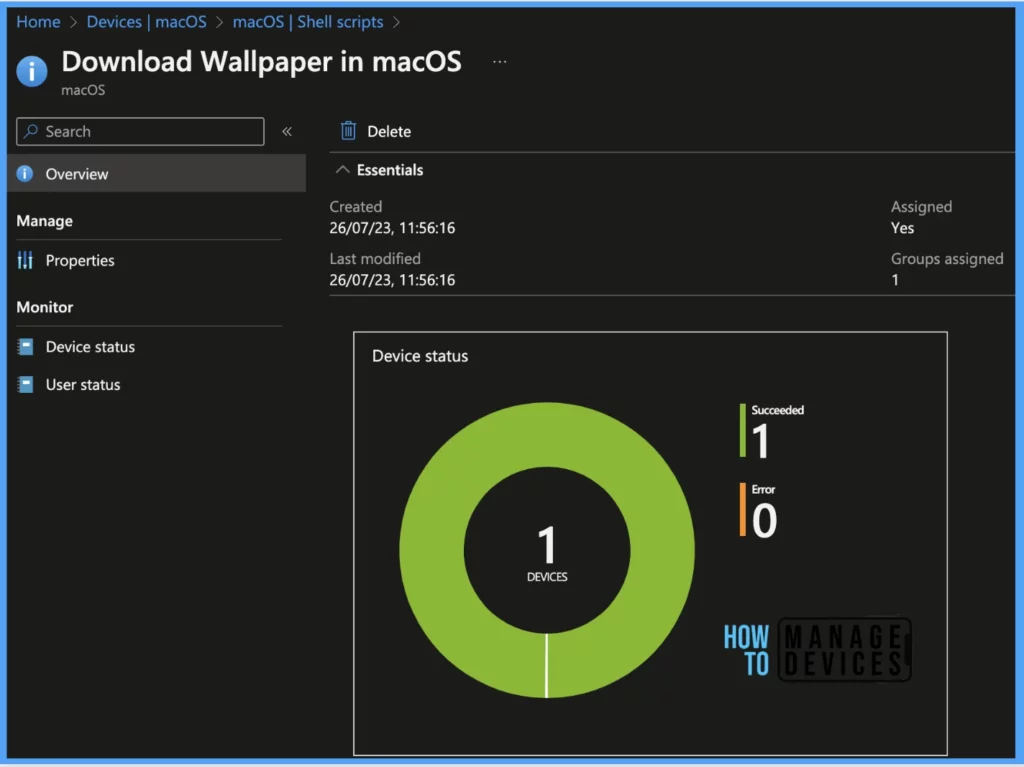
Once the Shell Script is created, it will take a few minutes to get pushed to all the devices in the organization; also, to monitor the status of the list of targeted devices, we can check as per the below steps.
To see all the device statuses, Navigate to Devices > under macOS > Select Shell Scripts, once you see the script, click on the link and go to the Overview page to view the graphical format of User and Device Status with status shown under the category Succeded and Error.
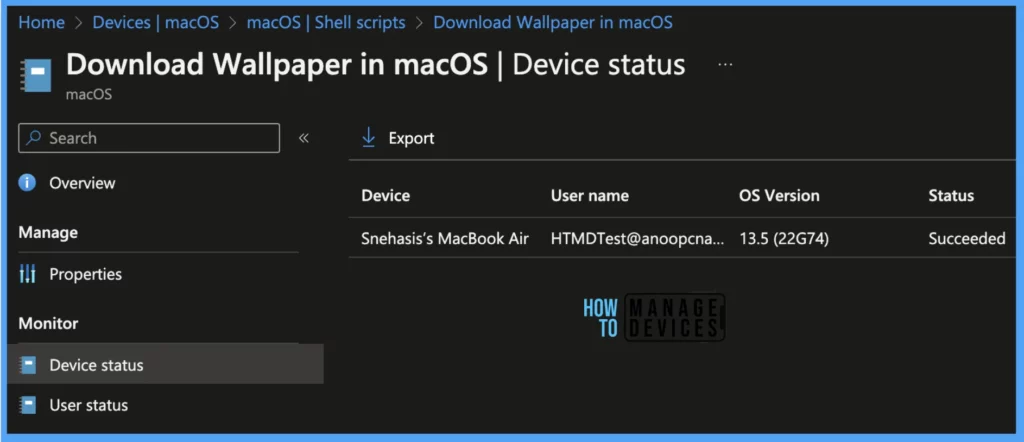
Also the same status also can be viewed in detailed format under the Monitor category. To check if the script ran successfully on the devices, click on Device Status, and we can get the status as Succeded or Error along with Device details, User Name, OS Version, and Last Updated Date and time stamp.
To view User Status, we can get the status as Succeded or Error along with User details as shown in the below image.
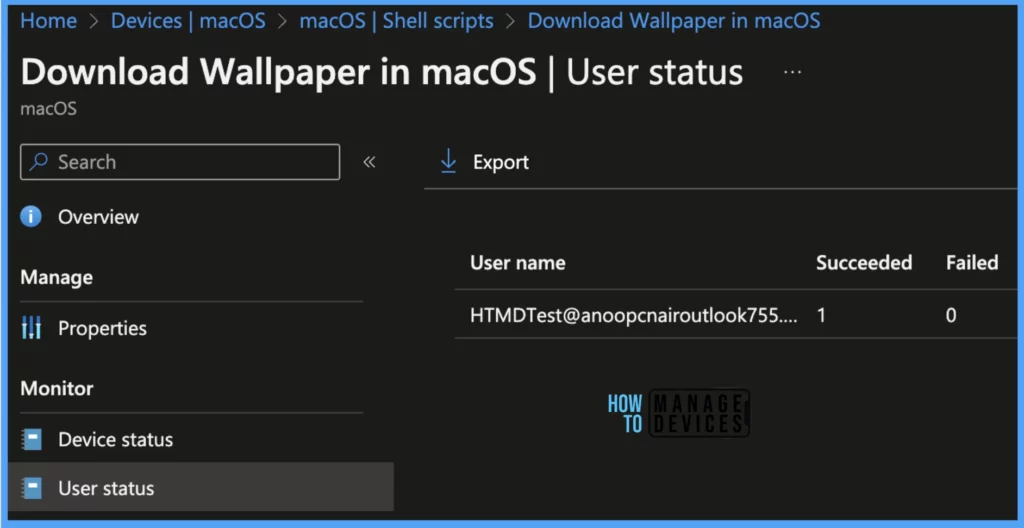
As now the Shell script is ready to download the Desktop Wallpaper in a specific location in macOS, in the next blog, we will guide you through how we can create a configuration profile that should set the downloaded organization standard wallpaper as default for all macOS devices across the organization.
How to create a Configuration Profile to Set Wallpaper in macOS using Intune
To Create the configuration profile, make sure to have the required Intune access, and you are allowed to create configuration profiles in the portal. Let us follow the below-mentioned steps.
- Sign in to the Microsoft Intune admin center https://intune.microsoft.com/.
- Select Devices > macOS > Configuration Profiles and click on Create Profile.
- Select Profile type as Settings Catalog and click on Create.
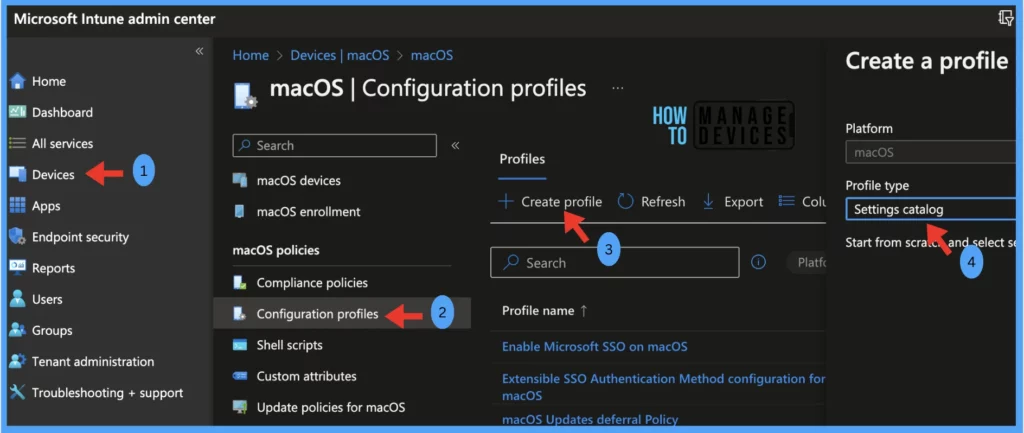
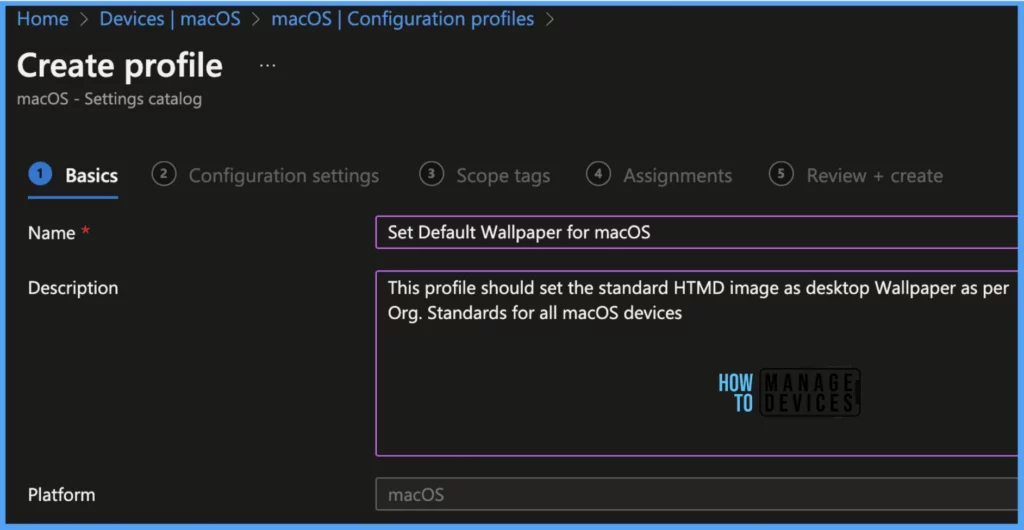
Once you click on Create button from the above page, Provide the Name of the configuration profile along with a detailed description and click on Next.
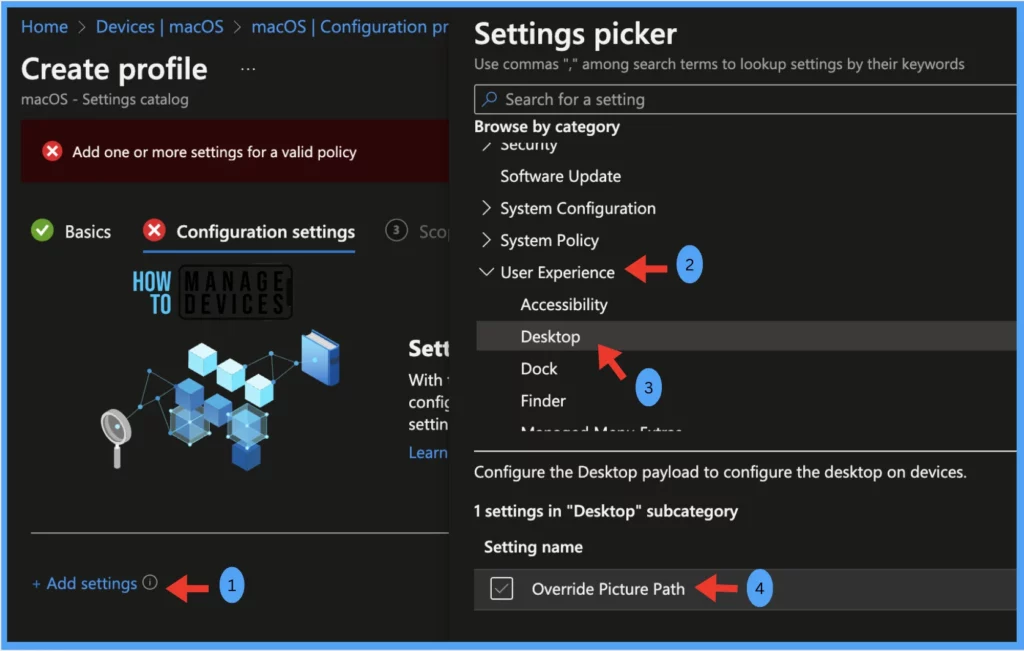
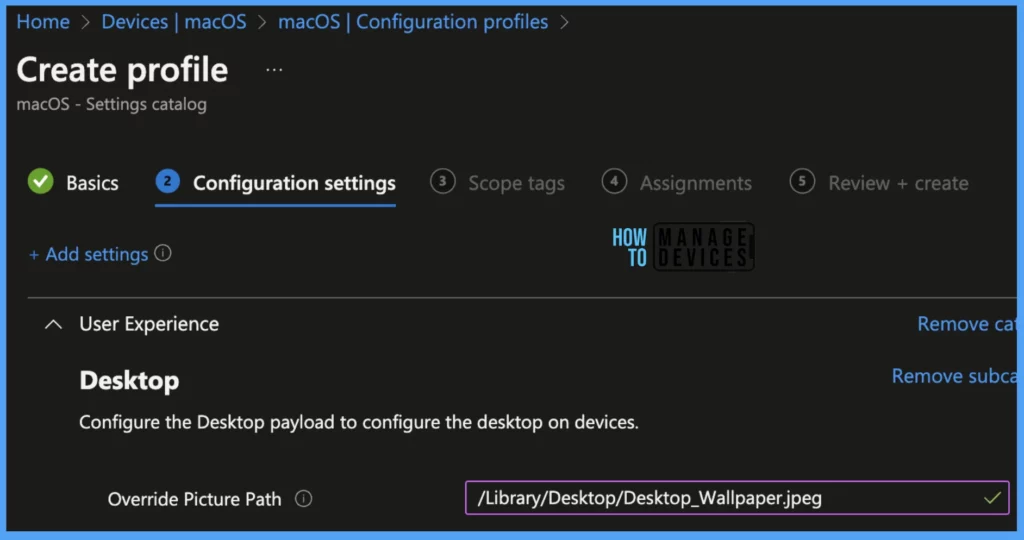
Under the Configuration settings tab, click on Add settings and browse by category as User Experience > Desktop > Check option for Override Picture Path.
After the setting loads, please provide the file path where the wallpaper has been downloaded. This will allow the Override picture path to automatically replace any existing wallpaper set by the user, preventing the user from having to set the wallpaper again. Then click on next.
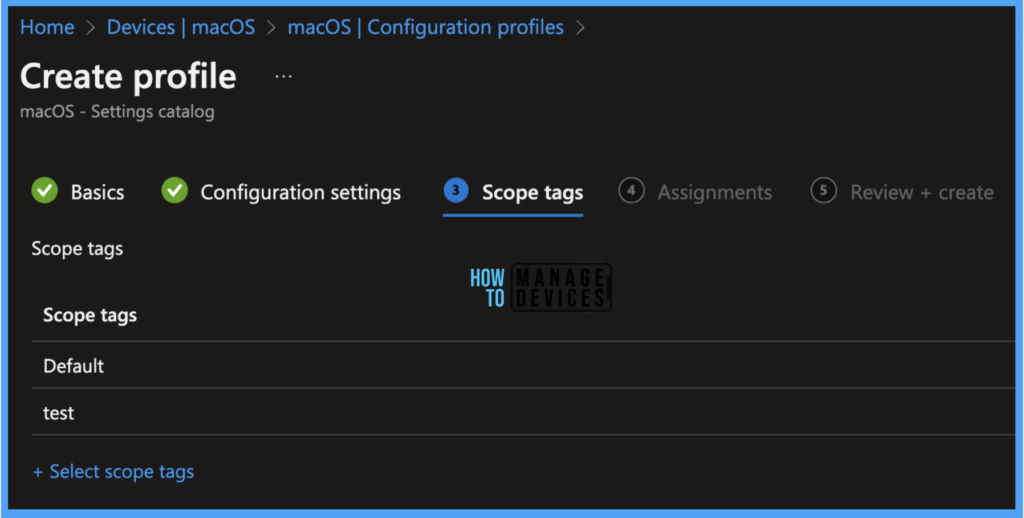
Scope tags are filtering options provided in Intune to ease the admin jobs. In the scope tag section, you will get an option to configure scope tags for the policy. Click on Next.
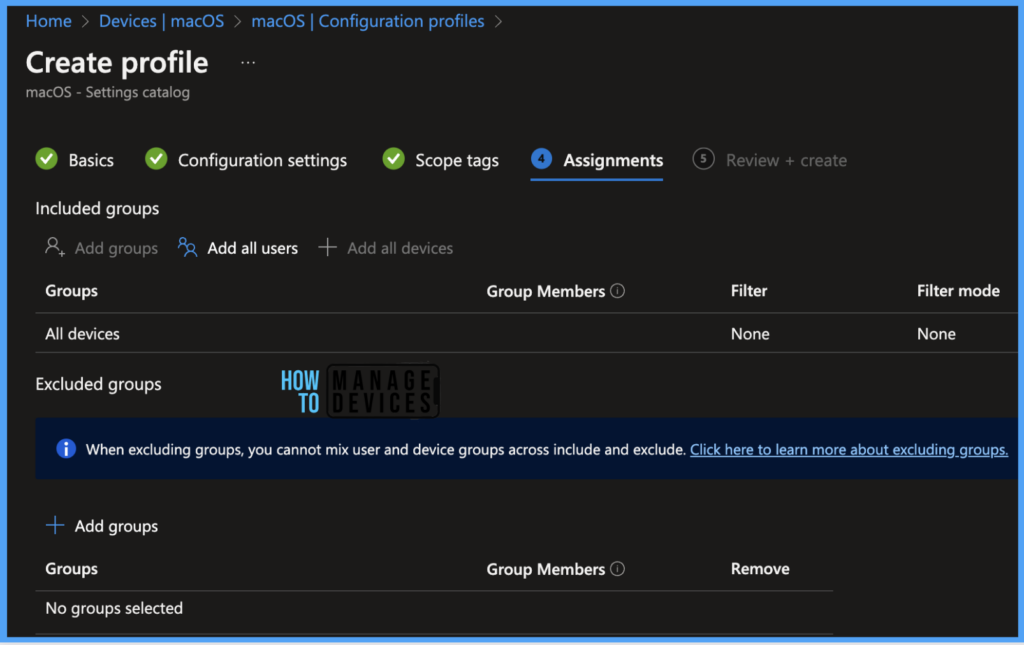
On the next page, select Assignments group (Included groups and Excluded groups) and click Next.
Note! Assignment Group: It determines who has access to any app, policy, or configuration profile by assigning groups of users to include and exclude.
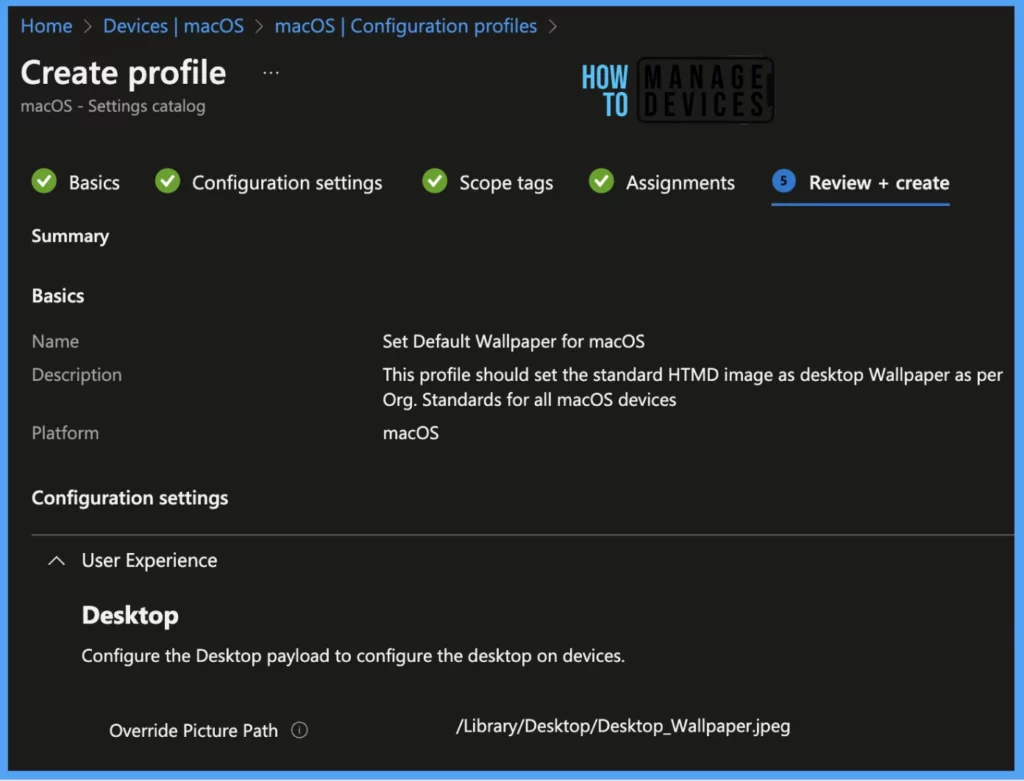
On the Review+create page, please review if any settings need to be changed, or else go ahead and create the Configuration Profile.
Once the Configuration profile is created, it will take a few minutes to get pushed to all the devices in the organization; also, to view the push status on the list of targeted devices, we can check as per the below steps.
To see all the device statuses, Navigate to Devices > under macOS > Select Configuration Profiles, once you see the profile, click on the link to go to the Overview page, and you should be able to find the list of devices categorized as per the below list.
- Succeeded
- Error
- Conflict
- Not Applicable
- In Progress
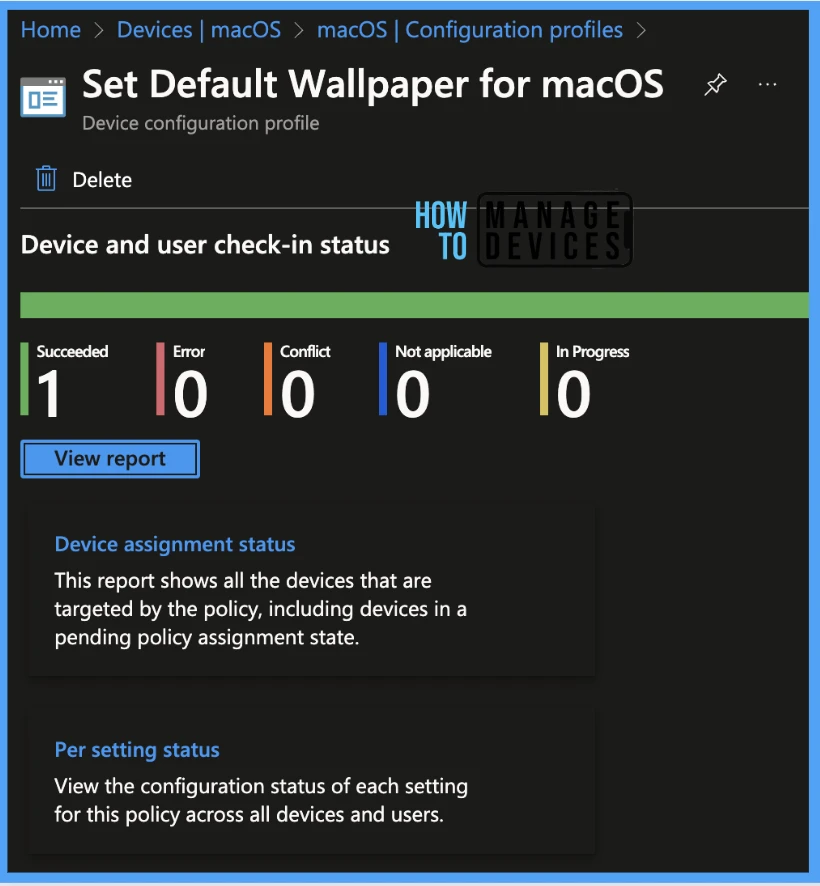
Once you click on the view report button, you can see the list of devices along with their details below:
- Device name
- Logged in User
- Check-in Status
- Last check-in time
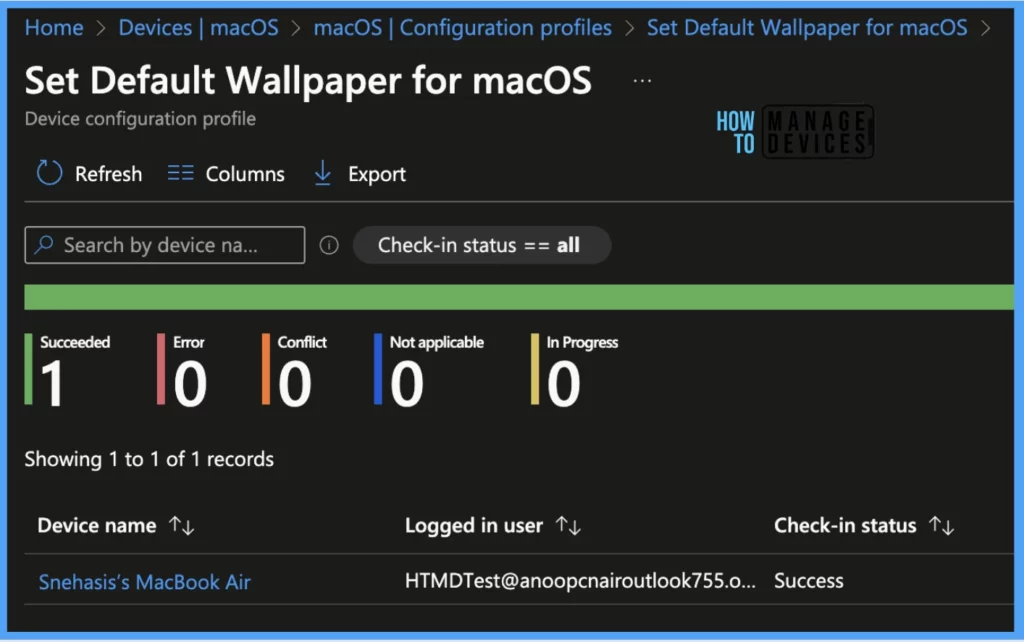
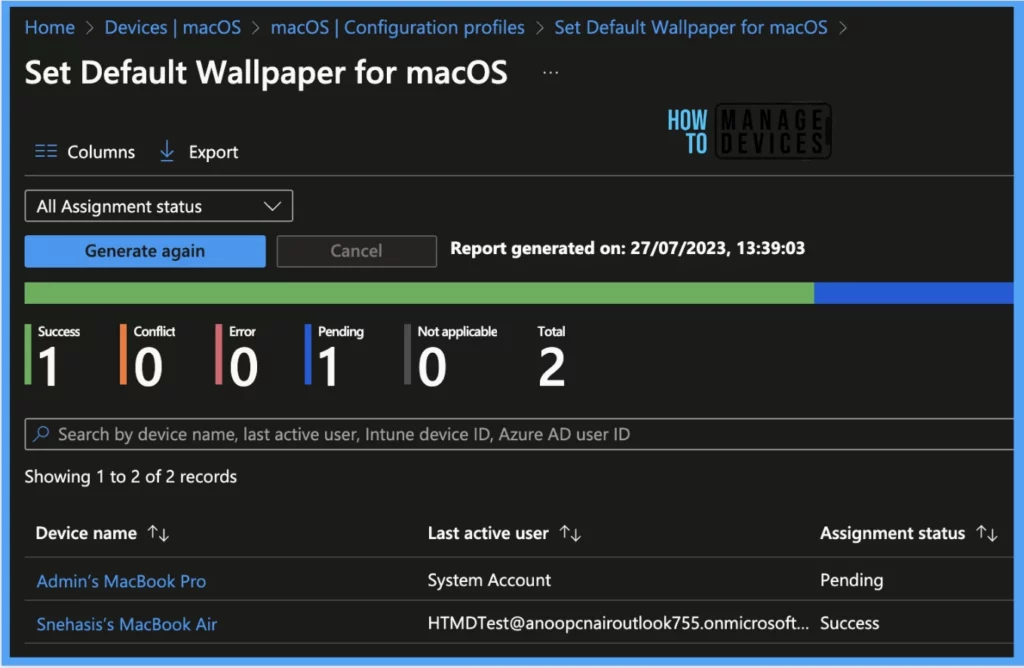
Also, we can view the two different types of reports, you can quickly check the update as devices/users check-in status reports.
Device assignment status, This report will show the list of targeted devices under the configuration profile, including devices in pending policy assignment status. To generate a fresh report every time, click on Generate again.
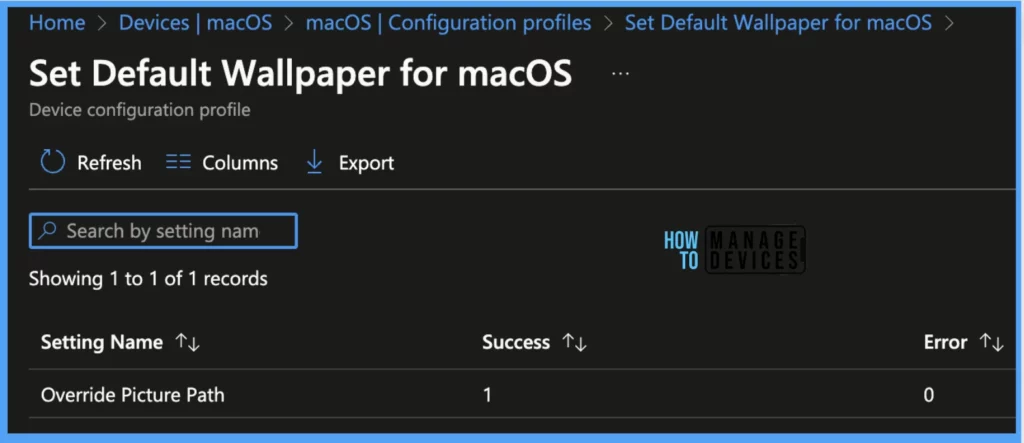
Per settings status, This report will show the configuration status of each set for this policy across all devices and users.
Here’s how you can export Intune setting catalog Profile report from Intune portal. You have two options to navigate to the compliance policies node either you can navigate to the Devices node or Endpoint Security, Intune Settings Catalog Profile Report.
- Enroll macOS in Intune with Step by Step Guide
- Configure macOS Compliance Policy in Intune for Devices
End User Experience
Now that we have pushed both the Shell script and the configuration profile to all the macOS devices in the organization, let us check what happens on the end user device when we push the script first.
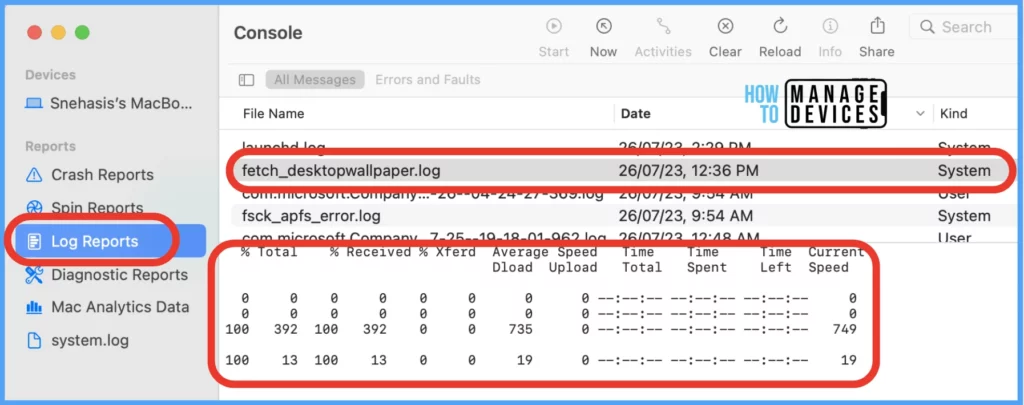
While setting up the script, we created a section for creating logs in the device, so let us check what has been logged. To check logs, launch the console in macOS from the spotlight ( command+Spacebar), and on the left corner, click on the Log reports and click on the log file as per the name provided in the script.
Once the configuration profile is pushed, you can check that by going to profiles in the System settings.
- Click on the Apple icon at the top-left corner
- Select System Settings from the list of options
- Go to Privacy & Security > Profiles
- Search for the profile com.apple.desktop.profile
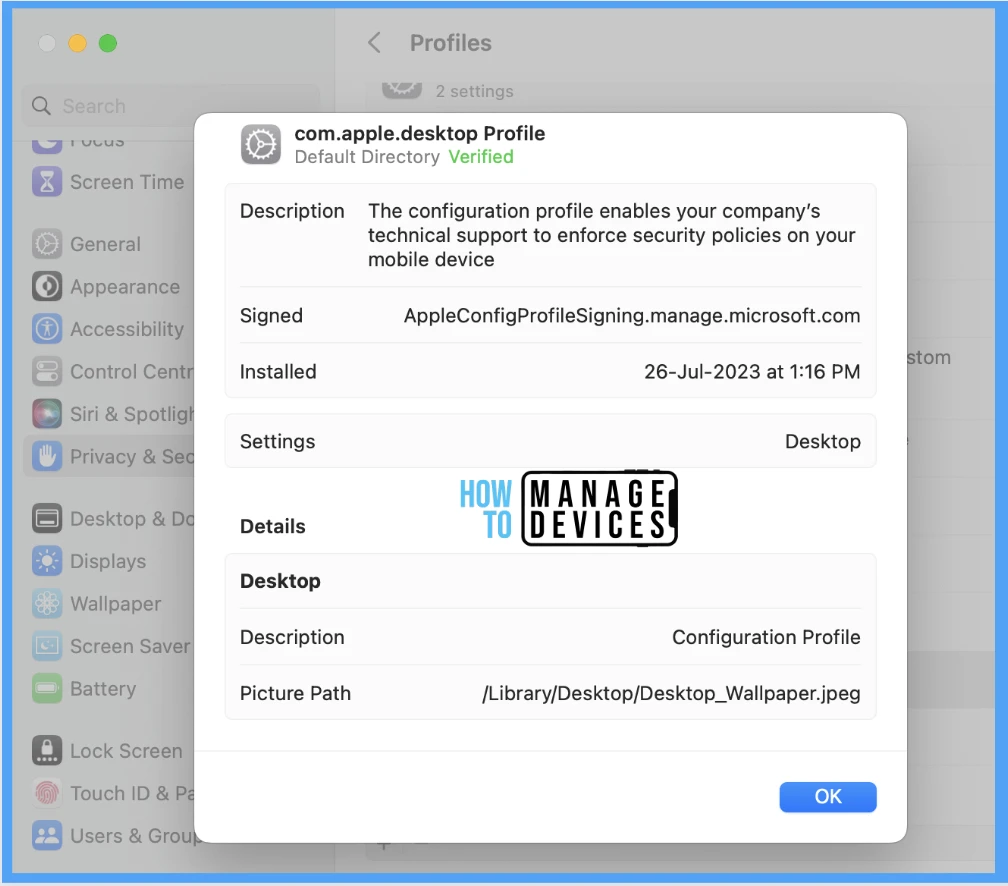
As shown in the above screenshot, this profile will override the existing wallpaper set by the user and prevent the user from setting any other wallpaper again.
Conclusion
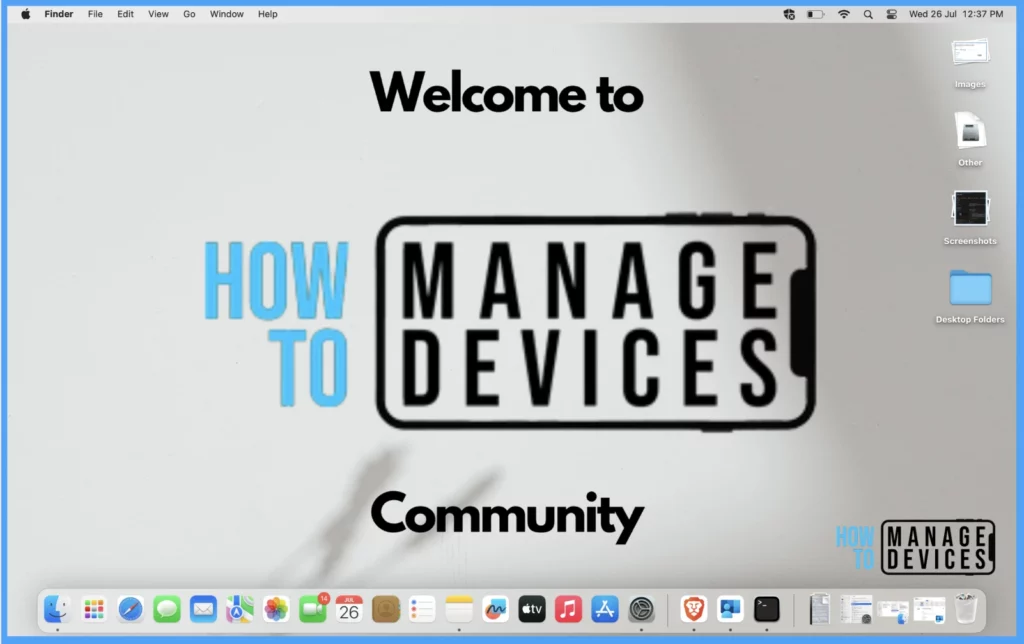
Organizations use desktop wallpaper as a representation method to convey their vision and goals to motivate employees. Below, I have shown the end result of how it looks after the configuration profile is pushed on the end-user devices, with the wallpaper set by our Organisation.
Author
Snehasis Pani is currently working as a JAMF Admin. He loves to help the community by sharing his knowledge on Apple Mac Devices Support. He is an M.Tech graduate in System Engineering with over 6+ years of IT Experience.

do you have script to change default wallpaper on win10 & 11??
what about if i want to change wallpaper to all my user’s by i want to let them change back with no admin access?
Hi Genesis,
Absolutely, you can use the script we used in this article. https://www.anoopcnair.com/deploy-wallpaper-using-sccm/
which changes the wallpaper on the windows devices.
If you want to give permission to user to change the wallpaper back, you may create another configuration in
Devices > macOS > configuration profiles > new > select settings catalog > under configuration settings > Enable the setting Allow wallpaper modification, this will allow the user to modify the wallpaper by themselves as well.
Hope I am able to answer your question.