Hello You All !!! We bring another post for you. In this post, we will learn about Slack Deployment Using SCCM through the Application model. Today we will deploy the Slack Application with the help of the SCCM Application model.
Many organizations are still using Slack even though MS Teams has challenged Slack in many ways. Slack is still attractive for non-Microsoft estates. The good thing about Slack is that they provide an MSI application hence it’s easy for Intune or SCCM admins to deploy to Windows 11 devices.
The Slack application is available in Microsoft Store as well but we can’t rely on Microsoft Store for Business (MSfB) integration with SCCM anymore. Microsoft announced the retirement of MSfB by 2023 and there is a plan to integrate SCCM with Windows Package Manager.
The best method to deploy the Slack application to Windows 11 devices is to MSI application. Sometimes even MSI app product code can also be a bit buggy. The Firefox MSI has had this product code issue for many years now.
Know About Slack
A messaging app for businesses, Slack connects people to the Information they need. Slack transforms the way organizations communicate by bringing people together to work as one team. With Slack, you can message anyone inside or outside your organization and collaborate in the same way that you would in person.
In this Step-by-Step guide for Slack Application Deployment using SCCM, we will use the MSI file for the deployment.
What is an MSI file?
Windows packages that contain installation information, including files to be installed and installation locations, are called MSI files. .EXE and MSI files both install and launch Windows programs. The EXE file may not always contain an installer, and instead may launch the program it contains when double-clicked. An MSI file, however, always contains an installer.
- Best Option to Deploy MS Teams MSI Using SCCM | ConfigMgr
- MacOS Users drop out from Teams Meetings intermittently Issue
Slack Deployment Tool Using SCCM
Let’s start with the Deployment of Slack using SCCM. As told earlier, here we are using the MSI file for Slack Deployment. You will see why the availability of MSI files for any application brings sparkles in the eyes of the SCCM Admin. We don’t need to work on prerequisites as we used to tell you in the previous posts.
- Deployment of Java using SCCM | Deploy EXE Application Guide
- Brave Browser Deployment Using SCCM | Step-by-Step Guide
Here we only have to download the MSI installer and the logo of the Slack Application. One can easily download the Slack Application from Download 64-bit MSI Installer for per-user deployment. Please don’t get confused between per-user deployment and machine-wide deployment types for Slack.
The following table gives you all the details that are required for the Slack Deployment tool using SCCM. This includes the command line for Slack silent install, Product Code, etc.
| Name | Command Line | Detection Method |
|---|---|---|
| Slack Deployment Tool – Windows Installer (*.msi file) | Install -> msiexec /i “SlackSetup.msi” /q | Windows Installer – {983598C8-B6ED-4C69-9A2B-1CDD119B8700} |
| Uninstall – msiexec /x {983598C8-B6ED-4C69-9A2B-1CDD119B8700} /q |
Create Slack Application Using SCCM Console
In this MSI application deployment guide, we will use the SCCM admin console to create an application. To start with the Application creation part, copy the downloaded Slack.msi setup to the package source location of the SCCM Server.
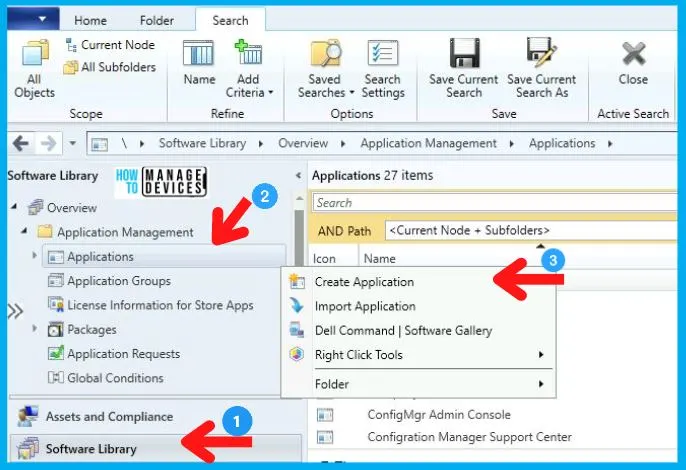
- Navigate to SCCM Console \Software Library\Overview\Application Management\Applications.
- Right-click on Applications and select Create Application.
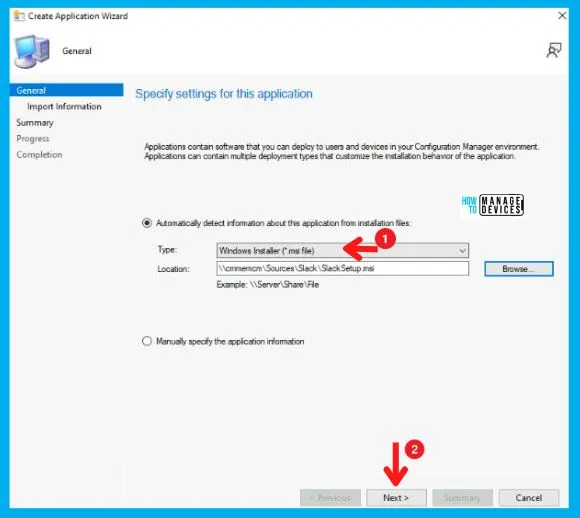
For all MSI application deployments, always Select the Automatically detect Information about the application from installation files and choose Windows Installer (.msi files) in the Type category. Also, enter the UNC Path for the application in Location and click Next.
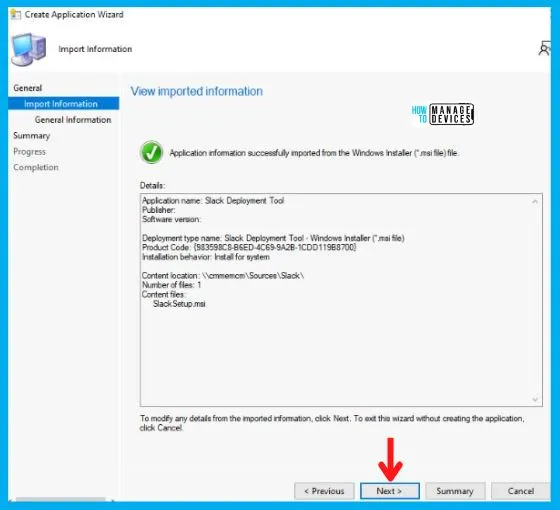
Now the real Magic Happens!!! As soon you click on next, you will see that all the information has been imported from the MSI file as shown below, and click Next.
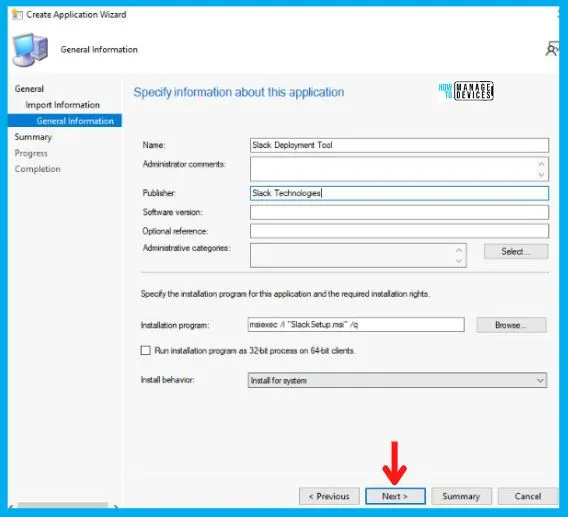
Also in the General Information Tab shown below, you will see it imports the install behavior/command (msiexec /1 “Slack Setup.msi” /q) from the installer itself. Set Install behavior to Install for System and click on Next.
- msiexec /1 “Slack Setup.msi” /q
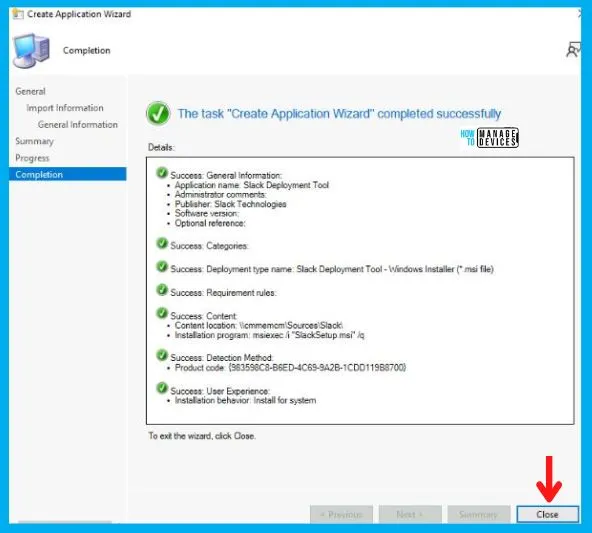
After this, click Next on the Summary Tab and end this Create Application Wizard by clicking on Close in Completion Tab.
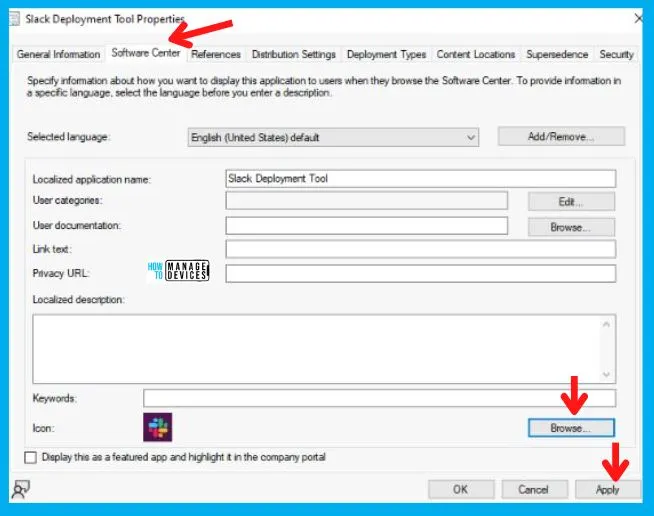
After the creation of the Application, it will appear in the Application Node. Now to Add an Icon to the Slack Application, right-click on the Slack Application and click on Properties.
After this choose Software Center Tab as shown below. And click on Browse in Icon and select the icon and click on Apply and OK as shown in the image below.
Distribute Slack Application to the DP
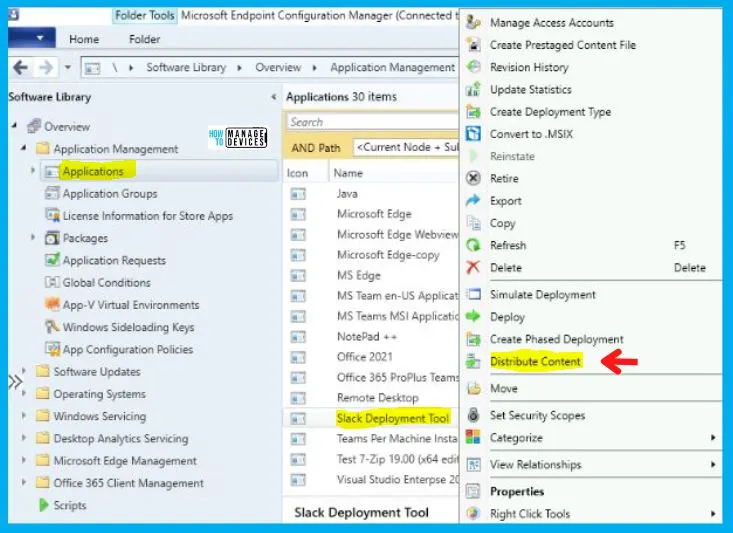
After the creation of the Application, it will appear in the Application Node. To begin with, the distribution right-clicks on the Slack Application and clicks on Distribute Content, as shown in the picture below.
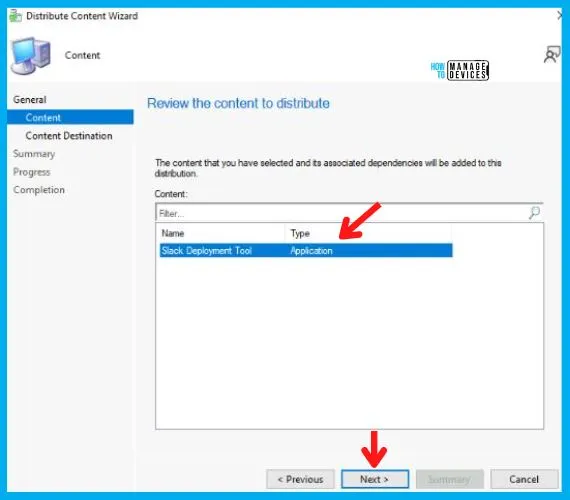
Now the Distribute Content Wizard will open, and click Next in the General Tab. Then select the Application Name in the Content Tab and Click on Next, as shown in the image below.
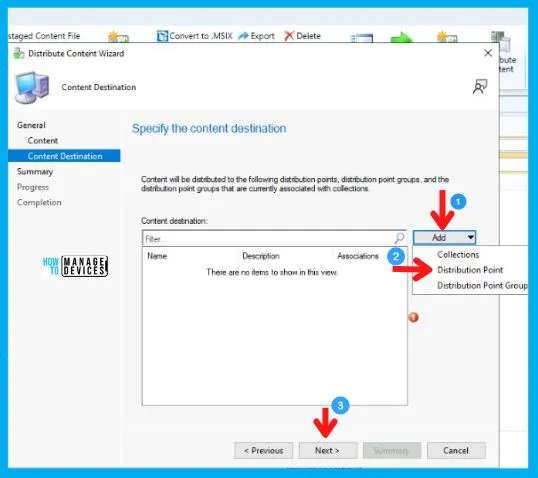
After this, in the Content Destination Tab, Click on Add and select the Distribution Point option.
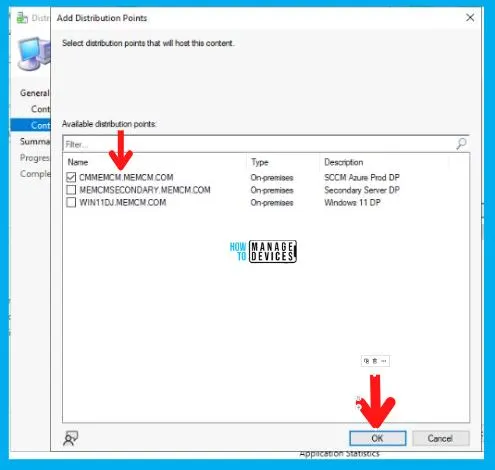
Then Add Distribution Point page will pop up, choose the Distribution Point on which you want to distribute the Application and click on OK, and then on Next.
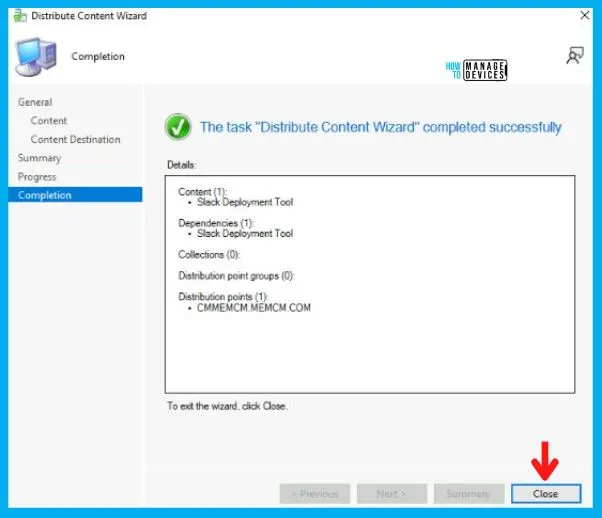
After this, Click Next on Summary Tab and complete this Distribution process by clicking Close on Completion Tab.
Deploy Slack Deployment Tool using SCCM
So as of now, we have accomplished two tasks i.e., Application Creation and Application Distribution to the DP. Now all that is left is the Deployment of the Slack Application on the All Windows 11 Device Collection.
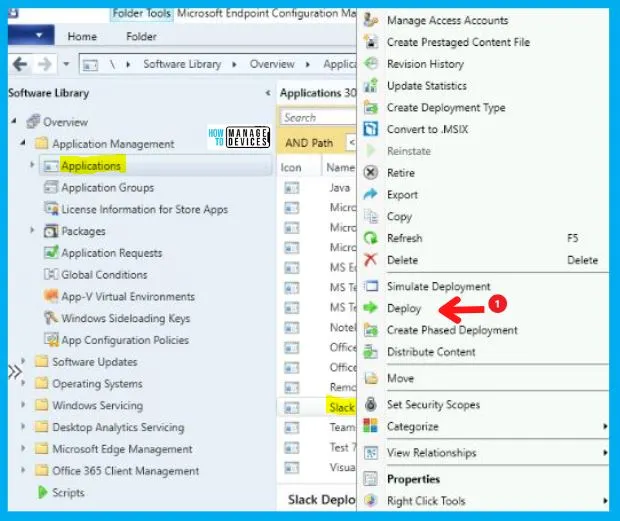
- As you can see, your Application is displaying in Application Node, Right-click on Slack Application and select Deploy.
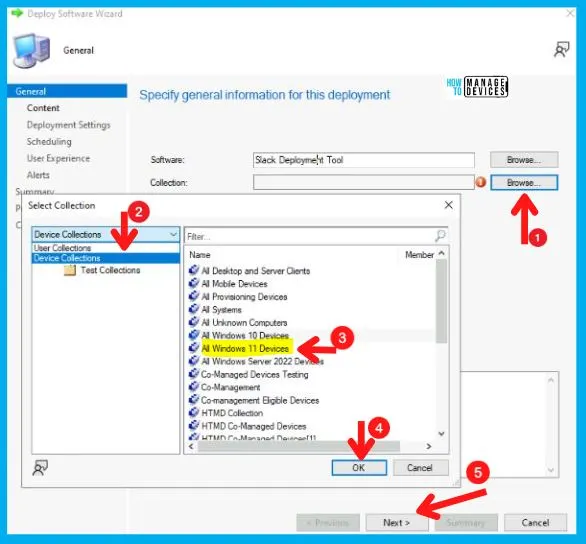
After this, Deploy Software Wizard opens, and in the General Tab, enter the Name of the Application and click on Browse to select the Collection.
- Now the Select Collection page will pop up; and choose Device Collection from the drop-down menu, and then
- Select your targeted Device Collection and click on OK, and then Next.
- Here I choose All Windows 11 Devices.
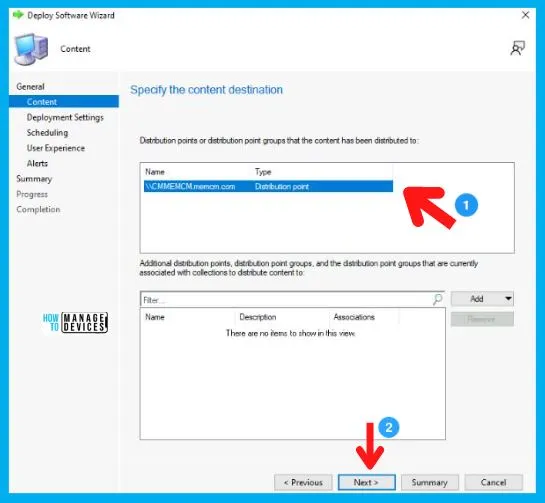
Now in the Content Tab, select the Distribution Point on which the Application is distributed and click on Next.
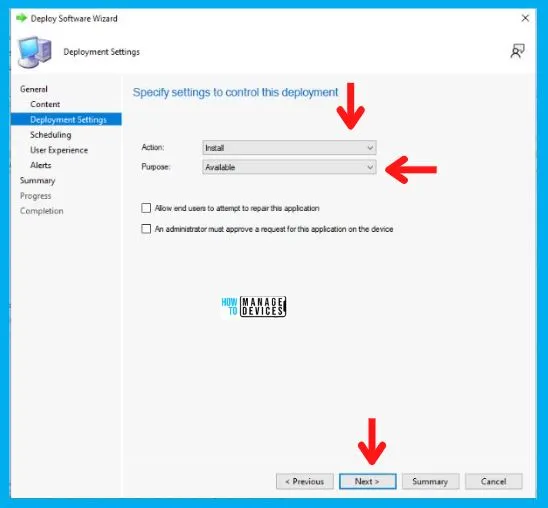
Now in the Deployment Settings Tab, select:
- Install in the Action box
- And choose Available in the Purpose category.
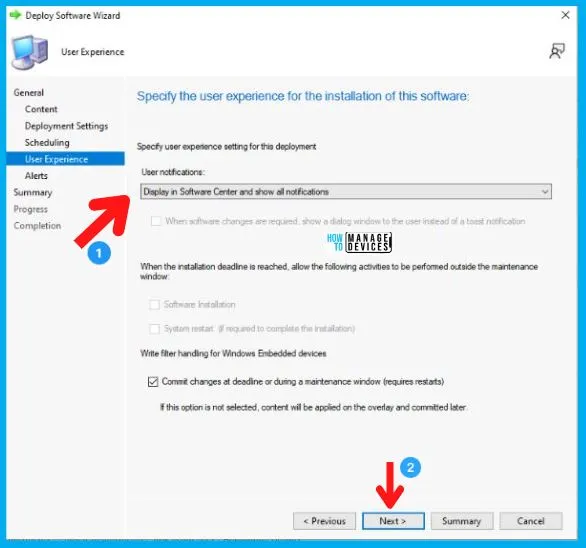
In the Scheduling Tab, enter the time details if you want it to be available at a specific time; otherwise, leave it as it is and click Next. After this, in the User Experience Tab,
- Select Display in Software Center and shows all notification options in the User notifications, and click on Next as shown below.
In the Alerts and Summary Tab, click on Next and to end the process, click on Close in the Completion Tab.
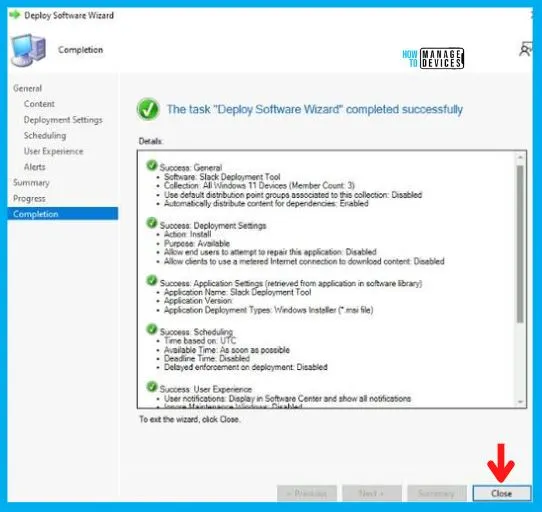
Let’s Check Windows 11 Client Machine
In this section, we will check the end-user experience for Slack Application Deployment and Installation. The Slack Application is Created, Distributed, and Deployed.
Now, if you check the Software Center of Win 11 device from the All Windows 11 Device Collection, you will see the Application there in Available Mode, and the user can install it as per the requirement.
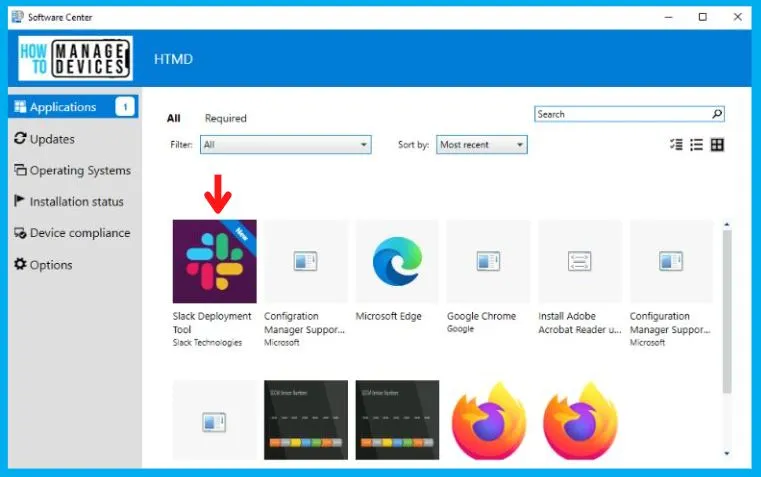
As you can see in the below screenshot, the Slack Application is installed successfully on Windows 10/11 devices. This proves that the above MSI installer works fine for Slack Application Installation using SCCM.
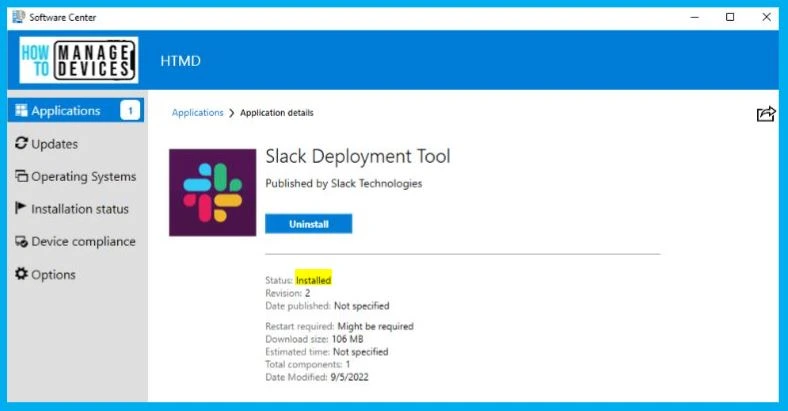
So here we have finally created, Distributed, Deployed, and Installed the Slack Application as it is available in the Software Center as shown in the above image.
Author
Abhinav Rana is working as an SCCM Admin. He loves to help the community by sharing his knowledge. He is a BTech graduate in Information Technology.
