Hello, You All. Here we come with another deployment post. This post includes the steps required for the Visual Studio Code Deployment Using SCCM. We will use the Visual Studio Code EXE Installer to deploy on the client machines using Configuration Manager.
Microsoft’s Visual Studio Code, also known as VS Code, is a source-code editor made for Windows, Linux, and macOS based on the Electron Framework. In addition to debugging, syntax highlighting, intelligent code completion, snippets, code refactoring, and embedded Git integration, this app supports debugging and syntax highlighting.
Even though VS Code is marketed primarily to professionals, it is an excellent editor for students and other learners just starting with HTML and CSS. With it, developers have just the tools they need for a quick code-build-debug cycle, leaving more complex workflows to more complete IDEs, like Visual Studio.
The Microsoft Python extension for Visual Studio Code makes working with Python simple, fun, and productive. In addition to working on any operating system with a variety of Python interpreters, the extension makes VS Code an excellent Python editor.
Also, with the Java Extension Pack installed, Visual Studio Code works very well as a Java IDE. When using Visual Studio Code for the Web, it becomes obvious that the editor is only OK without the extension pack.
- Pidgin Deployment using SCCM Application Silent Command Line
- Deploy Google Earth Pro Using SCCM Application MSI Model
Prerequisites – Visual Studio Deployment
You can browse Visual Studio Code’s official page to download the latest version. You will see the application available in different formats for different operating systems. One can easily pick the one as per the requirement.
We have not seen any Visual Studio Code MSI Application, so we need to use EXE Application to deploy and install the Visual Studio Code Application. Now, before we proceed further, we must have these three things in advance, especially when we have a .exe setup:
- Installation Command/Uninstallation Command
- Detection Method
- Application Icon
With the help of the internet, one can find an Install command for any application. In our case, we have to search the install command for the Visual Studio Code. After searching, the install command for the Visual Studio Code is VSCodeSetup-x64-1.74.3.exe /VERYSILENT /NORESTART /MERGETASKS=!runcode.
After successfully installing Visual Studio Code using the install command in your test environment. Now you have to look for the Uninstall command. The Uninstall Command for Visual Studio Code is “%ProgramFiles%\Microsoft VS Code\unins000.exe” /VERYSILENT /NORESTART.
| Install Command | Uninstall Command |
|---|---|
| VSCodeSetup-x64-1.74.3.exe /VERYSILENT /NORESTART /MERGETASKS=!runcode | “%ProgramFiles%\Microsoft VS Code\unins000.exe” /VERYSILENT /NORESTART |
Create Visual Studio Code Application Using SCCM Console
This EXE application deployment guide will use the SCCM admin console to create an application. To start with the Application creation part, copy the downloaded setup to the package source location of the SCCM Server.
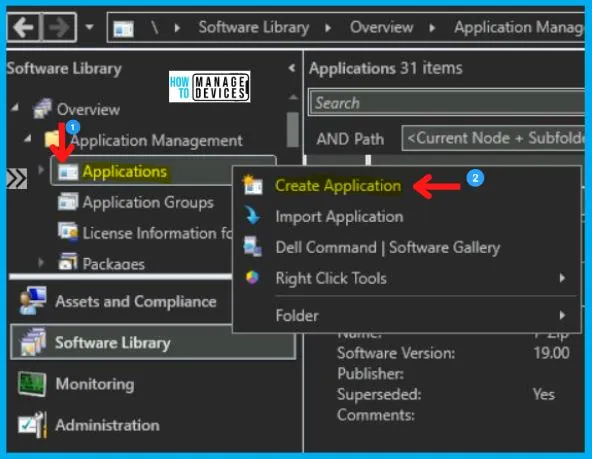
- Navigate to SCCM Console\Software Library\Overview\Application Management\ Applications
- Right-click on Applications and select Create Application
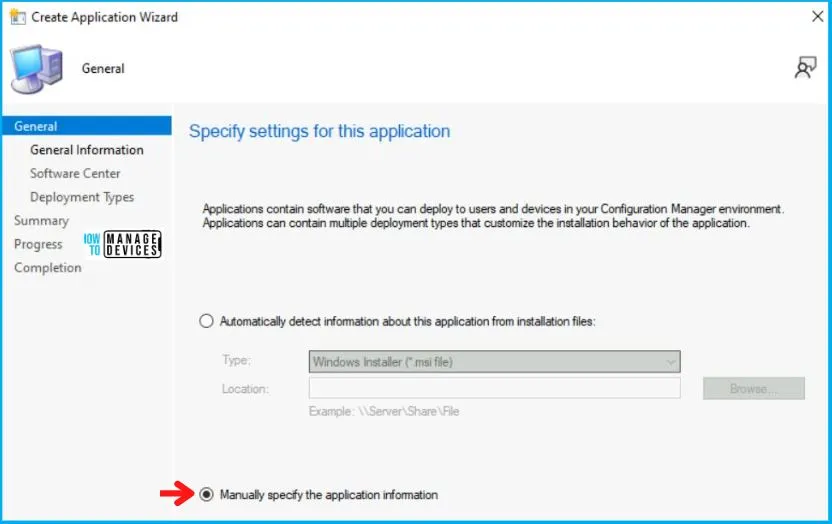
For all EXE application deployment, always Select the Manually Specify the Application Information option and click Next.
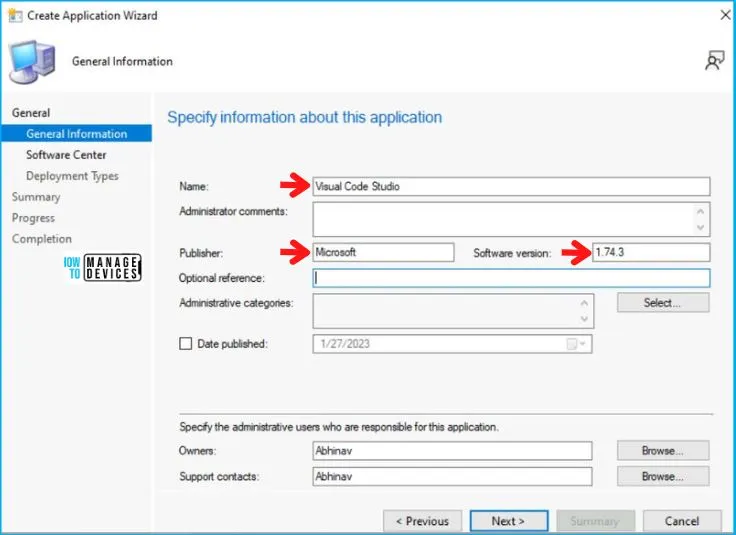
In the General Information Tab, you need to provide the metadata information of the SCCM Visual Studio Code application. You need to enter the details like:
- Name and Software Version.
- And click on Next.
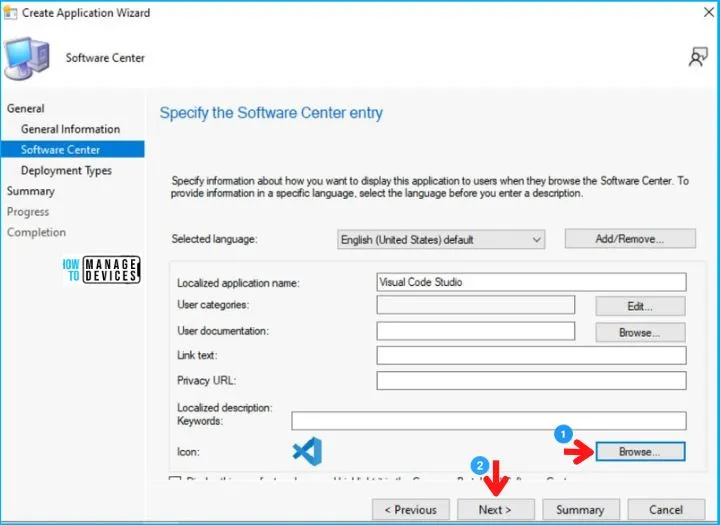
Then in the Software Center Tab, Enter the Application Name and upload the Icon by clicking on Browse. For more information about uploading icons, check the Easy Steps Software Center Icon for SCCM Application Deployment.
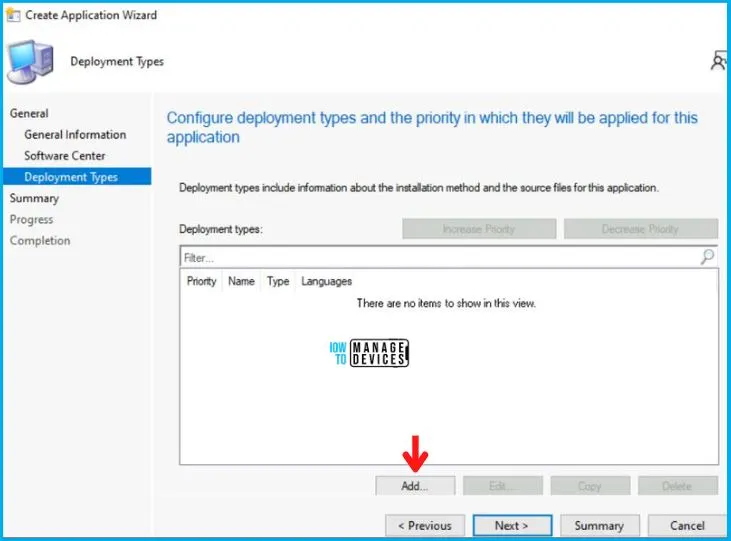
Now the Deployment Type Wizard will pop up, and click on ADD as shown below.
In General Tab, select Manually Specify the Deployment type information and click on Next.
Visual Studio Code App Install or Uninstall Command Lines
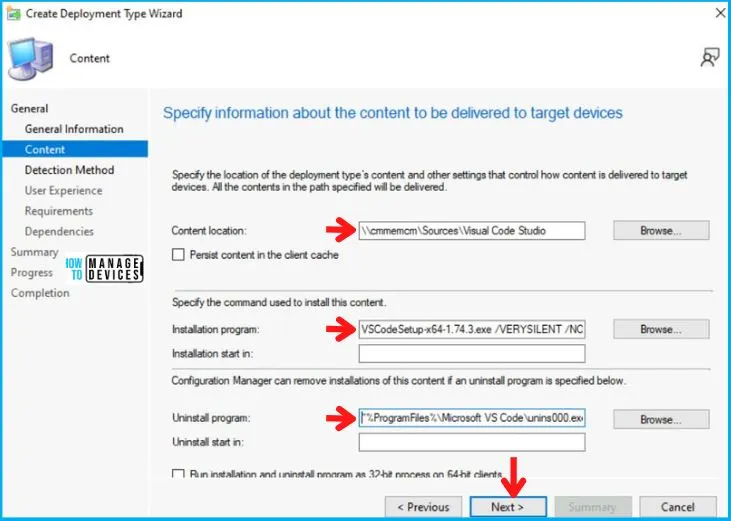
After this, the General Information Tab appears, in which you have to enter the application’s name and click on Next. Now in Content Tab, enter the important details mentioned below and click Next.
- Content-Location (Browse for the UNC path where your setup is kept)
- Installation Program
- VSCodeSetup-x64-1.74.3.exe /VERYSILENT /NORESTART /MERGETASKS=!runcode
- Uninstall Program
- “%ProgramFiles%\Microsoft VS Code\unins000.exe” /VERYSILENT /NORESTART
| Install Command Line for Visual Studio Code | Uninstall Command Line for Visual Studio Code |
|---|---|
| VSCodeSetup-x64-1.74.3.exe /VERYSILENT /NORESTART /MERGETASKS=!runcode | “%ProgramFiles%\Microsoft VS Code\unins000.exe” /VERYSILENT /NORESTART |
Detection Method for Visual Studio Code App
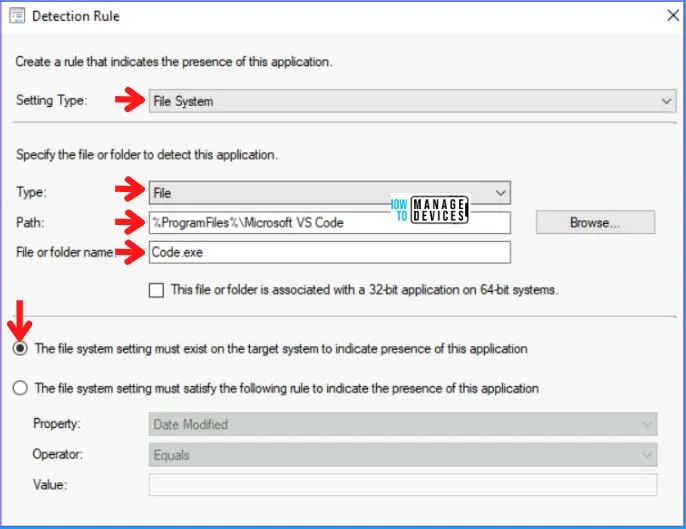
Now in the Detection Method Tab, click on Add Clause, and a new Detection Rule page will pop up. Fill in all the details very carefully, as mentioned below:
- Select File System in the Setting Type.
- Select File in the Type box.
- Copy the path in the Path box
- %ProgramFiles%\Microsoft VS Code
- Look for the file called Code.exe
The following table provides clearer options for a detection method for an exe file.
| Setting Type | Path/Hive | File Name/Key |
|---|---|---|
| File System | %ProgramFiles%\Microsoft VS Code | Code.exe |
NOTE! – You can check the better detection mechanism as per your organization’s requirement.
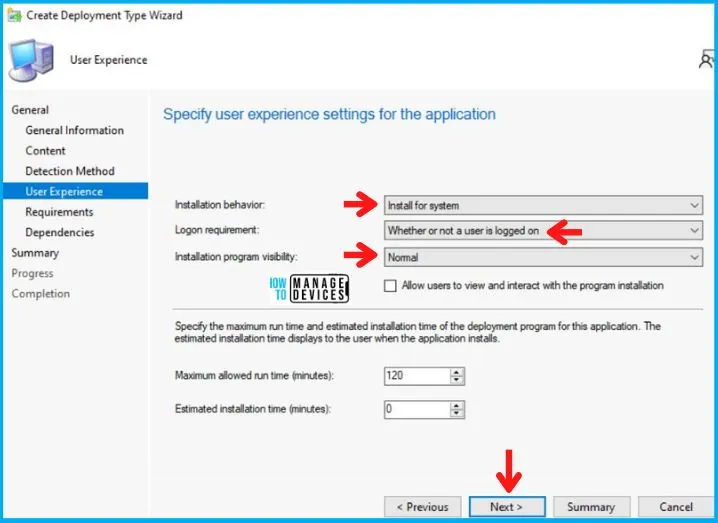
Now in the User Experience Tab, specify Install for the system in Installation behavior; in the Logon requirement, choose Whether or not a user is logged on. Set Installation Program Visibility to Normal as shown below and click on Next.
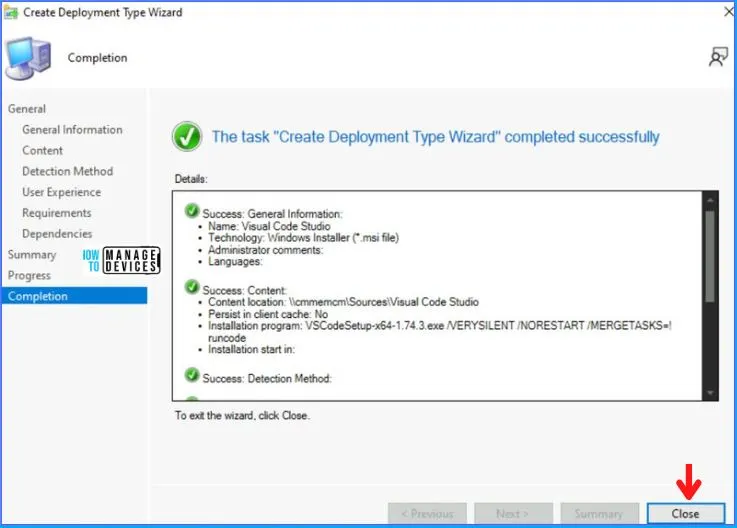
Click on Next in the Requirement, Dependencies, and Summary Tab. After this, in the end, Click on Close in the Completion Tab as shown below.
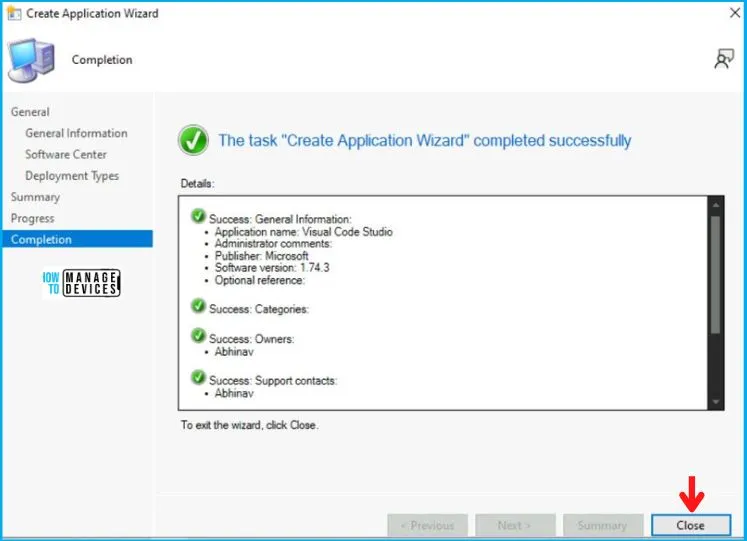
Then back in the Create Application Wizard, click Next in Deployment Tab. After this, click Next on the Summary Tab and end this Create Application Wizard by clicking on Close in Completion Tab.
Distribute Visual Studio Code Application to SCCM DP
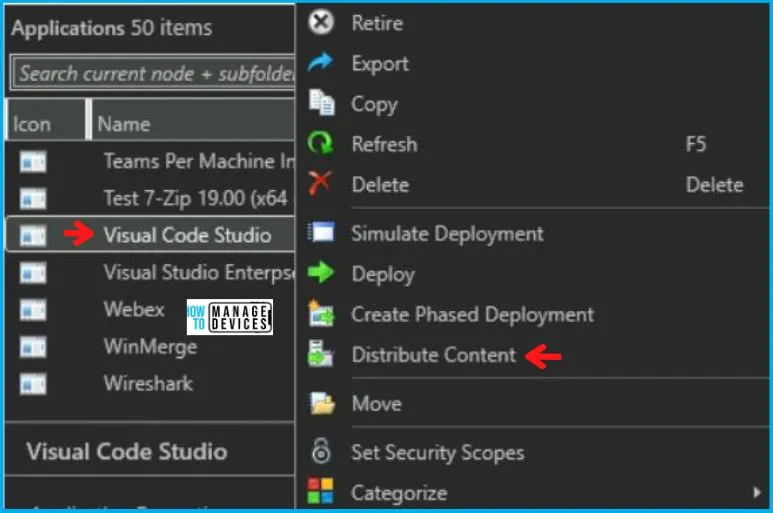
After creating the SCCM Application for Visual Studio Code, it will appear in the Application Node. To begin with, the distribution right-click on the Visual Studio Code Application and clicks on Distribute Content, as shown in the picture below.
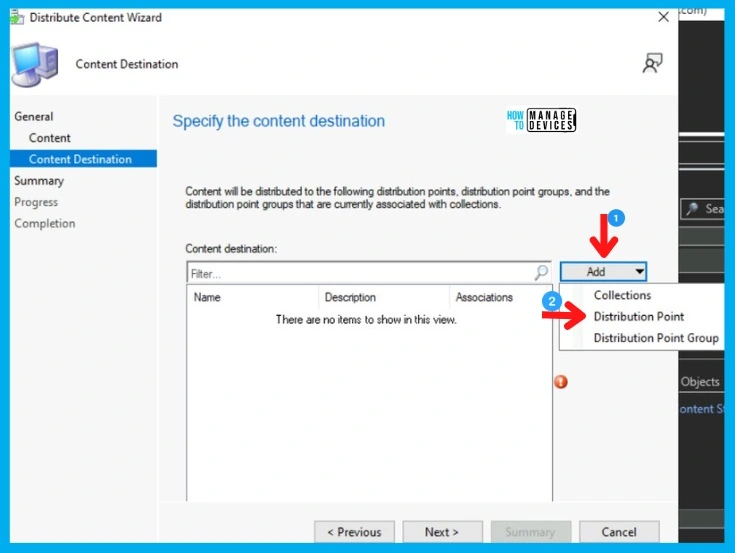
The Distribute Content Wizard will open, and click Next in the General Tab. Then select the Application Name in the Content Tab and Click on Next.
- After this, in the Content Destination Tab, Click on Add and select the Distribution Point option.
Then Add Distribution Point page will pop up, choose the Distribution Point on which you want to distribute the Application and click on OK, and then on Next.
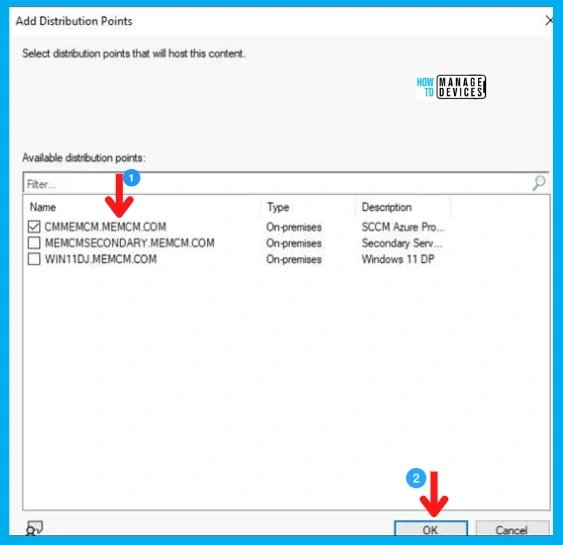
After this, Click Next on Summary Tab and complete this Distribution process by clicking Close on Completion Tab.
Visual Studio Code App Deployment Steps using SCCM
So far, we have accomplished two tasks, i.e., Application Creation and Application Distribution to the DP. Now all left is the Deployment of the Visual Studio Code Application on the All Windows 10 Device Collection.
- As you can see, your Application is displaying in Application Node, Right-click on Visual Studio Code Application and select Deploy.
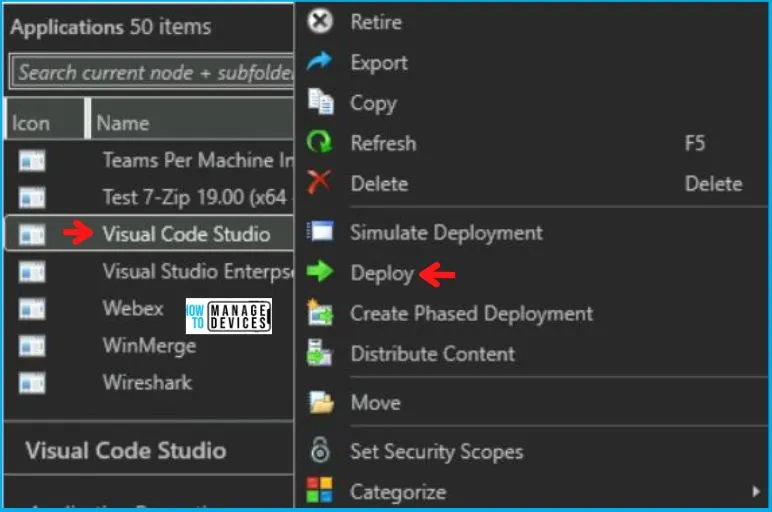
After this, Deploy Software Wizard opens, and in the General Tab, enter the Name of the Application and click on Browse to select the Collection.
Now the Select Collection page will pop up; choose Device Collection from the drop-down menu, and then
- Select your targeted Device Collection and click on OK, and then Next.
- Here I choose All Windows 10 Devices or Windows 11 Devices.
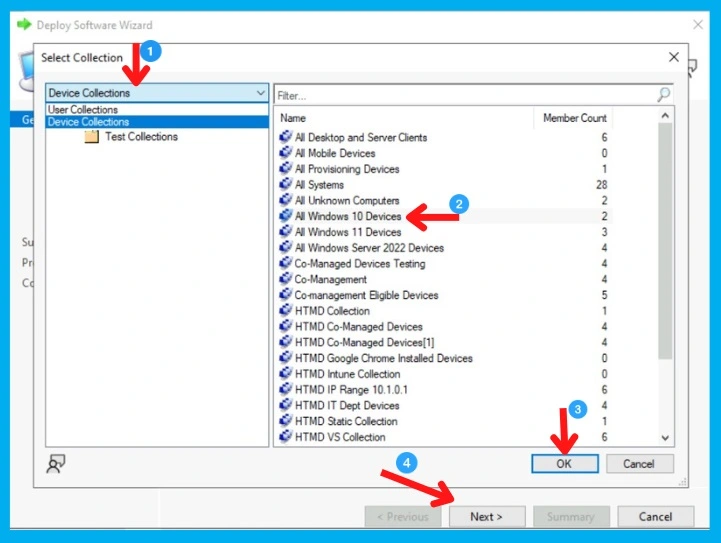
Now in the Deployment Settings Tab, select:
- Install in the Action box
- And choose Available in the Purpose category.
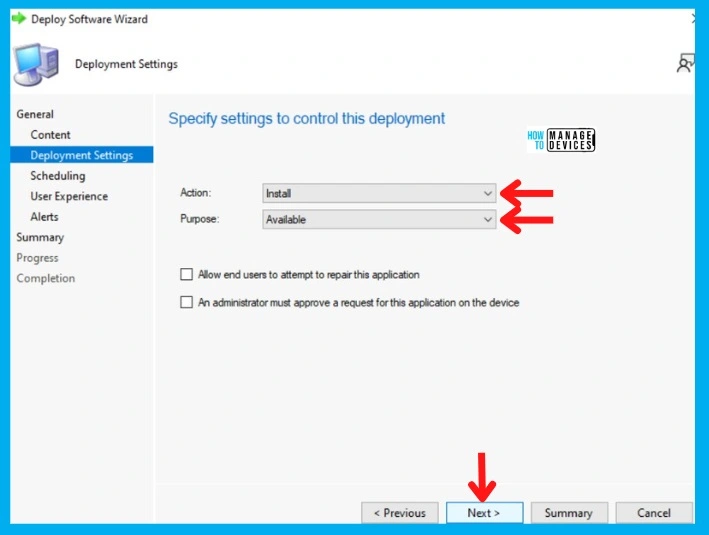
In the Scheduling Tab, enter the time details if you want it to be available at a specific time; otherwise, leave it as it is and click Next. After this, in the User Experience Tab,
- Select Display in Software Center and shows all notification options in the User notifications, and click on Next as shown below.
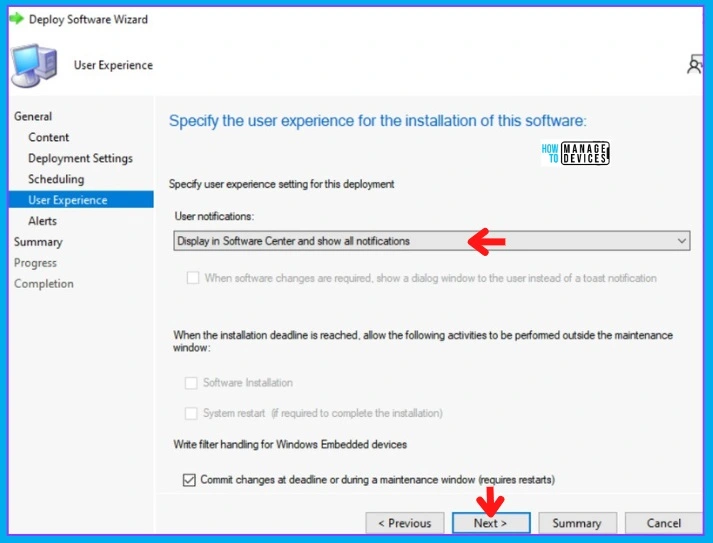
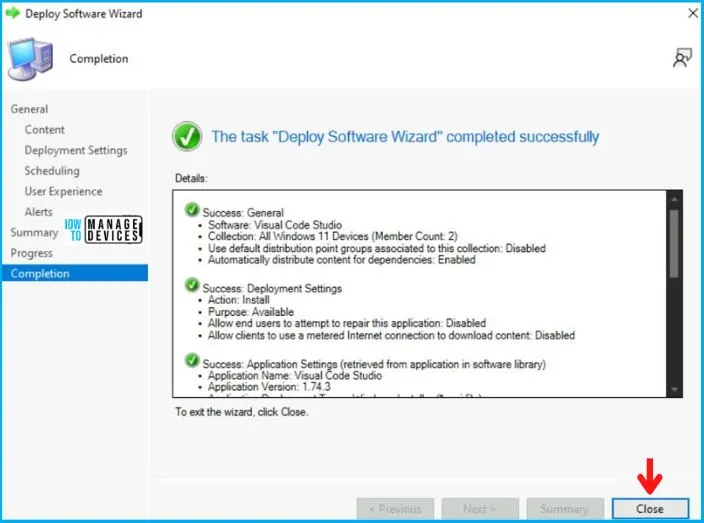
In the Alerts and Summary Tab, click on Next, and to end the process, click on Close in the Completion Tab.
End Users Experience
In this section, we will check the end-user experience for Visual Studio Code Application Deployment and Installation. The Visual Studio Code Application is Created, Distributed, and Deployed.
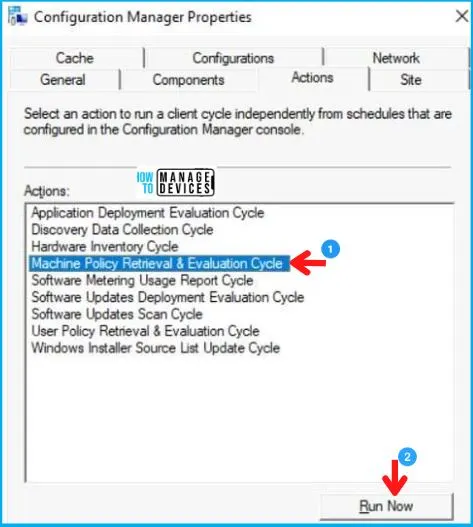
To test the deployment quickly on a lab device, you can manually initiate the machine policy from Windows 10 or 11 devices, as shown below in the image.
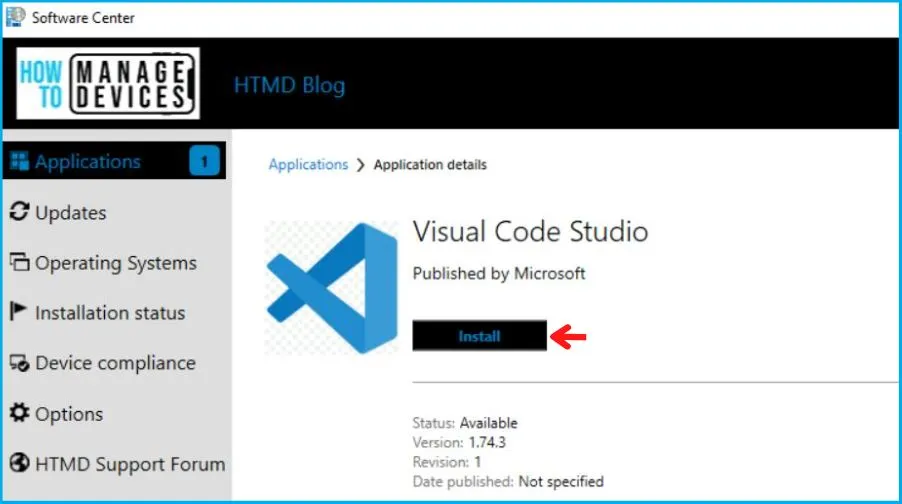
Now, if you check the Software Center of Win 10 device from the ALL Windows 10 Device Collection, you will see the application in Available Mode, and the user can install it as per the requirement.
As you can see in the below screenshot, the Visual Studio Code Application is installed successfully on Windows 10/11 devices. This proves that the above silent install and uninstall command and detection logic works fine for Visual Studio Code Application Installation using SCCM.
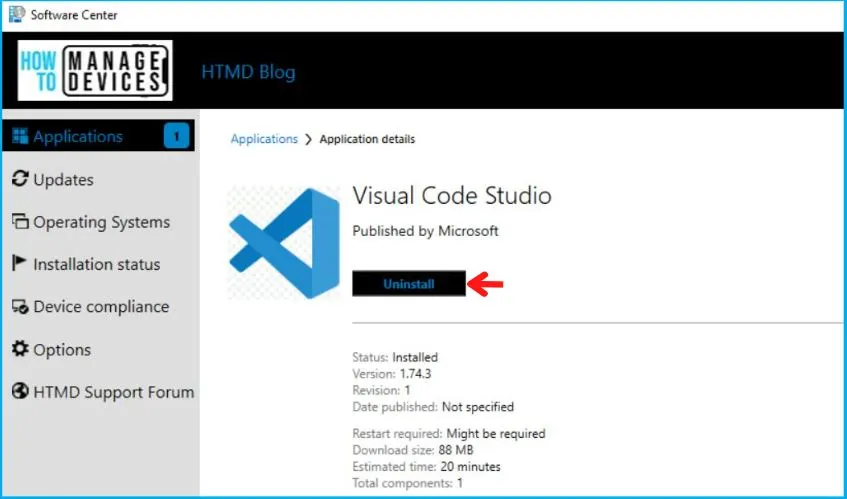
The installation was quick, and the Visual Studio Code was installed successfully without any issues. To monitor the Visual Studio Code Application installation, on the client computer, verify the AppEnforce.log file in the C:\Windows\CCM\Logs folder.
Kudos to all of you out there!! You have successfully created, Distributed, and Deployed the Visual Studio Code as it is installed from the Software Center.
Author
Abhinav Rana is working as an SCCM Admin. He loves to help the community by sharing his knowledge. He is a BTech graduate in Information Technology.
