Let’s learn about 5 methods to enable or disable Automatic Sample Submission for Microsoft Defender Antivirus in Windows Devices using Windows Security Settings Registry File PowerShell Script Group Policy and Intune Policy. Microsoft Defender Antivirus is an antivirus software that is included in Windows 11 and can help protect your device from viruses, malware, and other threats.
Cloud-delivered protection and automatic sample submission work together with Microsoft Defender Antivirus to help protect against new and upcoming threats. When Microsoft Defender Antivirus detects a potentially suspicious or malicious file, it immediately blocks the file and sends a sample to the cloud for rapid analysis.
Once the cloud service completes its assessment, typically within moments, the file is either unblocked or permanently blocked based on the verdict. If Microsoft Defender Antivirus is unable to reach a definitive verdict, it sends the file’s metadata to the cloud protection service. You can also learn how to turn on Cloud Protection for Windows 11 Microsoft Defender Using Intune by clicking here.
In most cases, the cloud can analyze this metadata in milliseconds and swiftly determine whether the file poses a threat or is safe to proceed. If the cloud protection service is unable to make a definitive determination based on file metadata, it may request a full file sample for deeper analysis. This request respects the configured sample submission settings defined by the user or administrator.
Table of Contents
How to Enable or Disable Automatic Sample Submission for Microsoft Defender Antivirus
Automatic Sample Submission in Microsoft Defender Antivirus is a security feature that helps identify and block emerging threats by sending suspicious file samples to Microsoft for cloud-based analysis. When enabled, it allows Defender to automatically submit safe files, like executables and scripts, that typically do not contain personal data. You can find the detailed post on Configure Microsoft Defender Antivirus Policies for Windows 11 by clicking here.
- Monitoring Defender Updates using Intune Portal
- What is Microsoft Defender XDR?
- Manage Microsoft Defender Antivirus Updates using Intune
If a file might include sensitive information, such as a document or spreadsheet, Defender will prompt the user before submission. This process enhances real-time protection and works in tandem with cloud-delivered protection to quickly assess and respond to potential malware. There are some methods to enable or disable Automatic Sample Submission are listed below.
- Windows Security Setting
- Group Policy Setting
- Registry File
- PowerShell Script
- Intune Policy
Windows Security Setting
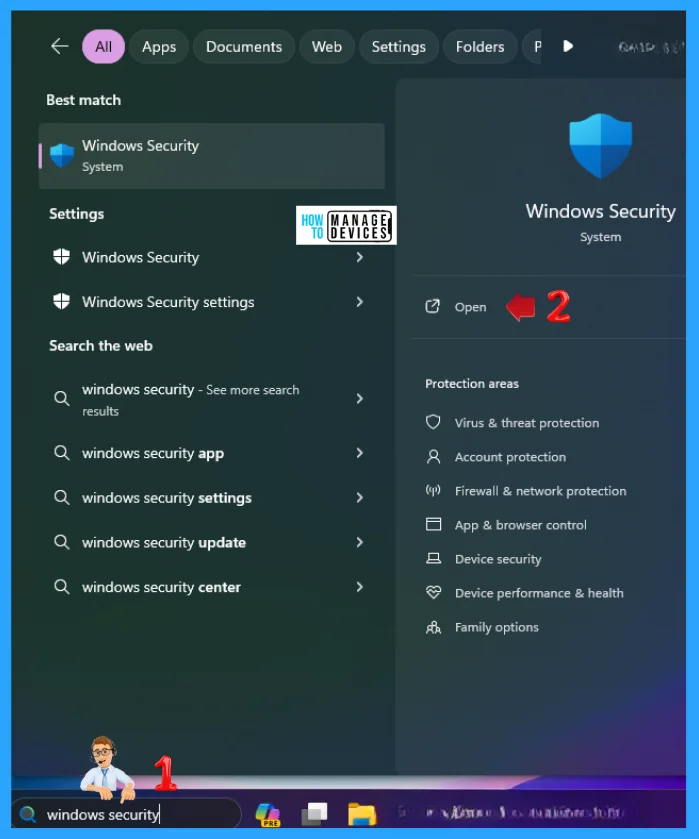
In Windows 11 there are some settings to do certain changes, here you can use the Window Security settings to enable or disable Automatic Sample Submission using Windows Security Setting, type Windows Security on the Searchbar on the Taskbar. Now choose Windows Security option as illustrated in the image below.
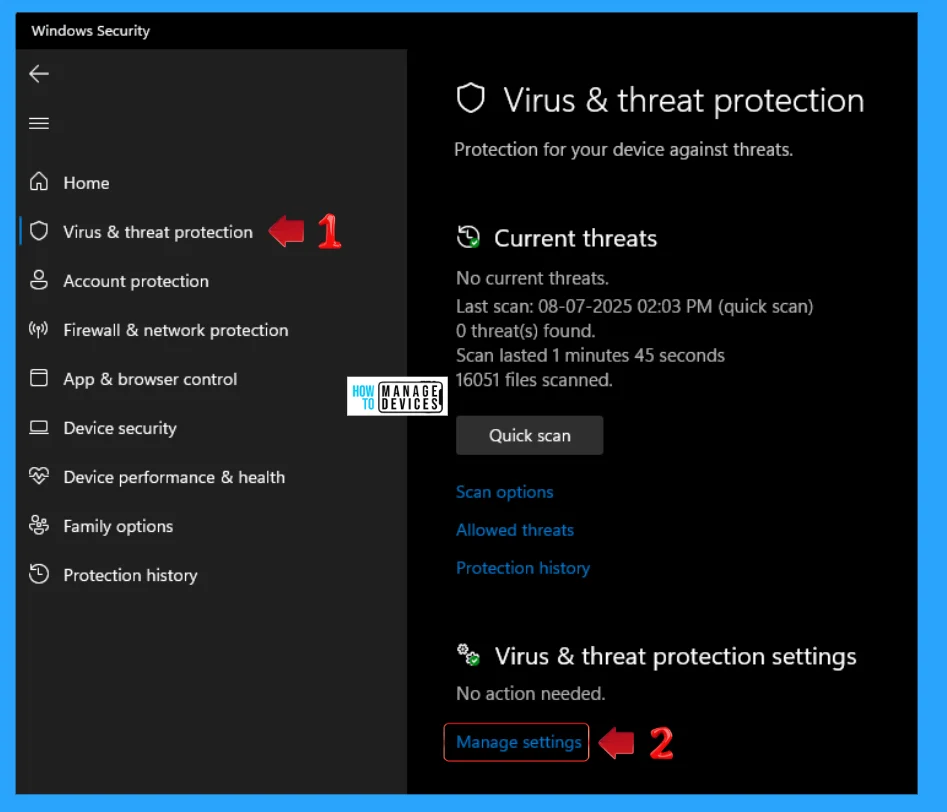
When the Windows Security opens, then click on Virus & Threat protection, that is a protection for your device against threats. Now you see Virust & threat protection settings under Virus & threat protection, click on the Manage Settings option as illustarated in the image below.
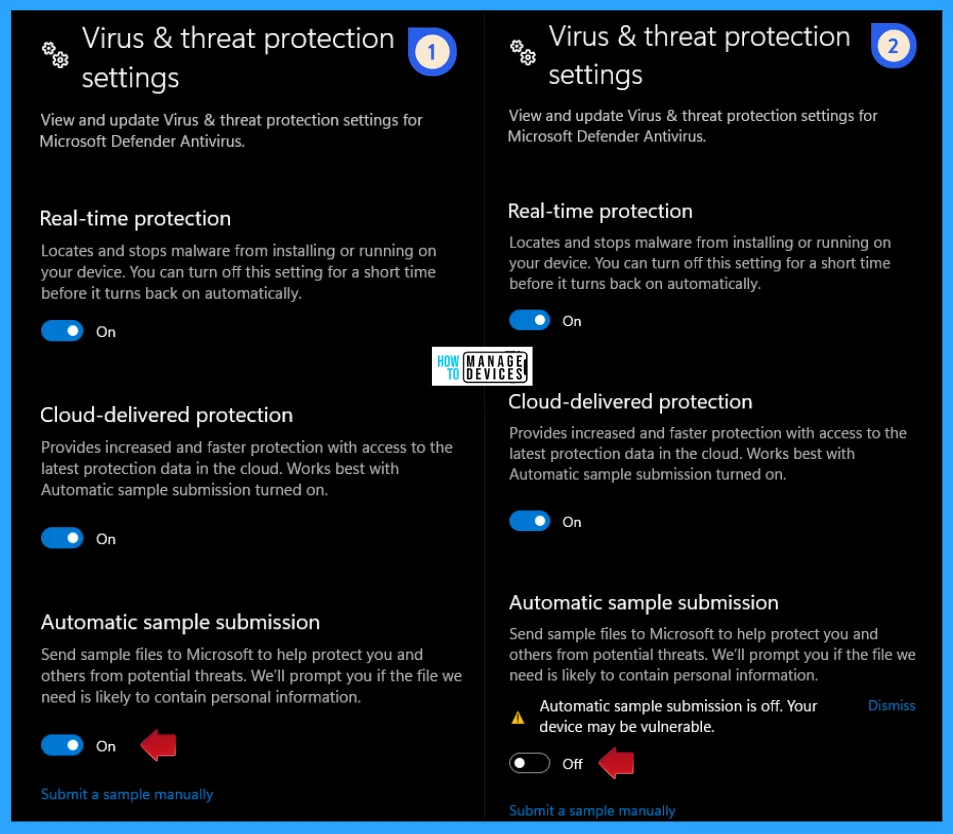
After clicking on the Manage Settings the Virus & threat protection settings window opens, which use to view and update virus & threat protection settings for Microsoft Defender Antivirus. Under it there is a option as Automatic Sample Submission, which send sample files to Microsoft to help protect you and others from potential threats, now toggle the button under it to turn this setting ON or OFF.
NOTE: Automatic Sample Submission is off. Your device may be vulnerable.
Local Group Policy Setting
In Windows 11, you can set the Local Group Policy Editor to enable or disable Automatic Sample Submission for Microsoft Defender Antivirus in Windows Devices. Open the Local Group Policy to enable or disable Automatic Sample Submission, and follow the process described below.
- Open the Run command and press Win Key + R.
- Type gpedit.msc
- Click OK or press Enter.
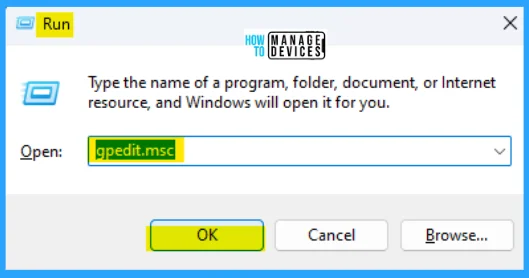
When the Group Policy Editor opens, navigate to the following path to access the required policy settings. To make changes, select Send file samples when further analysis is required.
Computer Configuration>Administrative Templates>Windows Components>Microsoft Defender Antivirus>MAPS

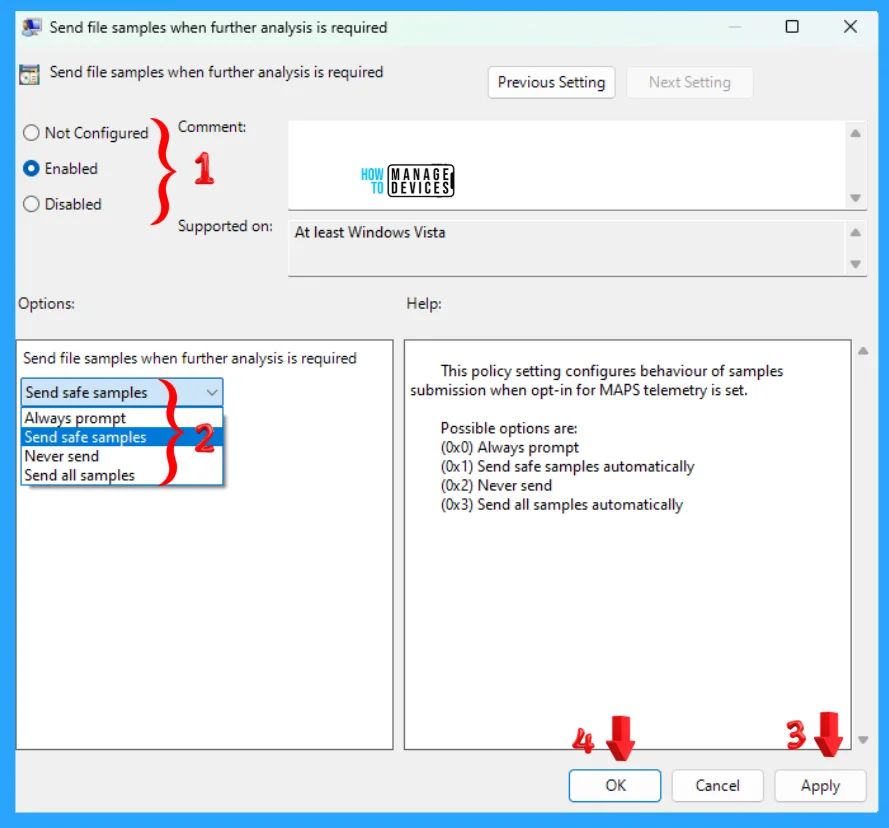
Double-click on Send file samples when further analysis is required to open the settings. Here, you can see that it needs at least Windows Vista. You can choose the following process and press Apply, then press the OK button to apply the changes. You can enable or disable Automatic Sample Submission in Windows 11.
This policy setting configures behavious of samples submission when opt-in for MAPS telementry is set. When you enables it there are some possible options are listed below:
- Always Prompt
- If configured, the user will always be prompted for consent before file submission
- This setting is not available in macOS cloud protection
- Send safe samples
- Safe samples are samples considered to not commonly contain PII data like: .bat, .scr, .dll, .exe.
- If file is likely to contain PII, the user will get a request to allow file sample submission.
- This option is the default on Windows, macOS, and Linux.
- Never send
- Prevents “block at first sight” based on file sample analysis
- Never Send is the equivalent to the Disabled setting in macOS policy
- Metadata is sent for detections even when sample submission is disabled
- Send all samples
- If configured, all samples will be sent automatically
- If you would like sample submission to include macros embedded in Word docs, you must choose Send all samples automatically
- This setting isn’t available on macOS cloud protection
Registry File
Using the registry editor, there are ways to enabel or disable Automatic Sample Submission for Microsoft Defender Antivirus in Windows 11. This procedure is done using the Registry File. Let’s discuss the step-by-step guidelines for it.
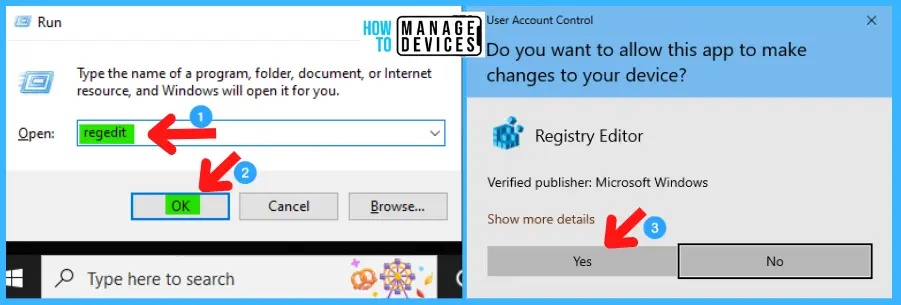
Now, open Run Window, and press Windows Key + R from the keyboard simultaneously. This is the keyboard shortcut to open the run window. Now, type regedit and click on OK to continue. Then, it asks the Admin’s permission to change the Device. Click Yes.
- Window Key + R (To open run command)
- Type ‘regedit‘ and press OK
- Administrator Permission press Yes
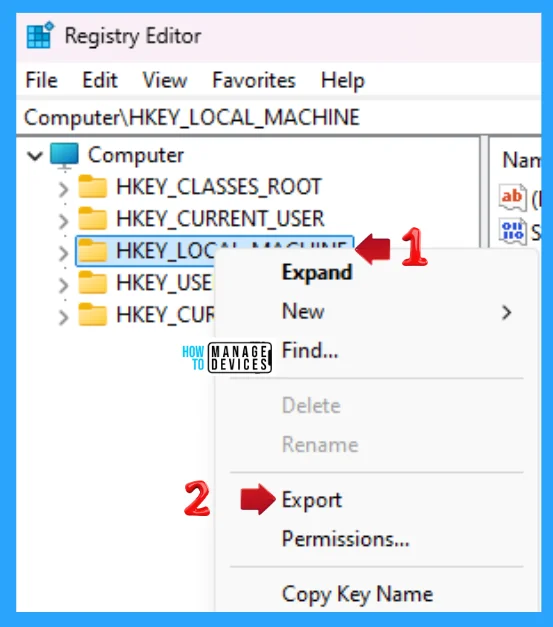
NOTE! Take Backup—If any mistake occurs in the Registry Editor, it may affect the system. It is advisable to take a backup of the Registry before proceeding. To back up, go to File in the top left corner of the Registry Editor. Click on it, then select Export and save the backup.
- Go to File.
- Right-click on HKEY_LOCAL_MACHINE.
- Click on Export.
- Please save it.
Use the .reg file to enable or disable Automatic Sample Submission in Windows. To create a .reg file, open NotePad, type the following code, and name it AlwaysPromptAutomaticSampleSubmission. Then, save it on the desktop using the .reg extension, which enables the cloud content search.
[HKEY_LOCAL_MACHINE\SOFTWARE\Policies\Microsoft\Windows Defender\Spynet]
"SubmitSamplesConsent"=dword:00000000
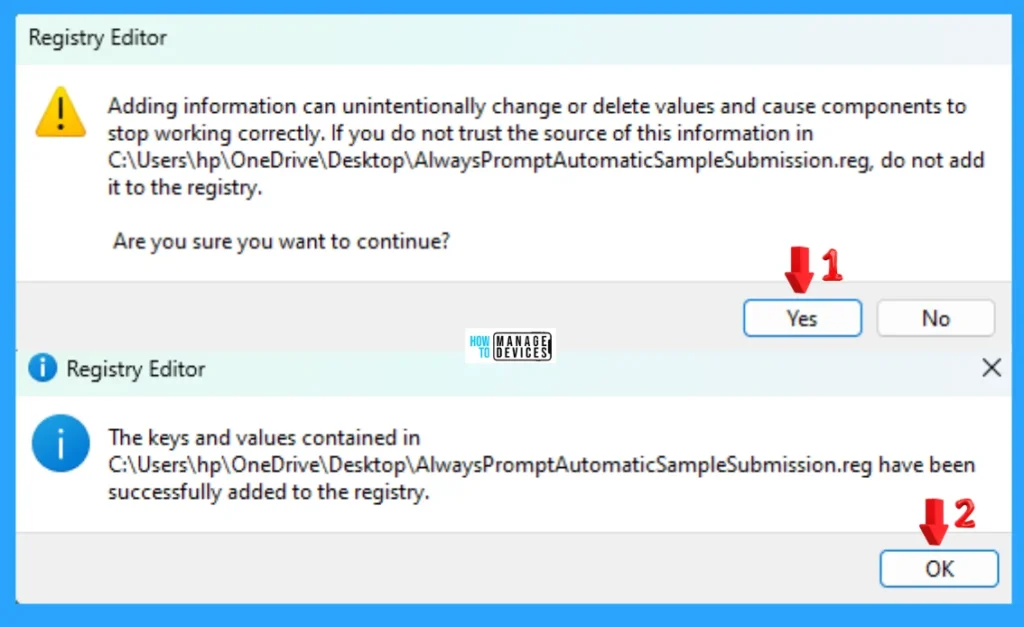
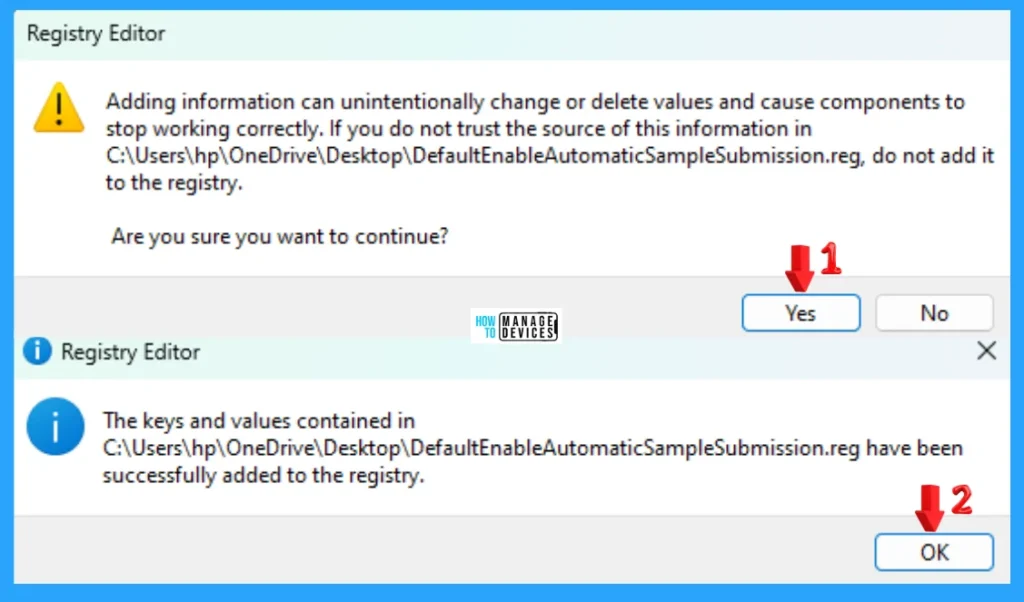
When the file is saved at your selected location, double-click on it. The User Account Control Window will open; click Yes to continue. Then, the Registry Editor Waring window will open.
Adding information can unintentionally change or delete values and cause components to stop working correctly. If you do not trust the source of this information in the path you created, do not add it to the registry; otherwise, click Yes to continue.
The following window shows that the key and value you added have been successfully added to the registry editor. Now click on OK and restart your PC to add the applicable test.
Use the .reg file to enable or disable Automatic Sample Submission in Windows. To create a .reg file, open NotePad, type the following code, and name it SendSafeSamplesAutomaticSampleSubmission. Then, save it on the desktop using the .reg extension, which enables the cloud content search.
[HKEY_LOCAL_MACHINE\SOFTWARE\Policies\Microsoft\Windows Defender\Spynet]
"SubmitSamplesConsent"=dword:00000001
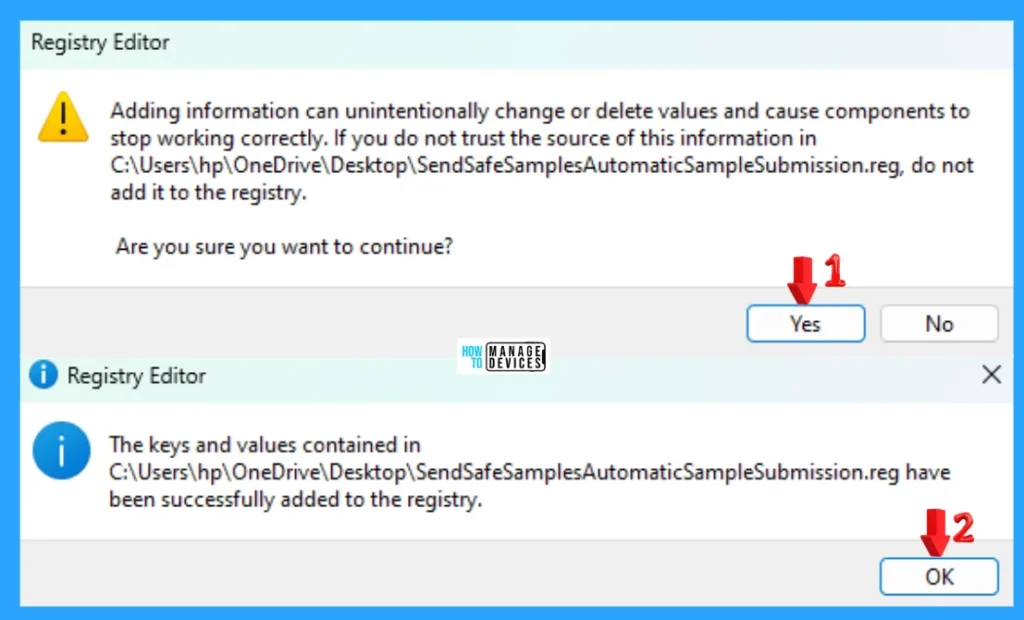
When the file is saved at your selected location, double-click on it. The User Account Control Window will open; click Yes to continue. Then, the Registry Editor Waring window will open.
Adding information can unintentionally change or delete values and cause components to stop working correctly. If you do not trust the source of this information in the path you created, do not add it to the registry; otherwise, click Yes to continue.
The following window shows that the key and value you added have been successfully added to the registry editor. Now click on OK and restart your PC to add the applicable test.
Use the .reg file to enable or disable Automatic Sample Submission in Windows. To create a .reg file, open NotePad, type the following code, and name it SendAllSamplesAutomaticSampleSubmission. Then, save it on the desktop using the .reg extension, which enables the cloud content search.
[HKEY_LOCAL_MACHINE\SOFTWARE\Policies\Microsoft\Windows Defender\Spynet]
"SubmitSamplesConsent"=dword:00000003
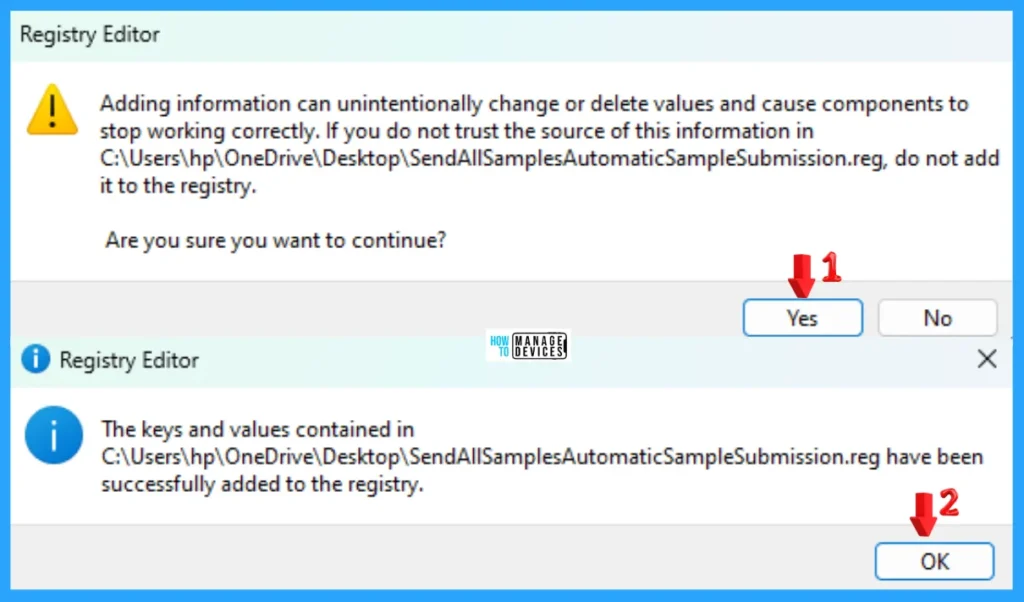
When the file is saved at your selected location, double-click on it. The User Account Control Window will open; click Yes to continue. Then, the Registry Editor Waring window will open.
Adding information can unintentionally change or delete values and cause components to stop working correctly. If you do not trust the source of this information in the path you created, do not add it to the registry; otherwise, click Yes to continue.
The following window shows that the key and value you added have been successfully added to the registry editor. Now click on OK and restart your PC to add the applicable test.
Use the .reg file to enable or disable Automatic Sample Submission in Windows. To create a .reg file, open NotePad, type the following code, and name it NeverSendAutomaticSampleSubmission. Then, save it on the desktop using the .reg extension, which enables the cloud content search.
[HKEY_LOCAL_MACHINE\SOFTWARE\Policies\Microsoft\Windows Defender\Spynet]
"SubmitSamplesConsent"=dword:00000002
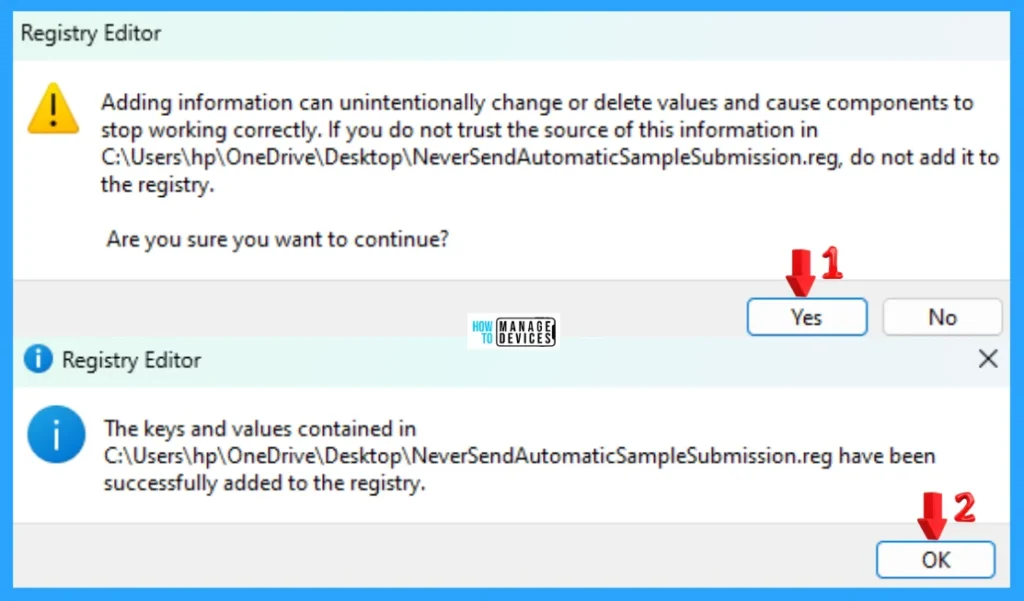
When the file is saved at your selected location, double-click on it. The User Account Control Window will open; click Yes to continue. Then, the Registry Editor Waring window will open.
Adding information can unintentionally change or delete values and cause components to stop working correctly. If you do not trust the source of this information in the path you created, do not add it to the registry; otherwise, click Yes to continue.
The following window shows that the key and value you added have been successfully added to the registry editor. Now click on OK and restart your PC to add the applicable test.
Use the .reg file to enable or disable Automatic Sample Submission in Windows. To create a .reg file, open NotePad, type the following code, and name it DefaultEnableAutomaticSampleSubmission. Then, save it on the desktop using the .reg extension, which enables the cloud content search.
[HKEY_LOCAL_MACHINE\SOFTWARE\Policies\Microsoft\Windows Defender\Spynet]
"SubmitSamplesConsent"=-
When the file is saved at your selected location, double-click on it. The User Account Control Window will open; click Yes to continue. Then, the Registry Editor Waring window will open.
Adding information can unintentionally change or delete values and cause components to stop working correctly. If you do not trust the source of this information in the path you created, do not add it to the registry; otherwise, click Yes to continue.
The following window shows that the key and value you added have been successfully added to the registry editor. Now click on OK and restart your PC to add the applicable test.
PowerShell Script
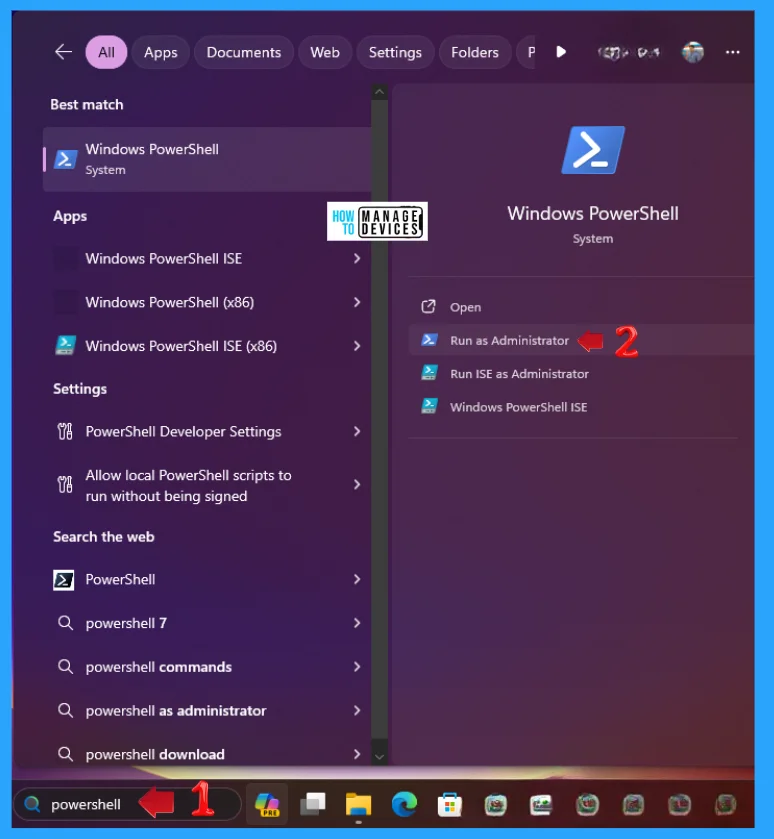
To enable or disable the Automatic Sample Submission using PowerShell, you can modify Microsoft Defender Antivirus. To do this, type PowerShell on the Searchbar on the Taskbar. Now choose Windows PowerShell Run as Administrator (elevated powershell) option as illustrated in the image below.
When the PowerShell opens then type the following command to process further for changing the settings regarding Automatic Sample Submission to Always Prompt.
Set-MpPreference -SubmitSamplesConsent AlwaysPrompt
Now, type the following command to process further for changing the settings regarding Automatic Sample Submission to Send Safe Samples.
Set-MpPreference -SubmitSamplesConsent SendSafeSamples
Now, type the following command to process further for changing the settings regarding Automatic Sample Submission to Never Send.
Set-MpPreference -SubmitSamplesConsent NeverSend
Now, type the following command to process further for changing the settings regarding Automatic Sample Submission to Send All Samples.
Set-MpPreference -SubmitSamplesConsent SendAllSamples
Intune Policy
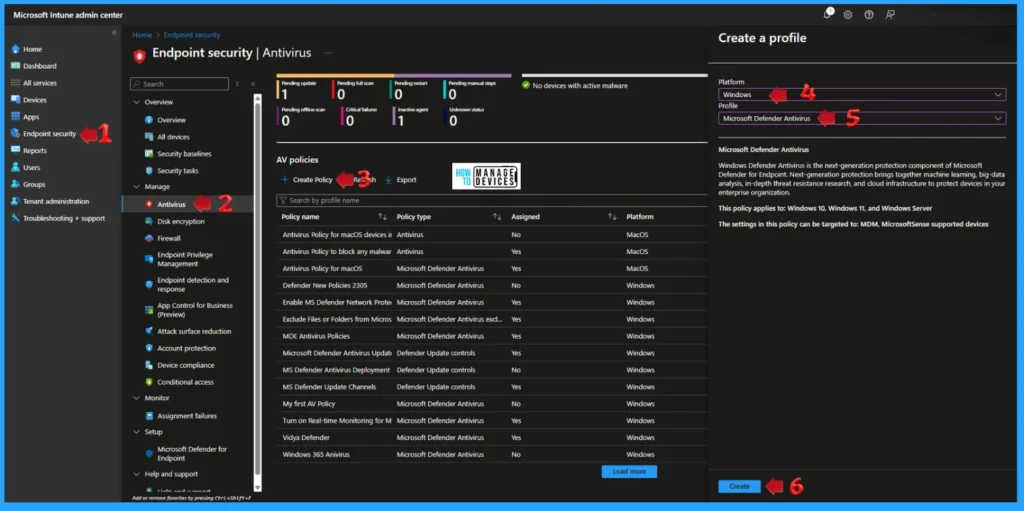
To enable or disable automatic sample submission for Microsoft Defender Antivirus in Windows 11 using Intune, you need to create or edit an existing Microsoft Defender Antivirus policy. Within the policy, you will configure the Submit Samples Consent setting to either send all samples automatically, send safe samples automatically, or not send samples. Here is a step-by-step guide:
- Log in to the Microsoft Intune Admin Center.
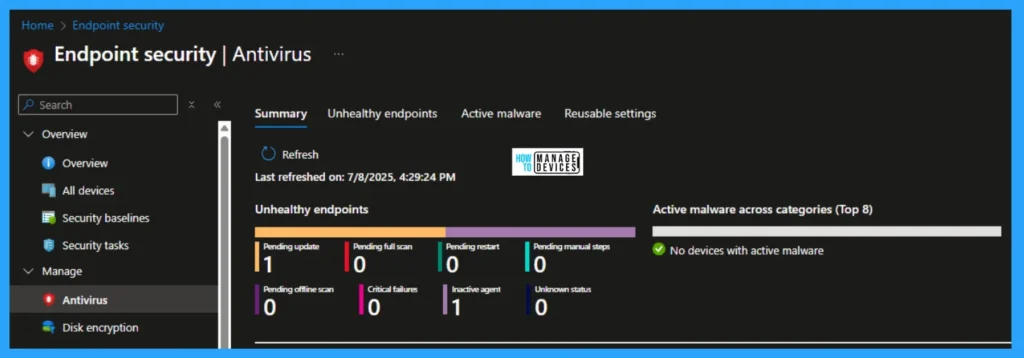
- Navigate to Endpoint security > Antivirus.
- Click on Create Policy
- Select Windows 10 and later as the platform.
- Choose Microsoft Defender Antivirus as the profile type.
- Click Create.
NOTE: Refer to the Intune Settings Catalog policy creation guide to complete the policy creation process – Create Intune Settings Catalog Policy.
Read this guide for more information on Customizing Windows 11 S
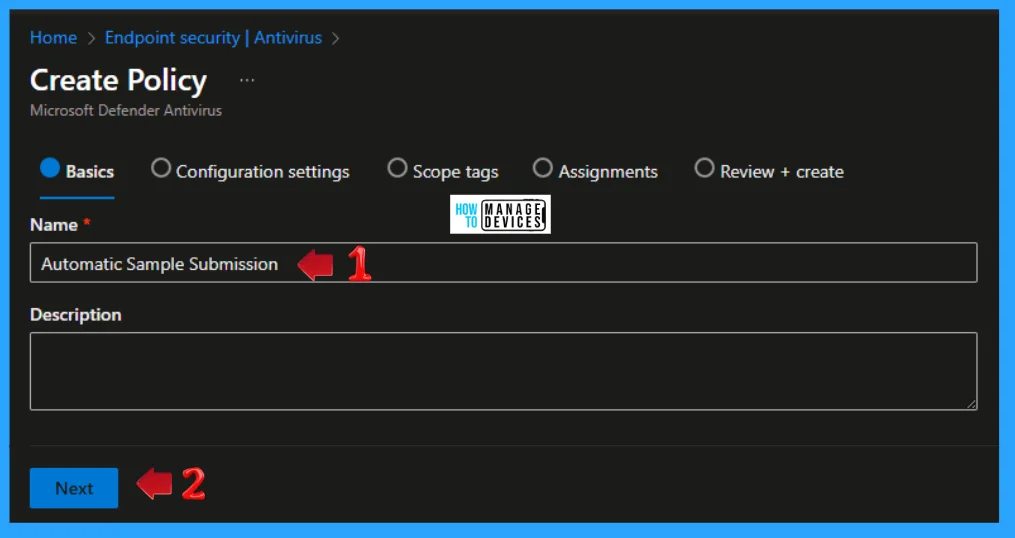
When the policy is created provide a suitable Name for your search and click on Next to move to the next window.
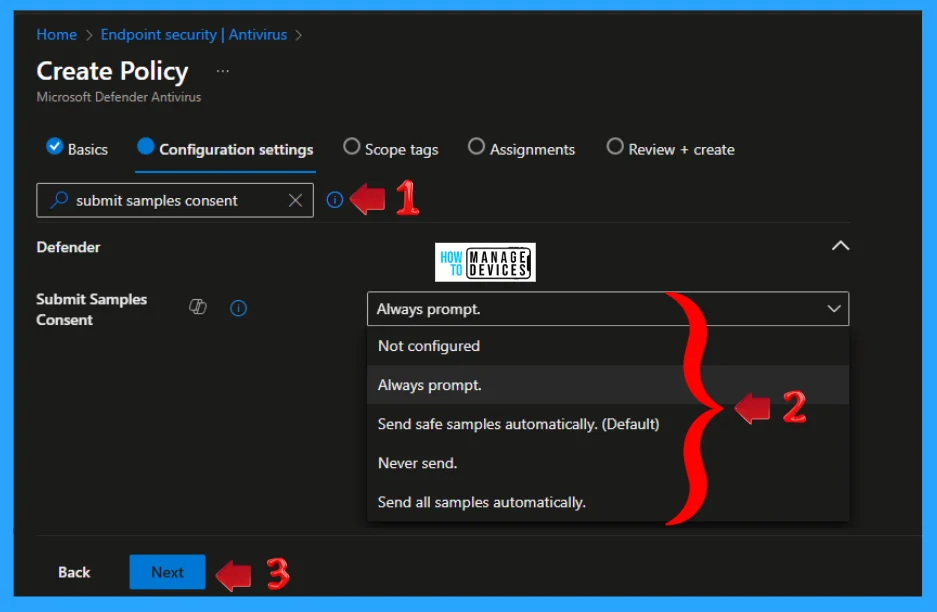
Under the Configuration Settings search for Submit Samples Consent then choose appropriate option from the drop down menu and click Next to continue. Choose one of the following options:
- Send all samples automatically: All samples are submitted for analysis.
- Send safe samples automatically: Only samples considered safe are submitted.
- Not configured/User Defined (if available): May require explicit user consent before submission or rely on user-defined settings.
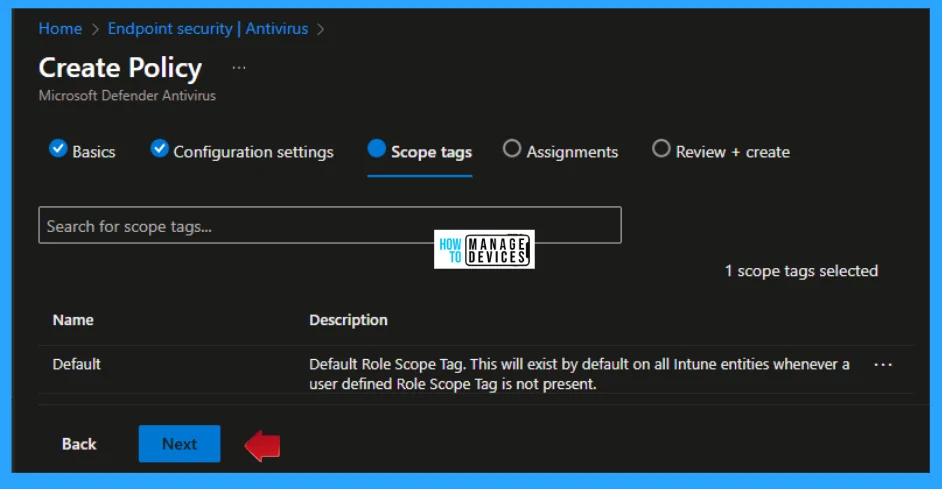
Next is Scope Tags where defaul role scope tag will exist by default on all Intune entities whenever a user defined Role Scope tag is not present, now click Next to continue.
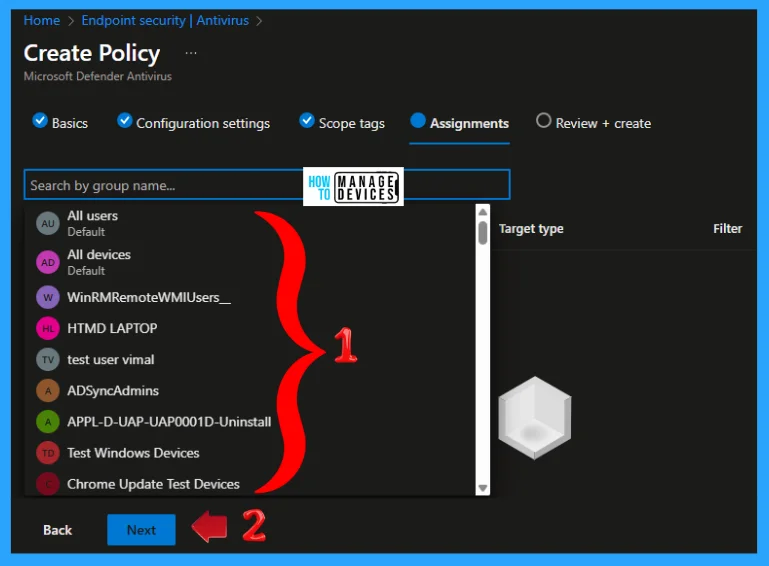
Under Assignment choose the user or group and select them as per the requrement and continue by clicking Next.
Now after all the inputs by you under Review + Create, review the policy carefully that all the input given by you is correct or as per your choice, then click Save.
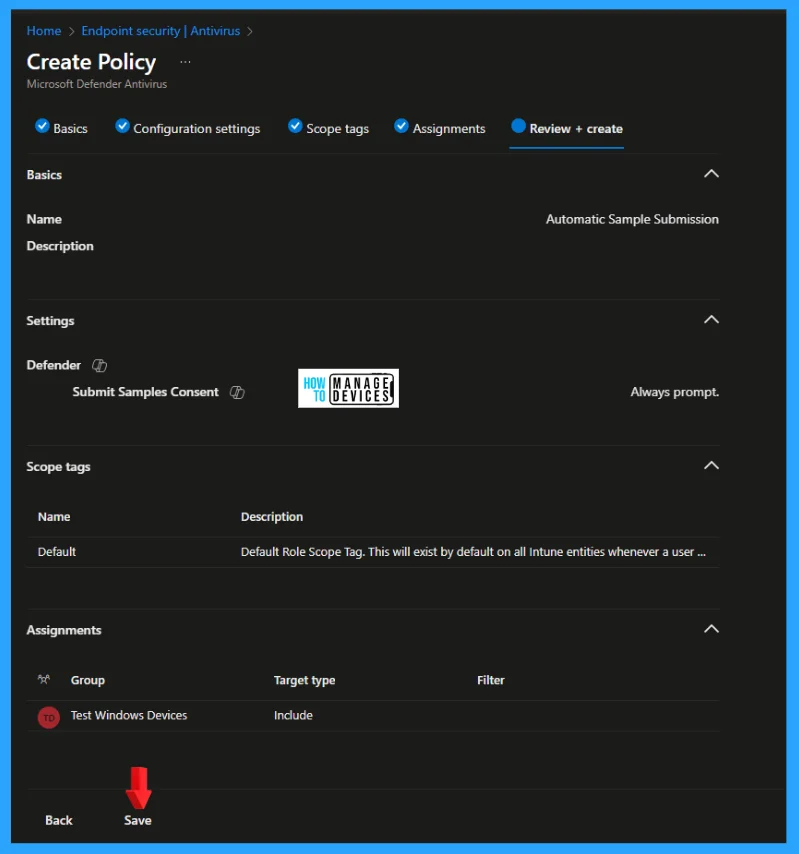
Now check the summary to for your setting and move to futher. Monitor the policy deployment and check for successful application to the targeted devices. Verify the settings on a test device by navigating to Windows Security > Virus & threat protection > Manage settings > Virus & threat protection settings > Cloud-delivered protection and sample submission. If configured via Group Policy, the setting may be greyed out and unavailable, according to Microsoft.
Important Considerations
- Cloud-delivered protection: Ensure cloud-delivered protection is enabled for automatic sample submission to work effectively.
- Tamper protection: If tamper protection is enabled, it may prevent users from manually changing sample submission settings.
- Group Policy: If your environment uses Group Policy to manage Defender settings, ensure that the Group Policy settings do not conflict with Intune settings.
- User consent: In some configurations, users may be prompted for consent before samples are submitted. By following these steps, you can effectively manage automatic sample submission for Microsoft Defender Antivirus using Intune in your Windows 11 environment.
I hope the information on 5 Methods to Enable or Disable Automatic Sample Submission for Microsoft Defender Antivirus in Windows Devices is helpful. Please follow us on the HTMD Community and visit our website, HTMD Forum, if you like our content. Suggest improvements, if any, and we would love to know which topic you want us to explore next.
Sources
- Use Microsoft Intune to configure and manage Microsoft Defender Antivirus
- Windows Security automatically disabling Automatic Sample Submission and Reputation Based Protection
- Cloud protection and sample submission at Microsoft Defender Antivirus
Need Further Assistance or Have Technical Questions?
Join the LinkedIn Page and Telegram group to get the latest step-by-step guides and news updates. Join our Meetup Page to participate in User group meetings. Also, Join the WhatsApp Community to get the latest news on Microsoft Technologies. We are there on Reddit as well.
Author
Alok graduated with a Master of Computer Applications (MCA) degree. He loves writing on Windows 11 and related technologies. He likes to share his knowledge, quick tips, and tricks with Windows 11 or Windows 10 with the community.
