Let’s discuss how to Block Password Manager on Google Chrome Browser using the Microsoft Intune Policy Settings Catalog. Using Policy, you can prevent users from saving or using saved passwords.
Do you know what Google Chrome’s Password Manager is? It is a built-in feature that helps you securely store and manage your passwords. There are many benefits of disabling password managers using the Microsoft Intune Policy.
Google’s password Manager focuses on convenience. It does not automatically log out when you close the browser. In Corporate Organizations, password managers are always turned off to ensure users do not store credentials on browsers.
Microsoft Intune Policy is the easiest way to block an organization’s manager’s password. Setting the policy to Disabled means you cannot save new passwords, but previously saved passwords will still work. In this blog post, I will give you step-by-step guidance to disable Google Chrome Password Manager.
Table of Contents
What are the Advantages of Block Password Manager on Google Chrome?
Password Managers provide many advantages, especially in certain environments or for specific users.
1. It enhanced security by reducing the risk of passwords manager
2. It has centralized password management
3. It reduces the risk of authorized access
4. Encourages Stronger Password Practices
Block Password Manager on Google Chrome Browser using Microsoft Intune Policy Settings Catalog
Blocking Password Manager is very important for ensuring the security of your organization. People store credentials with their accounts. For example, if people simply log into google.com, they enable and sync the passwords with that account.
Once that is synced, maybe those users will be using the same account on their devices or any other devices, and that is also too risky and vulnerable to identity theft and all those kinds of different attacks. The following are steps for Block Password Manager on Google Chrome on Microsoft Intune.
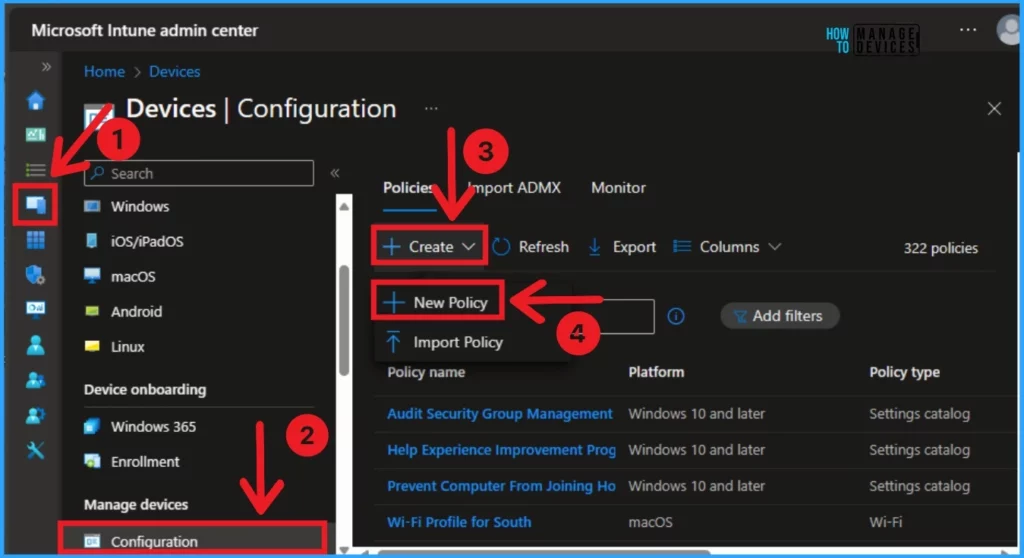
- Sign in to the Microsoft Intune admin center
- Select Devices and click on Configuration
- Click on +Create and select New Policy
| Key Features of Password Manager of Google Chrome |
|---|
| It helps to save and Autofill the Password |
| It provides a Password Checkup |
| It allows access across all your synced devices |
| It has Biometric Authentication |
- Enable Disable Show Account Email Address on Sign-in Screen in Windows 11 Using Group Policy Intune
- 7-Zip Update with Enterprise App Catalog App in Intune Best Step-by-Step Guide
- Intune Defender for Endpoint Security Settings Support in Government Cloud Environments in Public Preview
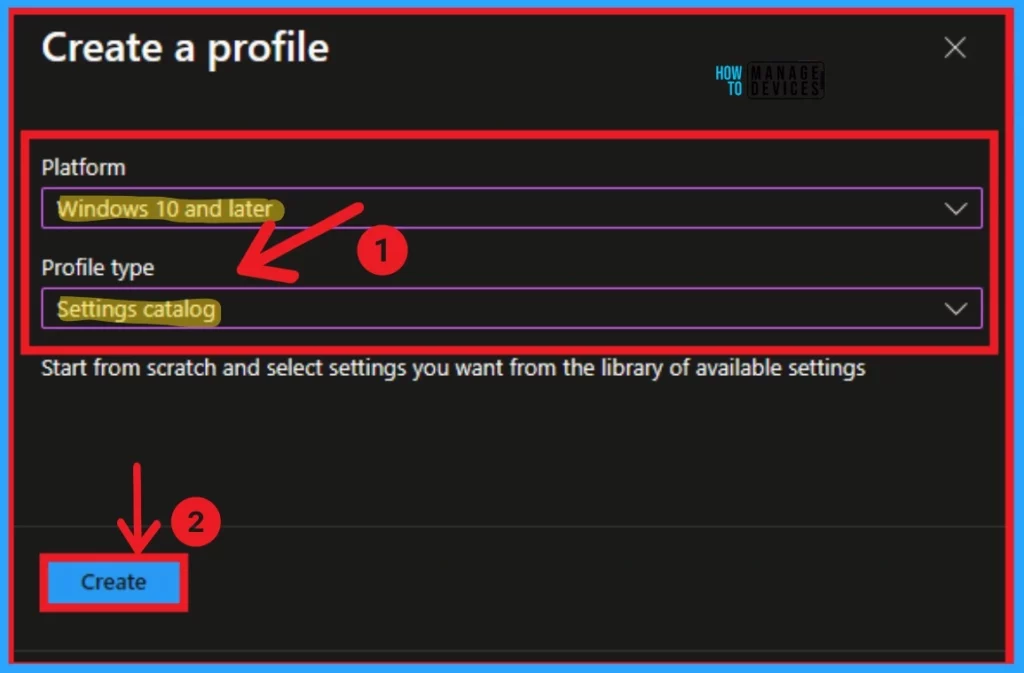
After that, a new window will appear, and you can choose the Platform and Profile Type. Select Windows 10 and later as the platform and Settings catalog as the Profile type. Then click on the Create button.
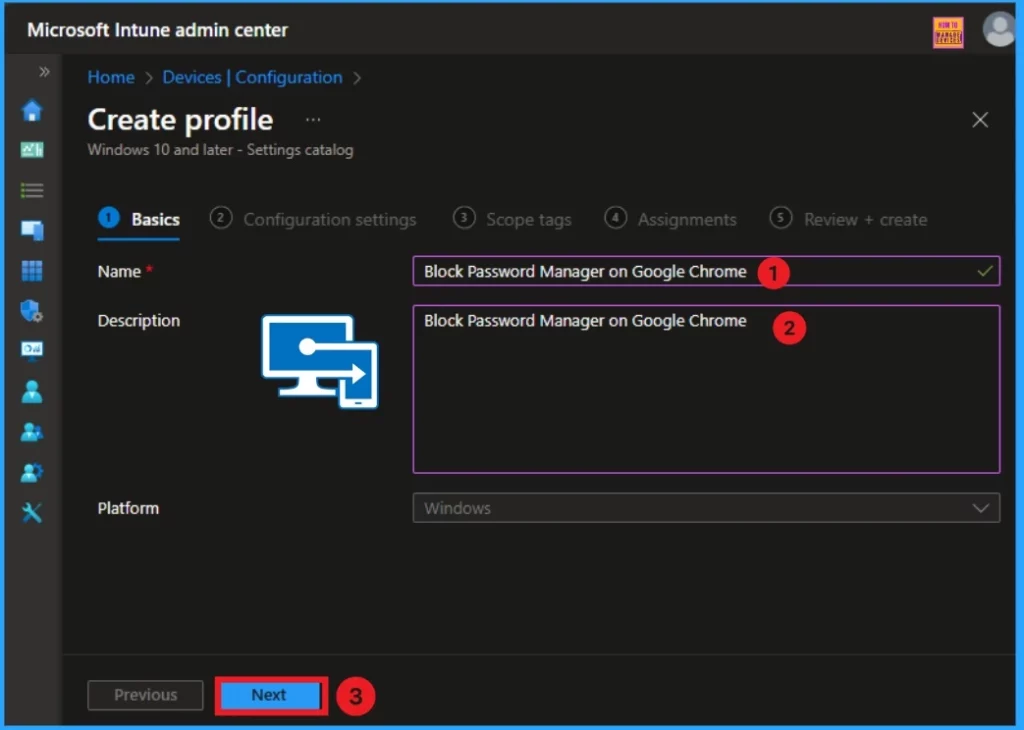
After that, you create a profile to block Password Manager on Google Chrome. The first section of the profile creation process is Basic. In this section, you can provide the appropriate Name and Description. This is a required section, and users must add it to continue creating Profiles.
- The description allows users to learn about the policy at any time.
- Click on the Next button after adding the Name and Description.
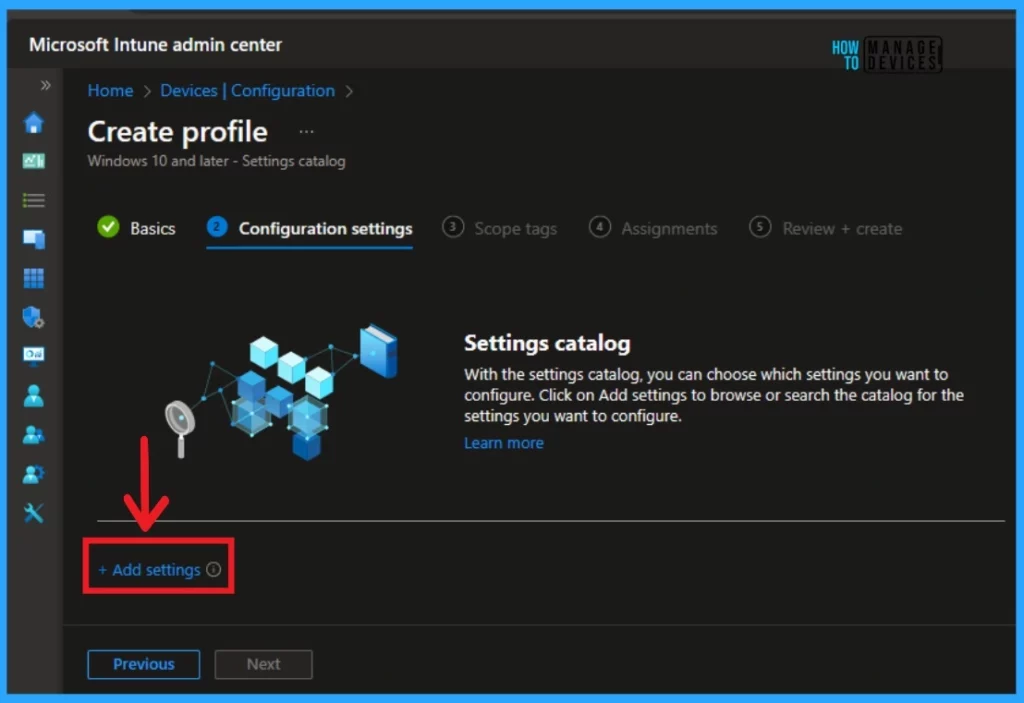
Next is the Configuration section, where you can select +Add settings to continue creating the profile. This section is used to choose the settings you want to configure.
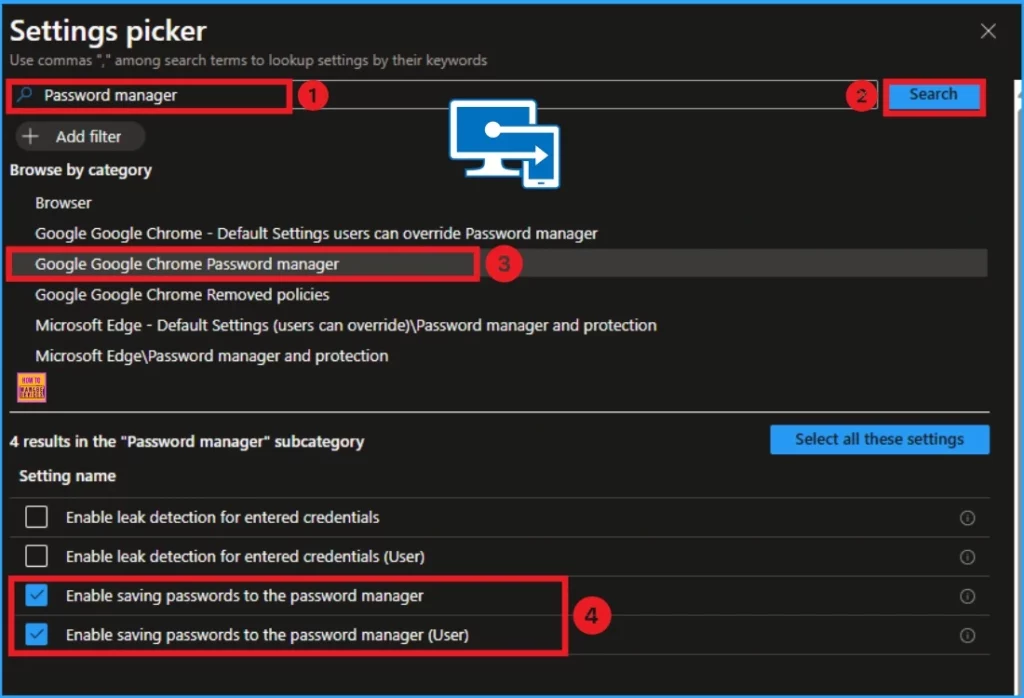
Then, the Settings Picker window will open, and you can search for the keyword of the search item. Here, the keyword is Password Manager. Then click on the Search button. After, you can browse the policy from the Google Chrome Password Manager category. The result is shown in the screenshot below.
- Click on the Enable saving passwords to the password manager
- Click on the Enable saving passwords to the password manager(user)
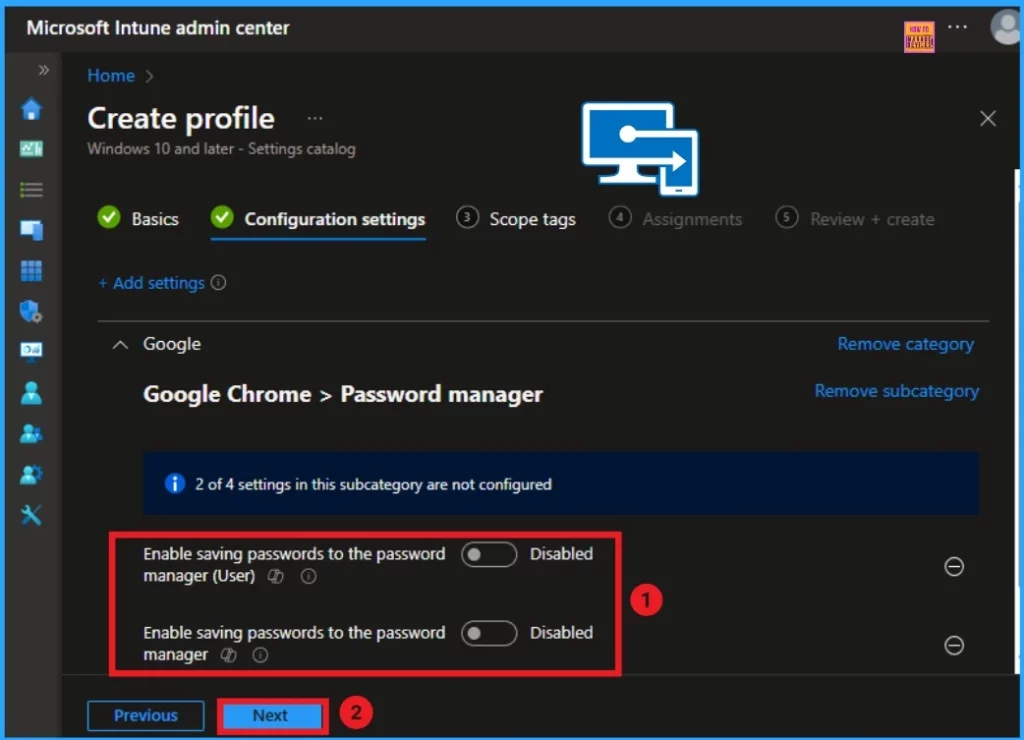
The window below shows the Configuration settings page. Here, the Enable saving password to the password manager and Enable saving password to the password manager (User) options are disabled. Then Click on the Next button.
- Enable Disable Google Cast in Google Chrome with Intune Settings Catalog Policy
- Best Guide to Install Google Chrome Extensions using Intune Policy
- Google Chrome for Business Deployment using Intune Enterprise App Catalog App
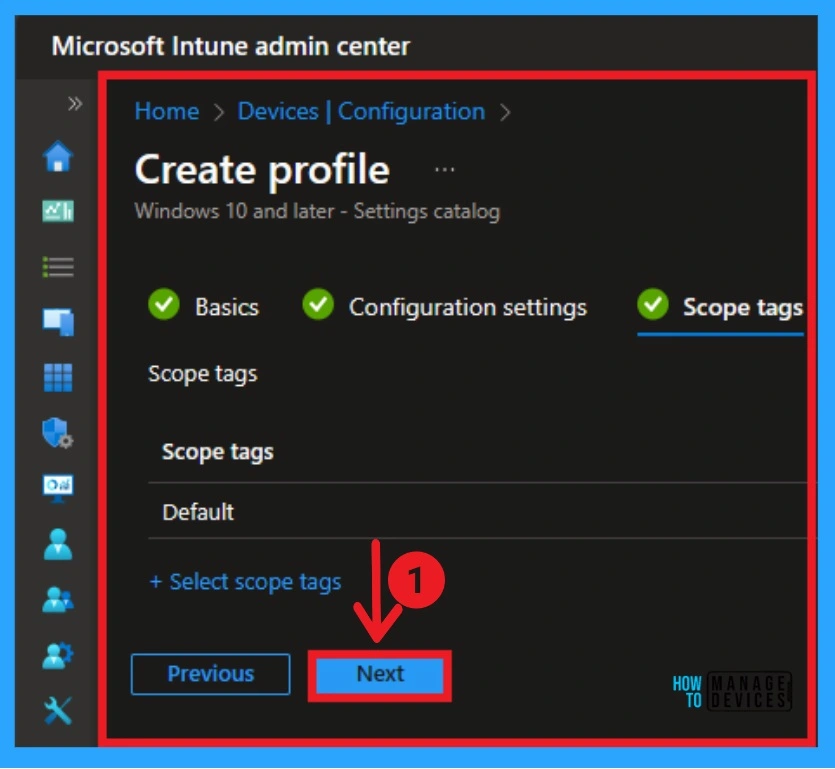
Scope Tag is the next stage of Profile Creation. You can easily skip this section or add Scope tags for your profile. However, a scope tag is not mandatory for this profile creation. If you skip this section, you can click on the Next button and continue.
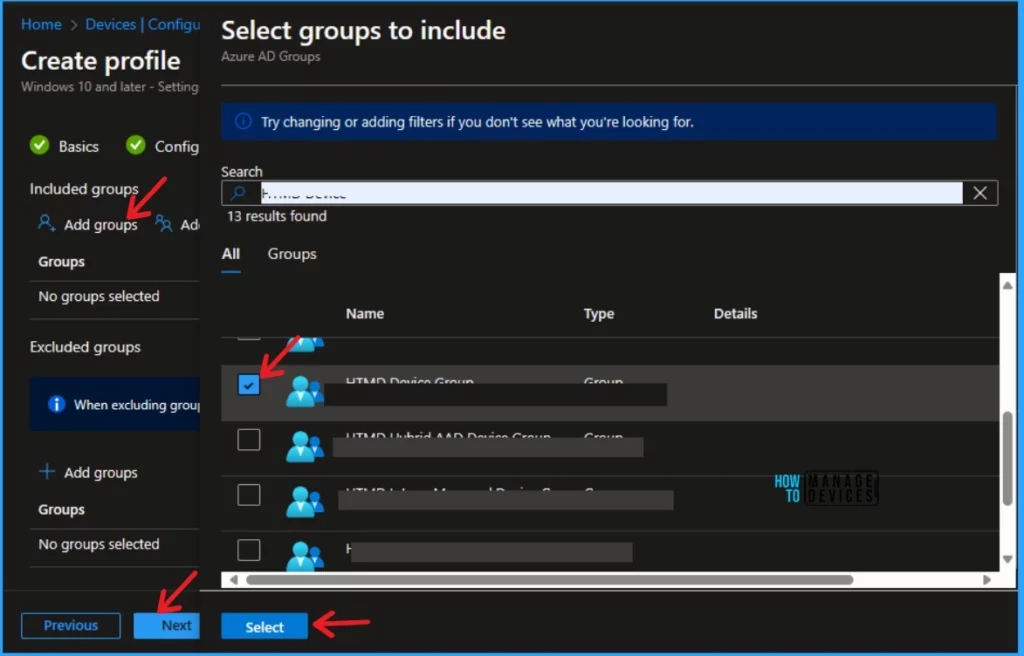
Next is the Assignment section. In this section, you can Add groups to turn off Copilot in Windows. To do this, add groups to the included groups. After that, a new window will appear, and you can select a group from here. Then click on the Select button and click on the Next button.
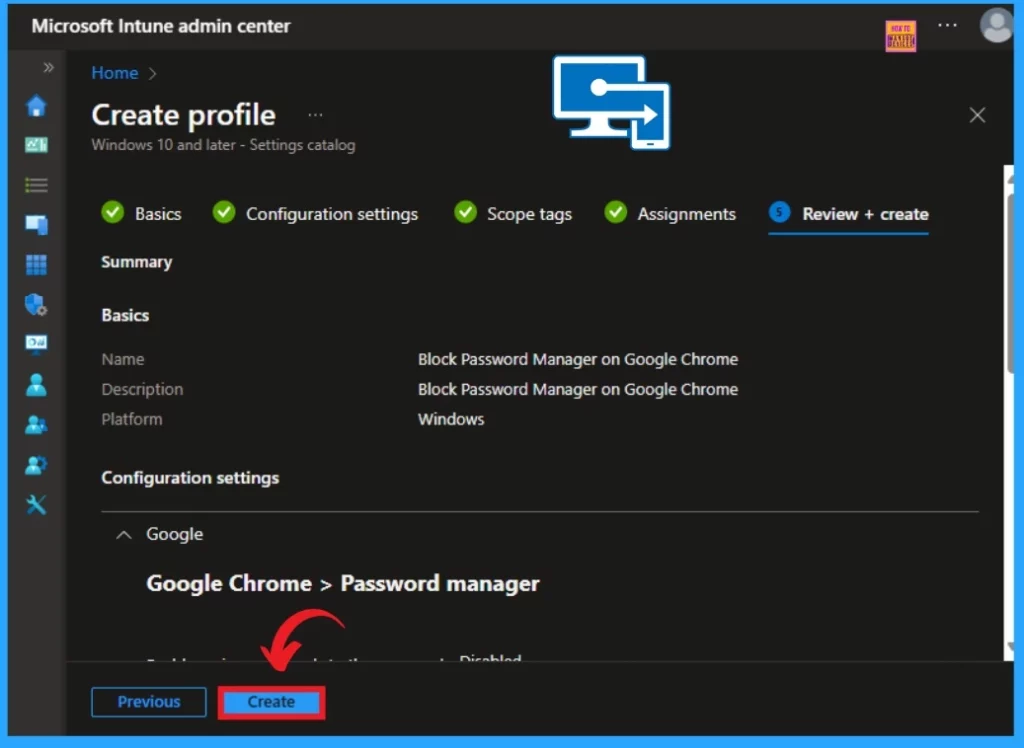
The last section is Review + Create. In this window, you can see all the details of your profile. It summarises the profile and shows the previous sections of profile creation. You can quickly go to the earlier sections if any changes are necessary. After verifying all the steps, you can complete the Profile creation.
- Click on the Review + Create button from this window
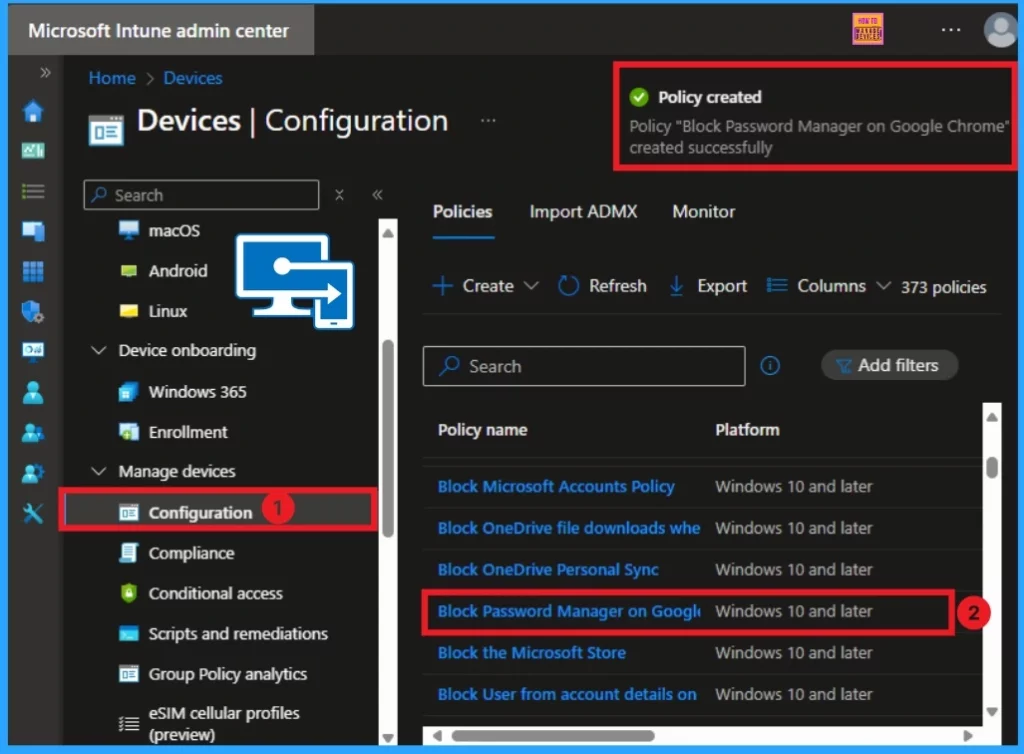
After clicking the Create button, you will get a notification on the Intune Portal as “Policy Turn Off Copilot in Windows Settings created successfully“. You can quickly check the Created policy in the Intune Portal.
- Devices > Configuration
- In the Configuration window, you can search the Policy by its name
Join the LinkedIn Page and Telegram group to get the latest step-by-step guides and news updates. Join our Meetup Page to participate in User group meetings. Also, Join the WhatsApp Community to get the latest news on Microsoft Technologies. We are there on Reddit as well.
Author
Anoop C Nair has been Microsoft MVP for 10 consecutive years from 2015 onwards. He is a Workplace Solution Architect with more than 22+ years of experience in Workplace technologies. He is a Blogger, Speaker, and Local User Group Community leader. His primary focus is on Device Management technologies like SCCM and Intune. He writes about technologies like Intune, SCCM, Windows, Cloud PC, Windows, Entra, Microsoft Security, Career, etc.
