Let’s check the Windows update cache removing methods in windows 11. In our computer, the cache memory stores a lot of unnecessary data and information, which causes many troubles in update issues. Here is the easiest and most effective way to fix windows update issues to clear the Windows update cache.
Clearing the windows update cache can fix most windows update download and installation problems like update stuck downloading, failure to install with different errors, etc. When checking for updates, the system automatically caches all the windows update installation files for further need.
Sometimes bugged updates or corrupt files are in the cache folder, which may create problems during the entire process and show different errors. If any situation happens, it would be best to clear up the windows update cache. Clearing the windows update cache removes old update files.
In this post, we have learned some different types of clearing windows update cache and how to perform such a cleaning process. The step-by-step guidelines with every detail are presented in this.
NOTE! Clear Windows update cache fixes not only various windows 10/11 updates installation problems but also free up a huge amount of disk space.
- Enable Disable Windows Update Policies using GPO or Intune
- Windows 11 KB5022287 KB5022303 January 2023 Patch Tuesday
What is Windows Update Cache?
Windows cache is data stored on the computer from your regular activity on applications and services. It provides easy and fast access to improve the user experience on the application or program.
What are the Advantages of Deleting the cache files of windows updates?
Storing the cache files for a long time can cause problems with your regular windows services. Deleting the cache files of windows updates provides some basic advantages; some are represented below:
1. The cache file can amount to large files that consume more space in your system. Deleting it is the option to clear your device.
2. Deleting the windows cache file will help to increase system speed and performance.
3. As long as the cache files stay in your PC, it becomes more corrupt, which affects your system. Deleting such cache files reduces the chance of being corrupted
Before deleting the windows, update the cache files or the folder containing all the updated cache files in the following steps. It prepares your computer for deleting the caches.
- Turn off all the background applications running on your computer.
- If any remote connection is there, then disconnect it.
- For emergencies, make a backup file.
Different Methods to Clear Windows Update Cache
You can easily clear your windows update cache using different methods. In this post, we are explaining different methods to clear the windows update cache. The following are the different methods to clear the Windows update cache.
- Windows Update Cache Clear Using Disk Cleanup
- Windows Update Cache Clear Using Run
- Windows Update Cache Clean Using Command Prompt
- Windows Update Cache Reset in Command Prompt
1. Windows Update Cache Clear Using Disk Cleanup
This is the basic way to clear the windows cache by using disk clean-up. To do the process let’s follow the steps below:
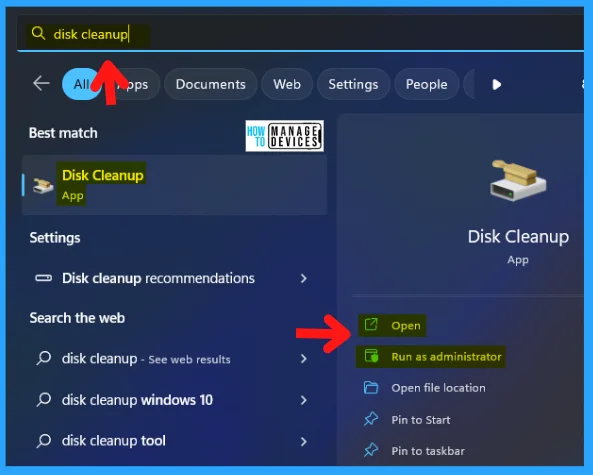
To perform the disk clean-up process, go to the search box in the taskbar and type “Disk Cleanup.” In the right panel Disk cleanup app is appeared; now click on the Open to launch.
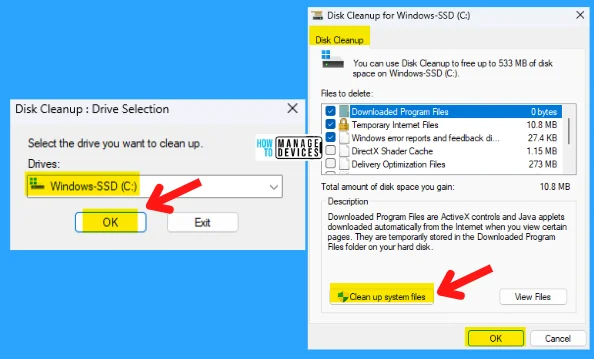
The Disk Cleanup: Drive Selection window opens; select the drive you want to clean up; here, choose C: drive because all the information is stored in the base file. Now the disk cleanup for the selected drive opens.
- Select the Drive C: press OK
- Now click on Clean up System Files
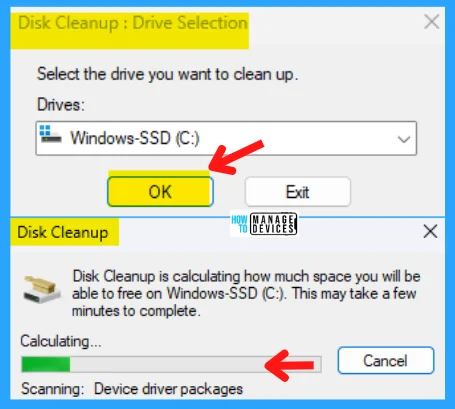
The next window will show the drive you want to clean up. Select the hard drive (default is C:) from where you want to clear the windows update cache. Then the cleaning process continues, as shown in the image below:
2. Windows Update Cache Clear Using Run
Step 1: Clearing all the windows update cache from your system using the Run dialog box follows the process to do so. Detailed information is given.
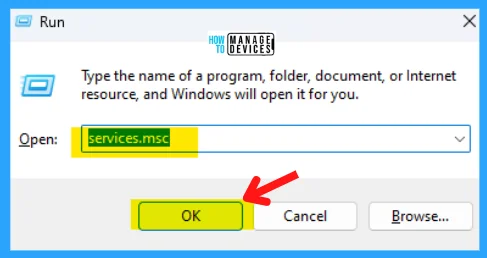
- Press Win Key + R, which opens the Run dialogue box.
- Type services.msc and click OK to open the services window.
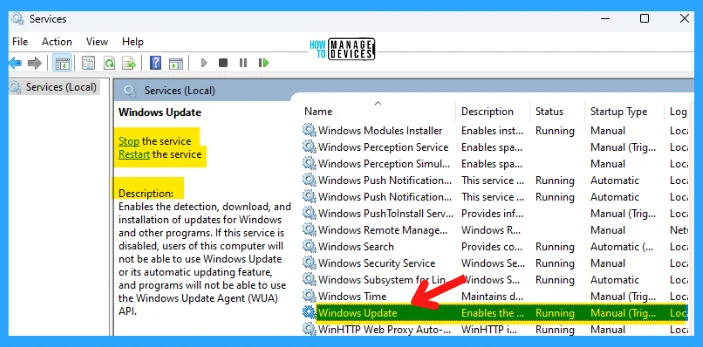
Step 2: Now the Services (local) window opens, you can scroll down to find the windows update option listed. The details can view in the image below:
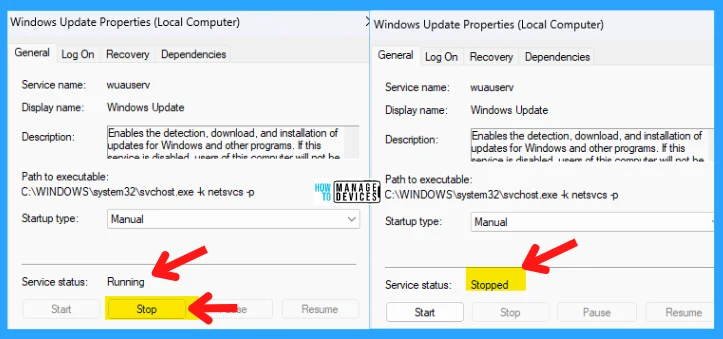
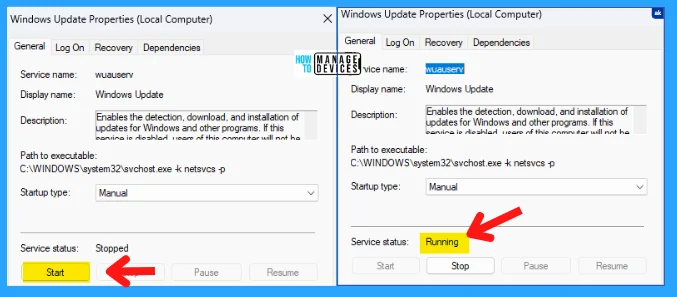
Step 3: Double-click on the Windows Update option, and the Windows Update properties open; go down and press the Stop button shown in the image below to stop windows update services.
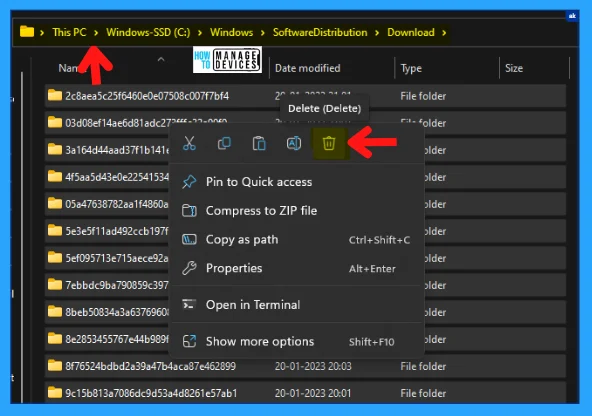
Step 4: After the stoppage of the Windows update, navigate to the C:\Windows\SoftwareDistribution\Download folder. Once the download folder opens, select all files (Ctrl + A), then delete them.
Step 5: After successfully deleting the selected files, repeat steps 1 and 2 to enter the services window. Scroll down to find windows update, double-click to open, and press Start the windows update services.
3. Windows Update Cache Clean Using Command Prompt
To clear the cache using the command prompt, you need to open the command prompt with administrative mode, type net stop wuauserv, and press enter. The message shows, “The Windows Update service is not started.”
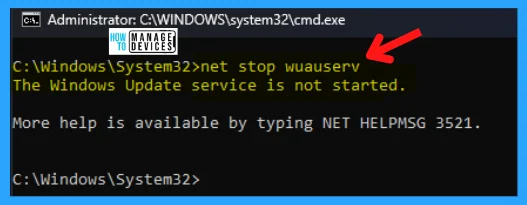
After the stoppage of the windows update option, now follow the steps to run the command in the elevated command prompt and remove the cache files of windows updates. Run each command one by one listed below and the parameter described in the table:
- cd/
- cd %Windir%\SoftwareDistribution
- del /f /s /q Download
| Parameters | Description |
|---|---|
| /f | Force removal of read-only files |
| /s | Include files in subdirectories |
| /q | Quiet mode to suppress prompts |

4. Windows Update Cache Reset in Command Prompt
To reset the windows update cache, open the elevated command prompt, type the commands one by one, and press Enter to execute each command. The commands are listed below:
- net stop wuauserv
- net stop cryptSvc
- net stop bits
- net stop msiserver
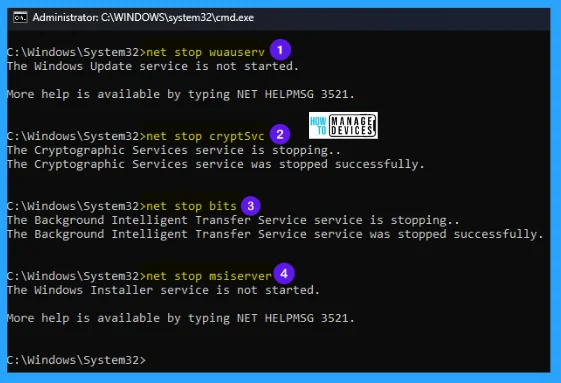
All the services are now stopped by executing the above commands; again, now type the command line presented below type one by one and press Enter after each command.
- ren C:\Windows\SoftwareDistribution SoftwareDistribution.old
- ren C:\Windows\System32\catroot2 Catroot2.old

When the above command is executed, start windows updates that stopped earlier. To start the processes, type the following commands one by one and press Enter after each command.
- net start wuauserv
- net start cryptSvc
- net start bits
- net start msiserver
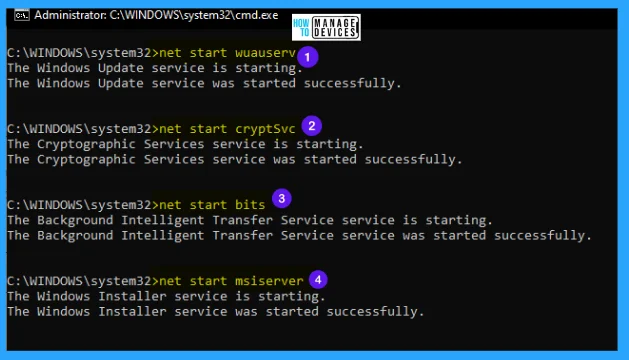
NOTE! After completing each process, restart your device and reset the Windows update cache can also clear the previous cache from your computer.
5. Windows Update Cache Clean by Script Using Notepad
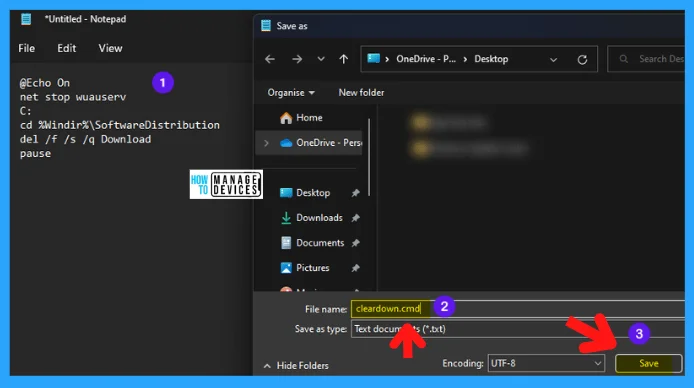
In this method, a code is presented below, written on the Notepad, saved with the name Cleardown.cmd, and saved on your device. One cleardown command setting is created and held at your chosen location.
@Echo On net stop wuauserv C: cd %Windir%\SoftwareDistribution del /f /s /q Download pause
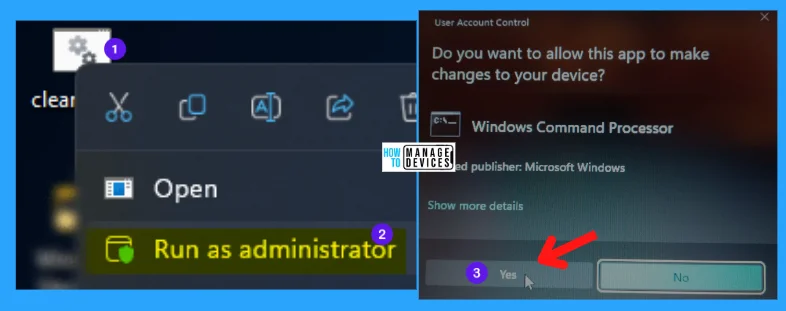
If you saved it on the desktop, a cleardown icon shows. Right-click on the cleardown icon and select Run as Administrator. The User Account Control window opens and asks permission; click YES to continue.
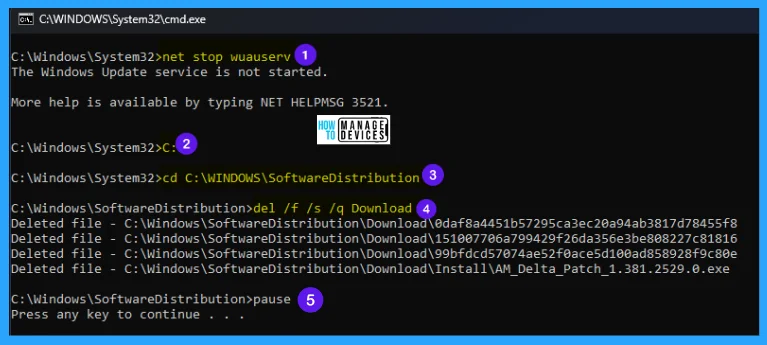
After getting permission, this starts running in the command prompt and performs the task as scripted in the notepad; it deletes the Windows update cache files. When the process is complete, a message appears as “Press any key to continue..” press a key, and it closes the command prompt window.
The information on the Windows update cache removing methods in Windows 11 is helpful. Please follow us on HTMD Community and visit our website HTMD Forum if you like our content.
Author
Alok is a Master of Computer Applications (MCA) graduate. He loves writing on Windows 11 and related technologies. He likes to share his knowledge, quick tips, and tricks with Windows 11 or Windows 10 with the community.
