Learn how to fix Cloud PC provisioning policy delete button is grayed out issue. I created a couple of Windows 365 Cloud PC provisioning policies, but there was no option to delete those policies. I was wondering what should be the reason for the same?
Let’s find out the reason for disabling the DELETE option for the provisioning policy. I think this is a good idea to disable the deletion of provisioning policies to reduce the damage control. So, don’t worry if you don’t have the delete option for a provisioning policy.
If you don’t know, What is Windows 365 Cloud PC? Well, you can check all those details from Windows 365 Cloud PC FAQs and Windows 365 Cloud PC Deployment Provisioning Process Step by Step Guide. The following are some of the Cloud PC posts.
- Deploy Windows 365 Security Baseline Policies to Cloud PCs
- Learn How to Resize Cloud PC Windows 365
- Configure Cloud PC RDP Properties using Intune Settings Catalog
- Cloud PC Health Performance Monitoring Using Endpoint Analytics using Intune
Issue Cloud PC Provisioning Policy Delete button is Grayed Out
Let’s try to reproduce the issue the Cloud PC provisioning policy delete button is grayed out. I have created a couple of provisioning policies for Windows 11 testing and the Windows 11 upgrade scenario. However, the provisioning policies didn’t get triggered because I didn’t have enough licenses available in the lab environment.
I just thought of deleting those policies by clicking on … dots (meatballs menu?) as shown in the below screenshot. Well, it seems this is not allowed. The delete option is disabled for a good reason! I’m sure this is for the accidental deletion of hundreds of Cloud PCs.

How to Enable Delete Button of Cloud PC provisioning Policy
It’s now time to end the suspense and share the fix to enable the Delete Button of the Cloud PC provisioning Policy. I think this grayed-out option is to avoid the accidental deletion of Windows 365 Cloud PCs. You will need to confirm that you want to delete the provisioning policy and you are aware of the consequences of this deletion.
You can see a column called ASSIGNED for each provisioning policy. If the assigned column shows as YES, then this policy is already assigned to the Azure AD user group, and there may be many users already using those assigned Cloud PCs.
You will need to remove the assignment group from the provisioning policy as the first step before directly deleting the policy. By removing the Assignment, you are confirming that I want to de-provision all these Cloud PCs. I don’t think this is an issue rather this is an additional safety feature.
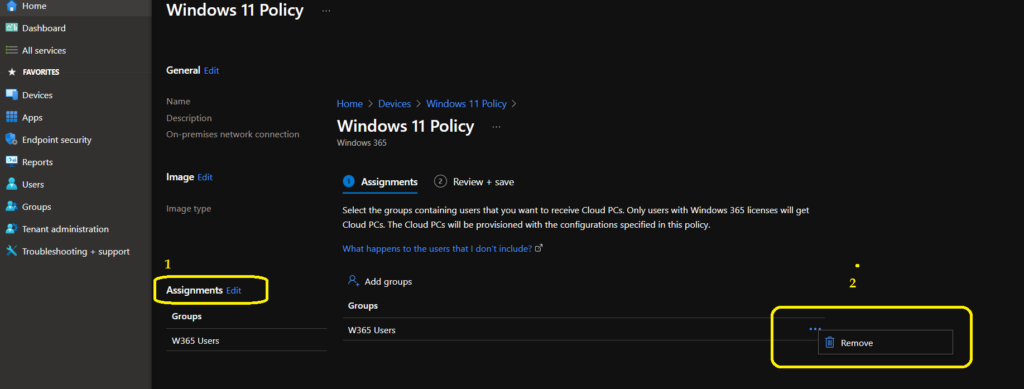
To remove the Assignment – Login to MEM Admin center portal – endpoint.microsoft.com. And Click on the Provisioning policy that you want to delete from Devices -> Windows 365 -> Provisioning policy node. Click on the EDIT button near the Assignment section.
From Assignment, page click on … dots menu (meatballs menu?) and click on DELETE button to remove the group from the Assignment. Now, you can click on the Next and Update buttons to continue.

It’s time to go back to the Provisioning policies tab on Windows 365 page. Click on the… Dots menu and check whether the DELETE provisioning policy button is enabled or not. Yes, that is correct; the Delete button is enabled now.
You can now delete the Cloud PC provisioning policy. The fix to the Cloud PC Provisioning Policy Delete Option Grayed Out Issue is to remove the assignment group.
NOTE! – “Are you sure to delete – This will delete the selected provisioning policy” warning message is also useful to avoid accidental deletion of Cloud PCs.

