In this post, you will learn how to Configure Enterprise Mode Site List using Intune. Microsoft Edge has built-in Internet Explorer mode (IE mode) so that you can access legacy Internet Explorer-based websites and applications straight from Microsoft Edge.
Some sites are built to work with Internet Explorer and have functionality not supported by modern browsers such as Microsoft Edge. If you need to view one of these sites, you can use Internet Explorer Mode in Microsoft Edge.
IE mode on Microsoft Edge makes it easy to use all of the sites your organization needs in a single browser. It uses the integrated Chromium engine for modern sites, and it uses the Trident MSHTML engine from Internet Explorer 11 (IE11) for legacy sites.
Read More -> Why A Hotfix To Remove IE Browser App From Windows 10 Devices Is Needed
You can use the Enterprise Mode Site List Manager tool that lets you create, edit, and export your organization’s site list and specify whether the site renders using Enterprise Mode or the default mode.
The following steps are part of a site configuration strategy for IE mode:
- Download Enterprise Mode Site List Manager
- Prepare your site list (Generate an XML file)
- Upload your site list to azure blob storage
- Create Intune Settings Catalog Policy in Intune
- Enable Internet Explorer Mode in Microsoft Edge
- Disable Internet Explorer Using Intune | Endpoint Manager | Easy Steps
- Disable PST Access to Outlook Profile using Intune MEM
Download and Install Enterprise Mode Site List Manager
First, let’s download the Enterprise Mode Site List Manager (schema v.2). You will be redirected to the Microsoft download center.
On the download page that opens, select Download. The file will be automatically downloaded to your system.
Right-Click on the downloaded file EMIESiteListManager.msi, Click Install to start the installation. A UAC prompt may appear to allow this app to make changes to your devices? Click on Yes.
The Setup Wizard will install Enterprise Mode Site List Manager on your computer. Click Next to continue.

Accept End-User License Agreement (EULA), Click Next.
Here, you can select the destination location to Install or leave it to default and click Next.

Click Install to begin the installation; please wait while the installation process. It will take a few minutes. Once completed, click Finish to exit from the wizard.

After successful installation, you will find the Enterprise Mode Site List Manager on the Start menu.
Prepare Site List
Let’s follow the steps to add individual sites to your site list.
Open Enterprise Mode Site List Manager, click Add. Type the URL for the website you’d like to add, for example: forum.howtomanagedevices.com , in the URL box.
It is recommended that you not add any of the following items to your schema because they can make your compatibility list behave in unexpected ways:
- Don’t use protocols. For example,
http://,https://, or custom protocols. They break parsing. - Don’t use wildcards.
- Don’t use query strings, ampersands break parsing
Select one of the following options from the Open in list:
- IE11 – Opens the site in the IE11 application.
- IE mode – Opens the site in Internet Explorer mode on Microsoft Edge if enabled and in the IE11 app otherwise. See Internet Explorer mode on Microsoft Edge.
- MSEdge – Opens the site in Microsoft Edge.
- Configurable – Allows the site to participate in IE mode engine determination. See Configurable sites in IE mode
- None – Opens in whatever browser the user chooses.
Under Compat Mode, choose one of the following options:
- IE8Enterprise – Loads the site in IE8 Enterprise Mode.
- IE7Enterprise – Loads the site in IE7 Enterprise Mode.
- IE[x] – Where [x] is the document mode number and the site loads in the specified document mode.
- Default Mode – Loads the site using the default compatibility mode for the page.
The Allow Redirect checkbox applies to the treatment of server-side redirects. If you check this box, server-side redirects will open in the browser specified by the open-in tag.
Type any comments about the website into the Comment box. Administrators can only see comments. Click on Save.
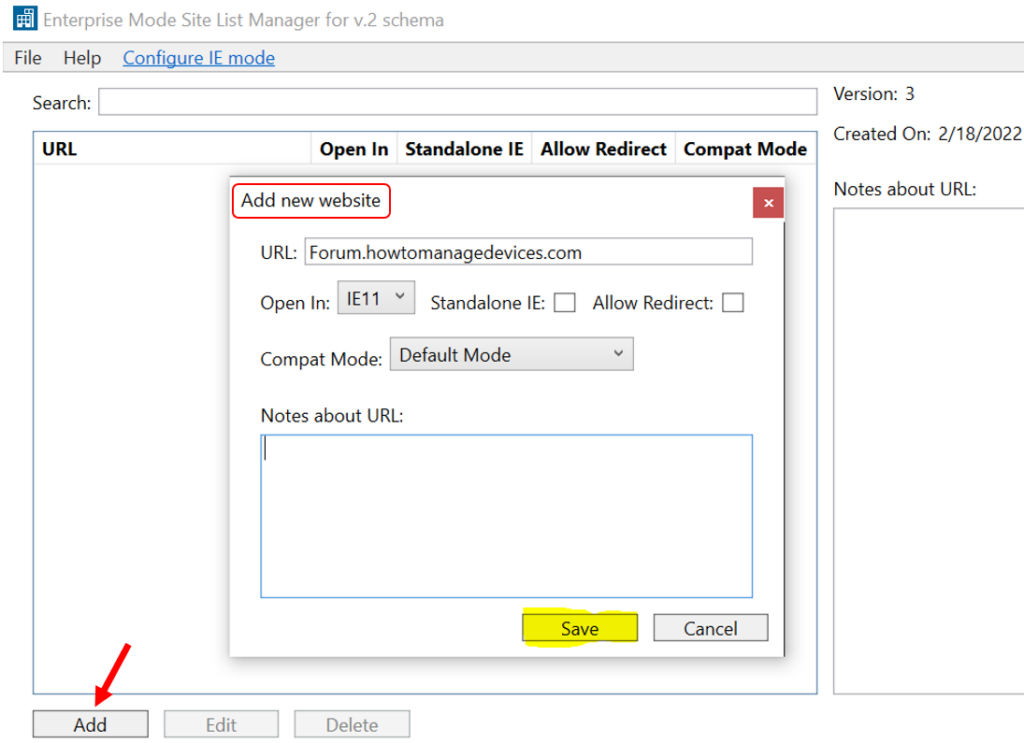
Similarly, You can add more websites to lists. Once you are done with adding sites. On the File menu, click Save to XML, and save your file. You can save the file locally or to a network share.

Add multiple sites to the Enterprise Mode Site List Manager
You can add multiple sites to your Enterprise Mode site list by creating a custom text (TXT) or XML file of problematic sites.
Custom text (TXT) File Option
You can create and use a custom text file with the Enterprise Mode Site List Manager to add multiple sites to your Enterprise Mode site list at the same time.
You must separate each site using commas or carriage returns. Open Notepad and add the site name and save to your preferred location. For example:
AnoopCNair.com, HTMDForum.com, AnoopCNair.com/IntuneAnoopCNair.com
HTMDForum.com
AnoopCNair.com/IntuneEnterprise Mode site list (XML) File Option
You can also create and use a custom XML file with the Enterprise Mode Site List Manager to add multiple sites to your Enterprise Mode site list.
Each XML file must include:
- site-list version number – This number must be incremented with each version of the Enterprise Mode site list, letting Internet Explorer know whether the list is new. Approximately 65 seconds after Internet Explorer 11 starts, it compares your site list version to the stored version number. If your file has a higher number, the newer version is loaded.
Important – After this check, IE11 won’t look for an updated list again until you restart the browser.
- <compat-mode>tag – This tag specifies what compatibility setting are used for specific sites or domains.
- <open-in> tag – This tag specifies what browser opens for each sites or domain.
<site-list version="3">
  <created-by>
    <tool>EMIESiteListManager</tool>
    <version>12.0.0.0</version>
    <date-created>02/18/2022 06:41:58</date-created>
  </created-by>
  <site url="anoopcnair.com">
    <compat-mode>Default</compat-mode>
    <open-in>IE11</open-in>
  </site>
  <site url="htmdforum.com">
    <compat-mode>IE7Enterprise</compat-mode>
    <open-in>IE11</open-in>
  </site>
  <site url="anoopcnair.com/Intune">
    <compat-mode>Default</compat-mode>
    <open-in>IE11</open-in>
  </site>
</site-list>
To add multiple sites –
- In the Enterprise Mode Site List Manager, click on File > Bulk add from file.
- Go to your site list (either .txt or .xml) to add the included sites to the tool, and then click Open.
Important – Each site is validated and, if successful, added to the global site list when you click OK to close the menu. If a site doesn’t pass validation, you can try to fix the issues or pick the site and click Add to list to ignore the validation problem.

- Click OK to close the Bulk add sites to the list menu.
- On the File menu, click Save to XML, and save your file.
You can use one of the following locations to store your prepared site lists:
- (Recommended) HTTPS location: https://iemode/sites.xml (I’ll be using Azure Blob Storgae)
- Local network file: \\network\shares\sites.xml
- Local file: file:///c:/Users/<user>/Documents/sites.xml
Create Storage Account and Blob Container – Upload Site List
The Blob storage is generally used for storing media like images, videos, etc. Let’s follow the steps to create storage accounts, containers to upload the created XML file.
- Login to Azure Portal http://portal.azure.com/.
- Navigate to “Storage Accounts” on Azure Global search and click on “Add“
- Choose your subscription and enter the following details, enter the below information (for example storgae account name) and click Next.
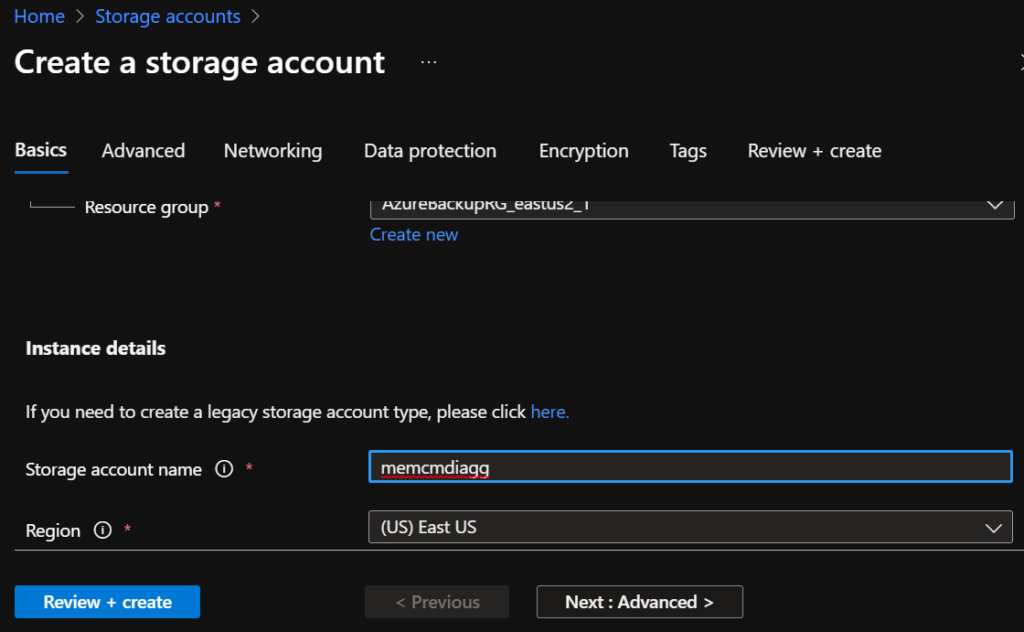
On the Networking tab, you can configure network connectivity and routing preference settings for your new storage account.
Add all required details and When you navigate to the Review + create tab, Azure runs validation on the storage account settings that you have chosen. If validation passes, you can proceed to create the storage account.
To create a container in the Azure portal, follow these steps:
- Navigate to your new storage account in the Azure portal. (If you have exisiting storgae account, you can also use the same, make sure you have desired access level)
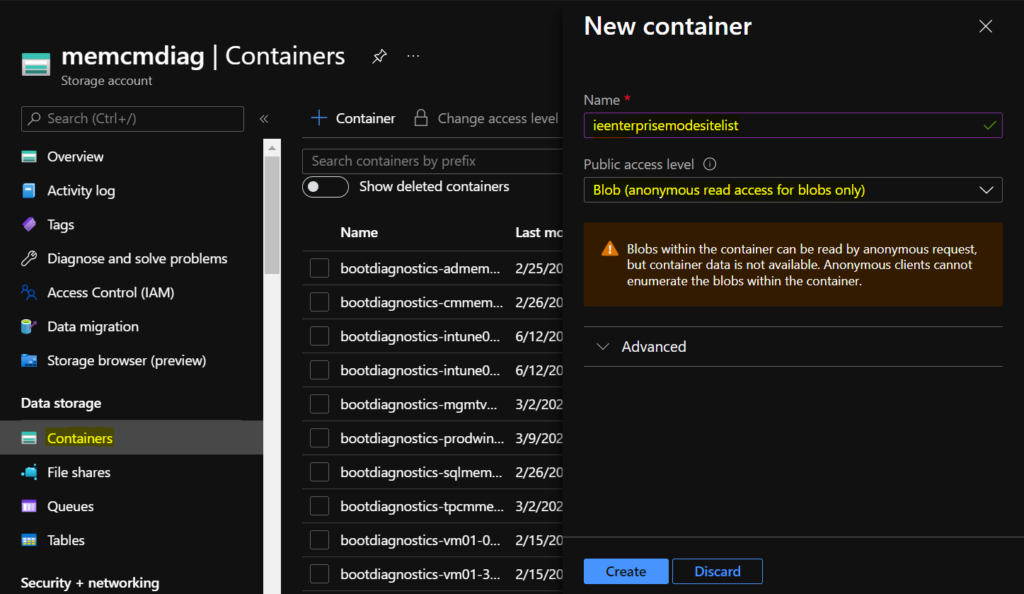
- In the left menu for the storage account, scroll to the Data storage section, then select Containers.
- Select the + Container button.
- Type a name for your new container. The container name must be lowercase, must start with a letter or number, and can include only letters, numbers, and the dash (-) character.
- Set public access level to the container Blob (Anonymous read access for blobs only)
- Select Create to create the container.
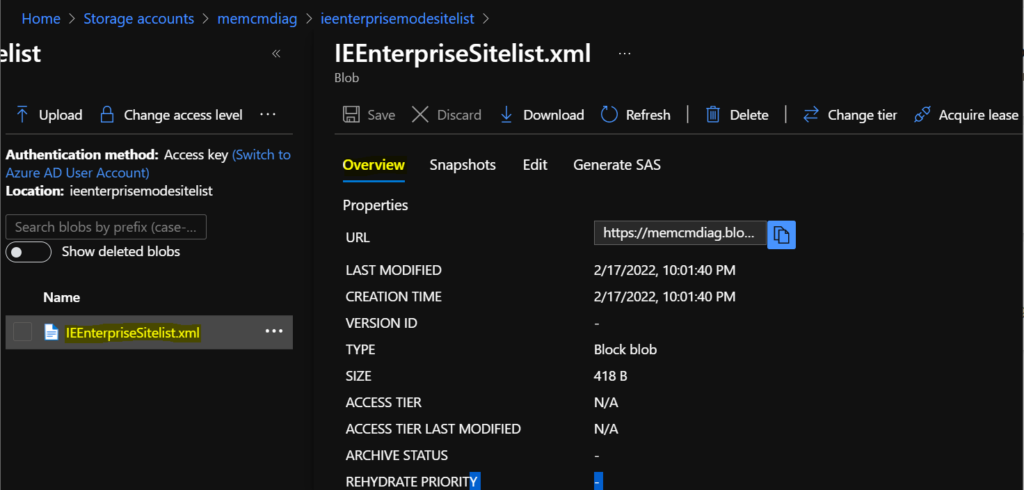
To upload an XML file to your new container. Select the Upload button to open the upload blade and browse your local file system to find a file to upload as a block blob (for example Enterprise Site list XML file). Select the Upload button to upload the blob.
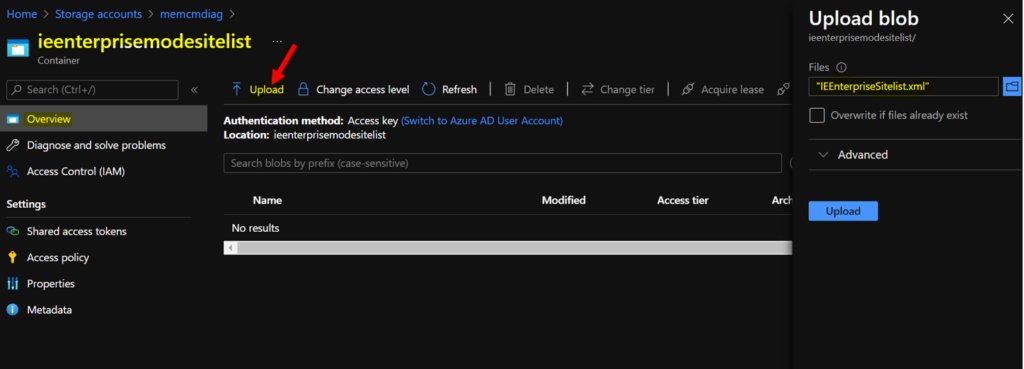
Once the files are uploaded to the container, you can click and validate the URL. As well you have an option to Download.
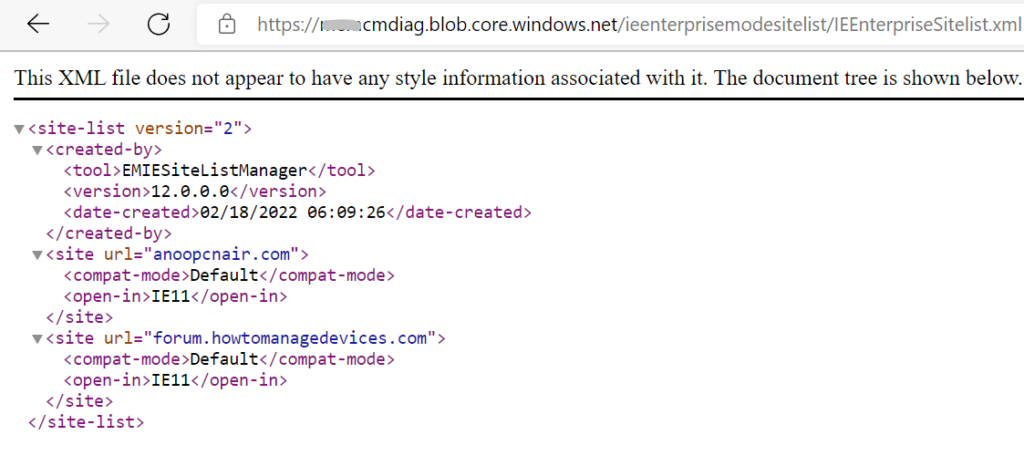
This is a view of the XML file. It’s recommended to use one list for both browsers, where each policy points to the same XML file location.
Configure Enterprise Mode Site List using Intune
You can refer to the following guide to Create Intune Settings Catalog Policy for Enterprise mode site list and deploy it only to a set of Intune Managed Windows 11 or Windows 10 devices using Intune Filters.
- Sign in to the Endpoint Manager Intune portal https://endpoint.microsoft.com/
- Select Devices > Windows > Configuration profiles > Create profile.
- In Create Profile, Select Platform, Windows 10, and later and Profile, Select Profile Type as Settings catalog. Click on Create button.
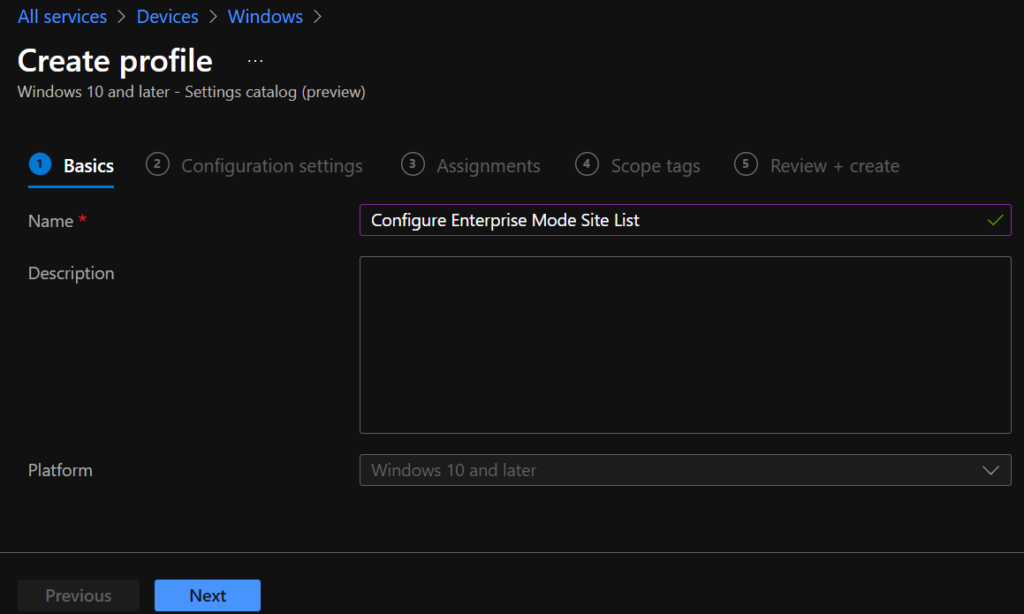
- On the Basics tab, enter a descriptive name, such as Configure Enterprise Mode Site List. Optionally, enter a Description for the policy, then select Next.
In Configuration settings, click Add settings to browse or search the catalog for the settings you want to configure.
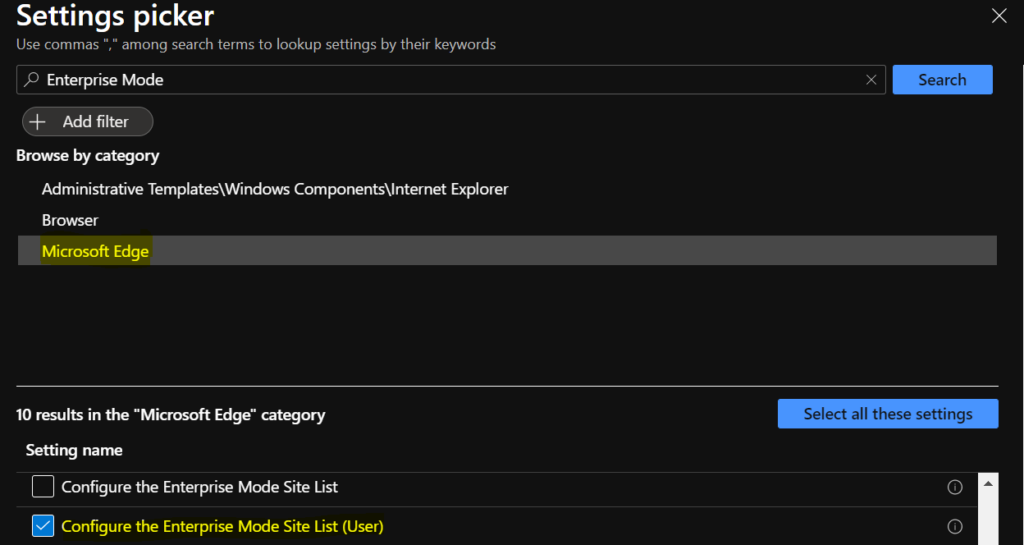
On the Settings Picker windows, Select Microsoft Edge to see all the settings in this category. Select the below settings, which is available in both computer or user category. After adding your settings, click the cross mark at the right-hand corner to close the settings picker.
- Configure Internet Explorer integration (User) – Configure Internet Explorer to open directly within Microsoft Edge (IE mode).
- Configure the Enterprise Mode Site List (User) – This policy lets you configure specific sites to open in IE mode for Microsoft Edge.
Note – In policy, use the search box to find specific settings. You can search by category or a keyword, such as Enterprise Mode/Internet Explorer Integration. It will display all the related settings available.
The setting is shown and configured with a default value Disabled. Set both the options to Enabled and configure with the below options. And Click Next.
Under Configure Internet Explorer integration (User) Options, you can set the dropdown value to
- Internet Explorer mode if you want sites to open in IE mode on Microsoft Edge
- Internet Explorer 11 if you want sites to open in a standalone Internet Explorer 11 window (This option will not be supported after June 15, 2022 when the Internet Explorer 11 desktop application will be retired and go out of support. After June 15, 2022 when IE11 will no longer be available, this option will behave the same as the Internet Explorer mode option.)
- None if you want to stop users from configuring Internet Explorer mode via edge://flags or through the command line
Configure the Enterprise Mode Site List (User) – Paste the url where your site is placed. (For example I’m providing the blob storage link)
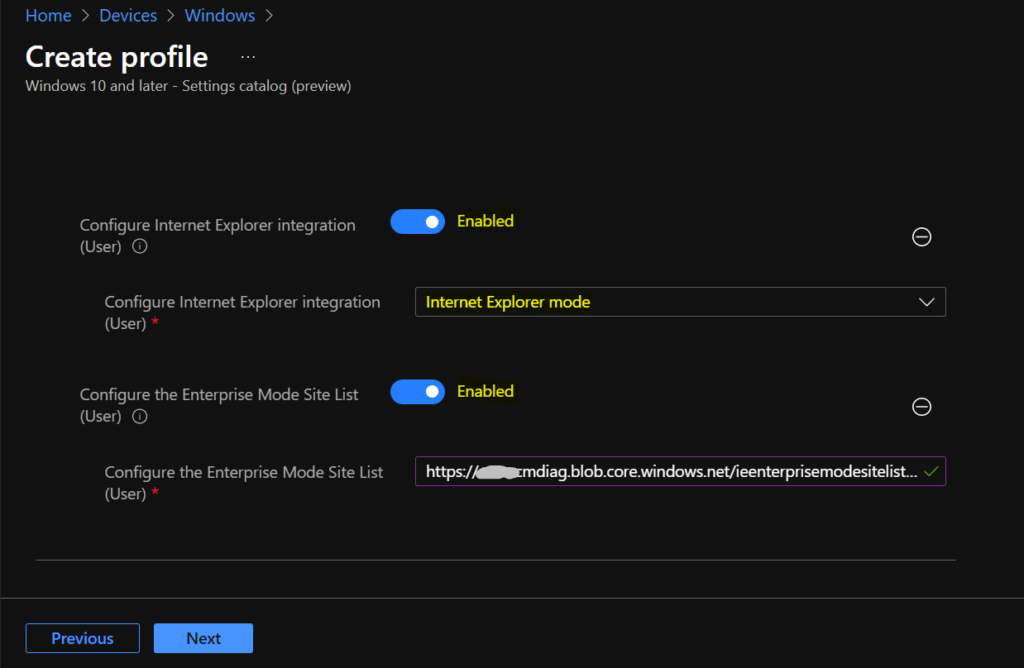
Under Assignments, In Included groups, click Add groups and then choose Select groups to include one or more groups. Click Next to continue.

In Scope tags, you can assign a tag to filter the profile to specific IT groups. Add scope tags (if required) and click Next.
In Review + create, review your settings. When you select Create, your changes are saved, and the profile is assigned.
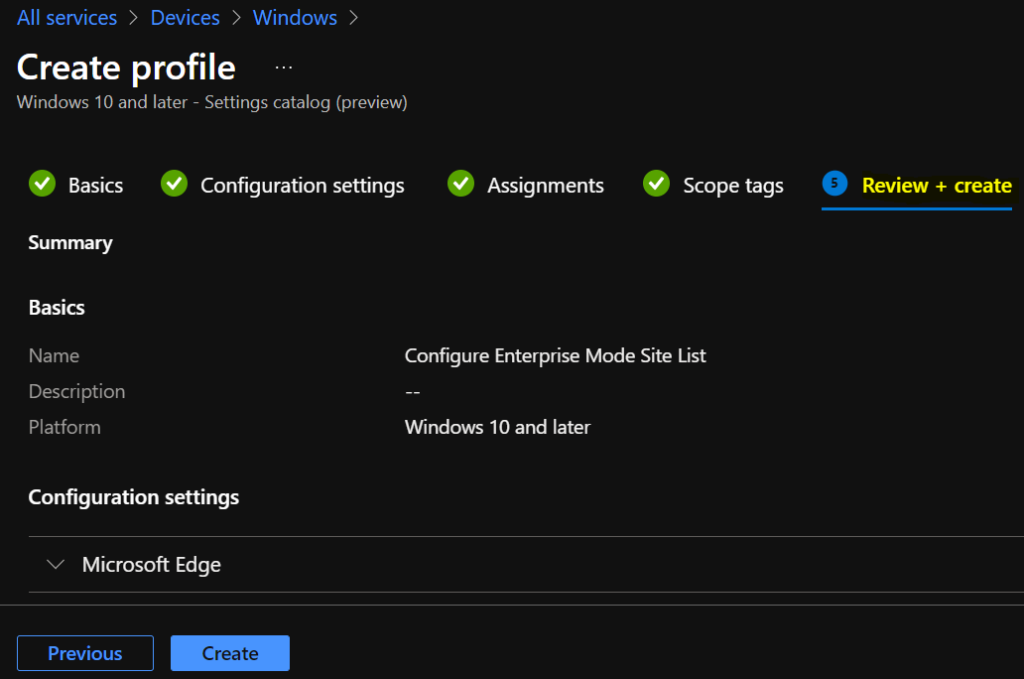
A notification will appear automatically in the top right-hand corner with a message. Here you can see that Policy “Configure Enterprise Mode Site List“ created successfully. The policy is also shown in the Configuration profiles list.
Reporting – Configure Enterprise Mode Site List
You can check Intune settings catalog profile report from Intune Portal, which provides an overall view of device configuration policies deployment status.
To monitor the policy assignment, from the list of Configuration Profiles, select the policy, and here you can check the device and user check-in status. If you click View Report, additional details are displayed.
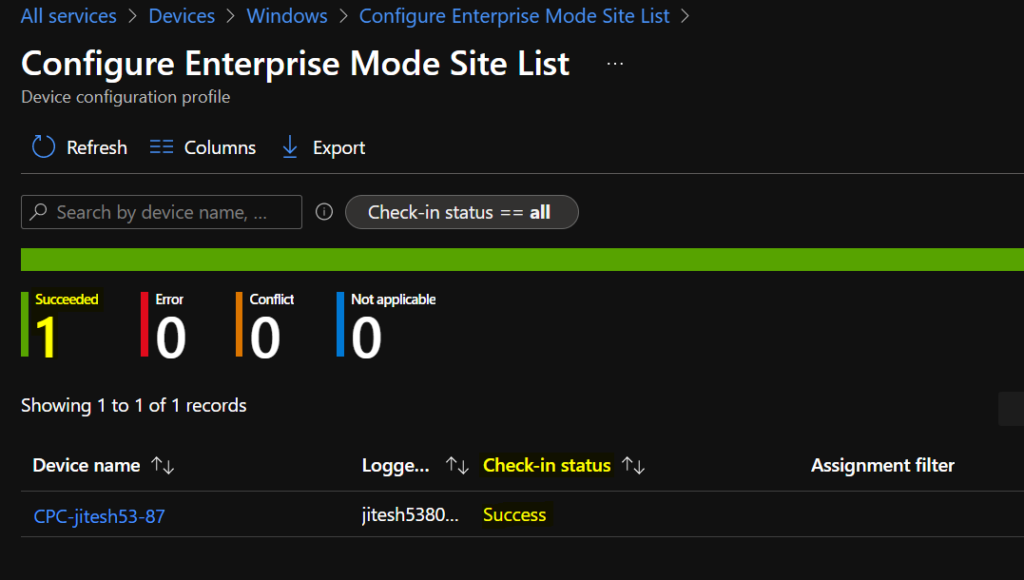
Intune MDM Event Log 814
The Intune event ID 814 indicates a string policy is applied on the Windows 11 or Windows 10 devices. You can also see the exact value of the policy being applied on those devices.
You can check the Event log path to confirm this – Applications and Services Logs – Microsoft – Windows – Devicemanagement-Enterprise-Diagnostics-Provider – Admin.
MDM PolicyManager: Set policy string, Policy: (InternetExplorerIntegrationSiteList), Area: (microsoft_edgev78diff~Policy~microsoft_edge), EnrollmentID requesting merge: (78BF73E9-4EBB-4575-9EF5-21B30DB3FD4E), Current User: (S-1-12-1-3186897695-1137825691-1845872004-278613382), String: (), Enrollment Type: (0x6), Scope: (0x1).
MDM PolicyManager: Set policy string, Policy: (InternetExplorerIntegrationLevel), Area: (microsoft_edge~Policy~microsoft_edge), EnrollmentID requesting merge: (78BF73E9-4EBB-4575-9EF5-21B30DB3FD4E), Current User: (S-1-12-1-3186897695-1137825691-1845872004-278613382), String: (), Enrollment Type: (0x6), Scope: (0x1).

Validate Registry – Configure Enterprise Mode Site List Using Intune
You will need to check a different registry path to confirm whether user policies are deployed.
The best way to do a keyword search (Ctrl + F) helped find the correct registry path for policy. These registry values determine the site list that has been applied for users.
Computer\HKEY_CURRENT_USER\Software\Policies\Microsoft\Edge Value Name InternetExplorerIntegrationLevel , InternetExplorerIntegrationSiteList

Computer\HKEY_LOCAL_MACHINE\SOFTWARE\Microsoft\PolicyManager\current\S-1-12-1-3186897695-1137825691-1845872004-278613382\microsoft_edge~Policy~microsoft_edge
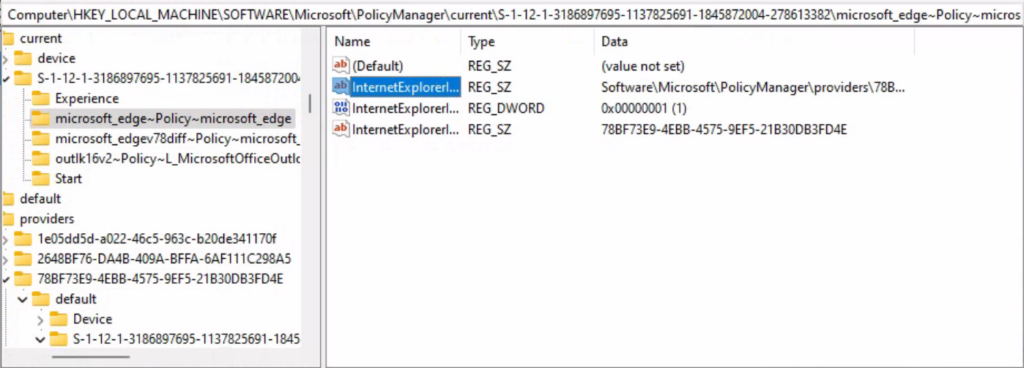
End Users Experience
Open Microsoft Edge. To quick access, Enterprise Mode Site List. In the address bar for Microsoft Edge, type edge://compat/SiteListManager and then click Enter.
If enabled, your users will see an Enterprise Site List Manager option on the left navigation pane in edge://compat. Here you will also see the sites on the list that use IE Mode with Edge to open in Internet Explorer automatically.
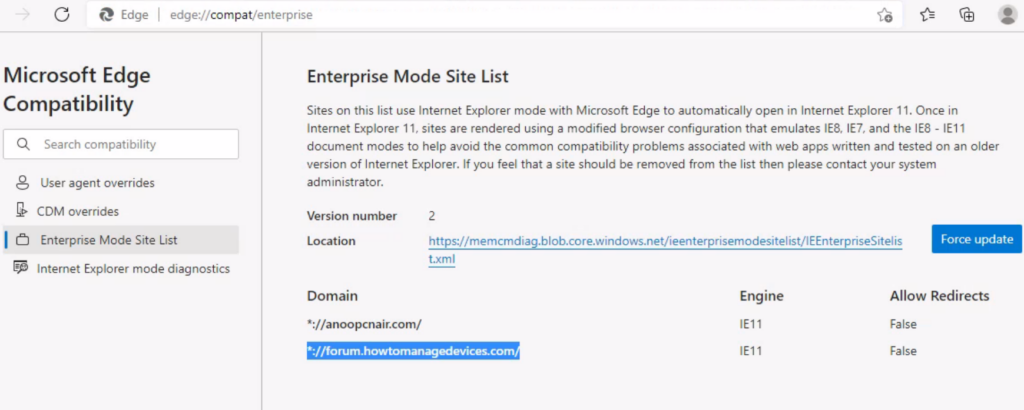
Internet Explorer mode is now enabled. To view a website using Internet Explorer mode in Microsoft Edge, use the following steps –
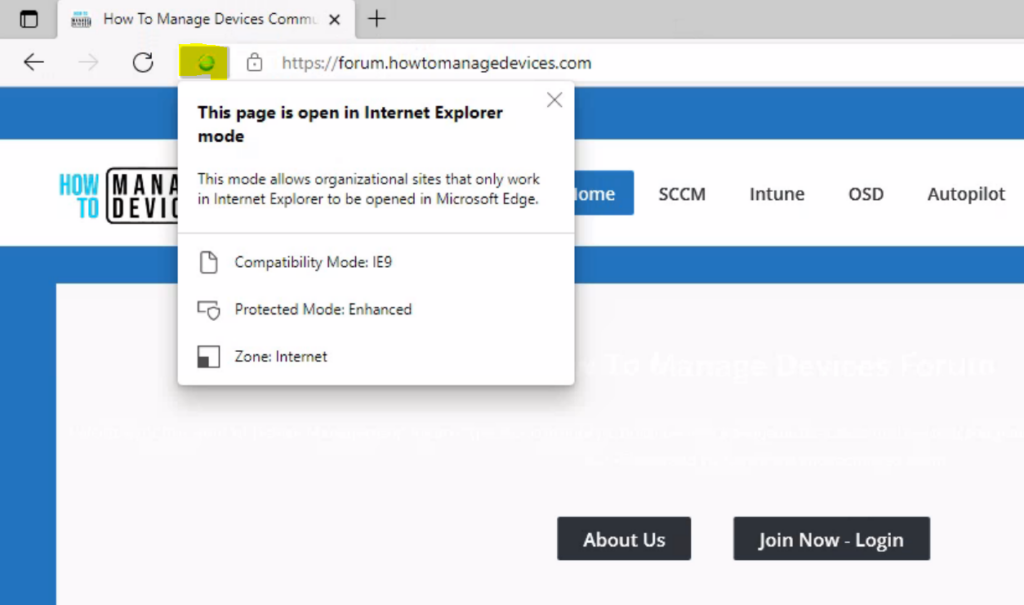
- Navigate to the website you added in enterprise site list to view in Internet Explorer mode
- While in IE mode, users will see the IE logo indicator displayed on the left side of the navigation bar. You can click the IE logo indicator to display additional information, as shown

Thanks for the writeup. I followed this, only difference ( I am pretty sure) is that I did a group with users instead of all users. The status for each of the users for the configuration profile is “Not Applicable” for all of them(3 users across 5 devices). Any idea why? The machines are windows 10 enterprise, 21h2,. I get an error in the devicemanagement-enterprise-diagostics-provider admin log with event id 404 of “MDM ConfigurationManager: Command failure status. Configuration Source ID: (6D64269D-D22C-45B3-AFB9-CCF6474A5341), Enrollment Name: (MDMDeviceWithAAD), Provider Name: (Policy), Command Type: (Add: from Replace or Add), CSP URI: (./Device/Vendor/MSFT/Policy/ConfigOperations/ADMXInstall/Receiver/Properties/Policy/FakePolicy/Version), Result: (The system cannot find the file specified.).” but I am not sure if that is related to this. they acure as far as the log file goes back, so it could of been happening before.
Hi there, great article. How does this setting interact with an IE Mode list deployed via Group Policy? Does it supersede Group Policy or would the Group Policy list take precedence?
That actually would addressed by the “MDM policy over GPO” setting within Intune.(andersrodland.com/how-to-make-intune-mdm-policy-win-over-gpo/). The real question is the On-prem Enterprise Mode Site List VS. Enterprise Mode Cloud Site List. The cloud setup in Azure is way better than than this process and I am trying to migrate users to it now….but which takes precedence when both are configured and matching in one policy. Can one be a fail over for the other?
You can also use step by step guide to configure MDM Wins over GPO policy – > https://www.anoopcnair.com/mdm-wins-over-gpo-group-policy-intune-policy/
Hi,
IE mode works intermittently. It works for day or two before it goes to an error state. After couple of days it starts working again. I have noticed it for couple of test users. When it stops working “Configure Internet Explorer integration” will be in an error state. Any thoughts?
We have assigned config profile to users not devices.
Allow Internet Explorer mode testing
Succeeded
Allow Internet Explorer mode testing (User)
Succeeded
Configure Internet Explorer integration
Error
Configure Internet Explorer integration (User)
Succeeded
Show context menu to open a link in Internet Explorer mode
Succeeded
Show context menu to open a link in Internet Explorer mode (User)
Succeeded
Thank you so much for sharing valuable information.
Thanks for sharing this useful article.