Hi, Let’s Discuss an Overview of the Windows Steps Recorder Application. Microsoft provides Step Recorder, which is available in all versions of Windows. Step Recorder is a tool for technical Documentation. It’s the old tool that has worked amazingly till now, and it’s the best tool for recording your PC screen.
Step Recorder is one of the best-hidden features in Windows. This tool acts as an amazing problem-solving technique. The step Recorder is also known In Windows 7 as the Problem Step Recorder. As its name suggests, exactly say what it does.
This is the best tool for you to solve your PC problems by this step-by-step documentation method. It’s a simple process that you can do easily with your PC. This tool is a quick and easy way to solve certain tasks on Windows. This tool is intended for tech support to help troubleshoot user issues.
Here, you will get a complete Guide on creating a particular task on a Step by Step Record. The Setp recorder is a completely free tool for Windows. If you have to teach someone about a particular task or application, it’s the best way for you all.
What are the Advantages of a Step Recorder?
The Step Recorder is a step-by-step Recording process, and the user can easily diagnose the exact problem or the exact way to access the task on your PC. With this tool, you don’t need to take manual screenshots and create any Documentation. The below list shows the advantages of a Step Recorder.
1. Its the best quick and easy tool for Windows
2. It doesn’t record passwords or any text you typed
3. You can easily Share with your friends and colleagues
4. It is a free tool for Windows
5. No need to take manual Screenshots and create Documentation
Video – Free Windows 11 App to Automate Documentation Process
Free Windows 11 App to Automate Documentation Process for step-by-step guides. This app provides a detailed Overview of the Windows Steps Recorder Application.
Overview of Windows Steps Recorder Application
Step Recorder is a step-by-step program that records your steps on your PC. It diagnoses the problem through these steps, which will help the user to solve it. This tool’s main feature is not recording any Text that the user types and Passwords.
In simple words, When you have any problem or want to teach something related to PC and Tasks to your friends and colleagues, sometimes it’s very difficult to explain exactly what you are meant to say. This tool is the best solution for you.
When you use this tool, you don’t worry about how to write any text or how to explain it to them. It would be best to turn on the step Recorder when you want to record and stop the recorder when needed. It’s a simple process that you can do easily with your PC.
How to Launch the Step Recorder In Windows
Let’s check how to Launch the Step Recorder in Windows. It is an easy Step, and this tool is already installed on your PC. Step recorder is a free tool, so you can easily use it. This tool is really helpful for short records for step-by-step programs on your PC.
- Go to Search Box near Start Menu and search Step Recorder
Note: Step Record is a free and Default tool in Windows
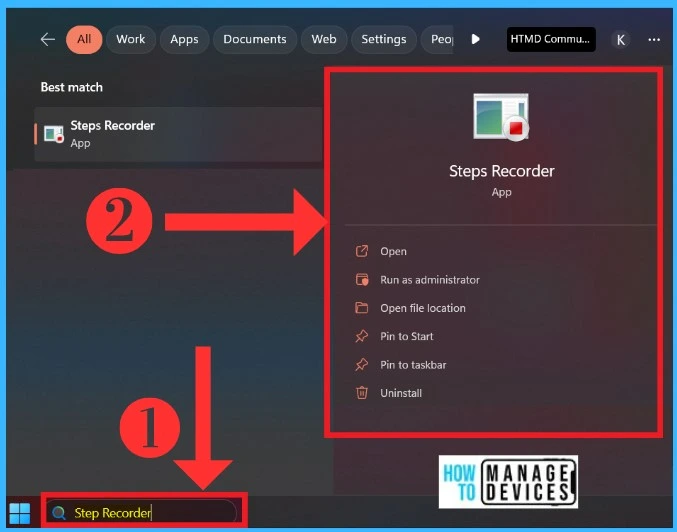
After Searching, you will get the Step Recorder. You can use another method for getting a step recorder via Control Panel. You can Launch this tool from there, also. When you open the Step Recorder application, you will get a small application window that is the minimum size of the application.
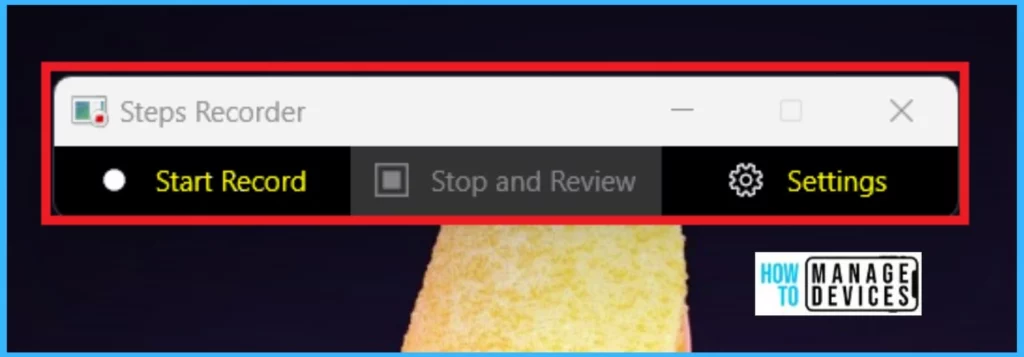
In the Step Recorder application, you will see the Start Record option and Settings option, which are the two options that are now enabled. The below list screenshot shows the Step Recorder application.
- First, click on the Start Record
Create Step By Step Record on Microsoft To Do
Here, I show you how to create a Step by Step recording of a Document with the help of Microsoft To Do. I will list something in the My Day and Important List Category in To Do. In this example, you will understand how it documents a task using the step recorder application.
You don’t need to do anything; click on the Start record, and when you are done with that, you click on the Stop and Review. The Step Recorder counts the Step Numbers and Time when you recorded. It counts all the steps that you are doing in the process.
You can easily be done with the Pause Record option when you want to pause the Record. After Recording, click on the Start and Review option. It will store in the Dowloaded location as a Zip file in the MHT document. The below list screenshot shows the Step Recorder window when capturing your screen.

First Recorded Steps
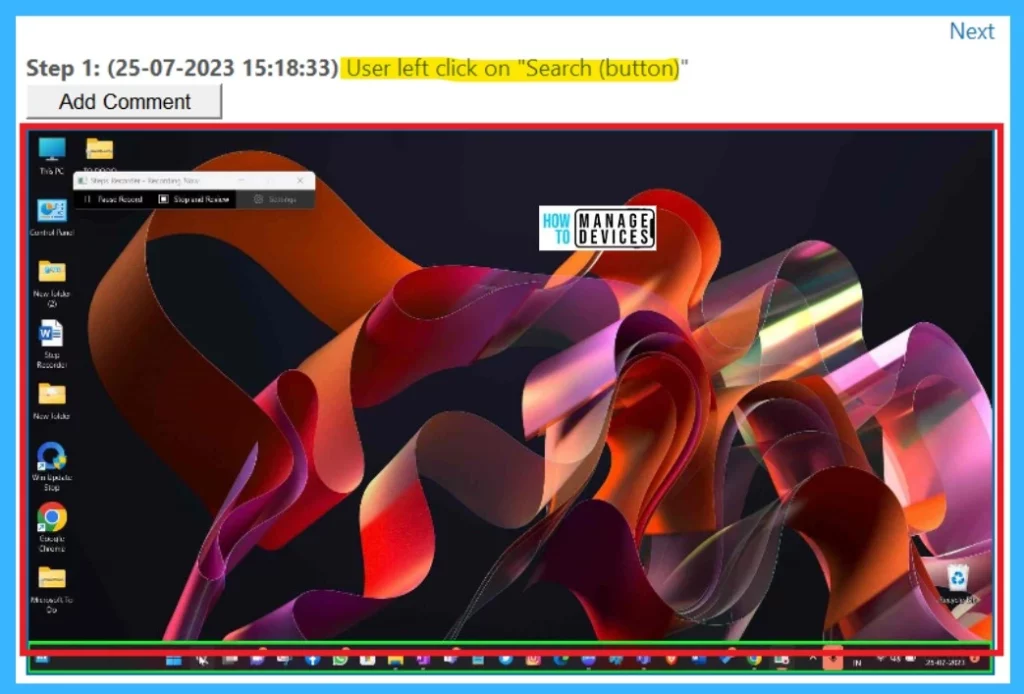
After Start Recording, I selected To Do from the Search; the first Step of this Record is that one. Step Recorder catches all the simple actions like mouse clicks and screenshots. The below screenshot shows the first step of the Step Recorder.
- Click on the Search button
Step 2
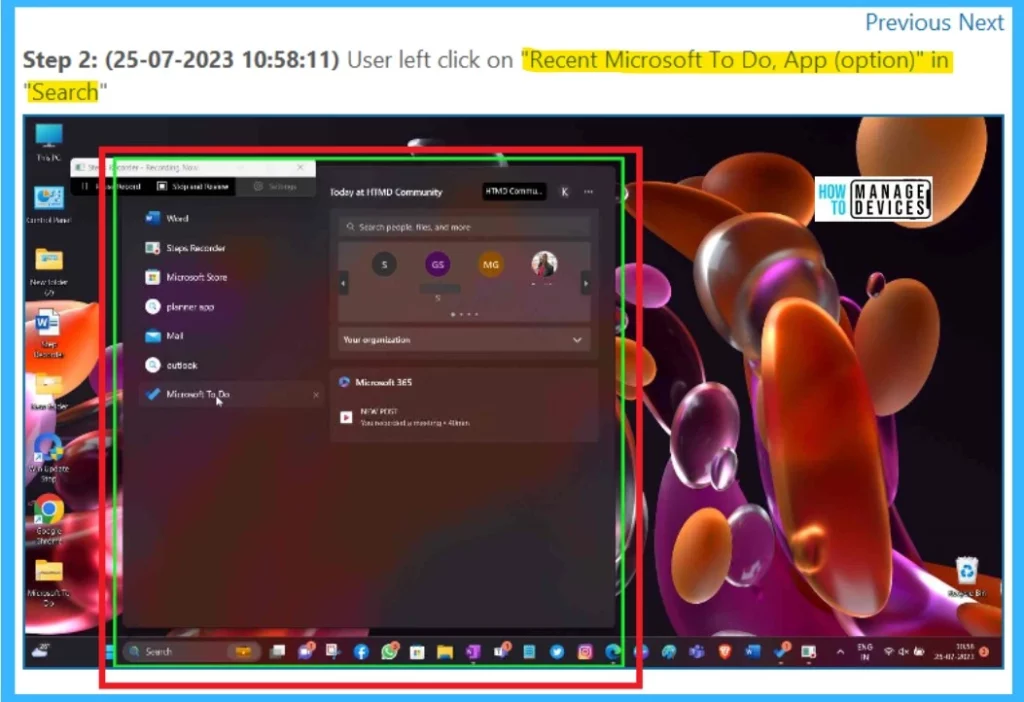
In Step 2, I clicked on the Microsoft To Do, So Step Recorder Documented that User left-clicked on Recent Microsoft To Do app in the Search. The step Recorder recording section is always on the green border. The below screenshot shows the 2nd Step.
- Click on the Microsoft To Do
Step 3
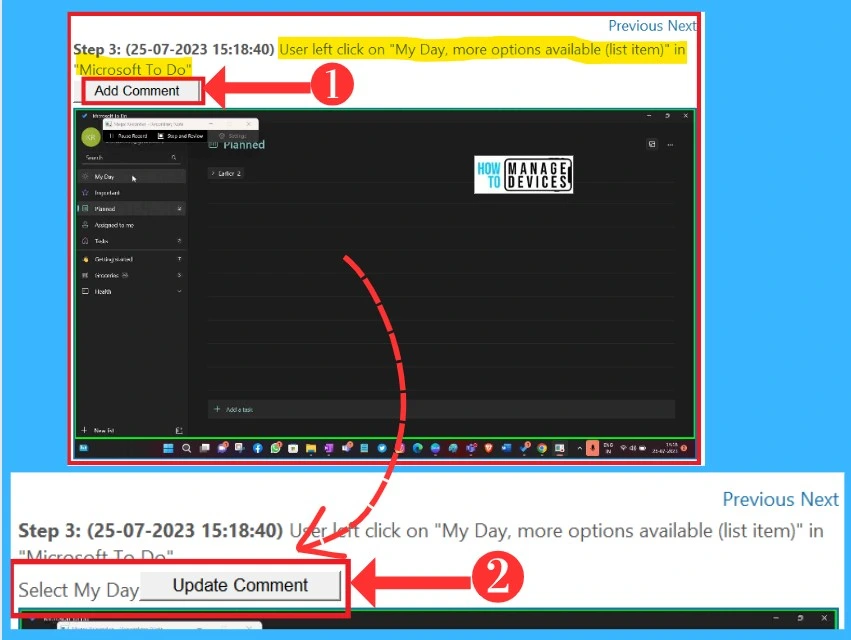
Step 3 contains another step of the process after step 2. In step 3, To Do is opened. I click on the My Day List option when you open it in the planned section. After the Recording, you can see Add comment options in every Step.
In the below screenshots, you will notice the Add Comment option. In this option, you can add comments for the steps. The below screenshot shows the 3rd Step I did and how to add comments for the steps.
Step 4
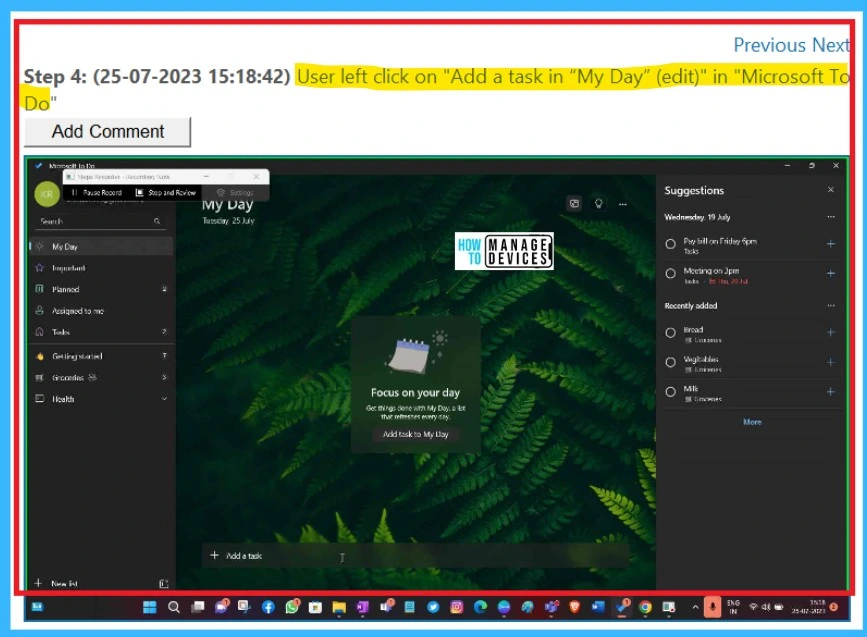
In Step 4, click the Add task option to create a list in My Day. In this screenshot, you can able to see how to step recorder Record the steps. The below screenshot shows the 4th Step in step recorder.
Step 5
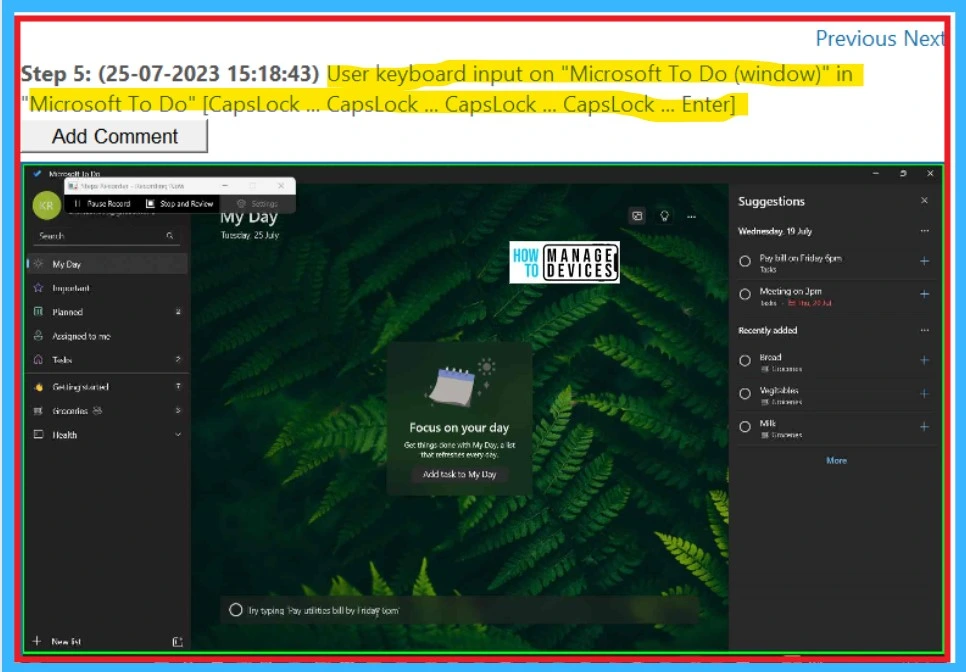
In the 5th Step, I type Deliver Mail to add a task option in To Do. The Step recorder Records everything except the password and any text you typed. In this screenshot, you can’t see any text you wrote. It only shows the key you have pressed on the keyboard.
Step 6
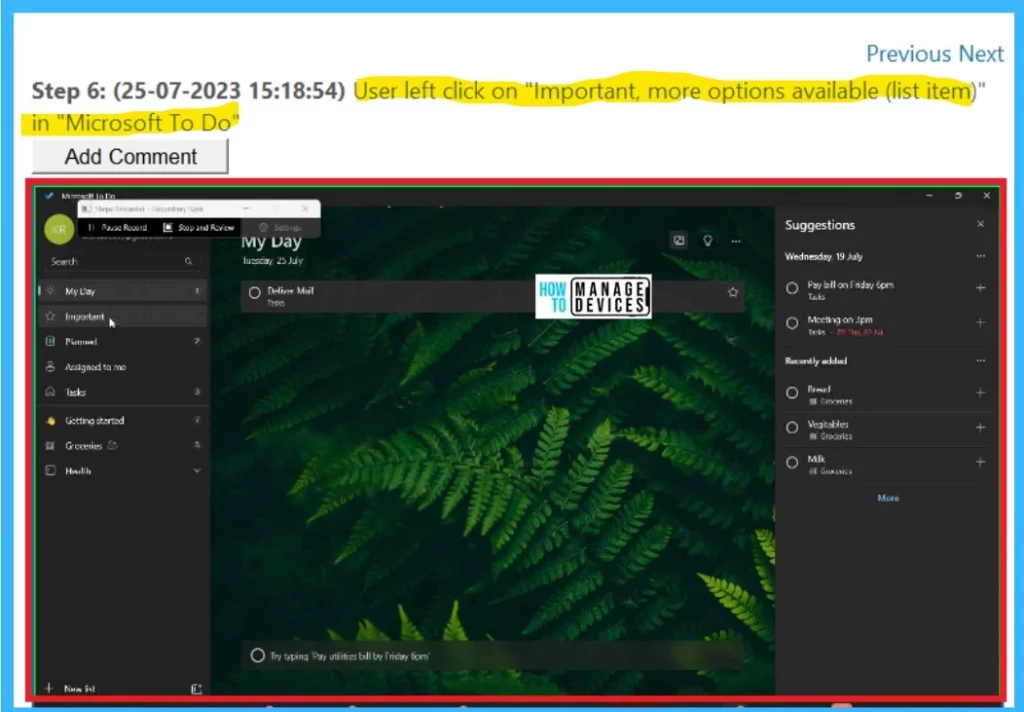
In Step 6, I click on the Important List section, so the Step Recorder shows them in this step section. This recording type will help you understand this step recorder documentation better. The below screenshot shows the 6th Step of the Step recorder.
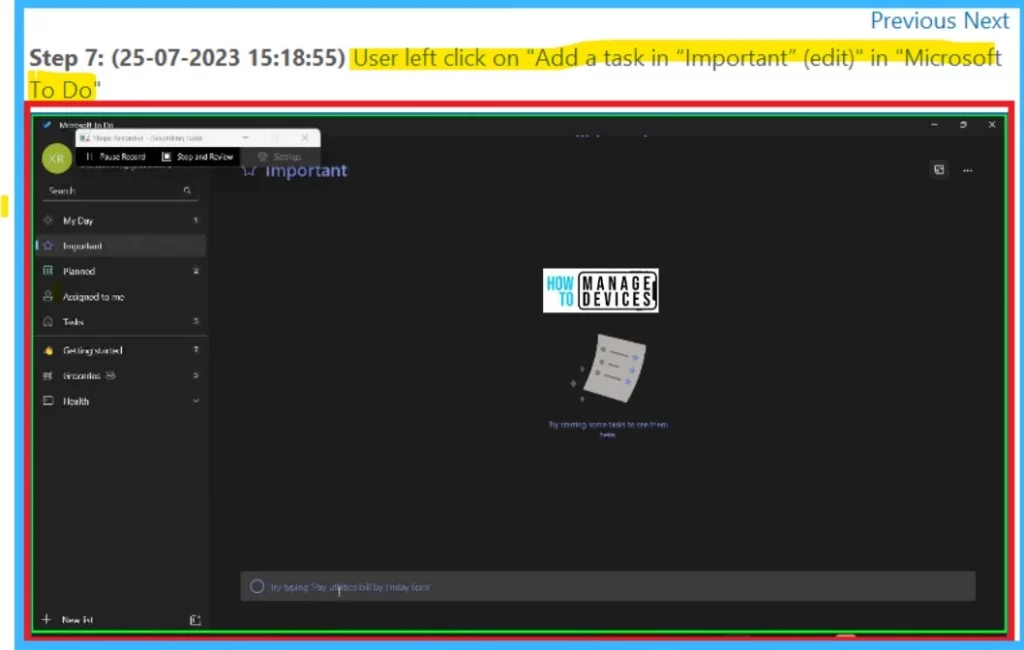
Step 7
In Step 7, I again click the Add task option to list an important task. It does not show the writing part. You aren’t able to see them in the screenshot. In this section, the step recorder texted the user. The below screenshot shows step 7.
Step 8
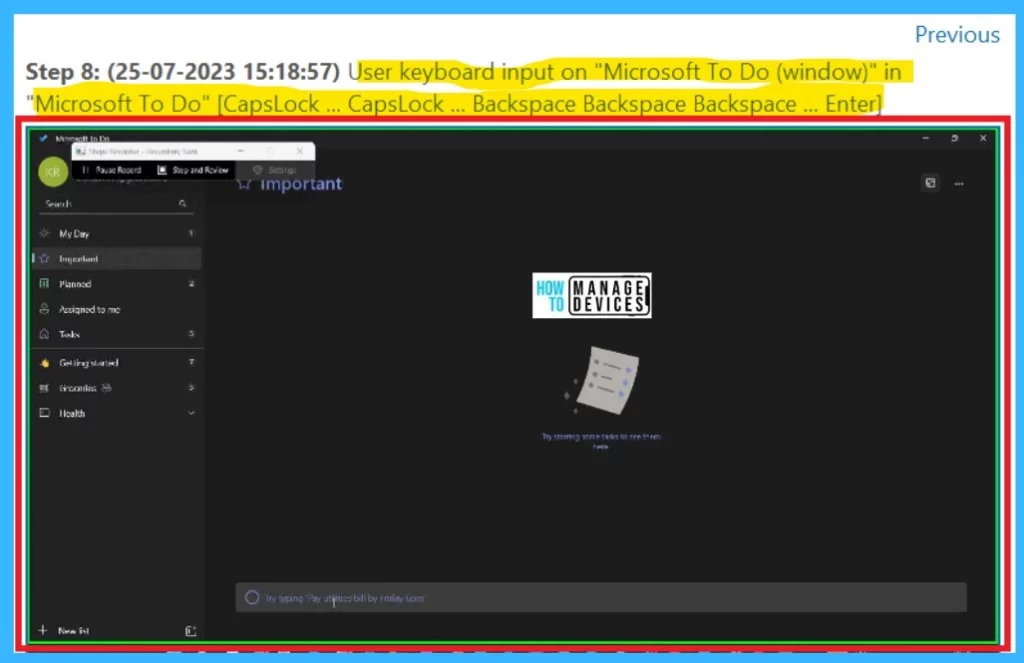
The 8th Step is the last process I did in the To Do. In this Step, you can text a list In the Important section. But in screenshots, it does not Capture. The Step record only shows what you did with the Keywords used for typing. The below screenshot shows the 8th Step of the Step Record.
Settings of the Steps Recorder
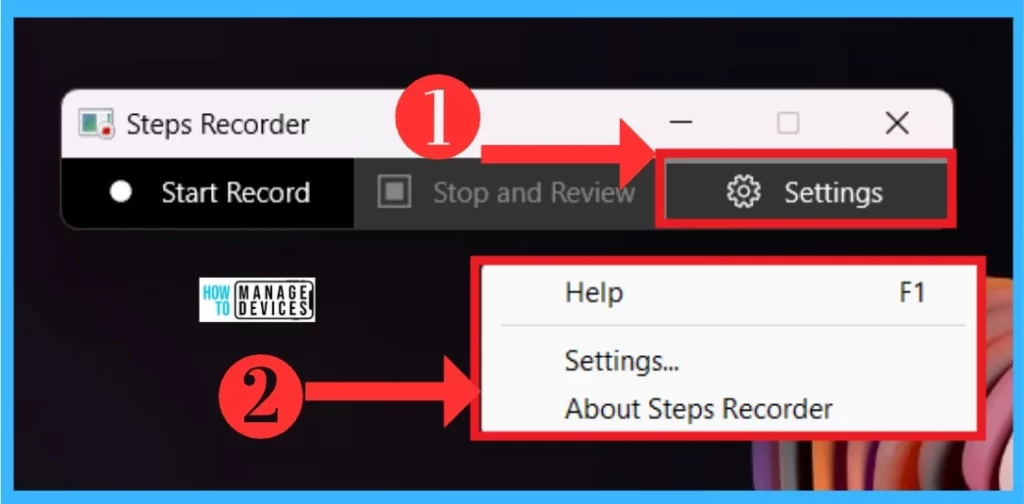
The Settings of Step Recorder are very simple to understand for the users. In settings, it contains only 3 options. You can click on Settings on the Right side of the Step recorder window. In these Settings, you can able to see another Settings option. The 3 options in Settings are below the list and the screenshot.
- Help
- Settings
- About Step Recorder
1. Help Option In Settings
The Help option is one of the most important parts when you want to know about Step Recorder. You can click on the Help option, and It will allow you to access the Microsoft Website to learn about Step Recorder. You can easily select the help option from the Settings.
2. Settings
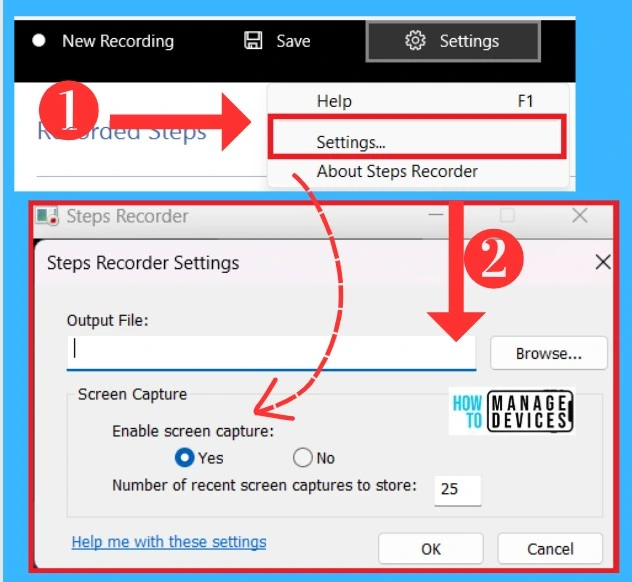
In Settings, you can open another set with a couple of options. In this option, you can do settings for output file location and screen capturing settings options. In the output File, saving the file every time prompts you to set the file location and name every time.
So you can browse to set a defaulted location and a file name. Enabling screen capture allows privacy for the users, and you can set it to Yes or No options. Select the No option; it doesn’t capture the screenshots.
Suppose the screen reveals your personal information that you don’t want to share with anyone. The below table and screenshot show the Settings option in Step Recorder.
| Setting Options | Use to |
|---|---|
| Output File | When every time you save the output, it provides to set a defaulted location and file name through browse |
| Enable screen capture | It provides privacy concern settings |
| Number of recent screen captures to store | It allows 25 defaulted screens, and you can easily increase the number depending on your records |
- Improve Windows PC Performance by using New Efficiency Mode
- Enable Live Caption Feature on Windows Devices and How to Use it
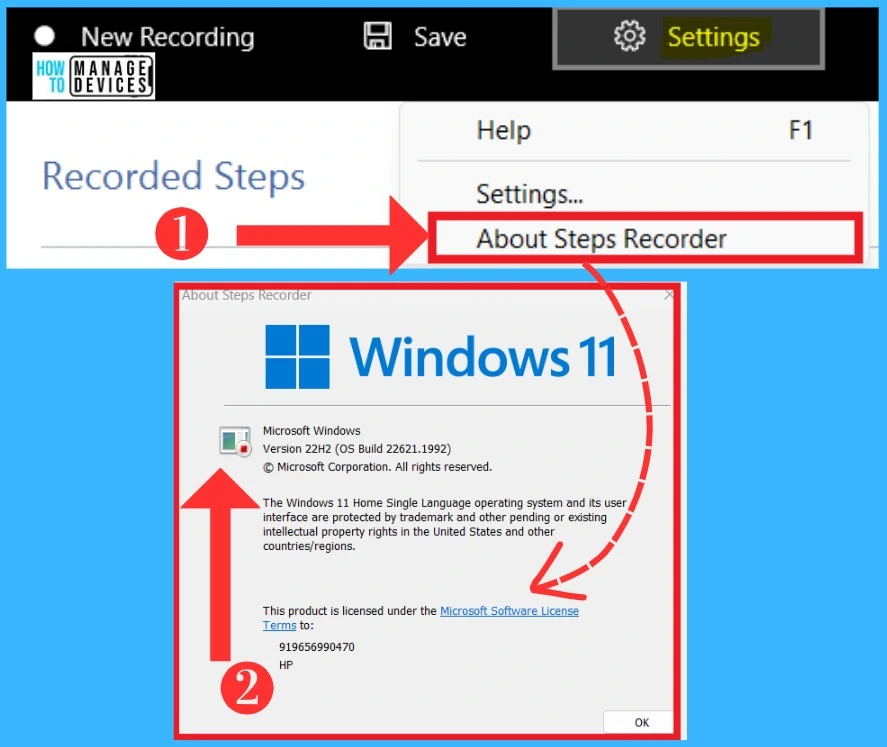
About Step Recorder
About Step Recorder, it provides all the details about Windows. In this option, it shows the Step Recorder version and the version is 22H2. The below screenshot shows the About Step Recorder.
Record steps to reproduce a problem – Microsoft Support
Author
Krishna. R is a computer enthusiast. She loves writing on Windows 11 and related technologies. She likes to share her knowledge, quick tips, and tricks with Windows 11 or Windows 10 with the community.
