Hi, Let’s learn a Detailed Overview of the Microsoft To Do application. Microsoft To Do is a simple task management application. It was first launched in 2017 as a preview base with basic features. Now its changed many features. With this application, you can increase productivity and stay on top of your life.
We live in a world where everything is Digital; Microsoft To-Do is the best for users to plan the day in Digital life. Microsoft To Do, also known as Wunderlist, comes with built-in Windows 11. It is a completely free application for users.
This article will give you complete information regarding Microsoft To Do and how to use it correctly. It is a powerful application, but it is simple and easy to manage. This is the best application if you face work stress or can’t manage your daily activities.
Microsoft claims that its To-Do is an intelligent task management app. To-Do can access through Windows, iOS, Web browsers, and Mobile Phones. Every day, we face so many workloads and stress. Microsoft To-Do is the best solution for your day-to-day stress life.
What are the Advantages of Microsoft To Do?
Microsoft To Do will help you to remember tasks that you accomplish every day. This application is helpful for all users of any age group. The To Do application is synced to every device with the help of Microsoft Cloud. There are many advantages to To Do. They are given below.
1. It is the best free application
2. Plan your Day to day life
3. Integrate with other Microsoft applications
4. You can share To Do list
5. It’s completely safe to use
6. You can independently co-ordinate your Task
7. Get Focused
8. Manage your To Do list Online
Microsoft To Do Application
Microsoft To-Do is an effective tool for planning your daily Task. In daily life, we have so much work to do and a lot of stress. The Microsoft To-Do will decrease your stress level and make your life easy. To Do act as a Digital diary and reminder, also a planner. When you forget something important, you can easily record it in the Microsoft To Do.
This application is now integrated with Outlook and especially on Outlook on the web. Outlook on the web is more advanced than the Desktop. This application syncs with Microsoft Cloud, allowing users to view day-to-day plans easily.
How to Launch Microsoft To Do
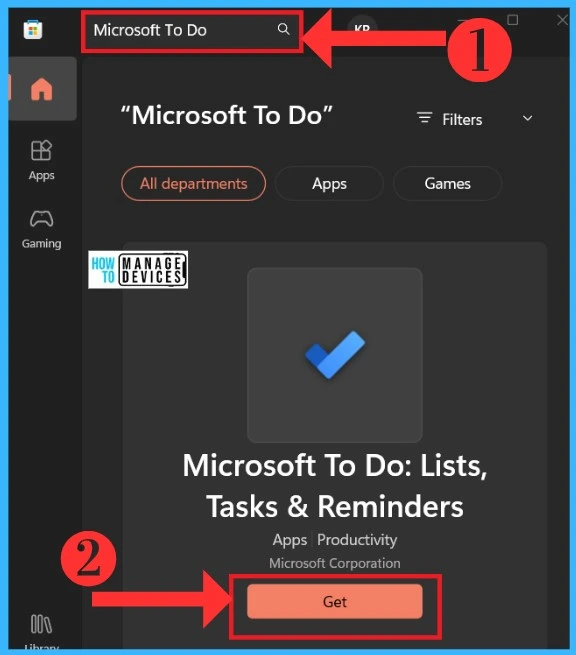
Let’s check how to launch Microsoft To Do in your Windows 11. The To Do application is already installed in our Windows 11, but in some cases, you can’t find it in your applications. In that case, you can do 2 things. First, You can Install it from the Microsoft Store or directly Download it from the Microsoft To Do website. The below list and screenshot show how to download To Do from the Microsoft Store.
- Search Microsoft To Do in the search box of the Microsoft store
- Click on the Get option from the below window
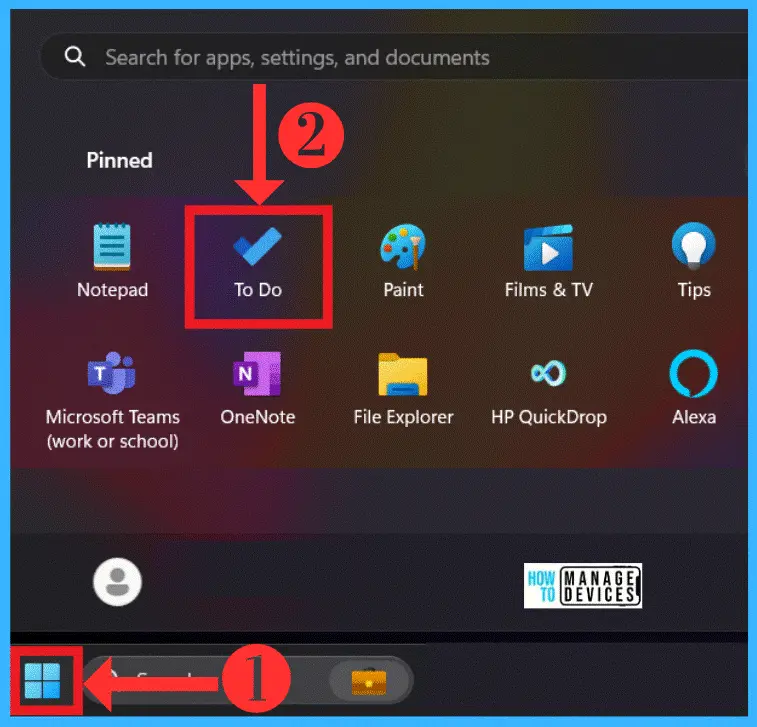
If your To Do is installed, you can Launch it from the Start menu or Search To Do in the search bar. The below screenshot shows how to Launch Microsoft To Do on your Windows.
- Select To Do from Start Menu
Home Screen of Microsoft To Do
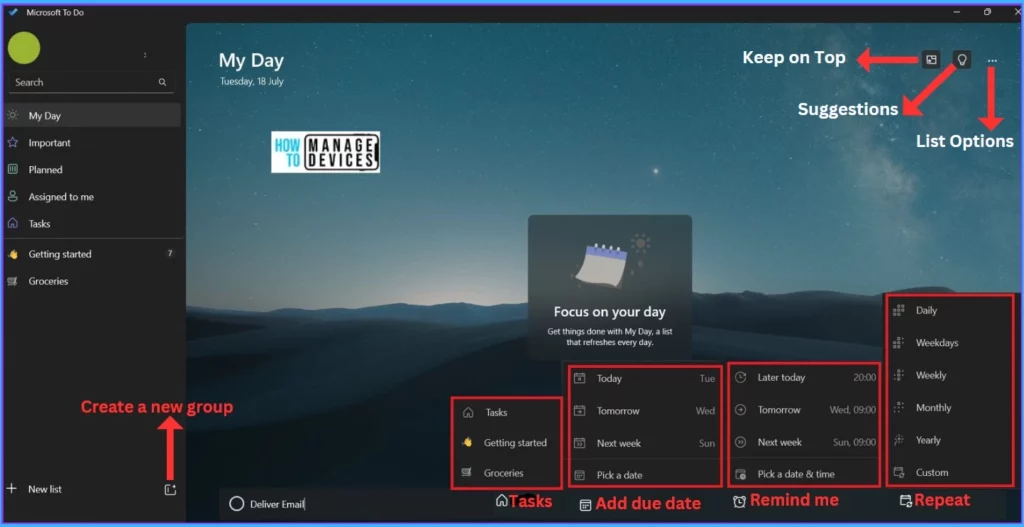
The Home Screen of To Do includes different options for adding a task. Microsoft To Do is easy to use and launch on your Windows 11. You can also use a Widget as a shortcut to open To Do. When you open the To Do, you can see many categories.
With these options, you can easily record your day-to-day Task differently. If you have many tasks in your daily life, you can do them as a list and save them as reminders for the next day, week, or month. The main To Do Categories are given below.
- My Day
- Important
- Planned
- Assigned to me
- Tasks
- Getting Started
- Groceries
1. My Day
My Day is an important section In Microsoft To Do; Everyones’s day depends on their plans. Sometimes we need to organize our day. My day is the best option for you. In this list you can add your daily Task here, which helps you increase productivity. My Day list has the option to write (Add a task ).
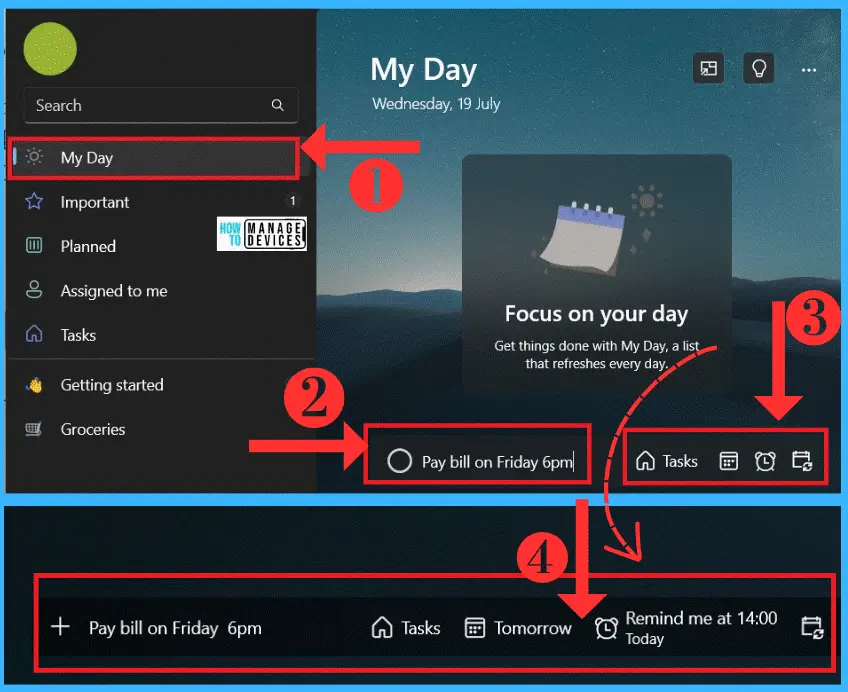
After Writing, you can decide the task time and day and fix it for repeat mode. The below screenshot shows how to add a task to your My Day.
- Select My Day from Microsoft To Do
- Write your Task on Add a Task option; here, I typed Pay bills on Friday
- Set your task Reminder, Due Date, and Repeat
2. Important
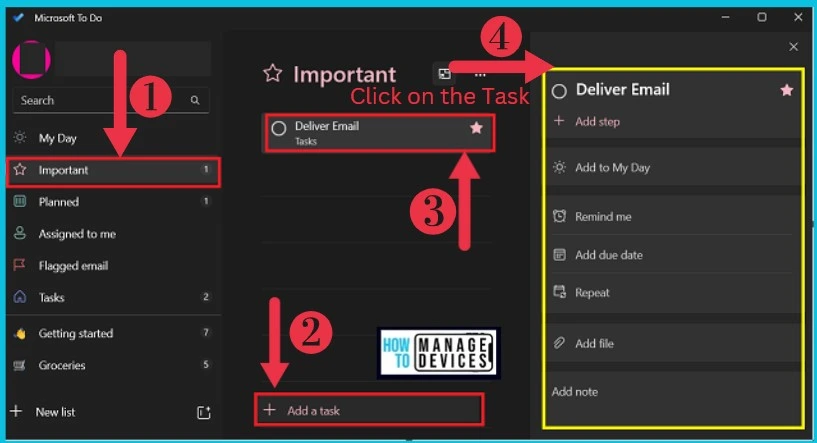
The Important category is used to add a task that important for your work. In this category, you can add tasks and star them as important tasks. You can also add many tasks that are important to you. The star mark shows the Importance of the Task that you can easily removable when the Task is not important to you.
When you enter a particular task, 4 options are displayed on the Add a Task. You can use those for options for the task Time, Date, etc. Here, I add Deliver Email as a task. After you text your Task, you can easily enter it, which will be shown at the top of the list. The below table and screenshot will guide you.
- After creating a Task, you can do more with your Task by Right-clicking the Task; there are many options available after Right-clicking
- Select Important from the Microsoft To Do options
- Type any task that you want to add to your list
- Right–click on the Task that you entered and Select any option that you want to set for your Task
- Suppose you are done with the options displayed after Right-clicking. You can click the Task and get other options for creating Steps for your Task, attaching a file, etc. These options are available for every list, like My Day Importance.
| Options for Task | Used to |
|---|---|
| Remove From My Day | You can remove the task from My day |
| Remove Importance | You can remove the Task from the Importance |
| Mark as completed | After completing, you can mark the task as completed |
| Due Today | It allows you to set the task due for today |
| Due Tomorrow | It allows you to set the task due for tomorrow |
| Pick a Date | It helps you to pick a date for the task |
| Move Task | It allows the created tasks to move to Task or Groceries |
| Delete Task | You can permanently delete a task that you created |
- 5 Ways to Manage Automatic Time Zone Changes in Windows 11
- New Voice Access for Windows 11 | Best Guide
3. Planned
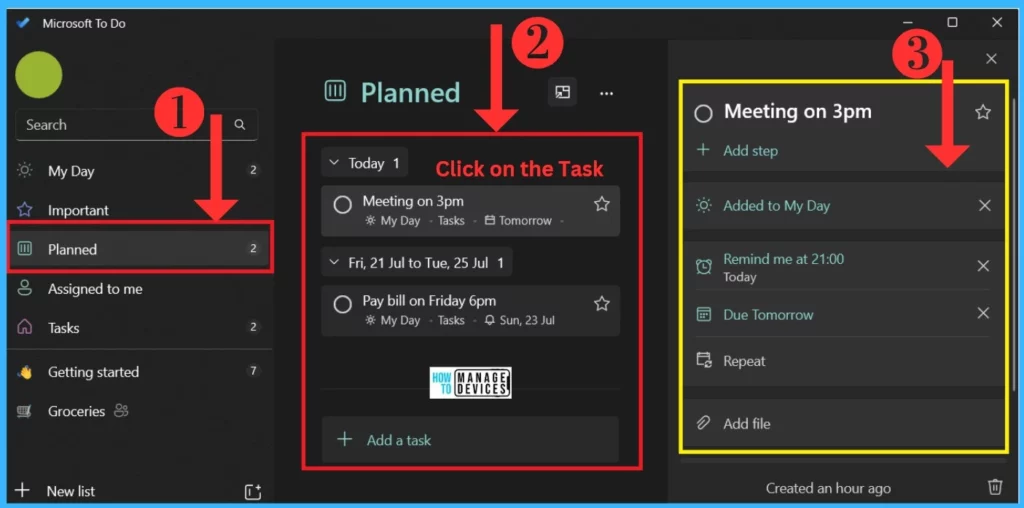
The planned category depends on all the tasks that you are doing. Those tasks appear here when you complete any task for today, tomorrow, or any time. As I mentioned above, you can get many options here by clicking on the Task that you are listed. The below screenshot will help you.
4. Assigned to Me
Assigned to Me is another list in the To Do category; in this option, you can assign tasks to this list. Microsoft To Do links with Microsoft 365 productivity, called Planner. If the Planner assigns any task to you, it will appear here.
5. Tasks
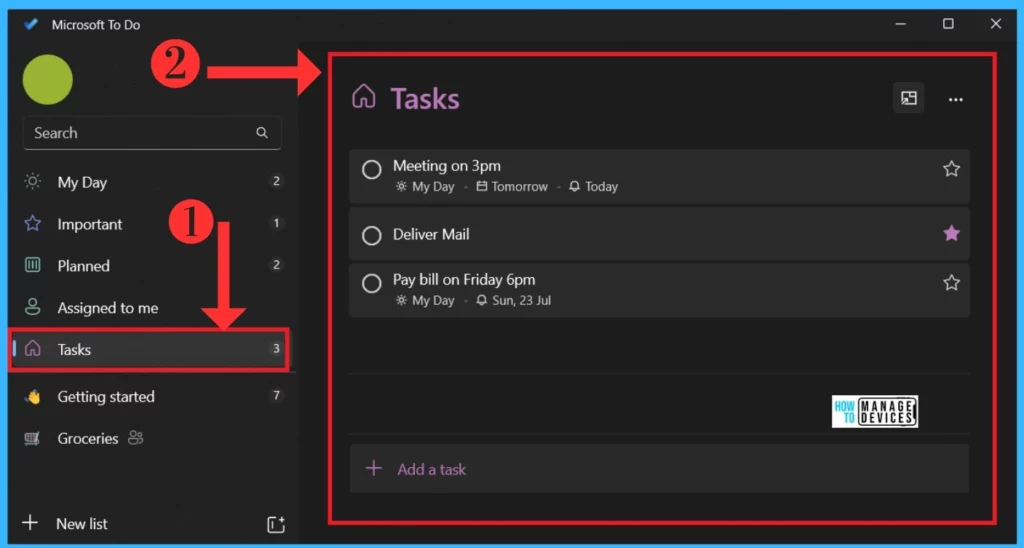
Tasks are the list showing all the tasks you entered in one place. It also helps you check all tasks you are doing in your day. You can add another task here or delete any task. The below screenshot shows all the tasks done in the To Do.
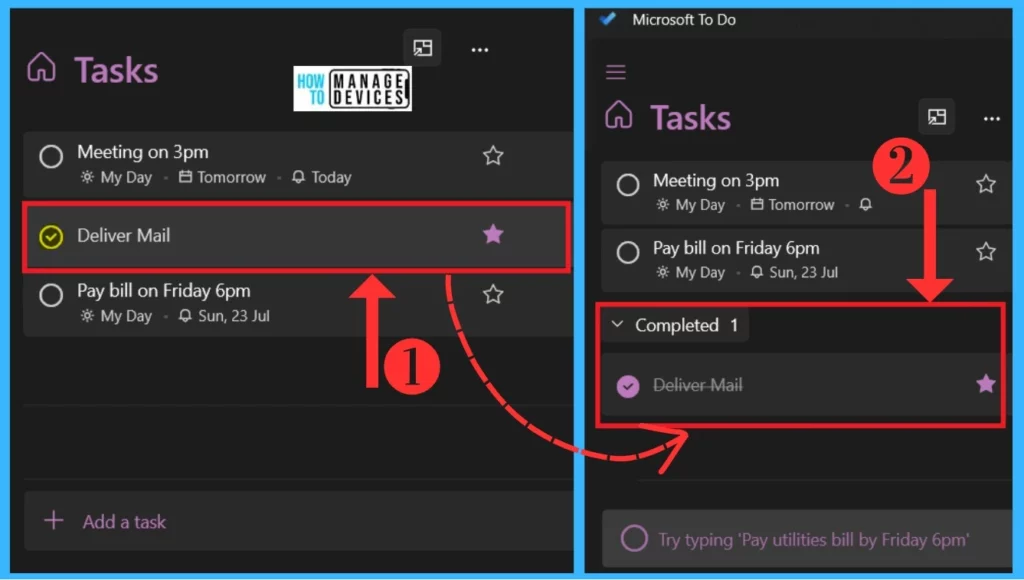
If you finish any task, you can give a Tick mark for the completed Task. After that, the completed Task will be shown under the complete task section. The below screenshot will guide you to how it works.
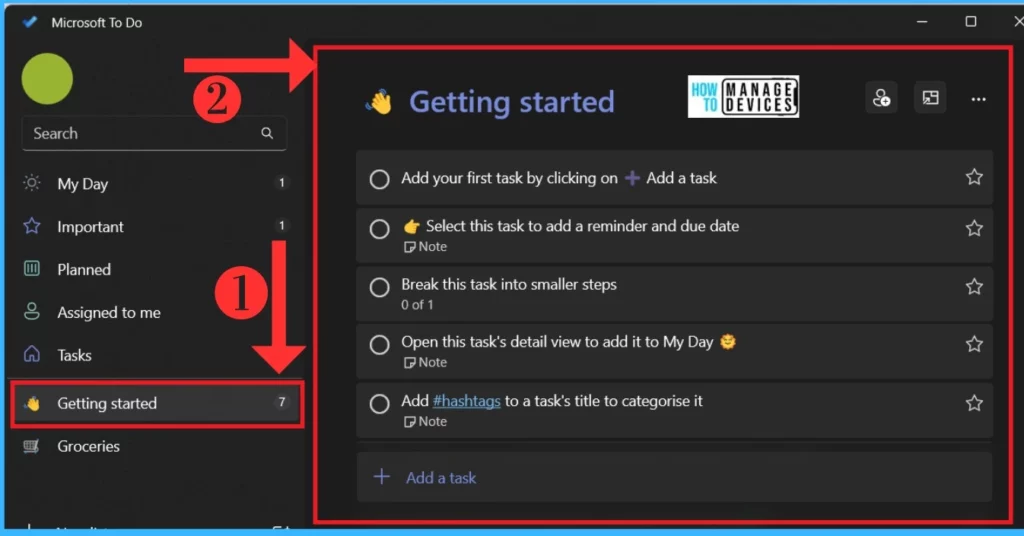
6. Getting Started
The Getting Started option is like a guide for you; it will show many lists. It contains instructions for users on adding tasks, setting reminders, etc. It’s a simple category where you can learn how to add tasks or use the To Do correctly. The below screenshot shows the Get Started list.
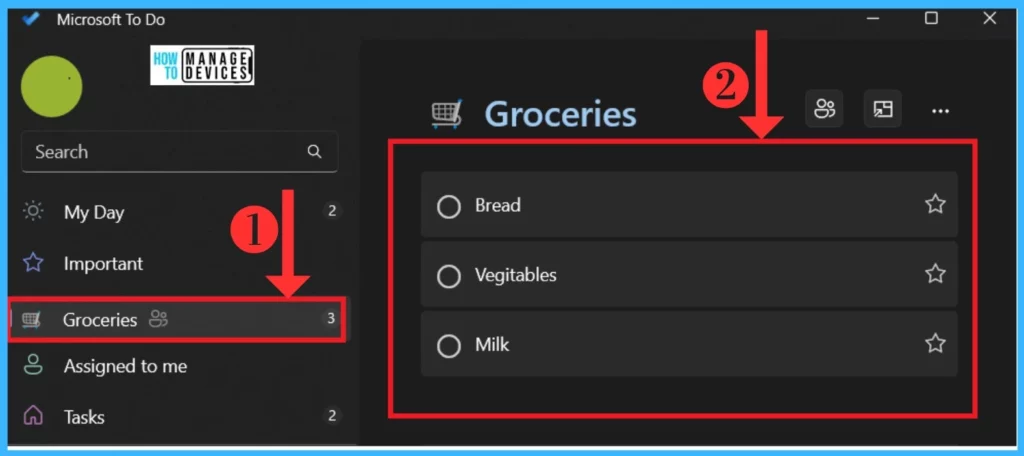
7. Groceries
Groceries categories are important in our day-to-day life. We always forget something on our shopping list, so this category list will help you to remind your Shopping Lists. Select Groceries from To Do list and add your shopping items. The Below screenshot will show how it looks.
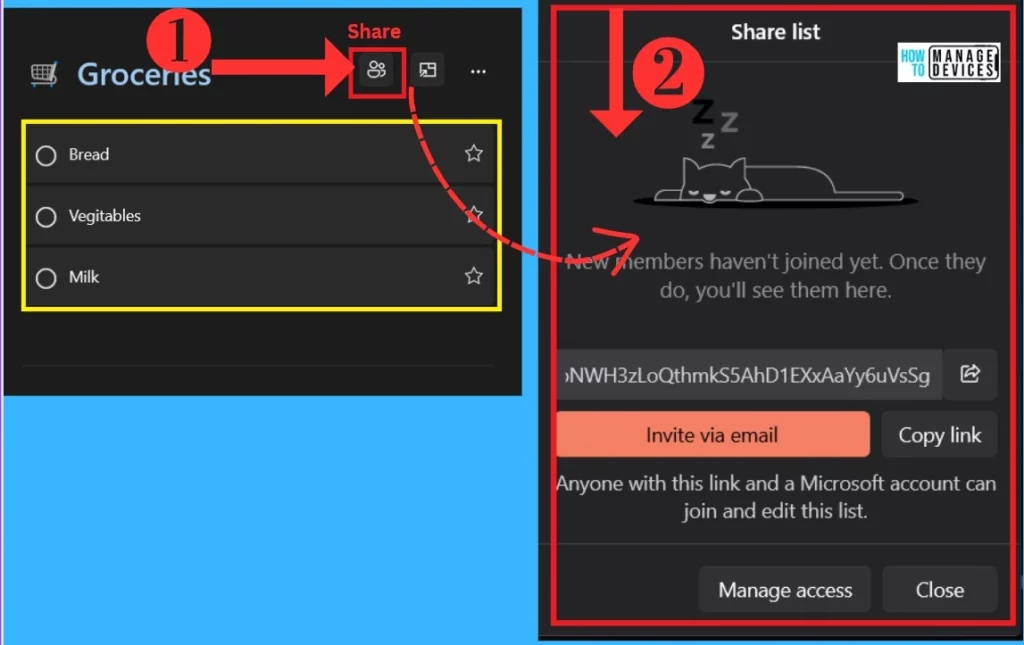
After the shopping lists are done, you can share the shopping list with the one that you want to share. Click on the share option to share your list. The below screenshot shows how to share your list.
- New Windows Alarm Clock Stop Watch Focus Session App Guide
- Enable Live Caption Feature on Windows Devices and How to Use it
Suggestion
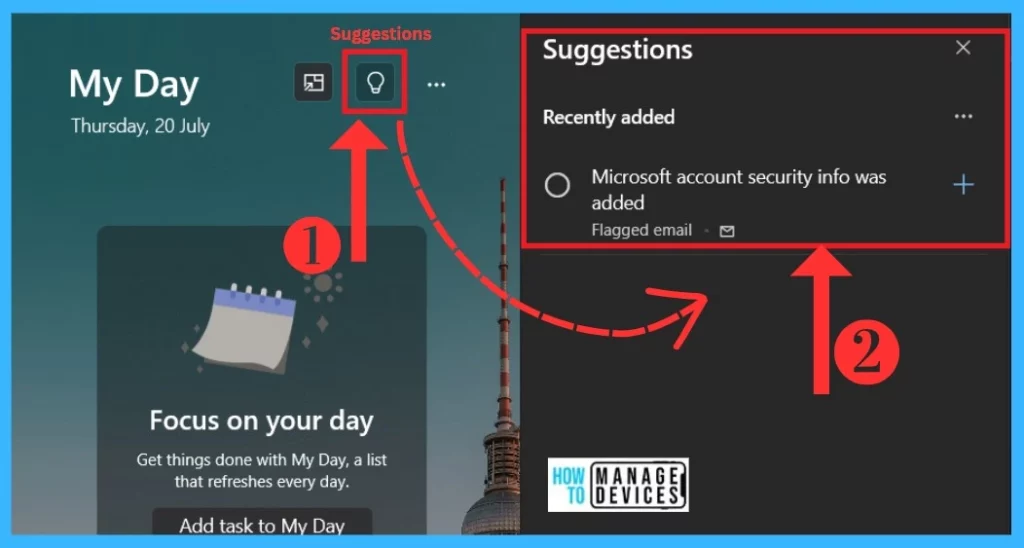
The Suggestion option shows your task in the My Day and Other List categories. In this option, it suggests a task that you have to complete today. It completely depends on the due date and time. The Suggestion option is available on the top right side of My Day. The below screenshot shows the Suggestion option.
Add a New List
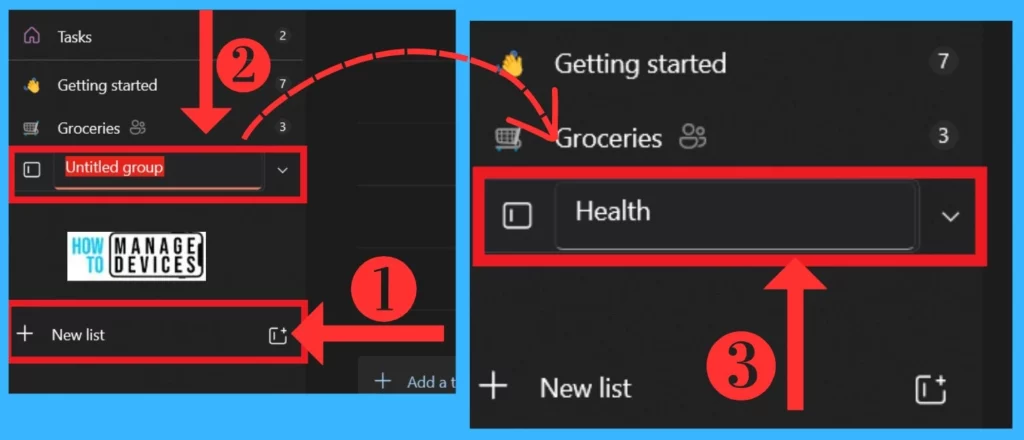
Add a New list is a good option in this To Do application. In this option, you can add many groups to your lists. You can easily detect the task by name if you add any new group. Here, I created a Health group so I can easily add a health-related list to it. The below screenshot will help you to add a new list.
- Click on the New List option on the left side of the To Do app
- Name the group list here; I named Health
Add Sub Task
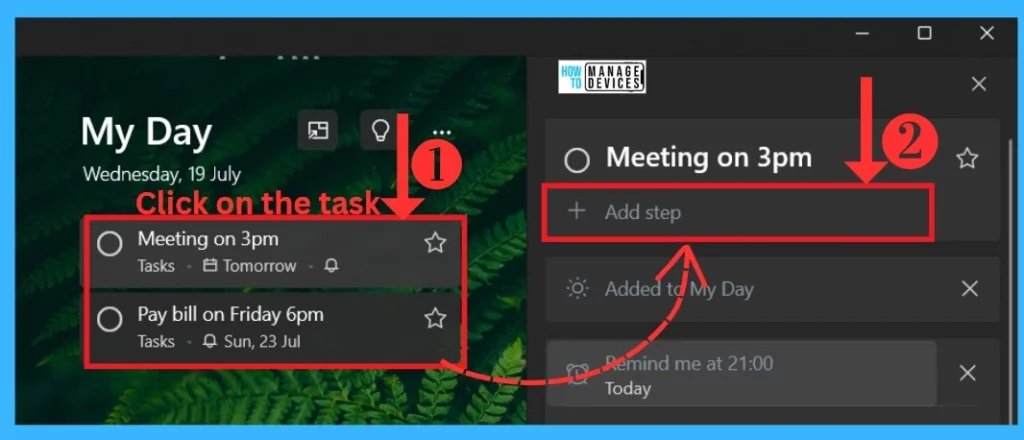
The main advantage of To Do is you can set Steps for each Task. You can choose the Add step option if you have any important work related to the Task you entered. In this option, you can add many Sub tasks that are important to you. The below screenshot shows how to get the step option.
- Click on any task that you want Sub-task
- Select Add step option from the coming window
- How to Customize Taskbar Behaviors in Windows
- Improve Windows PC Performance by using New Efficiency Mode
Manage Tasks by Sorting
You can Manage your Task by Sorting the List of Tasks done in To Do. After clicking the three–dot, it shows a sorting option for the list. It can be sorted Alphabetically, Due Date, importance, and creation date. The below screenshot shows Sorting options.

Set Theme for Your List
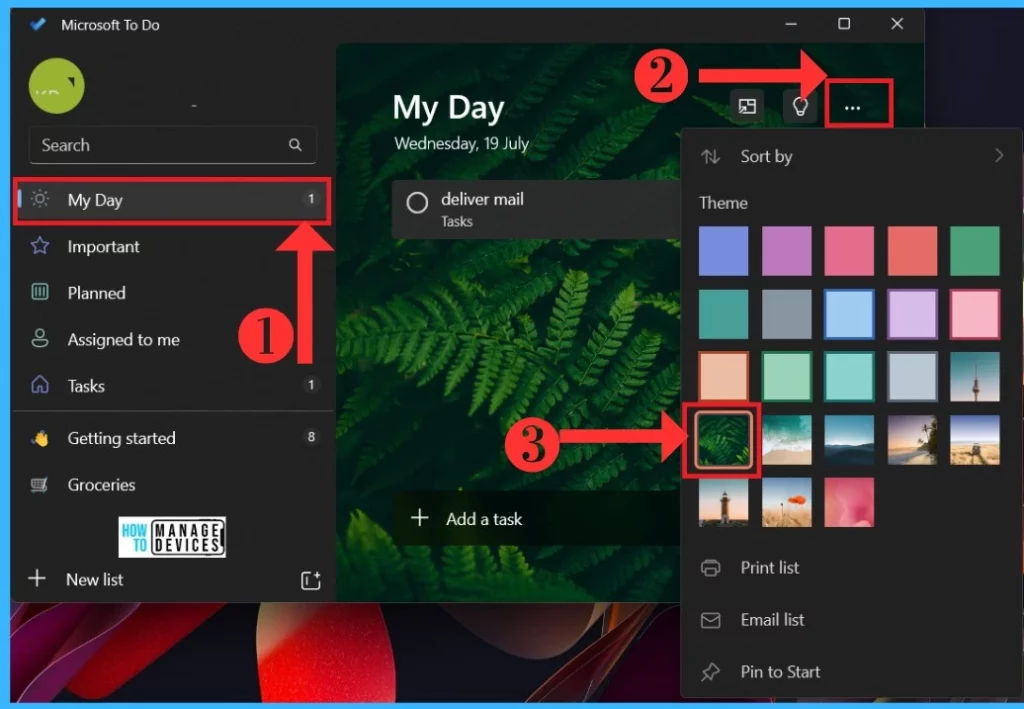
The To Do allows Themes for each category so we can set our loved theme for the background. If you select my day to set a theme, it will only appear on My Day. You have to set themes for each Category. The below screenshot shows how to set a theme.
- Select any list of categories here; I selected My Day
- Click on the 3 dot option
- Select any Theme from the list
Settings of To Do
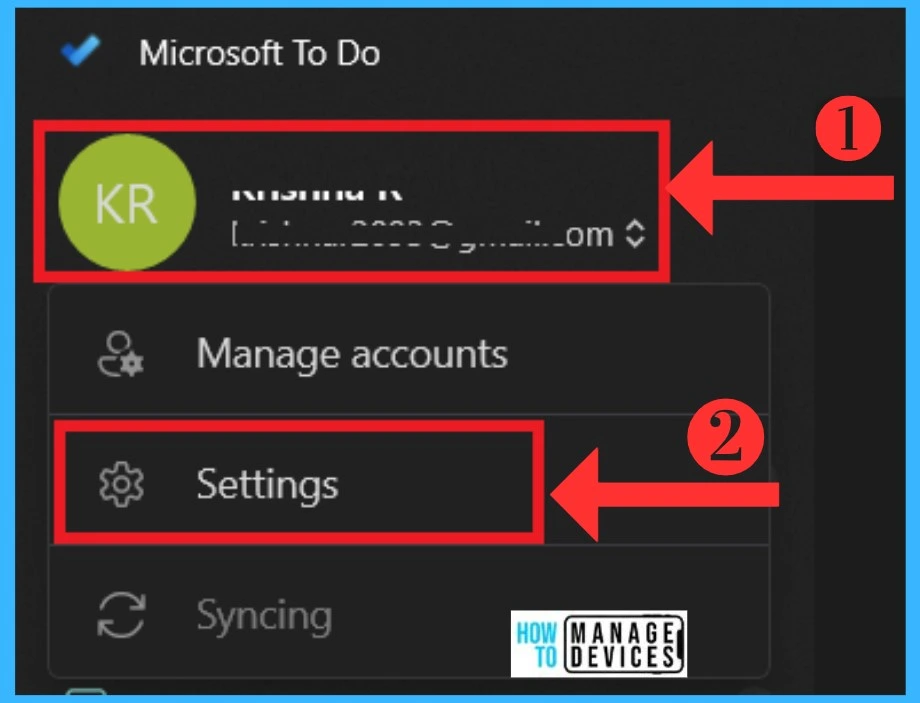
Settings are the important Feature that all applications need. In the setting option, you can easily manage all the tasks that you are done. The setting options are in 5 Categories. It helps to change the Theme Color, Notification, etc. The below screenshot shows how to get the setting in To Do.
- Click on the Account info
- Select the Settings options from the context menu
The Setting options are divided into many categories. You can easily change your settings, which is an easy step for the user. The below list shows the categories of settings.
- General
- Theme
- Smart List
- Connected Apps
- Notifications
1. General
In the General category, you can set the general setting of your task; You can set the new task to the top or turn it on or off to play completing sound. In this option, you can change the confirmation before you delete a task. If you don’t want that, it can easily turn off. The below screenshot shows general categories.
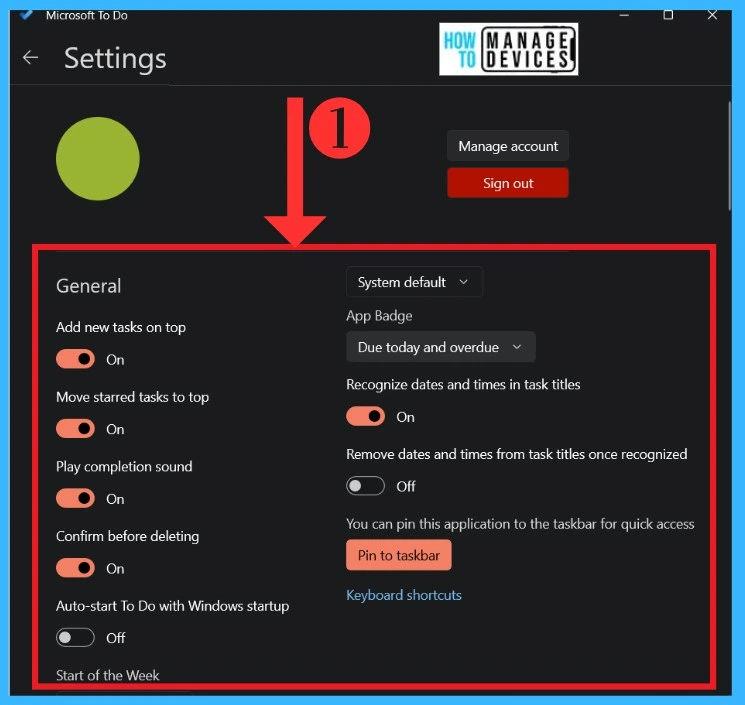
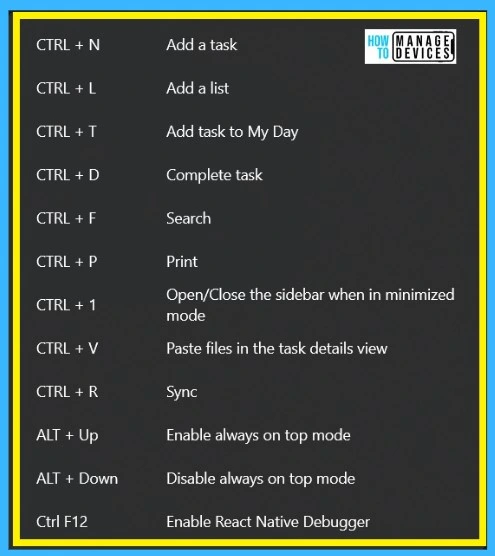
This general option helps you to learn keyboard shortcuts for To Do application. The shortcut keys are really helpful for creating a task in To Do. The below list and screenshot show the Keyboard shortcuts.
| Shortcut Keys | Use to |
|---|---|
| CTRL+N | Add a task |
| CTRL+L | Add a list |
| CTRL+T | Add Task to My Day |
| CTRL+D | Complete Task |
| CTRL+F | Search |
| CTRL+P | |
| CTRL+1 | Open/Close the sidebar when in minimized Mode |
| CTRL+V | Paste files in the task details view |
| CTRL+R | Sync |
| ALT+Up | Enable always-on Top Mode |
| ALT+ Down | Disable always on Top Mode |
| CtrlF12 | Enable react navigate Debugger |
2. Theme Settings
The Theme Settings are used for the theme for the list. The themes are used individually in all the lists in To Do. In this settings option, the user can easily set the theme by user preference. There are 3 options for Theme Settings. They are given below the list.
- Light Theme – It is used to set Light shades of theme to your list
- Dark Theme – It is used to set Dark theme color
- Use my Windows Theme – In this option, you can use your Windows themes for your list
3. Smart List
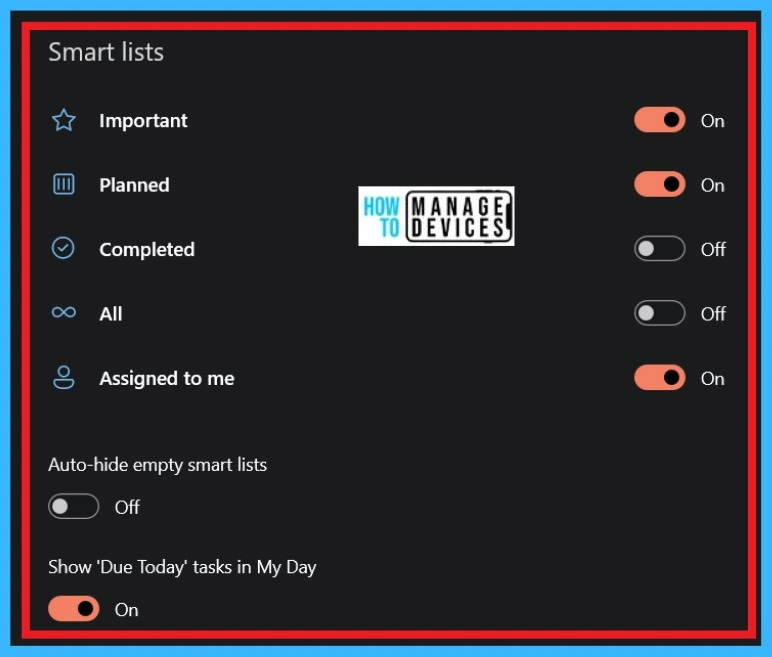
The Smart List is used for the list displayed on the To Do screen. With this option, you can turn the List categories On or Off on your screen. You can easily turn it off if you don’t want to assign it to me in those categories. The below screenshot shows the Smart List in settings.
4. Connected Apps
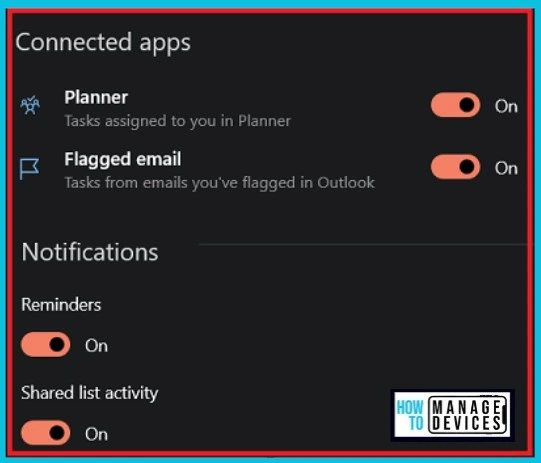
In Connecting Settings, you can enable Planner and Flagged Email to To Do. When you turn on the Flagged Email, it can be shown in the To Do list group. Enabling a planner will help you to show assigned tasks in To Do list. The below screenshot will show you the Connect Settings.
5. Notification
Notification in the settings is used for reminders and shared list activity. These options are enabled by default. If you enable the notification, it will show a notification when you set a reminder for any task. The above screenshot shows Notifications on To Do Settings.
Flagged Email
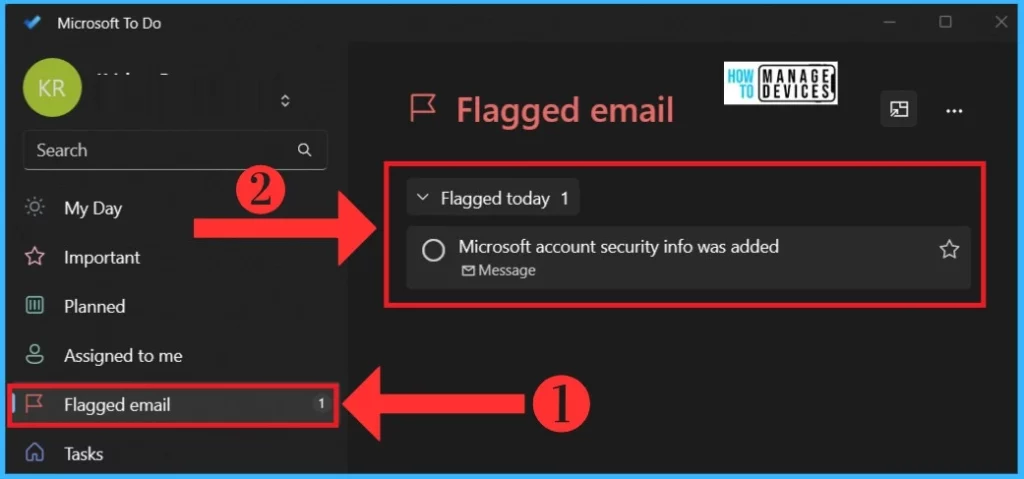
Flagged Emails are important; if you have any important Mail, you can Flagg them in your Mailbox when you are flagged, any mail displayed on the Microsoft To Do. It can turn it off on the screen By settings. The below screenshot shows Flagged emails.
- Click on Settings and select Connected apps
- Enable the Flagged Email, and it will be shown in the To Do List group
- Click on the Flagged Email, and it will display all the Flagged Emails
Author
Krishna. R is a computer enthusiast. She loves writing on Windows 11 and related technologies. She likes to share her knowledge, quick tips, and tricks with Windows 11 or Windows 10 with the community.
