This blog discusses how to install an SCCM client using Intune for Autopilot devices. Many Organizations are still using Endpoint Configuration Manager (MECM or SCCM) in their on-prem infrastructure, so most of the organizations will have a co-managed solution.
Microsoft Intune (Endpoint Configuration Manager) has a lot of modern management adaption compared to SCCM; still, administrators prefer to get the best of both sides (Intune and MECM/SCCM).
This post will explain provisioning a device through Windows Autopilot, installing the SCCM client using Microsoft Intune, and registering the SCCM Client through the Cloud Management Gateway.
You can also use the Tenant Attach feature. Recently, Microsoft has renamed the Co-management to Tenant Attach. Learn how to install SCCM client using Intune for Autopilot provisioned devices.
- SCCM Tenant Attach Troubleshooting Issues via Logs | ConfigMgr
- Fix ConfigMgr Tenant Attach Error 401 403 | Missing Config| SCCM
Prerequisites – Install SCCM Client using Intune for Autopilot Devices
Let’s install SCCM client using Intune for Autopilot devices. The following are the SCCM client installation prerequisites.
- SCCM Client requires CMG (Cloud Management Gateway), it involves the cost of Azure Tenant of your organization.
- The user must have the Azure Identity (for Intune Application deployment purposes)
- The MECM Client Settings (requires to support CMG communication
- Cloud Services
- Automatically register new Windows 10 or later domain joined devices with Azure Active Directory: Yes
- Enable clients to use a cloud management gateway: Yes
- Cloud Services
- Metered Interner connection (either Limit or Allow) based on your CMG scale setup
- Client communication on metered internet connections: Limit or Allow ( based on your CMG infra setup)
- The alternative without CMG, the device would be to connect to the on-prem Configuration Manager via a VPN connection.
More about co-management (https://www.anoopcnair.com/sccm-how-to-setup-co-management-part1-introduction-prerequisites/)

Installing the SCCM Client
There are two methods to install the SCCM client in Microsoft Intune; we can use either Win32 App deployment or Microsoft LOB (Line of Business). Installing the Configuration manager client during the middle of autopilot will break the autopilot process, as the Configuration Manager client becomes the management authority the moment it becomes active.
I have chosen to use Win32 App deployment instead of the LOB, the LOB application having an issue keeping the user at the Autopilot Deployment screen.
Win32 App Application Creation
Let’s understand how to create Win32 application creation for SCCM client agent installation using Intune. Manual Installation of the SCCM client on Domain Joined Windows 11 PC is straightforward if you connect the device to LAN.
- Copy the Source files of SCCM Client to the computer ( the SCCM source folder : \\SCCMServerName\SMS_SiteCode\Client). I have copied SCCM Clients files to C:\Temp local computer.
- Download the Intune App32 Packaging tool from https://github.com/Microsoft/Microsoft-Win32-Content-Prep-Tool portal
- Run the App32 Packaging Tool, for this demonstration the source file copied to C:\Temp
NOTE! – The explanation of the Win32 App (InutneWin) package in the following post Deploy Registry Fix Using Intune Win32 App.
The below steps explain the SCCM client package conversion into Intune Application. SCCM Client Installation using Microsoft Intune – SCCM Client Package conversion command-line execution.

SCCM Client Installation using Microsoft Intune. I have not entered any command-line option.

How to get SCCM Client Installation Parameters
The below steps walkthrough to get the SCCM client installation parameter from the SCCM console.
- Launch the Configuration Manager administration console and navigate to
Administration –> Overview –> Cloud Services > Co-management
- Select CoMgmgtSettigsProd and right-click select Properties
- Select the Enablement tab, click Copy to copy the command line and select OK

Note: In a few scenarios, SCCM Client installation needs additional parameters.
CMHOSTNAME – This property can specify the address of a cloud management gateway (CMG)
SMSSITECODE – This property specifies a Configuration Manager site to which you assign the client
SMSMP – Specifies an initial management point for the Configuration Manager client to use
AADCLIENTAPPID – Specifies the Azure Active Directory (Azure AD) client app identifier.
AADTENANTID – Specifies the Azure AD tenant identifier
AADRESOURCEURI – Specifies the Azure AD server app identifier
/nocrlcheck – Specifies that a client shouldn’t check the certificate revocation list (CRL) when it communicates over HTTPS with a PKI certificate
CCMHTTPSSTATE – Specify 31 to prevent Certificate Revocation List (CRL) check
Command Line – SCCM Client Application Installation
Command-Line, which I used in the lab environment to test the SCCM client install from Intune, is below. It may require some modifications in your production deployments or scenarios. I would recommend reading Microsoft documentation to have more guidance on this topic.
CCMSETUPCMD (MSI installation?) – Specifies command-line parameters and properties passed to ccmsetup.exe after ccmsetup.msi installs it. Use this property when bootstrapping the SCCM client using the Intune MDM installation method. Microsoft Intune limits the command line to 1024 characters.
You can get the command line details of your environment from SCCM co-management configuration properties. But I recommend adding some additional parameters like NOCRLCHECK for your lab environment.
More Details – Deploy Install SCCM Client Via Intune – Co-Management (anoopcnair.com)
Create Win32 app SCCM Client Application in Intune
Let’s walk through the Win32 app creation of the SCCM Client application.
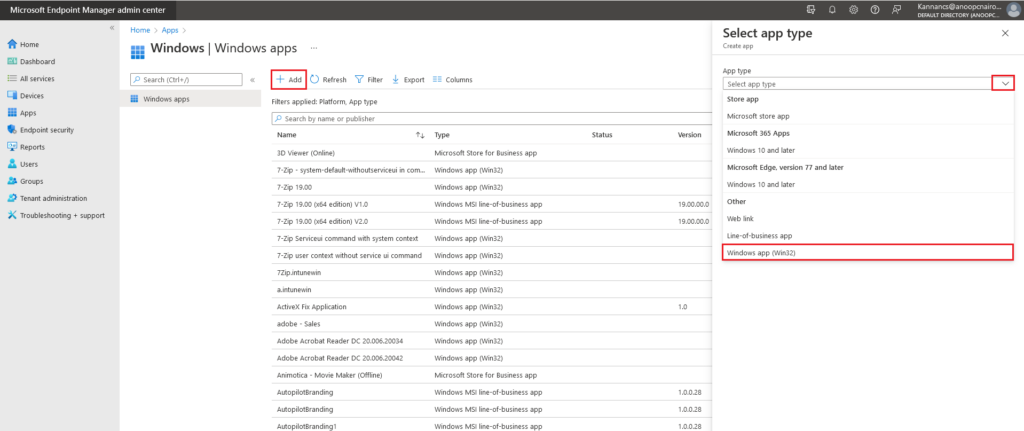
Launch the Microsoft Endpoint Manager admin center. On the Microsoft Endpoint Manager admin center portal, select Apps, and then select Windows.

On the Windows App page, select Add to create the application.
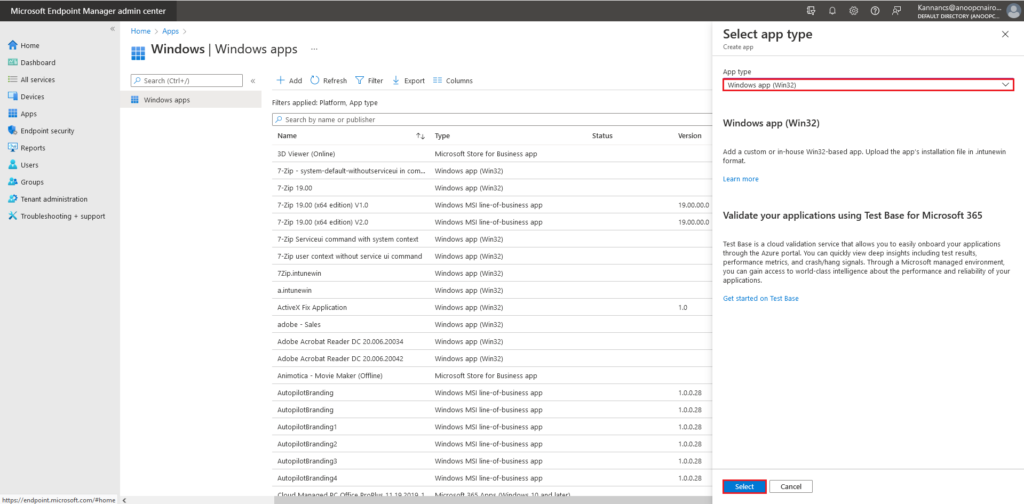
On the right corner, Select the app type page, select the App type drop-down menu, choose Windows App (Win32).

Click Select to start creating the application.

On the Add App page, choose the Select app package file option.
In the right corner App package file page, Select the Browse button to choose the SCCM Intune file type.

Browse and select the ccmsetup.intunewin file and click Open.

Ensure the cmsetup.intunewin file is selected, and click OK to continue creating the application.

On the Application Information tab, input the required information and select Next.

On the Program tab,
Enter the SCCM Client install parameter in the Install command column. Refer to the How to get SCCM Client Installation Parameters topic.
Enter the SCCM client uninstall parameter in the Uninstall command column. Select System as Install behavior. Select Next to continue to the next step.

Select the listed options as a prerequisite to installing the SCCM client on the Requirements tab.
Select Next.

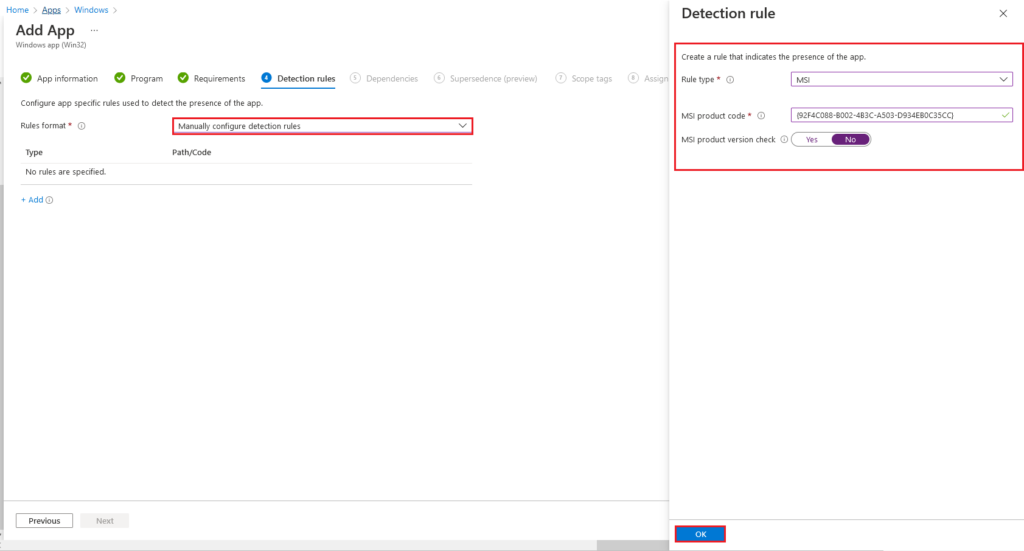
On the Detection rules tab, I have chosen MSI for SCCM Client installation; you can select the detection rule based on your requirement.
Rule Format: Manually configure detection rules
Rule Type: MSI
MSI product code: <SCCM Client MSI product code>
MSI Product version check: No
To get the MSI product for SCCM, execute the PowerShell script on the SCCM client-installed windows computer.
Get-WmiObject Win32_Product | Where-Object {$_.Name -eq “Configuration Manager Client”}


On the Dependencies tab, select Next.
On the Supersedense (preview) tab, select Next.

On the Scope tags tab, I haven’t chosen the scope tab; if required, select your option. Select Next.

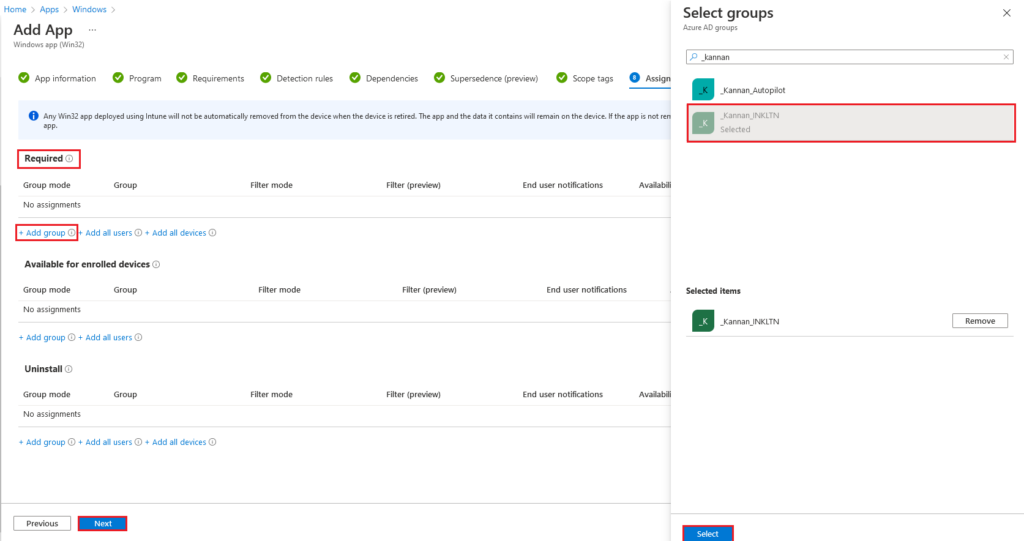
On the Add App tab, choose the Required > Add group option.
In the right corner, Select the groups tab, Select the AAD group, and click Select.
Click Next on the Add app tab.
I recommend deploying the SCCM client during Autopilot provisioning devices to the User group instead of the Device dynamic group. If the SCCM Client is deployed to the device group, it will break the Autopilot process to prioritize the SCCM client role of policy assignments.

On the Review + create tab, review the SCCM Client installation properties, select Create to complete the Intune application.

I would thank Joy and Rajul for guiding SCCM client installation and related issues from the Microsoft Endpoint Manager admin center.
Reference
Intune Win32 App Troubleshooting Client Side Process Flow – https://www.anoopcnair.com/intune-win32-app-troubleshooting/

Nicely Explained. Thanks for sharing. Cheers.
Hi,
Could you please let me know, how do you create a dynamic group in AAD which populates all new provisioned device?
Thanks,
You can create a dynamic group based on device properties. However, I don’t think we have any property called newly provisioned device in Azure AD. Some examples are given below.
1. https://www.anoopcnair.com/windows-autopilot-profile-aad-dynamic-device-groups/
2. https://www.anoopcnair.com/create-azure-ad-dynamic-device-groups-windows-byod-cyod/
My recommendation is to use something similar (the following link) for Win32 app deployment scenarios https://www.anoopcnair.com/intune-app-ps-script-based-enrollment-date/
Hi Anoop,
Nice article.
Is it possible to deploy the configmgr client for autopilot hybrid ad join device without CMG?
If yes, how can we acheive this?
Thank you,
Hi Anoop,
I think using the MSI ProdCode is problematic, because once client is upgraded it will not longer be TRUE, causing this Win32 app to retrigger on every device. I’d suggest [to others] to use these two in combination:
1. CCMExec.exe exists [file check]
2. CCMExec service “Start” value [reg check]
Also using Win32_Product for querying app lists is a big no-no. Otherwise very handy, so thanks!