Let’s learn how to install SCCM client on Windows 11 PC. 5th Oct 2021 is the date that Windows 11 is going to be generally available (Windows 11 is already available). I hope most of the SCCM admins wanted to try testing Windows 11 with ConfigMgr 2107 version.
You will need to perform Windows 11 domain join process before installing the SCCM client. I have explained the prerequisites of the domain join process in the previous blog post. If you are already using SCCM Task Sequence to test Windows 11 operating system, then you are already in good shape.
There are different ways to Install SCCM client on Windows 11 PC. One of the simplest methods is manual installation. You will need to make sure you have all the prerequisites in place. You can manage Windows 11 PCs with SCCM once the client is installed successfully.
- Create Windows 11 SCCM Device Collection Process
- Enable Windows 11 Patching Using SCCM WSUS
- Deploy Windows 10 Feature Update Using SCCM Task Sequence
Windows 11 SCCM Client Install
A device management solution should manage all Windows 11 PCs. If Windows 11 PC is domain joined and not Hybrid Azure or Azure AD joined, the best bet is SCCM (a.k.a Configuration Manager) to manage the devices centrally.
The SCCM will help you deploy Windows patches and 3rd party application patches along with all the applications to Windows 11 PCs. SCCM is matured device management solution for Windows 11.
SCCM 2107 supports all the device management scenarios of Windows 11 PC. Starting from Windows 11 OS deployment (provisioning), domain join, application deployment, patch deployment, Configuration Policy deployments, etc.
SCCM Workgroup Device Support for Windows 11 PCs
SCCM support is there for Windows 11 workgroup joined PCs. However, the supported features of SCCM will be very limited for Windows 11 workgroup PCs. I don’t recommend using Windows 11 workgroup PCs in the enterprise world because that could cause several security issues.

SCCM Client Install Prerequisites for Windows 11 PCs
Let’s check what the prerequisites for Windows 11 SCCM Client Install process are. Once the SCCM client is installed on Windows 11 PCs, you can manage those PCs from a central location. This would help to avoid manual tasks of application install and more.
- Windows 11 Pro or Enterprise edition.
- Windows 11 Home version is not supported.
- Windows 11 PC should have connectivity to LAN or WiFi network to reach the local DNS server (for name resolution), AD Domain Controller, and SCCM Management Point, Distribution Point, and Primary Server.
- Windows firewall and Network firewall, Proxy communication should be opened to allow communication between all the servers listed above and Windows 11 PC.
- Windows 11 PC should be Domain Joined (Recommended). Workgroup clients are also supported as mentioned above.
- Logged in with Domain User Account and user account should have administrative access (only for SCCM Client install using manual method).
- Windows 11 PCs IP should be part of SCCM Boundary Group.

SCCM Firewall Ports Requirement for Windows 11 PCs
Let’s find out the firewall ports requirement for Windows 11 PCs before installing the SCCM client. I have not covered all the Firewall requirements that are not changed specifically for Windows 11 PCs. So if you have already opened the firewall ports for Windows 10 PCs, then Windows 11 PCs should work without any issue.
| From | To | UDP | TCP | Description | Direction |
|---|---|---|---|---|---|
| Client | MP | 10123/80/443 | Client Notification/HTTP/HTTPS | Unidirectional | |
| Client | SUP | 80/8530/443/8531 | HTTP/HTTPS | Unidirectional | |
| Console | Client | 2701/3389 | RC/RDP/RTC | Unidirectional | |
| Client | DP | 80/443 | HTTP/HTTPS | Unidirectional | |
| Client | DP with Multi Cast | 63000-64000 | 445 | Multi Cast/SMB | Unidirectional |
| Client | DP with PXE | 67/68/69/4011 | DHCP/TFTP/BINL | Unidirectional | |
| Client | FSP | 80 | HTTP | Unidirectional | |
| Client | Domain | 3268/3269 | LDAP/LDAP SSL | Unidirectional | |
| Client | MP | 10123/80/443 | Client Notification/HTTP/HTTPS | Unidirectional |
SCCM Client Install Methods for Windows 11 PCs
There are many ways to install SCCM clients on Windows 11 PCs. The most common client installation method I have seen is the OS deployment or provisioning process. The following are the client installation methods.
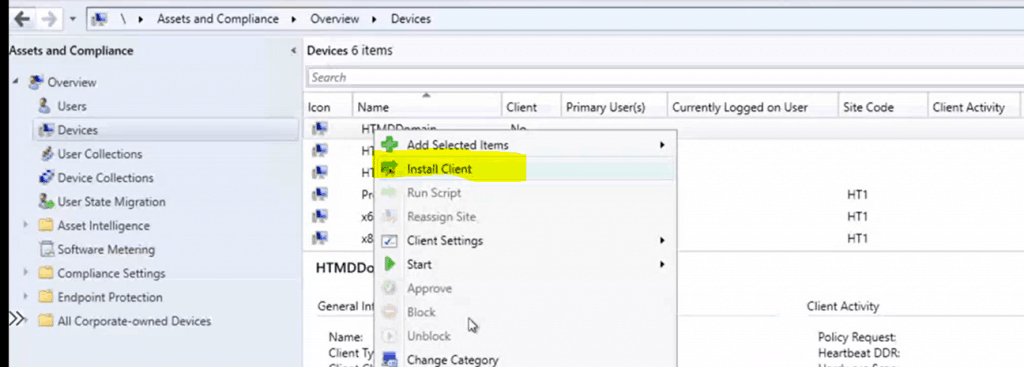
- Client push installation (From SCCM Console)
- Software update point-based installation (GPO GPEDIT.MSC)
- Group policy installation (GPO – GPEDIT.MSC)
- Using Microsoft Intune (Intune/Azure Console)
- Package and program installation (SCCM Console)
- OSD Task Sequence (SCCM Console)
- Logon script installation (AD)
- Workgroup computers (Manual) – not recommended
- Internet-based client management (SCCM/Manually ?)
- Provision client installation properties (GPO)
- Manual installation (Manual via command prompt?)

Install SCCM Client on Windows 11 PC
Let’s jump into the step-by-step guide to the ConfigMgr Client installation method. In this post, you will see how to install SCCM client on Windows 11 PC using the command line method (manual). The client push and all the client installation methods are not changed specifically for Windows 11 PCs.
If you are already using a client install method for Windows 10 and other Windows operating systems, you can use the same method for Windows 11 PCs. The SCCM 2107 version is fully supported with Windows 11 management.
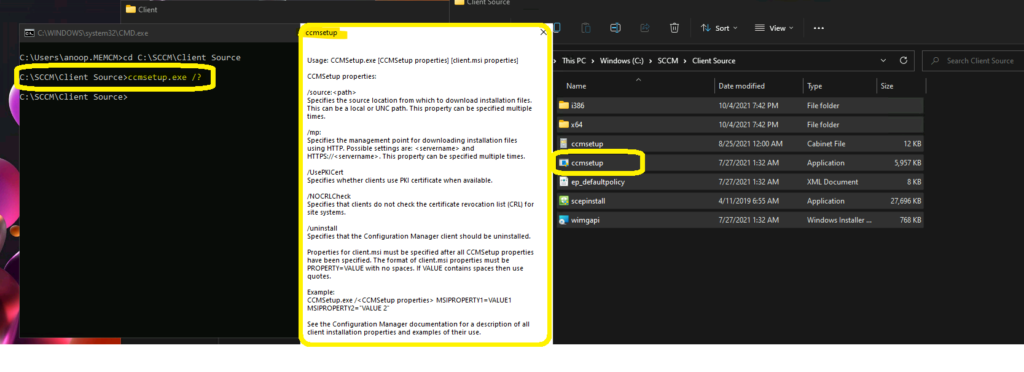
You can start the installation from CCMsetup.exe. The source files to CCMsetup.exe will be available in your primary server or CAS. You can copy it manually (use any script to copy) from the primary server to Windows 11 PC. You can get the latest source file to install SCCM client manually from Source Files from primary server -> \\<site server name>\SMS_<site code>\Client\
NOTE! – You must have administrator permissions to access the Manual SCCM client installation files.

MEM is the primary site code where the Windows 11 SCCM client will be assigned to. There are many other supported parameters available to complete the Windows 11 client install. I used the simplest one, as noted above.
SCCM Client Installation parameters for Windows 11
There are two different types of command-line parameter options to install the SCCM client manually. Those are CCMSetup.exe and Client.msi Parameters. You can Install SCCM Client Manually using any of the following Command Line Parameters mentioned below.
Sample Format for Windows 11 SCCM Client Install – CCMSetup.exe [<Ccmsetup parameters>] [<client.msi setup properties>]
SCCM CCMSetup.exe properties
- /mp:SMSMP01
- /logon

SCCM Client.msi properties
- Client.msi property
- FSP=SMSFP01
- /source:
- /retry:
- /noservice
- /service
- /uninstall
- /logon
- /forcereboot
- /BITSPriority:
- /downloadtimeout:
- /UsePKICert
- /NoCRLCheck
- /config:
- /skipprereq:
- /forceinstall
- /ExcludeFeatures:
Run SCCM Install Command-Line
Let’s launch the command prompt with administrative privileges on Windows 11 PC. You can launch the command prompt from Start (Right-click on Windows 11 start button) -> Select Run -> Type CMD and enter.
SCCM Install Command-Line that I used for Windows PCs – CCMSetup.exe /Source:“C:\SCCM\Client Source” SMSSITECODE=MEM

Results of Windows 11 SCCM Client Installation
It’s time to check the SCCM client installation status on Windows 11 PC. You need to check the Windows 11 control panel -> Configuration Manager Applet. You can check whether the client components are enabled and working fine or not.

You can now look at two log files from Windows 11 PC to confirm whether the SCCM client is installed or not. The CCMSetup.log and Client.MSI.log are the two logs that can help you troubleshoot if you have any issues with the SCCM client installation.
The location of those two client installation logs is C:\Windows\ccmsetup\Logs. You can get to the exact issue of the client install from client.msi.log. You can open the client.msi.log and search for Windows 11 the following entry, “Return Value 3” a few lines above this entry, you will get the exact reason for the client installation failure.
It’s time to look into the server-side to confirm whether the Windows 11 PC record is available in the console. You can also check whether the Windows 11 PC shows as ONLINE in the console or not.

Author
Anoop is Microsoft MVP! He is a Solution Architect in enterprise client management with over 17 years of experience (calculation done in 2018). He is Blogger, Speaker, and Local User Group HTMD Community leader. His main focus is on Device Management technologies like SCCM 2012, Current Branch, and Intune. He writes about ConfigMgr, Windows 11, Windows 10, Azure AD, Microsoft Intune, Windows 365, AVD, etc…..…

HI, the Firewall of the new version of Windows 11 bloqued the client push inatallation, I opened over a GPO All Ports Needed 445, 80, 135, 443, I tested from the MP, over powershell, and all Ports are Opened.
What need more to ben in the FW enable, so tha the client push Works ???
We have SCCM 2409
THANKS