Let’s learn how to perform New ConfigMgr Primary Server Installation using the HTMD Step-by-Step Guide. Let’s dive into the New ConfigMgr Primary Server Installation Step-by-Step Guide (LAB setup).
For many reasons, I have seen most customers use the SCCM primary server instead of CAS. I have also seen some folks recommend installing a CAS server if required.
I don’t recommend installing the CAS server, though.
It would help if you ensured that all the prerequisites, such as the high-level design of SCCM infrastructure, were in place before installing the primary server. This includes the DR and BCP requirements of the SCCM environment.
Prerequisites – ConfigMgr Primary Server Installation
The following are the prerequisites of ConfigMgr|SCCM server installation. Before installing the new SCCM server, read more about “Prepare to install ConfigMgr sites.”
Infra Setup
- Install 2/3 servers with the latest operating system – Server 2019 (recommended). More details here.
- Server 1 = Domain Controller
- Server 2 = SQL server
- Server 3 = MEMCM | ConfigMgr | SCCM Primary Server (you can install SQL Server on server 3 if you want). More details on ConfigMgr architecture decisions.
Active Directory Setup
- Install Active Directory for your SCCM server infrastructure.
- Extend AD Schema for SCCM | ConfigMgr. More details “Learn How to Extend AD Schema for SCCM | ConfigMgr | MEMCM.”
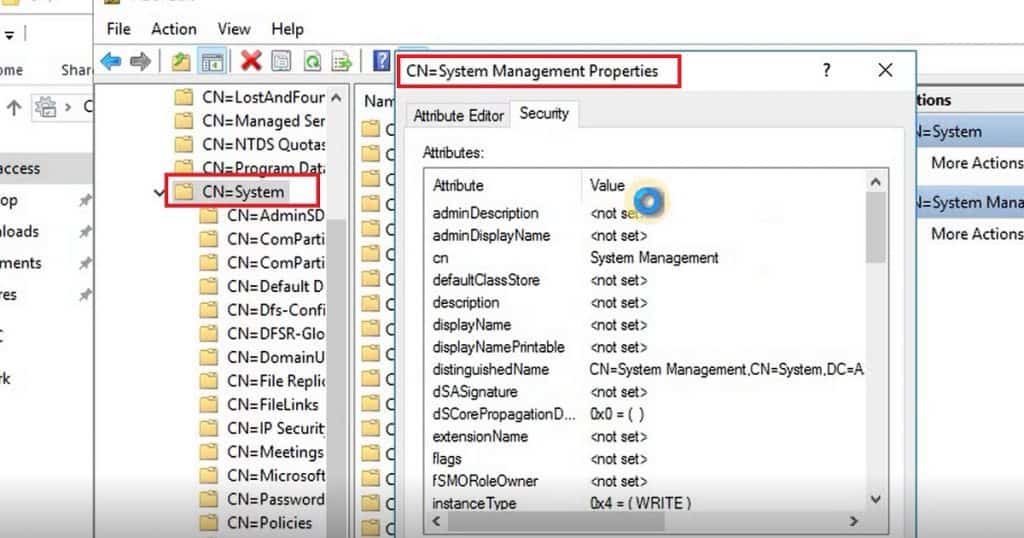
- Create a System Management Container and grant appropriate access to SCCM primary servers. For more details see “Create System Management Container for SCCM | ConfigMgr.”
User & Computer Access Rights Requirements
The user account *SCCM Admin account* that installs the site must have the following rights:
- Administrator on the following servers:
- The site server
- Each server that hosts the site database
- Each instance of the SMS Provider for the site
- Sysadmin on the model of SQL Server that hosts the site database
- Administrator on additional servers where you install the initial management point and distribution point
NOTE! – More details are available in Microsoft documentation.

SQL DB Setup
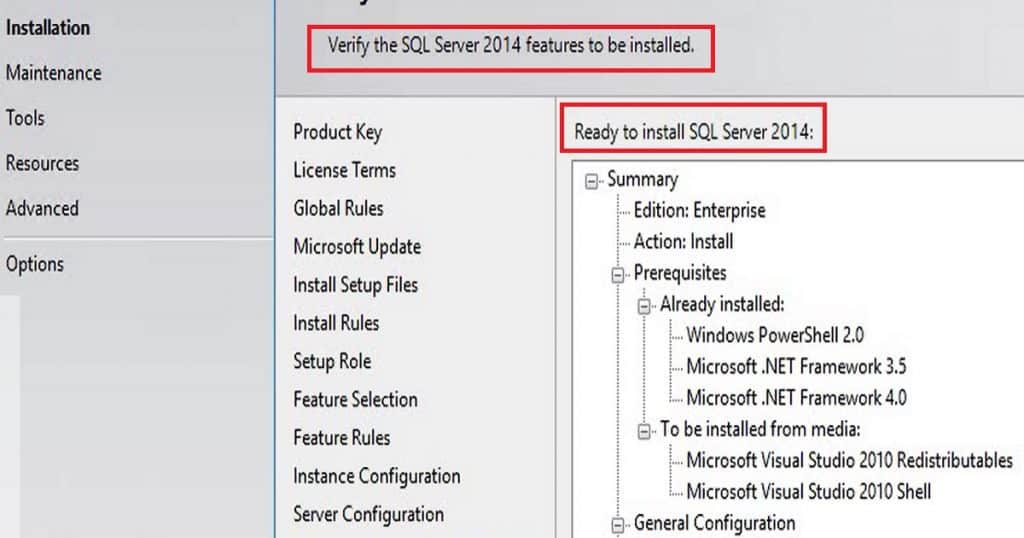
Install SQL server DB for ConfigMgr | SCCM Server infrastructure. More Details “The Complete Guide for SQL 2017 Installation for SCCM.”
Firewall Ports
Open Firewall Ports for the new infrastructure. More details about firewall port requirements for SCCM infrastructure.
Install Windows ADK
Download and Install Windows ADK & WinPE on ConfigMgr primary server. More details “Step by Step Guide to Update Windows ADK and WinPE Versions.”

Install WSUS & IIS
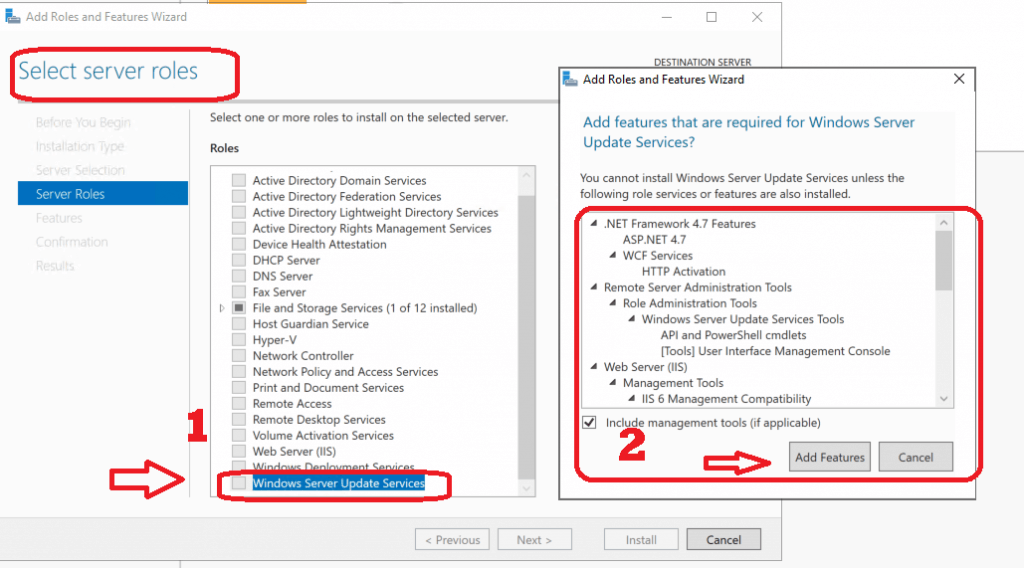
Install WSUS & IIS for primary SCCM server infra. More details Install WSUS for ConfigMgr Software Update Point Role.
Install Remote Differential & BITS
Install Remote Differential & BITS. More details Install Remote Differential Compression & BITS for ConfigMgr.

NOTE! – More details about SCCM site system-related prerequisites are explained in Site system prerequisites.
Download ConfigMgr Latest Version
Download the Configuration Manager Baseline version from:
- Download the SCCM Baseline version from VLSC Portal (Paid)
- Download SCCM Baseline version from Evaluation Portal (FREE Version)
- Download SCCM Baseline version from MSDN or Visual Studio (Paid)
Install New ConfigMgr Primary Server
You are ready to install the current branch version of SCCM. Let’s install the new SCCM primary server infrastructure now!
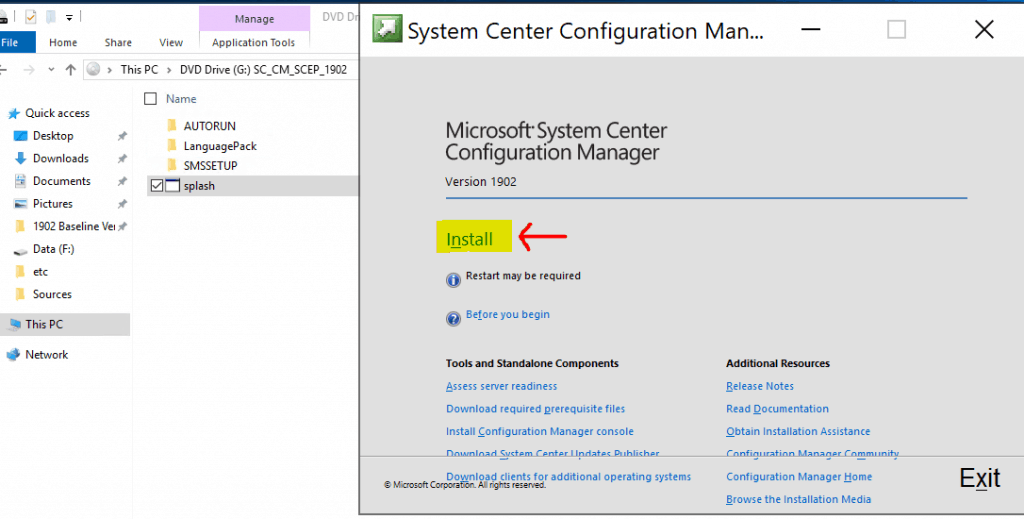
- Double click on Splash.exe

Select OK from “How do you want to open this file.”
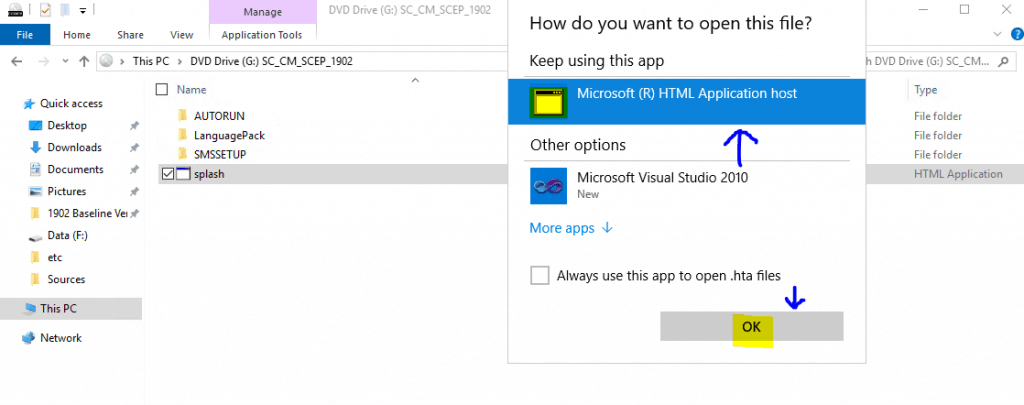
Here We GO! New ConfigMgr Primary Server Installation Step by Step Guide | SCCM
Click on the INSTALL button from the following page.
Confirm the Requirements Again
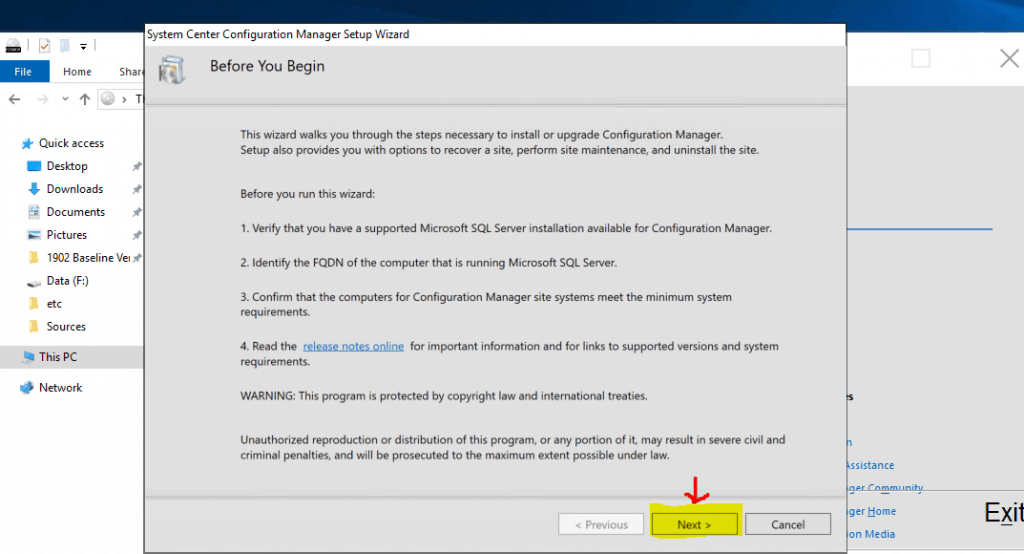
Let’s start Microsoft Endpoint Configuration Manager | MEMCM Setup Wizard.
Go through the verification steps again before proceeding. Most of them are listed in the Prerequisite section of this post above. Click on the NEXT button to continue.
Let’s Get Started
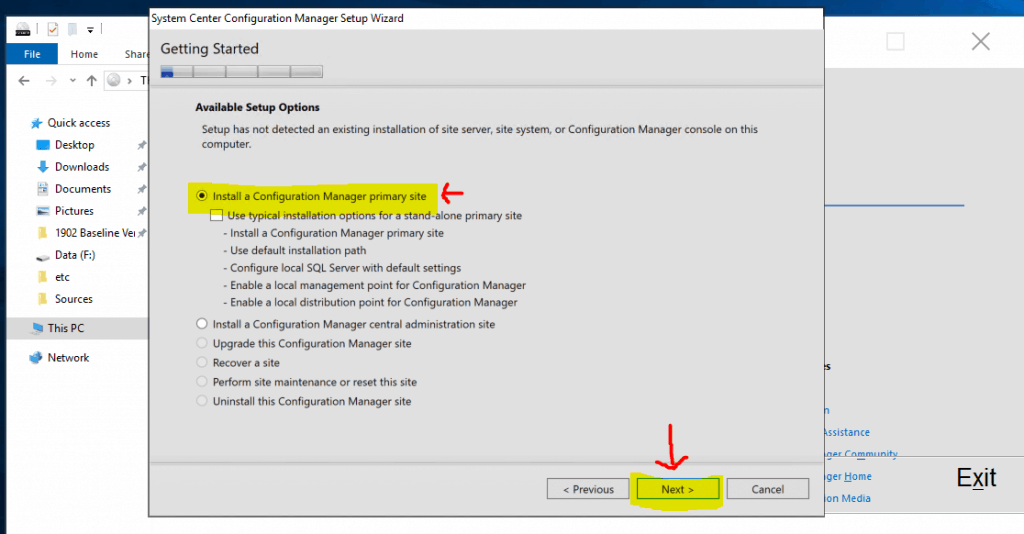
I will go through the primary server’s standard installation process. Select the option “Install a Configuration Manager Primary Site.”
Click on the NEXT button to continue.
NOTE! – I normally install all the other site system roles after successfully installing the Primary server.
ConfigMgr Product Key
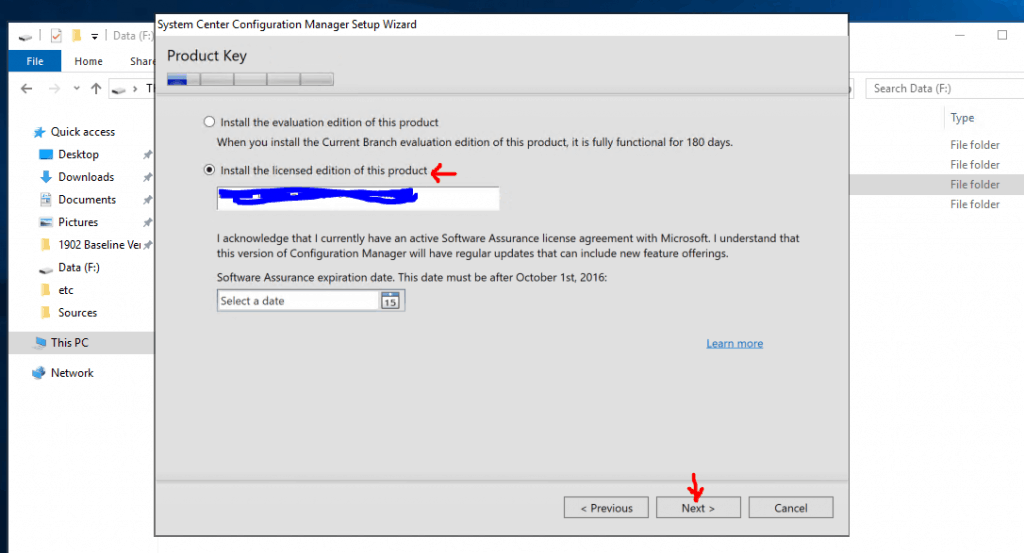
Select product key choice on this page. I have a ConfigMgr product key; hence I selected the “Install the Licensed Edition of this product” option.
If you don’t have a product key, please select the “Install the Evaluation version of the product” option. This version of SCCM shall be valid only for 180 days. Click the NEXT to continue.
Accept Product License Terms
The ACCEPT product License Terms can see below. Click on the NEXT button to continue.

Prerequisite Downloads
Select the Prerequisite files options from the following page. Download Required Files. Use Previously Downloaded Files (Use this option when you don’t have internet access on the SCCM server)
Click NEXT to continue.

Let’s wait until setup finishes “Verifying downloaded prerequisite components.”

Server Language Selection
Select the Server Language. In my scenario, it’s ENGLISH. Click on NEXT to continue.
NOTE! – You can modify the server languages if you run setup again and select the site Maintenance option.

Client Language Selection
Select the Client Language. It’s ENGLISH for me. Click NEXT to continue.

Site and Installation Settings
In the Site and Installation Settings. You need to decide Site Code, Site Name, and Installation Folder before proceeding.
Site Code (Any Combination of 3 three alphanumeric digits) = My site code name is MEM. Don’t Use the following name as site code. AUX, CON, NUL, PRN, and SMS.
Site Name is the name that helps to identify the site. Site Name Example – MEMCM Standalone Primary Server for HTMD.
Installation Folder – Specify the folder where you want to store SCCM Inbox and other folders. DO NOT install SCCM on C:\ Drive. Click on the Next button.

Primary Site Installation
Primary Server Installation Page: Select Install the primary site as a standalone site. Click on NEXT to continue.

Click YES on the pop, which provides you a message to expand the primary site to a hierarchy later by installing CAS.

SQL Database Connection Settings
Enter the SQL Database information on this page. Enter the SQL Server Name (FQDN) => I use a Remote SQL Database. SQLMEMCM.memcm.com.
Enter Instance name – I left it blank because I’m using the default instance of SQL. Database Name – The DB name shall automatically get populated based on your Site Code name. CM_MEM.
Don’t change the Service Broker port (in 99% of the Primary server installations) = 4022. Click on the NEXT button to continue.
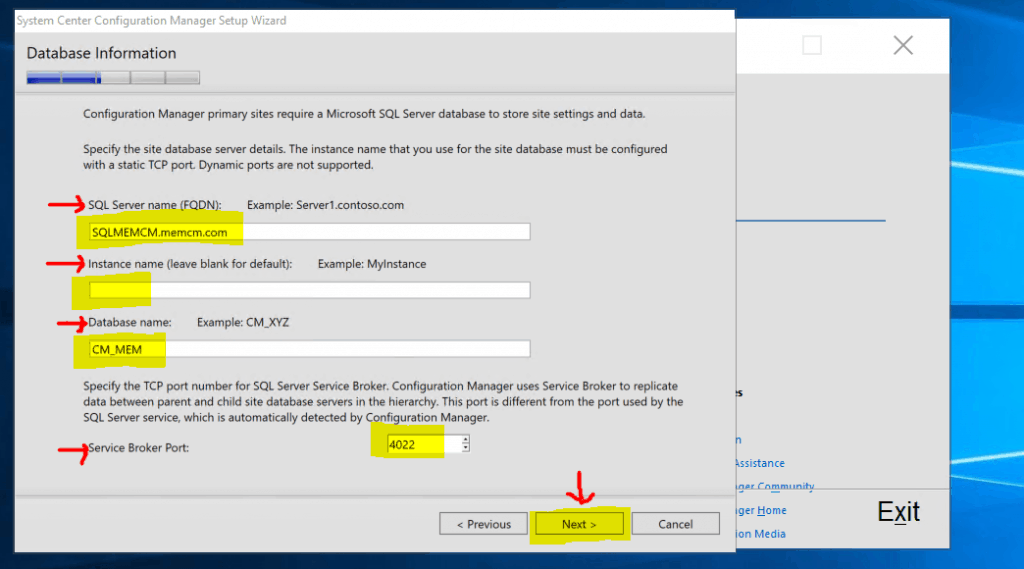
Database Information
Microsoft Endpoint Configuration Manager (MECM) populates locations for the SQL server data file and transaction log file locations. Leave the default location already inhabited by the setup wizard (for SQL server).
Path to the SQL server data file. F:\Program Files\Microsoft SQL Server\MSSQL12.MSSQLSERVER\MSSQL\DATA\.
Path to the SQL server log file. F:\Program Files\Microsoft SQL Server\MSSQL12.MSSQLSERVER\MSSQL\DATA\.
Click on the Next button.

Select SMS Provider Server
You get an option to select SMS Provider Server for your SCCM infra on this page. The ConfigMgr console uses SMS providers to communicate with the site database. You can create an SMS provider on a remote server if you want.
For this new standalone ConfigMgr primary server installation, I will use DEFAULT settings, the same server as the primary server.
SMS Provider (FQDN) – CMMEMCM.memcm.com. Click the NEXT to continue.

Client Computer Communication Settings
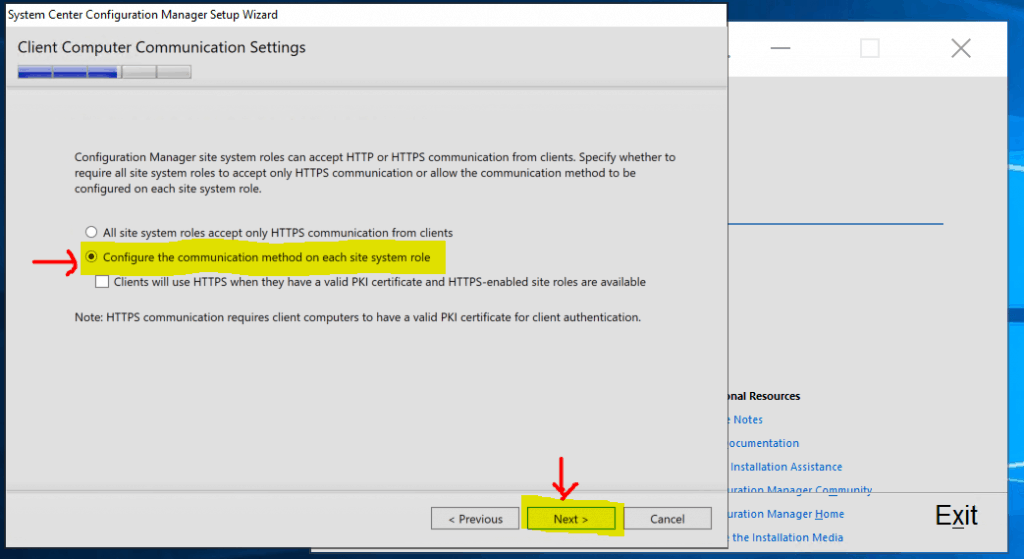
Configure client computer communication settings. Configure the communication method on each site system role. HTTPS (more secure, but you might need PKI infra before setting this up).
HTTP (This is the one I will use for this installation process). Click on the NEXT button to continue.
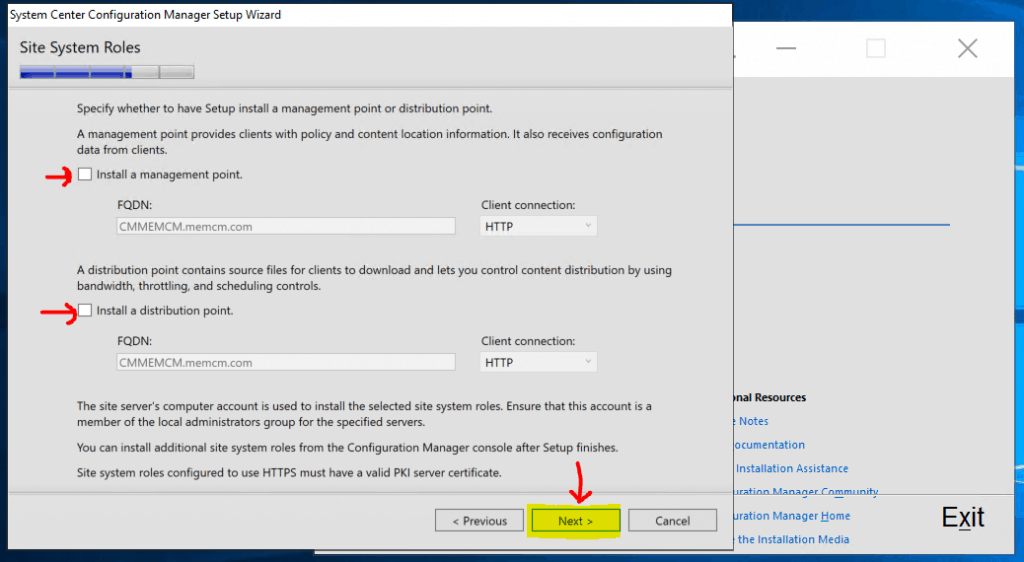
Site System Roles – MP / DP Installation Options
I removed the site system role installation to simplify the primary server installation.
You can install the Management Point Role and Distribution Point Role after the successful installation of the primary server.
Click on NEXT to continue.
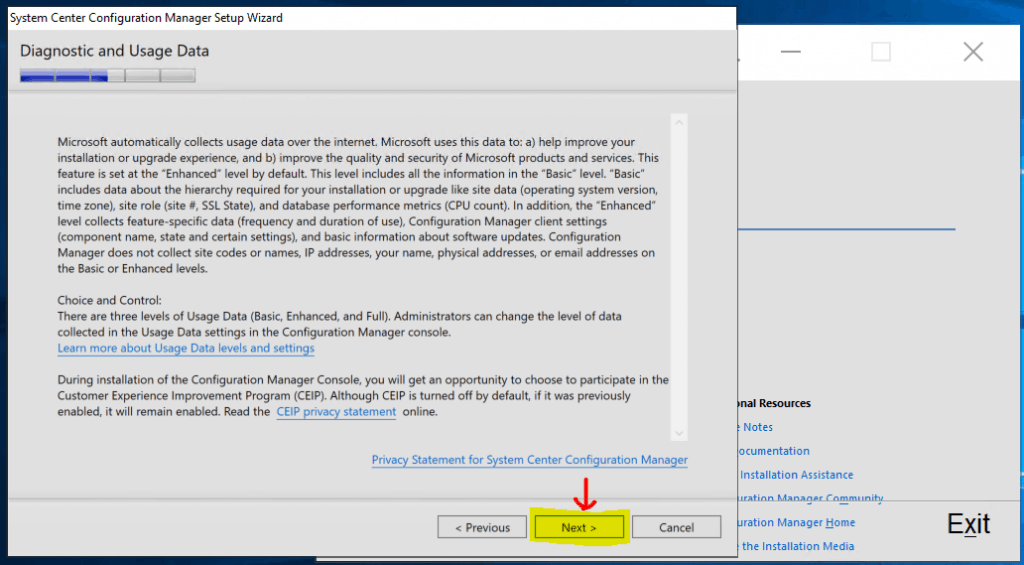
Diagnostic and Usage Data
Click on the NEXT button to continue.
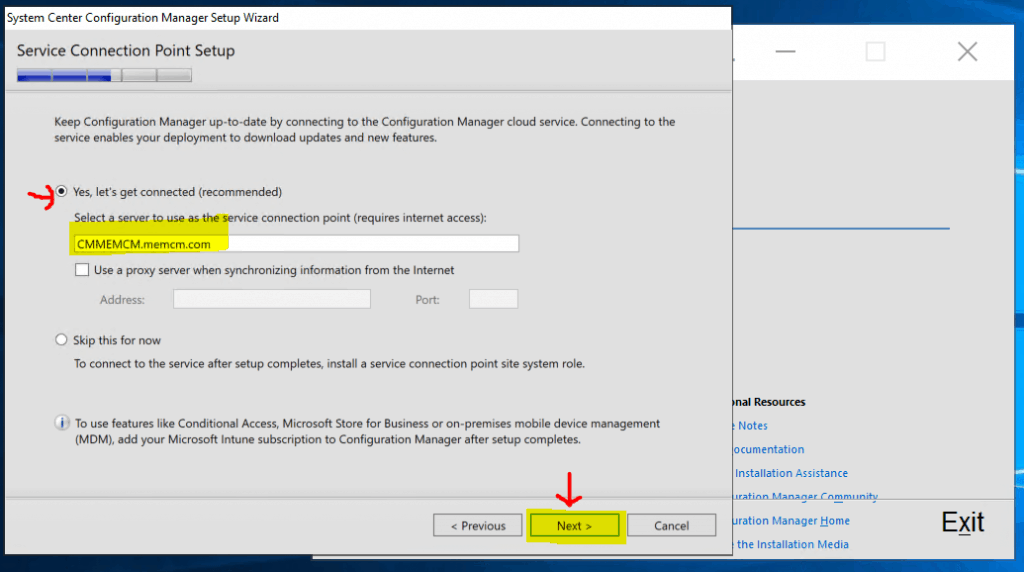
Service Connection Point Setup
Select the Service connection Point server for your SCCM environment. You can install this role on a remote server. But I install the SCP role on the primary server itself.
Use a proxy server when synchronizing information from the Internet. If the server is connected to the Internet without a proxy, you can keep the proxy server details blank.
You have the option to SKIP the service connection point set up during the primary server’s initial setup. I installed the SCP role on the primary server. Click on NEXT to continue.
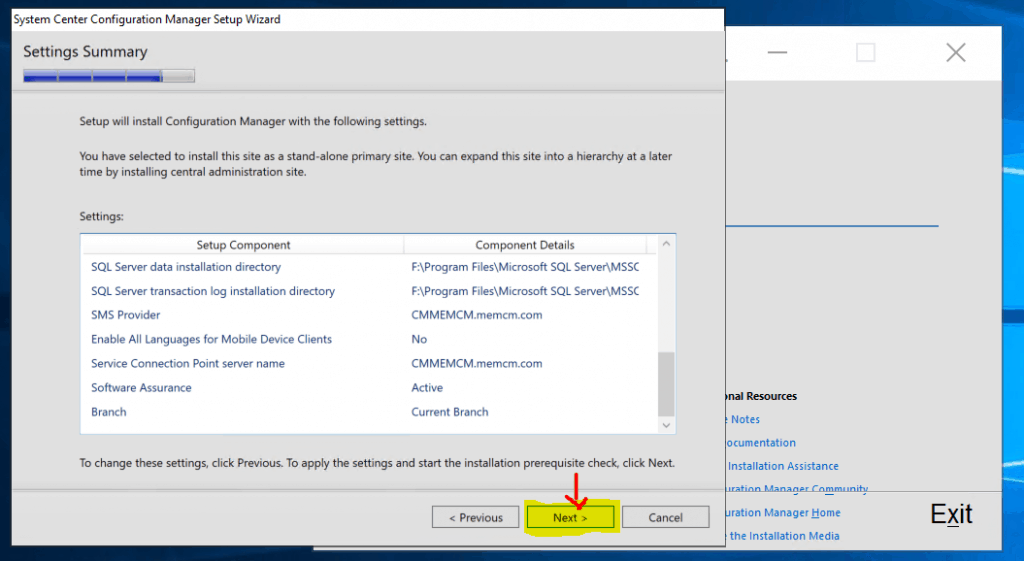
Setting Summary
Check and Confirm whether all the configurations are correct or not. Click on NEXT to continue.
Prerequisite Check & Install
Ignore all the warnings for NOW 🙂 in this installation guide. Click on BEGIN INSTALL button to start the installation.

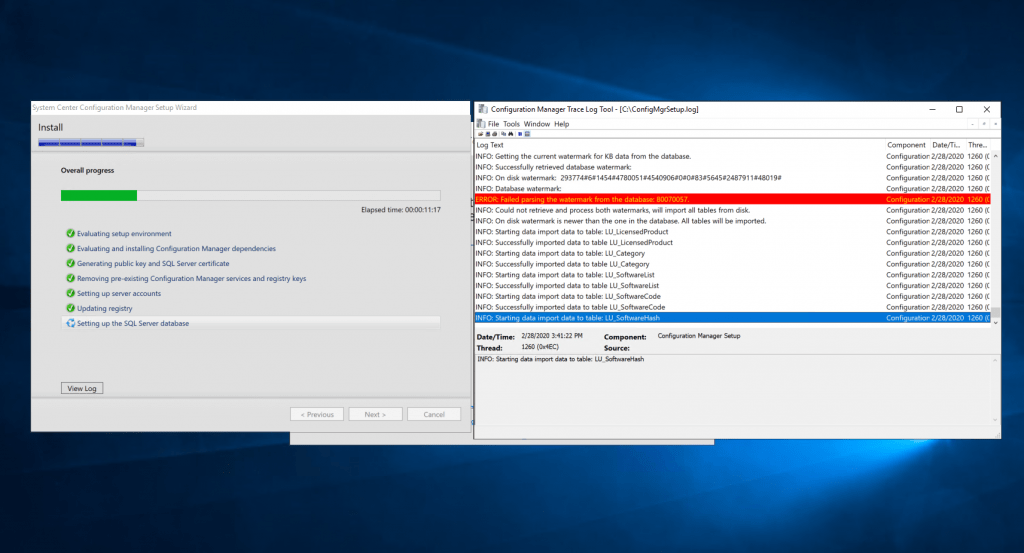
Progress – New ConfigMgr Primary Server Installation
Let’s check the installation progress and wait for it to complete. Click on the View Log option to study to understand what is happening.
Completed the Installation of the New Primary Server
Click on the CLOSE button to complete the successful installation of the ConfigMgr primary site server.
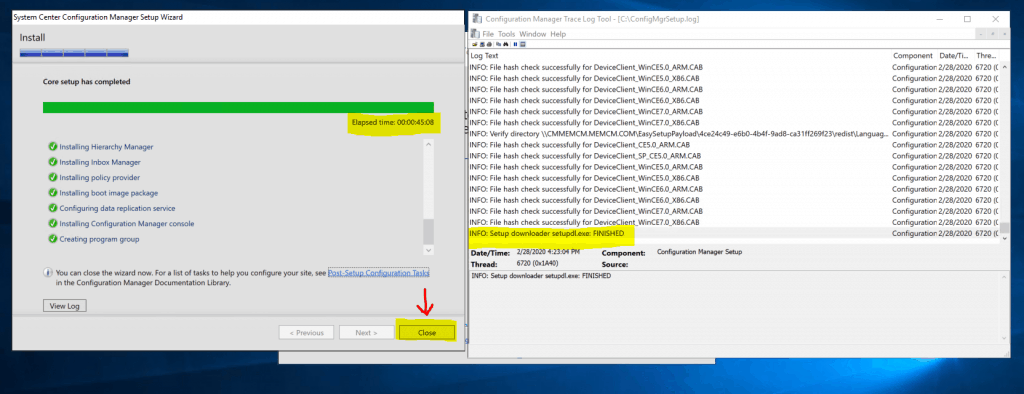
Log File Reference
You can refer to the SCCM log files to understand more details of the installation process. The following are the last two log file lines (ConfigMgrSetup.log) after successfully installing the SCCM primary site server.
- INFO: Setup downloader setupdl.exe: FINISHED
- Exiting ConfigMgr Setup Bootstrapper
Results – Launch Console
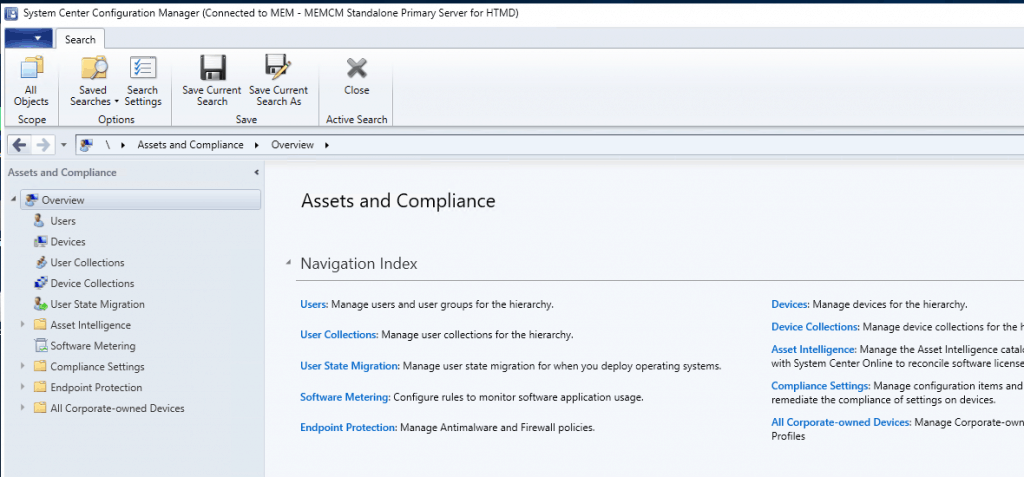
Launch SCCM Console from Start Menu. The latest version of SCCM is available under \Administration\Overview\Updates and Servicing.
We are on WhatsApp. To get the latest step-by-step guides and news updates, Join our Channel. Click here –HTMD WhatsApp.
Author
Anoop C Nair is Microsoft MVP! He is a Device Management Admin with more than 20 years of experience (calculation done in 2021) in IT. He is a Blogger, Speaker, and Local User Group HTMD Community leader. His main focus is on Device Management technologies like SCCM 2012, Current Branch, and Intune. He writes about ConfigMgr, Windows 11, Windows 10, Azure AD, Microsoft Intune, Windows 365, AVD, etc.

Thx you very much for this “how to” and your incredible explanations ! It’s a very good job.
Dear Anoop,
I have a setup SCCM, and I upgraded from 1802 to 2010. After the upgrade I realized the management point was not working and had to make the changes to the DB and completely uninstall the SCCM and reinstall. What I did was I kept the same DB and reinstalled the 1802 again and now I am not able to upgrade the application and not able to apply the license. Does that mean the database has the license value entered and upgrade values entered.
I am thinking is delete the Database, create a new database with all the prerequisites and run site reset with SQL validation and license upgrade. Do you think this way I can use the current application with a new clean database.
Regards
Aakhib Syed
Hi Anoop,
We recently renamed our Domain and would like some advise on sccm
I was running SCCM 2012 latest branch.
What would be the best approach for the SCCM and how can i migrate data from the current SCCM if i have to rebuild as i have alot of deployment policies and update deployments
Regards
Marcus
Hi – I don’t know whether it’s recommended or supported to rename the domain. I don’t think it’s supported to change the domain of existing SCCM servers. You can check the user voice item https://configurationmanager.uservoice.com/forums/300492-ideas/suggestions/34122982-support-changing-the-name-or-domain-of-sccm-server.
The FQDN should be same even if you want to backup and restore. The only other option is to use migration tasks from old SCCM primary server to new one in the new domain.
P.S -> I think you are on SCCM Current Branch 2010 version..not 2012 version
This is very helpful. A question – after successful install how do we get the client installed on the Primary Site? Are there any special steps we need to take to do this such as installing to a different drive?
It’s already taken care of at the Prerequisite Downloads section of the post. As you see in the screenshot, I installed primary server on F drive
i cant click the begin install button
Check ConfigMgrSetup.log to get more details? which version of sccm is been used?
Hi Anoop!
I have SCCM2012R2 and want to create a new server to substitute the old one. What are the main procedures?
Hi New Primary server with SCCM current branch, or just need to change the server hardware?
If new hardware -we have a couple of posts https://www.anoopcnair.com/sccm-server-hardware-migration-configmgr/
https://www.anoopcnair.com/migrate-sccm-cb-1606-primary-server-to-new-hardware/
https://howtomanagedevices.com/sccm/138/migrate-sccm-server/
I don’t have a product key, so I select the “Install the Evaluation version of the product” option. i am getting error like “The primary key is not correct. you must enter thr entire 25 digit product key.”
Great guide! The step-by-step instructions were very clear and easy to follow. I appreciate the tips you included for troubleshooting common issues. Looking forward to implementing this in my environment!
After the successful installation and updating the software update point the clients are not getting in to the required status. Please let us know what may be the reason.