In this post, we will see the Install Google Earth Pro Using Intune. Here we will make use of the MSI application to deploy Google Earth Pro using Intune on Windows 10/11 client machines.
Google Earth Pro allows visualization, assessment, overlay, and creation of geospatial data. This user-friendly resource is often a useful intermediary for learners who are interested in learning more about GIS and want to start with more basic processes and tools.
The desktop version of Google Earth Pro is free for users who require advanced features. You can export and import GIS data, and you can go back in time with historical imagery. This software is available for Windows, macOS, and Linux systems.
In this program, satellite images, aerial photographs, and GIS data are superimposed onto a 3D globe, allowing users to see cities and landscapes from different perspectives. Using a keyboard or mouse, users can explore the globe by entering addresses and coordinates.
Install Google Earth Pro Using Intune
Follow the steps below to upload the MSI file for deploying Google Earth Pro using Intune. To start with the Intune line-of-business app package creation, keep the downloaded Google Earth Pro MSI setup installation file in the appropriate location.
But here is a catch!! Google Earth Pro’s MSI is not available directly. Here we will try to retrieve the MSI file of the Google Earth Pro from its EXE file. For this, you first need to download the EXE file from Google Earth Pro. One can easily distinguish and download the 64-bit Architecture windows based application.
Now to retrieve the MSI file, you need to follow some specific steps. It hardly gives you 2 to 3 seconds to copy the MSI file. As shown below in the image, you need to open this path:
- Users\CurrentUser\AppData\Local\Temp
Now, as you keep handy the above path, it is this place where MSI will be visible as soon you double-click on Google Earth Pro setup. So it is advised to keep both windows side by side, as shown below. And copies the MSI setup as soon as it appears at another location.
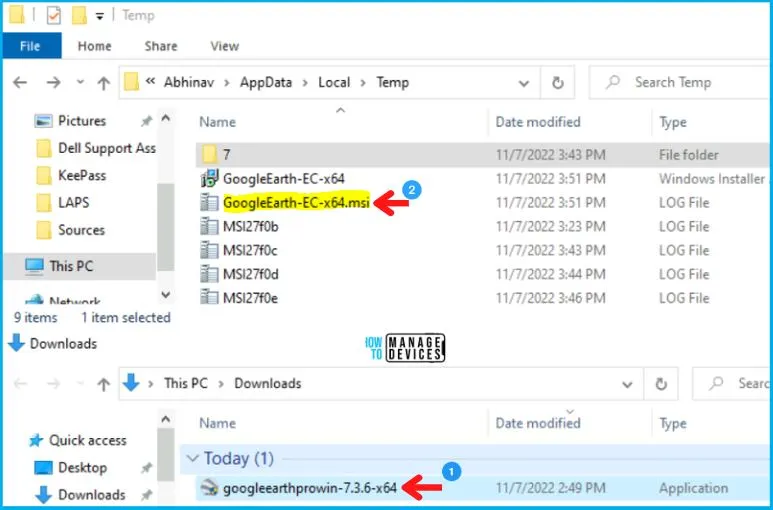
To upload the MSI file for deploying Google Earth Pro using Intune. To start with the Intune line-of-business app package creation, follow the steps below.
- Sign in to the Microsoft Intune admin center https://endpoint.microsoft.com/
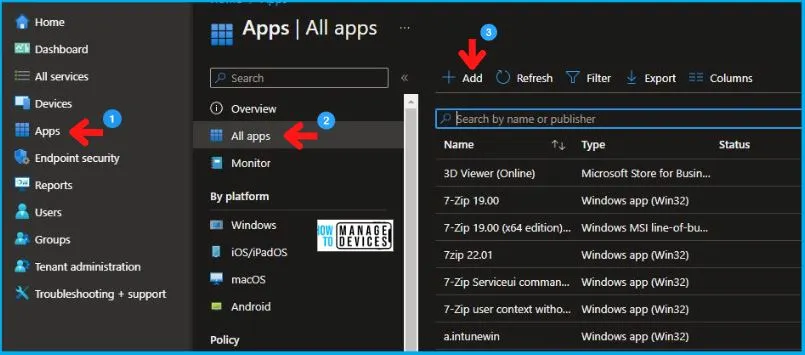
- Here you have two options to jump into the Application creation. Select Apps > All apps > Add, or you can navigate to Apps > Windows > Windows Apps.
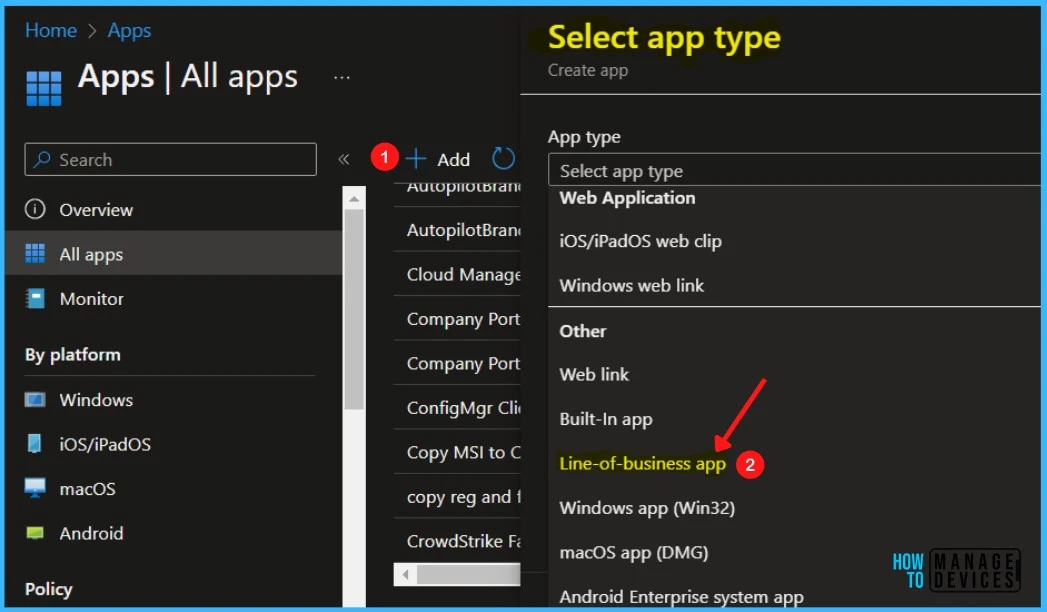
In the Select app type pane, under the Other app types, select Line-of-business app and click Select.
Now in the Add app pane, click Select app package file. Select the browse button. Then, select the downloaded application MSI file. Once you select the app file, The app details appear with Name, Platform, Size, and context. When you’re finished, select OK on the App package file pane.

Enter the Name of the App (For Example, Google Earth Pro), and Enter the description of the app. Enter the Publisher name – Google and Command-line arguments – Optionally, enter any command-line arguments you want to apply to the .msi file when it runs.
Also, refer to the below table for better understanding settings that we implemented during this phase of the Google Earth Pro Assignment:
| Name | Publisher | App Install Context | Ignore App Version |
|---|---|---|---|
| Google Earth Pro | Device | No |
- App install context – Select App install context as Device. This specifies the install context to be associated with this app. For dual-mode apps, select the desired context for this app. For all other apps, this is pre-selected based on the package and cannot be modified.
- Ignore app version – Select Yes for apps that are automatically updated by the app developer (such as Google Chrome, Zoom).
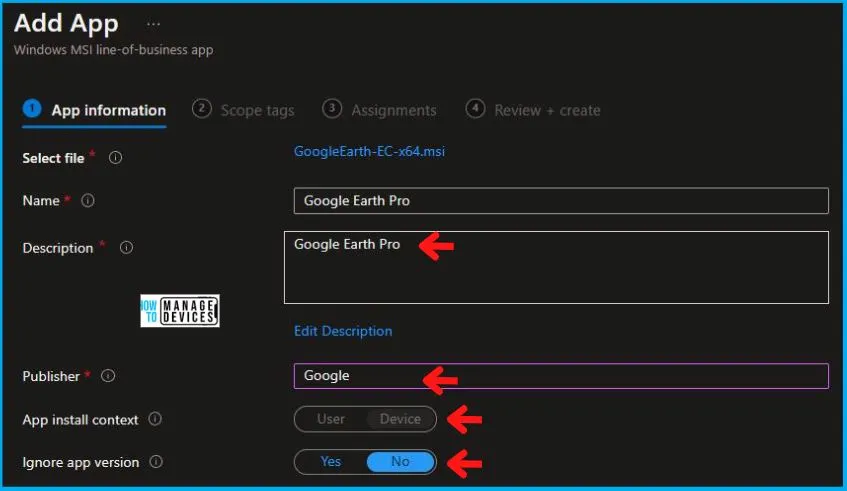
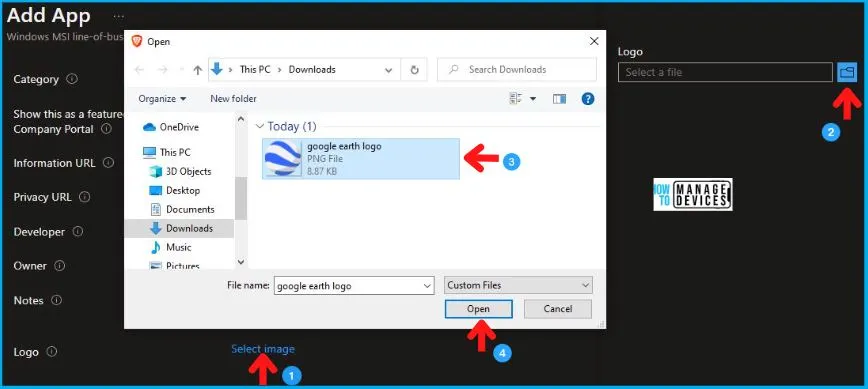
Also, Upload an icon for the app. When users browse the company portal, this icon is displayed with the app. In this section, you can provide additional information about the application and click Next.
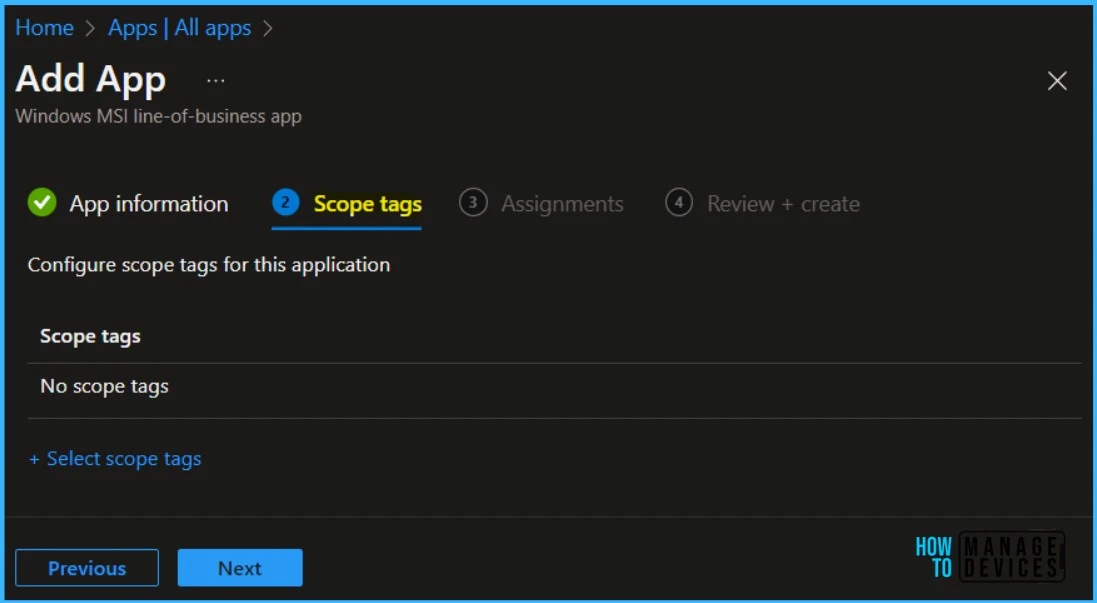
Scope tags are filtering options provided in Intune to ease the admin jobs. In the scope tag section, you will get an option to configure scope tags for the application. Click on Next.
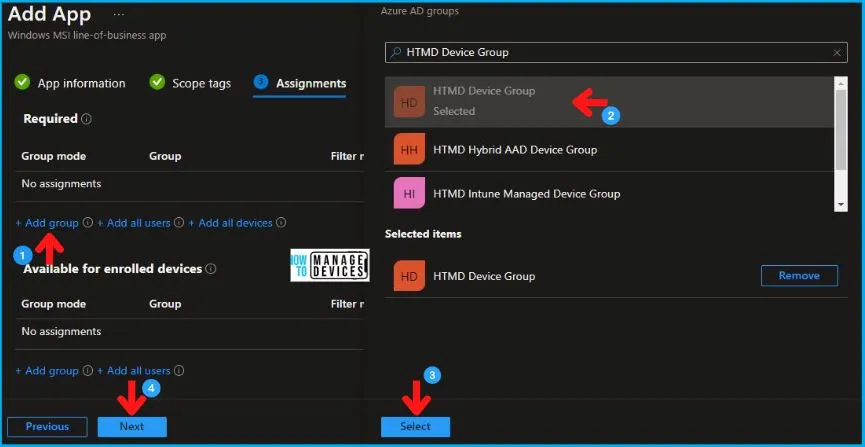
Under Assignments, In Included groups, click Add groups and then choose Select groups to include one or more groups to which you want to deploy Google Earth Pro, Click Next to continue.
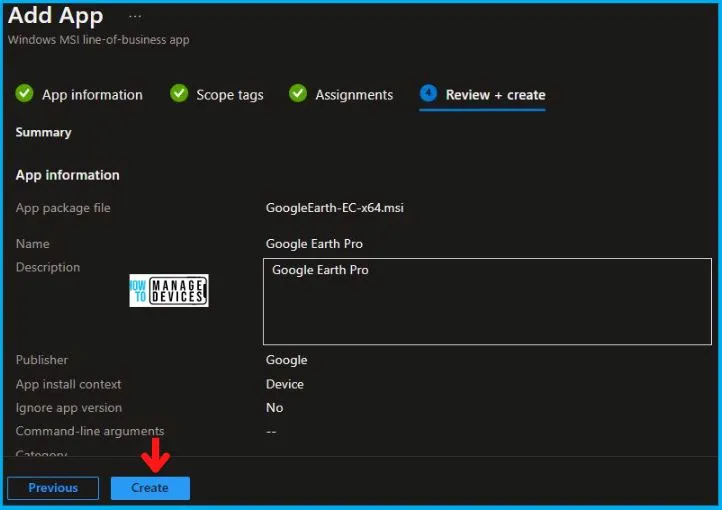
During the application creation process, you will see the details you provided. You can add the app to Intune by reviewing your settings and selecting Create.
You will see the status Uploading is in progress – When will it be completed? The speed of the internet connection and the size of the application determine how long it takes.
We recommend waiting a while for the upload process to complete, and you can check the progress by clicking on the Notifications icon. You will receive the status “Upload finished” once the package has been uploaded and finished.
Monitor Google Earth Pro Deployment from Intune Portal
Your groups will receive deployed applications when the devices check-in with the Intune service the policy applies to the devices.
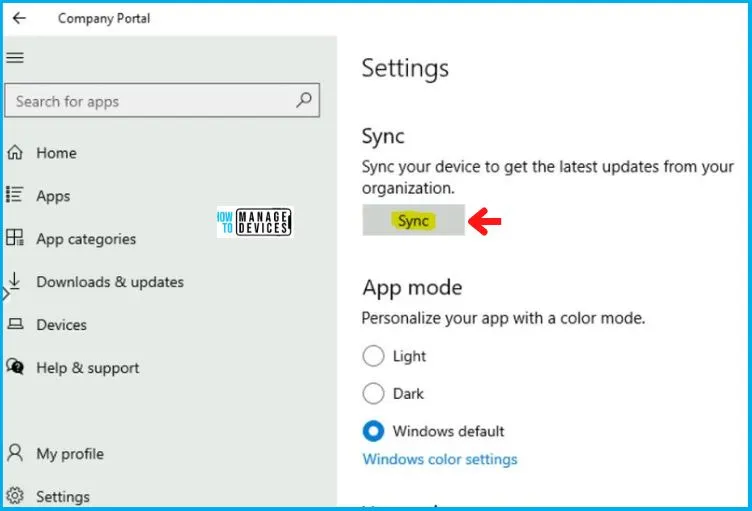
Now, when you login into the machine on which you deployed Google Earth Pro open the Company Portal and go to the settings tab and click on Sync as shown below to manually synchronize it.
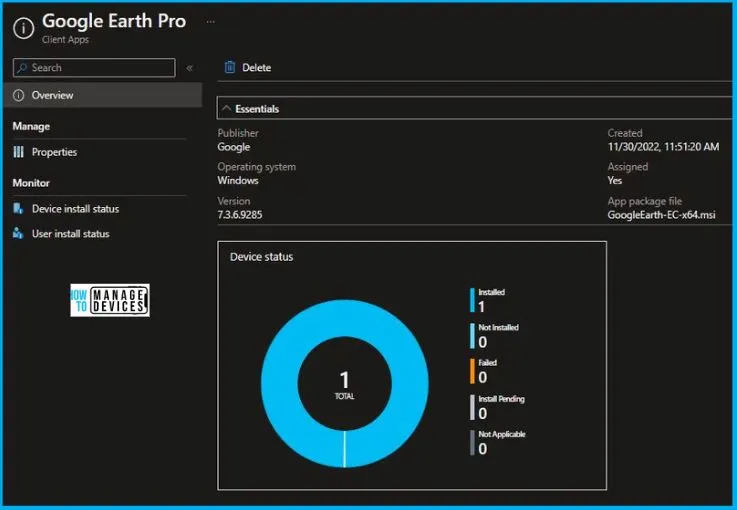
During the installation of an application, select the application, then select Monitor, where you can check the device and user check-in status. You can view additional details by clicking on the Device install status or User install status links.
End User Experience – Google Earth Pro Installation
Now to check whether the application is assigned to the targeted device successfully or not, we need to log in to that machine. After doing so, we need to open the Company Portal and check. As you see below in the image, it’s showing there.
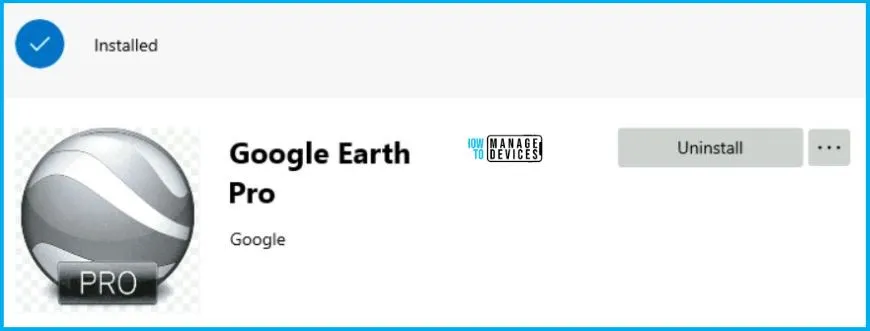
Hence the above picture clears that the Google Earth Pro application creation and assignment using Intune is successful. Also, Google Earth Pro is successfully installed on the machine on which we assigned it.
- Quickly Share Application From Intune Company Portal
- Intune Company Portal App For Windows 11 Android | Install And Uninstall
Track Intune MSI App Deployment from Windows Registry
All the information can be easily tracked using the registry for tracing deployment issues. LOB app deployment details can be checked from the following registry path HKEY_LOCAL_MACHINE\SOFTWARE\Microsoft\EnterpriseDesktopAppManagement.
There will be two sub-keys corresponding to the
- system SID (all zeros) [will list all device context MSI deployments]
- user SID [will list all user context MSI deployments]
Under System or user subkeys, you will find the MSI app deployments from Intune listed using the MSI Product ID of the package. More you can check the detailed post from Joy on how you can troubleshoot Intune app deployment issues using the Windows 10 or 11 registry and events.
Author
Abhinav Rana is working as an SCCM Admin. He loves to help the community by sharing his knowledge. He is a B.Tech graduate in Information Technology.
