Let’s try to understand how to install SCCM client on Workgroup Non-Domain Joined Windows 11 PC. You can use this method to manage a workgroup joined Windows 11 with Configuration Manager (MEMCM).
Installing the SCCM client on Domain Joined Windows 11 PC is straightforward, and you also have many supported options. However, SCCM client agent installation on non Domain Joined Windows 11, or Windows 10 PC is not easy.
Managing workgroup joined Windows 11 PCs and deploying applications to those devices is different from the normal SCCM client management scenarios. Since these devices are not Domain Joined, the user-based deployments will not work?
During the installation phase, the name resolution is the key piece in non Domain Joined Windows 11 PCs. The name resolution is needed to find out the primary server, MP, and DP server details from Windows 11.
- Create Windows 11 SCCM Device Collection Process
- Enable Windows 11 Patching Using SCCM WSUS
- Deploy Windows 10 Feature Update Using SCCM Task Sequence
Limited SCCM Workgroup Device Support for Windows 11 PCs
Let’s find out the limitations Workgroup Joined SCCM clients before installing client agents. SCCM supports Windows 11 workgroup joined PCs. However, the supported features of SCCM will vary, and it will be a subset of features.
NOTE! – I don’t recommend using Windows 11 workgroup PCs in the enterprise world because that could cause several security issues.

The following is the list of limitations with SCCM managed Windows 11 workgroup devices.
- Workgroup clients can’t locate MPs from AD Domain Services.
- Global roaming isn’t supported.
- AD discovery methods can’t discover computers in workgroups.
- Application Deployment to users of workgroup computers.
- The client push installation method can’t be used to install the client on workgroup computers.
- Automatic Client Approval is not working. The SCCM client might require manual approval.
- Workgroup clients can’t act as a distribution point.
Prerequisites & SCCM Firewall Ports Requirement
Manually installing the client on each workgroup PC is one of the requirements. The interactive login access should have administrative privileges to install the SCCM client on Windows 11 PCs.
- Make sure the SCCM Client Souce files are copied across to workgroup joined PC.
Let’s find out the firewall ports requirement for Workgroup joined Windows 11 PCs. I have covered only the basic port requirements required for SCCM client installation. All the Firewall port requirements are not changed specifically for Windows 11 non Domain Joined PCs.
So if you have already opened the firewall ports for Workgroup joined Windows 10 PCs, then it should be the same for Windows 11 PCs should work without any issue.
| From | To | UDP | TCP | Description | Direction |
|---|---|---|---|---|---|
| Client | MP | 10123/80/443 | Client Notification/HTTP/HTTPS | Unidirectional | |
| Client | DP | 80/443 | HTTP/HTTPS | Unidirectional | |
| Client | Domain | 3268/3269 | LDAP/LDAP SSL | Unidirectional |
Name Resolution for Workgroup Client Management with SCCM
It would help ensure that DNS is working fine between Windows 11 non Domain Joined PC and primary server/DP/MP. As you can see below, the primary server (DP, MP, and SUP) is reachable, and the name resolution is working OK.
NOTE! – Even though host files are evil, you can try to add the name resolution details in the HOST.txt file from %WinDir%\System32\Drivers\Etc to get the name resolution working between servers and clients.

Connectivity Between Servers and Clients
It’s important to have the connectivity between SCCM servers and Workgroup joined Windows 11 clients to install SCCM client. To check, the firewall ports are opened between SCCM servers (and domain), and the client is already in place.
You can use the following PowerShell commands to test firewall ports are opened or not.
- Test-NetConnection 10.45.0.27 -port 443
- Test-NetConnection 10.45.0.27 -port 80
- Test-NetConnection 10.45.0.27 -port 3268
The PowerShell Command Results should return TcpTestSucceeded: True. This means the firewall port communication is opened between the client and servers.
- ComputerName : 10.1.0.6
- RemoteAddress : 10.1.0.6
- RemotePort : 80
- InterfaceAlias : Ethernet 2
- SourceAddress : 10.1.0.12
- TcpTestSucceeded : True

Copy SCCM Client Source file to Workgroup Joined Windows 11 PC
The next step is to Copy the SCCM Client Source file to Workgroup Joined Windows 11 PC. You will need access to the SCCM primary server to copy the latest client source files.
NOTE! – Also, you should have connectivity back to Domain Controller to authenticate with SCCM server from non Domain Joined Windows 11 PC.
Using domain user name and password, you can connect to \\CMMEMCM.memcm.com\SMS_MEM folder. CMMEMCM.memcm.com is the primary server, and MEM is the SCCM site code. So, remember to change it accordingly for your SCCM environment.
Latest Client Source File on SCCM Primary Server – \\<site server name>\SMS_<site code>\Client\

You can now copy the latest source files for the SCCM client from \\CMMEMCM.memcm.com\SMS_MEM\Client folder and copy the entire client folder to Workgroup joined Windows 11 PC.

Install SCCM Client on Workgroup Non-Domain Joined Windows 11 PC
Now it’s time to start the installation process. You can Install SCCM Client on Workgroup Non-Domain Joined Windows 11 PC using the following command line. I have already explained how to install the SCCM client manually.
SCCM Install Command-Line that I used for Workgroup non Domain Joined Windows PCs – CCMSetup.exe /Source: “C:\SCCM Client” SMSMP=CMMEMCM.memcm.com SMSSITECODE=MEM
Where MP name is CMMEMCM.memcm.com and Site Code is MEM. Change the Source folder name, MP server name, and site code accordingly.
Ensure you run the command from CMD ever if running it from Windows Terminal on Windows 11 PC. If you run the above command from PowerShell, this will not work.
CCMSetup.exe: The term ‘CCMSetup.exe’ is not recognized as the name of a cmdlet, function, script file, or operable program. Check the spelling of the name, or if a path was included, verify that the path is correct and try again. At line:1 char:1

Verify Client Installation on Workgroup Non-Domain Joined Windows 11 PC
You can verify client installation on Workgroup Non-Domain Joined Windows 11 PC from Task Manager (right-click on the start button). Scroll down a bit to find out the ccmsetup.exe service. This service is the main component that helps to install SCCM clients.
The SCCM client installation is going on if the ccmsetup.exe process is running. You can also verify this using the CCMSetup.log and client.msi.log available in the C:\Windows\ccmsetup\Logs folder.

Following are the CCMSetup.log and Client.MSI.log entries that can help you confirm the successful installation of the SCCM client on Workgroup joined Windows 11 PC.
CCMSetup.log – MSI: Action 18:03:44: SmsClientInstallSucceeded. Sends a wmi event to indicate client installation succeeded.
CCMSetup.log – File C:\Windows\ccmsetup{AFEBCEB6-C9FE-4BF6-9C63-24020C95EF03}\client.msi installation succeeded.
Client.msi.log – MSI (s) (74:F0) [18:03:57:458]: Windows Installer installed the product. Product Name: Configuration Manager Client. Product Version: 5.00.9068.1000. Product Language: 1033. Manufacturer Installation success or error status: 0.

You can try to run Control smscfgrc from Windows Terminal to check whether the Configuration Manager SCCM Control Panel Applet is available in the control panel or not.
The Configuration Manager Applet actions tab might have only two actions, and the rest of the actions might be missing because the SCCM client is not APPROVED yet. You will need to follow the steps explained in the below section to make the SCCM client work properly.

Manually Approve WorkGroup Non-Domain Joined Windows 11 PC
Now, let’s check how to manually Approve WorkGroup Non-Domain Joined Windows 11 PC from the SCCM admin console. There is an option to automatically approve all Computers (not recommended), including the automatic approval of the Workgroup Joined client.
You can check this setting from the following location – \Administration\Overview\Site Configuration\Sites – Primary Server – Hierarchy Settings Properties – Client Approval and Conflicting Records tab.
NOTE! – I don’t recommend using this option to approve Workgroup joined Windows 11 PCs. Rather I would recommend using the manual method to approve (explained below) these types of clients.

Let’s check how to manually approve the Workgroup non-Domain Joined Windows 11 SCCM clients from the Devices node in the SCCM admin console.

Right-Click on the SCCM client record and click on the Approve button as shown below.

You need to click on the Yes button to continue with the approval of the Workgroup joined SCCM client.

Result – Workgroup Non-Domain Joined SCCM Client Management
Now, you can see the Workgroup Non-Domain Joined SCCM client is ready for management. The client status is changed to Approved now. It will take some time to change the status of the client from Unknown to Online status of the client.

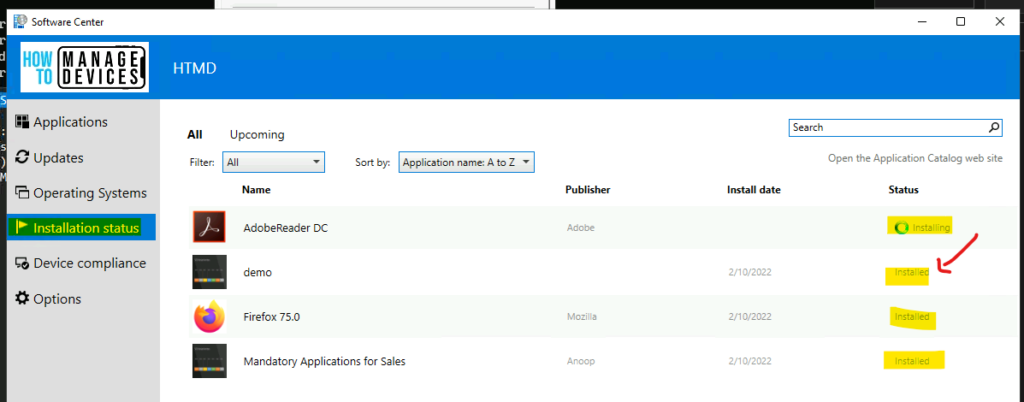
All the device-based applications are started getting deployed. You can check the Software Center to confirm the same.

Author
Anoop C Nair is Microsoft MVP! He is a Device Management Admin with more than 20 years of experience (calculation done in 2021) in IT. He is Blogger, Speaker, and Local User Group HTMD Community leader. His main focus is on Device Management technologies like SCCM 2012, Current Branch, and Intune. He writes about ConfigMgr, Windows 11, Windows 10, Azure AD, Microsoft Intune, Windows 365, AVD, etc.


Dear Anoop,
Thanks for this guide but do you have the same in a PKI environment please?
Thanks
Hello, the MS doc specifically states that port 3268 isn’t needed for workgroup computers. https://learn.microsoft.com/en-us/mem/configmgr/core/plan-design/hierarchy/ports
I have Workgroup PCs with an older version of SCCM. I would like to move these computers to a new MECM Server\Site we just stood up.
Can this be done via SCCM? Or do we need to upgrade each manually?
Also looking PKI Environment setup guide – especially for steps with the certificates on the clients