Let’s discuss the Walkthrough of Mac Device Passwordless SSO with Entra. Setting up Mac Device Passwordless SSO with Entra is like creating a shortcut for logging in without typing a password.
It is a helpful walkthrough that simplifies the experience of enabling Passwordless SSO on your Mac using Entra. It ensures a smoother and more secure authentication process. First, you link your Entra account to your Mac.
Single sign-on (SSO) allows users to log in to multiple apps or websites using just one set of credentials through their web browser. This helpful feature simplifies the whole login process, making it smoother for users by eliminating the need to enter different usernames and passwords for each application or site.
The Microsoft Enterprise SSO plug-in for Azure AD accounts is officially available for Apple devices ( iOS, iPadOS, and macOS). It supports all the applications earlier supported by Apple’s built-in enterprise SSO feature.
- How to Troubleshoot Microsoft Enterprise SSO Plug-in on macOS using Intune
- How to setup Microsoft Enterprise SSO plug-in for Apple macOS Devices using Intune
- Configure Device Restriction Settings for macOS Devices using Intune
- Easy method to Manage Multiple Profiles in Outlook for Mac
What is the Benefit of using Passwordless SSO on a Mac with Entra?

Setting up Passwordless SSO with Entra for your Mac is like creating a shortcut for logging in without typing a password. It offers a more convenient and secure way to access your device.
Walkthrough of Mac Device Passwordless SSO with Entra
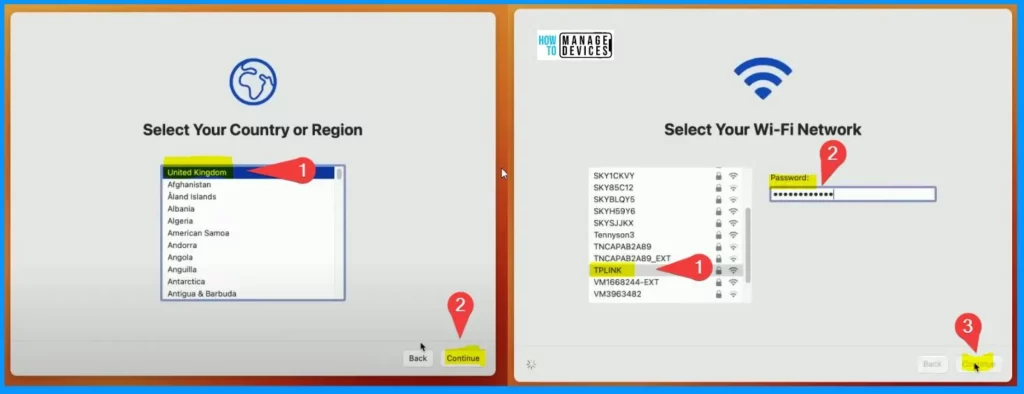
In the ADE setup Assistant flow for Single Sign-On (SSO) with passwordless Entra authentication on your Mac, there’s a step where you need to provide your Mac with the country or Region and a Wi-Fi password.
- Select your Country or Region from the first screenshot
- Select your Wi-Fi network password and click the Continue button
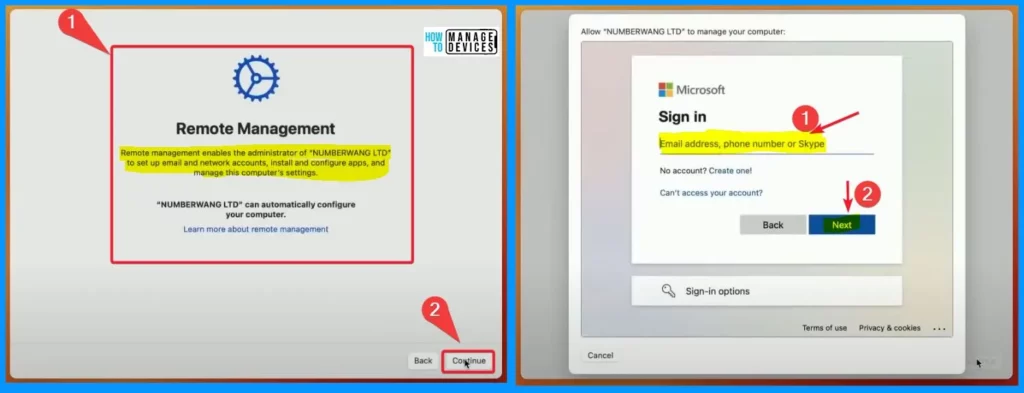
The window below highlights that Remote management enables a company administrator to set up email and network accounts, install and configure apps and manage this computer’s settings. After clicking the Continue button, the Sign-in window will appear.
- Enter the email ID and click the Next button from the second screenshot
Passwordless authentication is critical to the regular ADE authentication flow for accessing Entra ID. In the screenshot below, you can see that there is no need to type in a password. Instead, Entra sends a quick ping to the Authenticator app on your phone, which you have set up before.
After approval, sign in. You should create a computer account by filling out the following information to make your computer account.
| Create a Computer Account |
|---|
| Full Name |
| Account Name |
| Password |
| Password Hint |

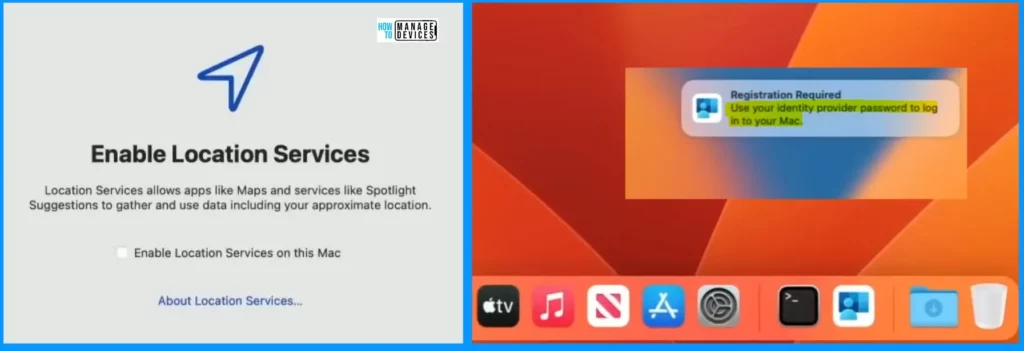
Location services allow apps like Maps and Services like Spotlight Suggestions to gather and use data, including your approximate location. Enable Location Services on this Mac. The second screenshot shows that the Registration Required. You can use your identity provider password to log in to your Mac.
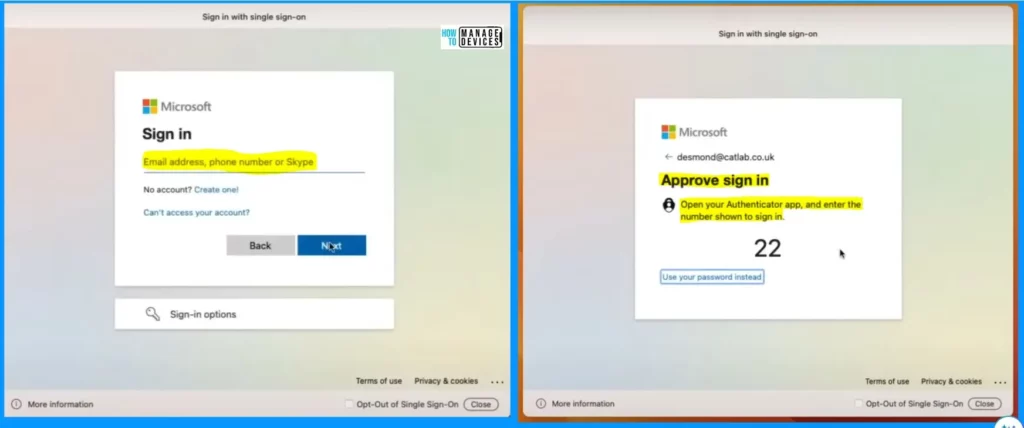
This is the window that helps you sign up with a single sign-on. Enter your email address, phone number, or Skype number and click the Next button. The next step is to approve the sign-in. Open your Authenticator app and enter the number shown to sign in.
- Open your Authenticator app and enter the number shown to sign in
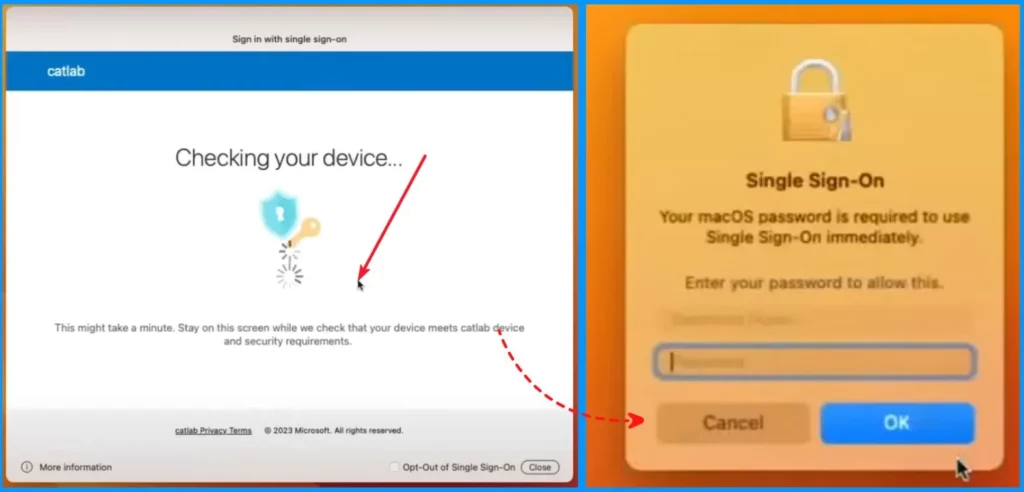
This might take a minute to check your device. Stay on this screen to check that your device meets the Catlab device and security requirements. Your MacOS password is required to use Single Sign-on immediately.
- Enter the Password and Click OK
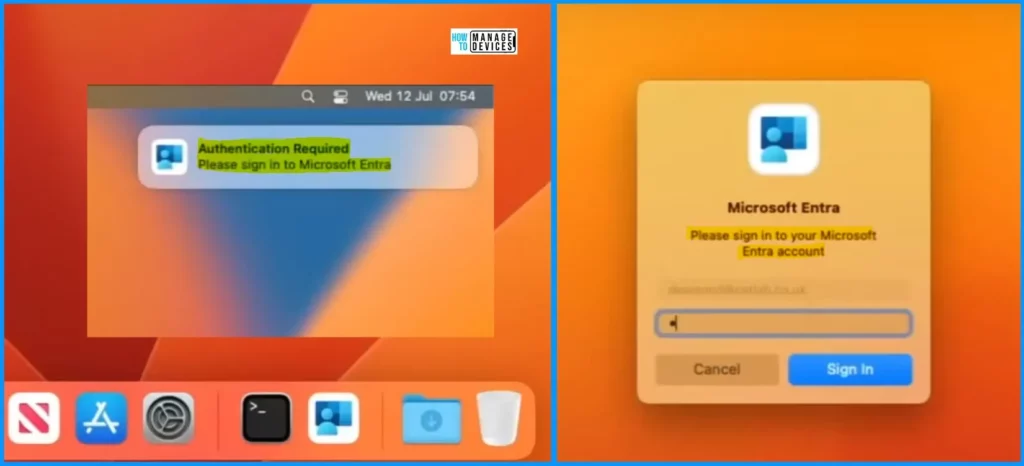
The screenshot shows the authentication required to sign in to Microsoft Entra. To sign in to your Microsoft Entra account, you need to enter your actual EntraID password. Click the Sign in button from the Microsoft Entra 2nd screen.
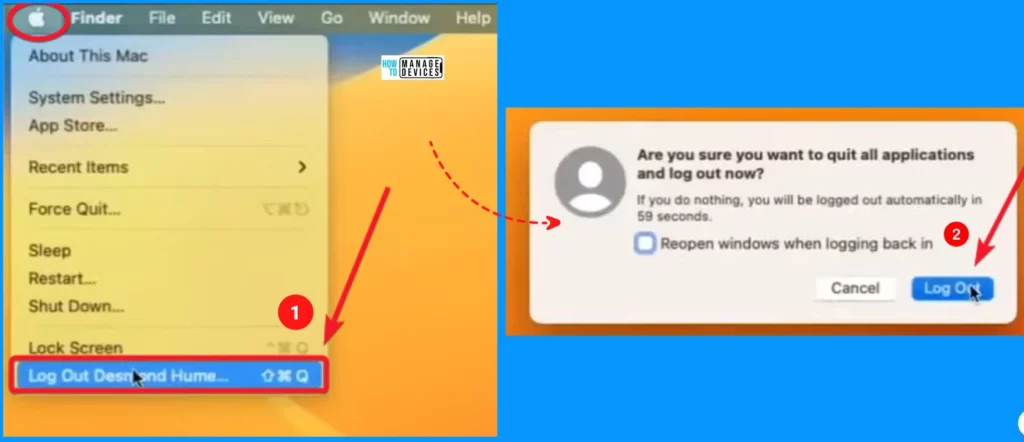
Now, you need to sign out and sign back in again. To sign out, click on the Apple Menu at the top-left corner of your screen. Select the “Log Out Username” option from the popup menu. A dialogue box will appear to confirm the Logout, asking if you are sure you want to log out. Click “Log Out” to proceed.
- After signing out and signing back in, there’s a new change in how you access your Mac.
- The old short password won’t work anymore; if you try, it gets rejected.
- Now, you use the long password from Entra to sign in.
- This means your Mac’s login is synchronized with Entra’s secure method, ensuring you access your computer with a more robust and reliable password.
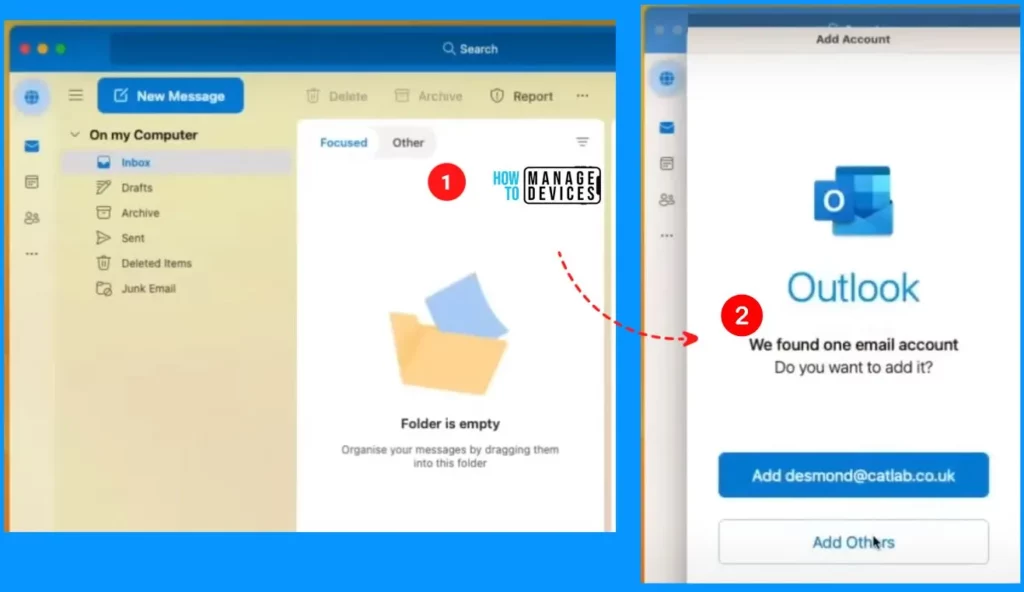
Let’s see how to launch Outlook. This is the first time we’re opening it, and something interesting to notice is that it doesn’t ask to enter the username and password. It just opens up without needing that extra information.
This makes it more convenient for users because they don’t have to enter these details every time they use Outlook. It saves time and effort. It’s a helpful feature for a smoother experience with the application.

The Outlook Inbox is empty; you can easily organize your messages by dragging them into this folder. In the second screenshot, you will see that you can either use an existing email account or choose to add other emails. This allows you to manage multiple email accounts within Outlook, making accessing all your emails convenient in one place.
You can personalize the new Outlook in the welcome window according to your preferences. You can easily choose how much information you want to see. Whether you prefer a lot of details or just the basics, it’s up to you. Additionally, you can pick the style you like for the reading pane, making it more comfortable to go through your emails.
Outlook already knows who we are and what credentials we need to access it. This combines a Single Sign-On (SSO) and a settings catalog. It is essential to set up several variables for Office. When we open Outlook, it automatically uses these details to recognize who we are and lets us access it without asking for our username or password every time.

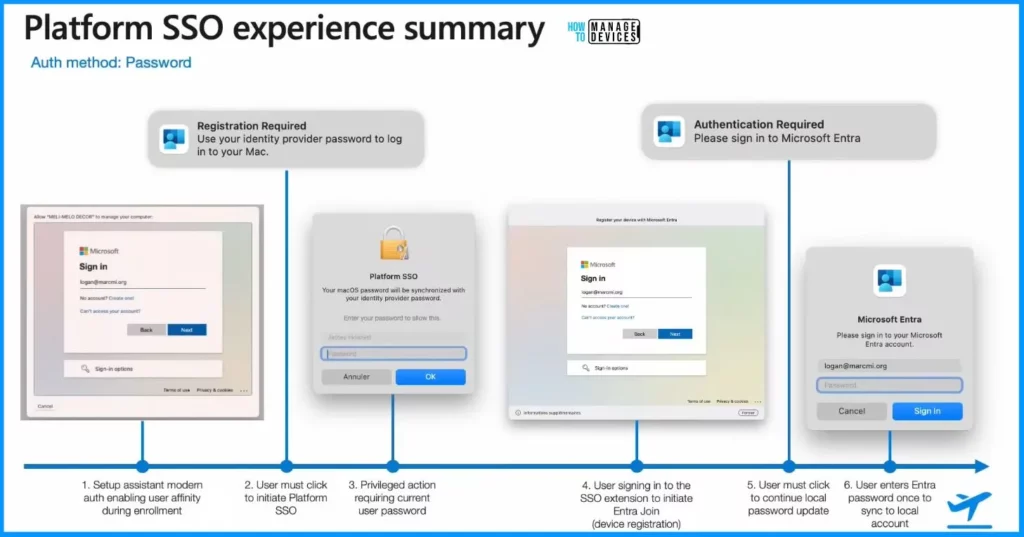
Platform SSO Experience Summary
This slide gives you the whole picture in one view. It shows every step in the process. It starts with the Setup Assistant asking who we are, then moves into initiating platform SSO. After that, it gives privileged access to the Keychain.
Next up is the Entra ID join, which is like registering the Mac with our workplace. The final step is entering our Entra ID password to sync it with the local Mac. This option is great for password synchronization.
| Platform SSO Experience Summary |
|---|
| Setup assistant moden auth enabling user affinity during enrollment |
| The User must click to initiate platform SSO |
| Privileged action requiring current user password |
| A User signing into the SSO extension to initiate Entra join (device registration) |
| The User must click to continue the local password update |
| A user enters the Entra password once to sync to the local account |
NOTE! – Microsoft shared detailed information on the Walkthrough of Mac Device Passwordless SSO with Entra with the latest Technical Takeoff session by Arnab Biswas.
We are on WhatsApp now. To get the latest step-by-step guides, news, and updates, Join our Channel. Click here. HTMD WhatsApp.
Author
About the Author – Vidya is a computer enthusiast. She is here to share quick tips and tricks with Windows 11 or Windows 10 users. She loves writing on Windows 11 and related technologies. She is also keen to find solutions and write about day-to-day tech problems.

Hi,
What happens if user ignore the registration notification?
Does it pop-up again later, until the user provides his password?
Thks!