
Key Takeaways
- Configure Microsoft Defender SmartScreen using the Intune Settings catalog.
- Protect users from phishing websites, malicious downloads, and unrecognized applications.
- Choose between Warn or Warn and prevent bypass based on organizational security requirements.
- Deploy the policy to selected Windows devices or users through Microsoft Intune.
Let’s see Configure Microsoft Defender SmartScreen to Improve Windows Security using Microsoft Intune. Microsoft Defender SmartScreen protects against phishing or malware websites and applications, and the downloading of potentially malicious files. Microsoft Defender SmartScreen determines whether a site is potentially malicious by analyzing visited web pages looking for indications of suspicious behavior.
Table of Contents
Table of Contents
Configure Microsoft Defender SmartScreen to Improve Windows Security using Microsoft Intune
SmartScreen also helps us whether a downloaded app or app installer is potentially malicious by checking downloaded files against a list of reported malicious software sites and programs known to be unsafe. If you turn on Microsoft Defender SmartScreen in organizations, additionally, when enabling this feature, you must also pick whether Microsoft Defender SmartScreen should Warn your employees or warn and prevent bypassing the message (effectively blocking the employee from the site).
Most important SmartScreen only protects against malicious files from the internet. It does not protect against malicious files on internal locations or network shares, such as shared folders with UNC paths or SMB/CIFS shares.
- Configure Potentially Unwanted Applications PUA Protection in Microsoft Edge using Intune MEM
- Disable Removable Storage Write Access Using Intune
- Intune Logs Event IDs IME Logs Details For Windows Client Side Troubleshooting
- Enable Microsoft Defender SmartScreen in Intune to Block Malicious Websites Phishing Unsafe Downloads and Unrecognized Apps
Configure Microsoft Defender SmartScreen to Protect Apps Files Using Intune
This section will help you assign the policy set up protection by configuring Defender SmartScreen the block potentially unwanted apps, files using Intune setting catalog policies. You can refer to the following guide to Create Intune Settings Catalog Policy and deploy it only to a set of Intune Managed Windows 11 devices using Intune Filters.

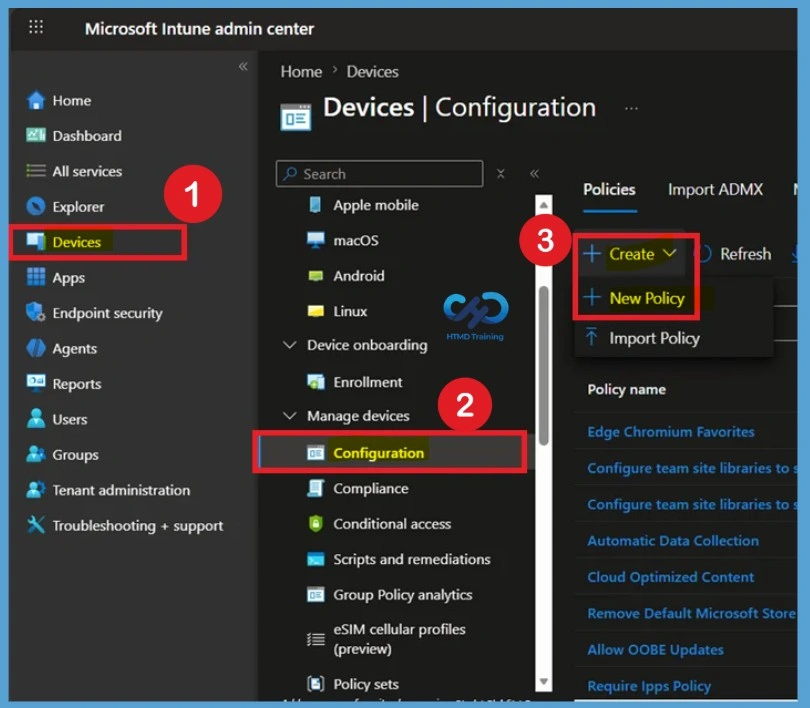
- Sign in to the Microsoft Intune Admin Center.
- Select Devices > Windows > Configuration profiles > Create profile
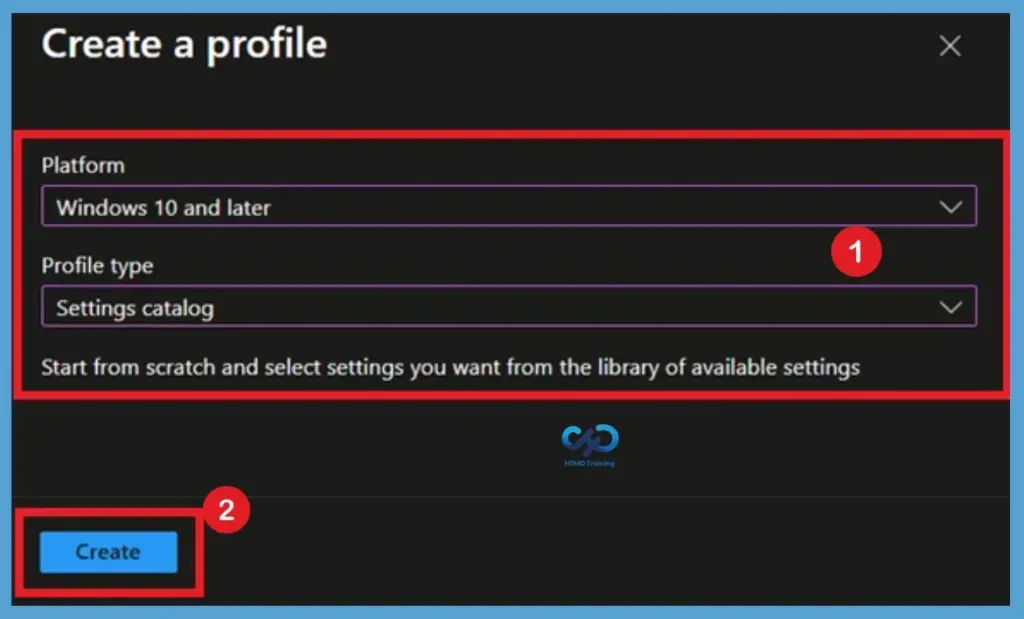
In Create Profile, Select Platform, Windows 10, and later and Profile, Select Profile Type as Settings catalog. Click on Create button.
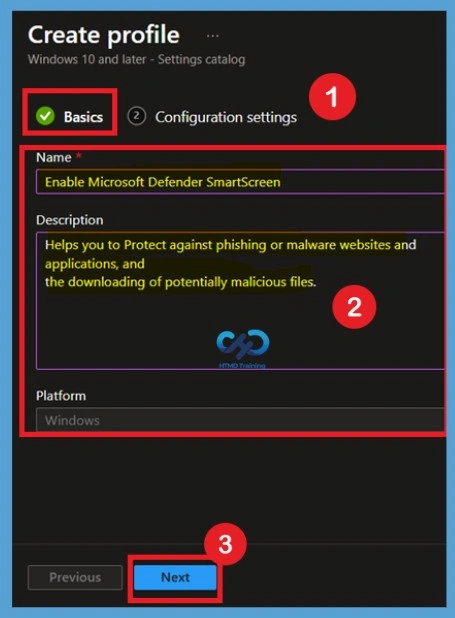
The Basic Tab
On the Basics page, enter a policy name such as Configure Microsoft Defender SmartScreen. Optionally, provide a description explaining the purpose of the policy to help administrators identify it later. Using a clear policy name and description simplifies policy management, especially in environments with multiple configuration profiles. After entering the required details, select Next to continue.
- Name– Enable Microsoft Defender SmartScreen
- Description– Helps you to Protect against phishing or malware websites and applications, and the downloading of potentially malicious files.
Configuration Settings
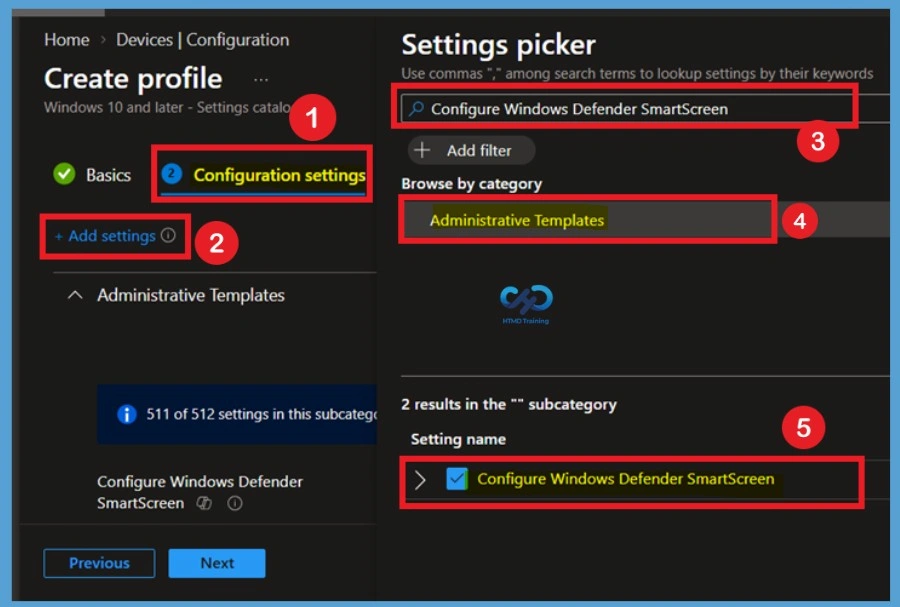
In Configuration settings, click Add settings to browse or search the catalog for the settings you want to configure. On the Settings Picker windows, Select Administrative Templates > Windows Components > File Explorer to see all the settings in this category. Here, you need to select the below settings Configure Windows Defender SmartScreen. After adding your settings, click the cross mark at the right-hand corner to close the settings picker.
Disabled by Default
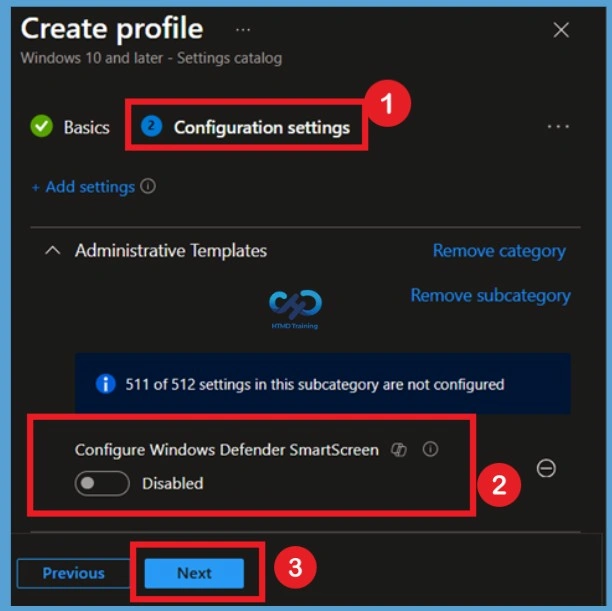
The Configure Microsoft Defender SmartScreen policy is Disabled by default when it is first added to the Settings catalog profile. In this state, Intune does not enforce SmartScreen behavior on managed devices. Leaving the policy disabled means Windows continues using its existing local configuration. Organizations that want centralized management should change the setting from Disabled to Enabled before deploying the policy.
Enable the Microsoft Defender SmartScreen Policy
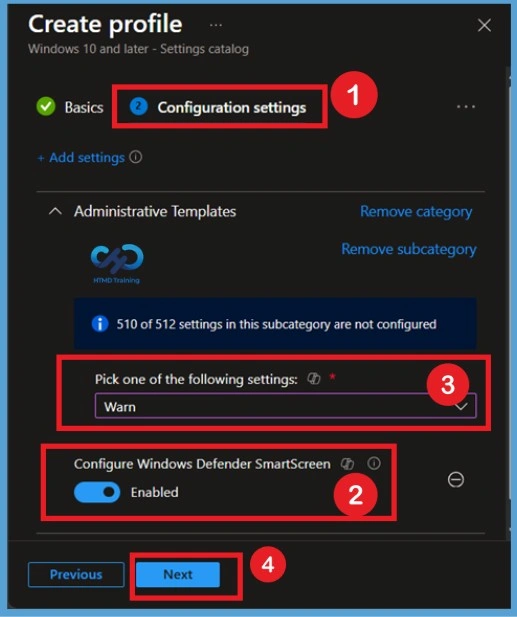
The setting is shown and configured with a default value Disabled. Set Configure Microsoft Defender SmartScreen to Enabled. Additionally, it’s good to configure the following available options and Click Next. If you enable this policy, SmartScreen will be turned on for all users. Its behavior can be controlled by the following options:
- Here I toggle the bar left to right to enable the policy.
- Then select the Warn Settings.
| Defender SmartScreen Policy Settings | Info |
|---|---|
| Warn and prevent bypass | This policy with the “Warn and prevent bypass” option, SmartScreen’s dialogs will not present the user with the option to disregard the warning and run the app. SmartScreen will continue to show the warning on subsequent attempts to run the app. |
| Warn | If you enable this policy with the “Warn” option, SmartScreen’s dialogs will warn the user that the app appears suspicious, but will permit the user to disregard the warning and run the app anyway. SmartScreen will not warn the user again for that app if the user tells SmartScreen to run the app. |
Scope Tags for Microsoft Defender SmartScreen Policy
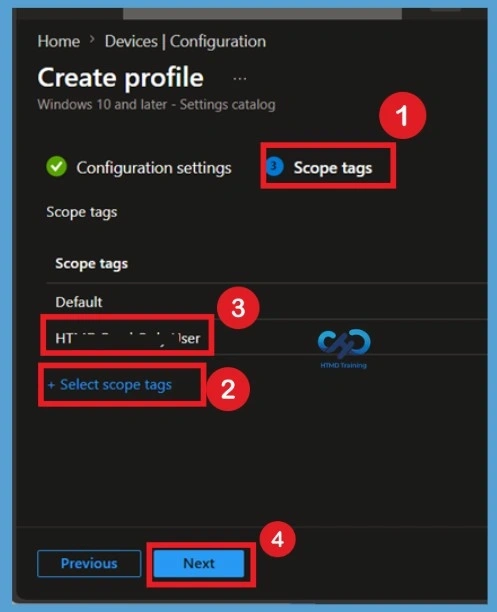
The Scope tags page allows administrators to assign scope tags to the Configure Microsoft Defender SmartScreen policy if role-based administration is used within the organization. If your organization does not use custom scope tags, the default tag is sufficient. Otherwise, assign the appropriate scope tags so only authorized administrators can manage or view the policy.
- Here I selected the appropriate scope tag and click on the Next to Continue.
Assignments
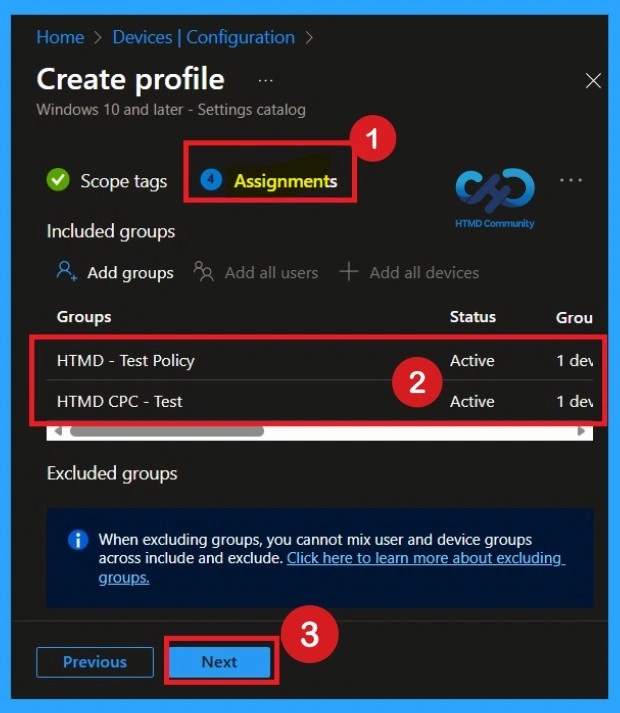
On the Assignments page, select Add groups and assign the Configure Microsoft Defender SmartScreen policy to the required Microsoft Entra user or device groups. Under Assignments, In Included groups, click Add groups and then choose Select groups to include one or more groups. Click Next to continue.
Review + Create
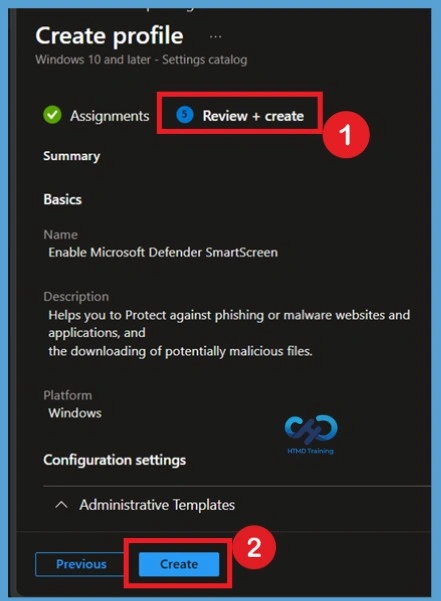
The Review + create page displays all configured settings for the Configure Microsoft Defender SmartScreen policy. Verify that every setting matches your organization’s security requirements. After reviewing the configuration, select Create. Microsoft Intune saves the policy and begins deploying it to the assigned devices during their next check-in with the Intune service.
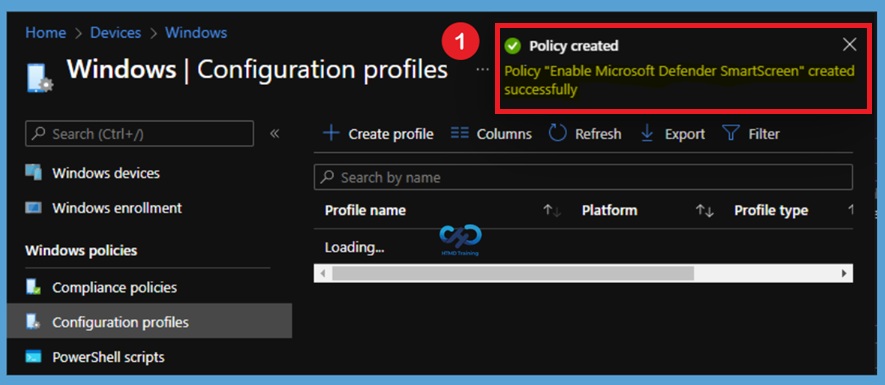
A notification will appear automatically in the top right-hand corner with a message. Here you can see that Policy “Control Running Background Windows Apps” created successfully. The policy is also shown in the Configuration profiles list.
Monitoring Status
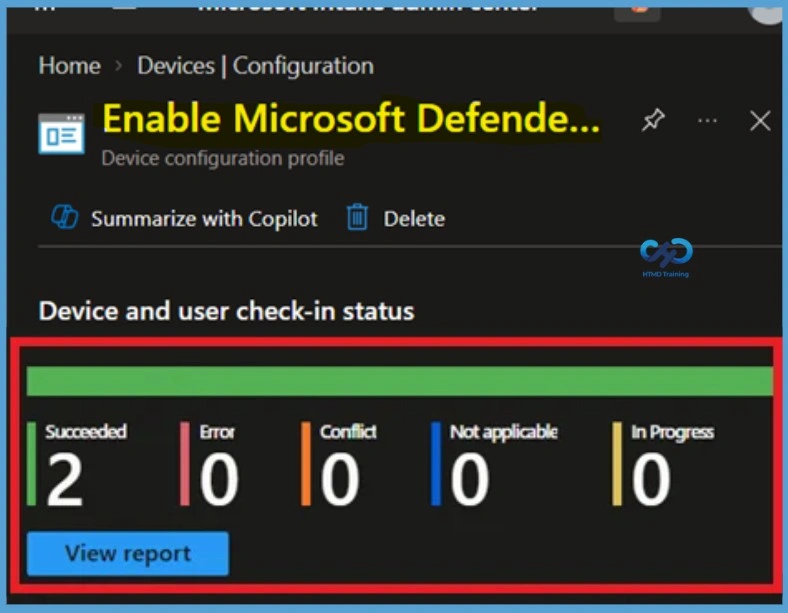
After deployment, navigate to Devices > Windows > Configuration and open the Configure Microsoft Defender SmartScreen policy to monitor its deployment status. The monitoring page displays successful, pending, failed, and not applicable devices, helping administrators quickly identify deployment issues and verify whether the policy has been applied successfully.
End Result
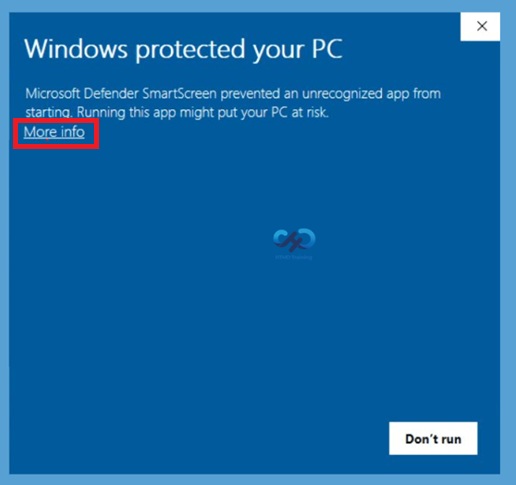
Your groups will receive your profile settings when the devices check-in with the Intune service. Once the policy applies to the devices. Windows SmartScreen prevented an unrecognized or unknown app or file downloaded from the Internet and come from another PC.
To allow running the app or file, Click on More info and unblock the apps, for more details you can check out post how to Unblock App Files in Windows 10 that are blocked by Open File – Security Warning and Windows SmartScreen. While unblocking or running applications or files make sure to check security concerns. Sometimes using from trusted source might interfere while using your PC. You can add an app or files to the list of safe or allowed apps to prevent them from being blocked
- You can check Intune settings catalog profile report from Intune Portal, which provides an overall view of device configuration policies deployment status.
Remove Assigned Groups
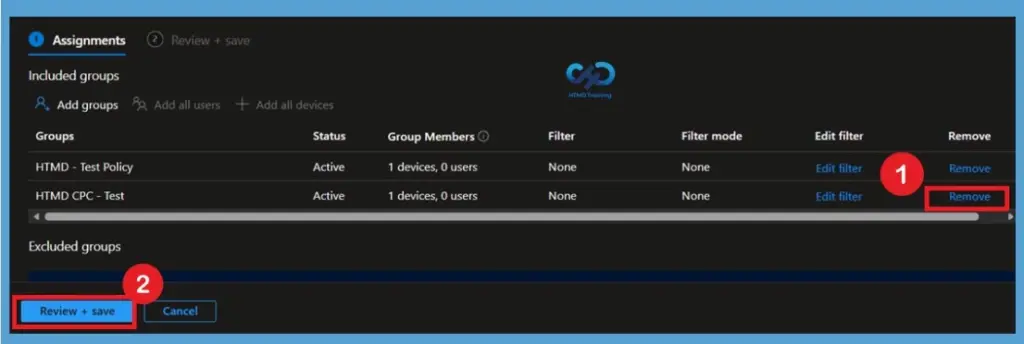
If the Configure Microsoft Defender SmartScreen policy is no longer required for specific users or devices, open the policy and navigate to Assignments. Remove the included Microsoft Entra groups, save the changes, and allow devices to check in with Intune. After synchronization, the policy is no longer targeted to those devices. When you scroll down you can see the basic, configuration and assigned tab details there you will get edit option. Click on the edit option near assignment.
- In the edit profile of assignment section, you can remove the group that you want and click on the review and create option.
For detailed information, you can refer to our previous post – How to Delete Allow Clipboard History Policy in Intune Step by Step Guide.
Delete Policy Permanently
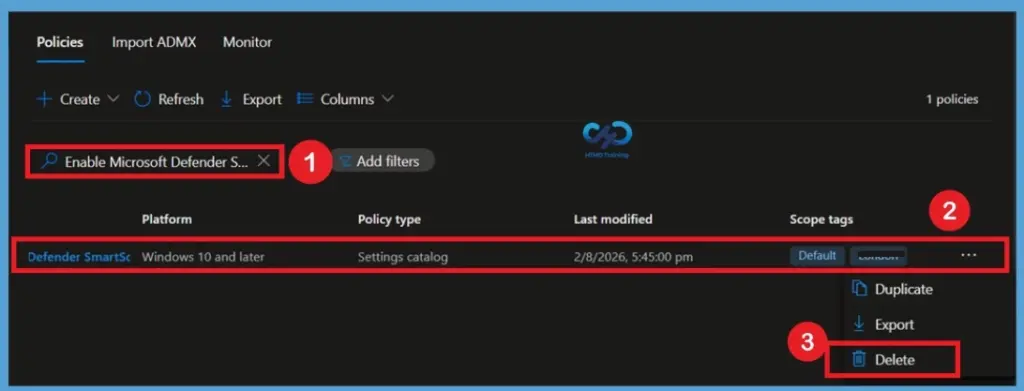
To permanently remove the Configure Microsoft Defender SmartScreen policy, open the policy from the Configuration profiles list in the Microsoft Intune admin center. Select Delete, confirm the deletion, and allow managed devices to synchronize with Intune. Once removed, the policy is no longer available in the tenant and will no longer be deployed to Windows device.
- To more understanding, first open the policy, select the 3 -dot (… ) menu (More options) and select Delete option, confirm the deletion, and permanently remove the profile from Intune.
For detailed information, you can refer to our previous post – Learn How to Delete or Remove App Assignment from Intune using by Step-by-Step Guide.
Need Further Assistance or Have Technical Questions?
Join the LinkedIn Page and Telegram group to get the latest step-by-step guides and news updates. Join our Meetup Page to participate in User group meetings. Also, join the WhatsApp Community and the WhatsApp channel to get the latest news on Microsoft Technologies. We are there on Reddit as well
Author
About Author – Jitesh, Microsoft MVP, has over six years of working experience in the IT Industry. He writes and shares his experiences related to Microsoft device management technologies and IT Infrastructure management. His primary focus is Windows 10/11 Deployment solution with Configuration Manager, Microsoft Deployment Toolkit (MDT), and Microsoft Intune.