Exciting news! Now, setting up Microsoft Edge Workspaces is super easy, just 3 steps! Microsoft Edge, one of the leading web browsers, continues to innovate with features that enhance productivity.
Recently, Microsoft introduced Edge Workspaces, a new tool designed to help users organize their browsing activities more efficiently. Keeping everyone on track with a project can be tricky. Links sent over email or chat can be outdated. But with Microsoft Edge Workspaces, it’s much more manageable.
Edge Workspaces are like shared folders for browser tabs. Everyone involved can see the same websites and files in real time, all in one place. You can use Edge Workspaces by yourself or with a group. It’s a handy way to organize projects and have everything you need in one spot.
This post will guide you through setting up Microsoft Edge Workspaces in just 3 simple steps. It is an easy way to keep your browsing organized and focused.
We have an article highlighting the MAM for Microsoft Edge on Windows. It introduces an exciting advancement in browsing technology. The MAM for Edge on Windows includes 4 main components: Microsoft Edge, Conditional access policies, App protection policies, and Windows Defender.

- Secure Microsoft Edge Browser using Intune Security Policies
- Latest AI Features of Microsoft Edge Browser | Game Changer
- Microsoft Edge for Business Review New Business Browsing Experience
What is Microsoft Edge?

Microsoft Edge is a web browser developed by Microsoft, which comes pre-installed on all new Windows computers. It offers faster performance and a more comprehensive range of features.
Setting Up Microsoft Edge Workspaces in 3 Easy Steps
Workspaces in Microsoft Edge help you stay organized by separating your browsing tasks into different windows. Each workspace has its tabs and favorites, which you and your collaborators can create and manage.
These workspaces are automatically saved and updated, so you don’t lose your progress. To start using Workspaces, click the Workspaces menu icon in the top-left corner of your browser window. It’s an easy way to keep your browsing focused and efficient.
- Turn On or Off Tab Performance Detector in Microsoft Edge
- Add or Remove the Copilot Toolbar Icon in Microsoft Edge
- Turn On or Off Show Action Hint for Mouse Gesture in Microsoft Edge
- Turn On or Off Microsoft Defender SmartScreen for Microsoft Edge in Windows 11
3 Easy Steps to Setting Up Microsoft Edge Workspaces
Let’s discuss the 3 Easy Steps to Setting Up Microsoft Edge Workspaces. The 3 Easy Steps to Setting Up Microsoft Edge Workspaces are explained below in detail.
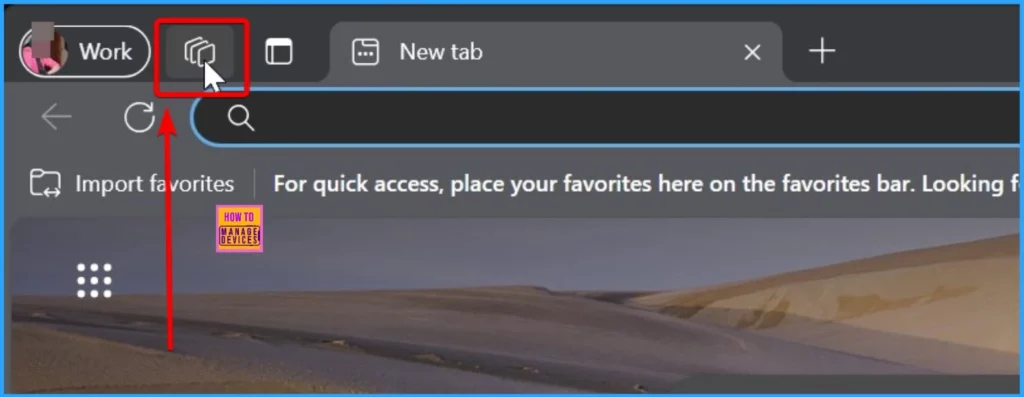
Step 1 – Click the Workspace Icon in the Upper Left corner of the Edge Browser Next to your Profile Photo
Launch Microsoft Edge on your computer. Ensure you have the latest browser version installed to access the Workspaces feature. Click the Workspace Icon in the Upper Left corner of the Edge Browser Next to your Profile Photo.
Step 2 – Click on “Create New Workspace” from Edge Workspaces
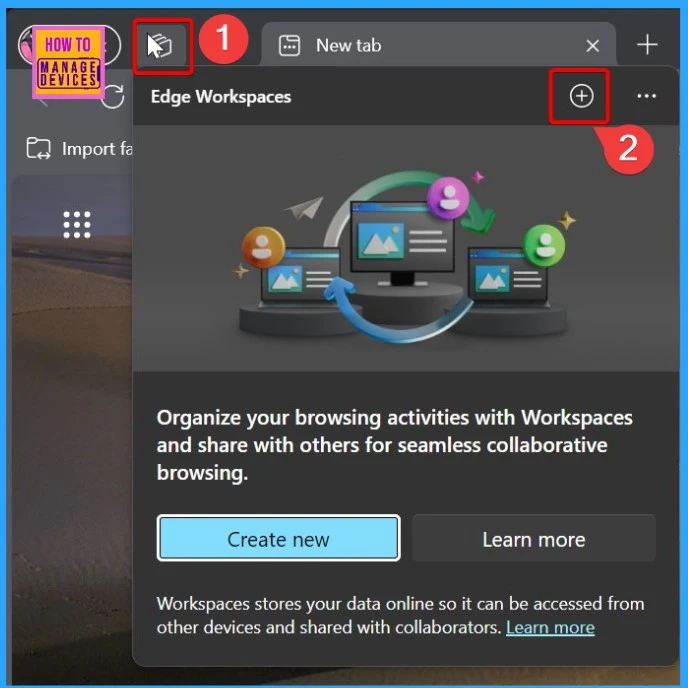
When you click on the Workspace icon, a menu will appear. From this menu, select “Create New“. This action prompts Edge to open a new workspace, allowing you to organize your browsing tasks separately.
By clicking “Create New“, you’re setting up a new workspace where you can manage tabs and favorites specific to your current task or project. This helps you stay focused and organized while browsing.
- If this is your first time creating your profile, you will see a pop-up window with Edge workspaces. Click the + symbol to create a new workspace.
Step 3 – Customizing your Workspace with a Name and Color
In the below window, you will give your workspace a name that reflects the task or project you’ll be working on. To do this, click the default workspace 1 and type in your desired name. Additionally, you can customize your workspace with a colour to make it easily distinguishable from other workspaces.
- Customizing your workspace with a name and colour helps you quickly identify and switch between tasks or projects.
- It makes managing your browsing sessions more efficient and organized.

Successfully Created your First Workspace in Microsoft Edge
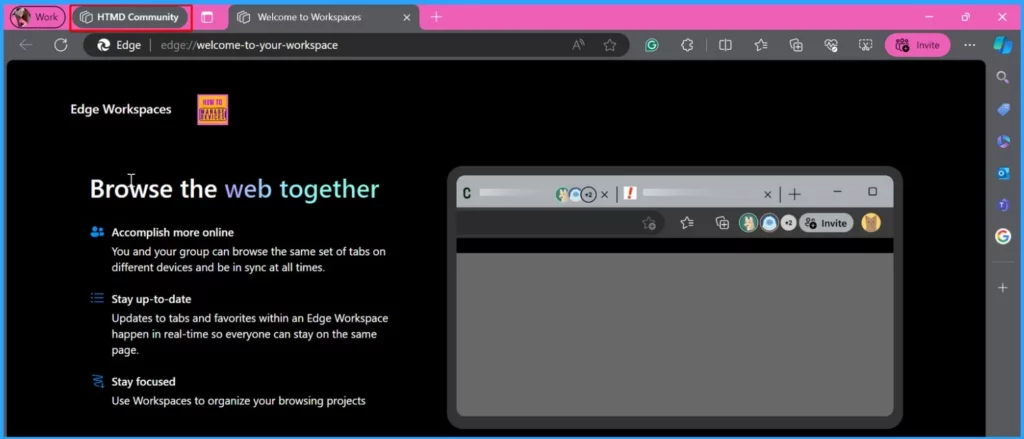
This workspace HTMD Community is now ready for you to start organizing your browsing tasks. You can add tabs related to your current project or task and manage them separately from your other browsing activities.
With your workspace set up, you can stay focused and organized while browsing, making it easier to manage multiple tasks or projects efficiently.
| Browse the Web Together | Details |
|---|---|
| Accomplish more online | You and your group can browse the same set of tabs on different devices and be in sync at all times. |
| Stay up-to-date | Updates to tabs and favorites within an Edge Workspace happen in real time so everyone can stay on the same page. |
| Stay focused | Use Workspaces to organize your browsing projects. |
- How to Enable and Use the New Screenshot Tool in MS Edge
- Enable Disable Let Copilot Use Content from Microsoft Edge in Windows 11
HTMD Community Workspace
You’ll find several options available if you click on the “HTMD Community” workspace. These options include inviting others to join the workspace, editing the workspace settings, or deleting the workspace entirely if needed. Additionally, you can easily create a new workspace by clicking on the “+” symbol next to the workspace list.
- Moreover, the HTMD Community workspace provides a quick overview of how many tabs are currently open.
- This feature allows you to keep track of your browsing activity within that specific workspace.
- Lastly, you may encounter a question asking, “Are you satisfied with Workspace?” This question seeks feedback on your experience with the workspace, ensuring that Microsoft Edge continues to meet your needs and preferences.
| HTMD Community Workspace Settings Options | Description |
|---|---|
| Learn more | Provides additional information about workspaces |
| Send Feedback | Allows you to send feedback about the workspace |
| Hide workspace | Hides the workspace from the view |
| Invite to workspace | Invite others to join the workspace |
| Edit workspace | Allows you to edit the settings of the workspace |
| Delete workspace | Deletes the workspace |
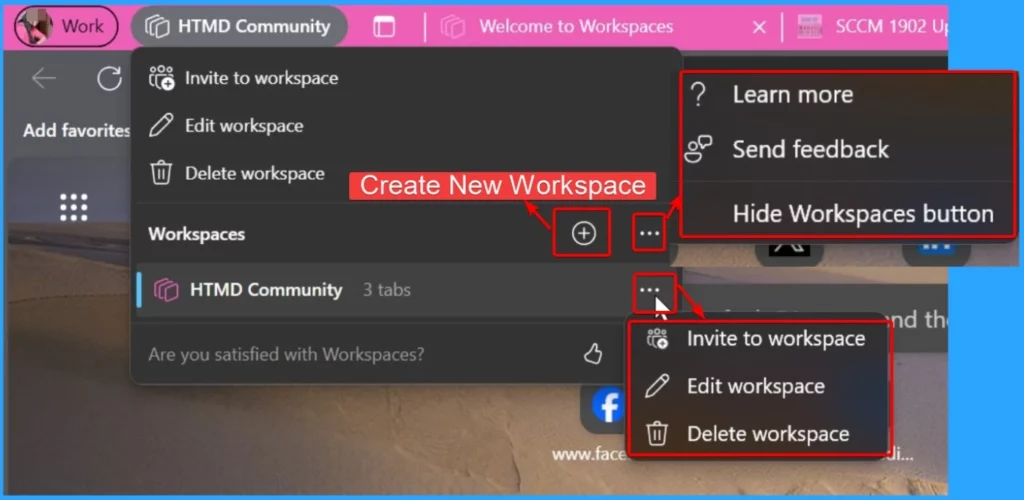
Right Clicking HTMD Community Workspace
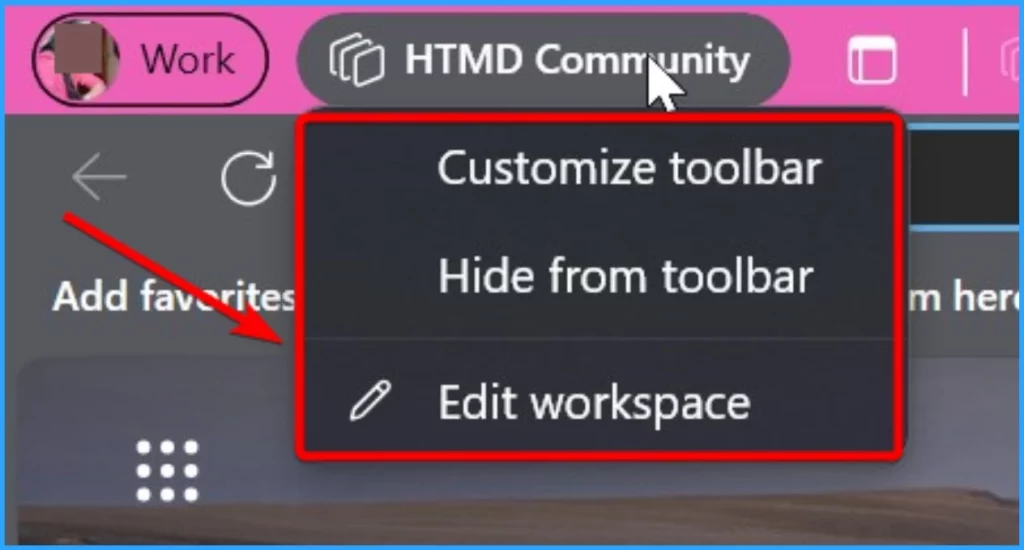
After right-clicking on the HTMD Community workspace, you’ll see several options. These options give you more control over interacting with the HTMD Community workspace.
| Right Clicking HTMD Community Workspace Option | Description |
|---|---|
| Customize toolbar | Customize toolbar settings |
| Hide from toolbar | Temporarily hide the workspace from the toolbar |
| Edit workspace | Modify settings and details of the workspace |
We are on WhatsApp now. To get the latest step-by-step guides, news, and updates, Join our Channel. Click here. HTMD WhatsApp.
Author
About the Author: Vidya is a computer enthusiast. She is here to share quick tips and tricks with Windows 11 or Windows 10 users. She loves writing about Windows 11 and related technologies. She is also keen to find solutions and write about day-to-day tech problems.
