Learn how to deploy Zoom using Intune. This Intune application deployment guide will help you with the Zoom Desktop client deployment, and the process to upload an MSI in Intune Admin center.
Zoom Meetings is a cloud-based video conferencing software solution that allows organizations in various sectors to conduct virtual meetings and collaborate in real time using integrated communication tools.
You can use Zoom to host a secure, free video conference call on any device. Zoom makes it easy to start or join a secure video call with crystal-clear HD video and audio, and powerful collaboration features like screen sharing and annotation.
You can download the Zoom Desktop Client installer directly from the Official Site. They have provided different setups for different environments. You can easily differentiate and choose the right setup.
The MSI parameters will be automatically used for the Zoom deployment using Intune, You can add Command-line arguments ZoomAutoUpdate = True to enable auto update. If the MSI file needs additional command-line options consider using Intune Win32 app management.
Deploy Zoom Using Intune Application Deployment Guide
Follow the steps below to upload the MSI file for deploying Zoom using Intune. To start with the Intune line-of-business app package creation, keep the downloaded ZoomInstallerFull.msi setup installation file in the appropriate location.
- Sign in to the Microsoft Intune admin center https://endpoint.microsoft.com/
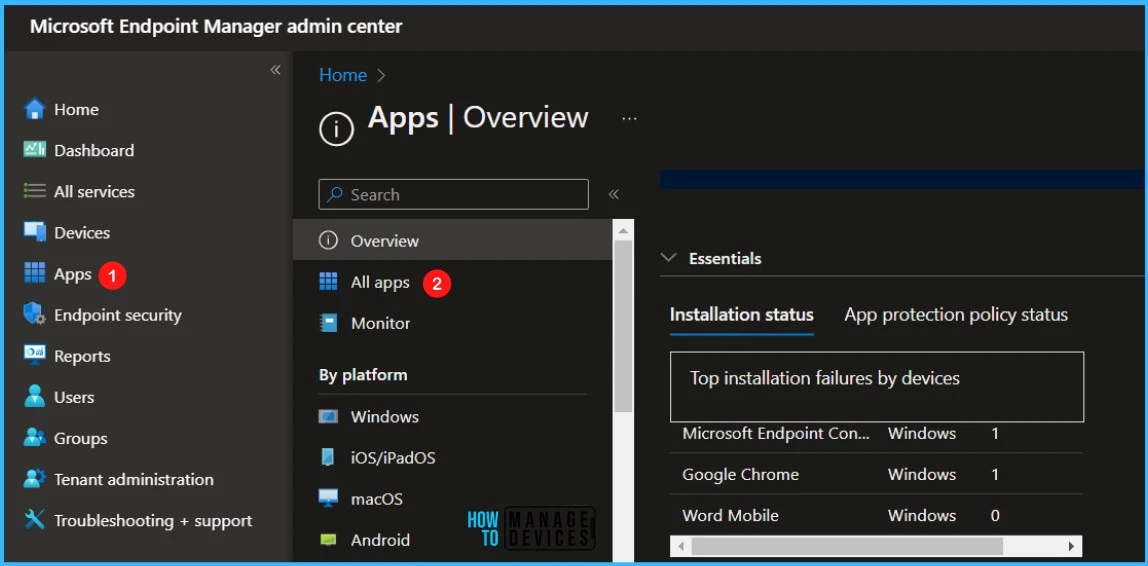
- Select Apps > All apps > Add, or you can navigate to Apps > Windows > Windows Apps.
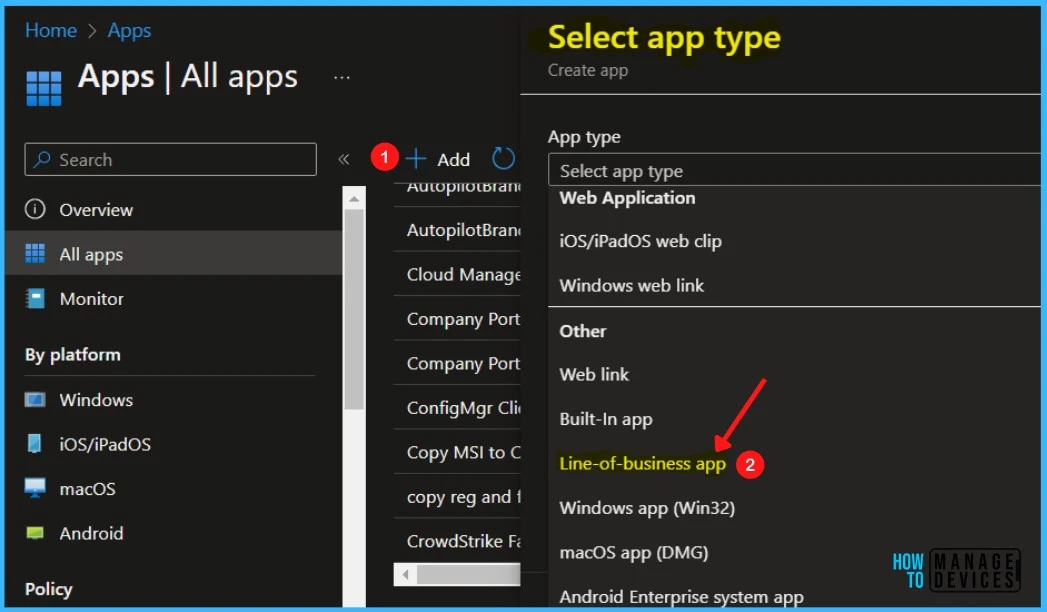
On the Select app type pane, under the Other app types, select Line-of-business app and click Select.
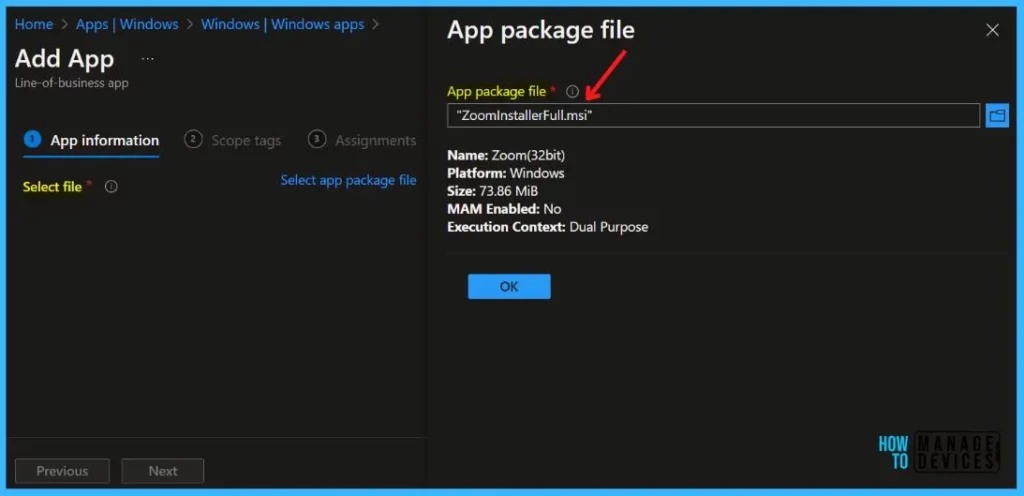
On the Add app pane, click Select app package file. Select the browse button. Then, select the downloaded application MSI file. Once you select the app file, The app details appear with Name, Platform, Size, and context.
When you’re finished, select OK on the App package file pane.
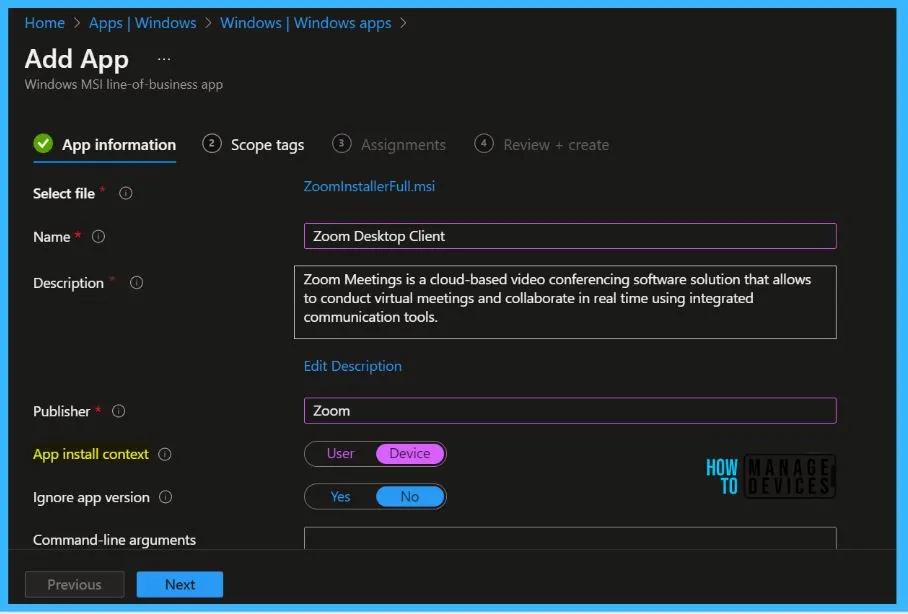
Enter the Name of the App (For Example – Zoom Desktop Client), and Enter the description of the app. Enter the Publisher name – Zoom and Command-line arguments – Optionally, enter any command-line arguments you want to apply to the .msi file when it runs.
- App install context – Select App install context as Device. This specifies the install context to be associated with this app. For dual mode apps, select the desired context for this app. For all other apps, this is pre-selected based on the package and cannot be modified.
- Ignore app version – Select Yes for apps that are automatically updated by the app developer (such as Google Chrome, Zoom).
NOTE! – Do not include the “msiexec” command or arguments, such as /i or /x, as they are automatically used. You can disable auto launch for Zoom and enable the auto update by specifying the command-line arguments.
Upload an icon for the app. This icon is displayed with the app when users browse the company portal. You may specify the additional app information here and click Next.
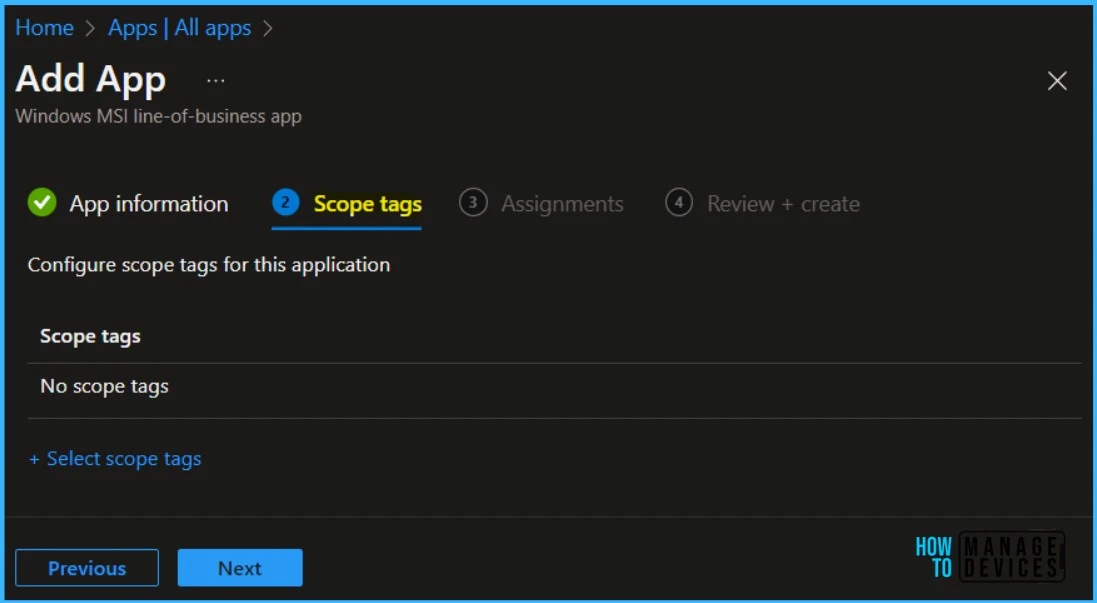
Scope tags are filtering options provided in Intune to ease the admin jobs. In the scope tag section, you will get an option to configure scope tags for the application. Click on Next.
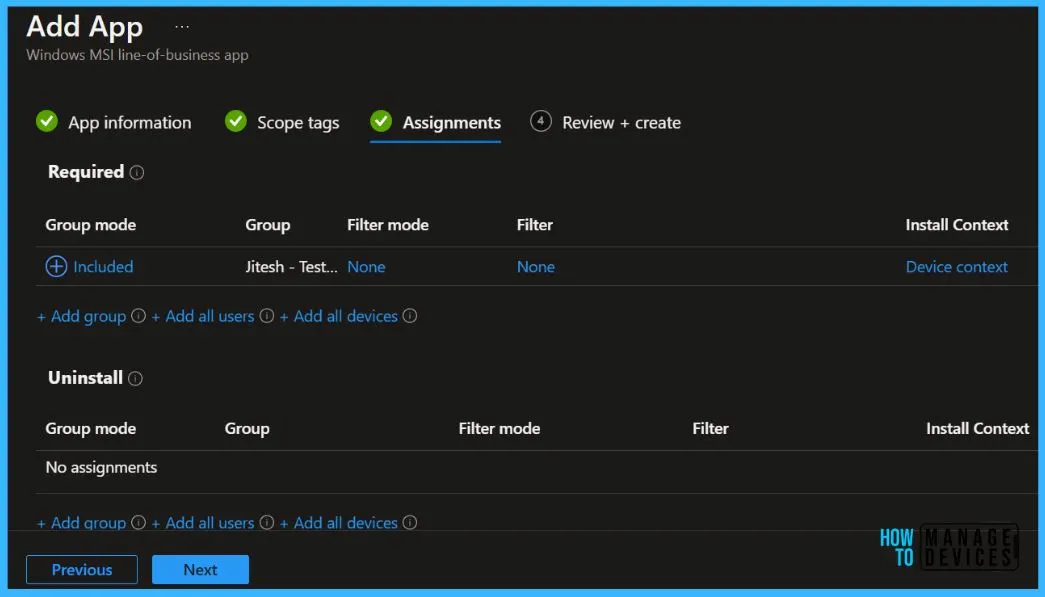
Under Assignments, In Included groups, click Add groups and then choose Select groups to include one or more groups to which you want to deploy Zoom, Click Next to continue.
Note – As we selected App Install Context, Device for the application. You will not get the option to make it available for enrolled devices. Changing the Install context to User would allow having all these options here.
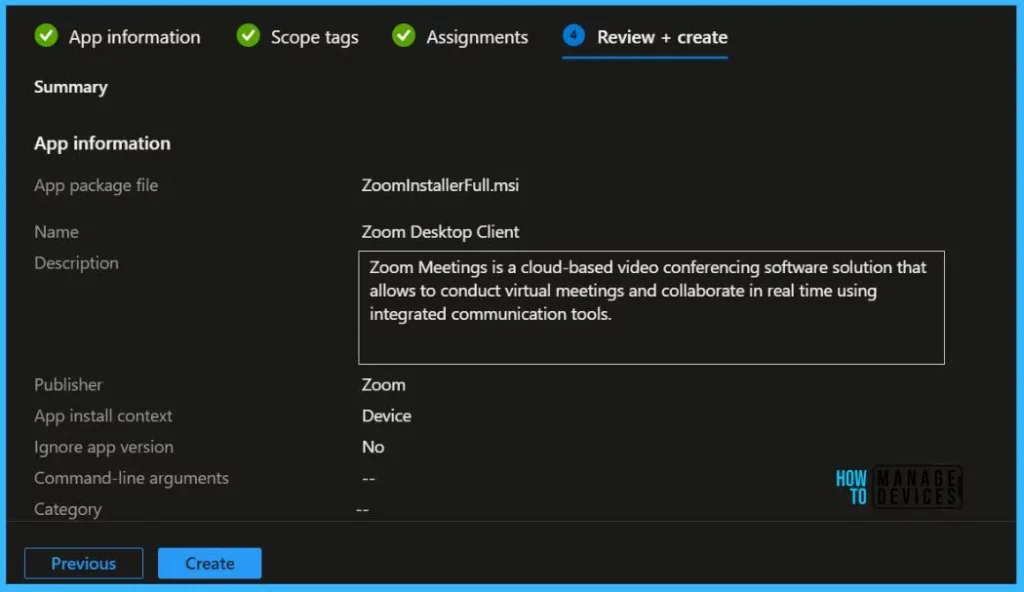
You will see the details you provided during the application creation process. Review your settings and select Create to add the app to Intune.
Here you will see the status Uploading is in progress – How much time will it take to complete the upload? It depends on the size of the application and the speed of internet connectivity.
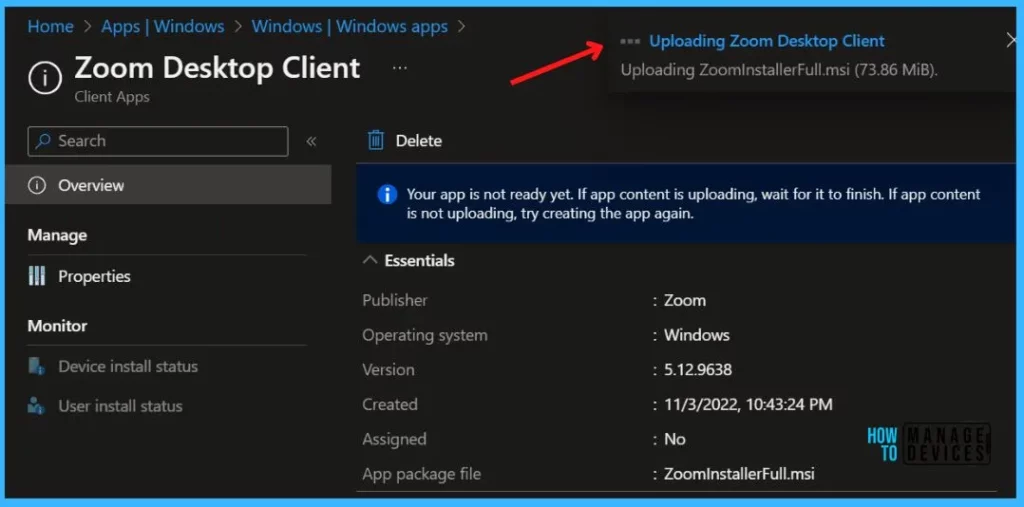
Please wait some time to complete the upload process, and you can check the progress by clicking on the Notification icon. Once the package is uploaded and finished, you will get the status “Upload finished.”
Monitor Zoom Deployment from Intune Portal
Where is the folder where Intune downloads the applications before it installs on a Windows device? Intune cache folder location, how to find out cache folder location. Check more details Cache Folder Windows 10 MDM Agent LOB Applications.
To monitor the application installation, select the application, and Under Monitor, you can check the device and user check-in status. If you click on Device install status or User install status, additional details are displayed.
Check Event Viewer for Application Installation Status
To confirm the application has been installed successfully, you can also check it in Event Viewer. Let’s follow the below steps to check the Application Deployment status.
The Intune event ID 1922 indicates that deployment was successful in Windows 10 or 11 devices. You can also see the exact value of the policy being applied to those devices.
The Event log path to confirm, Navigate – Applications and Services Logs – Microsoft – Windows – Devicemanagement-Enterprise-Diagnostics-Provider – Admin
EnterpriseDesktopAppManagement CSP: An application install has succeeded. MSI ProductCode: , User SID: , Result: (The operation completed successfully.)Tracking Intune MSI App Deployment from Windows Registry
All the information can be easily tracked using the registry for tracing deployment issues. LOB app deployment details can be checked from the following registry path HKEY_LOCAL_MACHINE\SOFTWARE\Microsoft\EnterpriseDesktopAppManagement.
There will be two sub-keys corresponding to the
- system SID (all zeros) [will list all device context MSI deployments]
- user SID [will list all user context MSI deployments]
Under System or user subkeys, you will find the MSI app deployments from Intune listed using the MSI Product ID of the package. Explore the post from Joy on how you can troubleshoot Intune app deployment issues using the Windows 10 or 11 registry and events.

Thanks for posting this. I followed these steps, including setting “Ignore App Version” to “Yes”, as is stated in the written instructions, however my client computers never update, and are perpetually stuck on an older version. I notice that your screen shots, however, have this setting set to “No”. Which is correct? Or do you have any suggestions as to why Zoom will not update when it’s set to “Yes”?
I thought we shouldn’t use LOB and Win32 apps togther
Hey, so Zoom MSI command line switches are not mentioned. You have to use them to tell Zoom what to do when installing from a MSI. If you do nothing Zoom will not update or allow users to update. Zoom just changed the command and now there are many options. Take a glance at these. I am currently forcing update by re-uploading the msi, and using command line switches to allow for user to check for updates and to auto update. Hope that helps!
https://support.zoom.us/hc/en-us/articles/10365151862285
Is there any way to deploy Zoom patch to user who installed Zoom applications.