Let’s learn how to Enable and Disable Unwanted Services from Windows 11. Local service is an essential part of Windows 11. The Local service in Windows 11 runs from the boot time until the Shutdown time.
Local service is run in the background only, enabling the applications in the system to be intended for related features like authentication, printing, and networking. The system automatically does the services. But sometimes, as users, we must check and control the services.
When you manually control the services, you can troubleshoot the problem and fix the issue of a Windows feature or application. There are many options for the user to control the services. You can stop, start, turn on and off the application you have the problem with.
The local services option is essential, and the system is beneficial to manage the services. In this article, you will learn how to turn on and off a service that runs in the background using different methods.
What are the Features of Services in Windows 11?
Services are the main part of a Windows 11 system. The services are run in the background when the system starts boots. There are many features of this system’s services that are given below.
1. The user can start and stop particular services running in the system
2. The services will help the system to perform better
3. You can easily enable and disable a service in the system
4. It is very easy to do manually
Ways to Enable and Disable Unwanted Services from Windows 11
Local service can stop it in many methods. The simple method is to search for services in the Start Menu and select a service. This is the easy method to access the service.
- Search Services on the Start menu
- Click on the Open
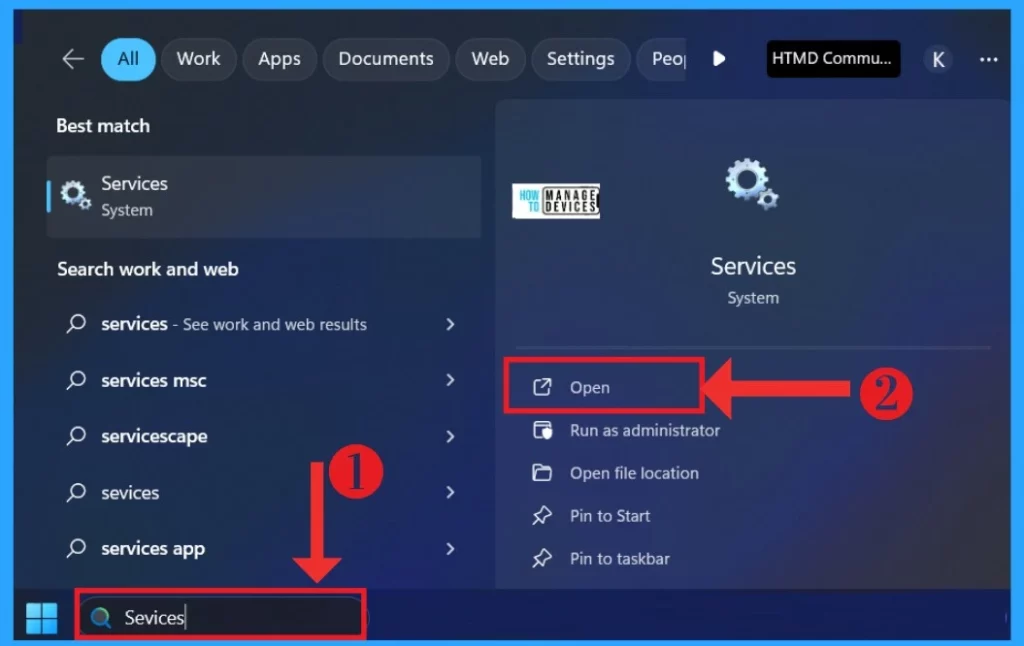
How to Stop Services on the Windows 11
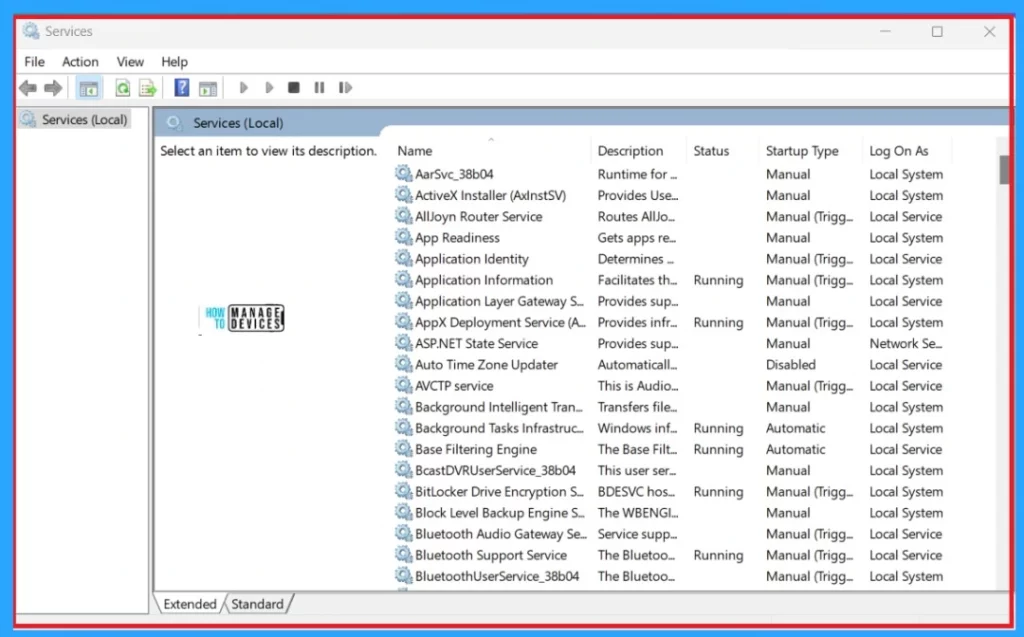
You can see many available services in the window when you open the services. You can select the services you want to stop when you select those that also show the short details of the particular service.
Note: When a service is not stopped running, that means it’s a critical service for the system
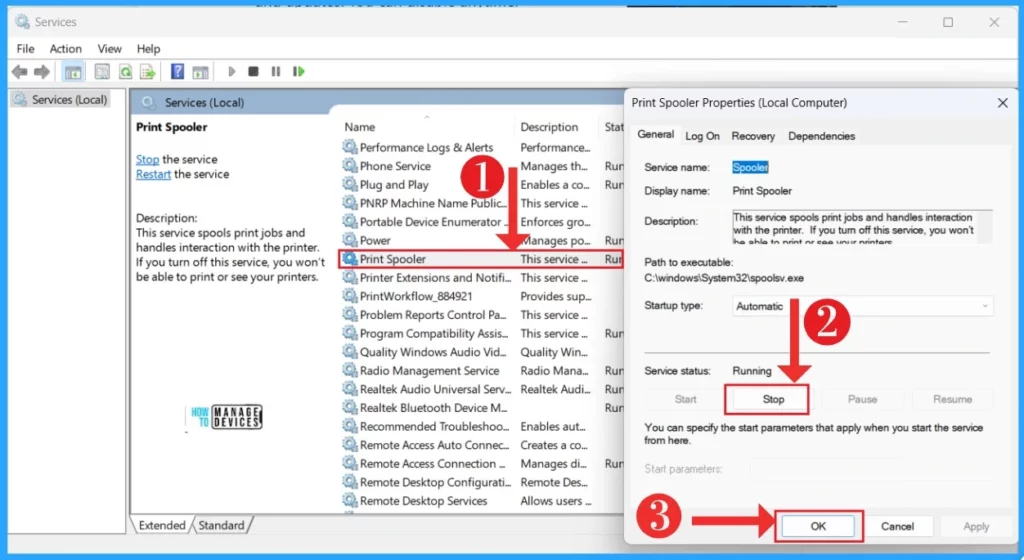
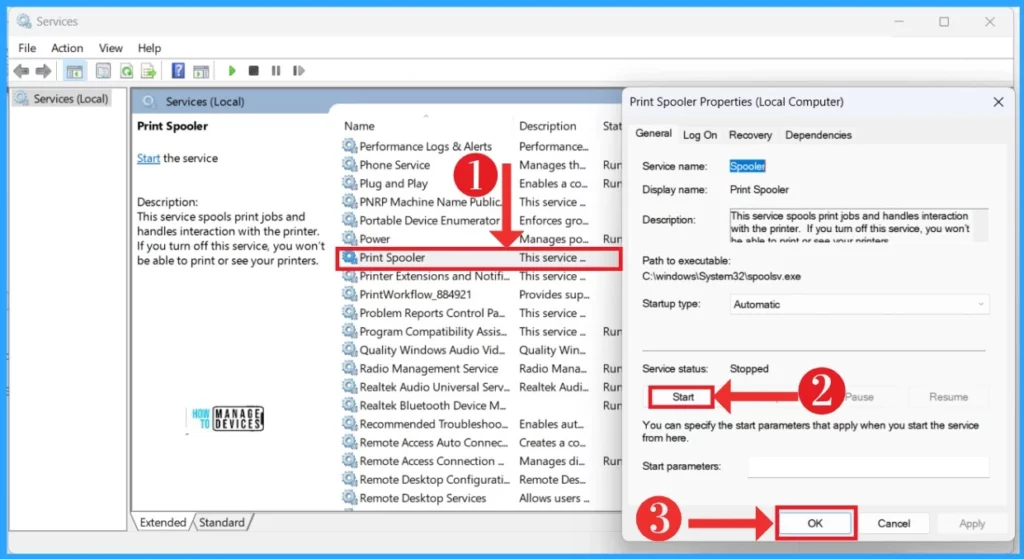
Here, I select the Print spooler; in the description of the print spooler, it shows that This service Spools print jobs and handles interaction with the printer. If you turn off this service, you won’t be able to print or see your printers.
- Double-click on the Service that you want to stop
- Click on the Stop option
- Click on the OK button
How to Start Services on the Windows 11
The other part is how to restart or start a stopped service. It is a very easy step here. I am showing the Print spooler as an example because it’s not a critical service. Above, I showed how it stopped. If you want to Start a service, search for that service and double-click on the service to start, then Click on the Start option and the OK button.
How to Disable Services on Windows 11
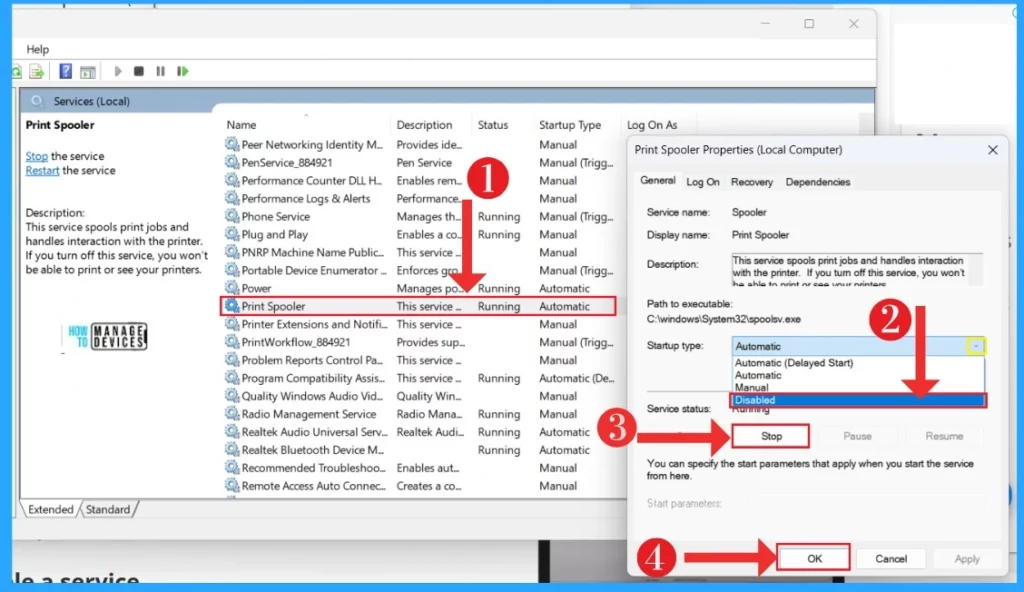
Disabling is the next part of the service. You can turn off a service by selecting the services you want to disable and double-clicking on the Service. Then, you will get a pop-up window.
- Click on the Startup type, and you will get many options list
- Select the Disable option from that list
- Click on the Stop Running option
- Click on the OK button
| Startup type | Used to |
|---|---|
| Automatic (Delayed Start) | When the system is turned on starts, the services automatically |
| Automatic | During the start, Automatically start the services |
| Manual | It allows the user to start a service manually |
| Disable | It allows that a service is not running even when it is required to be running |
How to Enable Services on Windows 11
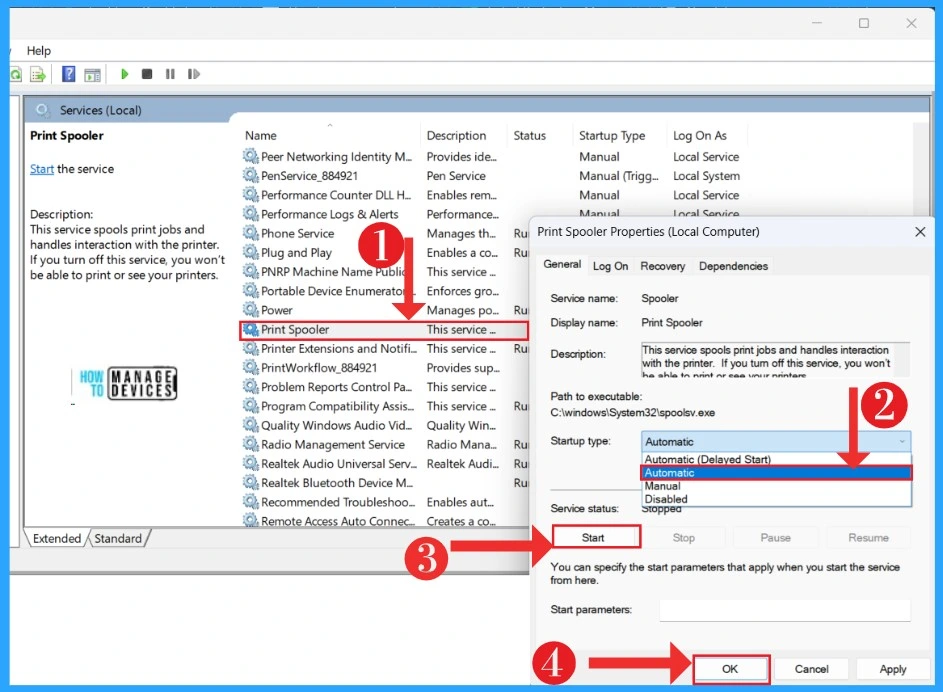
Enabling the services is a straightforward part of Windows 11. This is like the above steps. Select the service that you want to disable. Here, I show the Print spooler, and Double click for the option for the Enabling settings.
Click on the start-up type and select automatically. There are many options for you to adjust, but you can choose the automatic option for enabling. Click on the start option and Click on the ok button.
Stop a Service Using Task Manager
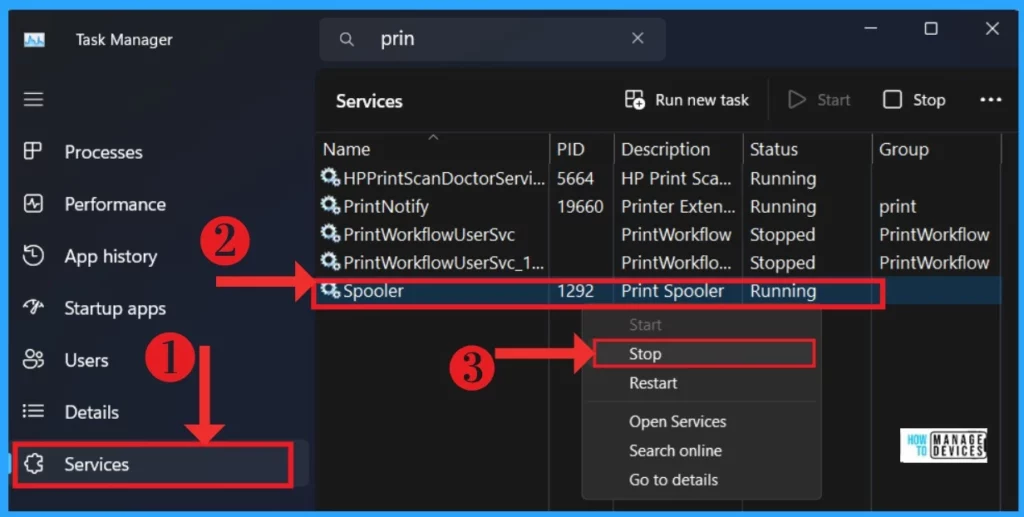
The Task manager is a Component of your operating system; it is a powerful tool that will help the process and performance of your system. In task manager, you can start or stop and restart the service for this open task manager on the Windows 11 PC. In the search box, search for the task manager and open it.
- In the task manager, Select Services from the left side of the window
- Select Print spooler (you can search for the service that you want)
- Right-click on the Print spooler
- In the context menu, click on the Stop option
- Improve Windows PC Performance by using New Efficiency Mode
- Enable Disable Settings Homepage in Windows 11
Stop a Service Using Command Prompt
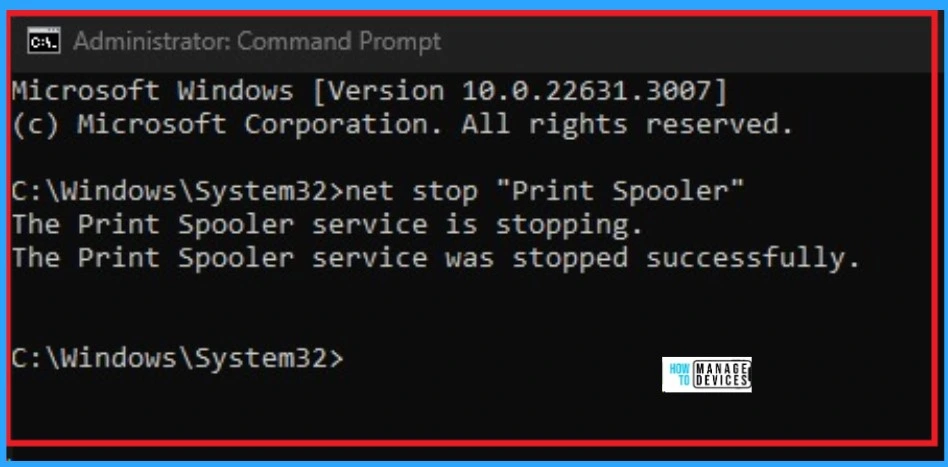
Using a command prompt is always a next-level experience. You can start and stop an unwanted service using this in Windows 11 PC. For this, open a command prompt as an Administrator.
- In the command prompt, Enter the following command to Stop a service
net stop “NAME-SERVICE” (Change the name of the service that you want to stop)
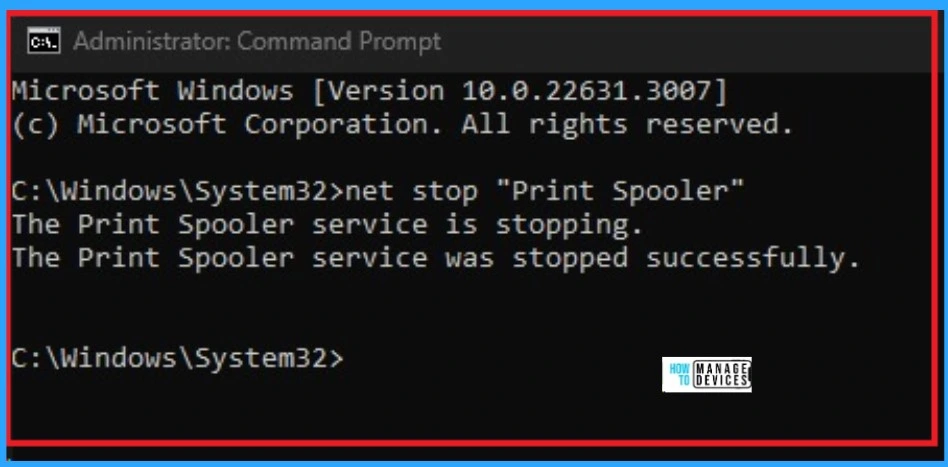
Start a Service Using Command Prompt
The other part is how to start the service using the Command prompt. It is an easy task. Using the command prompt, you can start, stop, enable, and disable the services. For this, open the command prompt as an Administrator, copy the command below to start the service, and press the Enter key.
net start “NAME-SERVICE”
| Used for | Commands |
|---|---|
| Start | net start “NAME-SERVICE” |
| Stop | net stop “NAME-SERVICE” |
| Enable | sc config “NAME-SERVICE” start=auto |
| Disable | sc config “NAME-SERVICE” start=disabled |
We are on WhatsApp. To get the latest step-by-step guides and news updates, Join our Channel. Click here – HTMD WhatsApp.
Author
Krishna. R is a computer enthusiast. She loves writing on Windows 11 and Intune-related technologies. She likes to share her knowledge, quick tips, and tricks with Windows 11 or Windows 10 with the community.
