Let’s learn how to turn on or off Cloud Content Search in Windows 11. You can use Windows Search from your taskbar to find what you want on your cloud device or the web. Windows Search can personalize your search results by including content from OneDrive, SharePoint, Outlook, Bing, and other services.
If you turn on the Microsoft Account settings for cloud content search, Windows search will show results from items in your personal OneDrive, Outlook, and other Microsoft services. Bind will personalise your results if you search the web or get web search suggestions using Windows search.
You can also earn a Microsoft rewards point when you search with Bing in the Windows search box. Windows search can save and use your web search history with your Microsoft accounts to get more relevant web search results and suggestions.
If you turn on the Work or School account setting for cloud content search, Windows Search will show results from OneDrive for Business, Outlook, SharePoint, and more from Microsoft Search. Windows Search saves your work or school account. Sign in using your work or school account to access the Bing search history page.

Table of Contents
Turn Off Cloud Content Search in Windows 11 using Registry GPO Intune Policies
In Windows 11, you can turn on or off cloud content search. The methods for changing the settings are listed below.
- If you want to know details about how to control search, click here: Control Search Options in Windows 11 using Policies | 42 Group Policy Settings | 14 Intune Policy Settings.
- If you want to know more details about Privacy and Security settings, click here: Privacy and Security Settings in Windows 11.
| How to Turn On or Off Cloud Content Search |
|---|
| Windows Settings |
| Local Group Policy Editor |
| Registry File |
| Intune Policy |
- Add or Remove Favorites in Registry Editor in Windows 11 | Do you want to Make Quick Registry Edits?
- Top 83 Windows 11 Desktop Admin Interview Questions
- Azure Monitor Agent and Remote Session Lock Configuration Windows 365 Cloud PC August 2024 Update
Windows Settings
To turn on or off cloud content search, you can use the Windows settings to make any modifications. To do so, click the Windows button, select Settings, or press Win Key + I to open settings directly.
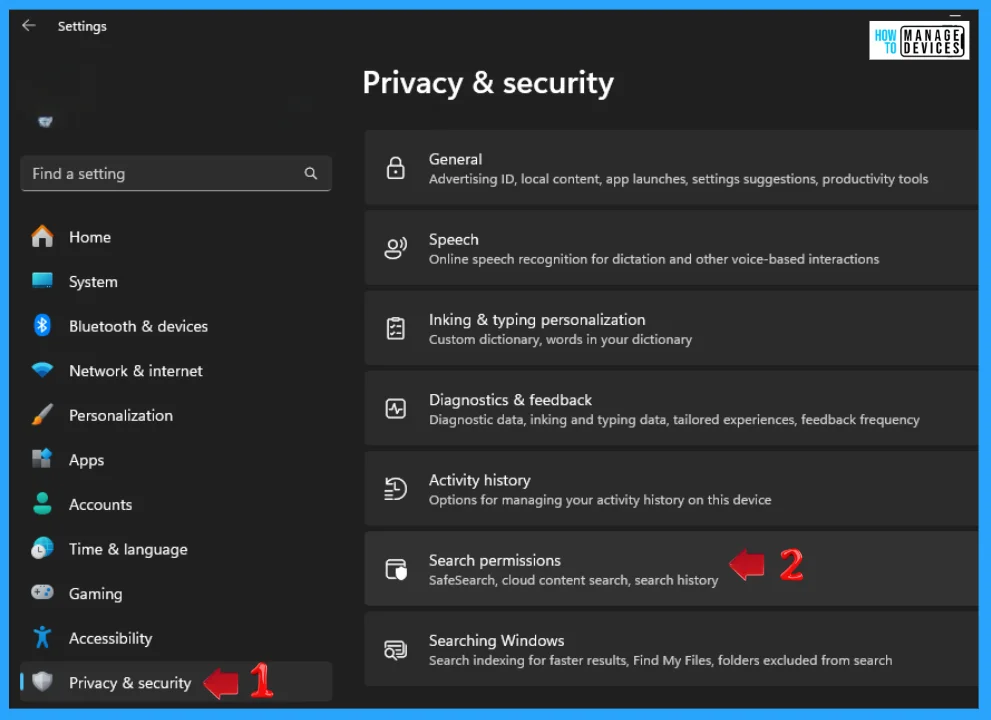
Then, under settings, click the Privacy & Security option on the left panel. Find the Search Permissions (used for SafeSearch, cloud content search, and search history) option in the right panel, then click on it to open.
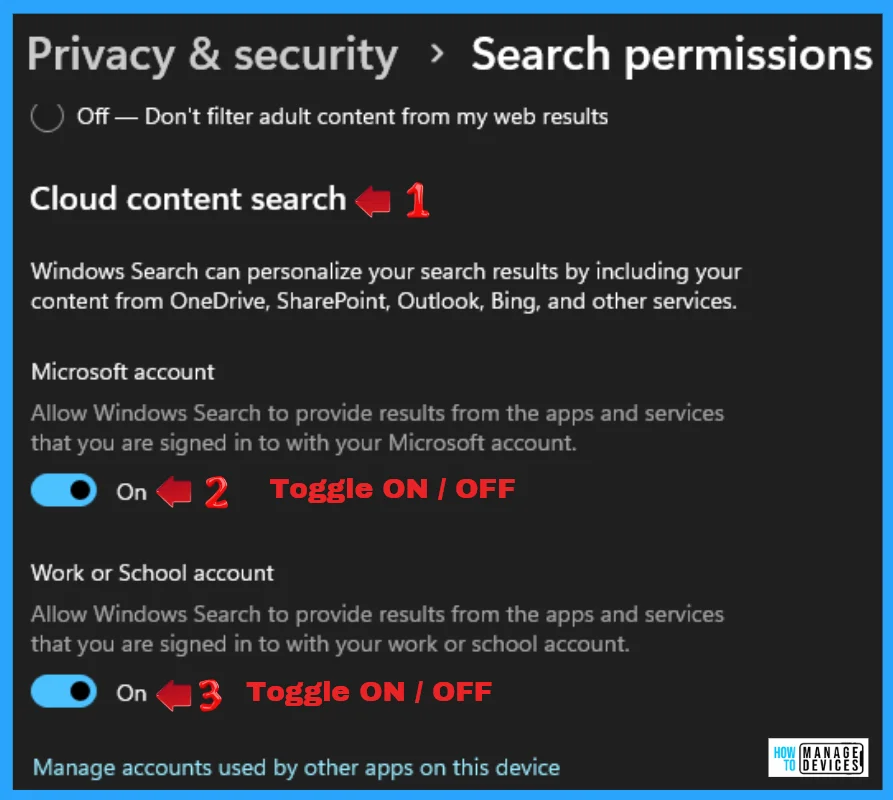
When the Search Permissions window opens, scroll down to find Cloud Content Search. Windows search can personalize your search results by including your content from OneDrive, SharePoint, Outlook, Bing, and other services. You can use two options listed below: toggle the adjacent button to turn on or off each option.
- Microsoft Account: Allow Windows Search to provide results from the apps and services you are signed in to with your Microsoft account.
- Work or School Account: Allow Windows search to provide results from the apps and services you are signed into with your work or school account.
Local Group Policy Settings
In Windows 11, you can set the Local Group Policy Editor to Turn on or off Cloud Content Search. Open the Local Group Policy to turn on or off Cloud Content Search, and follow the process.
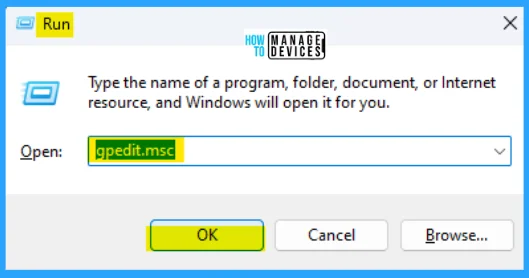
- Open the Run command and press Win Key + R.
- Type gpedit.msc
- Click OK or press Enter.
When the Group Policy Editor opens, navigate to the following path to access the required policy settings. To make changes, select Search.
Computer Configuration>Administrative Templates>Windows Components>Search

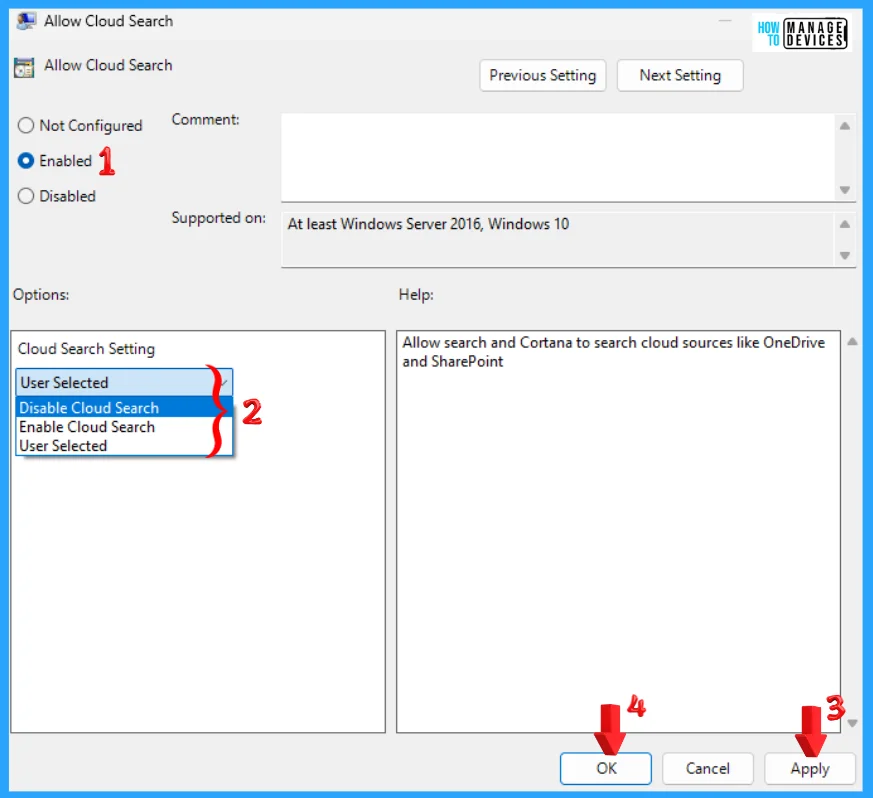
Double-click Allow Cloud Search to open the settings. Here, you can see that it needs at least Windows Server 2016 and Windows 10. You can choose the following option: press Apply, then press the OK button to apply the changes. You can turn on or off Cloud Content Search in Windows 11.
- If you choose Not Configured or Disabled, the cloud content search is turned off.
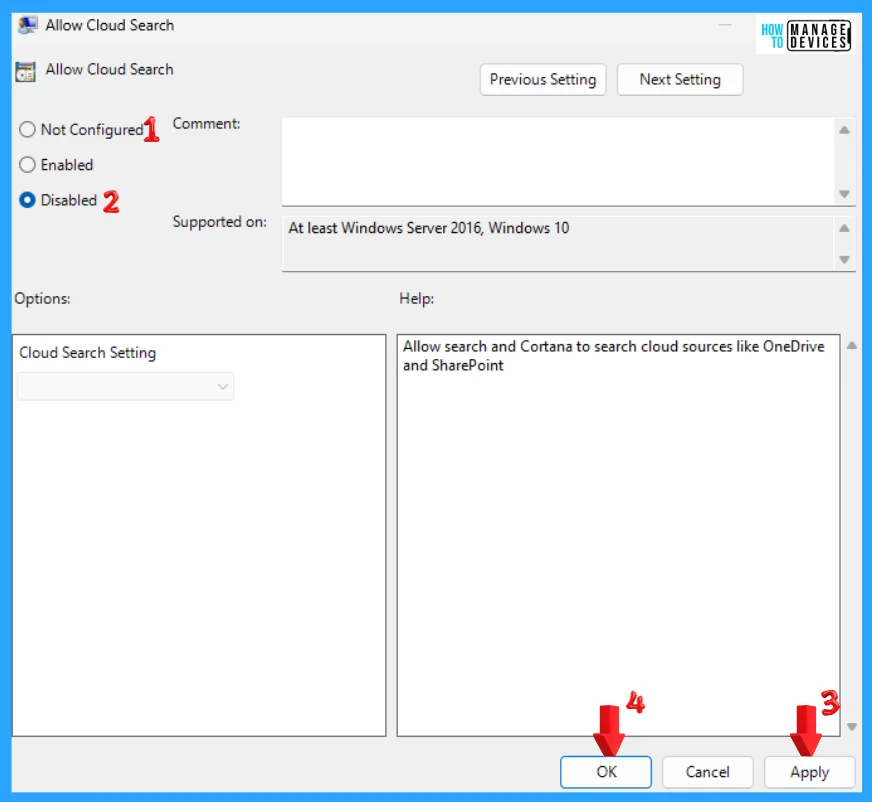
This allows Search and Cortana to search cloud sources like OneDrive and SharePoint. If you choose Enabled, you can turn on Cloud Content Search. When you select enable, you must choose the following option to help.
- Enabled
- Disable Cloud Search
- Enable Cloud Search
- User Selected
Registry File
Using the registry editor, there are ways to turn on or off cloud content search in Windows 11. This procedure is done using the Registry File. Let’s discuss the step-by-step guidelines for it. You can do the above using the three methods listed below.
- Current User
- All Users
- Default User Choice
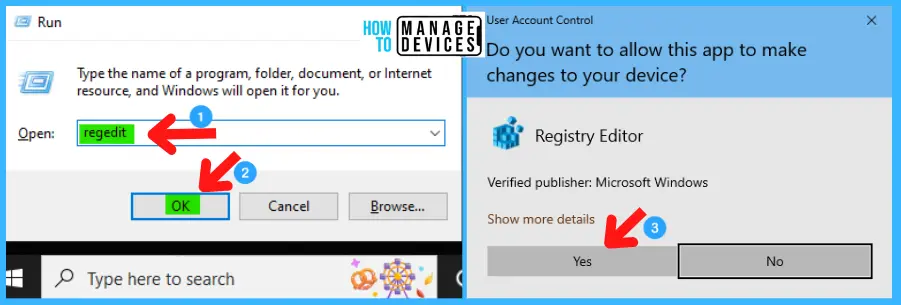
Now, open Run Window, and press Windows Key + R from the keyboard simultaneously. This is the keyboard shortcut to open the run window. Now, type regedit and press Enter.
| Registry Editor |
|---|
| Window Key + R (To open run command) |
| Type ‘regedit‘ and press OK |
| Administrator Permission press Yes |
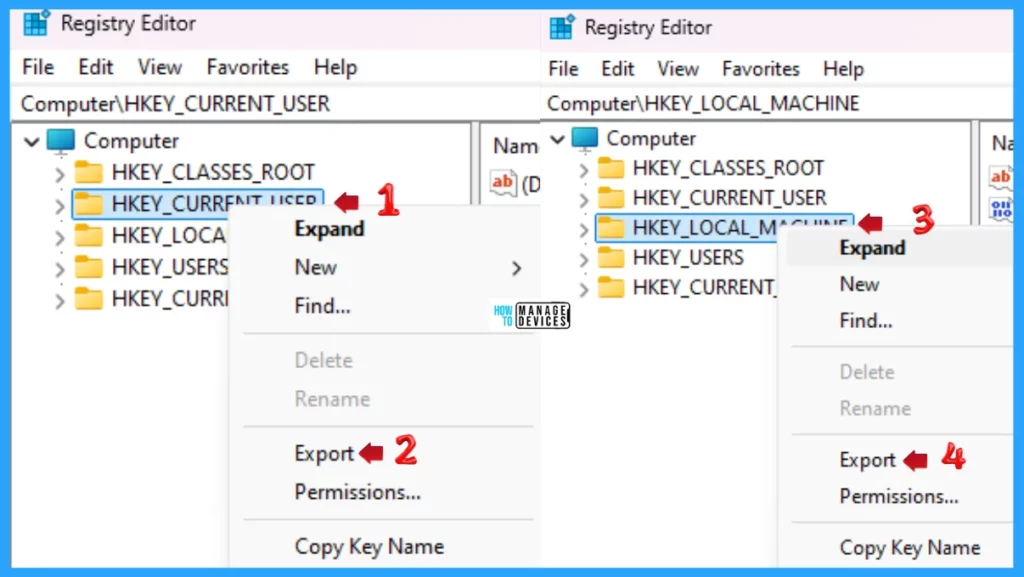
NOTE! Take Backup—If any mistake occurs in the Registry Editor, it may affect the system. It is advisable to take a backup of the Registry before proceeding. To back up, go to File in the top left corner of the Registry Editor. Click on it, then select Export and save the backup.
- Go to File.
- Right-click on HKEY_CURRENT_USER and HKEY_LOCAL_MACHINE.
- Click on Export.
- Please save it.
Current User – Microsoft Account
Use the .reg file to turn on or off Cloud Content Search in Windows for the Current User. To create a .reg file, open NotePad, type the following code, and name it TurnOnCloudContentSearchCurrentUser. Then, save it on the desktop using the .reg extension, which enables the cloud content search.
Windows Registry Editor Version 5.00

[HKEY_CURRENT_USER\Software\Microsoft\Windows\CurrentVersion\SearchSettings]
"IsMSACloudSearchEnabled"=dword:00000001
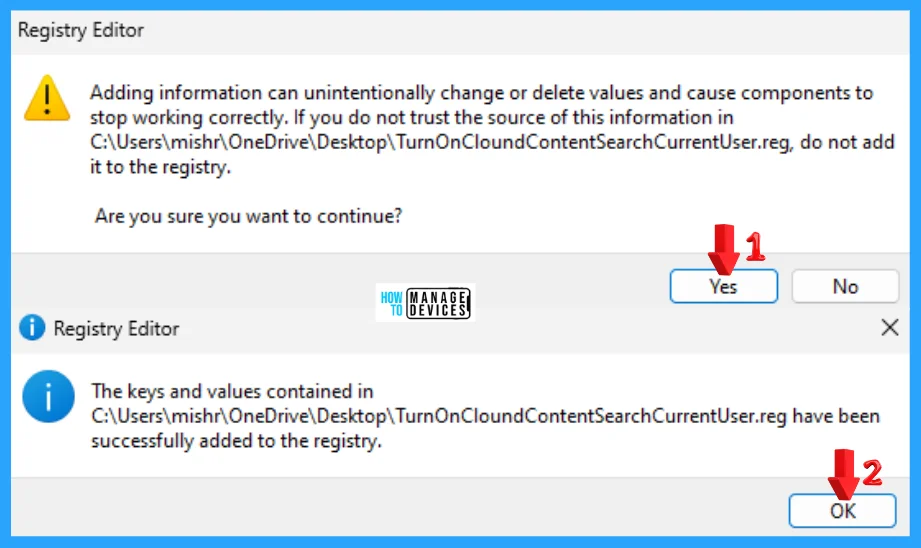
When the file is saved at your selected location, double-click on it. The User Account Control Window will open; click Yes to continue. Then, the Registry Editor Waring window will open.
Adding information can unintentionally change or delete values and cause components to stop working correctly. If you do not trust the source of this information in the path you created, do not add it to the registry; otherwise, click Yes to continue.
The following window shows that the key and value you added have been successfully added to the registry editor. Now click on OK and restart your PC to add the applicable test.
Use the .reg file to turn on or off Cloud Content Search in Windows for the Current User. To create a .reg file, open NotePad, type the following code, and name it TurnOffCloudContentSearchCurrentUser. Then, save it on the desktop using the .reg extension, which disables the cloud content search.
Windows Registry Editor Version 5.00

[HKEY_CURRENT_USER\Software\Microsoft\Windows\CurrentVersion\SearchSettings]
"IsMSACloudSearchEnabled"=dword:00000000
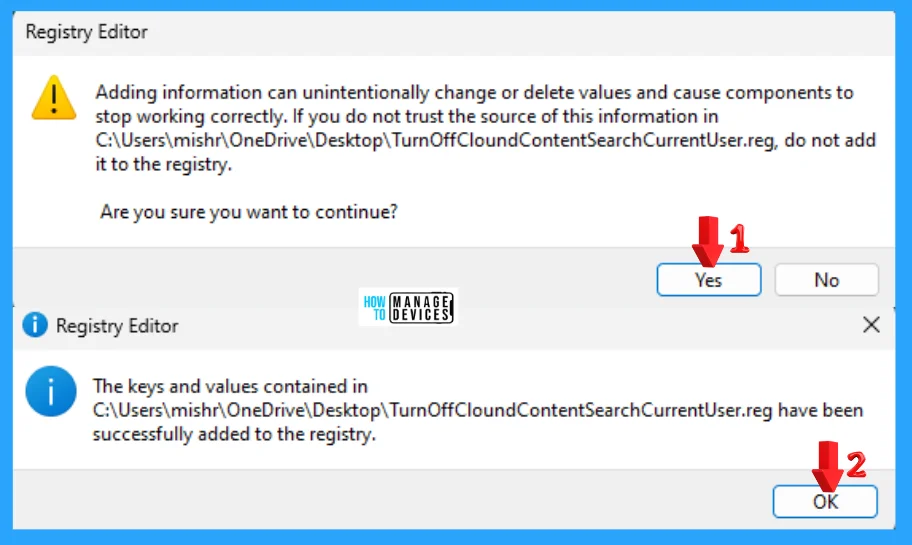
When the file is saved at your selected location, double-click on it. The User Account Control Window will open; click Yes to continue. Then, the Registry Editor Waring window will open.
Adding information can unintentionally change or delete values and cause components to stop working correctly. If you do not trust the source of this information in the path you created, do not add it to the registry; otherwise, click Yes to continue.
The following window shows that the key and value you added have been successfully added to the registry editor. Now click on OK and restart your PC to add the applicable test.
Current User – Work or School Account
Use the .reg file to turn on or off Cloud Content Search in Windows for the Current User – Work or School Account. To create a .reg file, open NotePad, type the following code, and name it TurnOnCloudContentSearchCurrentUserWorkSchool. Then, save it on the desktop using the .reg extension, which enables the cloud content search.
Windows Registry Editor Version 5.00

[HKEY_CURRENT_USER\Software\Microsoft\Windows\CurrentVersion\SearchSettings]
"IsAADCloudSearchEnabled"=dword:00000001
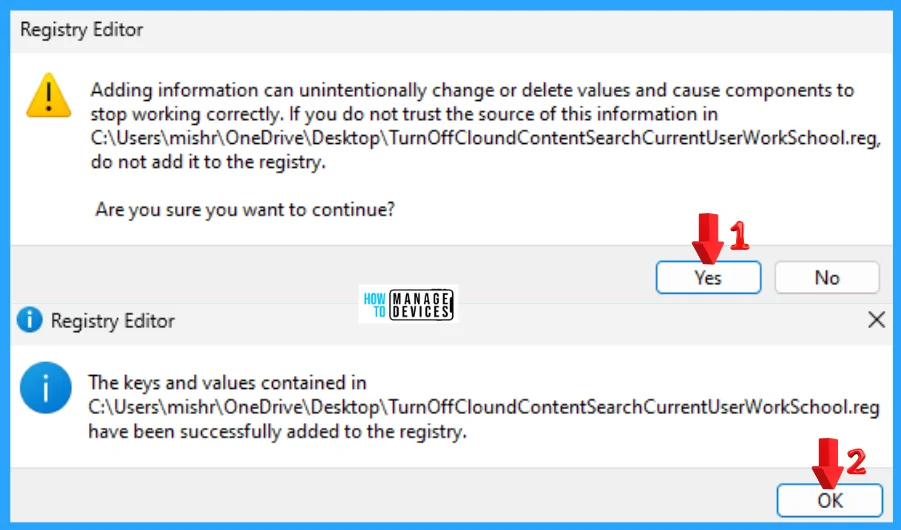
When the file is saved at your selected location, double-click on it. The User Account Control Window will open; click Yes to continue. Then, the Registry Editor Waring window will open.
Adding information can unintentionally change or delete values and cause components to stop working correctly. If you do not trust the source of this information in the path you created, do not add it to the registry; otherwise, click Yes to continue.
The following window shows that the key and value you added have been successfully added to the registry editor. Now click on OK and restart your PC to add the applicable test.
Use the .reg file to turn on or off Cloud Content Search in Windows for the Current User – Work or School Account. To create a .reg file, open NotePad, type the following code, and name it TurnOffCloudContentSearchCurrentUserWorkSchool. Then, save it on the desktop using the .reg extension, which disables the cloud content search.
Windows Registry Editor Version 5.00

[HKEY_CURRENT_USER\Software\Microsoft\Windows\CurrentVersion\SearchSettings]
"IsAADCloudSearchEnabled"=dword:00000000
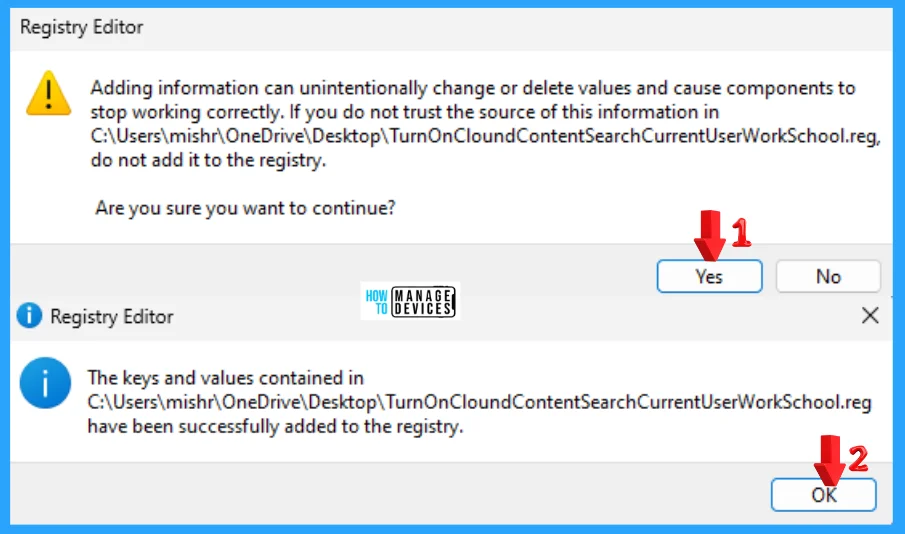
When the file is saved at your selected location, double-click on it. The User Account Control Window will open; click Yes to continue. Then, the Registry Editor Waring window will open.
Adding information can unintentionally change or delete values and cause components to stop working correctly. If you do not trust the source of this information in the path you created, do not add it to the registry; otherwise, click Yes to continue.
The following window shows that the key and value you added have been successfully added to the registry editor. Now click on OK and restart your PC to add the applicable test.
All Users – Enable Cloud Content Search
Use the .reg file to turn on or off Cloud Content Search in Windows for All Users. To create a .reg file, open NotePad, type the following code, and name it ForceTurnOnCloudSearch. Then, save it on the desktop using the .reg extension, which enables the cloud content search.
Windows Registry Editor Version 5.00

[HKEY_LOCAL_MACHINE\SOFTWARE\Policies\Microsoft\Windows\Windows Search]
"AllowCloudSearch"=dword:00000001
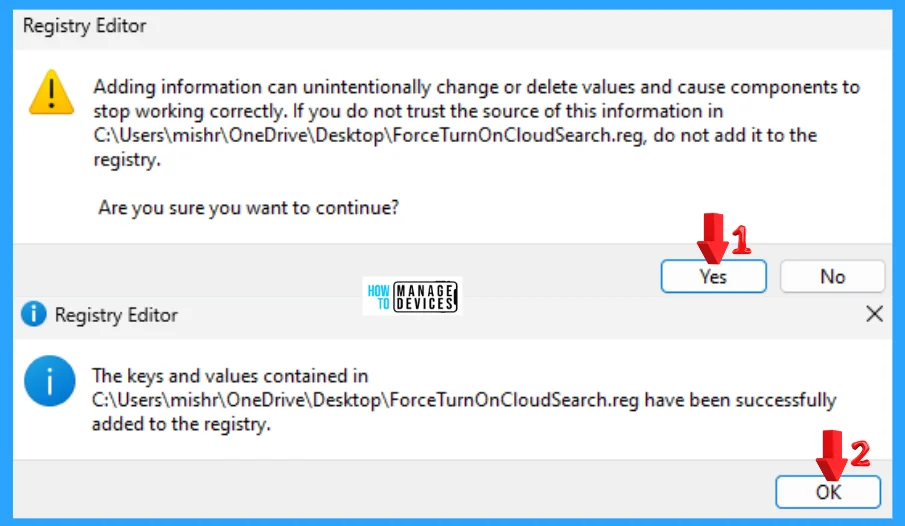
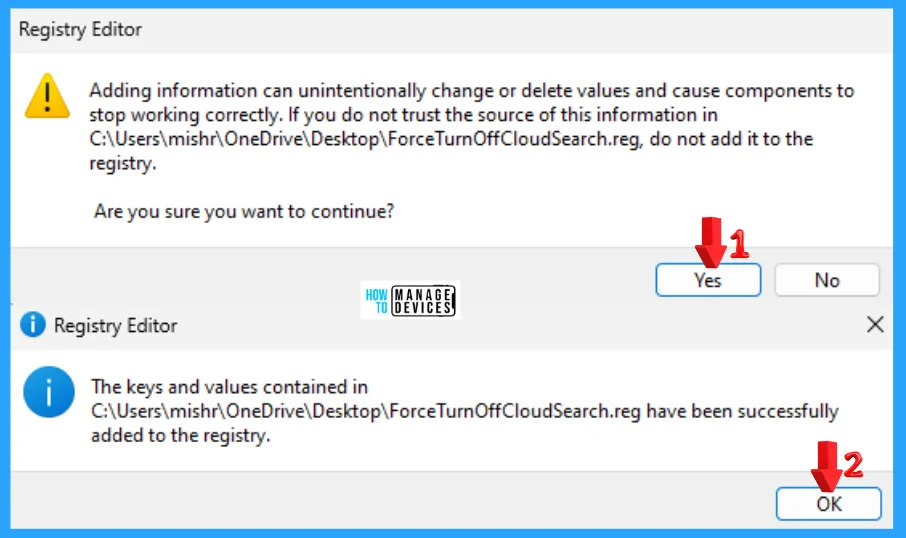
When the file is saved at your selected location, double-click on it. The User Account Control Window will open; click Yes to continue. Then, the Registry Editor Waring window will open.
Adding information can unintentionally change or delete values and cause components to stop working correctly. If you do not trust the source of this information in the path you created, do not add it to the registry; otherwise, click Yes to continue.
The following window shows that the key and value you added have been successfully added to the registry editor. Now click on OK and restart your PC to add the applicable test.
All Users – Disable Cloud Content Search
Use the .reg file to turn on or off Cloud Content Search in Windows for All Users. To create a .reg file, open NotePad, type the following code, and name it ForceTurnOffCloudSearch. Then, save it on the desktop using the .reg extension, which disables the cloud content search.
Windows Registry Editor Version 5.00

[HKEY_LOCAL_MACHINE\SOFTWARE\Policies\Microsoft\Windows\Windows Search]
"AllowCloudSearch"=dword:00000000
When the file is saved at your selected location, double-click on it. The User Account Control Window will open; click Yes to continue. Then, the Registry Editor Waring window will open.
Adding information can unintentionally change or delete values and cause components to stop working correctly. If you do not trust the source of this information in the path you created, do not add it to the registry; otherwise, click Yes to continue.
The following window shows that the key and value you added have been successfully added to the registry editor. Now click on OK and restart your PC to add the applicable test.
All Users – Default User Choice Cloud Content Search
Use the .reg file to turn on or off Cloud Content Search in Windows for All Users. To create a .reg file, open NotePad, type the following code, and name it DefaultUserChoiceCloudSearch. Then, save it on the desktop using the .reg extension, which disables the cloud content search.

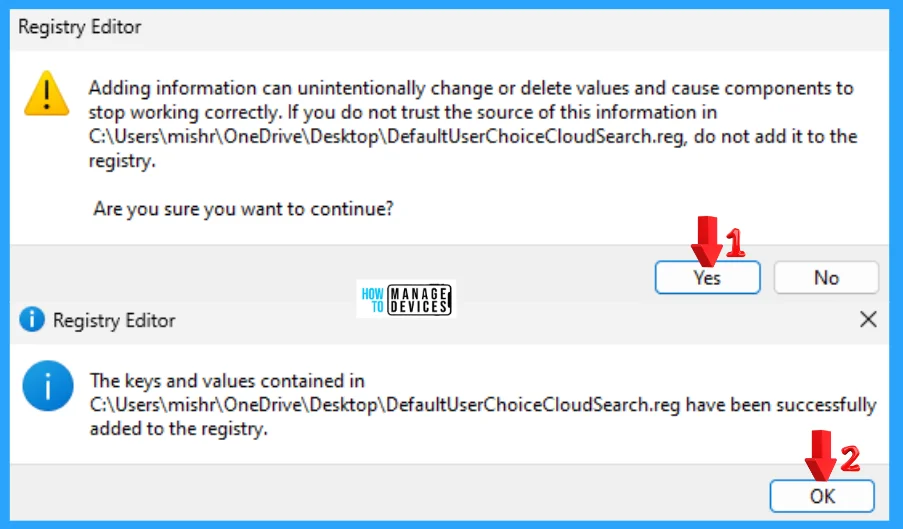
When the file is saved at your selected location, double-click on it. The User Account Control Window will open; click Yes to continue. Then, the Registry Editor Waring window will open.
Adding information can unintentionally change or delete values and cause components to stop working correctly. If you do not trust the source of this information in the path you created, do not add it to the registry; otherwise, click Yes to continue.
The following window shows that the key and value you added have been successfully added to the registry editor. Now click on OK and restart your PC to add the applicable test.
Intune Policy
Let’s learn how to Add or Remove All Program Lists from the Start Menu on a Windows device through configuration profiles in Intune and follow these steps meticulously.
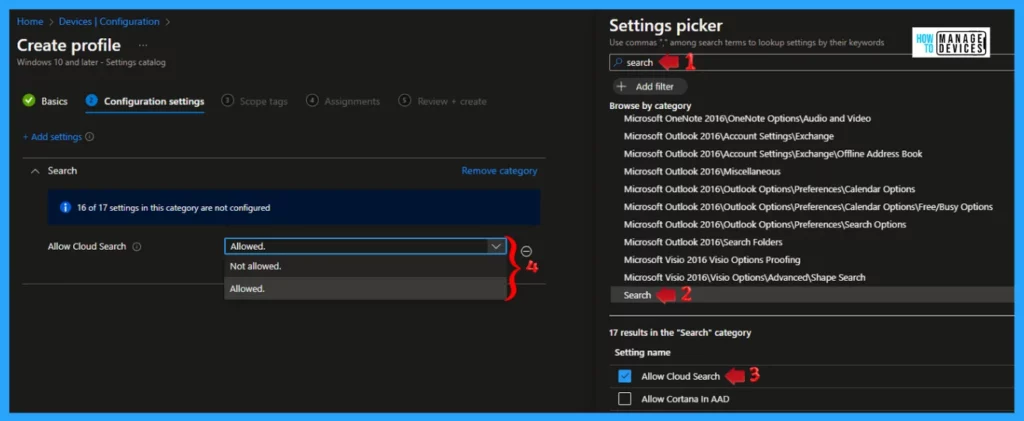
- Search with “Search” in the Settings picker search box.
- Select the Search Category.
- Select the policies listed below from the Settings name section.
- Allow Cloud Search
- Choose one of the following actions
- Allowed– Select the options from the Drop-Down menu
- Now Allowed – Select the options from the Drop-Down menu
- Choose one of the following actions
- Allow Cloud Search
NOTE: Refer to the Intune Settings Catalog policy creation guide to complete the policy creation process – Create Intune Settings Catalog Policy.
Read this guide for more information on Customizing Windows 11 S
I hope the information on How to Turn On or Off Cloud Content Search in Windows 11 is helpful. Please follow us on the HTMD Community and visit our website, HTMD Forum, if you like our content. Suggest improvements, if any, and we would love to know which topic you want us to explore next.
We are on WhatsApp. To get the latest step-by-step guides and news updates, Join our Channel. Click here – HTMD WhatsApp.
Author
Alok graduated with a Master of Computer Applications (MCA) degree. He loves writing on Windows 11 and related technologies. He likes to share his knowledge, quick tips, and tricks with Windows 11 or Windows 10 with the community.
