Let’s learn how to Add or Remove Desktop Icons in Windows 11. Desktop icons are small visual representations. Removing icons is one of the best and easiest ways to clean and speed up your Windows 11.
Desktop icons are small visual representations of programs, files, folders, or components displayed on a computer screen. We can easily add or remove icons without uninstalling them, and whenever we want, we can search for them and quickly get them.
Desktop icons help users navigate a computer system or a website by showing the type of file or function they present. They are part of the operating system’s graphical user interface. Using this feature, we can easily hide or add icons.
Adding or removing Desktop icons is very easy. Hiding Desktop icons helps secure our personal files. This blog post will help us remove or add icons easily.
- Windows 11 Issue with Copilot and Desktop icons might move unexpectedly between monitors
- How to Change User Account Control Settings in Windows 11
- How to Remove Start Backup in File Explorer of Windows11
- How to Remove and Replace Background using Windows Photos
What are the Features of Desktop Icons?
Desktop icons are symbols that help users understand and move through your app. Some important features are given below.
1. It helps users quickly and easily identify
2. It provides a more appealing visual representations
3. It helps to recognize and locate items easily
Add or Remove Desktop Icons in Windows 11
In Windows 11, different methods are used to add or remove desktop icons. The table below shows the details of each method.
| Different methods |
|---|
| 1. Using Settings App |
| 2. Right-click on the screen |
| 3. Using Group Policy |
1. Using Settings App
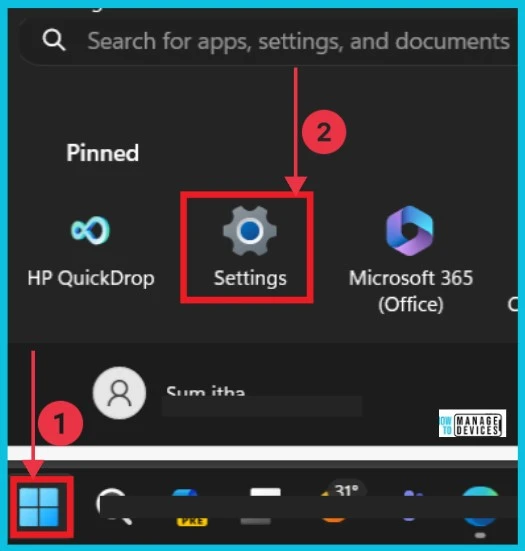
You can easily Add or Remove Desktop Icons in Windows 11 using the Settings app. This is a simple method: Select the Settings app from the start menu.
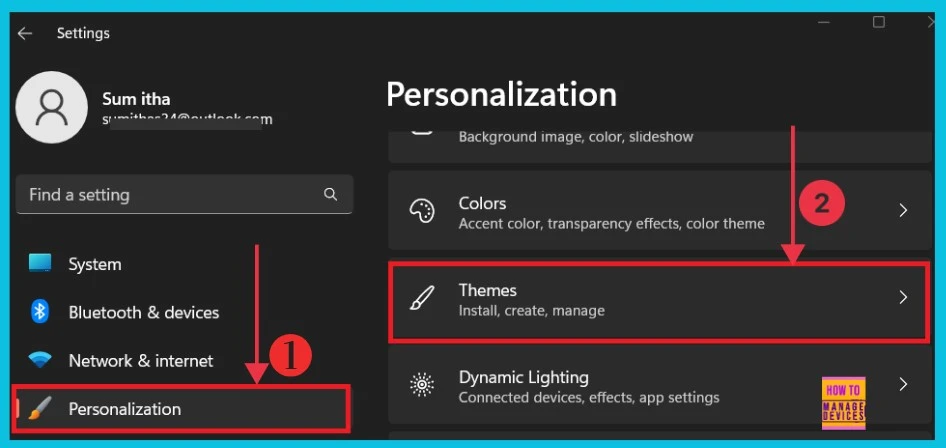
After clicking the settings app, select Personalization from the left side and click Themes on the right. This option helps to install, create, and manage themes.
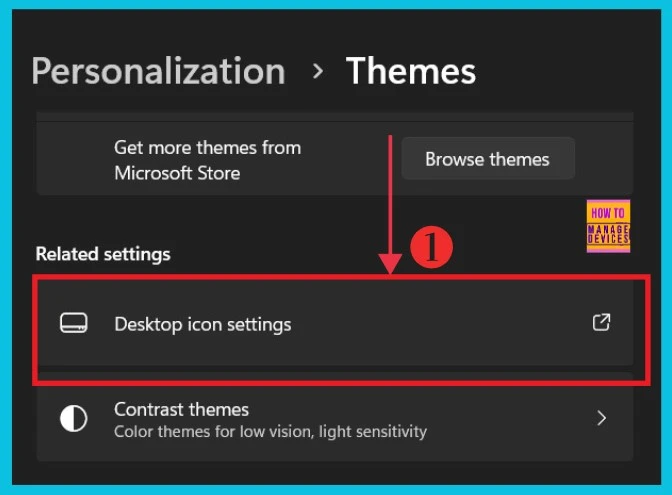
When the themes option is clicked, a new Themes window opens. Here, we can see different theme options. Click the Desktop icon settings under the Related settings.
- Tips App is getting Removed from Windows
- Enable Disable Performance Mode for Dev Drive Protection in Windows 11
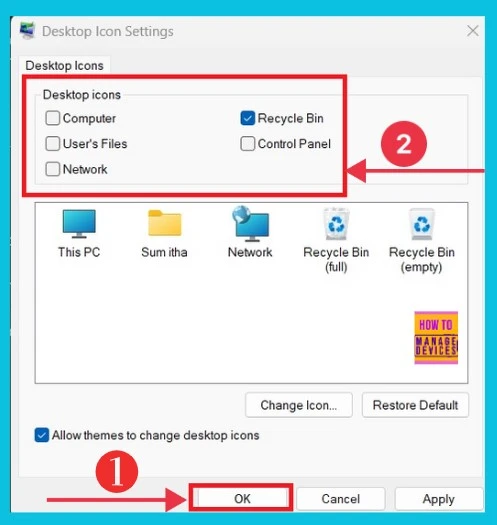
The screenshot below gives the details of the desktop icons. Here, we can see different options and select the options we want to add or remove from the desktop. Then click ok.
2. Right Click on the Desktop
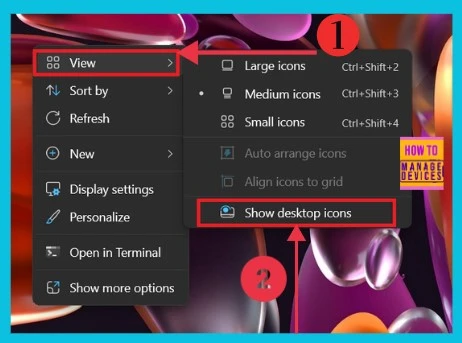
Here’s another easy way to add or remove desktop icons. First, right-click on your Desktop. A menu will pop up. Click on “View” from the menu. You’ll see different options for how your desktop icons are displayed. Choose “Show Desktop icons.” Now, your icons will show up on the desktop. If you want to remove them, click the same option again. It’s a simple method to customize your desktop with just a few clicks.
3. Using Group Policy
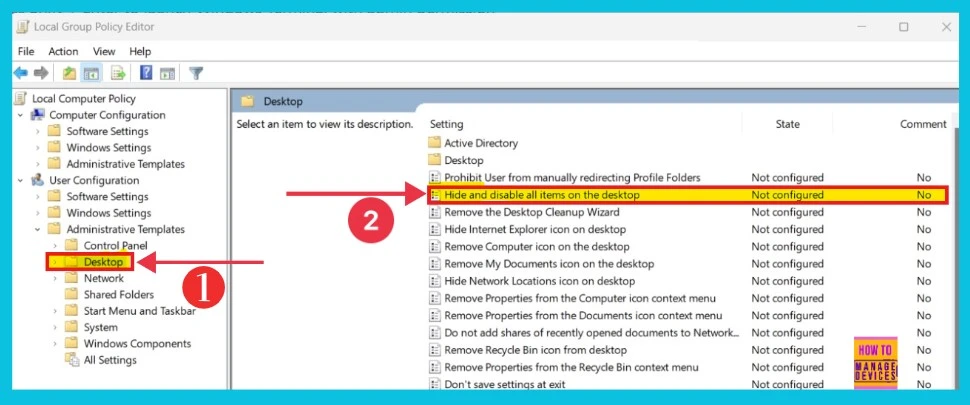
To add or remove desktop icons, Open Group Policy Editor and navigate the following steps. Press Windows Key + R to open the “Run” dialog box. Type “gpedit.msc“In the “Run” dialog box and press Enter or click “OK”
- User Configuration > Administrative Templates > Desktop
- Then click Hide and turn off all items on the desktop on the right side
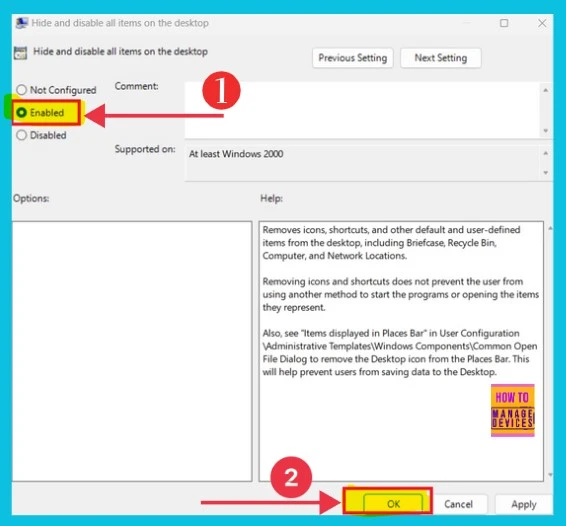
Now, you can get a new window with 3 options. Here, first, we select Enabled and then OK. Now, all icons are enabled on the desktop. This removes icons, shortcuts, and other default and user-defined items from the desktop, including the Briefcase, Recycle Bin, Computer, and Network Locations.
Removing icons and shortcuts does not prevent the user from using another method to start the programs or opening the item they represent.
- Enable Disable Defender SmartScreen for Microsoft Store Apps in Windows 11
- Enable Disable Conversation View in Outlook for Windows 11
Also, see “Items displayed in Places Bar” in User Configuration Administrative Templates\Windows Components\Common Open File Dialog to remove the Desktop icon from the Places Bar. This will help prevent users from saving data on the desktop.
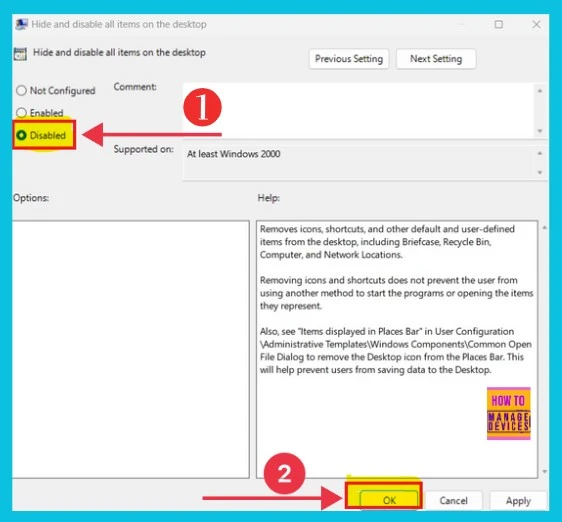
In the same window, we click Disabled and ok, and all icons are disabled on the desktop.
We are on WhatsApp now. To get the latest step-by-step guides, news, and updates, Join our Channel. Click here. HTMD WhatsApp.
Author
Sumitha was introduced to the world of computers when she was very young. She loves to help users with their Windows 11 and related queries. She is here to share quick news, tips and tricks with Windows security.
