Let’s learn how to speed up Windows PC. All laptops and computers will experience slower speeds at some point in the future; the slowness will affect the smooth performance of your PC.
Here, you will get all the important tweaks and tips that will help you speed up your sluggish laptop and make it faster. If you want to optimize Windows 11, take a few minutes to try out these tips to speed up your PC.
If your PC runs slow, the following suggestions might help you to speed up your PC. The tips and directions are listed in order, so start with the first one, see if that helps, and then continue to the next one if it doesn’t.
Windows is a graphical operating system developed by Microsoft; It helps you to store files, run software, play games, watch videos, and connect to the Internet. Windows speedup is very important for your PC and helps you improve your PC’s performance.
What are the Advantages of Speedup Windows 11 PC?

Windows speedup is very necessary for the smooth functioning of your PC. Windows is the main operating system of a PC. Windows speedup can be done through the settings option of your device.
1. Maintain Accuracy
2. Improve Efficiency
3. Reducing the time you wait to interface with applications and programs
4. making your experience seamless
5. Helps to remove all the clutter
- Enable Disable Windows Update Policies using GPO or Intune
- Windows 11 KB5022287 KB5022303 January 2023 Patch Tuesday
How to Speed Up Windows PC
Windows 11 is an Operating System that plays an important role in speeding up computer startup or application execution. There are different methods available to speed up Windows 11 PC.
The following tips and tricks are available to speed up your Windows 11 PC.
1. Restart Your Windows 11 PC
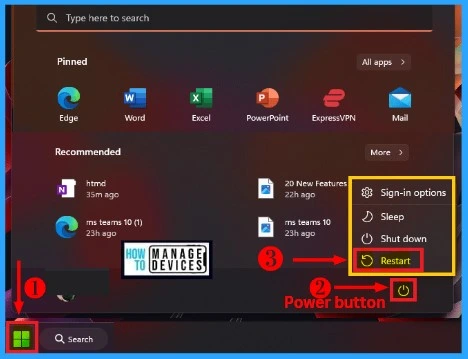
Restart is a simple and easy method to speed up Windows. There are different ways to restart Windows 11 PC, such as right-clicking the Start menu, selecting shut down or sign out, then selecting Restart, or using the keyboard shortcut Alt F4.
- Select the Start menu and click the power button
- Select the Restart option from the Power button
2. Update Your Windows 11 PC
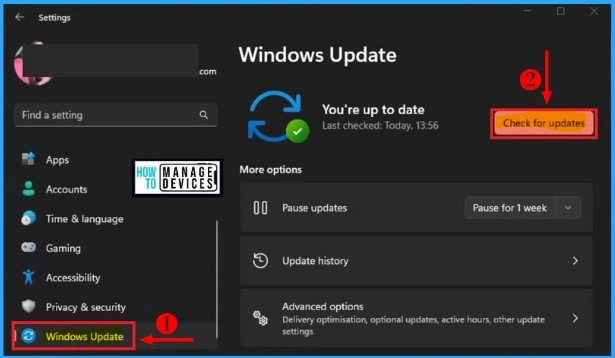
If the Restart doesn’t make any changes or doesn’t work the next, we want to Update the Windows 11 PC. You can easily Update your Windows 11 PC from Settings apps.
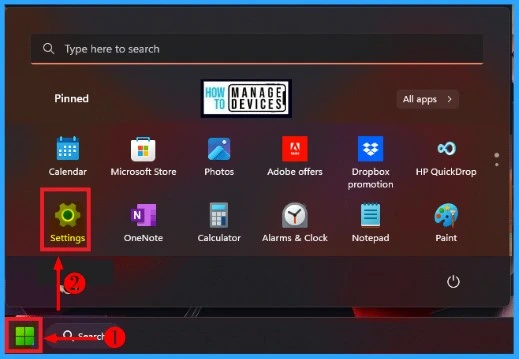
- Select Settings from the Start menu
After selecting Settings, select the Windows Update tab from the list of accounts. The right side of Windows Update shows the “Check for Updates” button; click the Check for Update button to update your Windows 11 PC.
3. Disable Transparency Effects
Disabling Transparency Effect is another method to speed up Windows 11 PC. By default, the Transparency Effect is enabled. The transparency effect helps to add an acrylic blur effect to apps and components.
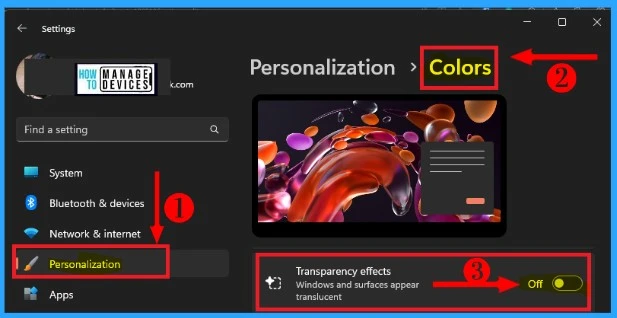
- Start menu >Settings
- Select the Personalization tab from the Settings Window
- Select Colors from the Personalization tab
- Disable the Transparency Effects by toggling the Transparency Effect pane to the Left side (It is enabled by default)
4. Change Visual Effects Settings
Changing Visual Effects is another method to make your operating system faster and more productive. Turning on visual effects will improve the overall performance of your Pc.
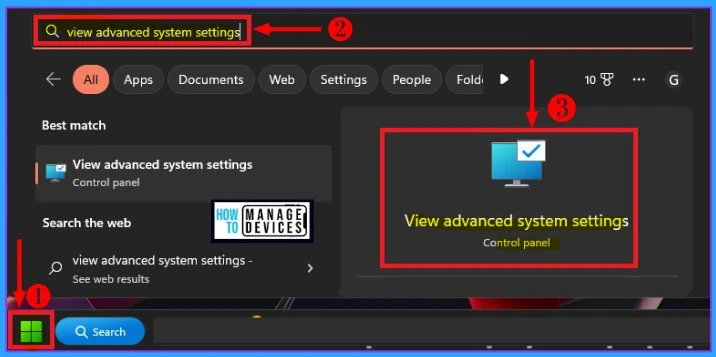
- Select the Start menu and search View advanced system settings
- Open View advanced system settings from the below window
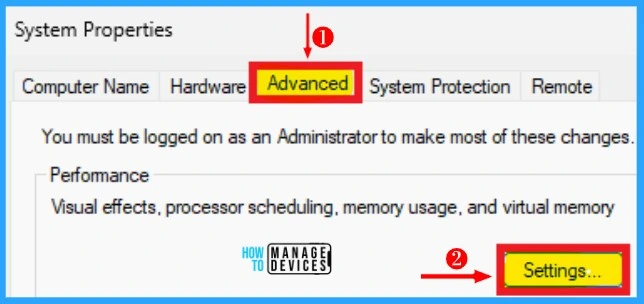
From the below system properties window, select the Advanced menu. After choosing the advanced menu, go to the Performance section, which includes visual effects, processor scheduling, memory usage, and visual memory.
- Select Settings from the advanced menu
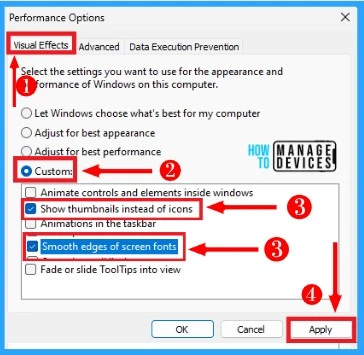
After clicking settings, the below “performance options” window will appear and shows the menu, such as visual effects and advanced and data execution prevention. Select Custom from visual effects and check or enable the following option to speed up windows.
- Show thumbnails instead of icons
- Smooth edges of screen fonts
- Click Apply from the below window
- Process Explorer is the Best Version of Task Manager in Windows 11
- SFC Command to Repair Corrupted System Files in Windows 11
5. Disable Startup Programs
Disable Startup programs is another method to speed up windows 11 pc. Startup programs are the apps that start when you sign in; it will affect the fast and smooth performance of the pc.
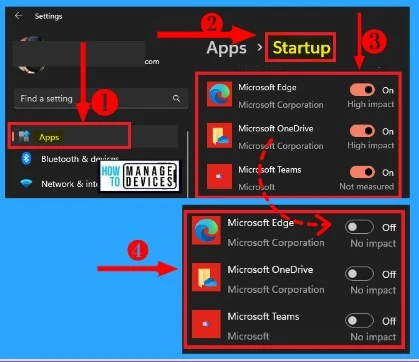
- Start menu > Settings
- Select the Apps tab on the left side of the settings window
- Select the Startup option from the Apps tab

Disable Startup programs helps for the Smooth functioning of your windows 11 PC. It reduces the problem of slowness. The below table shows how to Disable the startup programs on your PC.
| Startup programs | Enable | Disable |
|---|---|---|
| Microsoft Edge | Toggle the pane to the right side | Toggle the pane to the left side |
| Microsoft OneDrive | Toggle the pane to the right side | Toggle the pane to the left side |
| Microsoft Teams | Toggle the pane to the right side | Toggle the pane to the left side |
6. Disable Background Programs
Disable Background Programs is one of the methods to speed up Windows 11 PC. Background apps in Windows 11 perform the actions such as Updates, fetch up to date data, etc.
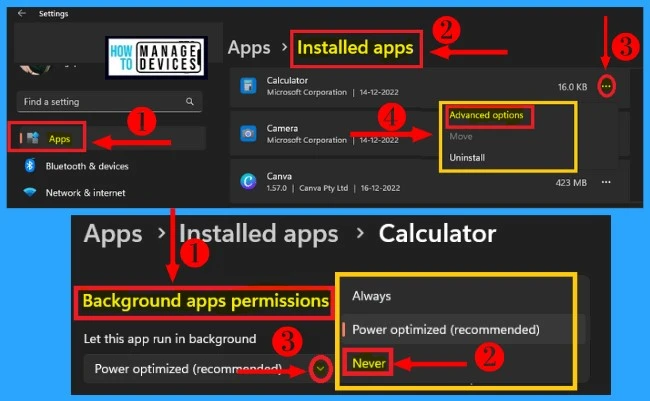
You can easily disable individual Microsoft Store apps from running in the background. You can disable it from the settings page.
- Start menu > Settings > Apps
- Select Installed apps from the Apps page
- Select the apps for which you want to disable the background programs (For Example, Calculator)
- Click the 3 horizontal dots on the right side of the app
- From the context menu, select “Advanced options“
- Click the down arrow from the “Background apps permissions“
- For disabling background programs, select the Never option from the context menu
7. Change Power Plan
Power is the Control panel in windows 11. A power plan is a set of hardware and system settings that helps to manage how computers use and conserve power. Changing the power plan helps to speed up your Windows 11 PC.
How to change the power plan in Windows 11 is as follows.
- Click the Start menu and then search Power plan
- Select Power plan from the Start menu
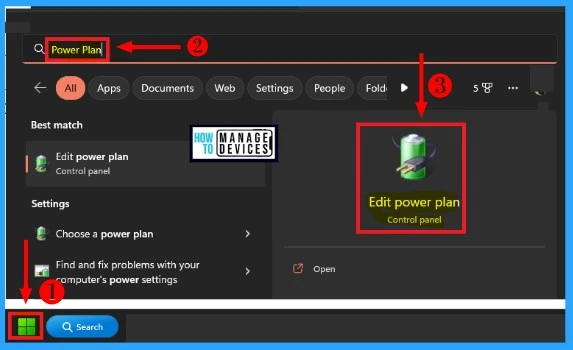
Select the Power plan that you want to customize, and then choose settings that reflect how you want your computer to manage power from the “power options” and select advanced settings.
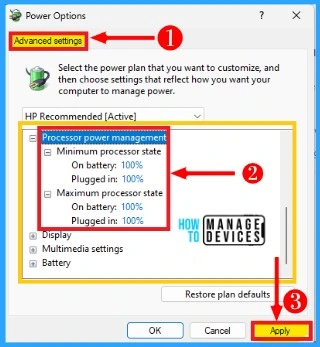
- For the smooth and fast performance of your Windows 11, Select Processor Power management and do the following.
- Minimum processor state
- On battery should be 100%
- Plugged-in should be 100%
- Maximum processor state
- On batter should be 100%
- Plugged-in should be 100%
- Select Apply option from the below window
- Minimum processor state
8. Remove Temporary Files
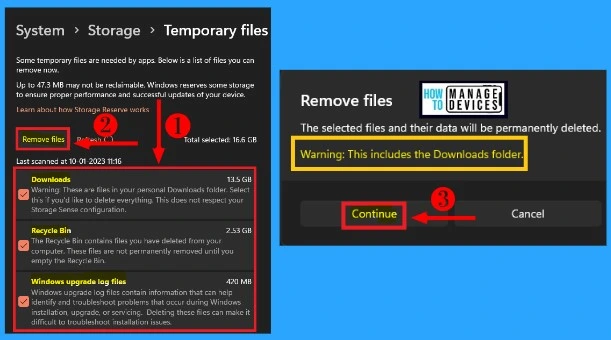
Removing Temporary files in Windows 11 helps you to take up a lot of storage space. You can easily remove temporary files through the system settings menu. The below list and screenshot show how to remove temporary files in Windows 11.
- Start menu > settings
- Select the systems tab from the settings page
- Select storage from the systems page
- From storage, select Temporary files
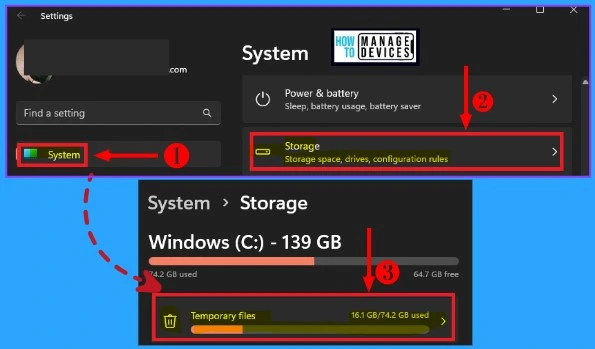
Apps need some temporary files. Below is the list of files such as Downloads, Recycle Bin, and Windows upgrade log files you can remove now. Windows reserves some storage to ensure proper performance and successful update of your device.
- Check the Downloads file, Recycle Bin, Windows upgrade log files
- Select “Remove files” from the below window
- After clicking “Remove files,” a warning message appears: “The selected files and their data will be permanently deleted.”
- Click Continue to remove the files
9. Deleting Windows Temporary Files and Folders
Deleting Windows temporary files and folders is another method to speed up your Windows 11 PC. A temporary file helps you to store information temporarily. Temporary files are Junck files that slow down and reduce the smooth performance of your pc.
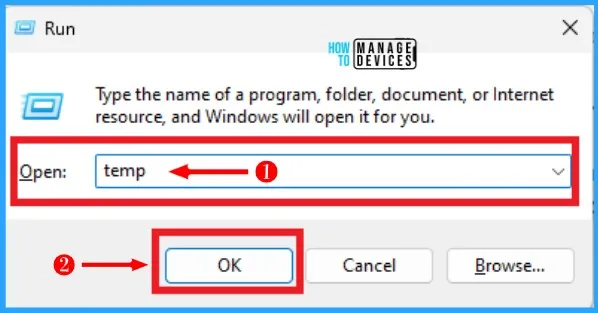
- Press Windows Key + R to open the Run command
- Then type “temp” in the search field
- Press Ok
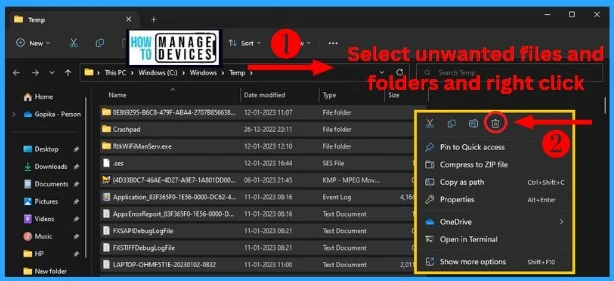
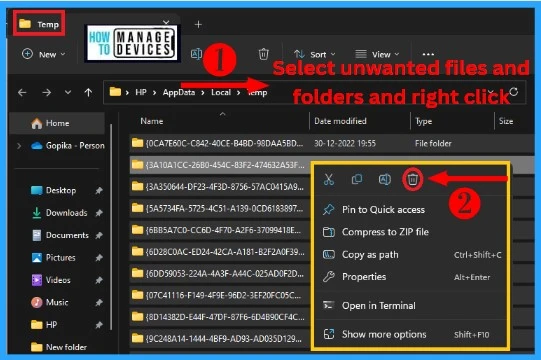
The below screenshot shows the Windows temporary files and folders. Select the Unwanted files and folders, and right-click will open a context menu including the options such as cut, copy, paste, delete, etc.
- Select the Delete icon from the context menu to delete Windows temporary files and folders
- How to Install and Use Notepad++ on Windows 11 PC | Detailed Review
- How to Use PsExec Utility Tool in Windows 11
10. Deleting Users Temporary Files and Folders
You can easily delete users‘ temporary files and folders. It is important to clean up your temporary files for fast performance every time. Temporary files accumulate huge space and memory, affecting your PC’s smooth function.
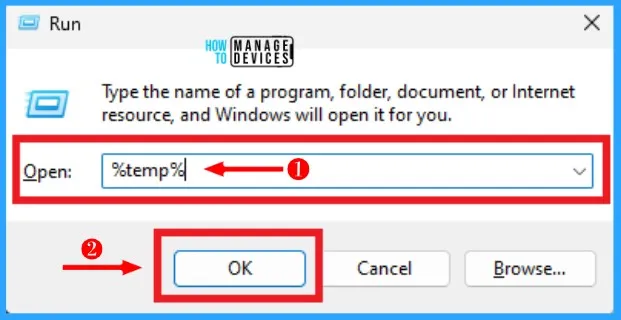
- Press Windows Key + R to open the Run command
- Then type “%temp%” in the search field
- Press Ok
The below screenshot shows the user’s temporary files and folders. Select the unwanted files from this user’s folders, and right-click will open a context menu.
- Select the Delete icon to delete the user’s temporary files and folders
11. Enable Storage Sense
Enabling Storage Sense is another simple and easy method to speed up windows 11 PC. Storage sense automatically free up space, delete temporary files, and manage locally available cloud content.
- Start menu > Settings > System
- Select Storage sense From the system page

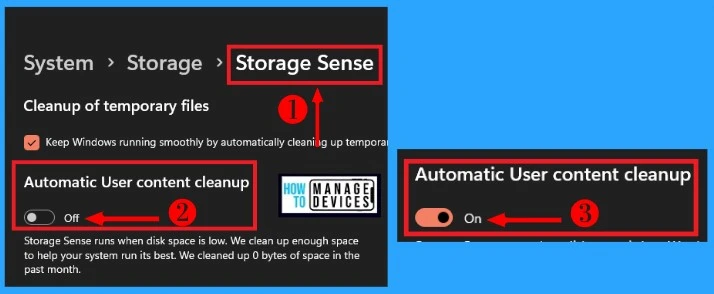
Storage sense runs when disk space is low. We clean up enough space to help your system run at its best. We cleaned up 0 bytes of space in the past month.
- Storage sense shows automatic user content clean up
- You can easily enable the automatic user content cleanup by toggling the pane to the right side
12. Remove Needless Software
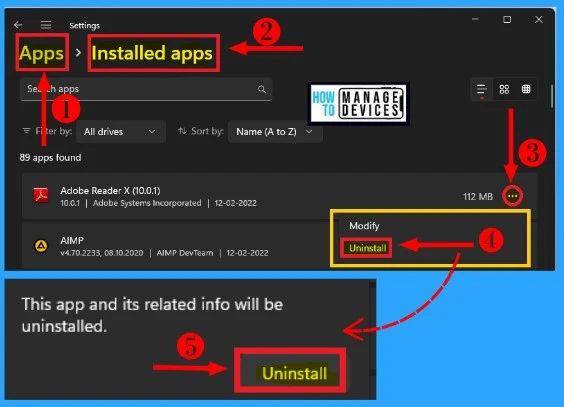
You can easily speed up your Windows 11 PC by removing needless software. The below list and screenshot show how to remove unnecessary software.
- Start menu > Settings > Apps > Installed apps
- Select the needless software (Here we select Adobe Reader)
- Select the 3 horizontal dots on the right side of Adobe Reader
- Select Uninstall from the context menu
- After clicking uninstall, a context menu will appear and shows a confirmation message “This app and its related info will be uninstalled” click Uninstall
13. Defragment and Optimize Drives
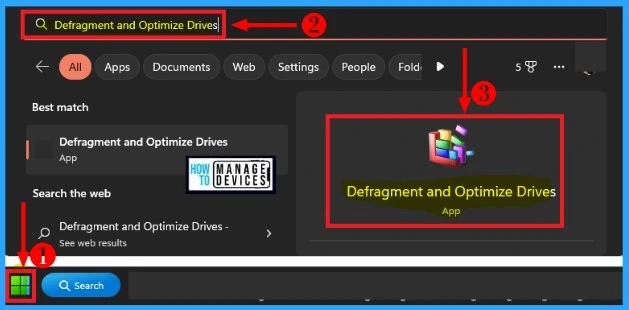
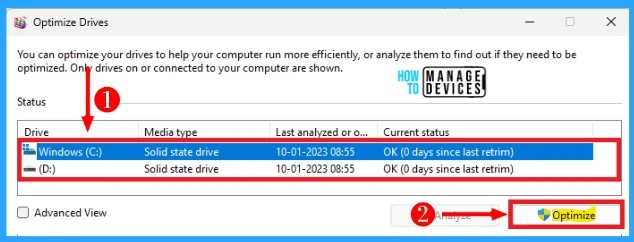
Defragmenting and optimizing the drive is another method to boost your computer’s performance. If your PC is running slower, one of the reasons for this is that the hard drive files are fragmented. The below list and screenshot show how to fragment and optimize drives.
- Click the Start menu and search Defragment and optimize the drives
- Select Defragment and Optimize Drives
You can optimize your drives to help your computer run more efficiently or analyze them to find out if they need to be optimized. Select the drives here; we are selecting C and D drives and clicking Optimize button.
14. Turn Off Restartable Apps
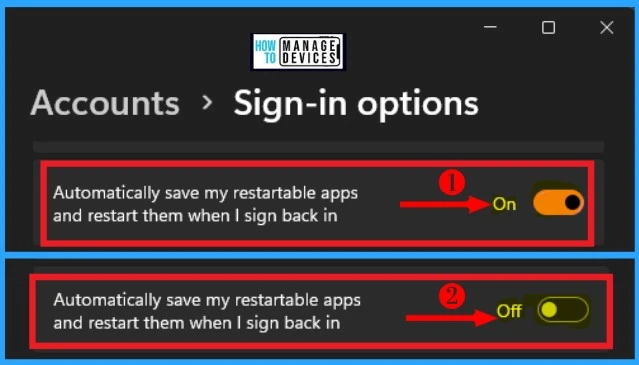
Enabling Restartable apps means when you restart the computer or sign in; the system can automatically restart the apps. It will slow down your PC and waste system resources. The below list and screenshot show how to turn off restartable apps on Windows 11 PC.
- Start menu > Settings
- Select the Accounts tab on the left side of the settings window
- Select Sign in option from the accounts tab
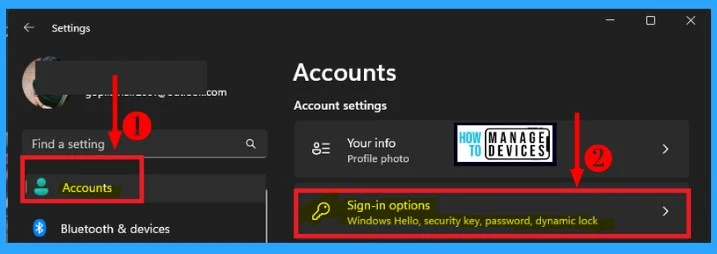
Sign-in options include Windows hello, security key, password, dynamic lock, etc. The additional settings in the sign-in options show “Automatically save my restartable apps and restart them when I sign back in.”
- Turn off Restartable apps – Toggle the pane to the Left side
15. Disable Notification and Tips
Disable Notification and Tips is another method used to speed up your PC. The following are the steps used to disable notifications and tips.
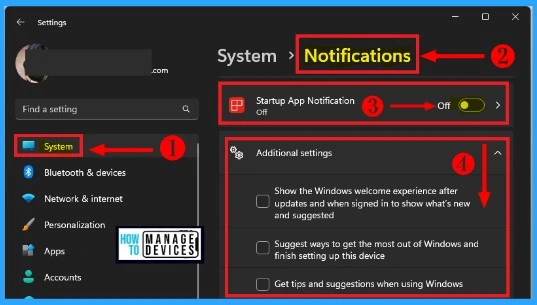
- Start menu > Settings > System
- Select Notification on the system page
- Disable Notifications and Tips ( Startup App Notification) – Toggle the pane to the Left side.
- In Additional settings, Uncheck the following.
- Show the Windows welcome experience after updates and when signed in to show what’s new and suggested
- Suggest ways to get the most out of Windows and finish setting up this device
- Get tips and suggestions when using Windows
16. Disable Virtualization-Based Security
Virtualization-based security is the security feature in windows 11 that creates an isolation region of memory for the security feature. The following list and screenshot help disable Virtualization-Based Security in Windows 11 PC.
- Click the Start menu and search Core isolation
- Select Core isolation from the below window
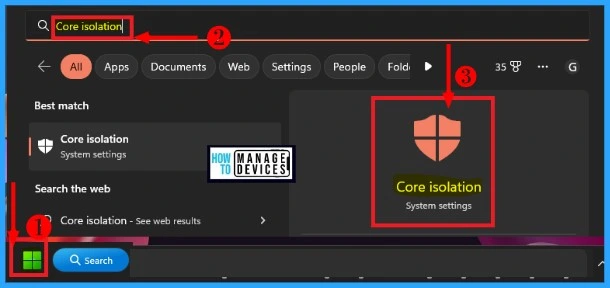
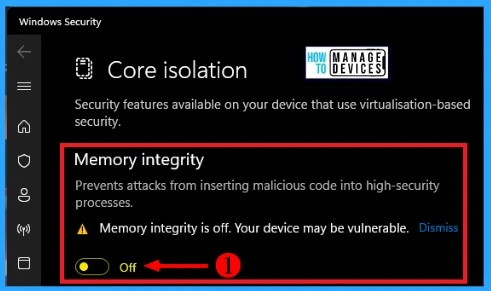
After selecting Core isolation, Disable the Memory Integrity. It helps to prevent attacks from inserting malicious code into high-security processes.
When Memory integrity is Turned OFF, a warning message will appear “Memory integrity is off. Your device may be vulnerable.”
17. Disable Game Mode
Game mode in Windows 11 allows you to game prioritizing characteristics. The games in windows 11 will affect the smooth performance and the battery life of Windows. The disabling game mode is important to speed up the windows 11 PC.
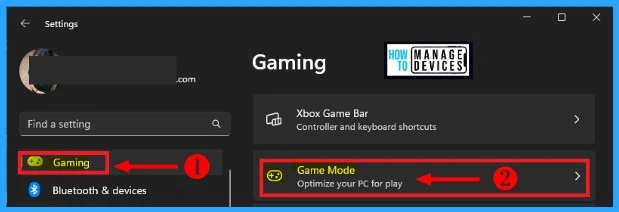
- Start menu > Settings > Gaming
- Select Game mode from Gaming
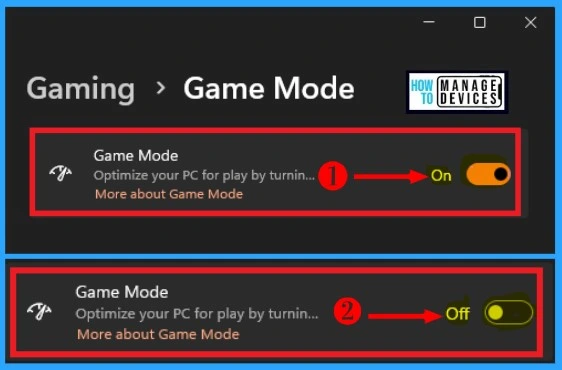
Game mode optimizes your PC for play by turning things off in the background. By default, the Gaming mode is enabled. You can easily Disable the Game mode by toggling the pane to the Left side.
18. Xbox Game Bar
Xbox Game Bar helps capture videos and screenshots while playing PC games. You can easily open the Xbox Game Bar from the Settings page or use the Windows Logo key +G on your keyboard.
- Start menu > Settings > Gaming
- Select Xbox Game Bar from Gaming
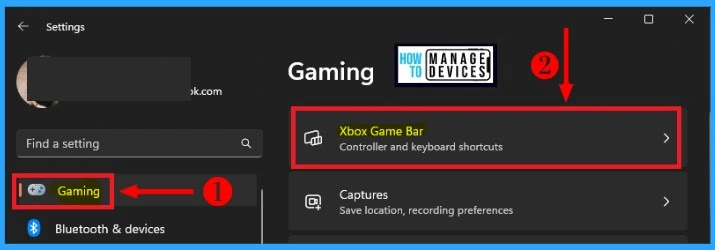
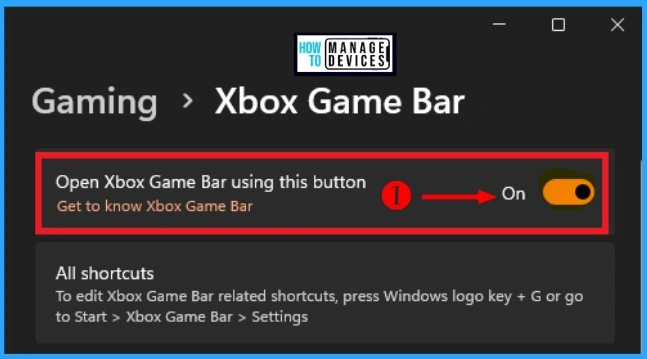
By default, the Xbox Game Bar is enabled. To increase the Speed and performance of your PC, you should Disable the Xbox Game Bar on the settings page.
- Disable Xbox Game Bar – Toggle the pane to the left side
19. 3rd Party Anti-Virus
Windows Security is very important. It provides the latest anti-virus protection. Windows security is actively protected from the moment you start Windows. It continuously scans for malware, viruses, and security threads.
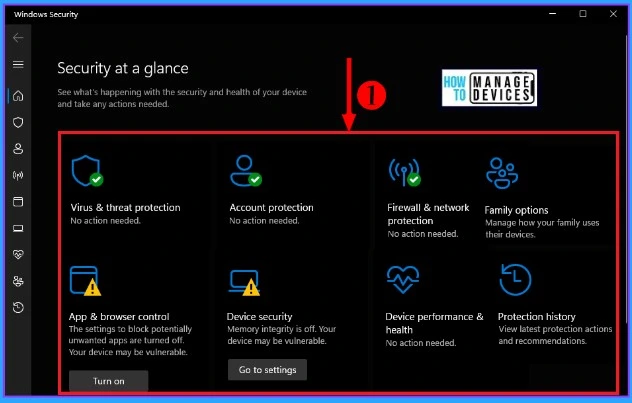
Security protection helps keep your device safe and protect it from treads. Preventing viruses and treads helps to speed up your Windows 11 PC. Windows 11 PC includes the following protections.
- Virus &threat protection
- Account protection
- Firewall & network protection
- Family options
- Apps & browser control
- Device security
- Device performance & Health
- Protection History
20. Adjust the Privacy Setting
Privacy and Security settings in Windows 11 are important to improve your system performance. Privacy and security settings help keep your windows 11 up to date and install each update available.
Adjust Privacy settings helps to make the PC runs smoothly and also helps to increase productivity. The following options in privacy & security should be disabled will helps you to speed up your Windows 11 PC.
- General
- Speech
- Linking & typing personalization
- Diagnostics & feedback, etc.
1. General
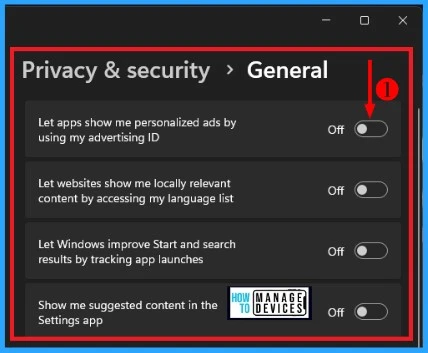
The General option in privacy & security includes advertising ID, local content, app launches, settings suggestions, and productivity tools. The below list and screenshot show how to disable the general options in Privacy & Security.
- Start menu > Settings > Privacy & Security
- Select General under windows permissions in Privacy & Security

To speed up Windows 11, you should Disable the following from General in privacy & security. By default, all the options in General settings are enabled, which will affect the smooth function of your PC.
| General in privacy & security | Disable |
|---|---|
| Let apps show me personalized ads by using my advertising ID | Toggle the pane to the Left side |
| Let websites show me locally relevant content by accessing my language list | Toggle the pane to the Left side |
| Let Windows improve Start and search results by tracking app launches | Toggle the pane to the Left side |
| Show me suggested contents in the Settings app | Toggle the pane to the Left side |
2. Speech
The Speech option in Privacy & Security shows the Online speech recognition for dictation and voice-based interactions. Disabling online speech recognition helps to speed up your PC. To Disable this feature, select Settings from the Start menu.
- Select the Privacy & Security tab on the Left side of the Settings window
- Select Speech under Windows permissions in Privacy & Security
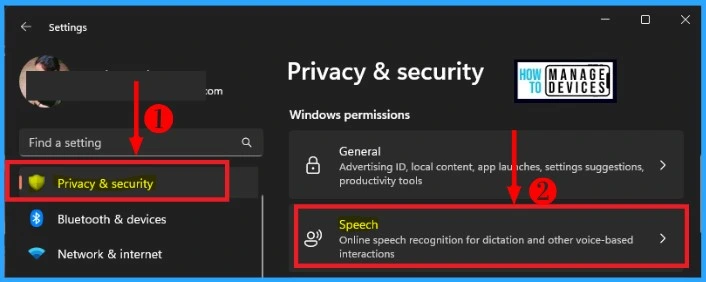
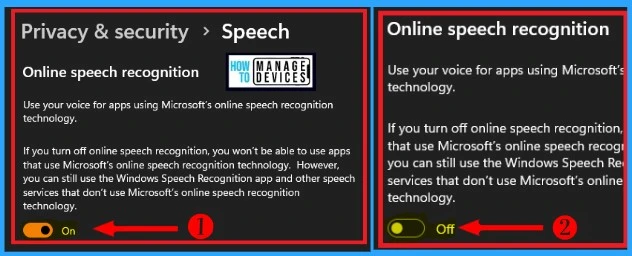
By default, online speech recognition is enabled. If you turn off online speech recognition, you will not be able to use apps that use Microsoft’s online speech recognition technology.
- Turn off – Toggle the speech pane to the Left side
3. Linking & Typing Personalization
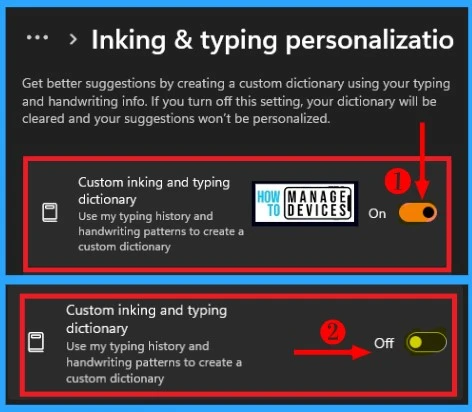
The Linking & Personalization includes a custom dictionary and words in your dictionary. Disabling the Linking & Typing Personalization option in Privacy & Security helps to speed up your Windows 11 PC. The following list and screenshot show how to Disable Linking & Typing Personalization.
- Start menu > Privacy & Security
- Select Linking & Typing Personalization under Windows Permissions in Privacy & Security

Custom linking and typing dictionary helps to get better suggestions. If you Disable the settings, your dictionary will be cleared, and recommendations will not be personalized.
- Disable the Linking & Typing Personalization – Toggle the pane to the Left side
4. Diagonostic & Feedback
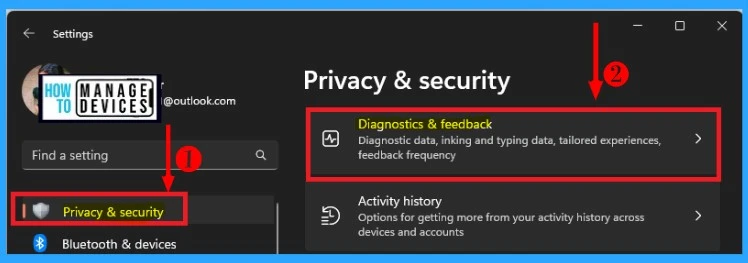
Disabling the Diagnostic & Feedback option in Privacy & Security is another method to Speed up the Windows 11 PC. It includes options such as Diagnostic data, Inking, and typing data, tailored experiences, and feedback frequency.
The below list and screenshot show how to disable the Diagnostic & Feedback in Privacy & Security.
- Start menu > Settings
- Select Diagnostic & Feedback from Privacy & Security
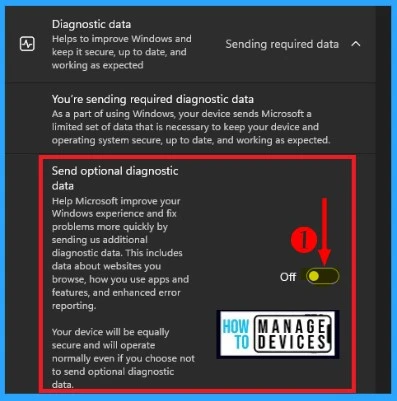
Microsoft helps to improve your Windows experience and fix problems more quickly by sending us additional diagnostic data such as Website data, app data, and their features, enhanced error reporting, etc. As a part of using Windows, your device sends a limited set of data to Microsoft.
This data is crucial to keep your device and operating system secure, up-to-date, and working as expected. By default Diagnostic & Feedback option is enabled.
- Disable Send optional diagnostic data – Toggle the pane to the Left side
21. App Permissions
Apps Permissions in Windows settings show which App permission is ON or OFF. The privacy page would not list apps with the authorization to access all resources. The app permissions settings help to speed up your PC; it includes the following.
- Locations
- Radios
- Messaging
- Notifications
1. Locations
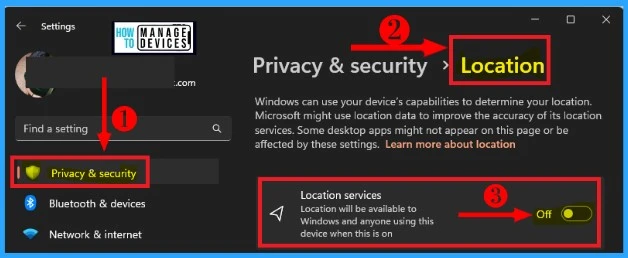
Windows can use your device capabilities to determine your location. The location data in windows 11 helps improve its location services’ accuracy. By default, the location services are enabled, reducing your PC’s Speed.
Location will be available to Windows and anyone using this device when this is on. For Disabling location services in App Permissions, do the following.
- Start menu > Settings > Privacy & Security
- Select Location from Privacy & Security
- Turn off Location services – Toggle the Location pane to the Left side
2. Radios
The radios option in Privacy & Security can access control devices’ radios if anyone uses this device. By default, Radios are enabled. It will reduce the Speed of your device. The below list and screenshot show how to disable Radios.
- Start menu > Settings > Privacy & Security
- Select Radios from Privacy & Security
- Disable Radios – Toggle the Radios pane to the Left side

3. Messaging
Disabling Messaging is another method used to speed up Windows 11 PC. Anyone can access to read text messages with a cellular connection if they choose this device.
The following list and screenshot show how to disable the Messaging option in Privacy & Security.
- Start menu > Settings > Privacy & Security
- Select Messaging from Privacy & Security
- Disable Messaging – Toggle the Messaging pane to the Left side

4. Notifications
The Notification option in Privacy & Security helps to notify your device. Anyone using this device can choose if their apps have access to their notifications. The following list and screenshot show how to Disable Notifications.
- Start menu > Settings > Privacy & Security
- Select Notifications from Privacy & Security
- Disable Notifications – Toggle the Notifications pane to the Left side

22. Disable Unwanted Windows Services
Windows services is a computer program that operates in the background. It is the services and controller app that helps to launch all the services and manage their actions. Disabling Unwanted Windows services helps to boost Windows performance.
- Click the Start menu and search Windows services.
- Select the Windows services app from the below window
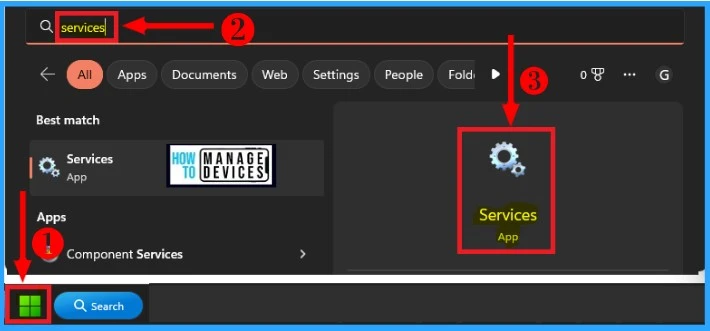
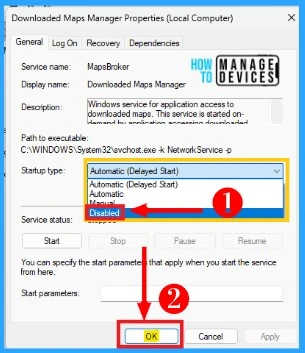
Select the unwanted Windows services (For Example, Downloaded maps manager) from the below services window. Disabling the unwanted Window services includes the following steps.
- Select all unwanted Window services from the Services window
- Right-click from the unwanted services will open a context menu
- Select Properties from the context menu
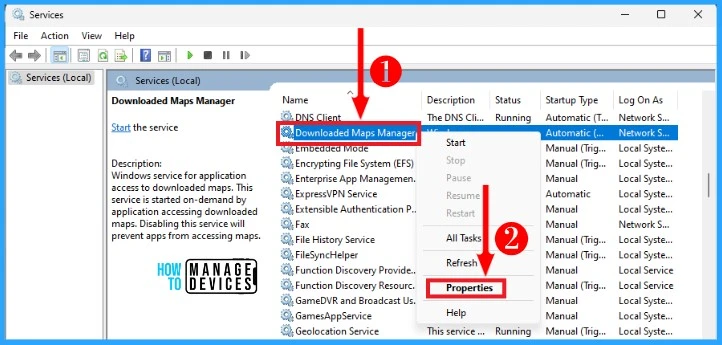
After selecting Properties from the Services window, Select Disabled as your Startup type. Click Apply from the below properties window to apply the change.
23. To Use ReadyBoost
ReadyBoost is a removable drive, like a USB Flash drive. Using ReadyBoost improves your PC’s performance without opening your PC, and it also helps to add more memory.
Note: The ReadyBoost is not work If the Window is Installed on a solid state drive (SSD). An SSD is very fast, and the ReadyBoost would be unable to improve the performance.
24. Pause OneDrives Syncing
You can easily Save files on your PC or to OneDrive by default and sync files between. Files must sync between your PC and OneDrive. The syncing will slow down your PC. You can easily Pause OneDrive syncing temporarily. And it will improve your PC’s performance.
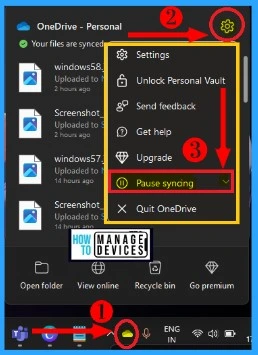
The below list and screenshot show how to pause OneDrive syncing.
- On the taskbar click the OneDrive icon near the notification area
- Select the Settings icon on the top right corner of the OneDrive window
- Click Pause Syncing to pause your OneDrive
25. Restore your PC from a System Restore Point
If you get any problem while installing apps, drivers, or updates for windows, You might get things running normally again by restoring your pc to an earlier point, called a Restore Point. The system converts work for changes made in the last 7 to 14 days.
Note: Restoring from a Restore point is not affecting your file, but it removes apps, drivers, and updates that are installed after the Restore point was created.
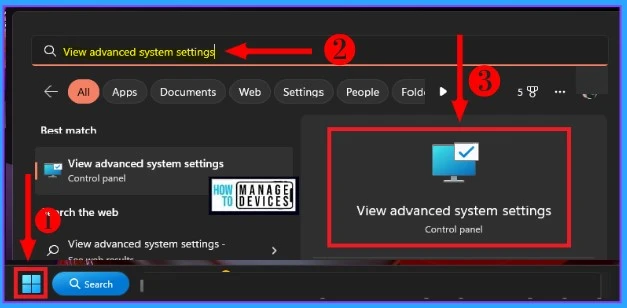
- Click the Start menu and search View advanced system settings
- Open View advanced system settings from the below window
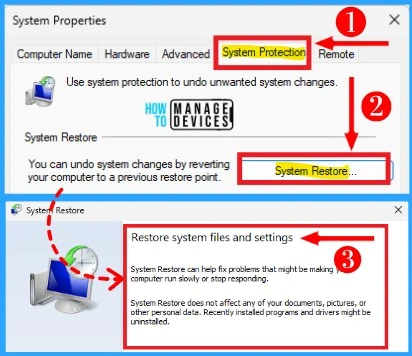
The System Properties window shows the system protection. You can undo system changes by reverting your computer to a previous restore point. System Restore helps you to fix problems that might be making your computer runs slow.
Note: The System Restore does not affect any of your documents, pictures, or other personal data
- Select the System Protection menu from System Properties
- Select Restore from System Protection
Author
Gopika S Nair is a computer enthusiast. She loves writing on Windows 11 and related technologies. She is here to share quick tips and tricks with Windows 11 or Windows 10 users.
