This post covers five easy ways to format a drive in Windows 11. I’m sharing this guide to help you format the drive on a Windows 11 PC using different methods. Formatting a drive permanently erases all data and sets up a file system.
Windows 10 and 11 support various file systems, including FAT, FAT32, exFAT, NTFS, and ReFS, ensuring flexibility and efficiency for managing disk volumes and partitions.
When you format a drive, you must enter a volume label. You can also decide how much space it will have, which file system to use, and the size of the allocation units. You can use a quick or full format to enable compression for files and folders.
In this post, I will show you how to format an internal or external drive that’s already connected and has an existing partition or volume with a drive letter in Windows 10 and Windows 11.
Table of Contents
What are the two methods of Formating Drive?

You can format a hard drive in Windows 11 using two methods:
1) Quick format: A quick format is faster and allows you to recover data later.
2) Full format : A full format erases all existing files, folders, and data from the drive, making recovery nearly impossible.
Five Easy Ways to Format a Drive in Windows 11
People format drives on Windows 11 to enhance their computer’s performance. Formatting a hard drive (HDD) or solid-state drive (SSD) removes unnecessary programs and files. You may need to format a hard disk in Windows 11 to change its file system, increase storage space, or enable file compression and encryption.
To format a drive on Windows 11, use the following methods to set up a new file system so your computer can read and write data.
| Methods to Format a Drive in Windows 11 |
|---|
| Settings |
| File Explorer |
| Command Prompt |
| PowerShell |
| Disk Management |
- Top 83 Windows 11 Desktop Admin Interview Questions
- 53 Most Common Run Commands For Windows
- Free Generic Windows 10 Product Keys from Microsoft
Settings
Follow the following steps to format a disk in Windows 11 through Settings:
- Open Settings (Win+I).
- Click on System on the left side, choose Storage on the right side
- Under Storage Management, click on Advanced Storage Settings to expand it
- Hit on Disks & volumes
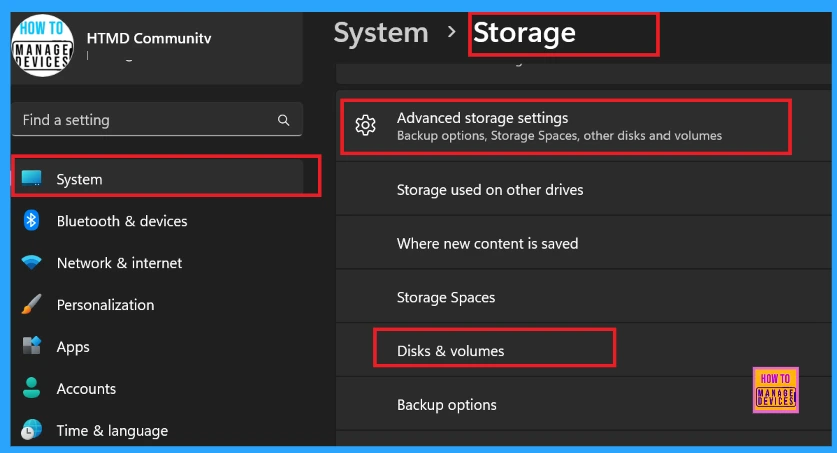
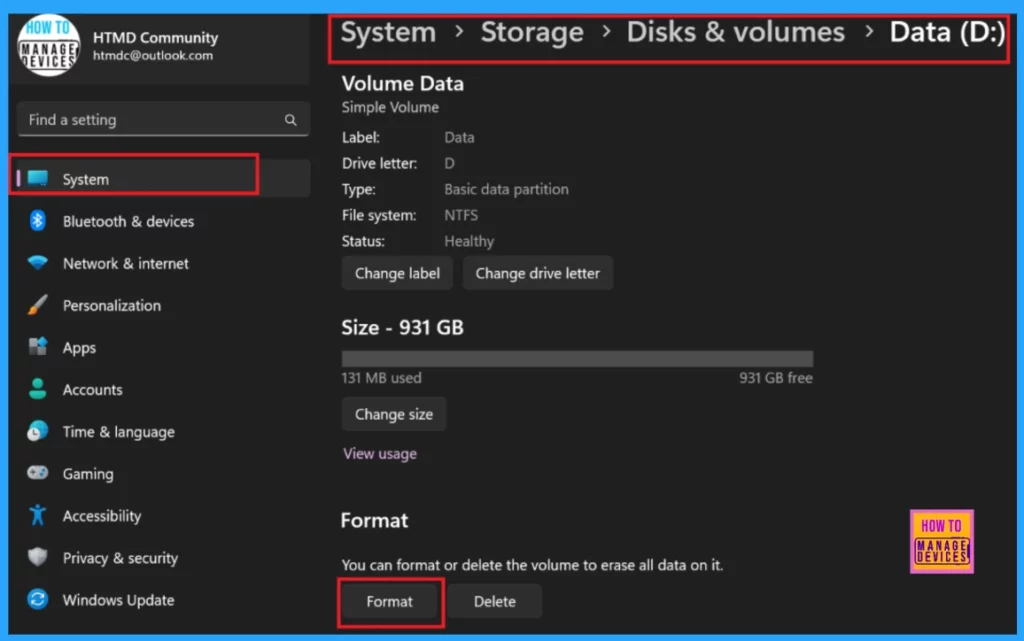
Select the disk you want to format and click Properties. Click on the Format. (see screenshot below)
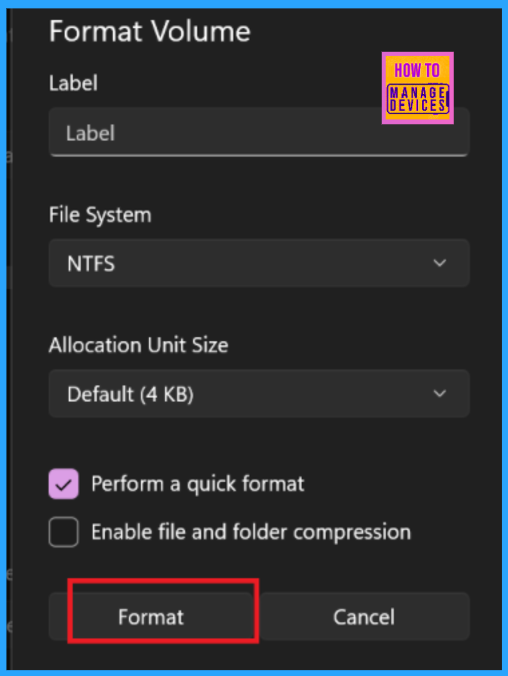
Label the drive, choose a file system, tick the Perform a quick format checkbox, and click Format.
File Explorer
File Explorer is the easiest way to format a hard disk on Windows 11 and other internal or external storage devices.
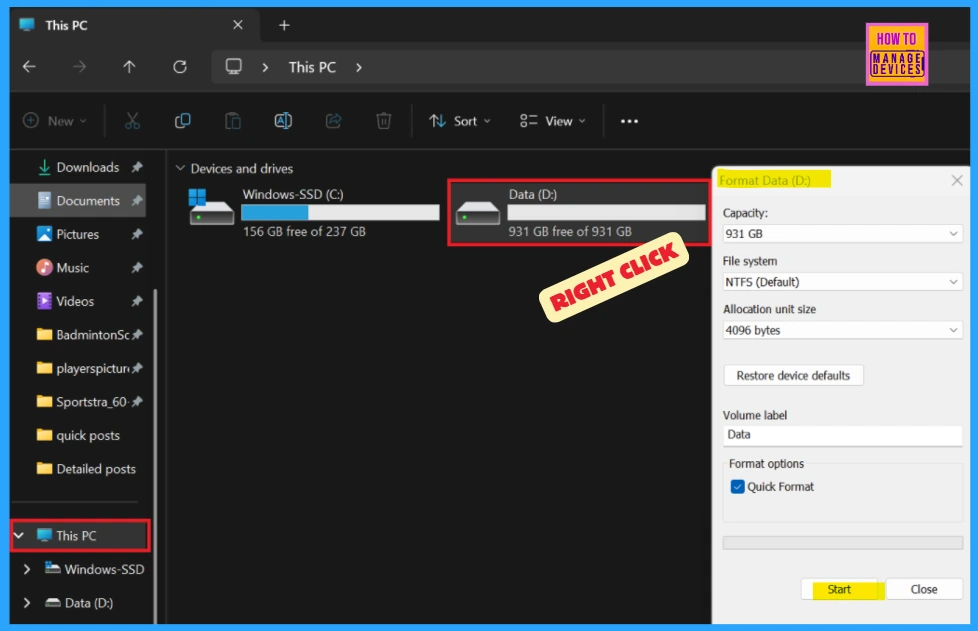
- Open This PC in File Explorer (Win+E).
- Right-click on the drive you want to format and hit Format.
or
Select the drive you want to format, click the See more (3 dots) button on the command bar and tap Format.
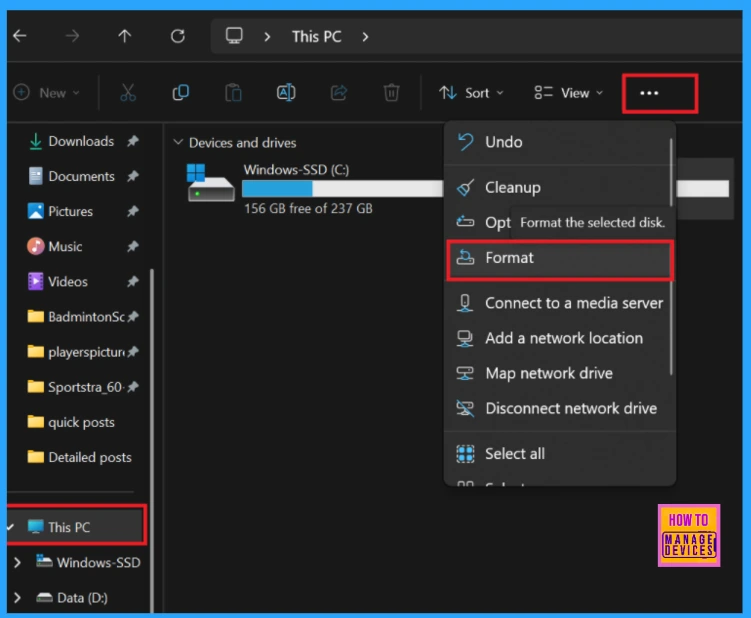
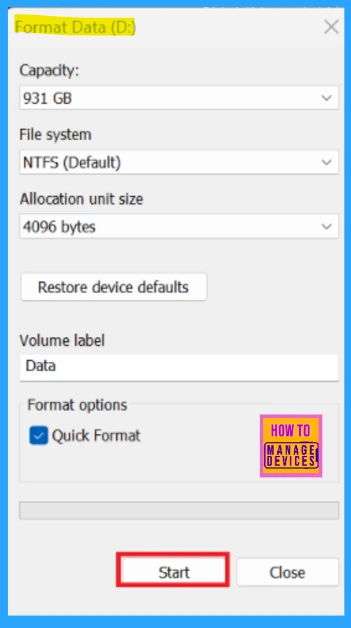
After hitting Format, you will see a pop-up window. There, you should type a Label for the drive. Select an available file system, allocate unit size, and check or uncheck. Perform a quick format for what you want.
- Click on Format when ready to format the drive.
Command Prompt
You must be signed in as an administrator to format a hard disk using Command Prompt.
Run the following commands in order:
- First, type ‘diskpart’ and press Enter
- Then type ‘list disk’ and press Enter
- The Command Prompt will show all the drives on your PC.
- Make a note of the Volume number (ex.”1″) of the drive letter (ex: “C”) to format.
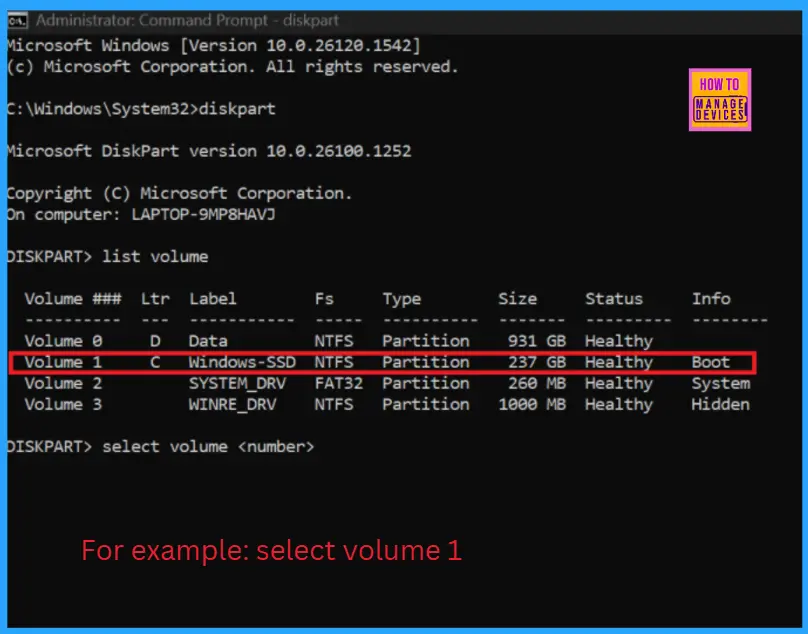
Here, Disk 1 is selected for formatting.
Type the command below you want to use into Windows Terminal (Admin), and press Enter.
Quick format): format fs=<FileSystemType> label=”<FriendlyName>” quick
OR
(Full format) : format fs=<FileSystemType> label=”<FriendlyName>“
Type the command below you want to use into Windows Terminal (Admin), and press Enter.
PowerShell
PowerShell is a command-line shell and scripting language for managing system configuration and automating various tasks. It’s included in all recent versions of Windows, so there’s no need to install anything.
- Open Windows Terminal (Admin), and select Windows PowerShell.
- Copy and paste the command below into Windows Terminal (Admin), and press Enter.
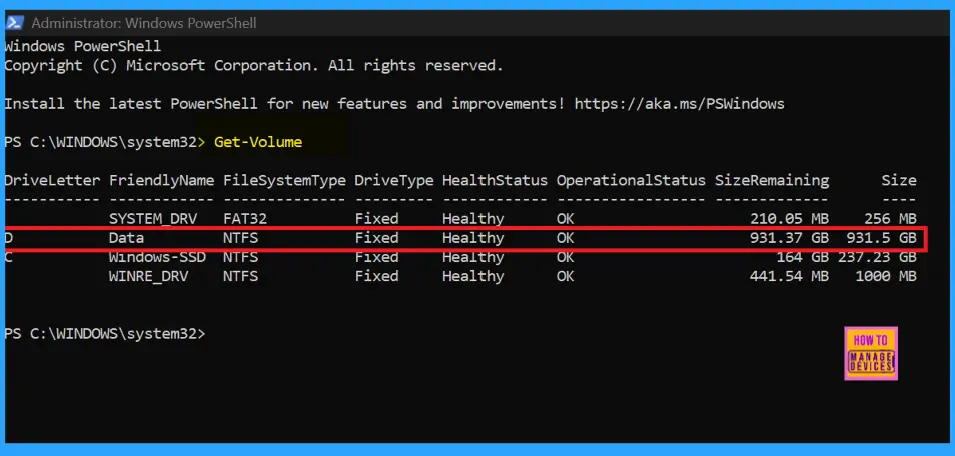
Get-Volume
- Note the drive letter (ex: “D”) of the drive you want to format. (see screenshot below)
- Type the command below you want to use into Windows Terminal (Admin), and press Enter.
(Quick format): Format-Volume -DriveLetter "<DriveLetter>" -FileSystem <FileSystemType> -NewFileSystemLabel "<FriendlyName>"
OR
(Full format): Format-Volume -DriveLetter "<DriveLetter>" -FileSystem <FileSystemType> -NewFileSystemLabel "<FriendlyName> -Full"
Disk Management
To open Disk Management, press Win+R, type the command diskmgmt.msc and press OK. Now, you can see the Disk Management window where all the disk partitions are located.
Right-click on the drive volume/partition you want to format and tap Format.
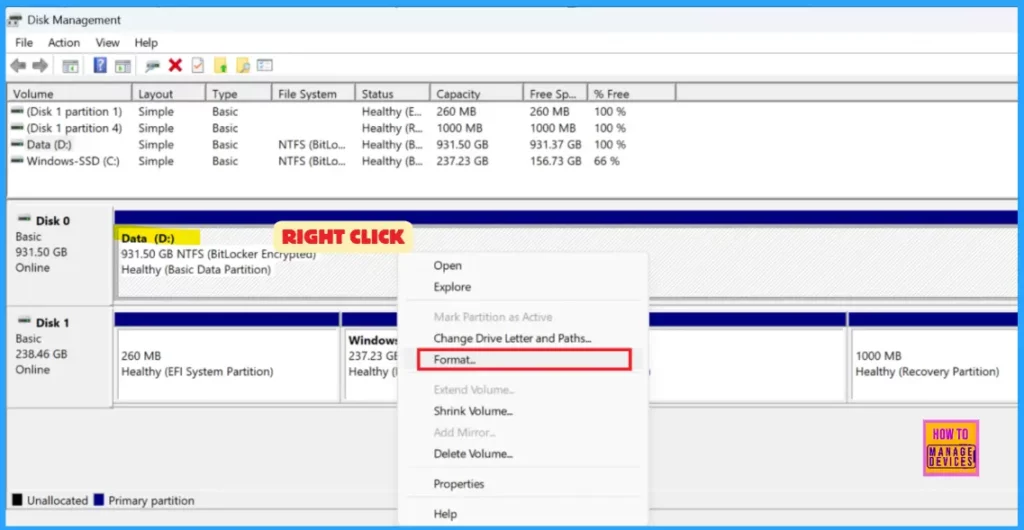
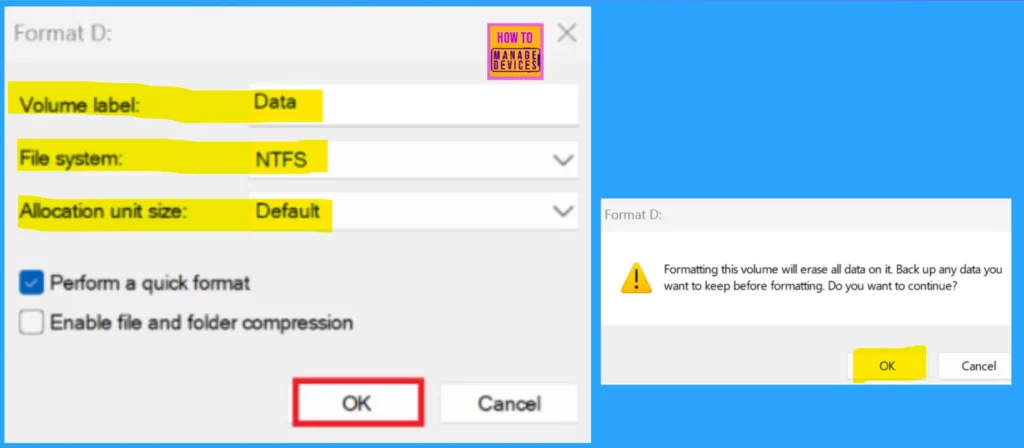
When you tap Format, a pop-up window will appear. In it, you should type the volume label you want for this drive, select the file system and allocation unit size, and check or uncheck Perform a quick format.
- Check or uncheck Enable file and folder compression on this drive.
- Click OK when you are ready to format the drive.
- Click/tap on OK to confirm. (see screenshot below)
- Click on OK when the formatting has finished.
Need Further Assistance or Have Technical Questions?
Join the LinkedIn Page and Telegram group to get the latest step-by-step guides and news updates. Join our Meetup Page to participate in User group meetings. Also, Join the WhatsApp Community to get the latest news on Microsoft Technologies. We are there on Reddit as well.
Author
Anoop C Nair has been Microsoft MVP for 10 consecutive years from 2015 onwards. He is a Workplace Solution Architect with more than 22+ years of experience in Workplace technologies. He is a Blogger, Speaker, and Local User Group Community leader. His primary focus is on Device Management technologies like SCCM and Intune. He writes about technologies like Intune, SCCM, Windows, Cloud PC, Windows, Entra, Microsoft Security, Career, etc.
