Let’s learn how to install and use Microsoft Power Automate Desktop. Power Automate, previously known as (Microsft Flow) is a part of Microsoft power platforms. It is a SaaS platform by Microsoft that is designed for users to create and automate workflows and business applications. The automated workflows are called flows.
There are different types of Flows available on Power Automate. They are Cloud Flows, Desktop Flows, and Business Processes Flows. In this post, we are discussing Desktop Flows. Desktops Flows are Windows-based applications that help to automate tasks on your local machines.
Usually, people do repetitive tasks in daily life, and sometimes it is very hard to manage all the tasks. Power Automate Desktop helps you simplify your life and cut out the manual tasks you have been doing. It helps you to interact with a wide range of applications.
You can automate all repetitive desktop processes with Desktop Flows (Power Automate Desktop). Desktop Flows has robotic process automation(RPA) capabilities. This post lets you understand all about Microsoft Power Automate Desktop.
What are the Advantages of Power Automate Desktop?

Power Automate Desktop is a powerful tool for complex automation tasks. PowerAutomate Desktop helps ease your daily life by minimizing repetitive tasks,s you can concentrate on strategic work. The following are the advantages of Microsoft Power Automate Desktop.
1. It provides a richer set of automation features
2. It allows drag-and-drop visual designer
3. It provides hundreds of pre-built actions
4. Helps to manage time
5. Helps to simplify your tasks
6. Helps to eliminate human errors
How to Install Microsoft Power Automate Desktop
Power Automate Desktop allows you to automate web and desktop applications with the help of user interface actions like click and keyboard input. Power Automate Desktop is a Default app for Windows OS.
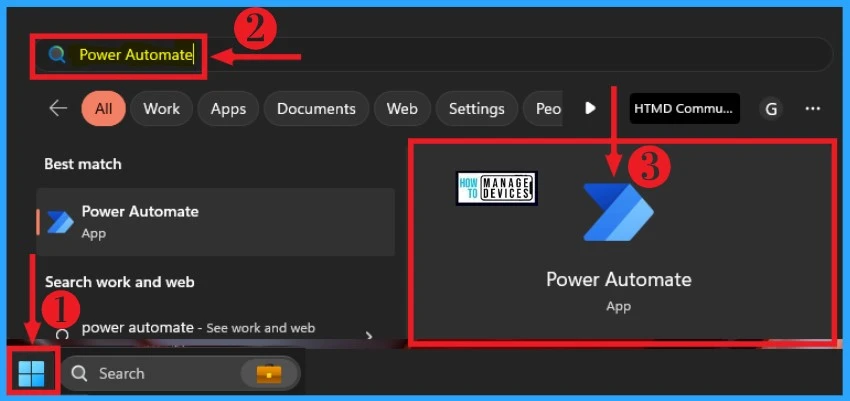
If you can’t launch Power Automate from your PC, you can easily install Microsoft Power Automate Desktop from the Microsoft Store. The below list and screenshot show how to launch Power Automate Desktop.
- Select Start Menu and search Power Automate on the search box
- Open the Power Automate app from the below window
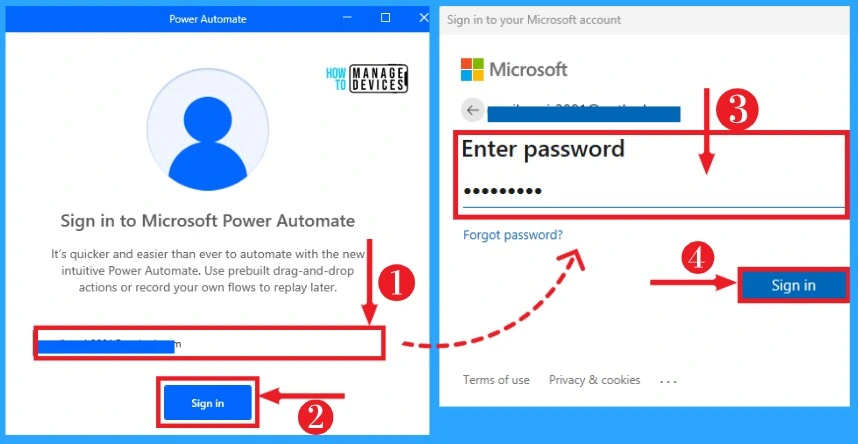
After launching the Microsoft Power Automate app, you have to Sign in to Microsoft Power Automate. You can easily Sign in to your Power Automate app with Microsoft Account and an email address, such as @outlook.com address. The below list and screenshot show how to Sign in to the Power Automate app.
- Enter your Microsoft or Outlook account in the box
- Click on the Sign in button
- Enter your Password in the box
- Click again on the Sign-in button from the below window
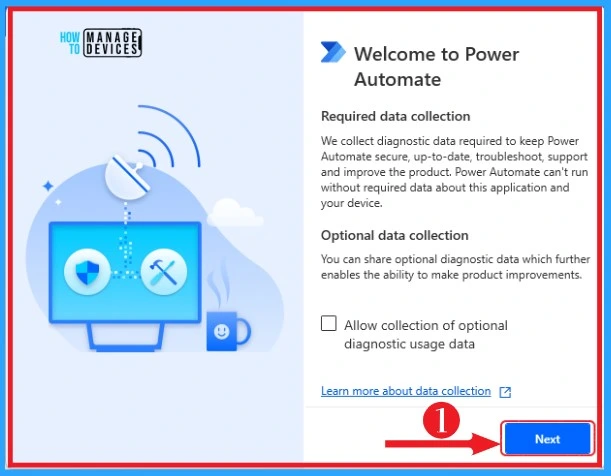
After Signing in to the app, the welcome window of Power Automate will appear. Power Automate collects diagnostic data required to keep your Power Automate secure, up-to-date, support, and improve the product.
After reading the information from the below window, click the Next button. The screenshot below shows the welcome window of the Power Automate app.
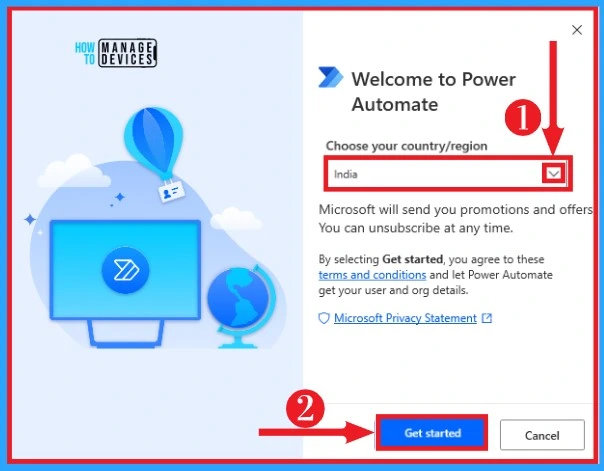
You can easily choose your country or region from the below window. Click on the drop-down arrow from the below window to select your country or region.
After selecting it, click the Get Started button and agree to these terms and conditions. The below screenshot shows how to select your country or region and Get started on Power Automate.
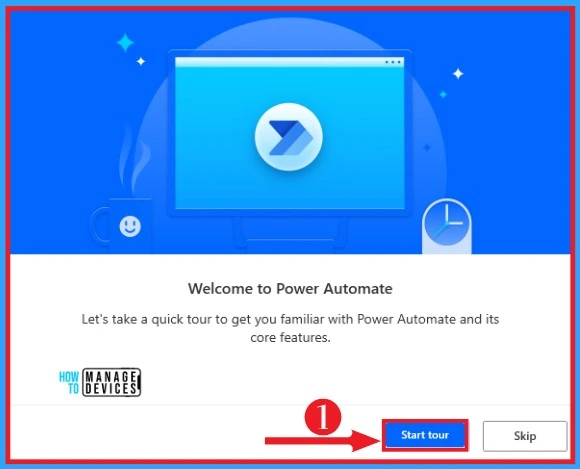
Power Automate allows you to start a tour of your account to familiarize yourself with its core features. Click on the Start Tour button from the below window. The screenshot below shows how to start the tour on Power Automate.
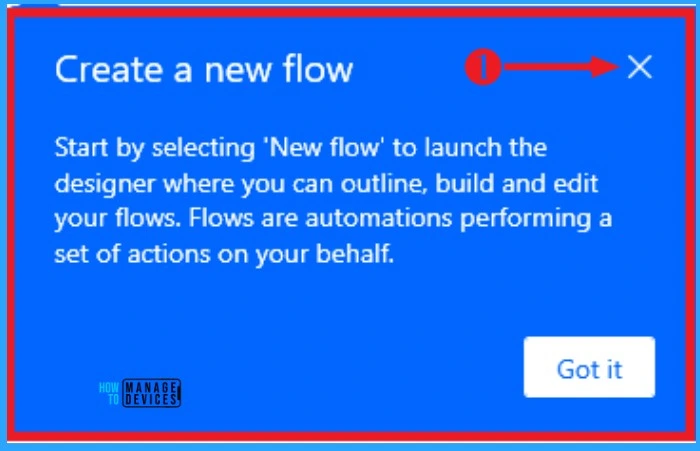
After this, you can create a New flow to launch the designer where you can outline. You can close this window or click on the Go It button. The below screenshot shows the new flow on Power Automate.
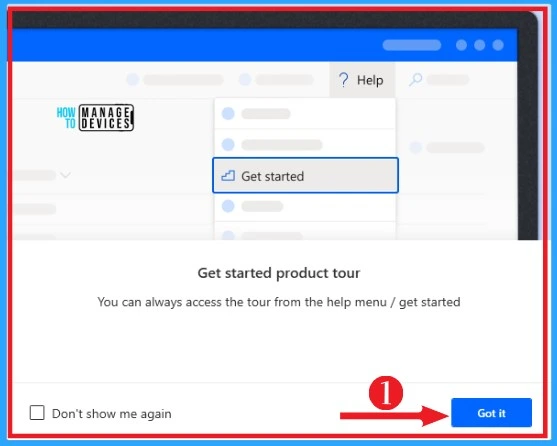
You can easily access the Get Started product tour from the help menu. Click on Got It button from the below window. The below screenshot shows how to Get Started on a product tour on Power Automate.
Home Screen of Microsoft Power Automate Desktop
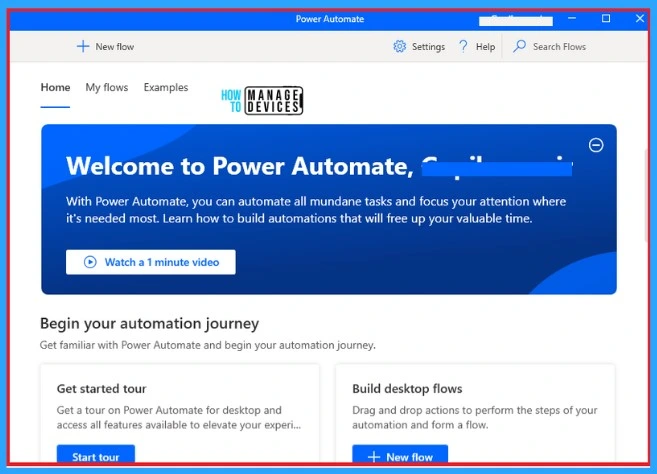
Microsoft Desktop Power Automate is a low-code platform that enables home and business users to optimize their workflows and automate repetitive and time-consuming tasks. Any Windows user can build flows with little-to-no coding experience. The list and screenshot below show different Home of Power Automate Desktop options.
- Begin your Automation Journey
- Start with an example
- Tutorials
- Useful Links
- What’s new
Begin Your Automation Journey
Begins Your Automation Journey helps you to familiarize yourself with Power Automate. You can get started on the tour on the power to automate for Desktop and access all features available to elevate your experience. It also allows you to build desktop flows. The below screenshot shows begin your automation journey.
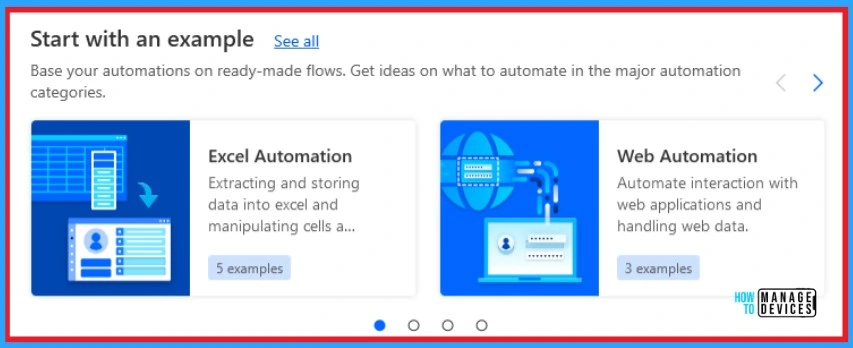
Start with an Example
Power Automate provides you with different types of examples of automation to enhance your experience. It helps you to understand flows on Power Automate easily. The below screenshot shows start with an example of Power Automate Desktop.
Tutorials
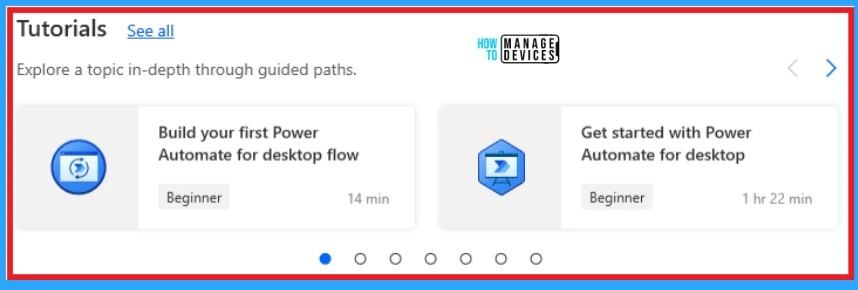
Tutorials on Power Automate help you to explore a topic in-depth through guided paths. It is a guideline for beginners to build and get started in power automation. The below screenshot shows Tutorials on Power Automate.
Useful Links
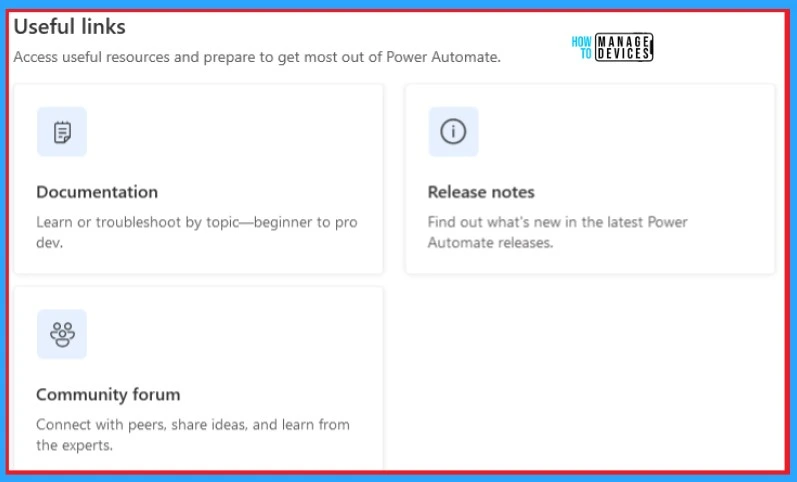
Useful Links allow you to access useful resources and prepare to get the most out of Power Automate. It includes documentation release notes and community forums. The below screenshot shows Useful links on Power Automate.
What’s New
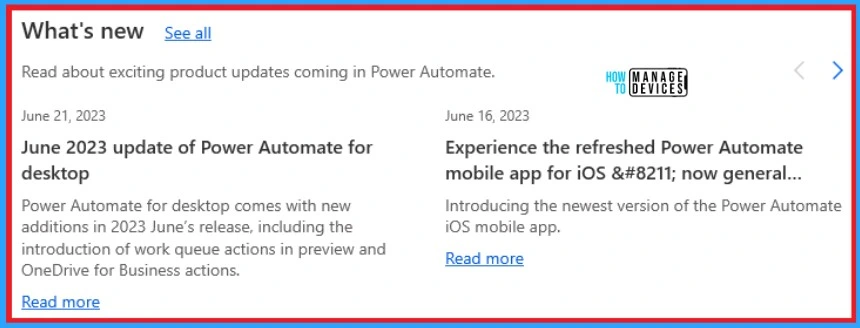
What’s New lets you know about exciting product updates in Power Automate. It helps you to be up to date on Power Automate. The below screenshot shows What’s New on Power Automate Desktop.
- How to Customize Taskbar Behaviors in Windows
- 300 Windows 11 Performance Improvements – Benchmark Report from Microsoft
My Flow
My Flow on Power Automate helps you to view different flows on your Power Automate Desktop. It will show the last modified time and status of that desktop flow. You can easily edit this Saved desktop flow at any time.
Refresh can be done in my flows to speed up your automation. You can easily select my flow on the home screen of power to automate. The below screenshot shows My Flow on Power Automate.

Examples
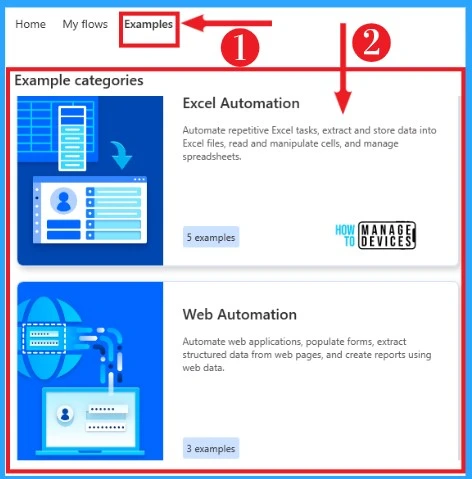
An Example helps you to practice different types of automation to enhance and speed up your automation. It includes automation such as Excel Automation, Web Automation, Desktop Automation, Scripting, etc.
You can easily select examples from the home screen of Power Automate Desktop. The below screenshot shows examples of power automation.
How to Create Desktop Flows on Power Automate
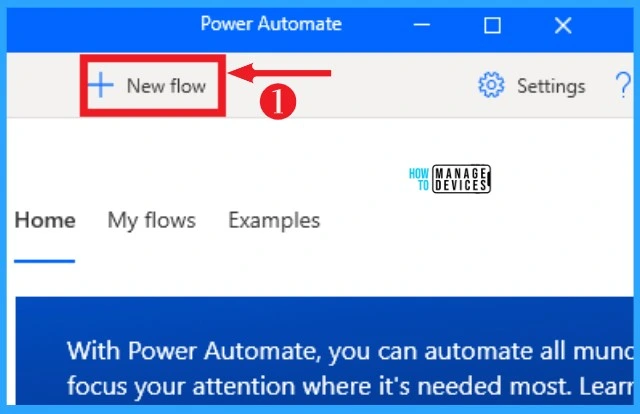
My Flows allows you to automate varieties of actions on Power Automate Desktop. This flow helps you to manage your repetitive task. My Flow allows you to record the automation process, which will help you do those tasks automatically. The below list and screenshot show how to create My Flow on Power Automate.
- Click on the New Flow(+) from the home screen of the power automated desktop.
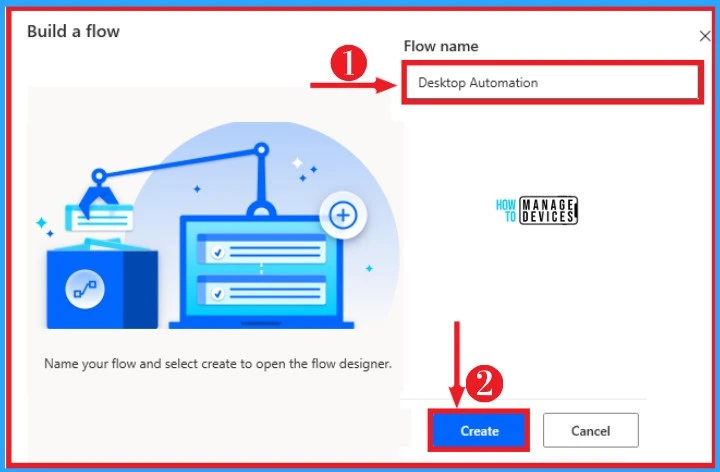
After clicking on the new flow, give any name to your desktop flow on the flow name box. Click on Create button from the below window to create your desktop flow. The below screenshot shows it.
Home Screen of Desktop Flows
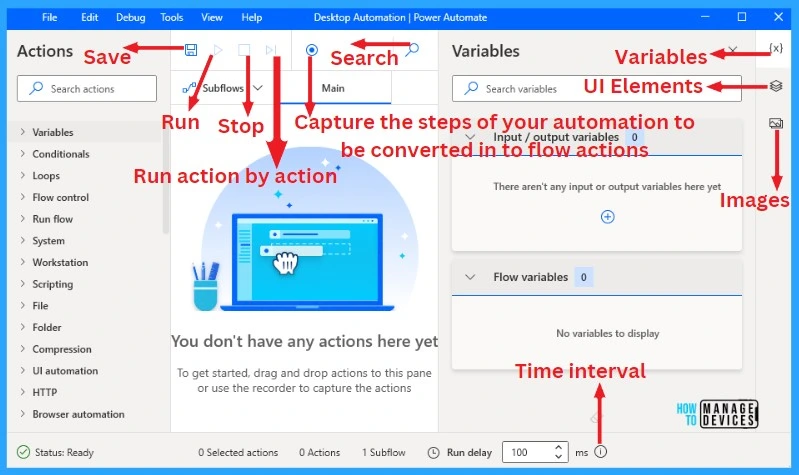
The home screen of desktop flows shows different actions for creating your desktop flows in different ways. This action helps you to do your repetitive tasks quickly. You can save and record this automation process. The below list and screenshot show different options on the home screen of desktop flows.
- Save – It helps to save your automation process
- Run – Used to run the automation
- Stop – It helps to stop automation
- Run action by action – It is used to run automation on action by action
- Record – It helps to capture the steps of your automation to be converted into flow actions
- Variable – It helps to show different data types
- UI Elements – It helps to access UI Elements
- Images – It helps to access Images
Various Actions on Desktop Flows
1. Variables
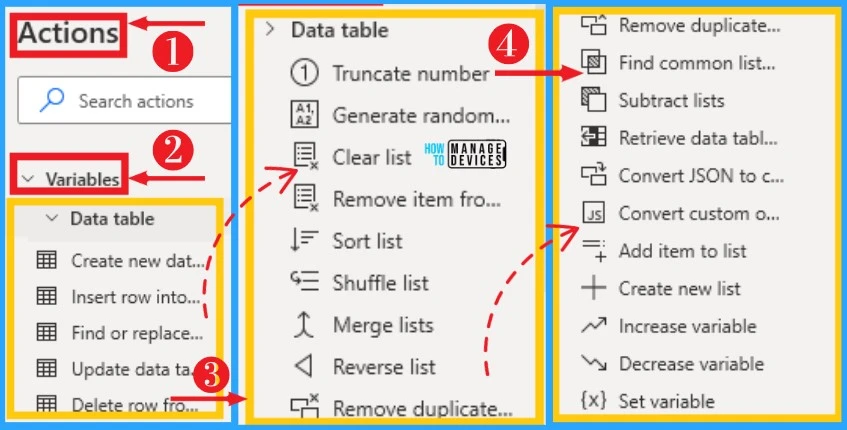
Variables are one the important action on Power Automate Desktop. Variables in desktop flows provide different types of data types that help converts them to a specific type based on their content. It helps to create, merge, shuffle, sort, reverse tables, and list.
The variable can easily access from the Action on the left side of Desktop Flow. The below table and screenshot show options available on Variables.
| Options on Variables | Used to |
|---|---|
| Create new data table | Helps to create a new data table variable |
| Convert the custom object to JSON | Inserts a row at the end or before a specific index value |
| Find or replace in data table | Helps and/or replaces data table values |
| Update data table item | Update a data table row item on a defined column |
| Delete row from data table | Delete a data table row at the corresponding row index |
| Truncate number | Get the integral or fractional digits of a numeric value, or round up the value to a specified number of decimal places |
| Generate random number | Generate a random number or s list of random numbers that fall between a minimum and maximum value |
| Clear list | Remove all items from a list |
| Remove item from list | Remove one or multiple items from a list |
| Sort list | Sort the items of a list, use items of the same type |
| Shuffle list | Create a random permutation of a list |
| Merge list | Merge two lists into one |
| Reverse list | Retrieve the data table column into list |
| Remove duplicate items from list | Remove the multiple occurrences of items in a list, so that in the resulting list each item will be unique |
| Find common list items | Compare two lists and create a new list with the items that are common to both |
| Subtract list | Compare two lists and create a new list with the items that are in the first list but not in the second |
| Retrieve data table column into list | Retrieve the data table column into list |
| Convert JSON to custom object | Convert a JSON string to a custom object |
| Add an item to list | Convert a custom object to a JSON string |
| Add item to list | Append a new item to a list |
| Create new list | Create a new empty list |
| Increase variable | Increase the value of a variable by a specific amount |
| Decrease variable | Decrease the value of a variable by a specific amount |
| Set variable | Set the value of a new or existing variable, create a new variable or overwrite a previously created variable |
2. Conditionals
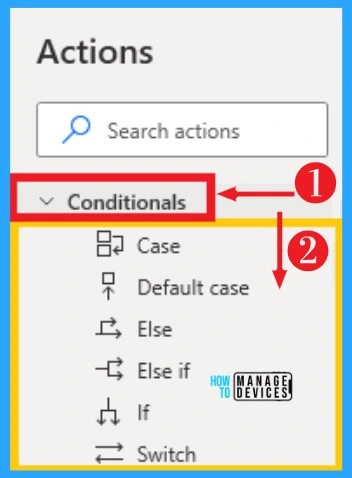
Conditional actions provide different types of conditions, such as case, default case, etc. If conditionals help you to evaluate any type of condition. Provide default and alternative behaviors to your desktop flows based on the available data.
Conditionals can be easily accessed from the Action on the left side of Desktop Flow. The below list and screenshot show Conditional on Power Automate.
- Case – An expression that, if met, a block of actions associated with that particular case runs
- Default case – A block of actions that are run, if no case expression has been met in the switch body
- Else – Marks the beginning of a block of actions that run if the condition specified in the preceding “if’ statements aren’t met
- Else if – Marks the beginning of a block of actions that ran if the conditions specified in the preceding ‘if’ statements aren’t met, but the condition specified in this statement is met
- If – Marks the beginning of a block of actions that is run if the condition specified in this statement is met
- Switch – Dispatches execution to different parts of the switch body based on the value of the expression
3. Loops
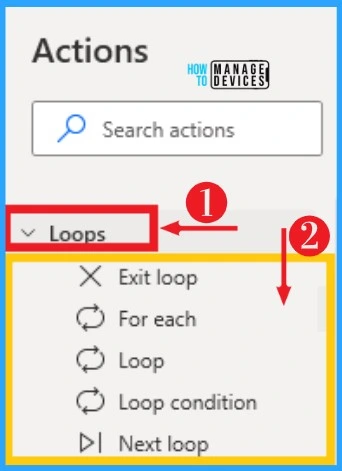
Loops on Power Automate help you to automate repetitive sections of your desktop flows and avoid running the same actions multiple times. You can easily select Loop from Actions on the left side of Desktop Flow. The below table and screenshot show Loops on Power Automate.
| Options on Loop | Used to |
|---|---|
| Exit loop | Terminates the loop, and the flow resume at the next action or statement following the loop |
| For each | Iterates over items in a list, data table, or data row, allowing a block of actions to be executed repeatedly |
| Loop | Iterate a block of actions for a specified number of items |
| Loop condition | Iterates a block of actions as long as a specified condition proves to be true |
| Next loop | Forces the next iteration of the block to take place, skipping any actions in between |
4. Flow Control
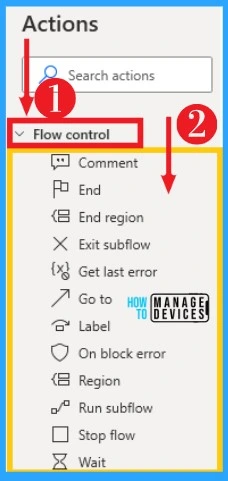
Flow Control is the act of controlling the order in which actions and sub-flows run. Power Automate enables you to implement flow control through the flow control actions. You can easily set rules and manage the course of the flow from Flow Control.
You can easily select flow control from the actions left side of the desktop flow. The below list and screenshot show flow control on Power Automate.
- Comment – User comment
- End – Set rules and manage the course of the flow
- End region – Marks the end of a group of actions
- Exit sub-flow – Exits current sub-flow and returns to the point it was called from
- Get last error – Retrieves the last error that occurred in the flow
- Go to – Transfer the flow of execution to another point, indicating a label
- Label – Acts as the destination of a ‘go to statement
- On-block error – Marks the beginning of a block to handle actions errors
- Region – Marks the beginning of a group of actions
- Run sub-flow – Run a sub-flow specifying any required arguments
- Stop flow – Terminates the flow
- Wait – Suspends the execution of the flow for a specified amount of seconds
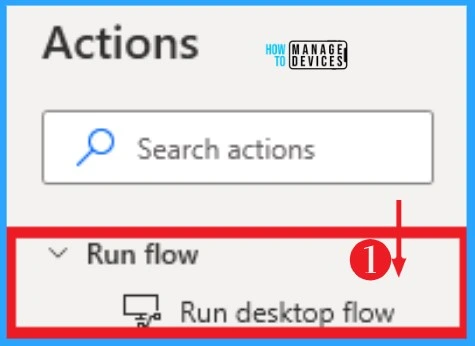
5. Run Flow
Runs a desktop flow that can receive input variables and may produce output variables. The parent’s flow run will be paused until the called desktop flow completes.
Run Flow can access the actions on the left side of the power automation. The below screenshot shows Run Flow on Power Automate Desktop.
6. System
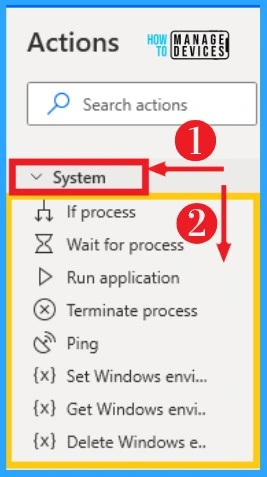
The System helps to perform a variety of tasks in a Windows environment and retrieve information from the system. You can use the system actions to automate tasks fundamental to the Windows operating system.
It can be easily selected from the actions on the left side desktop flow. The below table and screenshot show the System on Power Automate.
| Options on System | Used to |
|---|---|
| If process | Marks the beginning of a conditional block of actions depending on whether a process is running or not |
| Waite for process | Suspends the execution until a process starts or stops |
| Run application | Executes an application or opens a document by executing the associated application |
| Terminate process | Immediately stops a running process |
| Ping | Sends a message to determine whether a remote computer is accessible over the network |
| Set Windows environment variable | Set an environment variable to a given variable |
| Get Windows environment variable | Retrieves the value of an environment variable |
| Delete Windows environment variable | Deletes an environment variable from a given scope |
7. Workstation
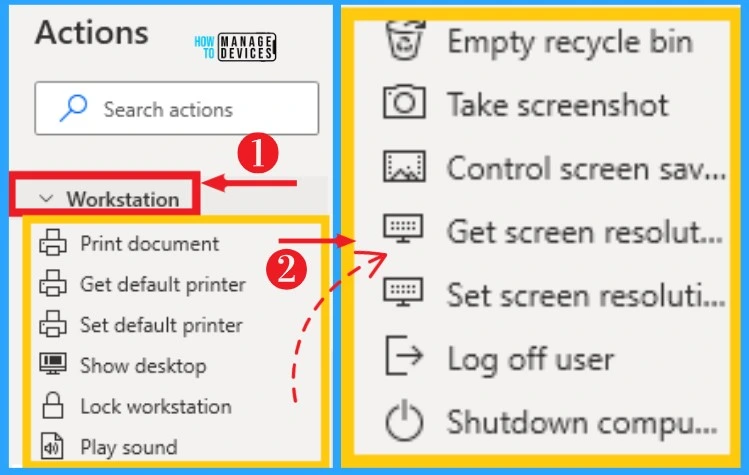
The Workstation group of actions provides a collection of actions that automate some essential functionalities of your workstation. It includes printing documents, showing desktops, taking a screenshot, etc.
You can easily select workstations from the actions on the left side of desktop flows. The below screenshot shows workstations on Power Automate.
- Print document – Prints a document on the default printer
- Get default printer – Gets the name of the default printer
- Set default printer – Sets a printer as the default printer
- Show desktop – Shows the desktop
- Lock workstation – Locks the workstation’s display to protect it from unauthorized use
- Play sound – Plays a sound from a WAV file
- Empty recycle bin – Deletes all files from the Windows recycle bin
- Take a screenshot – Takes a screenshot of all screens and saves it to the clipboard
- Control screen saver – Enables, disables, starts, or stops the screensaver
- Get screen resolution – Gets the width, height, bit count, and frequency of a selected monitor
- Set screen resolution – Sets the width, height, bit count, and frequency of a selected monitor
- Log off user – Logs off user
- Shutdown computer – shut down the computer
8. Scripting
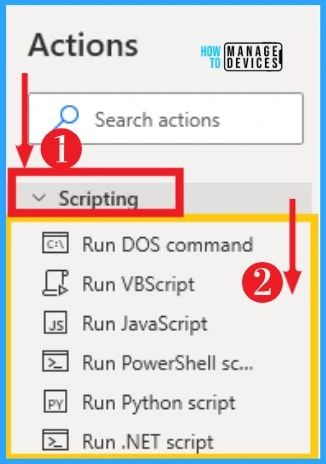
Scripting actions enable you to run blocks of code and implement custom behavior in your desktop flows. It allows different types of scripts, such as VBScript, JavaScript, PowerShell script, etc.
You can access the Scripting from actions on the left side of the desktop flow. The table screenshot below shows Scripting on Power Automate.
| Options on Scripting | Used to |
|---|---|
| Run DOS command | Runs a DOS command or console application in invisible mode and retrieves its output upon completion |
| Run VBScript | Executes some custom VBScript code and retrieves its output into a variable |
| Run JavaScript | Executes some custom JavaScript code and retrieves its output into a variable |
| Run PowerShell script | Executes some custom PowerShell script and retrieves its output into a variable |
| Run Python script | Executes Python 2 script code and retrieves its output |
| Run .NET script | Executes a user-provided .NET script and stories its outputs in variables |
9. File
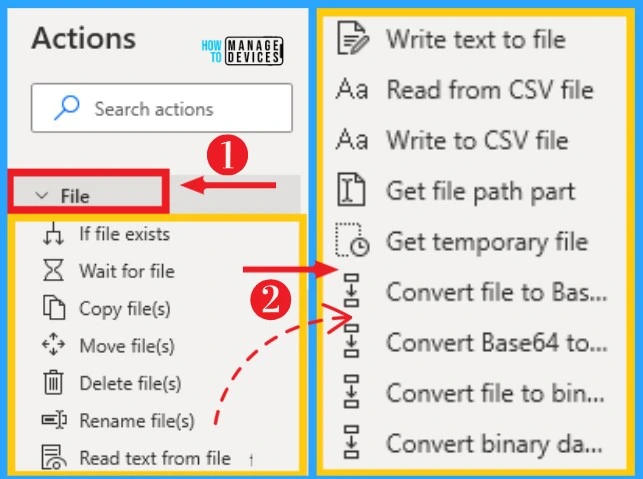
Files on Power Automate helps you to manage files, retrieve their properties, read and write data, and convert them to other types. You can easily convert files in different formats, and it also allows you to convert binary data to files.
Files can be accessed from actions on the left side of desktop flows. The below list and screenshot show the file on Power Automate.
- If the file exists – It marks the beginning of a conditional block of actions depending on whether a file exists or not
- Waite for file – Suspend running the flow until a file is created or deleted
- Copy file(s) – Copy one or more files into a destination folder
- Move file(s) – Move one or more files into a destination folder
- Delete file(s) – Delete one or more files
- Rename file(s) – Change the name of one or more files
- Read text from file – Read the content of a text file
- Write text to file – Write or appends text to a file
- Read from csv file – Read a CSV file into a data table
- Write to CSV file – Write a data table, data row, or list to a csv file
- Get file path part – Retrieve one or more parts (directory, filename, extension, etc.) from a text that represents a file path
- Get temporary file – Create a uniquely named, empty temporary file on disk, and get the file object (which is a representation and can access the file and all its information)
- Convert file to Base64 – Convert a file to Base64 encoded text
- Convert Base64 to file – Convert a Base64 encoded text to a file
- Convert file to binary data – Convert a file to binary data
- Convert binary data to file – Convert binary data to file
10. Folder
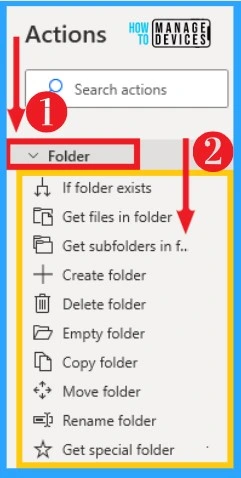
Power Automate allows you to organize and manipulate Folders on Desktop Flows. You can create, delete, move, copy, and rename files on desktop flows. Folders can be selected from actions. The below table and screenshot show Folders on Power Automate.
| Options on Folder | Used to |
|---|---|
| If folder exists | Marks the beginning of a conditional block of actions depending on whether a folder exists or not |
| Get files in folder | Retrieve the list of files in a folder |
| Get subfolders in folder | Retrieve the list of subfolders in a folder |
| Create folder | Create a new folder |
| Delete folder | Delete a new folder |
| Empty folder | Delete all the contents of a folder (files and subfolders) without deleting the folder itself |
| Copy folder | Copy a folder into a destination folder |
| Move folder | Move an existing folder into a destination folder |
| Rename folder | Change the name of a folder |
| Get special folder | Retrieve the path of a Windows’ special folder (such as Desktop, My Pictures, Internet Cache, etc.) |
11. Compression
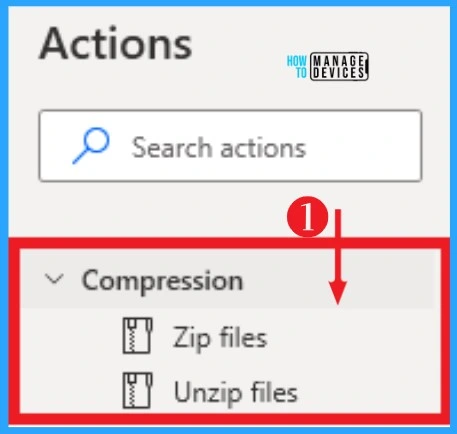
To compress (or zip) a file, use the ZIP files action and specify a path to the archive. If the archive already exists, the action will add the selected files. Compression can access from actions on the left side of desktop flows.
- Zip files – Compress one or more files or folders into a zip archive
- Unzip files – Uncompress one or more files or folders contained in a zip archive
12. UI Automation
UI Automation on Power Automate helps users to interact with Windows and desktop applications. Some UI automation actions require you to set UI elements in their properties to indicate the element you want to handle.
It can be selected from the actions on the left side of desktop flows. The below table and screenshot show UI Automation on Power Automate
| Options on UI Automation | Used to |
|---|---|
| Get details of windows | Gets a property of a window, such as its title or its source text |
| Gets a property of a window, such as its title or its source text | Get the value of a UI element’s attributes in a window |
| Get selected checkboxes in windows | Retrieves the names of the selected checkboxes in a checkbox group or the state of a specific checkbox |
| Get selected radio button in windows | Retrieves the names of the selected radio button in a radio button group or the state of a specific radio button |
| Extract data from window | Extracts data from specific parts of a window in the form of single values, lists, or tables |
| Take screenshot of UI element | Take a screenshot of UI elements in Windows |
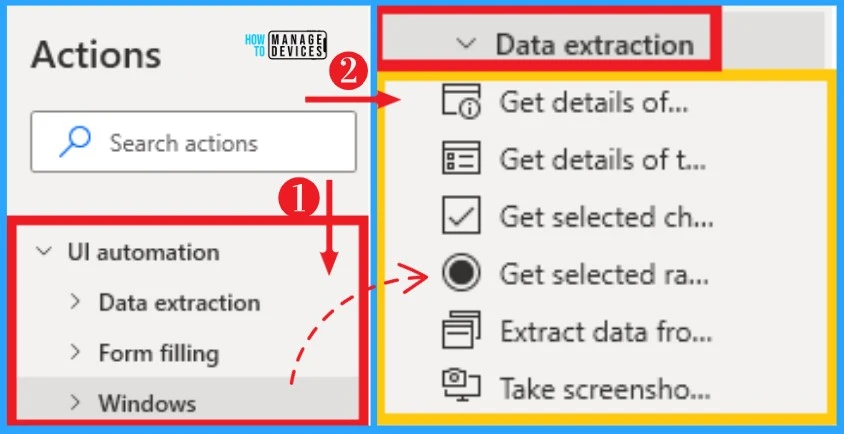
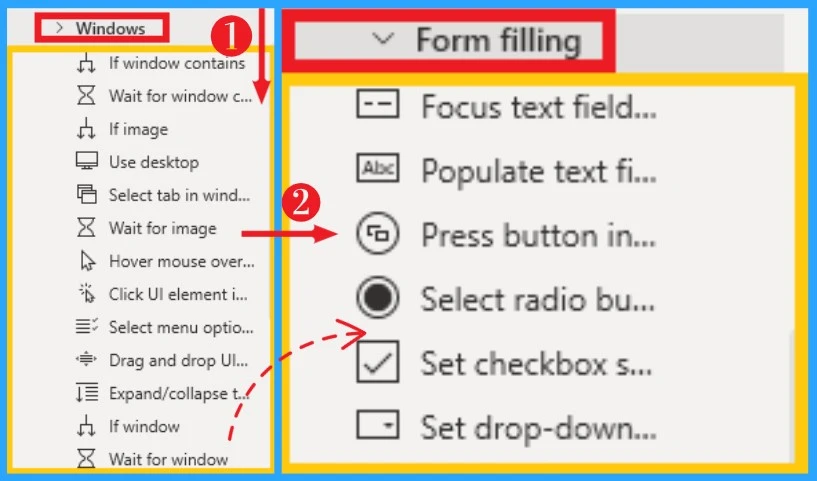
UI Automation also includes options such as Data extraction and form filling. The below list and screenshot show Data extraction and Form filling options on UI automation.
- Focus text field in the window – Sets the focus on a text box of a window and scrolls it into view
- Popular text field in the window – Fills a text box in a window with the specified text
- Press the button in the window – Press a window button
- Select the radio button in the window – Selects a radio on a window
- Set checkbox state in the window – Checks or unchecks a checkbox in a window form
- Set drop-down list value in the window – Sets or clears the selected options for a drop-down list in a window form
- Get window – Gets a running window for automating desktop applications
- Focus window – Activates and brings to the foreground a specific window
- Set window state – Restores, maximizes or minimizes a specific window
- Move window – Sets the position of a specific window
- Resize window – Sets the size of a specific window
- Close Window – Closes a specific window
- If the window contains – Marks the beginning of a conditional block of action depending on whether a specific piece of text or UI elements exits in a window
- Waite for window content – Suspends the execution of the automation until a specific piece of text or UI element appears or disappears from a Window
- If image – This action marks the beginning of a conditional block of actions depending on whether a selected image is found on the screen or not
- Use desktop – Performs desktop and taskbar-related operations
- Select tab in the window – Selects a tab from a group of tabs
- Wait for image – This action waits until a specific image appears on the screen or on the foreground window
- Hover mouse over UI element in Window – Hover the mouse over any UI element of a window
- Clicks UI element in the window – Clicks on any UI element of a window
- Select menu option in the window – Selects an option in the menu of a window
- Drag and drop UI element in the window – Drags and drops UI elements of a window
- Expand/collapse tree node in the window – Expands or collapses a node of a tree view residing in a window
- If window – This action marks the beginning of a conditional block of actions depending on whether a window is open or not and whether a window is the focused (foreground) window
- Waite for window – Suspends the execution of the process until a specific window opens, close, gets, or loses the focus
13. HTTP
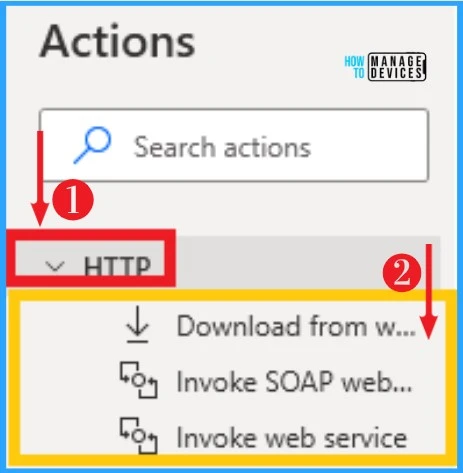
HTTP in Power Automate helps you to communicate with web applications and services directly. It performs various operations, such as uploading and downloading data and files. HTTP can select from actions. The below table and screenshot show HTTP on Power Automate.
| Invoke web service | Used to |
|---|---|
| Download from web | Downloads text or a file from the web and stores it |
| Invoke SOAP web service | Invokes a method from a SOAP web service |
| Invoke web service | Invoke web service |
14. Browser Automation
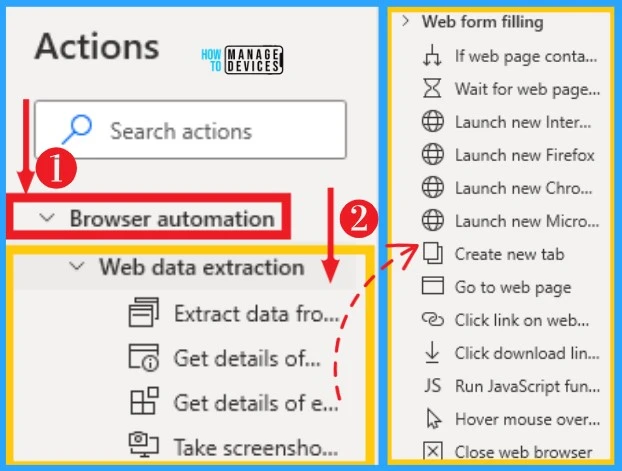
Browser automation actions enable users to interact with web applications and components through UI elements. UI elements describe uniquely the web components that the action is going to handle. Browser Automation can select from actions. The below list and screenshot show Browser Automation.
- Extract data from a web page – Extract data from specific parts of a web page in the form of single values, lists, rows, or table
- Get details of web page – Get a property of a web page, such as its title or its source text
- Get details of element on a web page – Get the value of an element’s attribute on a web page
- Take a screenshot of the webpage – Take a screenshot of the web page currently displayed in the browser and save the image to the clipboard
- If a web page contains – Mark the beginning of a conditional block of actions, depending on whether a specific piece of text or elements exists in a web page
- Wait for web page content – Suspend the flow until a specific piece of text or web page element appears or disappears from a web page
- Launch new internet explorer – Launch a new instance of Internet Explorer for automating websites and web applications
- Launch new Firefox – Launch a new instance of Firefox for automating websites and web applications
- Launch new Chrome – Launch a new instance of Chrome for automating websites and web applications
- Launch new Microsoft Edge – Launch a new instance of Microsoft Edge for automating websites and web applications
- Create new tab – Create a new tab and navigate to the given URL (supported in Microsoft Edge, Chrome, and Firefox)
- Go to a web page – Navigate the web browser to a new page
- Click the link on a web page – Clicks on a link or any other element of a web page
- Click the download link on a web page – Click on a link in a web page that results in downloading a file
- Run JavaScript function on the web – Run a JavaScript function on the web page and get the returned result
- Hover mouse over an element on a web page – Hover the mouse over an element of a web page
- Close web browser – Close a web browser window
15. Excel
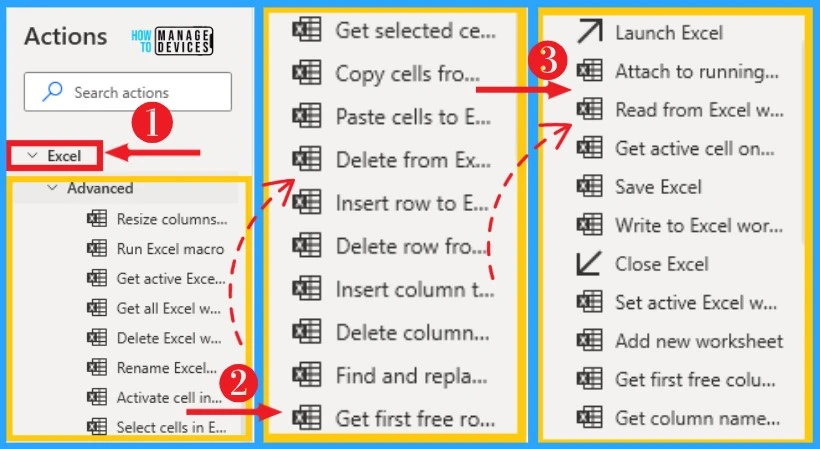
Excel on Power Automate helps to automate any excel related activity. It allows you to access your Excel quickly and easily. It helps to read and extract data from an Excel document using the Read from Excel worksheet action. It can be accessed from actions, and the below list and screenshot show Excel on Power Automate.
- Resize columns/rows in Excel worksheet – Resizes a selection of columns or rows in the active worksheet of an Excel instance
- Run Excel macro – Runs a specified macro on the document of an Excel instance
- Get active Excel worksheet – Retrieves an Excel documents active worksheet
- Get all Excel worksheets – Retrieves all worksheet names of an Excel document
- Delete Excel worksheet – Deletes a specific worksheet from an Excel instance
- Rename Excel worksheet – Renames a specific worksheet of an Excel instance
- Active cell in Excel worksheet – Activate a cell in the active worksheet of an Excel instance by providing a column, row, and offset
- Select a cell in the Excel worksheet – Selects a range of cells in the active worksheet of an Excel instance
- Get select cell in Excel worksheet – Retrieve the selected range of cells in a structure consisting of the first column, first row, last column, and last row
- Copy cells from Excel worksheet – Copies a range of cells from the active worksheet of an Excel instance
- Paste cells to Excel worksheet – Pastes a range of cells to the active worksheet of an Excel instance
- Delete from Excel worksheet – Deletes a range of cells from Excel
- Insert row to Excel worksheet – Inserts a row above a selected row of an Excel instance
- Delete row from Excel worksheet – Deletesa selected row from an Excel instance
- Insert a column to Excel worksheet – Inserts a column to the left of a selected column of an Excel instance
- Delete column from Excel worksheet – Deletes a selected column from an Excel instance
- Find and replace cells in Excel worksheet – Finds text and replace it with another in the active worksheet of an Excel instance
- Get the first free row on the column from the Excel worksheet – Retrieve the first free row, given the column of the active worksheet
- Launch Excel – Launch a new Excel instance or opens an Excel document
- Attach to running Excel – Attaches to an Excel document that’s already open
- Read from Excel worksheet – Reads the value of a cell or a range of cells from the active worksheet of an Excel instance
- Get active cell on Excel worksheet – Get the active cell in the active worksheet of the Excel document
- Save Excel – Saves a previously launched Excel instance
- Write to Excel worksheet – Writes a value into a cell or a range of cells of an Excel instance
- Close Excel – Closes an Excel instance
- Set active Excel worksheet – Activates a specific worksheet of an Excel instance
- Add new worksheet – Adds a new worksheet to the document of an Excel instance
- Get the first free column/row from the Excel worksheet – Retrieves the first free column and/or row of the active worksheet. This is useful for adding new data to a worksheet that already has data in it
- Get column name on Excel worksheet – Gets the name of the column
Example of Creating Desktop Flow on Excel Action
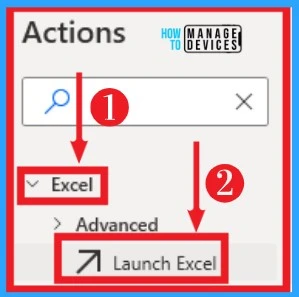
Desktop Flow on Power Automate helps you to launch Excel applications easily. Select the Excel option from Actions from the left side of the desktop Flows. Click on the Launch Excel option from the below window. The below screenshot shows how to launch Excel via desktop flows.
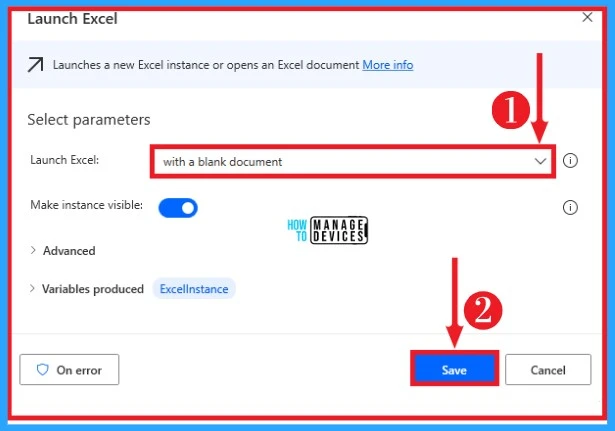
After clicking on the Launch Excel option, select the parameters for launching. Then you can easily launch Excel by clicking on the save option. The below screenshot shows how to select parameters for launching Excel on desktop flows.
After saving the automation, you can see the Launch Excel automation on the desktop flow screen. Click on the Run button above the window to complete the Excel launching process. The below screenshot shows the launching of Excel on desktop flows.

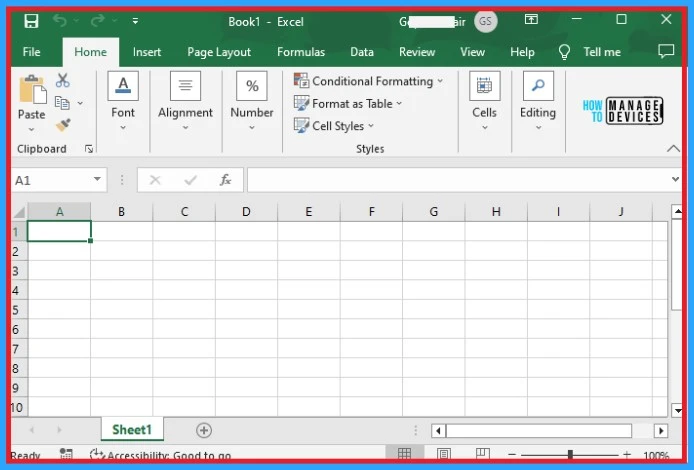
When you click on the run button, the Excel application launches automatically. Power automation helps you to launch different types of Excel sheets. The below screenshot shows launching a blank Excel document using power automate.
16. Database
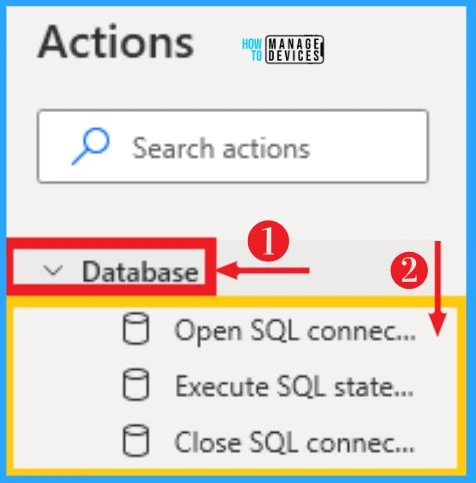
Database on Power Automate helps to connect to databases and executes SQL statements. A connection string specifies all information necessary to connect to a database, such as the driver, the database, server names, and the username and password.
You can easily select Database from action on the left side of Power Automate. The below table and screenshot show the Database on Power Automate.
| Options on Database | Used to |
|---|---|
| Open SQL connection | Open a new connection to a database |
| Open a new connection to a database | Connect to a database and execute an SQL statement |
| Close SQL connection | Close an open connection to a database |
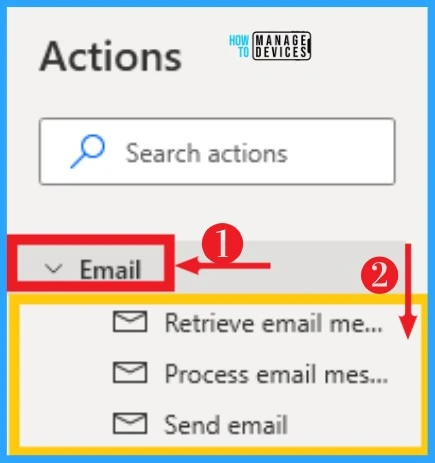
17. Email
Email on Power Automate helps you to automate sending, receiving, and managing email messages through imap/smtp. It helps you to manage your time. Email can be accessed from action on desktop flow. The below table and screenshot show Email on Power Automate.
| Options on Email | Used to |
|---|---|
| Retrieve email messages | Retrieves email messages from an IMAP server |
| Process email messages | Move, delete, or mark as unread email messages (or a list of email messages) retrieved by a Retrieve email messages action |
| Send mail | Move, delete, or mark as unread email messages (or a list of email messages) retrieved by a Retrieve email messages action |
18. Exchange Server
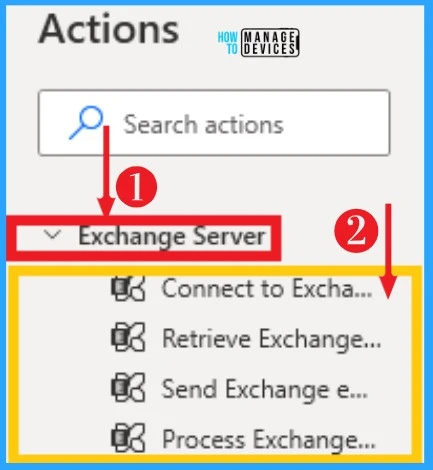
The Exchange Server actions enable you to connect to an Exchange server and manage your correspondence. It helps to automate sending, receiving, and managing emails through Exchange.
It can be easily selected from actions on the left side of desktop flows. The below list and screenshot show the exchange server on Power Automate.
- Connect to Exchange server – Open a new connection to an Exchange server
- Retrieve Exchange email messages – Retrieve email messages from the specified Exchange server
- Send Exchange email message – Create and send a new email message
- Process Exchange email messages – Move, delete, or mark as unread an email message (or a list of email messages)
19. Outlook
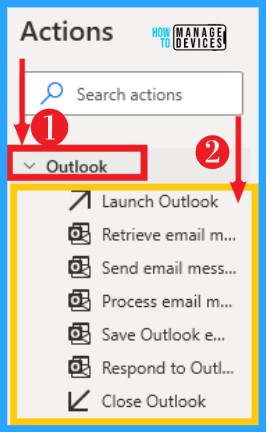
Outlook on Power Automate allows you to automate sending, receiving, and managing email messages of an Outlook account. It helps you to access Outlook on your PC easily and quickly.
Outlook on Power Automate can be easily selected from actions on desktop flows. The below list and screenshot show Outlook on Power Automate.
- Launch Outlook – Launch Outlook and create a new Outlook instance
- Retrieve email messages from Outlook – Retrieve email messages from an Outlook account
- Sending email messages through Outlook – Create and send a new email message through Outlook
- Process email messages in Outlook – Move or delete an email (or a list of email messages) retrieved by a “Retrieve email messages from Outlook action
- Save Outlook email messages – Save Outlook email messages given an account
- Respond to Outlook messages – Respond to an Outlook message by replying, replaying to all, or forwarding it
20. Message Boxes
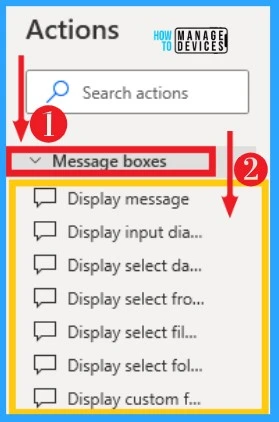
Message Boxes on Power Automate help you to interact with users and request input through message boxes. To display a message to the user while a flow runs, use the Display message action. It can access from actions, and the below table and screenshot show Message Boxes on Power Automate.
| Options on Message Boxes | Used to |
|---|---|
| Display message | Displays a message box |
| Display Input dialog | Displays a dialog box that prompts the user to enter text |
| Display select date dialog | Displays a dialog box that prompts the user to enter a date or date range |
| Display select from list dialog | Displays a dialog box with options that lets the user selection a list |
| Display select file dialog | Displays the select file dialog and prompts the user to select one or more files |
| Display select folder dialog | Displays the select folder dialog and prompts the user to select a folder |
| Display custom form | Display a customized form that can include multiple types of elements, like text, number or file inputs, etc. |
21. Mouse and Keyboard
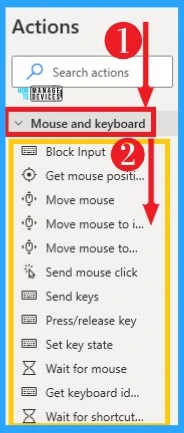
Power Automate allows you to take control of the Mouse and Keyboard. It helps to reduce your time consumption. The Mouse and Keyboard can access from actions, and the below list and screenshot show it on Power Automate.
- Block Input – Blocks the user’s mouse and keyboard input so that the flow can perform mouse and keyboard actions without interference from the user
- Get mouse position – Retrieve the current position of the mouse cursor on the screen in pixel coordinates
- Move mouse – Moves the mouse to a specific position
- Move the mouse to image – Moves the mouse over an image found on the screen or on the foreground window
- Move the mouse to text on screen (OCR) – Moves the mouse over a text found on the screen or on the foreground window using OCR
- Send mouse click – Sends a mouse click event
- Send keys – Sends keys to the application that is currently active
- Press/release key – Presses (and holds) or release one or more modifier keys (Alt, Control, or Shift)
- Set key state – Sets the state (on or off) for the keys Caps Lock, Num Lock, or Scroll Lock
- Wait for mouse – Suspends the execution of the flow until the mouse pointer change, usually to or from the ‘wait cursor’ or hourglass
- Get keyboard identifier – Retrieve the active keyboard identifier from the machine’s registry
- Wait for the shortcut key – Pause the flow until a specific shortcut key is pressed. Shortcut keys must contain at least one key or a key and one of (ctrl, alt, shift)
22. Clipboard
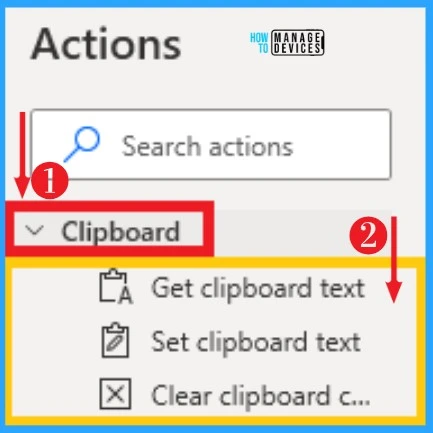
Clipboard actions on Power Automate help you to manipulate or extract the contents of your machine’s clipboard. It can be easily selected from actions, and the below table and screenshot show the Clipboard on Power Automate.
| Options on Clipboard | Used to |
|---|---|
| Get clipboard text | Helps to get clipboard text |
| Set clipboard text | It helps to Sets clipboard text |
| Clear clipboard contents | Used to clear clipboard contents |
23. Text
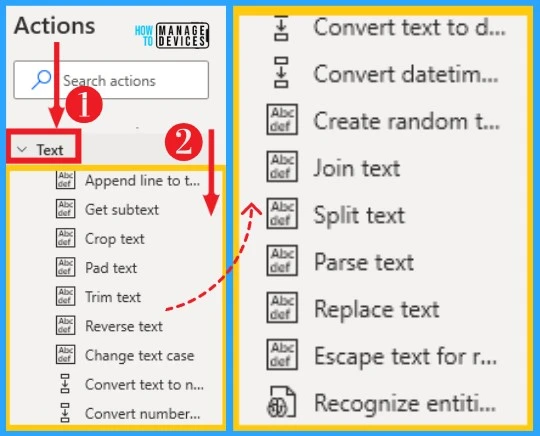
Text actions enable you to handle, manipulate, and convert text values in your desktop flows. You can easily crop, trim, change case, split, join, etc, on text. You can easily access text from actions, and the below list and screenshot show text on Power Automate.
- Append line to text – Appends a new line of text to a text value
- Get subtext – Retrieves the subtext of a text value specifying the start index and length
- Crop text – Retrieves a text value that occurs before, after, or between the specified text flag(s) in a given text
- Pad text – Creates a fixed-length text by adding characters
- Trim text – Removes all occurrences of white space characters (such as space, tab, or new line) from the beginning
- Reverse text – Reverse the order of letters in a text string
- Change text case – Change the casing of a text uppercase, lowercase, title case or sentence case
- Convert text to number – Converts a text representation of a number to a variable that contains a numeric value
- Convert datetime to text – Converts a DateTime value to text using a specified custom format
- Create random text – Generates a text of a specified length consisting of random characters. This can be useful for generating passwords
- Join text – Converts a list into a text value by separating its items with a specified delimiter
- Split text – Creates a list containing the substrings of a text that is separated by a specified delimiter or a regular expression
- Parse text – Parses a text to find the first or all occurrences of a specified subtext or a regular expression pattern
- Replace text – Replaces all occurrences of a specified subtext with another text. It can also be used with regular expressions
- Escape text for regular expression – Escapes a minimal set of characters (\,*,+,?,|,{,[,(,),^,$,#, and white space ) by replacing them with their escape codes
- Recognize entities in the text – REcognizes entities in text, such as numbers, units, date/time, and others expressed in natural language across multiple languages
24. Date and Time
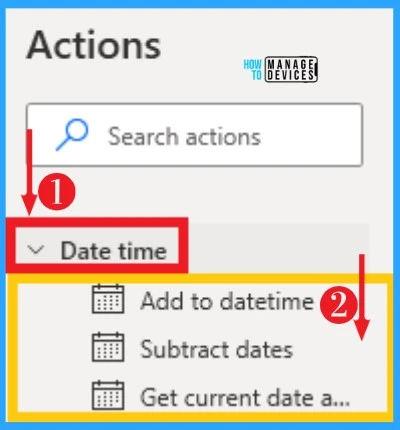
Date and Time in Power Automate help to get the date and time and perform time-related operations. The date format depends on the Windows configuration. Date and Time can be accessed from actions and below table, and screenshots show it on Power Automate.
| Options on Date and RTime | Used to |
|---|---|
| Add to datetime | Adds (or subtracts) a specific number of seconds, minutes, hours, or days to a datetime value |
| Subtracts dates | Finds the time difference between two given dates in days, hours, minutes,or seconds |
| Get current dateand time | Retrieves the current date or the current date and time |
25. PDF
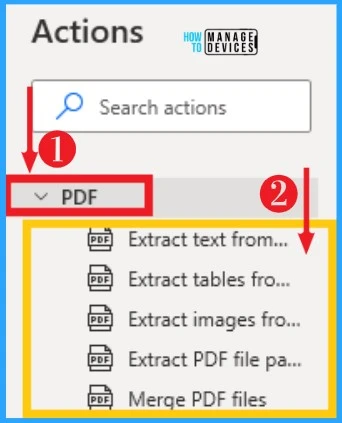
PDF on Power Automate helps to automate PDF files and their content (text and images). It allows the automation of tables from PDF files and arranges pages to create new documents. Pdf can access from actions, and the below list and screenshots show it on Power Automate.
- Extract text from a PDF – Extract text from a PDF file
- Extract tables from PDF – Extract tables from a PDF file
- Extract images from PDF – Extract images from a PDF file
- Extract PDF file page to a new PDF file – Extract pages from a PDF file to a new PDF file
- Merge PDF file – Merges multiple PDF files into a new one
26. CMD Session
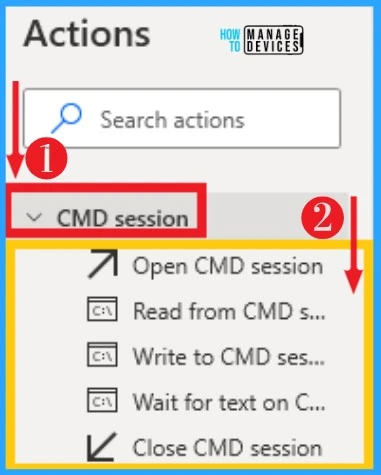
CMD Session helps to commence a command prompt session on desktop flows. It specifies the working folder and optionally changes the code page in the Advanced section. CMD session can be selected from actions on the left side of desktop flows. The below table and screenshot show it.
| Options on CMD Session | Used to |
|---|---|
| Open CMD session | Open a new CMD session |
| Read from CMD session | Read the output of a CMD session |
| Write to CMD session | Execute a command on an open CMD session |
| Waite for text on CMD session | Waite a specific text on a previously opened CMD session |
| Close CMD session | Close a previously opened CMD session |
27. Terminal Emalution
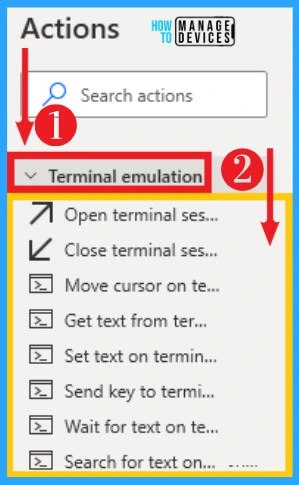
Terminal Emulation helps to take control of terminal emulators for automating mainframes and legacy systems. It allows one to perform operations such as moving the cursor, setting and getting text, and sending keys. It can select from actions on desktop flows. The below list and screenshot show Terminal Emulation on Power Automate.
- Open terminal session – Open a new terminal session
- Close terminal session – Close an open terminal session
- Move cursor on terminal session – Move the terminal’s cursor to the specified position
- Get text from the terminal session – Get text from a terminal session
- Set text on terminal session – Set text on a terminal session
- Send key to terminal session – Send a control key to a terminal session
- Waite for text on terminal session – Waite for a specific text to appear on a terminal session
- Search for text on terminal session – Search for all occurrences of a specific text on a terminal session
28. OCR
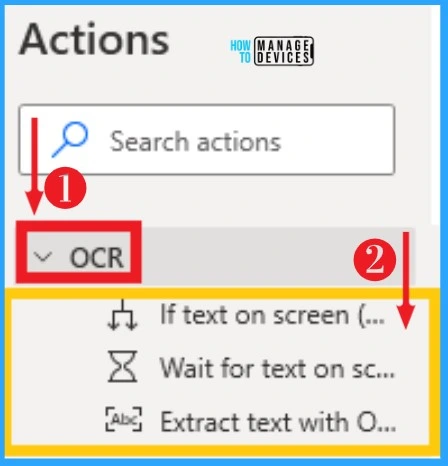
OCR on Power Automate initiates OCR engines to perform OCR-related activities. Power Automate enables users to read, extract, and manage data within files through Optical Character Recognition (OCR). OCR can select from actions, and the below table and screenshots show it.
| Options on OCR | Used to |
|---|---|
| If text on screen (OCR) | Marks the beginning of a conditional block of action depending on whether the text specified appears on the screen or not using OCR |
| Waite for text on screen (OCR) | Waite until a specific text appears/disappears on the screen, the foreground window, or relative to an image on the screen or foreground window using OCR |
| Extract text with OCR | Extract text from a given source using the specified OCR engine |
29. Cryptography
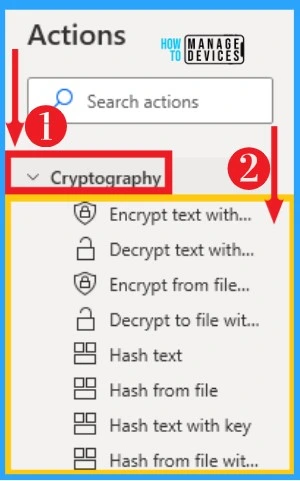
Cryptography actions enable you to encrypt and decrypt plain text and text from files providing a key and an encoding format. You can provide the encryption key directly or through a variable. It can be easily accessed from actions, and the below list and screenshot show Cryptography on Power Automate.
- Encrypt text with AES – Encrypt a string with AES using a key and a specified encoding format
- Decrypt text with AES – Decrypt a string with AES based on a specified key and an encoding format
- Encrypt from file with AES – Encrypt the contents of a file with AES, using a key and a specified encoding format
- Decrypt to file with AES – Decrypt a string to a file with AES based on a specified key and an encoding format
- Hash text – Hash a string using a specified algorithm and an encoding format
- Hash from file – Hash the contents of a file using a specified algorithm and an encoding format
- Hash text with key – Hash a string with a key using a specified algorithm and an encoding format
30. Windows Services
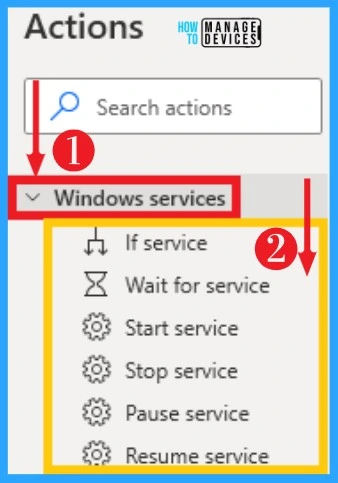
Power Automate allows you to handle Windows Services via the available Windows services actions. With these actions, you can maintain complete control of the Operating System and limit the running services. Windows Service can select from actions, and the below table and screenshot show it on Power Automate.
| Options on Windows Services | Used to |
|---|---|
| If services | Marks the beginning of a conditional block of actions depending on Whether a service is running, paused, stopped, or installed on the computer |
| Wait for service | Suspend running the flow until service starts, stops, or pauses |
| Start service | Start a stopped Windows service |
| Stop service | Stop a running Windows service |
| Pause service | Pause a running Windows service |
| Resume service | Resume a paused Windows service |
31. XML
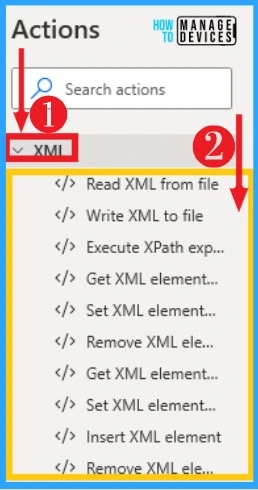
Power Automate provides the capability to use desktop flows to manage XML attributes and elements. It can be easily accessed from action on the left side of desktop flows. The below list and screenshot show XML on Power Automate.
- Read XML from file – Read the contents of an XML file into a variable
- Write XML to file – Write the contents of an XML node variable into a file
- Execute XPath expression – Extract values from an XML document based on the provided Xpath query
- Get XML element attribute – Get the value of an attribute of an XML element
- Set XML element attribute – Set the value of an attribute of an XML element
- Remove XML element attribute – Remove an attribute from an XML element
- Get XML element value – Get the value of an XML element
- Set XML element value – Set the value of an XML element
- Insert XML element – Insert a new XML element into an XML document
- Remove XML element – Remove one or more XML elements from an XML document
32. FTP
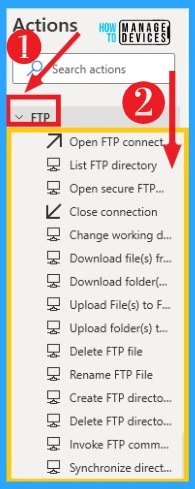
FTP on Power Automate helps you to manage folders and files on the FTP server. Use the FTP action group to upload and download files and manipulate directories on FTP servers. It can select from actions on the desktop flows. The below list and screenshot show FTP on Power Automate.
- Open FTP connection – This action establishes a specific connection to a remote FTP server and stores that connection as a variable for later use
- List FTP directory – This action returns the subdirectories and files contained in the current directory of an FTP connection
- Open secure FTP connection – This action establishes a specific secure connection to a remote FTP server and stores that connection as a variable for later use
- Close connection – This action closes as open FTP connection
- Change working directory – This action sets the current working directory for an FTP connection
- Download file(s) from FTP – Downloads one or more files from an FTP server
- Download folder(s) from FTP – Downloads one or more folders from an FTP server
- Upload Files(s) to FTP – Upload one or more files from an FTP server
- Upload folder(s) to FTP – Upload one or more folders to an FTP server
- Delete FTP file – Deletes one or more files from an FTP server
- Rename FTP file – Renames a file that resides on an FTP server
- Create FTP directory – Creates a directory on an FTP server
- Delete FTP directoryDeletes a directory from an FTP server
- Invoke FTP command – Invokes the given literal FTP command on the server
- Synchronize directories – Synchronize the file and subdirectories of a given folder with a given remote FTP directory
33. CyberArk
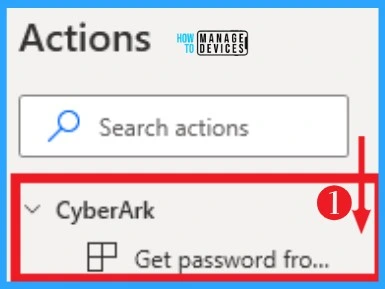
CyberArk helps users to secure human and machine identities from end-to-end through an identity security platform. It helps you to retrieve passwords.
You can get a password without a certificate. CyberArk can access from action on the left side of desktop flows. The below screenshot shows CyberArk on Power Automate.
34. Active Directory
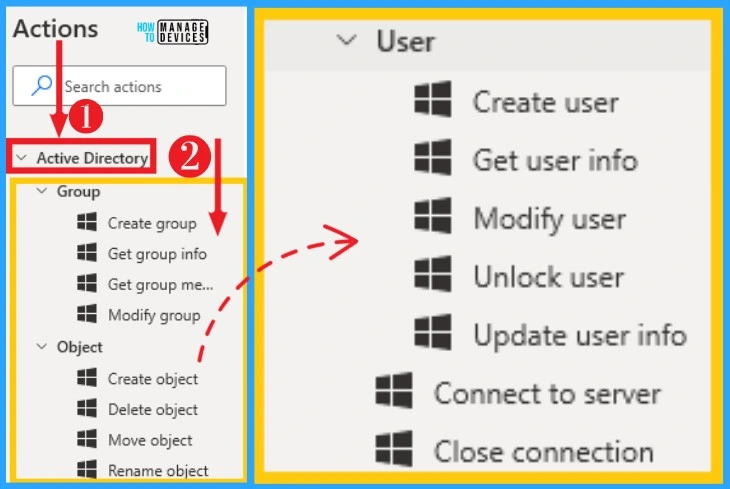
Active Directory actions require a connection to an Active Directory server. It helps to connect to an Active Directory server for performing operations.
You can easily select the Active Directory from the Action on the left side of your Desktop Flow. The below table and screenshot show Active Directory on Power Automate.
| Options on Active Directory | Used to |
|---|---|
| Create group | Creates a group in the Active Directory |
| Get group info | creates a group in the Active Directory Get group info – Gets information about a group from the Active Directory server |
| Get group member | Gets the members of a group in the Active Directory |
| Modify group | Modifies a group in the Active Directory |
| Create object | Creates an object in the Active Directory |
| Delete object | Deletes an object in the Active Directory |
| Move object | Moves an object in the Active Directory |
| Rename object | Renames an object in the Active Directory |
| Create user | Gets a user’s information in the Active Directory |
| Get user info | Gets a user’s information in the Active Directory |
| Modify user | Modify a user in the Action |
35. AWS
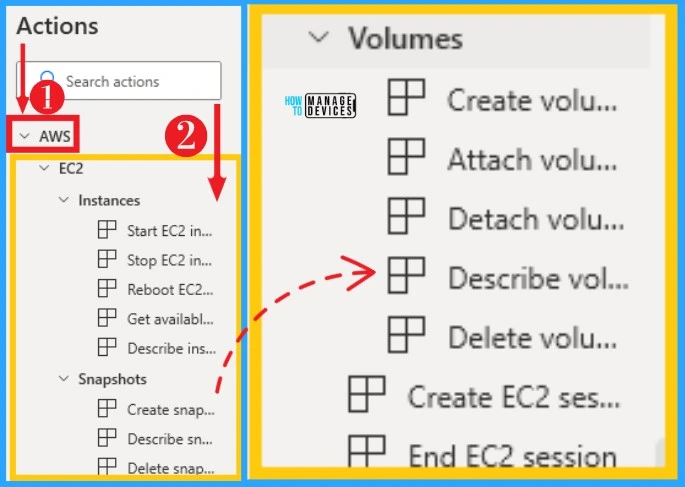
Power Automate enables users to handle EC2 instances, volumes, and snapshots through the AWS group of actions. You can easily start and stop rebooting EC2 instances on AWS on Power Automate Desktop.
You can easily select AWS from the Actions left side of the Desktop Flow. The below list and screenshot show AWS on Power Automate Desktop.
- Start EC2 instance – Start EC2 instance(s)
- Stop EC2 instance – Stop EC2 instance(s)
- Reboot EC2 instance – Reboot EC2 instance(s)
- Get available EC2 instance – Get information for the relevant EC2 instance
- Describe instance – Returns all the information for the EC2 instance(s)
- Create snapshot – Create a snapshot of an EBS volume and stores it in Amazon S3
- Describe snapshots – Describe the specified EBS snapshots available
- Delete snapshot – Delete the specified snapshot
- Create EC2 session – Create an EC2 client to automate EC2 web services
- End EC2 session – Dispose of an open EC2 client
36. Azure
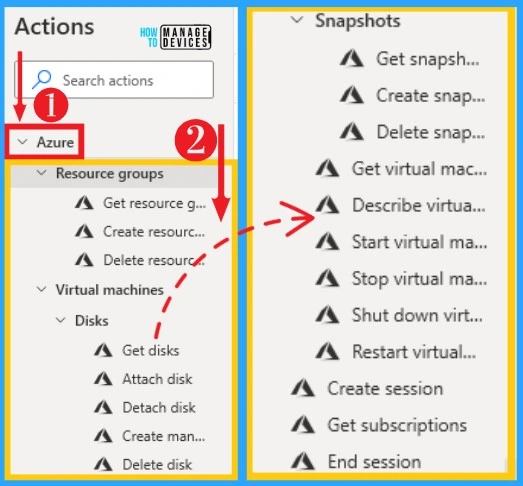
Power Automate allows you to manage Azure virtual machines through the Azure group of actions. To implement Azure functionality in your desktop flows, create a new Azure session using the create session action.
Azure includes options such as resource groups, virtual machines, disks, and snapshots. It can be easily selected from the actions on the left side of the Desktop Flow. The below table and screenshot show Azure in Power Automate Desktop.
| Options on Azure | Used to |
|---|---|
| Get resource groups | Get resource groups |
| Create resource group | Creates a new resource group |
| Delete resource group | Deletes the specified resource group and all the contained resources |
| Get disk | Gets the disks based on the specified criteria |
| Attach disk | Attaches an existing disk to the virtual machines with the specified name and resource group |
| Detach disk | Detaches the disk from the virtual machines with the specified name and resource group |
| Create Managed disk | Create Managed disk |
| Delete disk | Deletes the managed disk with the specified name and resource group |
| Get snapshot | Gets the snapshots based on the specified criteria |
| Create snapshot | Creates a snapshot from the specified disk |
| Delete snapshot | Delete the snapshot with the specified name and resource group |
| Get Virtual Machines | Gets the basic information for the virtual machines |
| Describe virtual machines | Gets all the information for the virtual machines(s) based on the specified criteriaDescribe virtual machines |
| Start virtual machine | Starts the virtual machine |
| Stop virtual machine | Stops the virtual machine and deallocates the related hardware (CPU and memory)and network resources |
| Stop down virtual machine | Stop down the virtual machine |
| Shut down virtual machines | Shuts down the operating system of a virtual machine |
| Restart virtual machine | Restarts a virtual machine |
| Create session | Creates an Azure session using service principal |
| Creates an Azure session using a service principal | Get subscriptions |
| End session | Ends an Azure session |
37. Google Cognitive
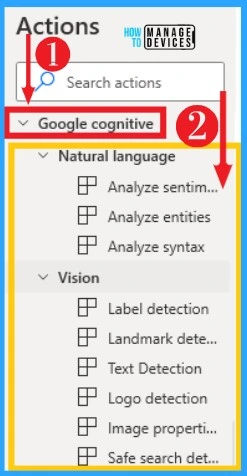
Google Cognitive services allow you to process unstructured data through machine learning and simplify complicated tasks like text analysis and computer vision. It includes natural language and vision. Natural language reveals the structure and meaning of the text.
Vision helps to Assign labels to images and classify them into predefined categories. Detect objects, faces, and read printed and handwritten text. Google Cognitive can be selected from the Actions left side of Desktop Flow. The below list and screenshot show Google Cognitive on Power Automate Desktop.
- Analyze sentiment – Invokes the Google Cloud Natural Languages services named ‘Analyze Sentiment
- Analyze entities – Invokes the Google Cloud Natural Languages service named Analyze Entities
- Analyze syntax – Invokes the Google Cloud Natural Languages service named Analyze Syntax
- Label detection – Invokes the Google Cloud Vision service named Label Detection
- Landmark detection – Invokes the Google Cloud Vision service named Landmark Detection
- Text Detection – Invokes the Google Cloud Vision service named Text Detection
- Logo Detection – Invokes the Google Cloud Vision service named Logo Detection
- Image properties – Invokes the Google Cloud Vision Services named Image Properties Detection
38. IBM Cognitive
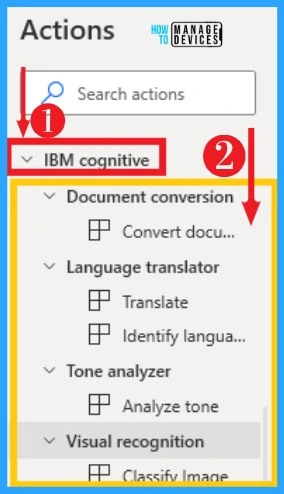
IBM cognitive services are machine learning algorithms that use artificial intelligence to perform complex operations, such as language tone analysis and visual recognition. Desktop flows on Power Automate allow you to use these services through IBM cognitive actions.
IBM Cognitive can be quickly accessed from the action on the left side of Desktop Flow. The below list and screenshot show IBM Cognitive on Power Automate Desktop.
- Convert document – Invokes the IBM services named Convert Document
- Translate – Invokes the IBM service named Translate
- Identify language – Invokes the IBM services named Identify Languages
- Analyze tone – Invokes the IBM service named ‘Analyze Tone
- Classify Image – Invokes the IBM service named Classify Image
39. Microsoft Cognitive
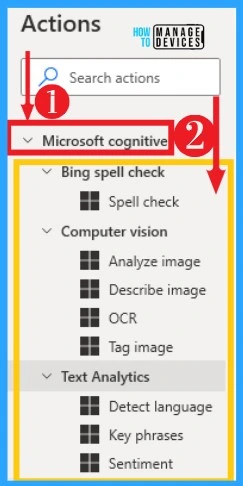
Microsoft Cognitive services enable you to accelerate decision-making using artificial intelligence without requiring machine learning expertise. Desktop flows provides different variety of Microsoft Cognitive actions that allows you to integrate this functionality in your desktop flows.
Microsoft Cognitive can be easily selected from the Actions left side of your Desktop flow. The below table and screenshot show different options on Microsoft Cognitive.
| Option on Microsoft Cognitive | Used to |
|---|---|
| Spell check | Invokes the Microsoft Cognitive services named ‘Bing Spell check’ |
| Analyze image | Invokes the Microsoft Cognitive service named Analyze image’ |
| Describe image | Invokes the Microsoft Cognitive service named ‘ describe Image’ |
| OCR | Invokes the Microsoft Cognitive services named ‘OCR’ |
| Tag image | Invokes the Microsoft Cognitive service named ‘Tag Image |
| Detect language | Invokes the Microsoft Cognitive service named ‘Text Analystic – Detect Language’ |
| Key phrases | Invokes the Microsoft Cognitive service named ‘Tag Image’ |
UI Automation
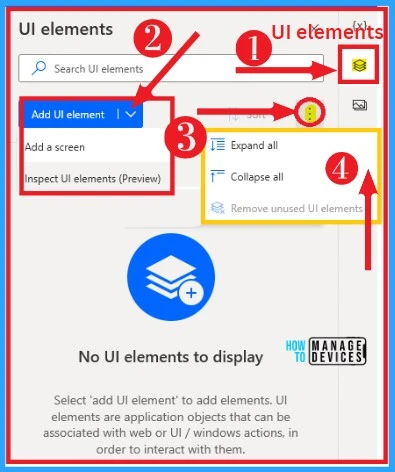
UI Automation can be easily done on desktop flows. You can add UI elements to the UI automation. It also allows you to expand and collapse. UI Automation option can be easily selected from the home screen of desktop flows.
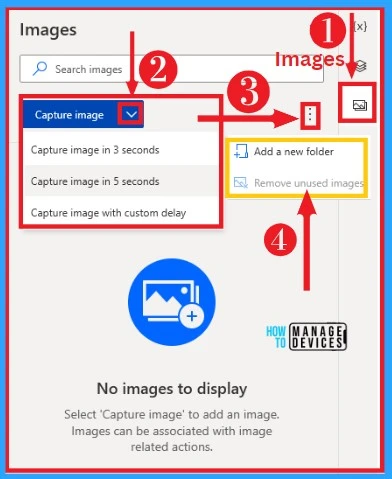
Images
Images on desktop flows allow you to capture images on your PC. You can capture images in 3 seconds, 5 seconds, and custom delay. It also allows you to add a new folder. Images option can select from the desktop flow home screen.
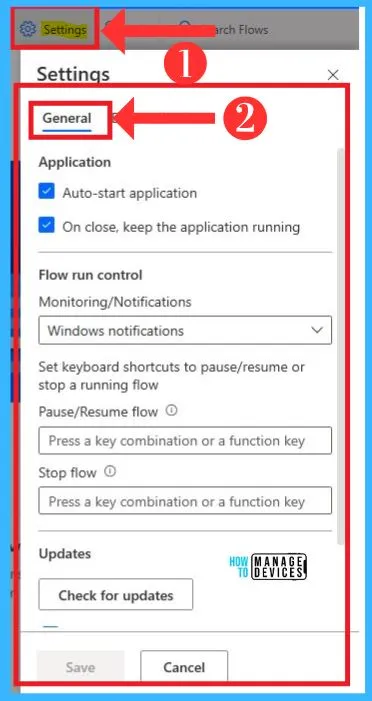
Settings
The Settings option on Power Automate helps you to set different options. You can manage flow control options and check updates in them. The below screenshot shows the Settings option on Power Automate.
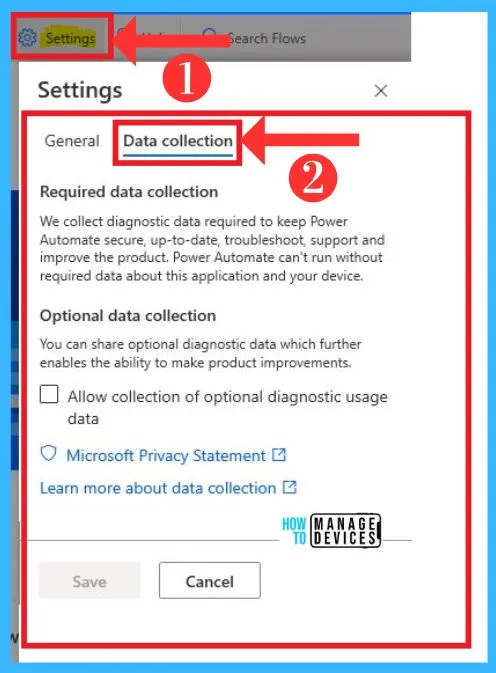
The Settings option also shows data collection on Power Automate. Microsoft Power Automate collects diagnostic data required to keep Power Automate secure. The below screenshot shows Settings.
Author
Gopika S Nair is a computer enthusiast. She loves writing on Windows 11 and related technologies. She is here to share quick tips and tricks with Windows 11 or Windows 10 users.

Its good article, Great work.