Let’s learn Microsoft Loop Notion Competitor. Microsoft Loop is a Collaborative Platform that allows you to create content in real-time anywhere. It allows users to manage and stay on top of the Projects. Users can easily collaborate, share ideas smoothly, and organize everything.
The Loop is completely free and in public preview. It is integrated with Microsoft 365 and a powerful and flexible canvas that syncs across applications. It enables the Team to think, plan, and create together. This post will let you know more about Microsoft Loop App.
Microsoft Loop has been a competitor of the Notion web Application for two years. The Loop is made up of workspaces, pages, and components. Loop pages are flexible canvases where you can react, comment, and build on each other’s ideas.
Notion is a Productivity software that offers organizational tools like task management and bookmarks. It is also a collaborative platform that was initially released in 2016. Notion is available for Windows, macOS, Android, and iOS with additional offline features. Users can easily create customized templates and embed videos on Notion.
What are the Advantages of Microsoft Loop?

Microsoft Loop is a Modern collaboration tool that helps users do their work easily and quickly. It replaces many collaborative platforms like Notion with its unique features. The following are the Advantages of the Microsft Loop app.
1. Helps to sync without switching apps
2. Helps to track your files and documents easily
3. Provides different components that help to sync across apps in real time
4. Easy to share your loop component by copying and pasting a link.
Video – Microsoft Loop Notion Competitor
In this video, let’s discuss Microsoft Loop and how to work it as expected. Users need to do some Policy Settings and Configuration to work Microsoft Loop easily. It can be easily done via Microsoft 365 App admin center. This video helps you to easily fix the Microsoft Loop login issue by creating Policy Settings.
How to Install Microsoft Loop App on a PC
Microsoft Loop is a Popular transformative co-creation experience that helps bring your organization to work anywhere and anytime. It isn’t easy to search and find different documents on different applications. MS Loop helps you to manage this problem by bringing several applications together.
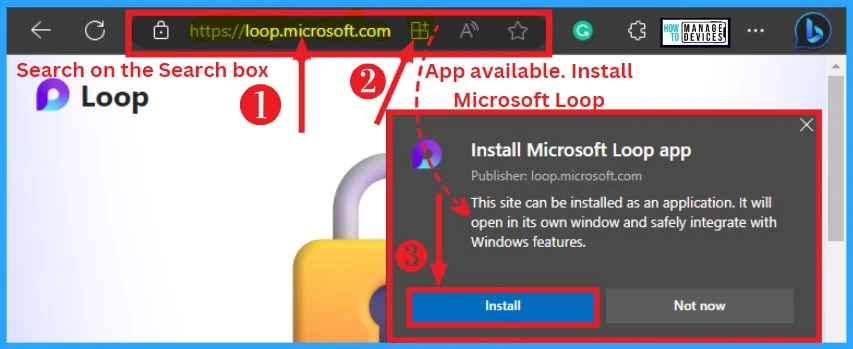
Enabling Microsoft Loop helps to empower your organization, and it saves you valuable time. You can easily Install the Microsoft Loop app on your Edge Browser. The below list and Screenshot show how to Install Microsoft Loop App.
- Search Microsoft Loop on the search box of Edge Browser
- Click on the Install button on the Address bar
- Click on the Install button from the pop-up Window
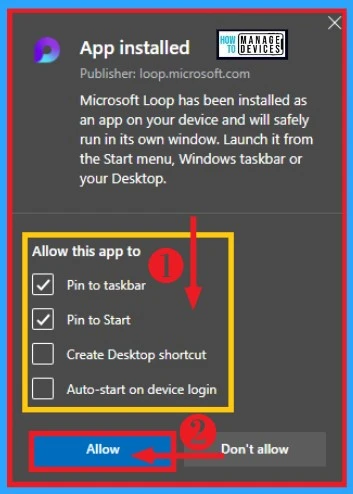
After completing the Microsoft Loop installation, you will get a new window. It shows that Microsoft Loop has been installed as an app on your device and will safely run on its Window. You can easily launch it from Start Menu or Windows Taskbar. You can pin to the taskbar or Pin to Start and click on Allow button.
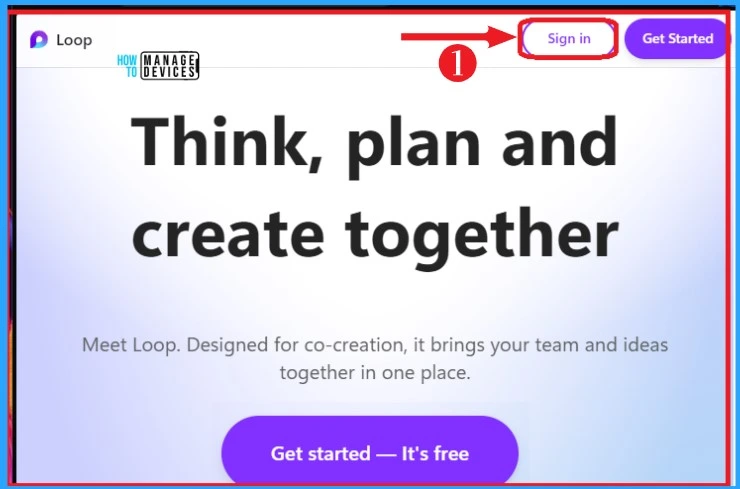
After Allowing MS Loop to pin to the taskbar and start, you should Sign in to your Loop App to experience the incredible features. You can easily Sign in by Clicking on the Sign in or Get Started button from the below Window. The below Screenshot shows how to Sign in to your Loop App.
After Clicking on Sign in, you should select your account and complete the Sign In process. You can select your account as showing or use another account from the Window. You can explore with Loop, think, plan, and create together after Signing in.

Home Screen of Microsoft Loop
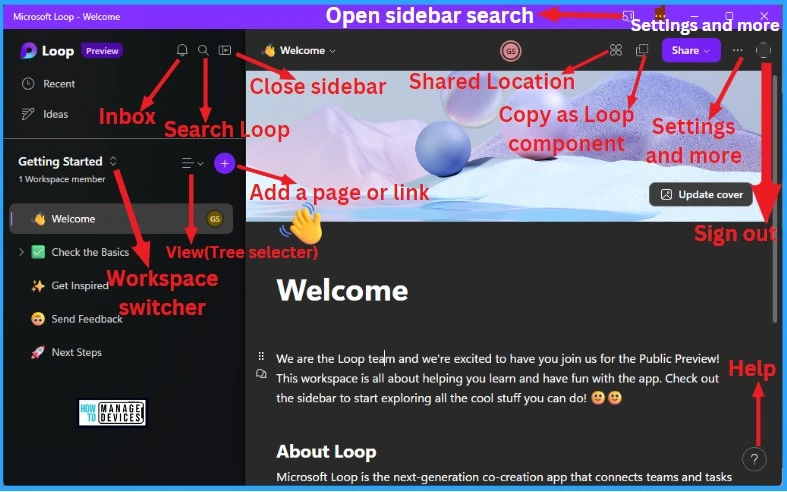
Microsoft Loop is a new way of working that allows users to create their ideas and share it others inside and outside your organization. Loop pages are flexible canvases where you can react, comment, and build on each other’s ideas. The below table and Screenshot show the Home Screen of Microsoft Loop.
| Home screen Options | Used to |
|---|---|
| Inbox | It shows all Notifications on Loop App |
| Search Loop | It helps to search on Microsoft Loop |
| Close Sidebar | Used to close Loop sidebar |
| Add a page or link | It helps to add a page or link on Loop |
| View (Tree selected) | View and organize pages by hierarchy |
| Workspace Switcher | Used to switch Workspace |
| Open sidebar search | Helsp to open sidebar search |
| Settings and more | It helps to view loop settings and more options |
| Shared Location | Used to see Shared Locations |
| Copy as a Loop component | Used to copy Loop component |
| Settings and More | Used to see settings and more |
| Sign out | Used to Sign out of Loop account |
| Help | It helps to add a page or link on Loop |
Check the Basic
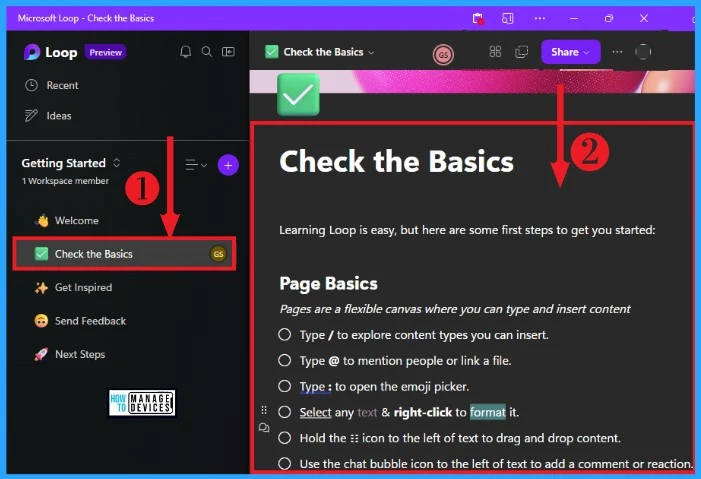
Check the Basic option on the Loop App helps the users to give some guidance for creating loop pages. It is a guideline that shows some first steps to get started Loop. You can learn and improve your Loop experience through these steps.
Check the Basic option can be easily selected from the left side of the Loop Home screen. The Screenshot below shows how to start with Page Basics on Microsoft Loop.
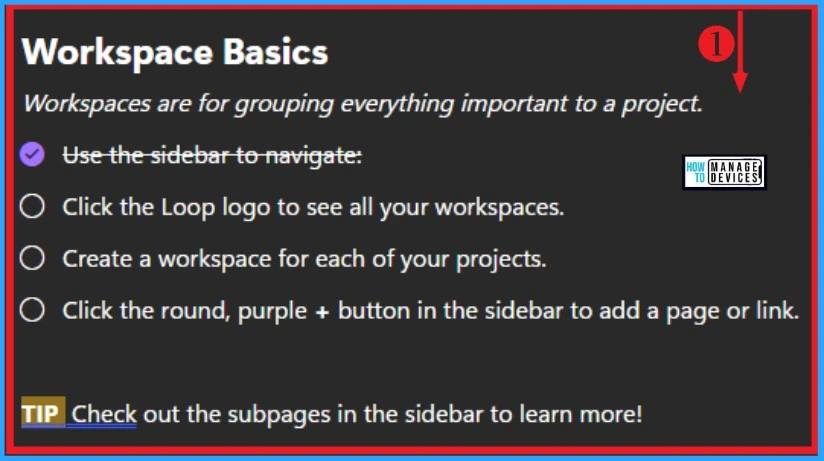
Check the Basic option also shows Workspace Basics. It is a guideline for some first steps to Get started workspace Basic on Loop. The below Screenshot shows Workspace Basic on the Loop app.
Get Inspired
The Get Inspired Option on the Microsft Loop app provides some ideas for using the Loop with your Team. You can collect important files, meeting notes, etc. link to important components from your Teams chat or Outlook emails.
- The Get Inspired window can be easily selected from the Loop home page, and the below Window shows how to select it.
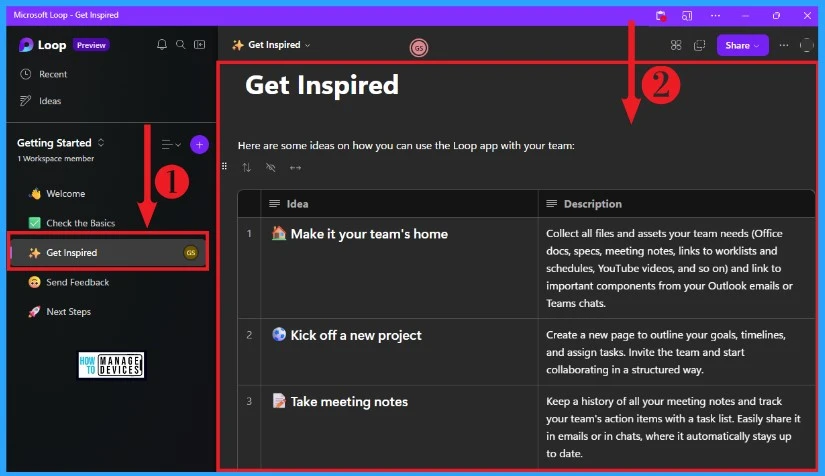
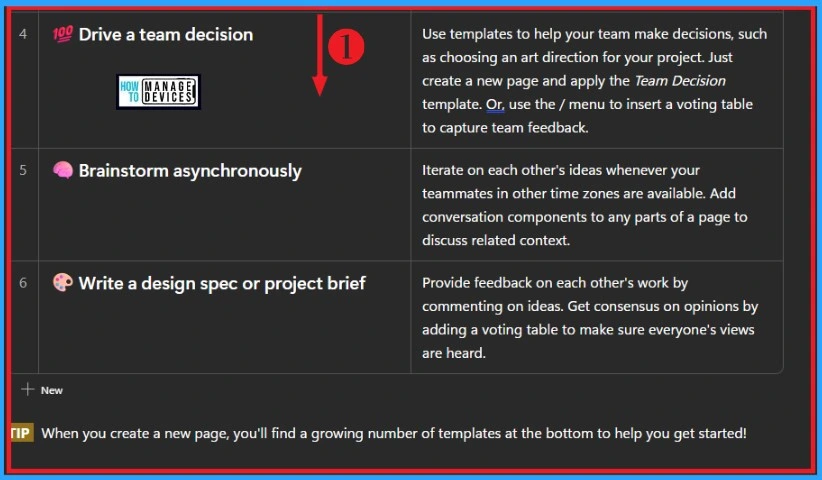
The Get Inspired option gives more guidelines for using the Loop app for your Team. The below Screenshot shows a table that includes how to drive a team decision, Brainstorm asynchronously, and Write a design spec or project brief.
Send Feedback
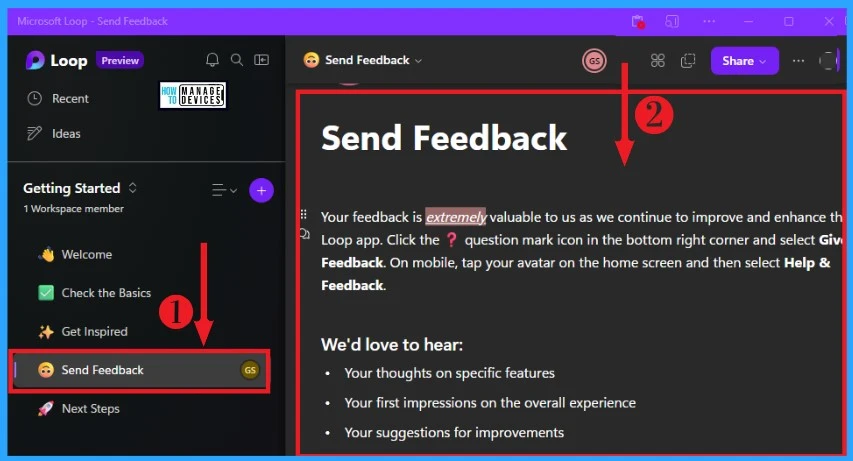
Send Feedback is another option on the Home screen of the Microsoft Loop app. Users can easily send Feedback about the Microsoft Loop app by Clicking the “?” icon on the bottom right corner and selecting Give Feedback.
Send Feedback option can be selected from the left side of the Loop home screen. The below Screenshot shows more details about Sending the Feedback option.
Next Steps
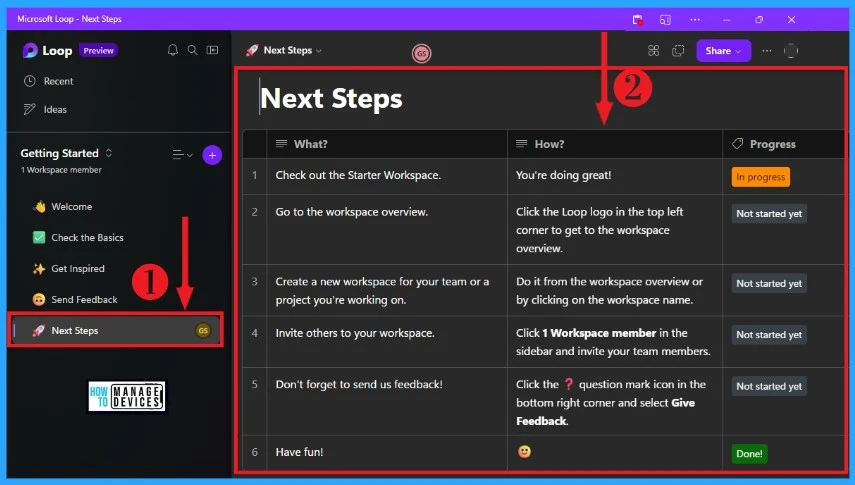
The Next Steps option on the Loop app shows some features of the Loop app, how to use it, and its current status. Most of the loop features are not started yet. The Next Step option can be selected from the bottom left side of the Microsoft Loop home screen. The below Screenshot shows the Next Steps option on the Loop app.
Three Elements of Microsoft Loop
Microsoft Loop comprises 3 Elements that allow users to think, plan, and create ideas with their teams. These elements say goodbye to the frustration of jumping between apps and losing track of documents and ideas. The below list shows Elements of Microsoft Loop.
- Loop Pages
- Loop Workspaces
- Loop Components
1. Loop Pages
Loop pages are flexible canvases where you can react, comment, and build on each other’s ideas. You can easily create your ideas on Loop pages as your wish. Loop pages can be shared with your teams, and it will improve your work. The below list and Screenshot show how to Create Loop pages.
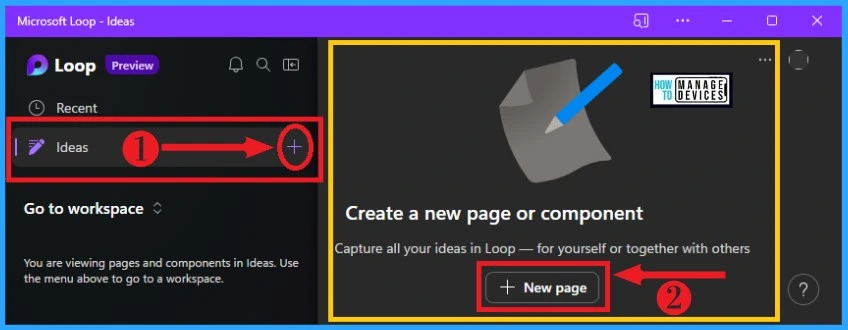
- Select the Ideas option on the top left corner of the Loop home Screen
- Click on the + button near the Idea option
- Click on the +New Page option to create a Loop page
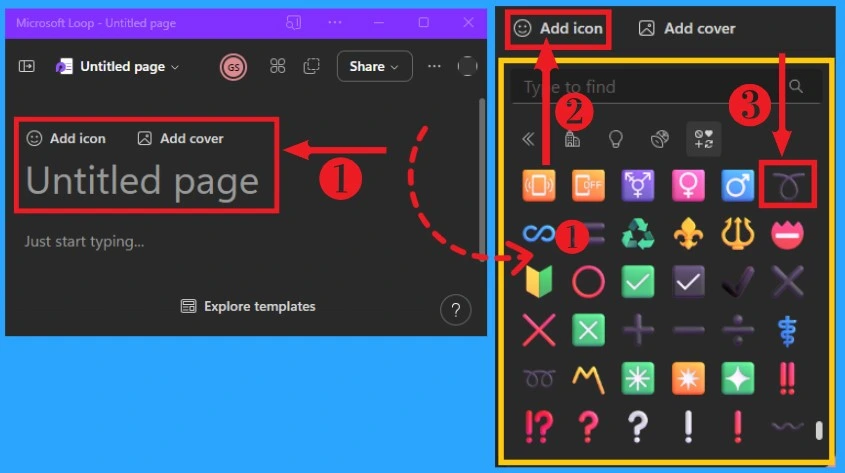
After clicking the + New pages option, an untitled page will appear on your Microsoft Loop App. Adding Icons, Covers, and Titles can easily modify these loop pages. You can easily add Icons to Loop pages by clicking on Add icon and selecting an emoji. The below Screenshot shows how to add an Icon to a Loop Page.
You can easily add a cover to your Loop Pages by clicking Add Cover option. Many cover images appear on the below window, and you can easily select anyone from your Loop pages. After selecting a cover image, click on the Add button. The below Screenshot shows how to add a cover to your Loop Pages.
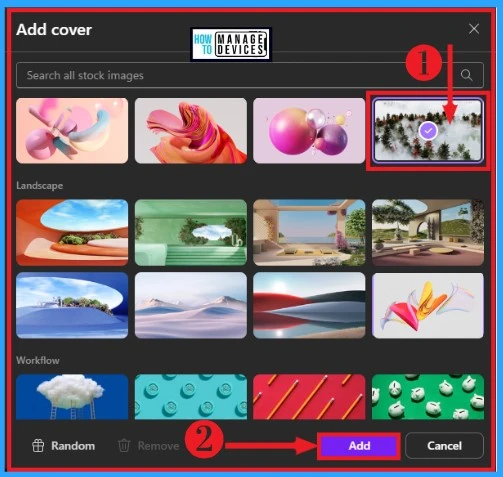
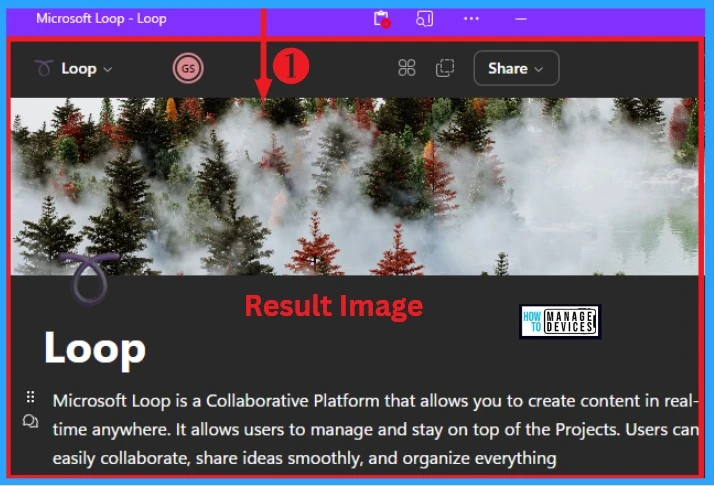
Adding Icons and Covers enhances the appearance of your Loop Pages. After adding this, you can write or paste any content on your Loop Pages. You can share these Loop Pages via the Page link option or as a Loop component. The Screenshot below shows the Loop Page Result Image after adding Icons and Cover.
How to Add a Comment on Loop Pages
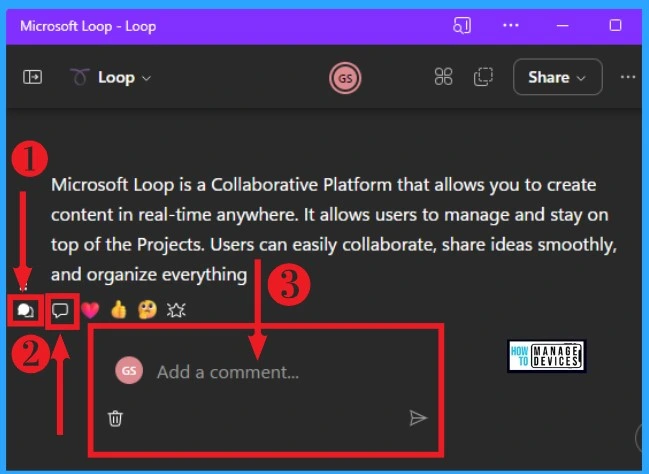
Microsoft Loop allows users to add a Comment on the Loop Pages. You and others inside your organization can add a comment on your Loop Pages. It helps to know the Opinion of others about your Loop Pages. The below list and Screenshot show how to add a comment on Loop Pages.
- Type or add any content to your Loop Page
- Click on the Comment button near the content on Loop pages
- Click on the Text button near the Comment Button
- Add a comment on the Loop Page
How to Add Reactions on Loop Pages
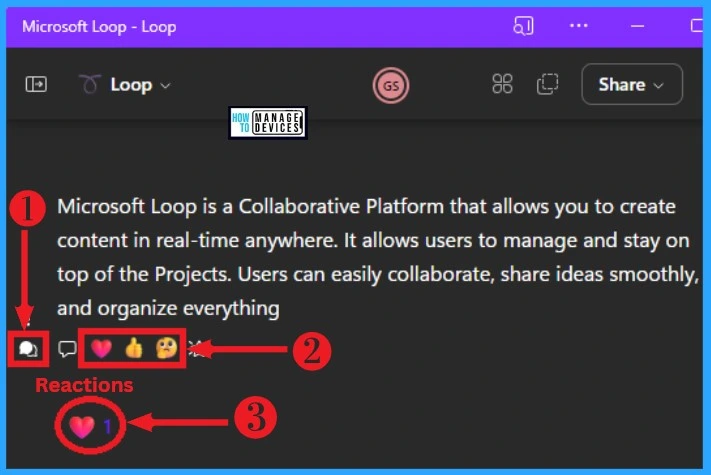
Reactions on Loop allow you to react on Loop pages. It is applicable on both your and others’ Loop Pages. Reactions help users to show their reactions through emojis and send their Opinion.
It can be added by clicking on the Comment button near the content on the Loop Page. Select the Reaction emoji from the below Window. The below Screenshot shows how to Add Reactions on Loop Pages.
How to Add a Boost on Loop Pages
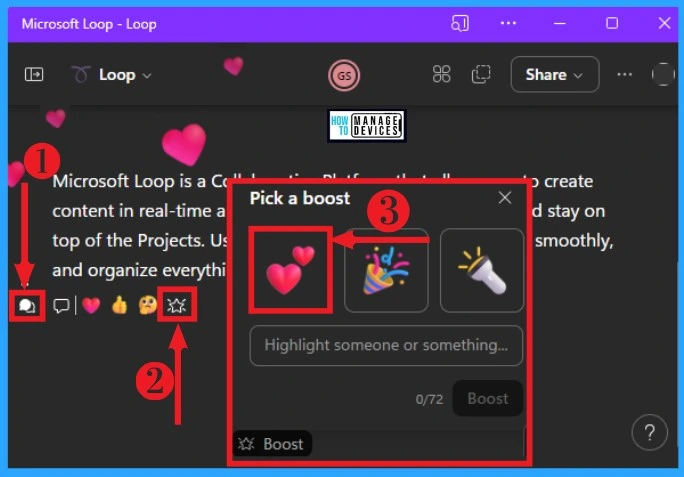
Add a Boost is another option on Microsoft Loop to express your Reaction or Opinion about that Loop Pages. It helps to highlight someone or something on the Loop app.
You can easily pick a boost on Loop by clicking on the comment button on the Loop page and clicking on the Star button. The below list and Screenshot show 3 types of Boost available on Loop and how to add this to your page.
- Love this! – It helps to express love reactions
- Let’s celebrate! – Used to show Celebration reaction
- Check this out! – It helps to show check the Loop page
Adding Templates on the Loop Pages
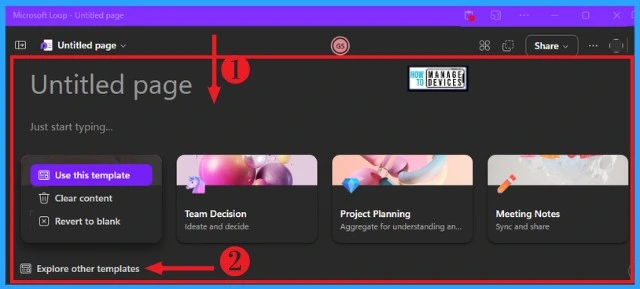
When you select a new Loop page on your Microsoft Loop App, you can choose a template for adding a cover for your Loop Page. Click on any template from the below Window. There are four basic templates shown when we select a Loop Page first.
These Templates include options such as using this template, clear content, and reverting to blank. You can explore other templates also on this Loop page. The below Screenshot shows how to add a Template on Microsft Loop Page.
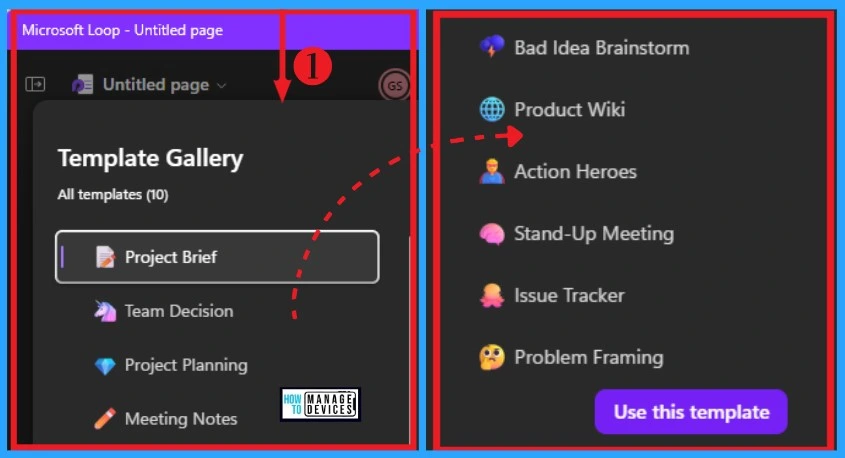
After Clicking on the Explore other templates option from the above window, you can see more template options on your Loop app. There are ten different Templates available for your Loop page. The table and screenshot below show different Templates available on the Loop app.
| Different types of Templates | Used to |
|---|---|
| Project Brief | Used to kick off a new project |
| Team Decision | Helps to make a team decision asynchronously |
| Project Planning | It is used to define, scope, and plan milestones for your next project |
| Meeting Notes | Used to plan an effective meeting |
| Bad Idea Brainstorm | It helps to brainstorm innovation by back-engineering bad ones |
| Product Wiki | It helps to collect all things related to your product in one place |
| Action Heroes | Used to assign team members actions on tasks |
| Stand-Up Meeting | It is used to collect updates, ideas, and blockers raised by your team |
| Issue Tracker | Helps to identify issues and assign team members to resolve them |
| Problem Framing | Used to breakdown specific issues or obstacles into small, solvable parts |
How to Delete Loop Pages
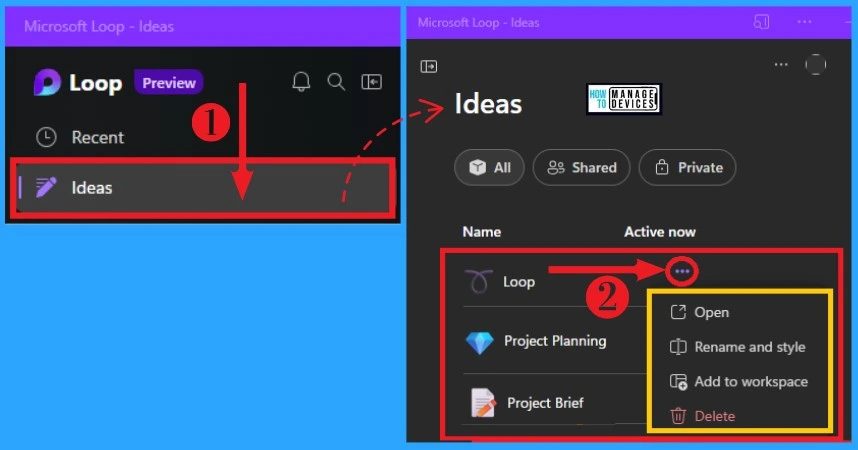
You can easily Delete your Loop Pages at any time on the Microsoft Loop App. Select the Ideas option from the sidebar of the Microsoft Loop home screen. After selecting the Ideas Option, you can see the different Loop pages you created. Click on the three-dot option from the right side of the page which you want to delete.
Click on the Delete button from the below pop-up Window. The pop-up window also shows options such as Open, Rename, Style, and Add to Workspace. The below Screenshot shows how to Delete a Loop Page on your Loop App.
2. Loop Workspace
Loop Workspaces are Shared Workspaces, including Loop pages to store important files and documents. It helps you and your team to organize and track. The Loop can even do the searching for you, making it easy to add existing project-related information and organize it into pages.
Continue adding to your workspace as your project evolves, and organize it as you want. The below list and screenshot show how to Create Loop Workspaces.
- Click On the Loop Icon from Microsoft Loop App
- Click on the + button (Add new Workspace) from the top right corner
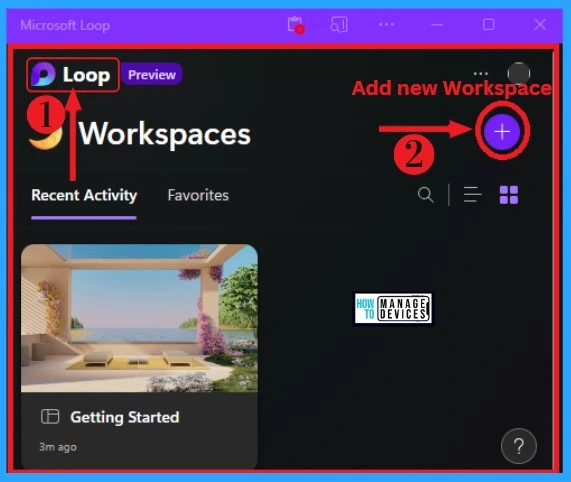
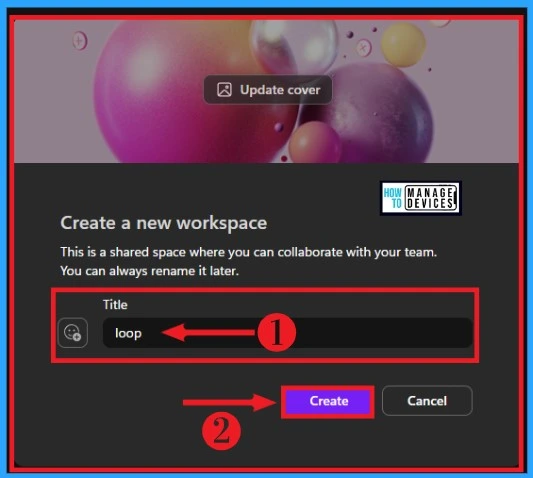
After clicking the + button (Add new Workspace), you will get a window for creating your Workspace. This Workspace allows you to collaborate with your Team. You can add a Title to your Workspace and click on Create button. The below Screenshot shows how to create Loop Workspaces.
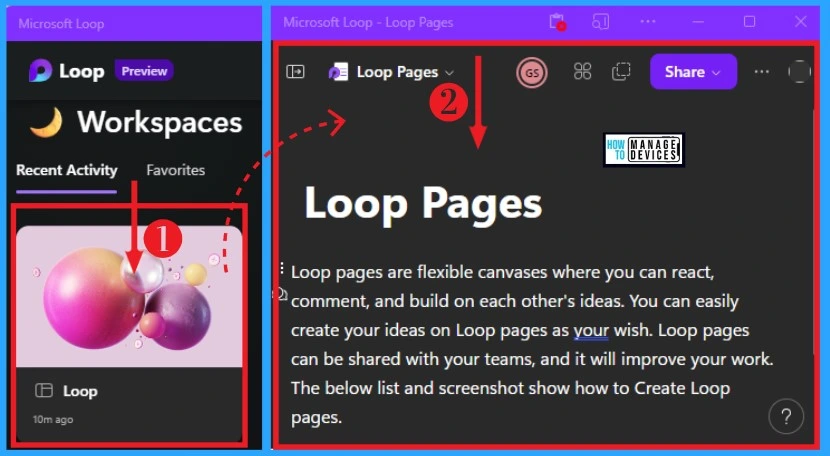
After creating Loop Workspaces, you will get an Untitled Loop page. Loop Workspace is a group of Loop pages, and you can add Titles, Icons, Covers, etc. You can add content to your Workspaces and more loop pages related to your Workspaces. The below screenshot shows Loop Workspaces.
How to Delete Loop Workspaces
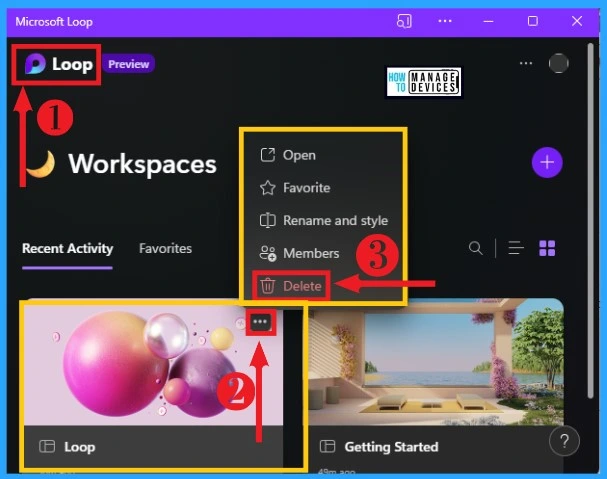
You can easily Delete your unwanted Loop Workspaces very quickly on Microsoft Loop. It helps to free up your Loop app. Loop Workspaces can be Deleted by clicking on the Loop Icon from the Loop app and clicking on the three-dot option from the Workspace which you want to Delete.
Then Click on the Delete button from the below window. The below Screenshot shows how to Delete Loop Workspaces from your Loop App.
Loop Component
Loop Components are portable content that stays in sync across all the places they have been shared, no matter where they are updated. You can share components and create new ones, like lists, tables, paragraphs, and more, across your favorite Microsoft 365 apps.
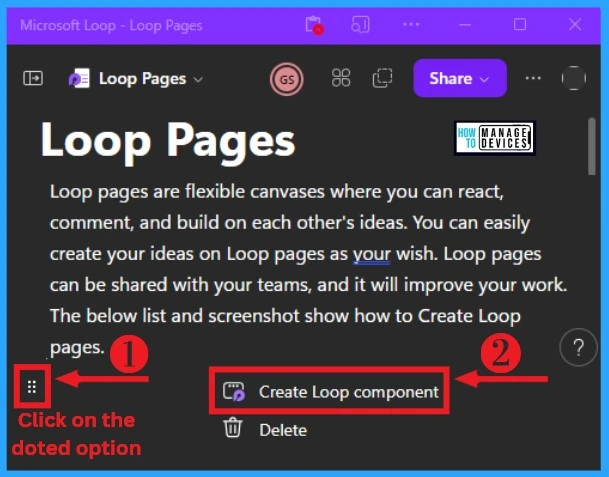
You’re always in control because it’s easy to see where components were shared and who has access. You can easily create Loop Components from Loop pages. The below list and Screenshot show how to create Loop Components.
- Click on the 6-dot option on the left side of the Loop Page Content
- Click on the Create Loop Component option from the below Window
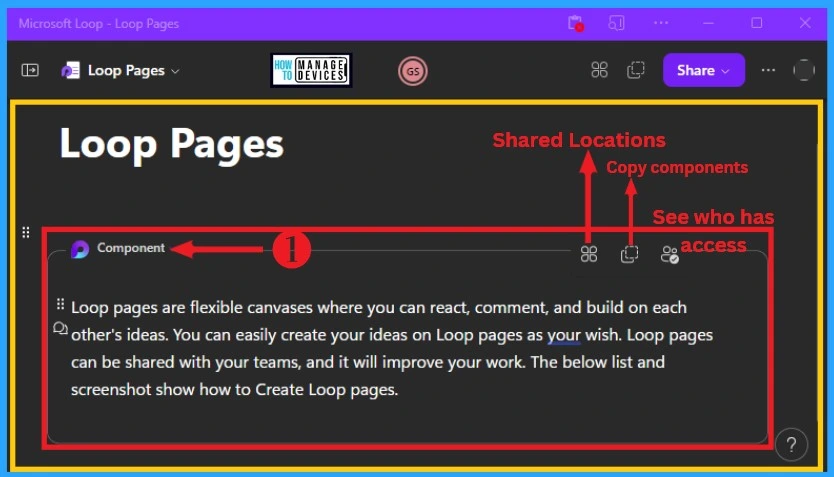
After Clicking on Create Loop component option, the Loop component is created. You can easily copy this component, see who has access, and see Shared Locations. The below screenshot shows Loop Component on your Loop app.
How to Delete Loop Component
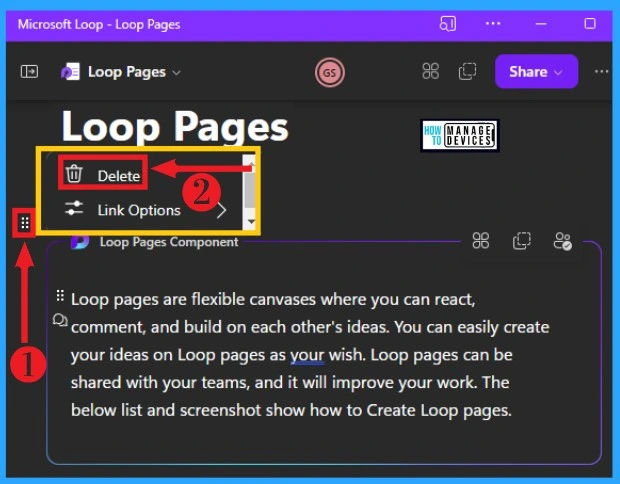
You can easily Delete unwanted Loop Components from your Loop App. Click on the 6 dot option near the Loop Page content. Click the Delete option from the below window. The below screenshot shows how to delete the Loop component from your Loop app.
- 3 Easy Ways to Fix Pen Drive Not Recognized Error in Windows 11
- 12 Best Ways to Speed Up Brave Browser
Recent Pages on Microsoft Loop
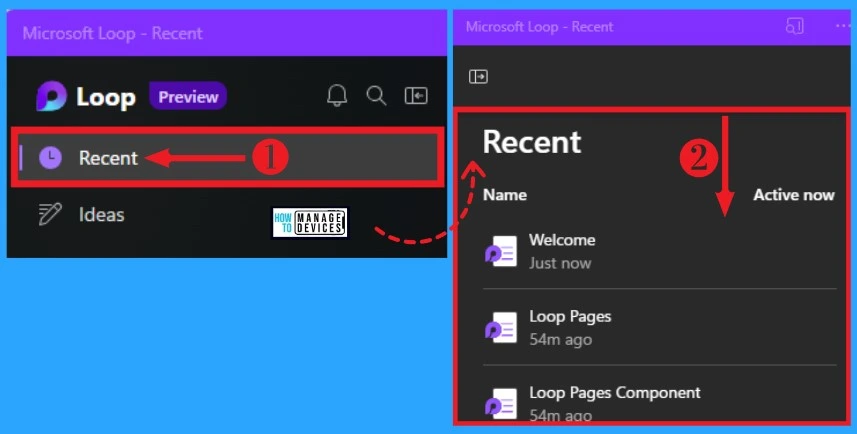
The Recent Pages option on Microsoft Loop shows all the Pages opened by users on their Loop app. It helps to know which pages users currently visit on the Loop app.
Click on the Recent option from the Loop home page to see the Recent Loop pages. The below screenshot shows how to select recent pages on Microsoft Loop.
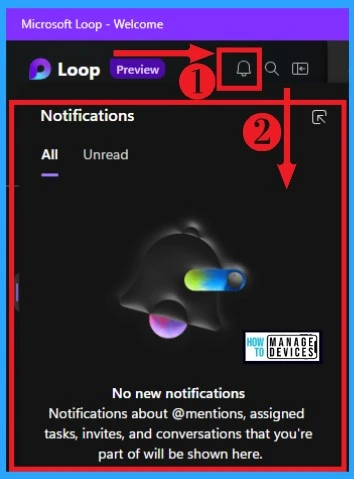
Notifications (Inbox) on Microsft Loop
Notifications help you track the things you care about and focus on what matters, all while staying in the flow of your work. You can easily select Loop Notifications from the Loop home page. The below screenshot shows how to select Loop Notification on your Loop app.
Author
Gopika S Nair is a computer enthusiast. She loves writing on Windows 11 and related technologies. She is here to share quick tips and tricks with Windows 11 or Windows 10 users.
