Let’s discuss the step-by-step guide to Deploying Windows 11 24H2 Using SCCM Task Sequence. Microsoft has officially released Windows 11 24H2, also called the Windows 11 2024 Update. It can now be downloaded and deployed using Windows Server Update Services (WSUS) or Windows Update for Business, making it easier for businesses to manage and install this latest version across their devices.
You can effortlessly upgrade to Windows 11 version 24H2 using Microsoft Intune. This update brings enhanced security, improved performance, and a better user experience. It also offers productivity boosts, better multitasking capabilities, and increased energy efficiency, helping users complete everyday tasks more quickly and smoothly.
One of our posts outlines the Windows 11 24H2 support timeline with SCCM and critical insights. SCCM aims to support each new Windows 11 version after its release, but this support depends on both products’ separate development and release schedules. When an SCCM version reaches the end of support, it is removed from the support matrix and no longer supports Windows 11 versions that are also out of their lifecycle.
This post will guide you through deploying Windows 11 24H2 using SCCM. We will cover how to download the Windows 11 24H2 ISO, Import Windows 11 into SCCM, and deploy Windows 11 24H2 through a task sequence. If you plan to deploy and manage Windows 11 version 24H2 using SCCM, this comprehensive guide will provide all the necessary details to ensure a smooth deployment process.

Table of Contents
What are the Hardware Requirements and other Key Points for Deploying Windows 11 24H2?

You must follow these essential steps to deploy Windows 11 24H2 successfully.
1. Ensure your devices meet the hardware requirements, including TPM 2.0, UEFI with Secure Boot, and a 64-bit CPU.
2. Download and use the PC Health Check app from the Microsoft site to verify if your devices are compatible with the upgrade.
3. Ensure you are running a supported version of the Windows ADK.
4. Ensure all necessary network and storage drivers are added to the boot image.
5. Set up the boot image to deploy from a PXE-enabled distribution point.
Step by Step Guide to Deploying Windows 11 24H2 Using SCCM Task Sequence
Windows 11 24H2 is the latest feature update for Windows 11. It introduces new improvements and features designed to improve the user experience. The Windows 24H2 ISO is a downloadable file containing everything needed to install this update, also called the “Windows 11 2024 Update.”
Note! Windows 11 24H2 isn’t officially supported until SCCM 2409 releases, but it should still work in ideal conditions even without support.
Read more – How to Download the Windows 11 24H2 ISO through Visual Studio Subscriptions.

- How to Upgrade Windows 11 24H2 for Free | Easiest Method is Explained
- Enable Disable Personal Data Encryption on Windows 11 Devices using Intune Settings Catalog
- Windows 11 Version Numbers Build Numbers Major Minor Build Rev
Importing Windows 11 24H2 into SCCM
Before importing the Windows 11 24H2 Operating System into SCCM, you must prepare the ISO file. Start by mounting the Windows 11 24H2 ISO and extracting its contents to a designated folder. To do this, create a shared folder to store the files.
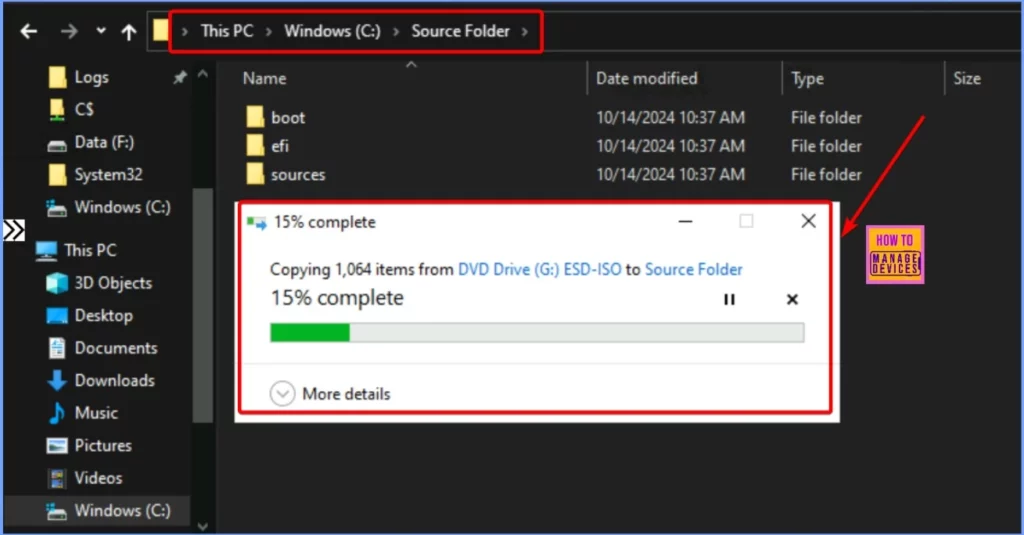
After you download the Windows 11 24H2 ISO, a virtual disc drive will be created to access the files inside. Please select all the contents from this drive and copy them to a shared source folder on your SCCM Server. The copying process may take some time, so be patient while it is completed.
Note – It’s important to note that you can find the default operating system image in the Windows source folder at \Sources\install.wim. Copy this file from the ISO into your shared directory, as it will be essential for the deployment process.
How to Import Windows 11 24H2 Operating System Image
The Windows 11 operating system image contains all the files needed to install Windows 11 on a target computer. To prepare this image, follow these simple steps. This process will help you add the Windows 11 image to your SCCM environment, preparing it for deployment.
- Open the SCCM Console.
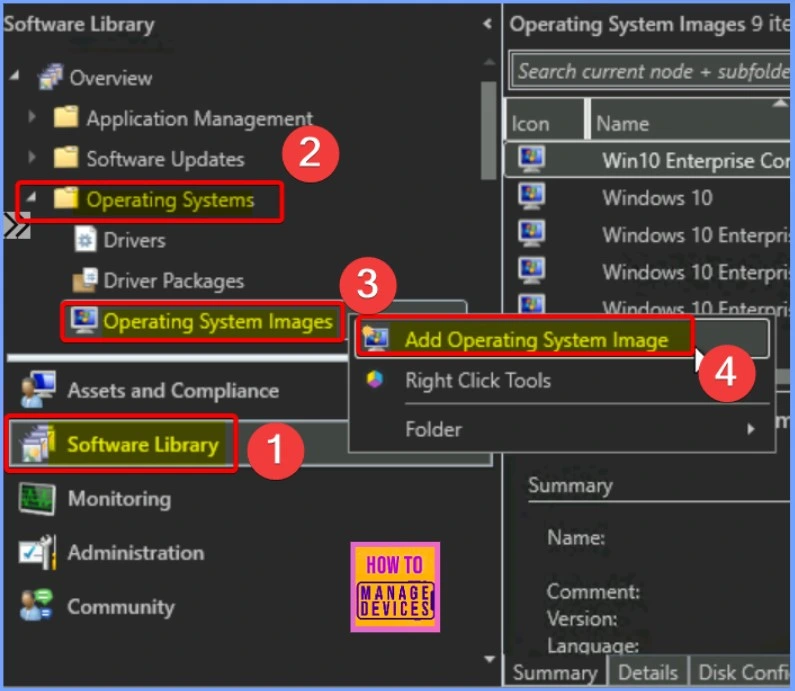
- Navigate to Software Library > Operating Systems > Operating System Images.
- Right-click on Operating System Images and select Add Operating System Image.
- This process will help you add the Windows 11 image to your SCCM environment, preparing it for deployment.
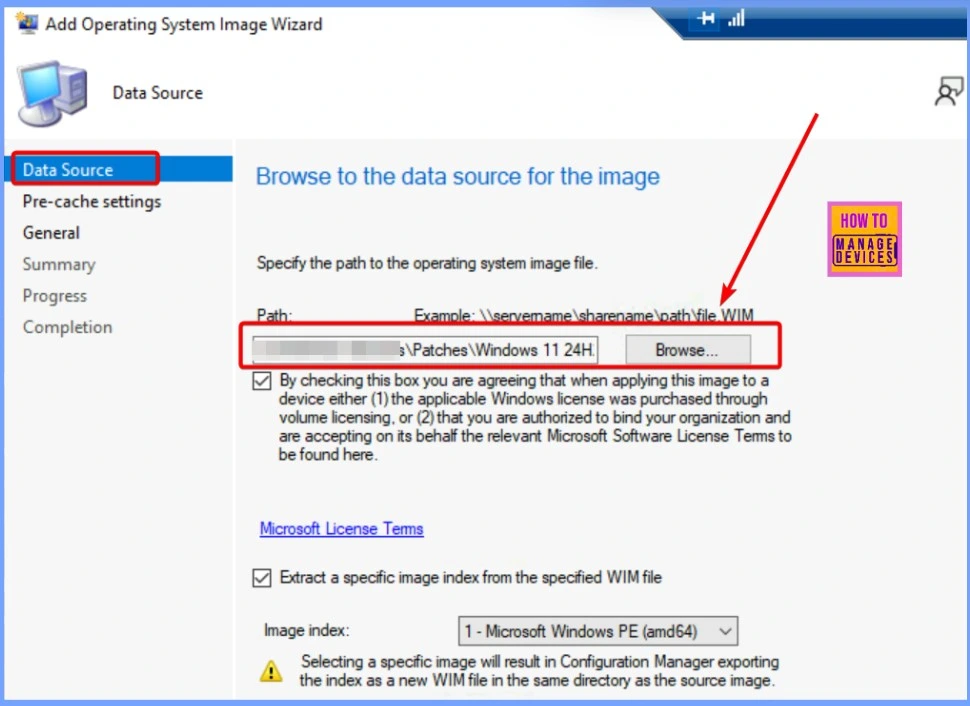
In the Data Source section, click Browse to specify the network-shared path where you saved the installation.wim file from the Windows 11 24H2 source directory. This is the location where you extracted the contents of the ISO file. After selecting the correct path, make sure to accept the licensing terms.
- After adding the path, check the following and Click Next
- By checking this box, you are agreeing that when applying this image to a device, either (1) the applicable Windows license was purchased through volume licensing, or (2) you are authorized to bind your organization and are accepting on its behalf the relevant Microsoft Software License Terms to be found here.
- Extract a specific image index from the specified WIM file
Note! You can now automatically import a single image index from the specified WIM file instead of importing all image indexes. This option leads to a smaller image file size, making the deployment process more efficient.
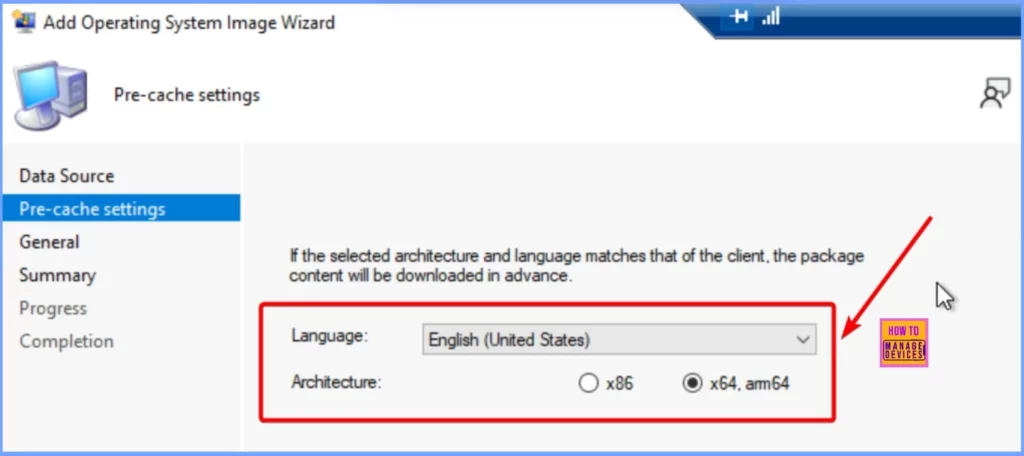
Select the architecture and language for your Windows 11 deployment on the Pre-cache settings page. Choose x64 for the architecture, as Windows 11 requires a 64-bit processor. Next, select English (United States) as the language option to ensure the installation uses the correct language settings.
- After making these selections, click Next to continue with the setup process.
On the General page of the Task Sequence setup, you must provide essential details about the task sequence you are creating. Enter a Name that clearly describes the purpose of the task sequence, such as “Deploy Windows 11 24H2.” Next, provide the version number. Finally, add a comment to provide additional context or instructions related to the task sequence.
- After filling in these fields, click Next to proceed with the configuration.
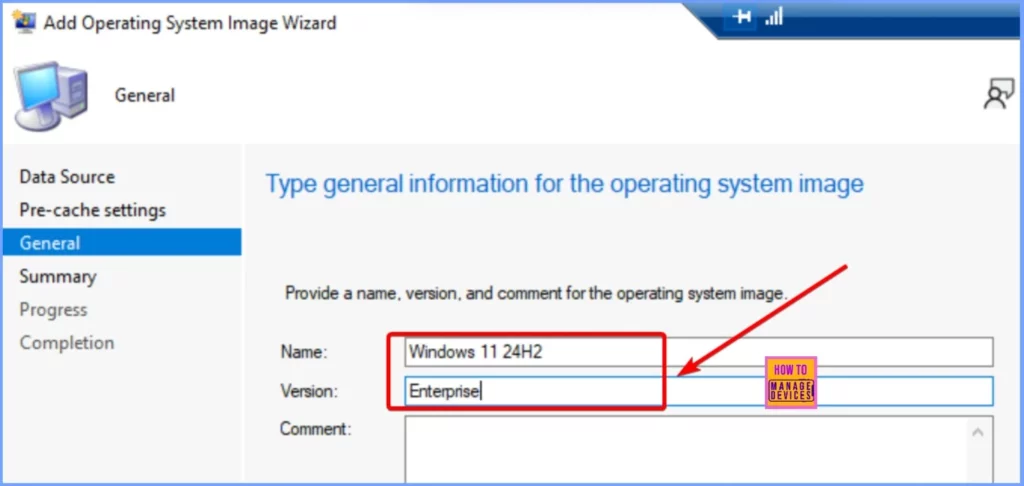
After entering all the necessary details for the task sequence, review the information you provided to ensure everything is correct. This step is essential for confirming that all settings and configurations are accurate before finalizing the process. Once you have verified the details, click Next to complete the wizard.
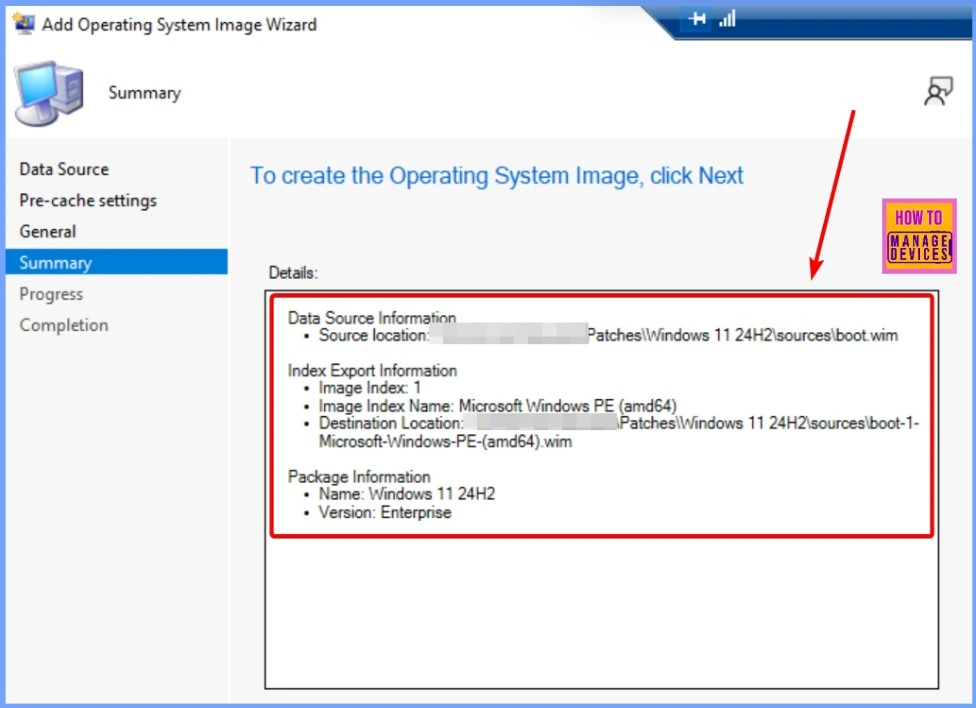
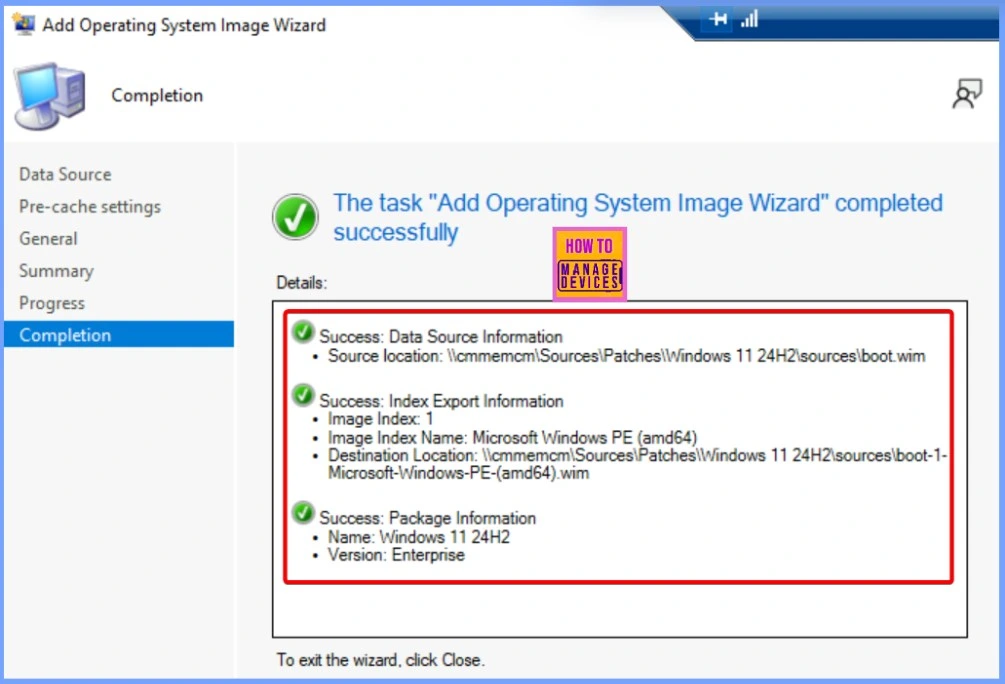
The screenshot below indicates that the Add Operating System Image Wizard has been completed. This confirms that the operating system image has been added to your SCCM environment.
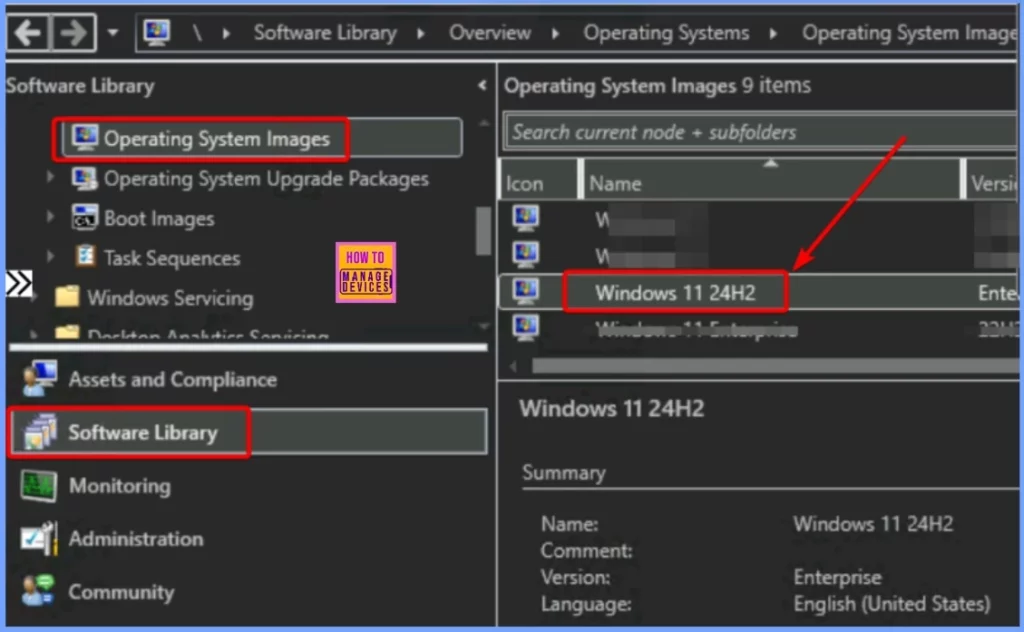
Verifying the Windows 11 24H2 Operating System Image
You should now see the Windows 11 24H2 Operating System Image listed under the Operating System Images node in the SCCM console. This appearance confirms that the image has been successfully added to your SCCM environment and is now available for use in your deployment tasks.
- With this image in place, you can deploy Windows 11 24H2 to your target devices, ensuring they are updated with the latest features and improvements.
- Go to SCCM console > Software Library > Operating System Images > Windows 11 24H2
Distributing the OS Image Package
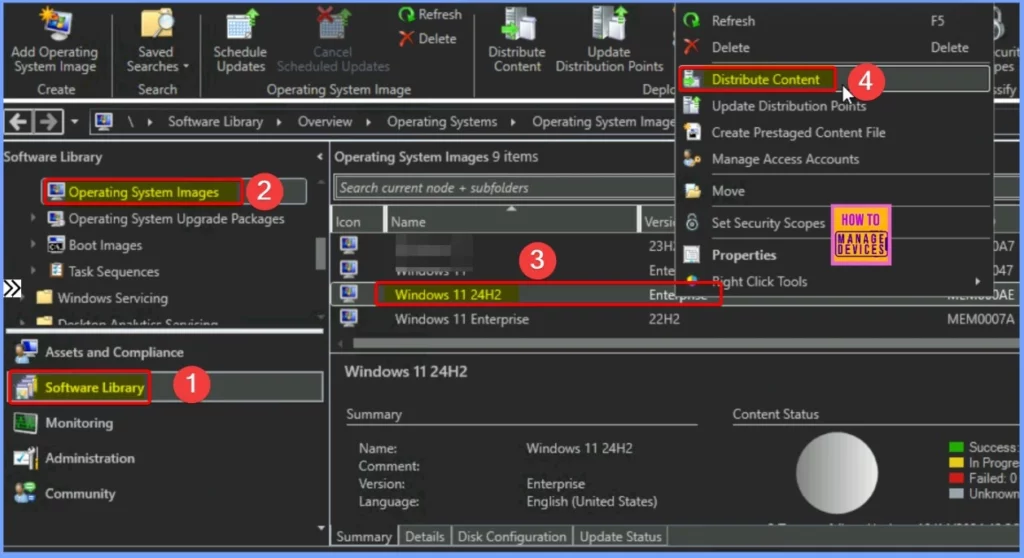
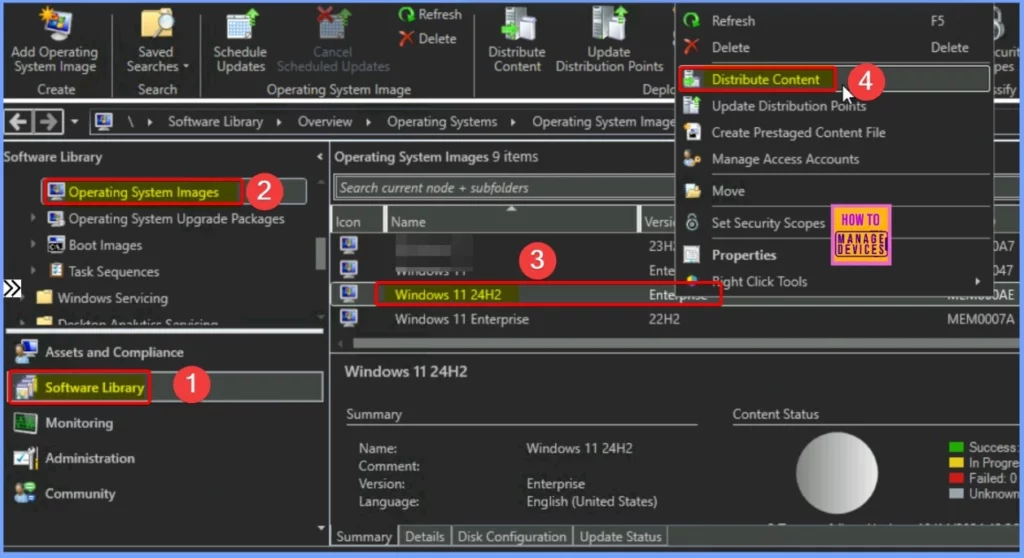
After successfully creating the Operating System Image Package, it will be visible in the Operating System Images node of the SCCM console. To start the distribution process, right-click on the Windows 11 Image you want to distribute and select Distribute Content from the context menu.
- Go to SCCM console > Software Library > Operating System Images > Windows 11 24H2 >Distribute Content
Distributing the OS Image Package
After successfully creating the Operating System Image Package, it will be visible in the Operating System Images node of the SCCM console. To start the distribution process, right-click on the Windows 11 Image you want to distribute and select Distribute Content from the context menu.
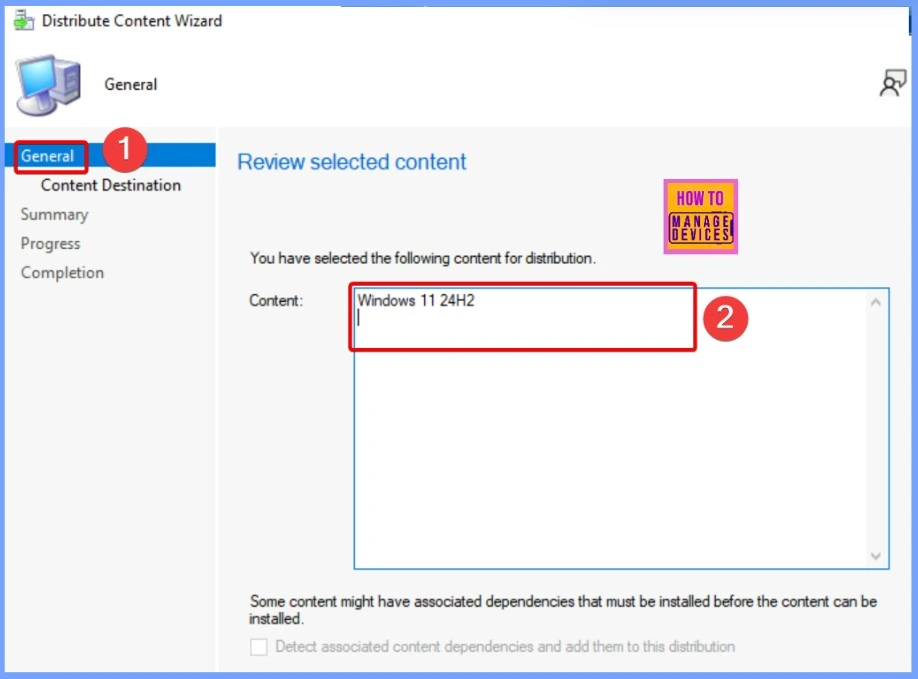
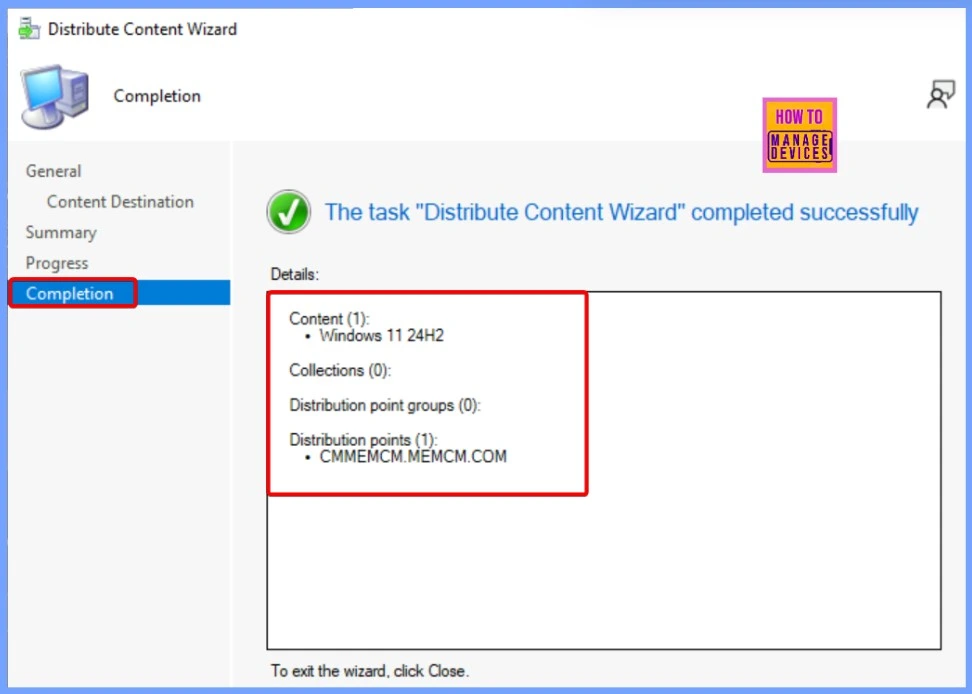
In this step, you have selected the Windows 11 24H2 Image for distribution. Now, it’s time to review your chosen content to ensure it is correct.
This review process lets you confirm that the proper image and associated settings are selected before proceeding. Once you have verified the content chosen, click Next to continue the distribution process.
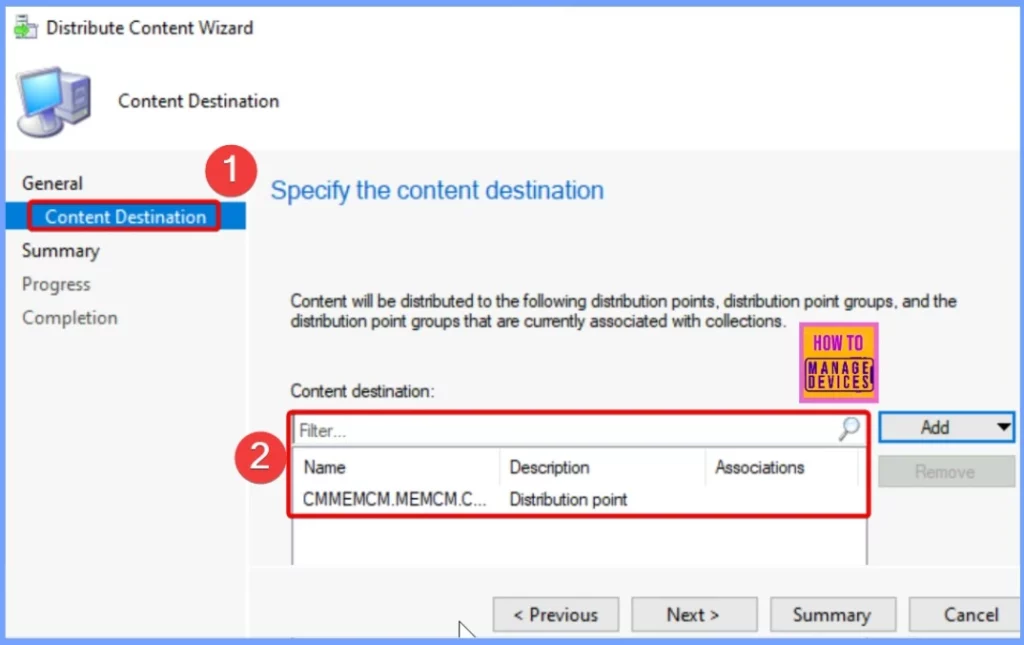
Next, you need to add the Distribution Point where you want to distribute the content. This step allows you to select the specific distribution points or groups that will receive the Windows 11 24H2 Image. After adding the desired distribution points, take a moment to review your selections to ensure that the correct points and groups are included.
Review all the settings you have configured for the content distribution on the Summary page. Ensure everything looks correct, including the selected distribution points and image details. Once you have confirmed that all the information is accurate, click Next to continue.
Monitoring Content Status
This is the status of content distribution in SCCM. If the status is yellow, the distribution is still in progress. Once the content has been successfully distributed, it will change to green, confirming it is ready for deployment.

- Create Windows 11 23H2 SCCM Device Collection
- SCCM Collection Best Practices while Creating a Dynamic Collection
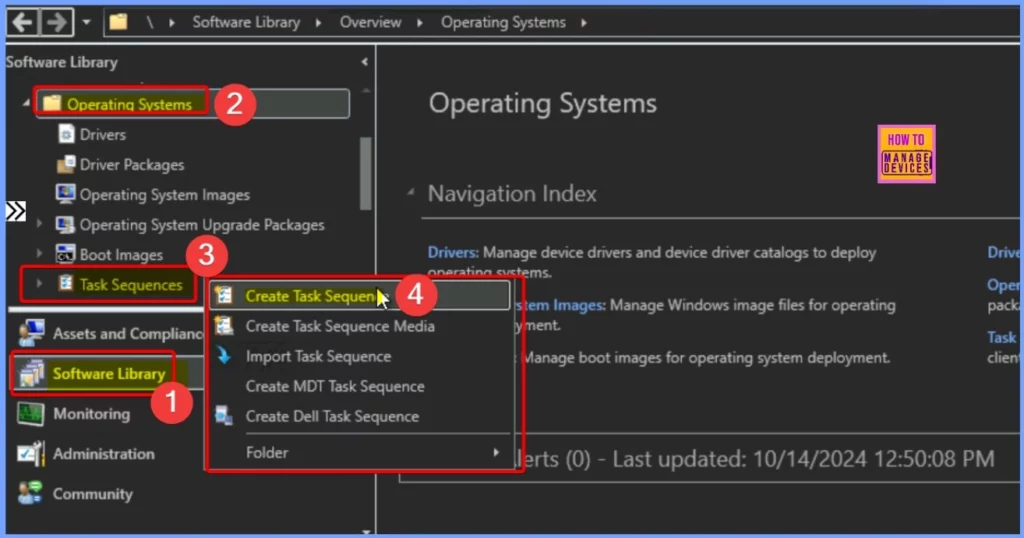
Create Task Sequence to Deploy Windows 11 24H2
Let’s discuss creating a Task sequence to deploy Windows 11 24H2. This table provides a clear overview of creating a task sequence for Windows OS installation in SCCM.
| Steps |
|---|
| Open the SCCM console and go to the Software Library. |
| Click to expand the Operating Systems section. |
| Right-click on Task Sequences in the left pane. |
| Select Create Task Sequence from the context menu. |
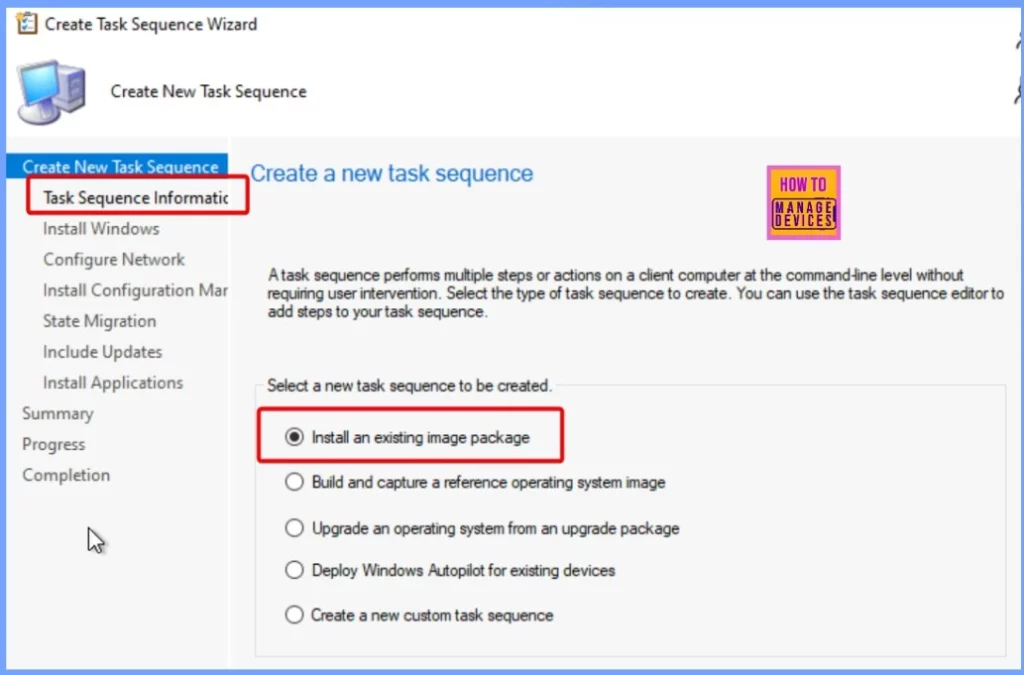
Choose Install an existing image package from the Task Sequence information tab. This option creates a task sequence that installs the OS, migrates user settings, applies updates, and installs applications. After making your selection, click Next to continue with the setup process.
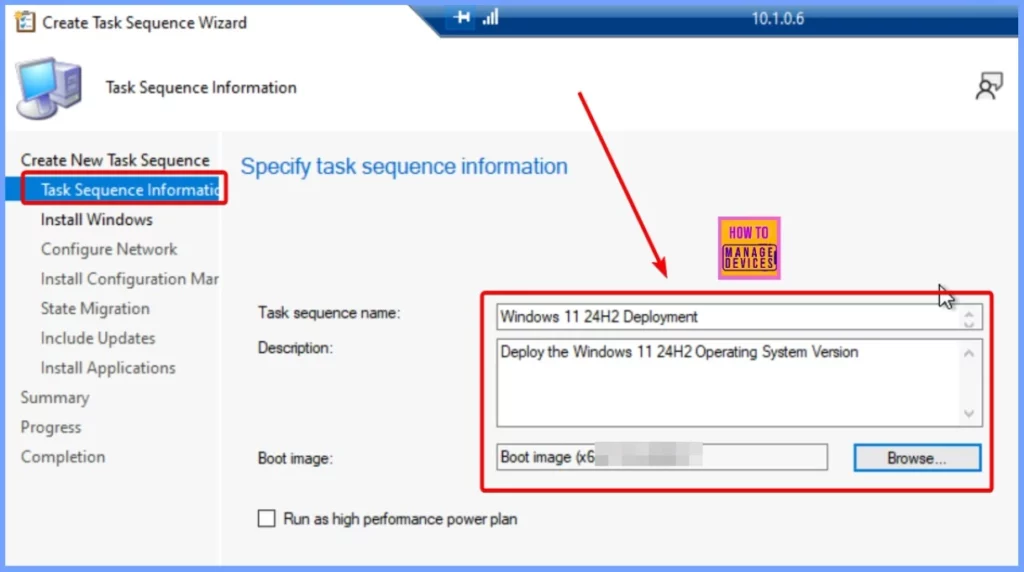
Before proceeding, specify a few essential settings on the Task Sequence Information page. First, enter a Task Sequence Name that identifies the task sequence for easy recognition. You can also add a Description to provide additional context about the task sequence, although this is optional.
Next, move to the Boot Image section. Click Browse to select an available boot image package that will be used during the installation process. Additionally, check the option for Run as a high-performance power plan. This setting ensures the system runs optimally during the task sequence execution, which can help speed up the installation process.
- Task Sequence Name: Specify a name that identifies the task sequence for easy recognition.
- Description: Optionally, describe to give additional context about the task sequence.
- Boot Image: Click Browse to select an available boot image package that will be used during the installation.
- Check the box for Run as a high-performance power plan to ensure optimal performance during the task sequence execution.
On the Install Windows page of the task sequence in SCCM, you will need to configure several necessary settings before proceeding. Here’s what to do. Image Package—Click on Browse to select the image package that contains the Windows operating system you want to install.
Ensure that the option to Partition and format the target computer is selected. This step prepares the disk for the new operating system by setting it up correctly. The screenshot below helps you show more details.
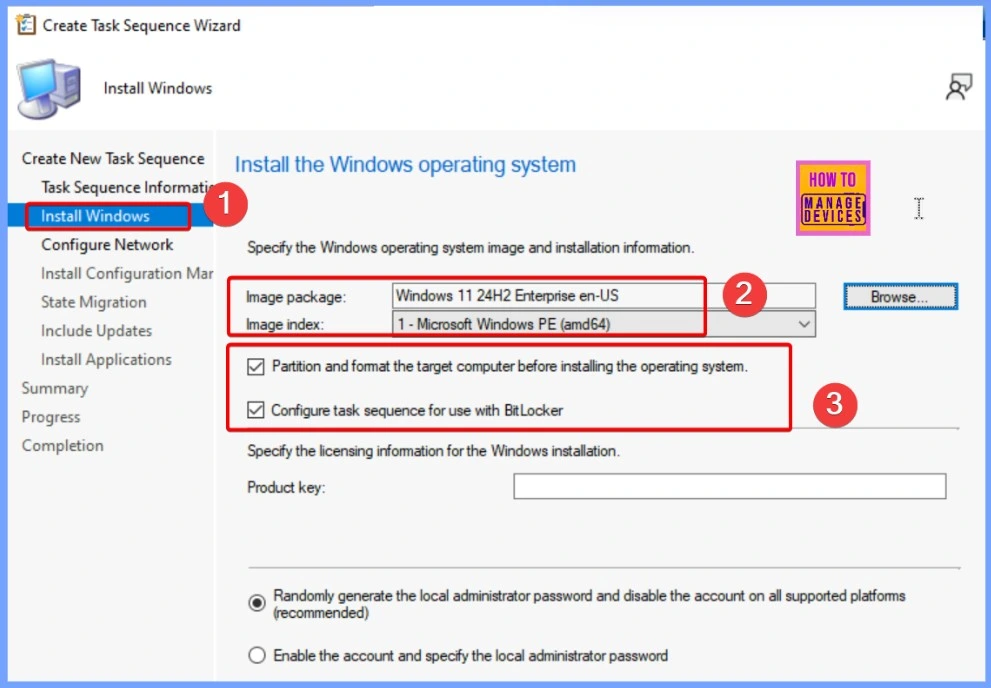
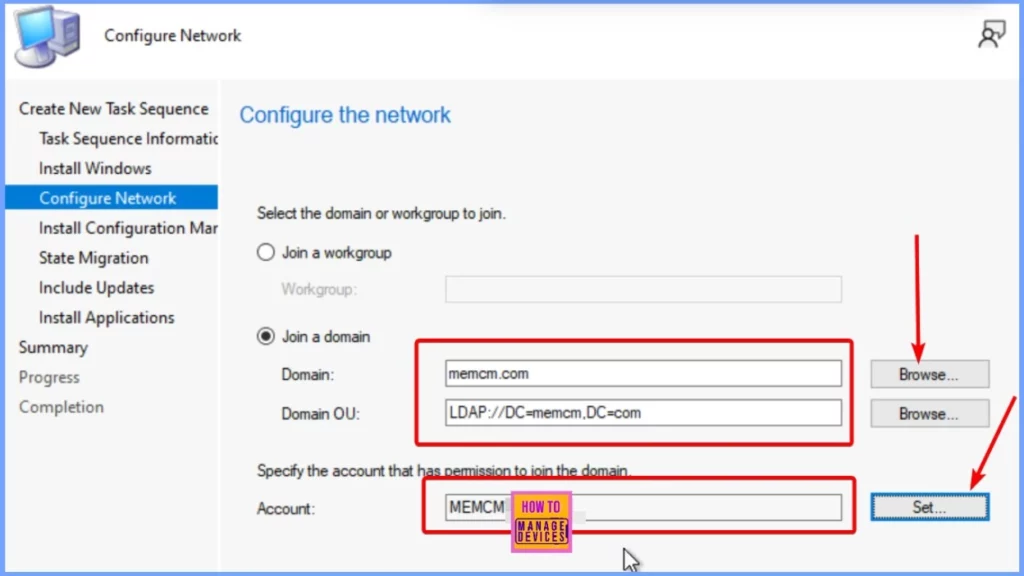
On the Configure Network page, you need to set up how the destination computer will connect to your network by joining a workgroup or domain. Join a Workgroup: If you choose this option, the computer will be added to a workgroup, a simple network setup typically used for small groups of computers.
Join a Domain: If you prefer to connect the computer to a domain, click Browse to specify the domain name. This option is suitable for more extensive networks where computers are managed centrally.
You can also specify an Organizational Unit (OU) in the Domain OU field, although this is optional. Account Details: You must provide the username and password for an account with permission to join the specified domain. This ensures that the computer can connect securely to the network.
- After entering these settings, click Next to proceed with the configuration.
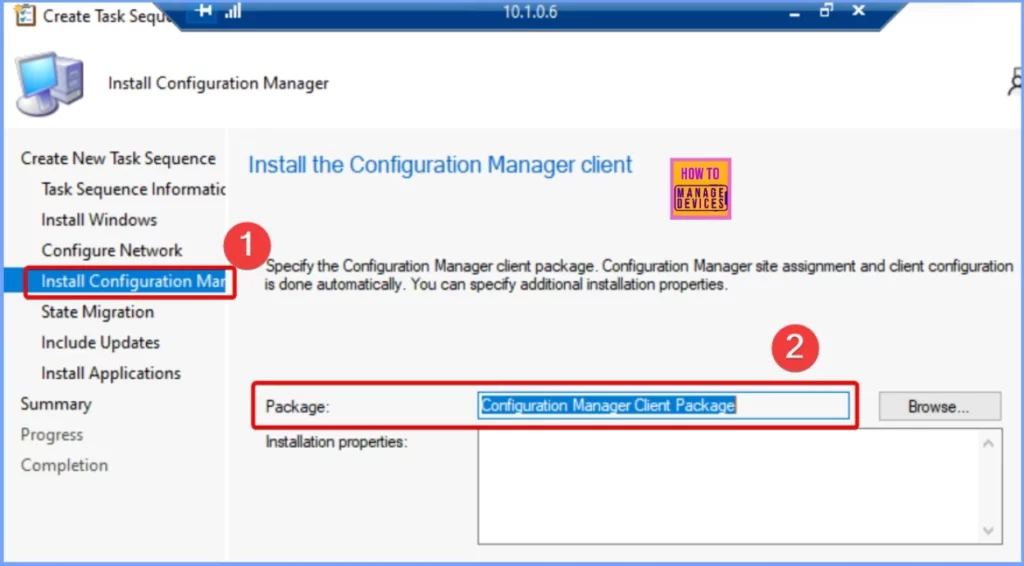
On the Install Configuration Manager page, you’ll see that the Configuration Manager client package is automatically selected for you. This package is essential for installing the SCCM client on the target computer. If needed, you can add extra properties for the SCCM client installation to customize the setup further. After you’ve reviewed your settings, click Next to move on with the process.
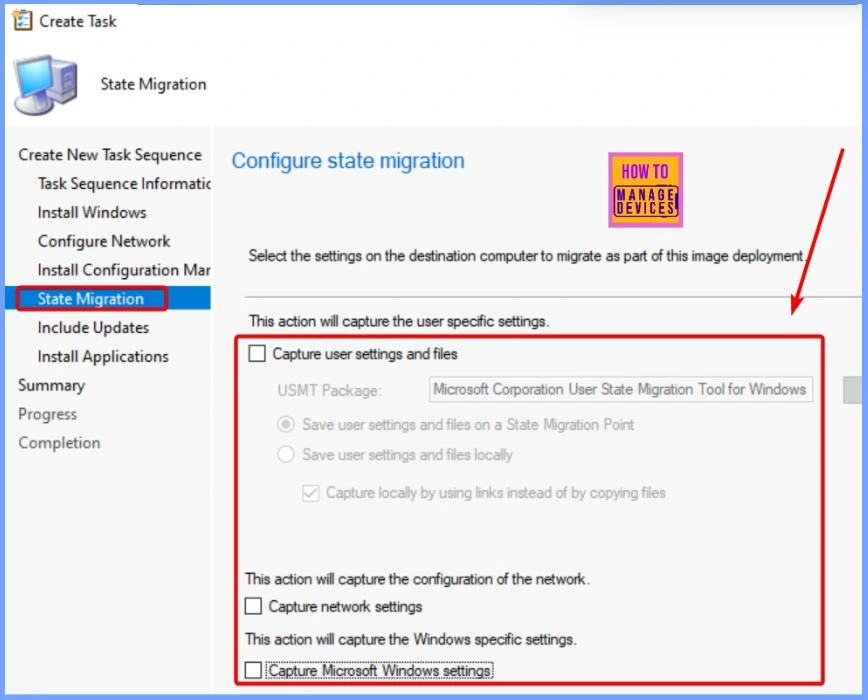
You can leave the default settings on the State Migration page or uncheck all the options if you don’t want to capture user settings. This section is optional and mainly applies to task sequences that are not set to run automatically. After reviewing your choices, click Next to continue with the setup.
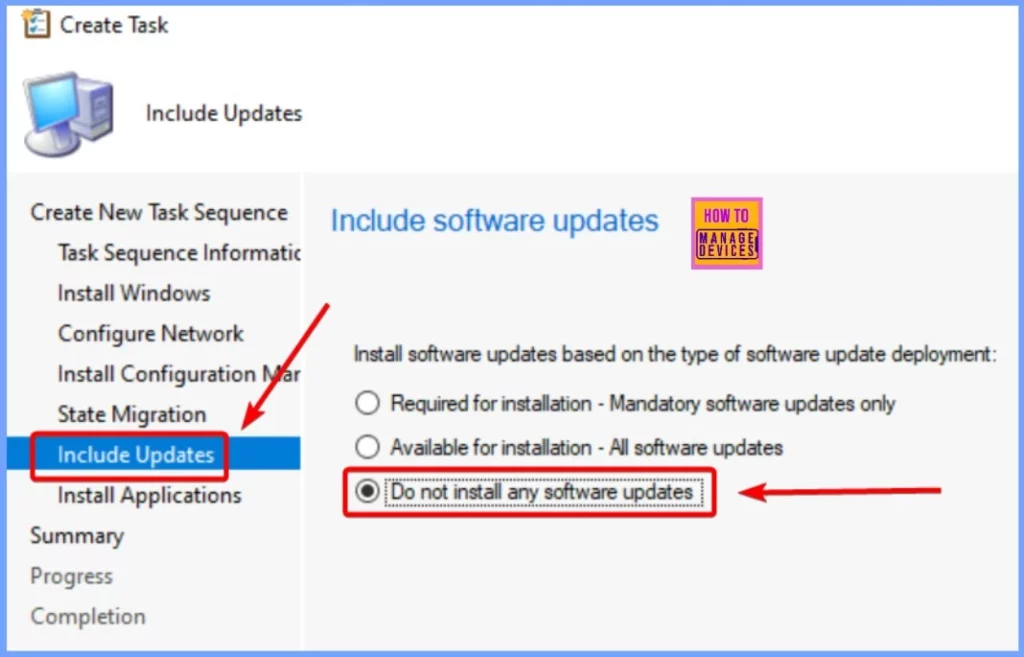
On the Include Updates page, you can choose whether to install only the required software updates or all available updates. In this case, I decided not to install any software updates and kept the default option as it was. After making this choice, I clicked Next to continue the installation process.
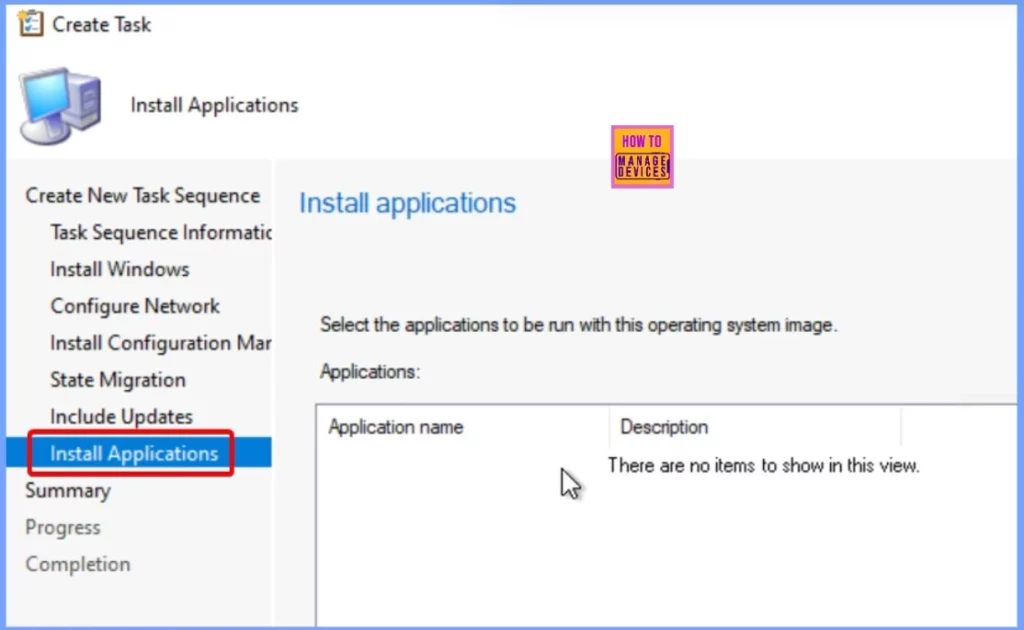
On the Install Applications page, you can specify which applications you want to install during the deployment. If you prefer, you can add applications later in the task sequence steps. After making your selections, click Next to proceed.
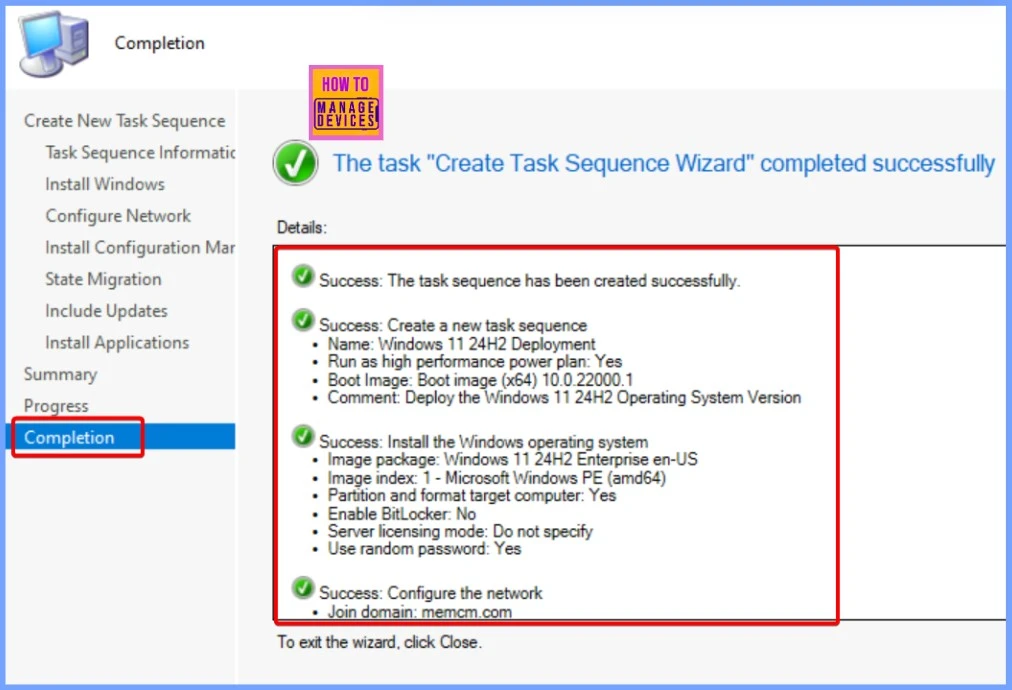
After reviewing the task sequence details, click Next to continue. You will then see a message indicating that the Create Task Sequence Wizard completed successfully. Finally, click Close to finish the wizard.
Modifying an Existing Windows 11 24H2 Task Sequence
Follow these steps to modify a Windows 11 24H2 task sequence in the Configuration Manager console.
- Navigate to Software Library.
- Expand Operating Systems and then select Task Sequences.
- Select the task sequence and then Right-click the Windows 11 24H2 deployment.
- Choose the Edit option from the pop-up window.
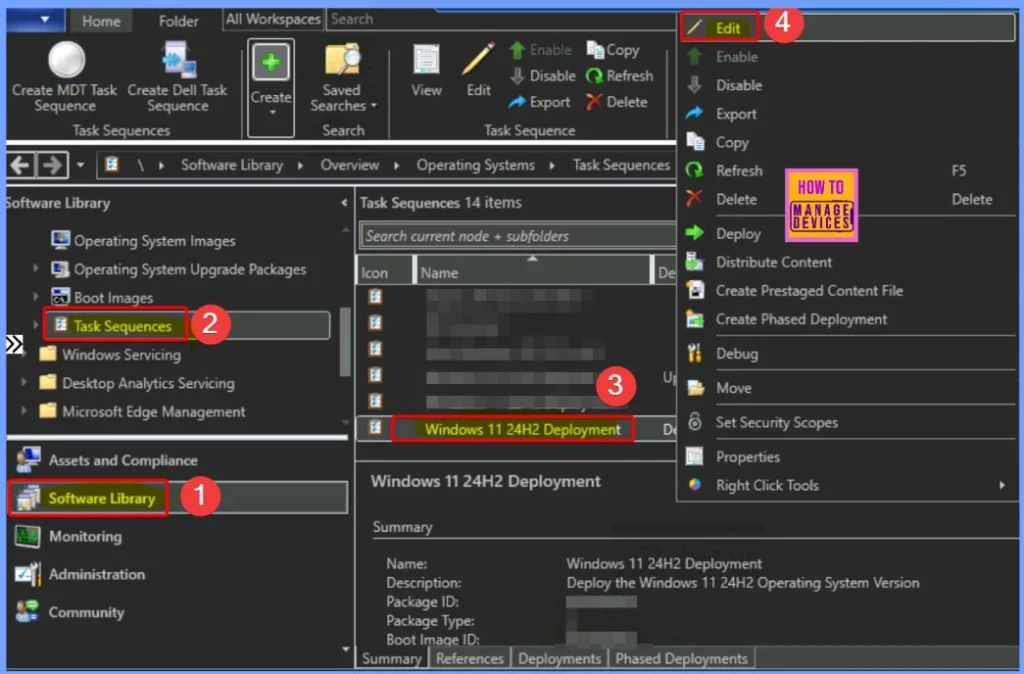
The table below shows the essential functions you can perform when editing a Windows 11 24H2 Task Sequence in SCCM. Utilizing these features in the task sequence editor allows you to customize the deployment process to meet specific requirements and improve efficiency.
| Action | Details |
|---|---|
| Add or Remove Steps and Groups | Modify the task sequence by adding new steps or removing existing ones as needed. |
| Change Step Order | Rearrange the order of tasks to ensure they execute in the desired sequence. |
| Set Step Options | Define how the task sequence behaves, such as whether it continues executing when an error occurs. |
| Add Conditions | Specify conditions for when certain steps or groups should run, enhancing flexibility in the sequence. |
Adding Drivers to SCCM Task Sequence
To ensure that your Windows 11 24H2 Task Sequence runs smoothly, it is essential to add the necessary drivers. Here are the steps to Add the Apply Driver Package Step to your SCCM Task Sequence. These steps ensure the required drivers are included and applied adequately during the Windows 11 installation process.
- Let’s check the steps for Adding the Apply Driver Package Step to the SCCM Task Sequence. Then, review the drivers and applications installed with the task sequence.
- Before you deploy the task sequence, make sure the drivers are compatible. To import drivers, create driver packages, and process and integrate driver packages into task sequences.

- Add Install Application Step to SCCM Task Sequence
- Add Run PowerShell Script Step to SCCM Task Sequence
- Add Run Command Line Step to SCCM Task Sequence
Note! Review all other settings added to the Task Sequence before finalizing. Make sure to apply all changes by clicking Apply and then OK. Finally, close the task sequence editor to ensure your modifications are saved.
Deploying Windows 11 24H2 Using SCCM
Follow these steps to deploy your Windows 11 24H2 Task Sequence to computers in a specific collection. Following these steps, you can efficiently deploy Windows 11 24H2 to your designated devices within the specified collection.
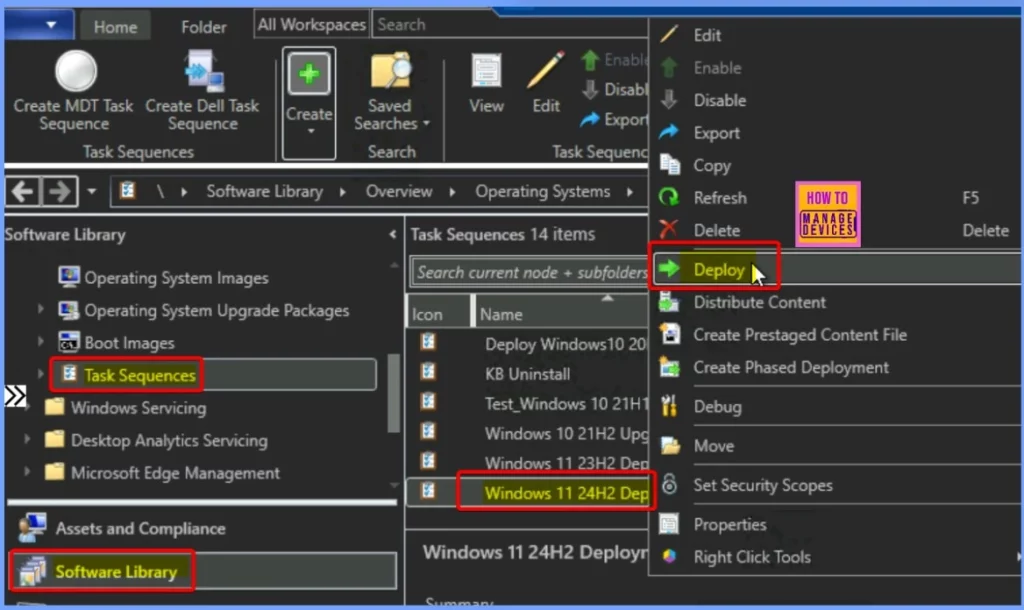
- Locate and select the task sequence you created for deploying Windows 11 24H2 in the Task Sequence list within the Configuration Manager console.
- Right-click on the selected task sequence and choose Deploy from the context menu. This will open the deployment wizard.
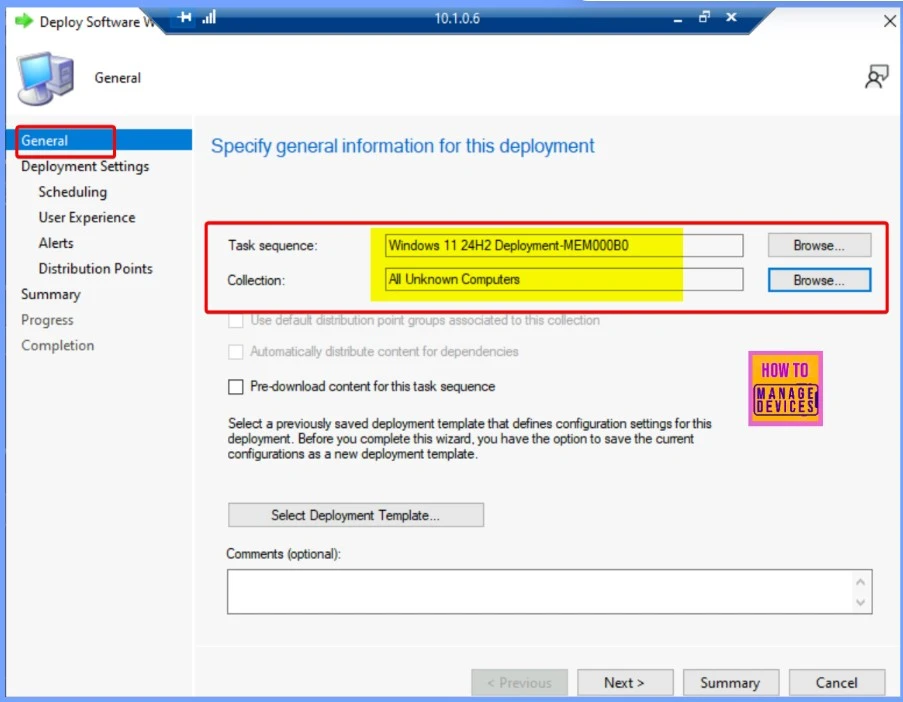
To deploy the task sequence, click Browse on the General page to select the device collection for the deployment. You can choose to Deploy to All Unknown Computers, which includes any computers not currently managed by Configuration Manager or those that haven’t been imported into it.
This option helps target new devices that must be set up with the operating system.
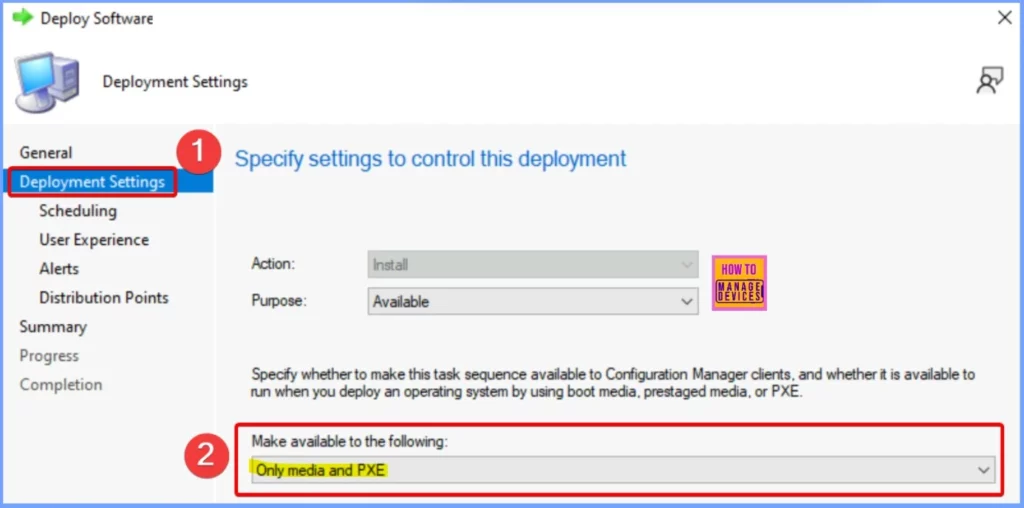
On the Deployment Settings page, choose the deployment’s Purpose. Available: This option requires the user to be at the destination computer to initiate the deployment. The user must press the F12 key to continue the PXE boot process. The computer will boot into its current operating system or the next available boot device if no user is present.
- Required: This allows for a fully automated deployment using PXE without requiring any user interaction.
- For the Make available to the following setting, select from.
- Configuration Manager clients, media, and PXE
- Only media and PXE
- Only media and PXE (hidden)
Note: The Only media and PXE (hidden) option is recommended for automated task sequence deployments. To allow the computer to boot to the deployment automatically without user interaction, enable Allow unattended operating system deployment and set the SMSTSPreferredAdvertID variable during the media creation.
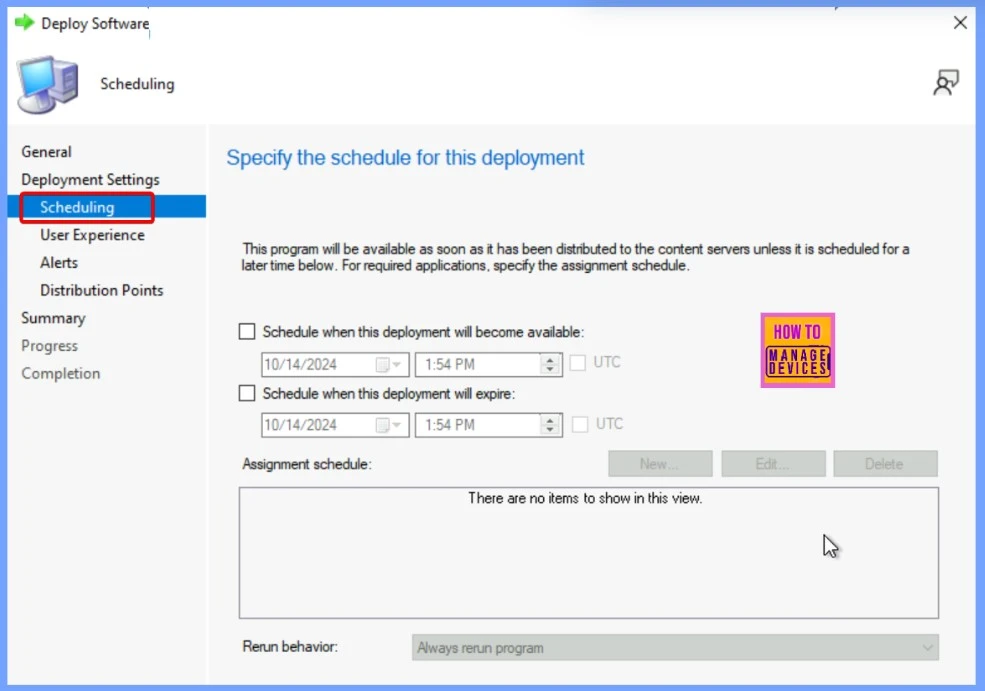
On the Scheduling tab, you can set the time and date for the deployment to begin. This lets you control the task sequence’s deployment to the selected computers. Once you’ve set the schedule, click Next to proceed with the deployment process.
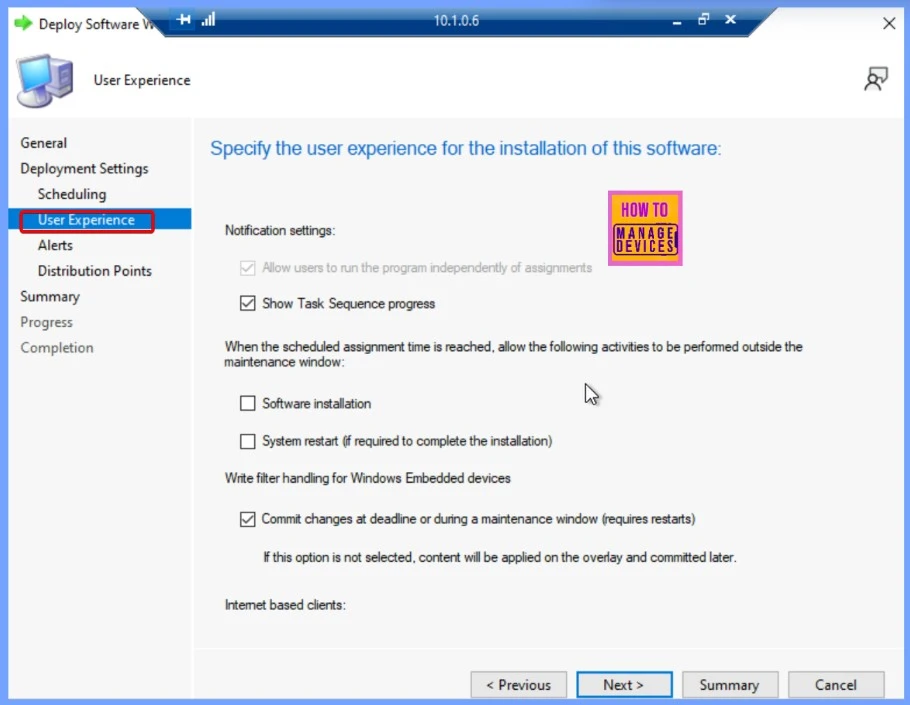
Keep the default settings on the User Experience tab, determining how users interact with the deployment. After confirming the defaults, click Next to move to the next step.
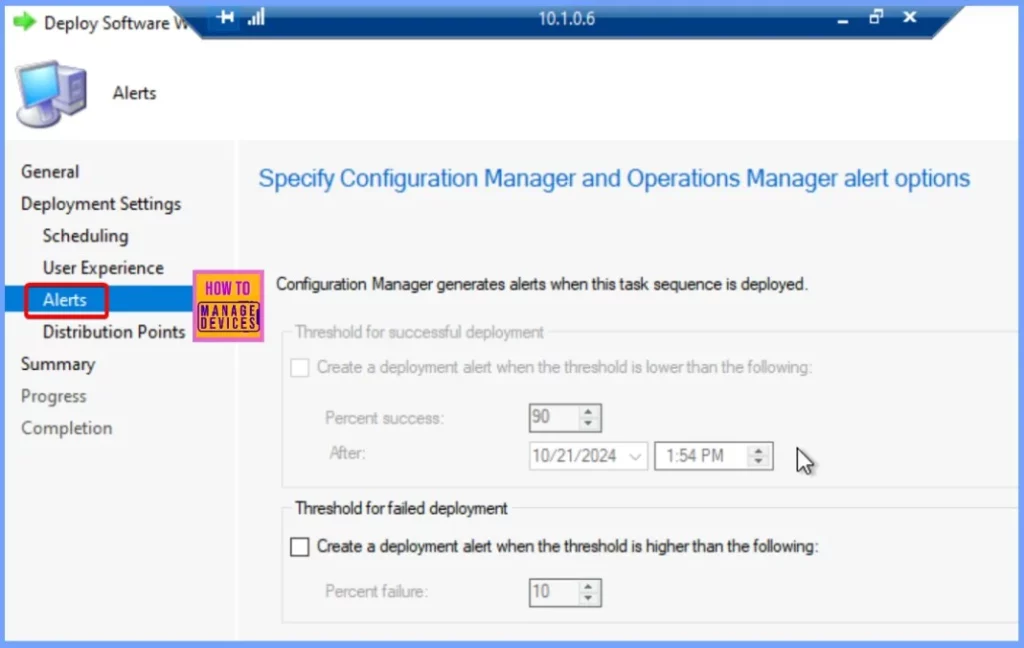
The Alert tab is integral to deploying Windows 11 24H2 using SCCM. When the task sequence is deployed, SCCM generates alerts to notify you about the deployment status or any issues. These alerts help you monitor the deployment process and take action if any problems arise. After reviewing the alert settings, you can proceed with the next step in the deployment.
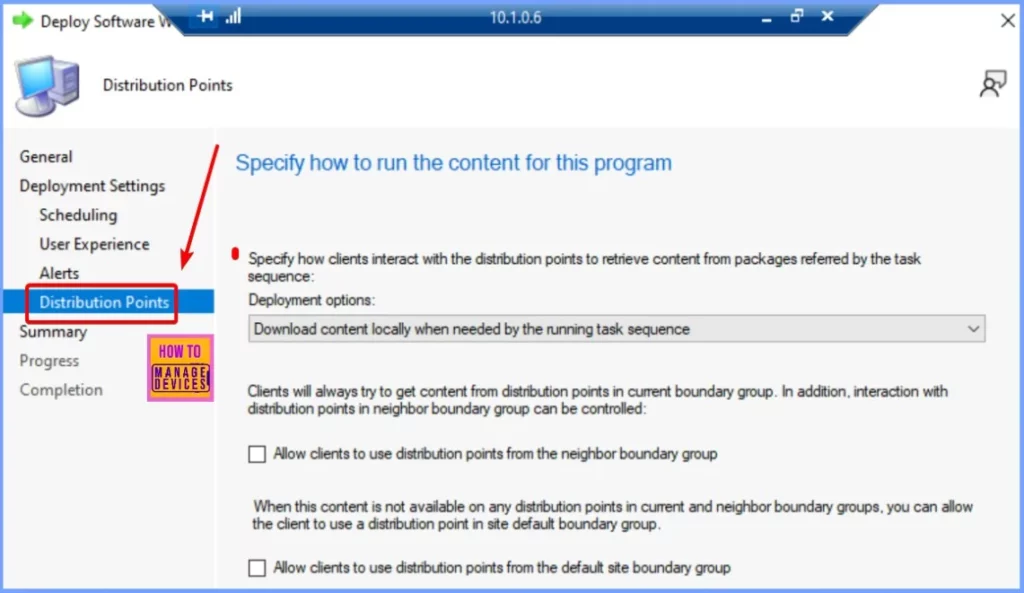
On the Distribution Points page, configure how clients will interact with the distribution points to access the content required by the task sequence. Clients will attempt to retrieve content from distribution points within their current boundary group by default.
You can also manage interactions with distribution points in neighboring boundary groups, allowing for flexible content retrieval based on network conditions and location. Once these options are set, click Next to proceed with the task sequence deployment.
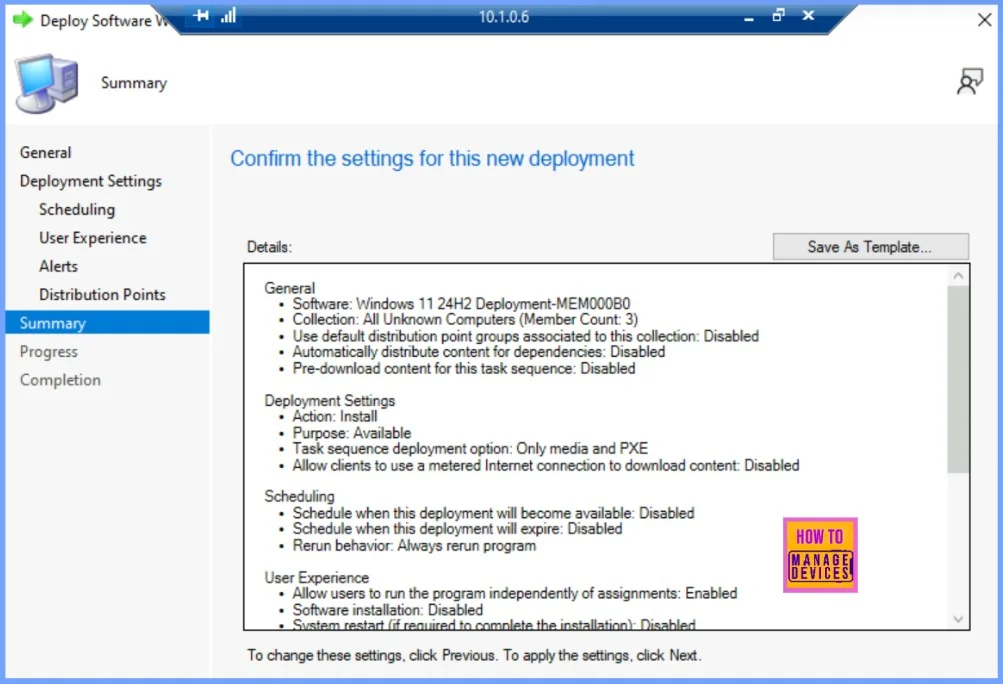
On the Summary page, carefully review all the settings you have configured for the deployment. This is important to ensure that everything is accurate, including the selected task sequence, distribution points, deployment schedule, and user experience options. After confirming all settings are correct, click Next to proceed with the deployment process.
Read more – SCCM Task Sequence Available Deployment Options in Distribution Points Tab | ConfigMgr
The screenshot below shows the successful completion of the Deploy Software Wizard task. It provides further details about the deployment process and confirms that all the steps have been completed correctly.
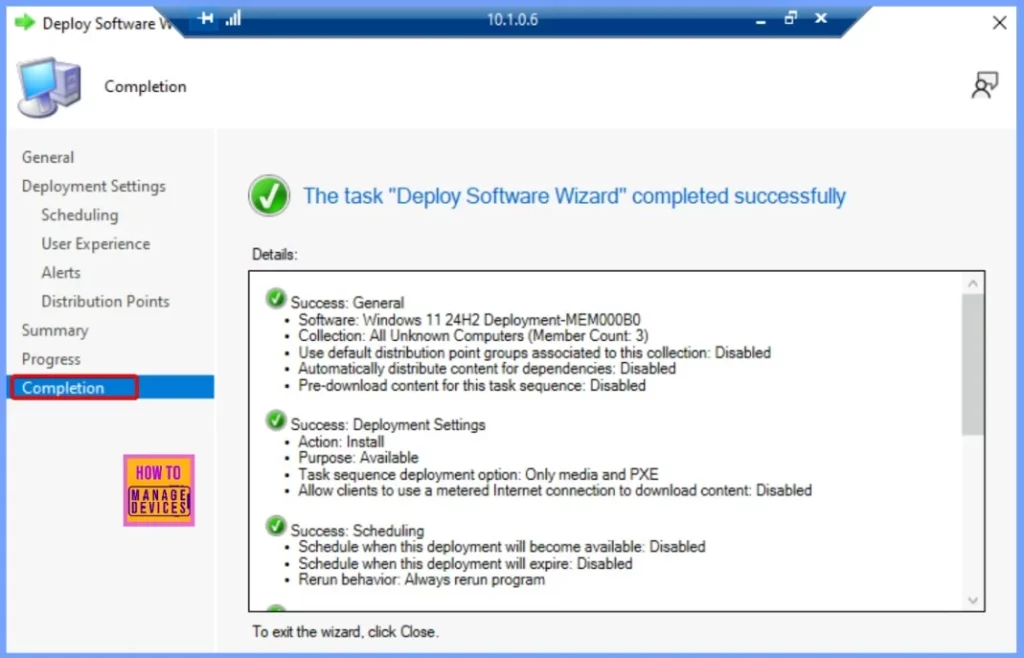
Windows 11 24H2 Deployment Results
Different hardware models can provide unique experiences when using PXE (Preboot Execution Environment). Generally, UEFI-based devices use one specific key for network booting, while BIOS-based devices require a different key.
The task sequence wizard will display after a device successfully boots through PXE. If the media requires a password, users must input it on the welcome page before moving forward. Once ready, click Next to proceed with the installation.
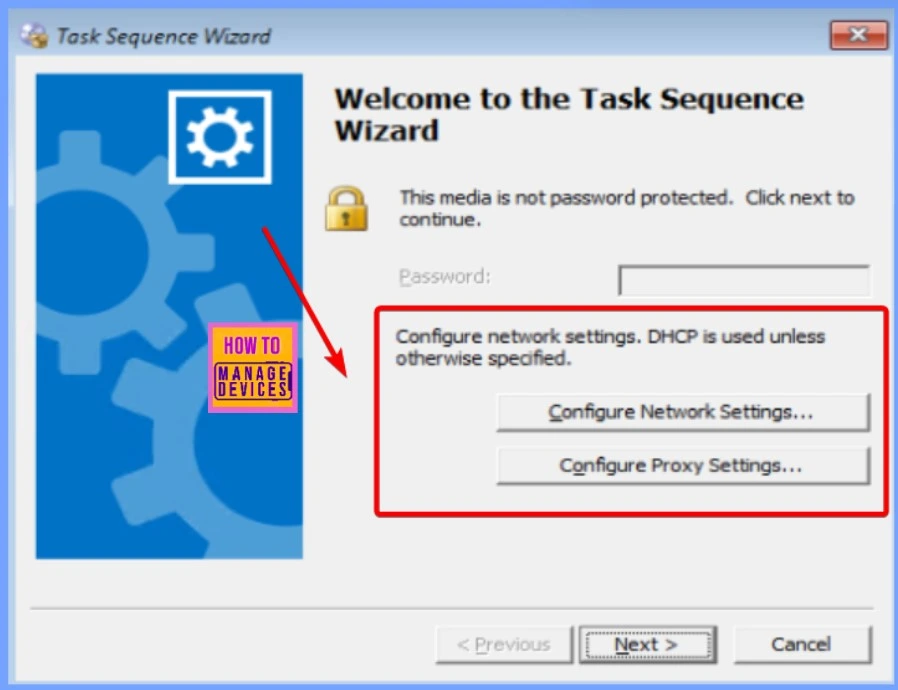
When you deploy multiple task sequences to a device, the first step is to choose which task sequence to run. It’s essential to provide clear and descriptive names and descriptions for your task sequences so that users can easily understand their purpose.
Once you’ve selected the appropriate task sequence from the list, click Next. The task sequence will begin to execute after the system downloads its policy and verifies the content location.
Once you finish the wizard, the new operating system deployment will begin. As the task sequence runs, you’ll see the Installation Progress window. It’s essential to allow the task sequence deployment to be completed fully.
After installing, sign in to the device using your domain or local credentials. To confirm the installation, click Start, type Winver, and press Enter. You should see that Windows 11 version 24H2 (OS Build 22631) has been successfully installed.
Read More – How to Improve SCCM Task Sequence Progress Bar End User Experience.
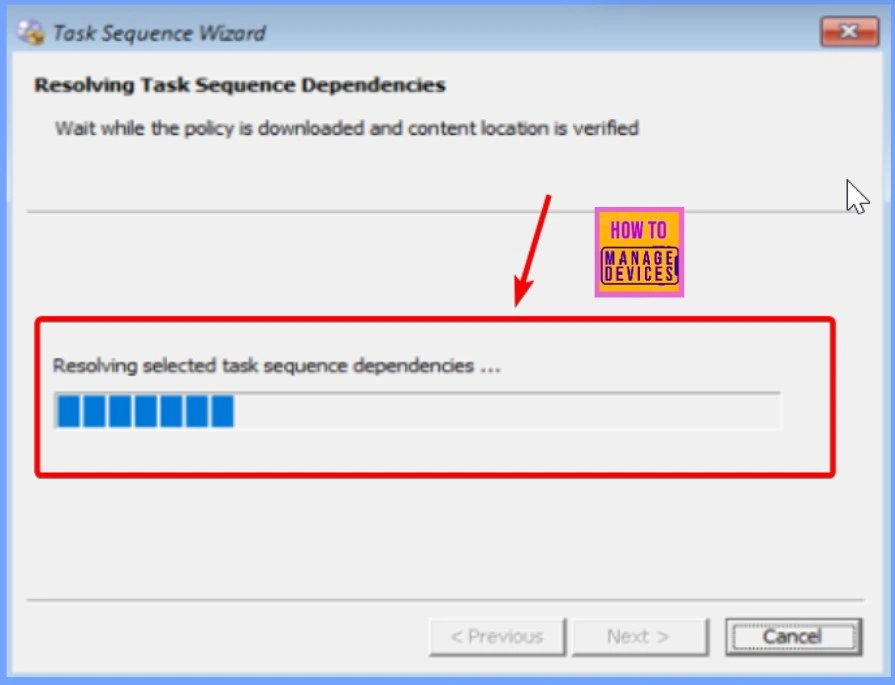
Fix – Deploy Windows 11 24H2 using SCCM
When deploying Windows 11 24H2 using SCCM, the SMSTS.log file is crucial for troubleshooting any installation issues related to Operating System Deployment (OSD). This log captures detailed information about the task sequence’s execution and can help identify errors or failures during deployment.
- OSD Known Issues Troubleshooting Guide | SCCM | ConfigMgr
- ConfigMgr OSD Troubleshooting Known Issues Guide Part 2 | SCCM
Read More – SCCM SMSTS Log File Location | Reading Tip
Join the LinkedIn Page and Telegram group to get the latest step-by-step guides and news updates. Join our Meetup Page to participate in User group meetings. Also, Join the WhatsApp Community to get the latest news on Microsoft Technologies. We are there on Reddit as well.
Author
Anoop C Nair has been Microsoft MVP from 2015 onwards for 10 consecutive years! He is a Workplace Solution Architect with more than 22+ years of experience in Workplace technologies. He is also a Blogger, Speaker, and Local User Group Community leader. His primary focus is on Device Management technologies like SCCM and Intune. He writes about technologies like Intune, SCCM, Windows, Cloud PC, Windows, Entra, Microsoft Security, Career, etc.

Many organizations like my we need to re-image return devices from windows 10 to windows 11. But we will like to use autopilot after. We have few autopilot profile for that reason I don’t want to add autopilot to the task sequence. To get into OOBE I apply a reset at the end, there is a better way?