In this article, we will learn Visual Studio Code Installation using Intune. This step-by-step guide will utilize the EXE version of the application for the deployment of Visual Studio Code.
Microsoft Visual Studio Code, also known as VS Code, is a cross-platform source code editor designed for Windows, Linux, and macOS using the Electron Framework. It offers a range of features including debugging, syntax highlighting, smart code completion, code snippets, refactoring, and Git integration.
Even though VS Code is marketed primarily to professionals, it is an excellent editor for students and other learners just starting out with HTML and CSS. With it, developers have just the tools they need for a quick code-build-debug cycle, leaving more complex workflows to more complete IDEs, like Visual Studio.
Additionally, it has an integrated terminal and supports extensions, allowing users to customize their work environment and add new functionality. With its modern and intuitive interface, ease of use, and powerful capabilities, VS Code has become a favorite among developers for both personal and professional projects.
Visual Studio Code functions exceptionally well as a Java Integrated Development Environment (IDE) with the installation of the Java Extension Pack. However, when using the editor for web development, its capabilities are limited without the extension pack.
- Wireshark Installation using Intune Deployment Step-By-Step Guide
- Explore New Intune Troubleshooting Dashboard For Intune Issues
Prepare Visual Studio Code Installation Source for Intune
Preparing a Win32 app using the Microsoft Win32 Content Prep Tool is necessary before adding it to Microsoft Intune. To pre-process Windows classic (Win32) applications, you use the Microsoft Win32 Content Prep Tool.
You can browse the Visual Studio Code official page to download the latest available version. You will see the application available in different formats for different operating systems. One can easily pick the one as per the requirement.
Let’s start by identifying the command line to carry out the silent installation or removal of Visual Studio Code.
Visual Studio Code Installation Command
In this case, we need to search for the installation command for Visual Studio Code. Upon searching, Visual Studio Code. After searching, the install command for Visual Studio Code is VSCodeSetup-x64-1.74.3.exe /VERYSILENT /NORESTART /MERGETASKS=!runcode.
After successfully installing Visual Studio Code using the install command in your test environment, you now have to look for the Uninstall command. Refer to the below table for the details.
| Install Command | Uninstall Command |
|---|---|
| VSCodeSetup-x64-1.74.3.exe /VERYSILENT /NORESTART /MERGETASKS=!runcode | “%ProgramFiles%\Microsoft VS Code\unins000.exe” /VERYSILENT /NORESTART |
Download the updated IntuneWinAppUtil.exe from GitHub. Run IntuneWinAppUtil.exe file. Run as administrator.
- Please specify the source folder – Enter the folder that contains your application setup files. (For Example, C:\sources\Visual Studio Code)
- Please specify the setup file – Enter the setup file name (such as setup.exe or setup.msi), for example, VSCodeSetup-x64-1.74.3.exe.
- Specify the output folder – Input the output folder to generate the .intunewin file.
- Do you want to specify catalog folder – Type N.
Note! Please wait a few minutes while running the Win32 Content Prep Tool. Once it generates the .intunewin file, the status indicates 100% at the bottom of the command prompt.

Once the process completes, Browse to the output folder (For Example, C:\sources\Visual Studio Code) to collect the Intune Win32 app deployment file.
Deploy Visual Studio Code using Intune
Follow the steps below to upload the Intunewin file for deploying Visual Studio Code to managed devices. Here’s how you can deploy Visual Studio Code using Intune Portal.
- Sign in to the Microsoft Intune admin center https://endpoint.microsoft.com/.
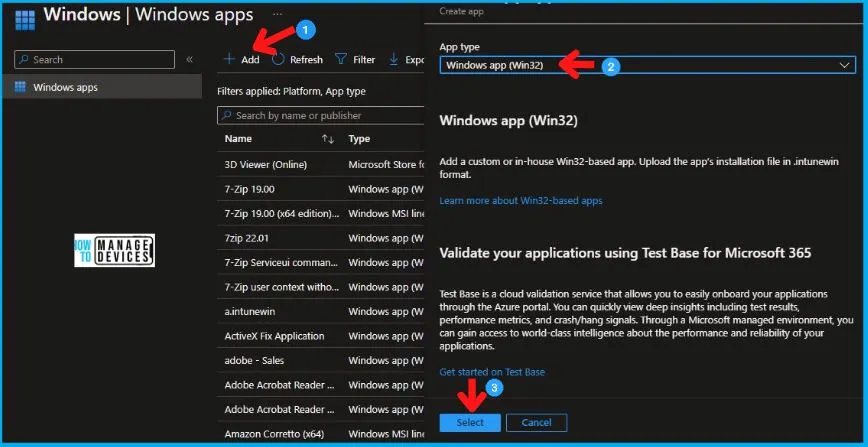
- Select Apps > All apps > Add, or navigate to Apps > Windows > Windows Apps.
- On the Select app type pane, select Windows app (Win32) under the Other app types and click Select.
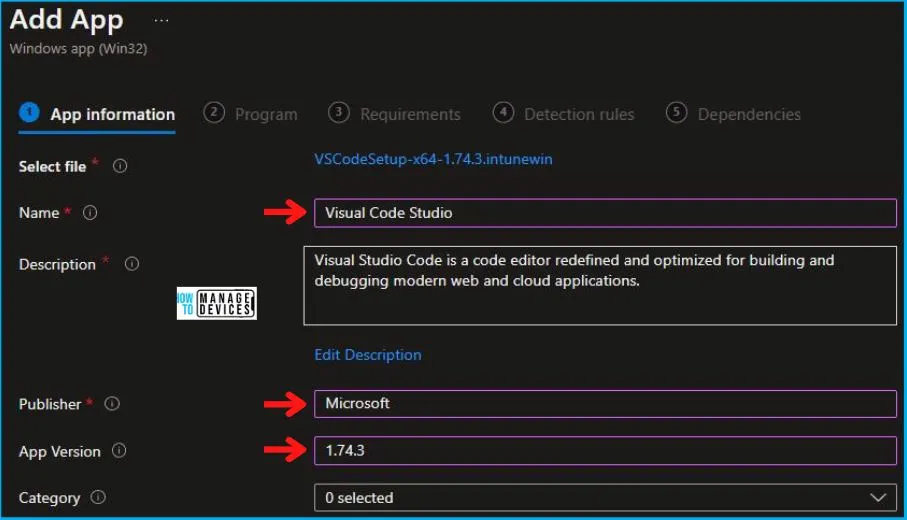
On the Add app pane, click Select app package file. Click the browse button. After that, select the prepared file with the extension .intunewin. Detailed information about the app appears. You can now select OK on the App package file pane when you’re done.

Enter the Name of the Windows App Win32 (For Example, Visual Studio Code App), and Enter the Description of the Microsoft App. Enter the Publisher name – Microsoft. You may specify the additional app information here.
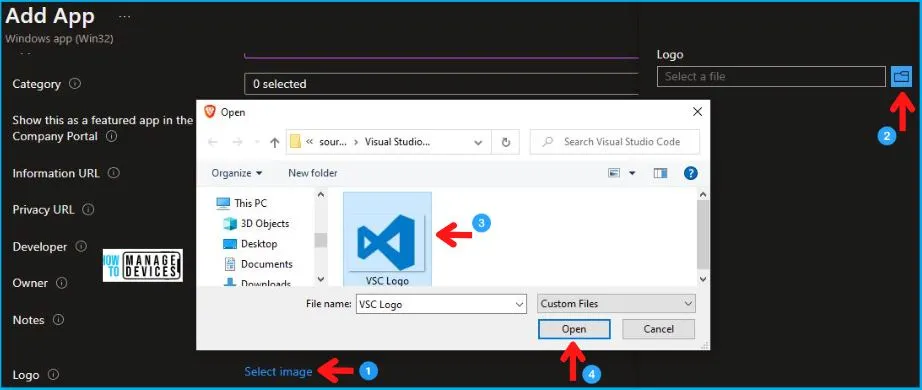
After entering the above details, you will get the option to Upload an icon for the app by scrolling down on the same page. This icon is displayed with the app when users browse the company portal and click Next.
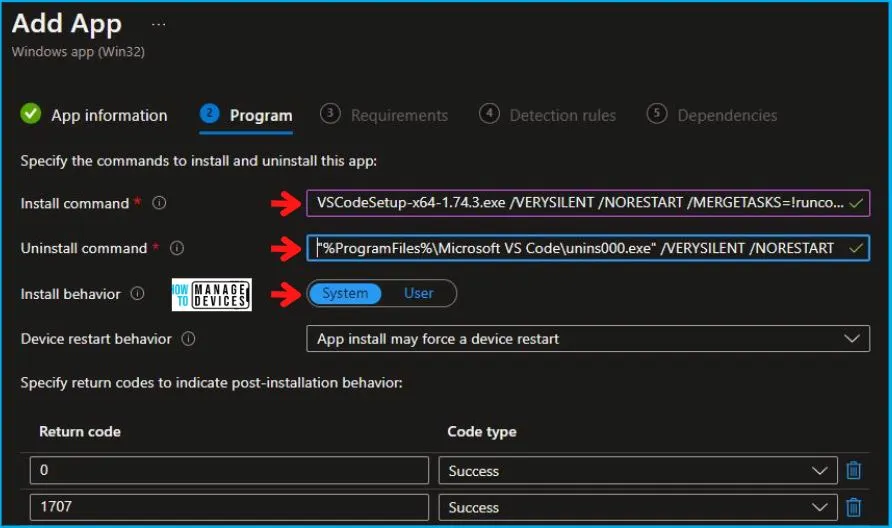
The most important part is to specify the commands. On the Program, configure the app installation and removal commands for the app:
- Install base: Add the complete installation command line to silent install Visual Studio Code. (VSCodeSetup-x64-1.74.3.exe /VERYSILENT /NORESTART /MERGETASKS=!runcode)
- Uninstall command: Add the uninstallation command line for Visual Studio Code. (“%ProgramFiles%\Microsoft VS Code\unins000.exe” /VERYSILENT /NORESTART)
- Install behavior: Set the install behavior to System.
You can also specify the Device restart behavior and Post-installation behavior. Click Next to continue.
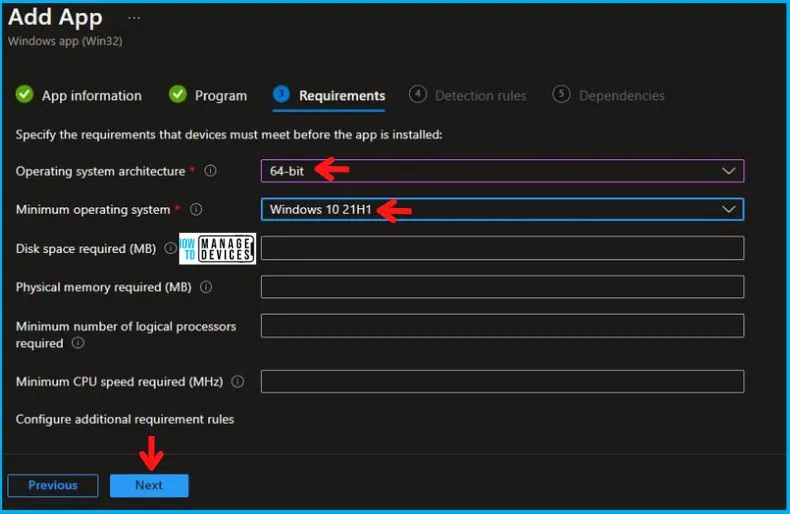
On the Requirements page, specify the mandatory requirements that devices must meet before installing the update and click Next.
- Operating system architecture: Choose the architectures needed to install Visual Studio Code.
- Minimum operating system: Select the minimum operating system needed to install Visual Studio Code.
There are some built-in and custom requirements rules when creating your Win32 application. Explore Intune Win32 App Requirement Rules.
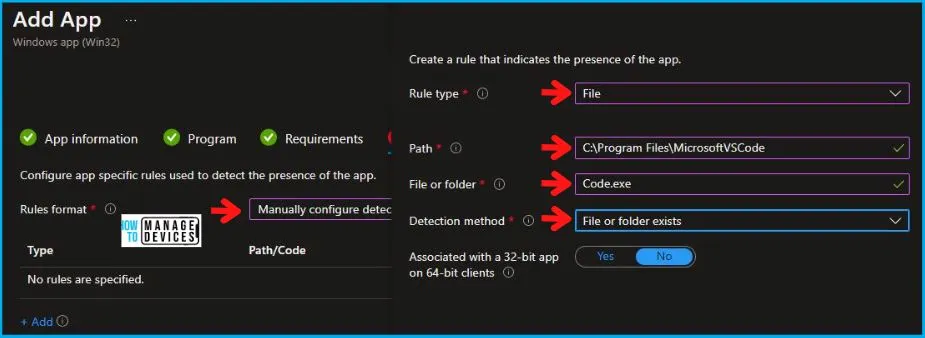
On the Detection rules pane, configure the rules to detect the presence of the app. You can choose to add multiple rules. Here I selected the Manually configure detection rules format. Click on Add button, and A popup will appear showing the Detection rule, select File System.
After this, you have to check for the Detection Method. Here we try to use the File type for the detection method. We must go to a particular file location and select a certain file.
- Select File in the Rule Type and copy the path in the Path box
- %ProgramFiles%\Microsoft VS Code
- Look for the file called “Code.exe“
The following table provides clearer options for detecting an exe (Code.exe) file. Check the details from the above table and enter as shown below carefully.
| Setting Type | Path/Hive | File Name/Key |
|---|---|---|
| File System | %ProgramFiles%\Microsoft VS Code | Code.exe |
You can also specify app dependencies where the applications must be installed before your Win32 app can be installed. Also, in the scope tag section, you shall get an option to Configure scope tags for this Windows App.
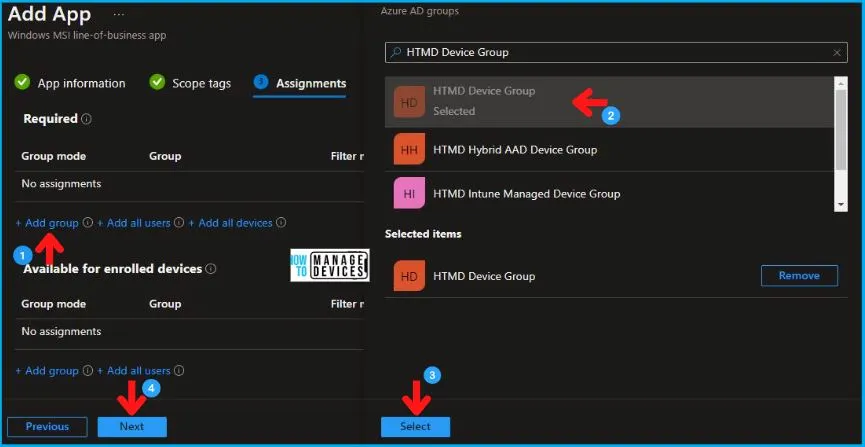
Under Assignments, In Included groups, click Add groups and then choose Select groups to include one or more groups to which you want to deploy the Windows Update. Click Next to continue.
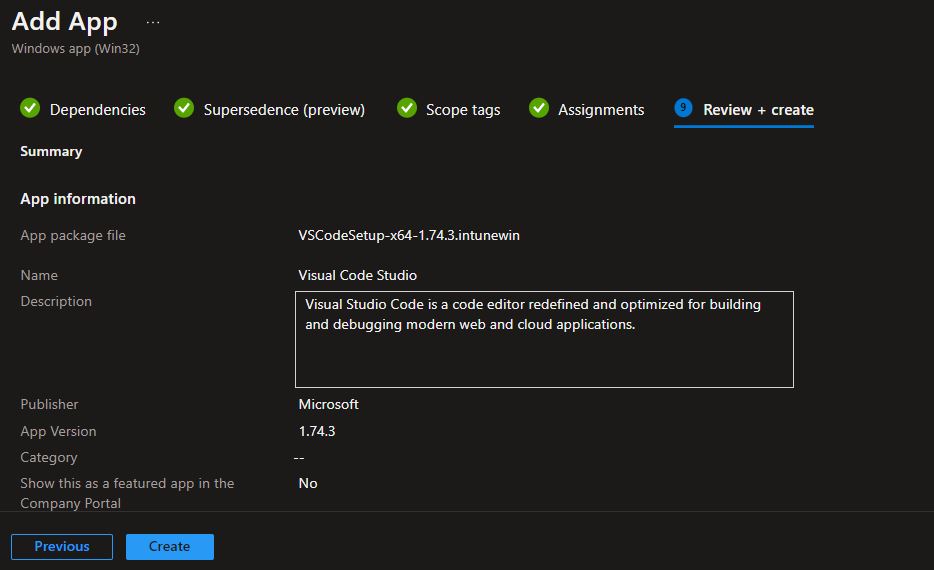
Now you will see all the details you provided during the application creation process. Review your settings and select Create to add the app to Intune.
Once you proceed to create, you will see the status Uploading is in progress, If you are thinking about how much time will it take to complete the upload? It depends on the size of the application and the speed of internet connectivity.
Please wait some time to complete the upload process, and you can check the progress by clicking on the Notification icon. Once the intune package is uploaded and finished, you will get the status “Upload finished.”
- Intune Company Portal App for Windows 11 Android | Install and Uninstall
- 32 Privacy Settings for Windows 11 | 99 Intune Privacy Settings Policies
Monitor Deployment
Intune will deliver targeted applications to your groups when the devices check in with the service that applies to them.
To monitor the application installation from Intune Portal, select the application, and here you can check the device and user check-in status. If you click on Device install status, additional details are displayed.
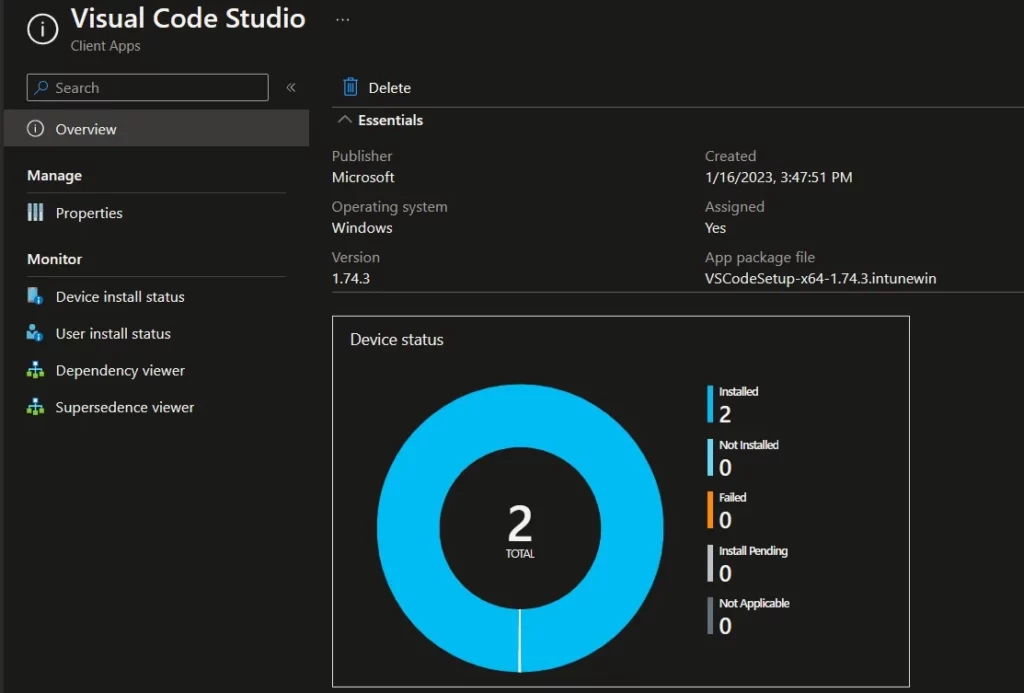
On the client machine, In the Company Portal, You can click on the apps to track the details and check the progress. The application Visual Studio Code was successfully installed.
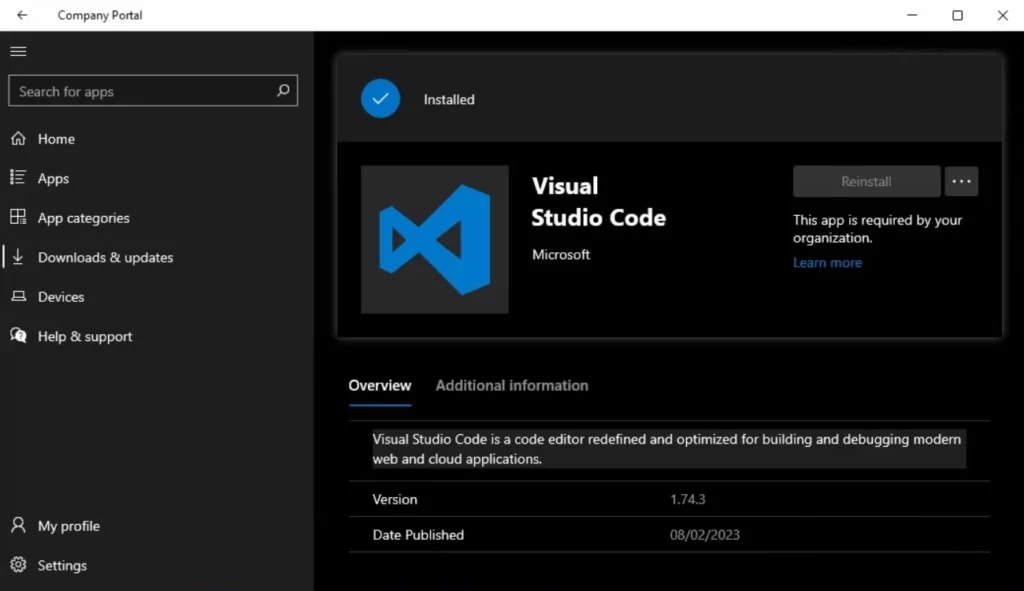
Track Visual Studio Code Installation
Once the application installation starts, the “Detection rule” will be evaluated. Checks were performed against the rules configured, and the app “Install command” will be triggered.
You can track the details logged at IntuneManagementExtension.log located C:\ProgramData\Microsoft\IntuneManagementExtension\Log. You track the application activity in client devices. You can get through an excellent article on Intune Win32 App Issues Troubleshooting for more details.
Where is the folder where Intune downloads the applications before it installs on a Windows device? Intune cache folder location, Below are the 3 Intune Management Extension Agent working folders.
- Incoming
- Staging
- Staged
Let’s learn Intune Win32 App Troubleshooting Client-Side Process Flow. You can look at the Level 3 deep dive troubleshooting Intune Management Extension (IME) Level 3 Troubleshooting Guide.
Author
Abhinav Rana is working as an SCCM Admin. He loves to help the community by sharing his knowledge. He is a B.Tech graduate in Information Technology.

Hi Anoop,
Thanks for the detailed steps to install VS Code on Windows, I have question how we can update the VS Code through MS Intune?
Detection method will detect for the file present on the device, with this how we can push update from MS Intune?
Also is there any way to install the .exe software setup file, where .MSI is not available and manual detection rule is not available (like SourceTree software installation)
how update VS Code version from MS Intune?
Or just select Microsoft Store and deploy vscode from there ))))))) thousand times easier.
thousand times easier, yeah, as long as you don’t have system scope installed VS Code 😉
About update VS Code, just use MSI UID code with version check.
Cheers
Do you have any article for VS auto update for MAC device in Intune?