Nakivo Hyper-V Backup

Walk Through of NAKIVO Hyper-V Backup – Installation

Walkthrough of NAKIVO Hyper-V Backup—Installation. I have a Hyper-V server 2016 with SCCM, AD servers, and Windows 10 virtual machines. In this post, I will share my experience installing the NAKIVO Hyper-V backup solution.

NAKIVO Backup & Replication supports Microsoft Hyper-V 2016, 2012(R2), and 2012 hypervisors. The installation was straightforward and took less than 5 minutes for me.

Download NAKIVO backup and replication solution from https://goo.gl/3Tb7D2

NAKIVO Backup & Replication provides integration with Microsoft Active Directory. You can easily map Active Directory groups to NAKIVO Backup & Replication user roles.

I plan to cover the BACKUP and RESTORE guide in future blog posts. IE is missing from the recommended browsers list of NAKIVO. I don’t know the exact reason for this. In this post, I will cover the following.

Walk Through of NAKIVO Hyper-V Backup – Installation

Prerequisites for NAKIVO Microsoft Hyper-V backup How to Install NAKIVO Backup and Replication Solution What is a Transporter? NAKIVO troubleshooting Logs How to Perform NAKIVO Configurations How to Create a New Backup Repository for NAKIVO Hyper-V Video Tutorial of NAKIVO Backup & Replication Installation.

Prerequisites for NAKIVO Microsoft Hyper-V backup

Let’s discuss the Prerequisites for NAKIVO Microsoft Hyper-V backup. The list below provides more details.

  • Full administrative permissions are required
  • Default administrative shares must be enabled on Hyper-V hosts
  • The “File server” role must be enabled on Hyper-V hosts
  • The SMB v1 protocol should be allowed on Hyper-V hosts

NAKIVO Backup & Replication can be installed on the following operating systems.

  • Windows Server 2012 R2 Standard (x64)
  • Windows Server 2012 Standard (x64)
  • Windows Server 2008 R2 Standard (x64)
  • Windows 10 Professional (x64)
  • Windows 8 Professional (x64)
  • Windows 7 Professional (x64)
NAKIVO Backup & Replication can be accessed from the following Web browsers
Google Chrome v26 or later
Mozilla Firefox v21 or later
Walk Through of NAKIVO Hyper-V Backup – Installation – Table 1

How to Install NAKIVO Backup and Replication Solution

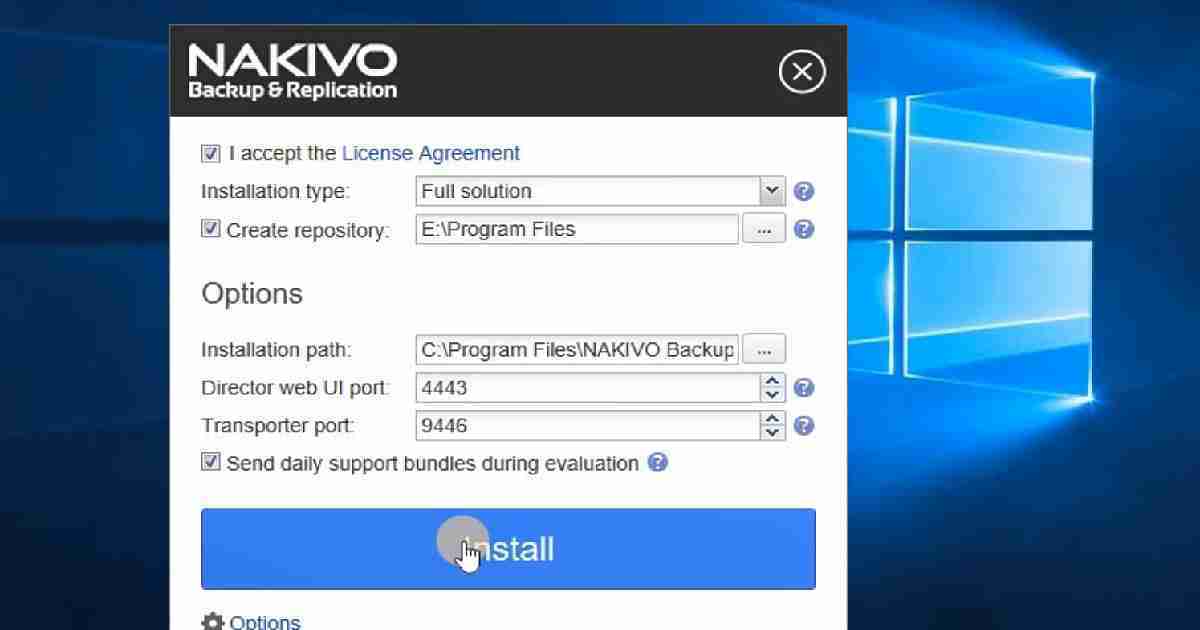
NAKIVO can be installed on Windows, Linux, and NAS. To install NAKIVO Backup & Replication on the Windows platform, run the NAKIVO Backup & Replication installer and click Install. This is explained in the video tutorial here.

NAKIVO has three main components: Director, Transporter, and Backup Repository. When you select FULL Installation, all three parts will automatically be installed. I chose the following configurations for installation.

  • Installation Type:        Full solution
  • Create Repository:        E:\Program Files
  • Installation Path:        C:\Program Files\NAKIVO Backup & Replication
  • Director Web UI port:    4443
  • Transporter Port:         9446
Walk Through of NAKIVO Hyper-V Backup - Installation - Fig.1
Walk Through of NAKIVO Hyper-V Backup – Installation – Fig.1

What is a NAKIVO Transporter?

A Transporter is a service running backup, replication, and recovery tasks. These components are also responsible for managing backup repositories. 

Do I Need a Transporter? Your installation already includes one transporter, the “Onboard transporter.” However, if you run a large environment or have multiple sites, you may need additional transporters.

NAKIVO Logs Location for Troubleshooting

C:\Program Files\NAKIVO Backup & Replication\logs\0

How to Perform NAKIVO Configurations

The configuration steps are General, Inventory, Transporters, Repositories, Events, and Licensing. From my perspective, inventory and backup repository configurations are the most important settings.

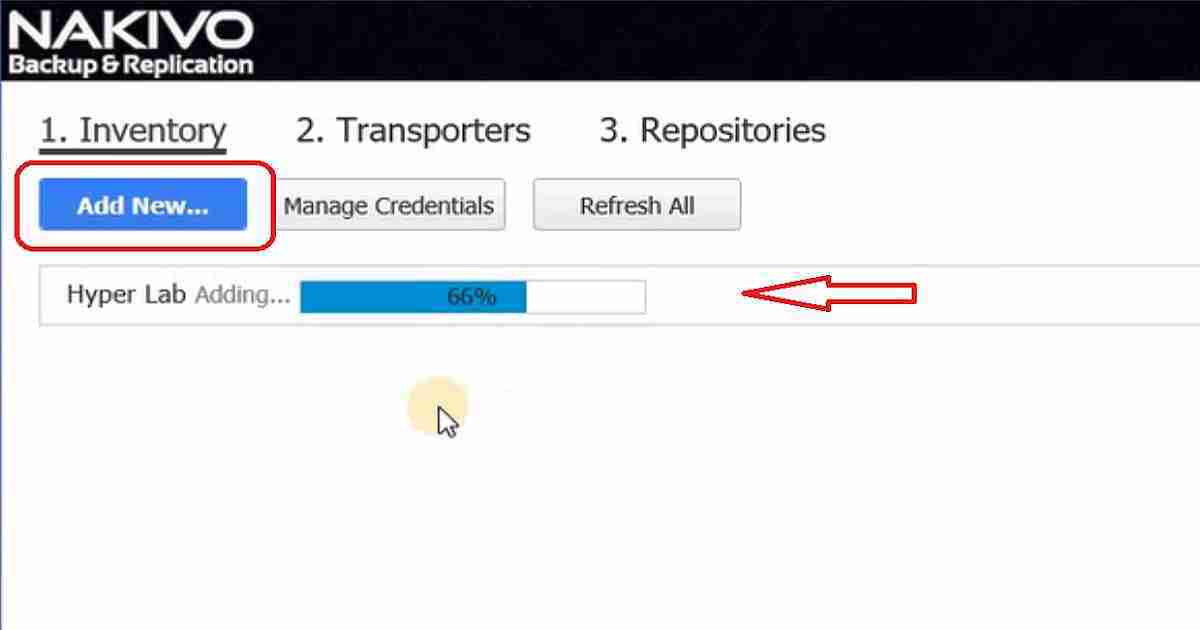
Inventory is the place where you add the hypervisor connectivity details and inventory of that infrastructure.

Walk Through of NAKIVO Hyper-V Backup - Installation - Fig.2
Walk Through of NAKIVO Hyper-V Backup – Installation – Fig.2

I tested the NAKIVO inventory option by Adding Hyper-V Servers to connect my SCCM Hyper-V lab infrastructure with NAKIVO. 

Display Name: Type: select whether you want to add a standalone Hyper-V server Hostname or IP: Specify the hostname or IP address of the Hyper-V server Username and Password: Specify credentials of the Hyper-V server that you want to add to the inventory. The credentials you specify should have full administrative privileges to the Hyper-V server WS MAN port: 5986 – Specify the port number for WS MAN.

How to Create a New Backup Repository for NAKIVO Hyper-V

To create a new Backup Repository, follow the steps below

  1. Click Configuration in the upper right corner of the product.
  2. Go to the Repositories tab and click Add Backup Repository
  3. Click Create a new backup repository
  4. Fill out the fields as described below:
    Name, the target (Assigned transporter), Type (forever incremental, Incremental with full backups), Location (Local folder on assigned transporter), etc.
  5. To specify advanced options, click More Options and perform the following options Storage Savings & Encryption
Walk Through of NAKIVO Hyper-V Backup – Installation – Video 1

Reference

https://helpcenter.nakivo.com/

We are on WhatsApp now. To get the latest step-by-step guides, news, and updates, Join our Channel. Click here. HTMD WhatsApp.

Author

Anoop C Nair is Microsoft MVP from 2015 onwards for consecutive 10 years! He is a Workplace Solution Architect with more than 22+ years of experience in Workplace technologies. He is a Blogger, Speaker, and Local User Group Community leader. His main focus is on Device Management technologies like SCCM and Intune. He writes about technologies like Intune, SCCM, Windows, Cloud PC, Windows, Entra, Microsoft Security, Career etc…
Video Guide Windows Server 2016 Backup Solution from Veeam 2

Video Guide Windows Server 2016 Backup Solution from Veeam

Let’s discuss the Video Guide Windows Server 2016 Backup Solution from Veeam. Veeam offers a backup and restore solution for Microsoft Windows devices.

Veeam Agent for Microsoft Windows can take servers, desktops, and laptop backups. Previously, this solution was known as “Veeam Endpoint Backup“.

This post will show a Video Guide on Veeam’s Windows Server 2016 Backup Solution. The next three posts will cover Veeam’s Windows endpoint backup solution.

Under the post-Veeam Backup for the O365 v4 Community Version Upgrade Guide, you will find all the details of Veeam Backup for the O365 v4 Community Version. Veeam released the latest version of Veeam Backup for Microsoft Office 365 with many enhancements.

  1. Windows 10 backup and recovery Software from Veeam
  2. Video Guide Windows Server 2016 Backup Solution from Veeam

Video Guide Windows Server 2016 File & Volume Recovery Solution from Veeam

Veeam has a free backup and restore solution for Microsoft Windows devices. Veeam Agent for Microsoft Windows can take backups of servers, desktops and laptops. Previously, this solution was known as “Veeam Endpoint Backup“.

Video Guide Windows Server 2016 Backup Solution from Veeam – Video 1

Video Guide Windows Server 2016 Backup Solution from Veeam

Veeam Vanguard is a community program by Veeam, and I’m honoured and privileged to be part of this exciting tech community.

Video Guide Windows Server 2016 Backup Solution from Veeam
Installation of Veeam Agent on Microsoft Windows Server 2016
Create Recovery Media
Taking Backup of Server 2016 as per schedule
Video Guide Windows Server 2016 Backup Solution from Veeam – Table 1
Video Guide Windows Server 2016 Backup Solution from Veeam - Fig.1
Video Guide Windows Server 2016 Backup Solution from Veeam – Fig.1

Install Veeam Agent for Windows on Server 2016

Veeam Agent for Microsoft Windows is a data protection and disaster recovery solution for physical and virtual machines. It can protect different types of computers and devices, including desktops, laptops, and tablets. The solution can be installed on any computer that runs the following OS.

  • Microsoft Windows 7 SP1 or later
  • Microsoft Windows 2008 R2 SP1 or later
Video Guide Windows Server 2016 Backup Solution from Veeam - Fig.2
Video Guide Windows Server 2016 Backup Solution from Veeam – Fig.2

The installation of the Veeam Agent for Windows is straightforward. It will automatically take care of installing prerequisites like SQL Express, etc. After the installation, you will be able to see.

  • Veeam Agent for Microsoft Windows Service
  • Veeam Agent Tray
  • SQL Server 2012 Express LocalDB

How to Create Recovery Media for Server 2016

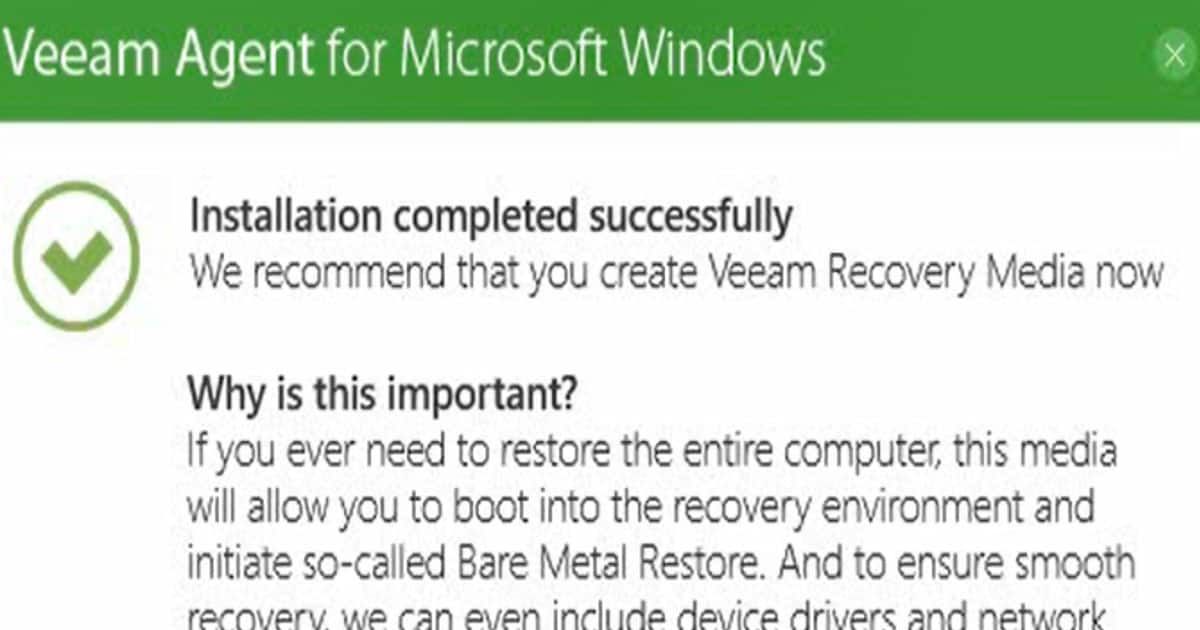
Once the Veeam Agent for Windows is installed, the first step is to create a Veeam Recovery media. Veeam Agent for Microsoft Windows lets us create a Veeam Recovery Media, which is nothing but a recovery image of your computer.

You can boot your computer or server with recovery media, fix the OS system errors on your server 2016, or restore data from the backup. Microsoft Windows RE (Recovery Environment) automatically reboots after 72 hours of continuous use. All data that has not been saved before reboot will be lost.

Video Guide Windows Server 2016 Backup Solution from Veeam - Fig.3
Video Guide Windows Server 2016 Backup Solution from Veeam – Fig.3

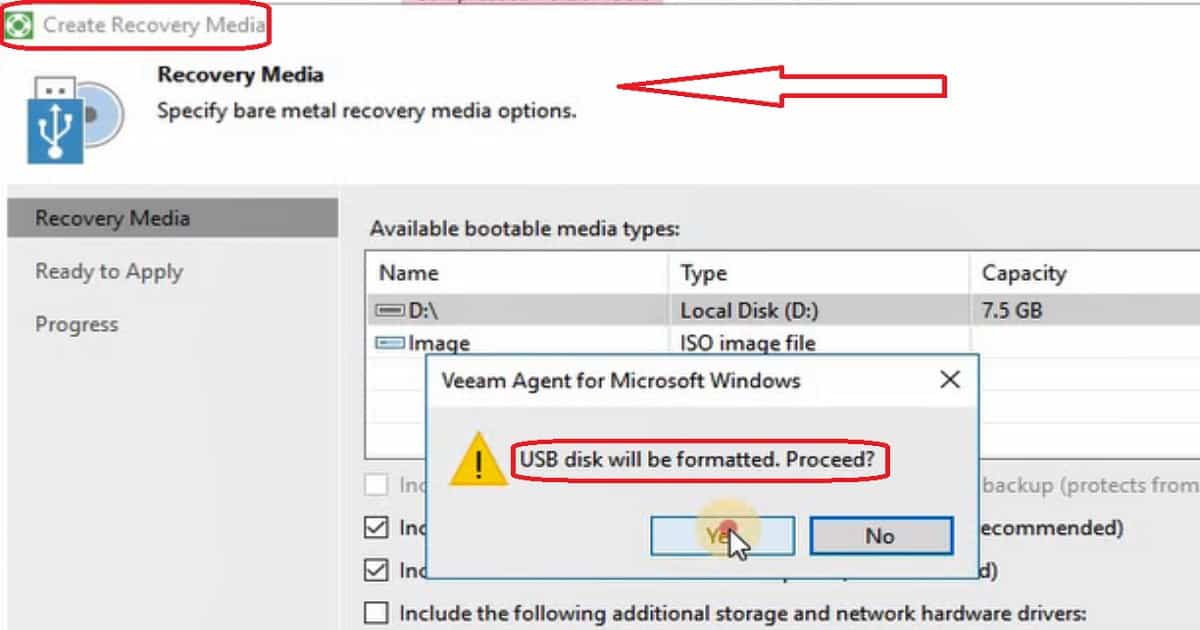
You can launch the recovery media creation wizard from the Veeam Agent for the Windows home page. As the video tutorial shows, media creation is straightforward.

It took nearly 9 minutes to create a recovery media on my server 2016. The wizard will prompt you to format the USB during the media creation. At the high level, the following are the tasks.

  • Mounting Recovery Environment Image
  • Copy Veeam Recovery Environment files
  • Adding .NET framework
  • Adding system drivers
  • Copying boot files
  • Unmounting Recovery Image
  • Preparing USB disk
  • Copying data to USB disk
  • Recovery media has been created

Take Full Backup of Server 2016 using Veeam Agent for Windows

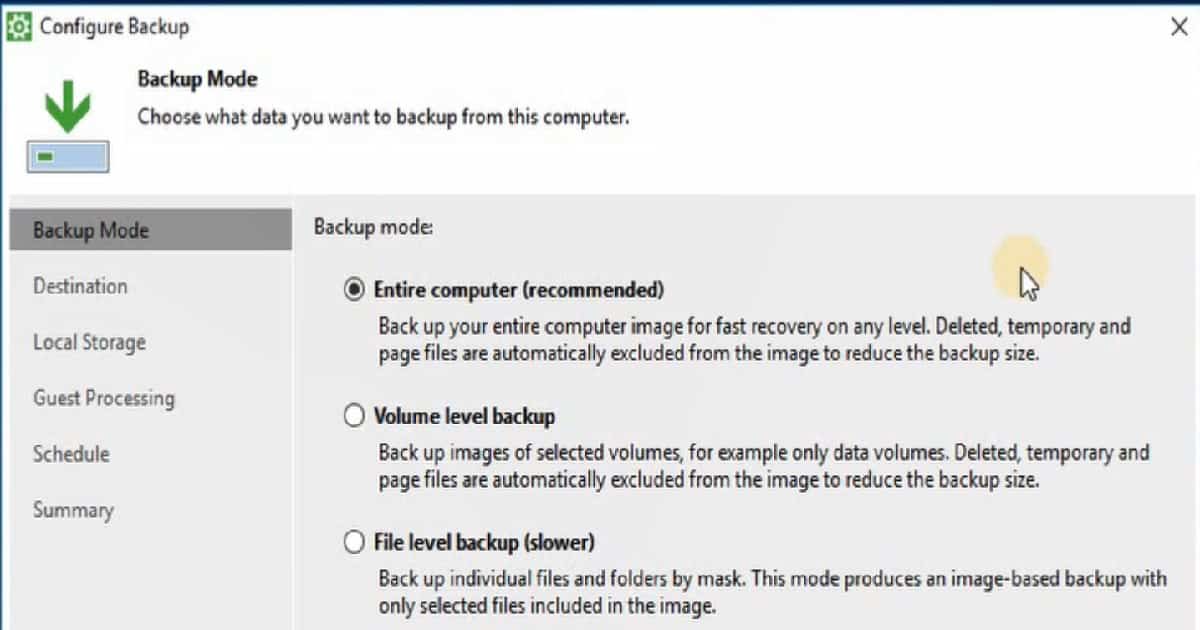
Veeam Agent for Windows offers three backup modes: “Entire computer,” “Volume-level backup,” and “File-Level backup.” Veeam Agent for Windows servers supports five backup options listed below.

  • Removable storage device
  • Local computer drive
  • Network shared folder
  • A Veeam backup server manages the backup repository
  • Cloud repository managed by a Veeam Cloud Connect service provider
Video Guide Windows Server 2016 Backup Solution from Veeam - Fig.4
Video Guide Windows Server 2016 Backup Solution from Veeam – Fig.4

“Configure backup” is the Veeam agent’s option to start configuring and scheduling the backup for the Windows server. The recommended option in the Veeam Agent for Windows is backing up your entire server. This helps with fast recovery on any level.

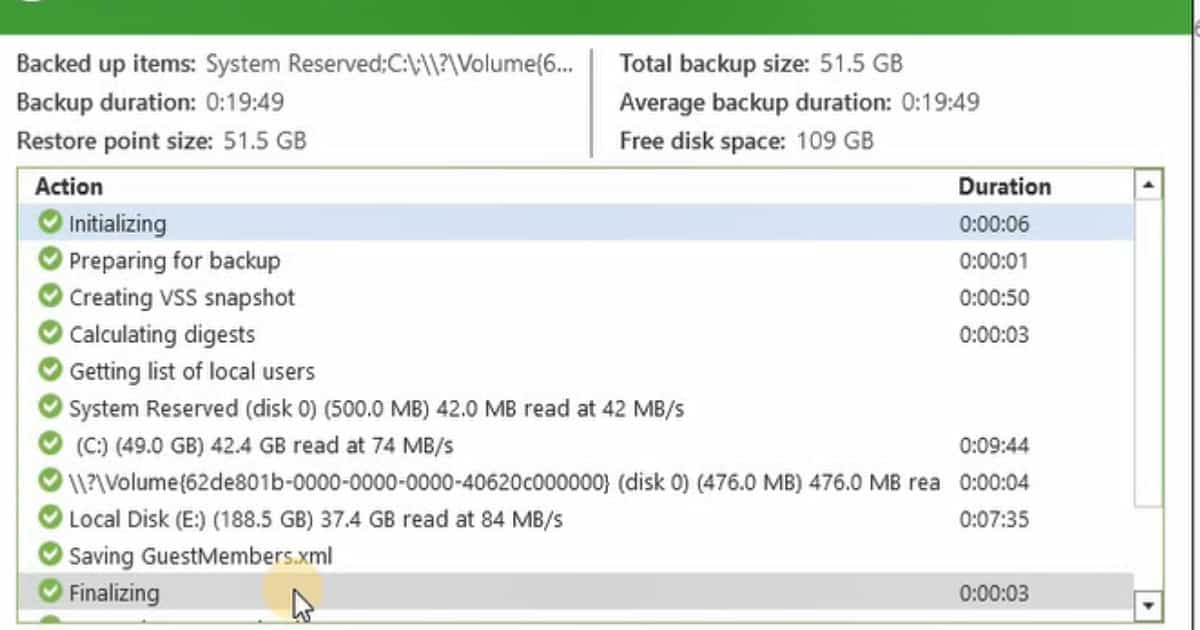
I selected the Entire Computer backup option for my server 2016. I used the external hard disk (local storage) to back up the server in 2016. This is my Hyper-V server in my lab. The video tutorial here provides more details. The following are the tasks that I could see.

  • Initializing
  • Preparing for backup
  • Creating VSS snapshot
  • Calculating digests
  • Getting a list of local users
  • System Reserved (disk 0) (500.0 MB) 42.0 MB read at 42 MB/s
  • (C:)(49.0 GB)42.4 GB read at 74 MB/s
  • Local Disk (E:) (188.5 GB) 37.4 GB read at 84 MB/s
  • Saving GuestMembers.xml
  • Finalizing
  • Truncating transaction logs
  • Truncating SQL server transaction logs
  • Processing finished
Video Guide Windows Server 2016 Backup Solution from Veeam - Fig.5
Video Guide Windows Server 2016 Backup Solution from Veeam – Fig.5

Resources

Veeam Agent for Microsoft Windows – User Guide

We are on WhatsApp now. To get the latest step-by-step guides, news, and updates, Join our Channel. Click here. HTMD WhatsApp.

Author

Anoop C Nair is Microsoft MVP! He is a Device Management Admin with more than 20 years of experience (calculation done in 2021) in IT. He is a Blogger, Speaker, and Local User Group HTMD Community leader. His main focus is on Device Management technologies like SCCM 2012, Current Branch, and Intune. He writes about ConfigMgr, Windows 11, Windows 10, Azure AD, Microsoft Intune, Windows 365, AVD, etc.

How to Take Backup and Restore Office 365 Mailboxes Veeam 3

How to Take Backup and Restore Office 365 Mailboxes Veeam

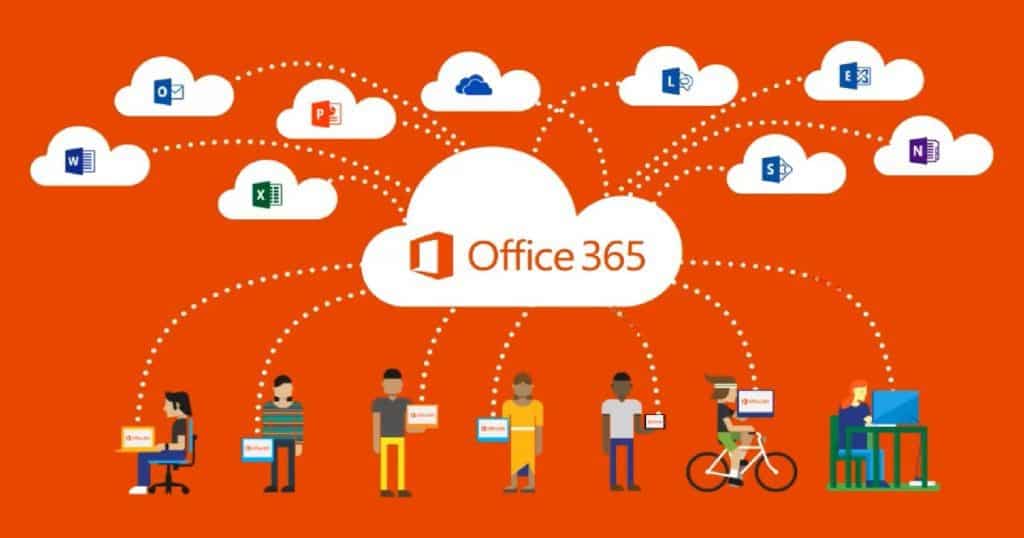
Let’s discuss How to Take Backup and Restore Office 365 Mailboxes Veeam. Microsoft Office 365 is a SaaS solution used by many organizations worldwide. As of the last report, there were 24.9 million total subscribers, confirming that many people use Office 365 to help manage their businesses.

Do we need a backup for a SaaS solution like Office 365? I think so. This post will show how to Backup and Restore Office 365 Mailboxes.

Veeam Backup for Microsoft Office 365 is a solution that stores mailbox items from Office 365 Online organization to an offline backup repository. Office 365 admin can restore single or multiple emails using Veeam Explorer.

These items (mailboxes, folders, messages, tasks, contacts, and so on) can be restored via Veeam Explorer. We can get a FREE temporary license for Veeam Backup for Office 365.

Backup and Restore Office 365 Mailboxes

This temporary license is available for the first six months. Recovered e-mail can be saved as a file, e-mailed as an attachment, or exported as a PST file. The Content of this post is explained below.

  • Do We Require Office 365 Backup?
  • How to Install Veeam Backup Office 365
  • Connect to Office 365 with Veeam Backup?
  • Create Backup Job for Office 365 Backup
  • Advanced Search Option – Veeam Explorer
  • How to Restore Deleted Office 365 Mails?
  • Veeam Backup Office 365 Troubleshooting
  • Veeam Backup Office 365 PowerShell Commands
How to Take Backup and Restore Office 365 Mailboxes Veeam - Fig.1
How to Take Backup and Restore Office 365 Mailboxes Veeam – Fig.1

Do We Require Office 365 Backup?

What happens if the user accidentally deletes data from Office 365 mailboxes? The Office 365 service provides several options for restoring Deleted items, and manual recovery is also possible.

The following are Microsoft’s retention policies. However, I don’t think Microsoft provides granularity in backing up and recovering emails. Veeam Backup for Office 365 has more granular loads.

Veeam Backup for Microsoft Office 365 provides recovery options. Recovered e-mail can be saved as a file, emailed as an attachment, or exported as a PST file. I don’t think Microsoft provides all these options.

How to Install Veeam Backup Office 365

You can download Veeam Backup for Microsoft Office 365 from here. It contains 2 MSI files: VeeamBackupOffice365_1.5.0.1099.MSI and VeeamExplorerExchange_9.6.0.1099.MSI. We need to install VeeamBackupOffice365 and then VeeamExplorerExchange.

  • The installation is straightforward, and there is no prerequisite when installing these on Windows Server 2016.
  • The video tutorial here provides more details.
  • Once Veeam Backup for Microsoft Office 365, You have three shortcuts on your Windows Server 2016.
  • Veeam Backup for Microsoft Office 365
  • Veeam Explorer for Microsoft Exchange
  • Veeam Backup for Microsoft Office 365 connects to

Connect to Office 365 with Veeam Backup?

In the background, Veeam Backup for Microsoft Office 365 uses the Power-Shell command to connect to Office 365. To join Office 365 from Veeam Backup, Click the Add Organization” button. There are 3 Organization deployment types available for Veeam Backup for Microsoft Office 365.

Connect to Office 365 with Veeam Backup
Microsoft Office 365
Hybrid Deployment
On-Prem Microsoft Exchange
How to Take Backup and Restore Office 365 Mailboxes Veeam – Table 1

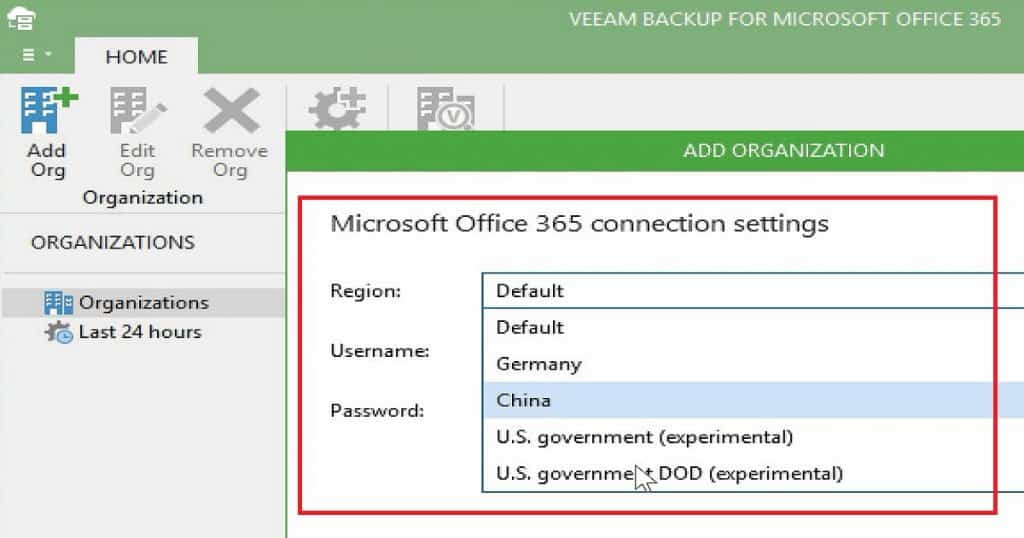
I selected Microsoft Office 365 to add my organization’s mailbox to the Veeam backup solution. The “Microsoft Office 365 connection settings” page has multiple region options, such as Default, China, US Govt, and US Govt-DOD.

Enter the Office 365 admin username and password to complete the ADD ORGANIZATION wizard. You can see more details in the video tutorial here.

How to Take Backup and Restore Office 365 Mailboxes Veeam - Fig.2
How to Take Backup and Restore Office 365 Mailboxes Veeam – Fig.2

Following are the Veeam Backup for Office 365 Connection Parameters.

  • Connect to EWS
  • Connect to Power-Shell
  • Check View-Only Configuration Role
  • Check View-Only Recipients Role
  • Check Application Impersonation Role
  • Check Role Management Role
  • Check Organization Customization
  • Check Organization Configuration Role
  • Enable Organization Customization

Create Backup Job for Office 365 Backup

Click the Backup button to create and schedule a backup job for Office 365 mailboxes. The backup job wizard allows us to select all individual mailboxes. I have chosen one Office 365 mailbox for the backup job.

We must also select the Backup proxy and repository as part of the backup job wizard. Veeam Backup for Microsoft Office 365 has granular schedule options. This backup job is a recurring incremental backup task.

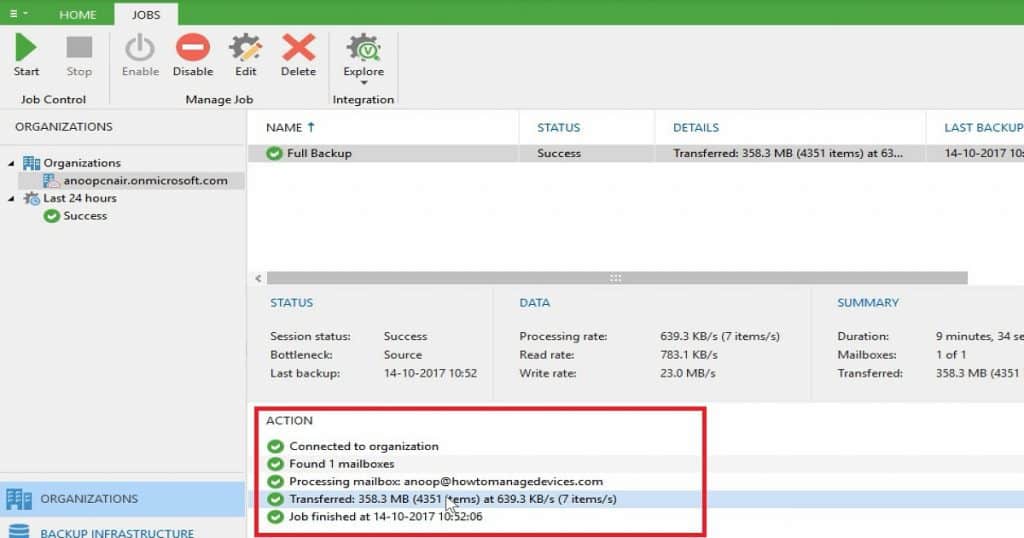
The backup job GUI provides an excellent experience. It gives all LIVE details in the Veeam Backup for Office 365 GUI. What was the transfer rate of the backup job, etc.? The backup job status page has three segregations: 1. Status, 2. Data, and  3. Summary.

How to Take Backup and Restore Office 365 Mailboxes Veeam - Fig.3
How to Take Backup and Restore Office 365 Mailboxes Veeam – Fig.3

Veeam Backup Job has the Following Actions

The Veeam Backup Job has the following actions.

  • Created Backup Job
  • Connected to organization
  • Found One mailbox
  • Processing mailbox:Anoop@devices.com
  • Transferred:400 MB (4300 items) at 639.3 KB/s (7 items/s)
  • Job finished at 14-10-2017 10:52:00

Advanced Search Option – Veeam Explorer

Veeam Explorer for Microsoft Exchange provides numerous granular options with Advanced Search mailboxes. Using Veeam Explorer, we can search mailboxes with advanced find options. Veeam Explorer offers many search criteria.

  • Category
  • Field
  • Condition
  • Value

How to Restore Deleted Office 365 Mails?

Recover the Office 365 mailboxes and individual emails. Veeam Explorer provides options for exporting the Office 365 mailbox to the PST file. Also, there are other options to save personal mail to “.MSG” files. You can also send recovered emails to another email id. You can see more details in the video tutorial here.

  • Following are the options recovery options available in Veeam Explorer
  • Open
  • Restore to Mailbox anoop@devices.com
  • restore to….
  • Export to Desktop\Inbox.pst
  • Export to .pst file
  • Save to Desktop
  • Save to .msg file
  • Send to anu@devices.com
  • Send to…

Veeam Backup Office 365 Troubleshooting

C:\ProgramData\Veeam\Backup365\Logs is the place where you can find the log files of Veeam Backup for Microsoft Office 365. Veeam.Archiver.Proxy_2017_10_14_10_31_41.log file contains the details about the Database connectivity. It also includes connectivity errors.

  • 14-10-2017 10:31:41 5 (2904) Loading ESE library: C:\Windows\system32\esent.dll…
  • 14-10-2017 10:31:41 5 (2904) Module file version: 10.0.14393.0 (rs1_release.160715-1616)
  • 14-10-2017 10:31:41 5 (2904) Resolving DLL entry points…
  • 14-10-2017 10:31:41 5 (2904) Setting a maximum number of instances to 1024…
  • 14-10-2017 10:31:41 5 (2904) Creating ESE instance VEEAM_ARCHIVER_PROXY_9333c395-7a2b-43da-b776-295b574b1099
  • 14-10-2017 10:31:41 5 (2904) Setting instance parameter MaxVerPages to 1073741824…
  • 14-10-2017 10:31:41 5 (2904) Setting instance parameter MaxOpenTables to 15000…
  • 14-10-2017 10:31:41 5 (2904) Setting instance parameter MaxSessions to 1000…
  • 14-10-2017 10:31:41 5 (2904) Initializing ESE instance…
  • 14-10-2017 10:31:42 5 (2904) Setting ESE maximum cache size to 2147248128 bytes…
  • 14-10-2017 10:31:42 5 (2904) Creating database: C:\ProgramData\Veeam\Backup365\ProxyDb\config.edb…
  • 14-10-2017 10:31:42 5 (2904) Creating database schema…

How can Veeam Backup Office 365 be used in a Programmatic way?

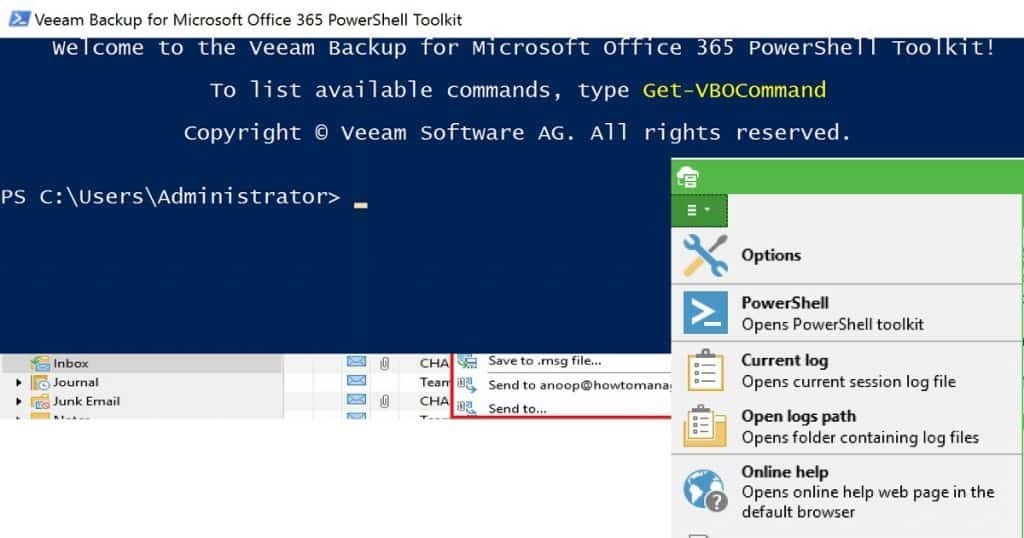
Using Veeam Backup for Microsoft Office 365 PowerShell Toolkit, we can automate the Veeam Backup Microsoft Office 365 tool.

How to Take Backup and Restore Office 365 Mailboxes Veeam - Fig.4
How to Take Backup and Restore Office 365 Mailboxes Veeam – Fig.4

The following are the PowerShell commands that are available for Veeam Backup Office 365 mailboxes.

Name
Add-VBOJob
Add-VBOOrganization
Add-VBOProxy
Add-VBORepository
Connect-VBOServer
Disable-VBOJob
Disconnect-VBOServer
Enable-VBOJob
Get-VBOEmailSettings
Get-VBOFolderExclusions
Get-VBOHistorySettings
Get-VBOJob
Get-VBOJobSession
Get-VBOLicense
Get-VBOOrganization
Get-VBOOrganizationMailbox
Get-VBOProxy
Get-VBORepository
Get-VBORestAPISettings
Get-VBORestorePoint
Install-VBOLicense
New-VBOBackupWindowSettings
New-VBOJobSchedulePolicy
Remove-VBOJob
Remove-VBOOrganization
Remove-VBOProxy
Remove-VBORepository
Set-VBOBackupWindowSettings
Set-VBOEmailSettings
Set-VBOFolderExclusions
Set-VBOHistorySettings
Set-VBOJob
Set-VBOJobSchedulePolicy
Set-VBOOrganization
Set-VBOProxy
Set-VBORepository
Set-VBORestAPISettings
Start-VBOJob
Stop-VBOJob
Sync-VBOEntity
How to Take Backup and Restore Office 365 Mailboxes Veeam – Table 2

We are on WhatsApp now. To get the latest step-by-step guides, news, and updates, Join our Channel. Click here. HTMD WhatsApp.

Author

Anoop C Nair is Microsoft MVP! He is a Device Management Admin with more than 20 years of experience (calculation done in 2021) in IT. He is a Blogger, Speaker, and Local User Group HTMD Community leader. His main focus is on Device Management technologies like SCCM 2012, Current Branch, and Intune. He writes about ConfigMgr, Windows 11, Windows 10, Azure AD, Microsoft Intune, Windows 365, AVD, etc.

Hyper-V Backup Step by Step Installation Configuration Video Guide Altaro Backup Guide 4

Hyper-V Backup Step by Step Installation Configuration Video Guide Altaro Backup Guide

Let’s learn Hyper-V Backup Step-by-Step Installation Configuration Video Guide Altaro Backup Guide. This post will show the details of the Hyper-V backup step-by-step installation and configuration guide. I have to build a hyper-v server 2016 with three VMs.

This is my new SCCM CB lab, and Altaro VM backup has been installed and configured on that server to take backup of my hyper-v VMs.

A future blog post will cover the restoration process of Hyper-v VMs from Altaro VM Backup. This blog post will cover the installation, configuration, VM backup, backup retention, and VM backup health check.

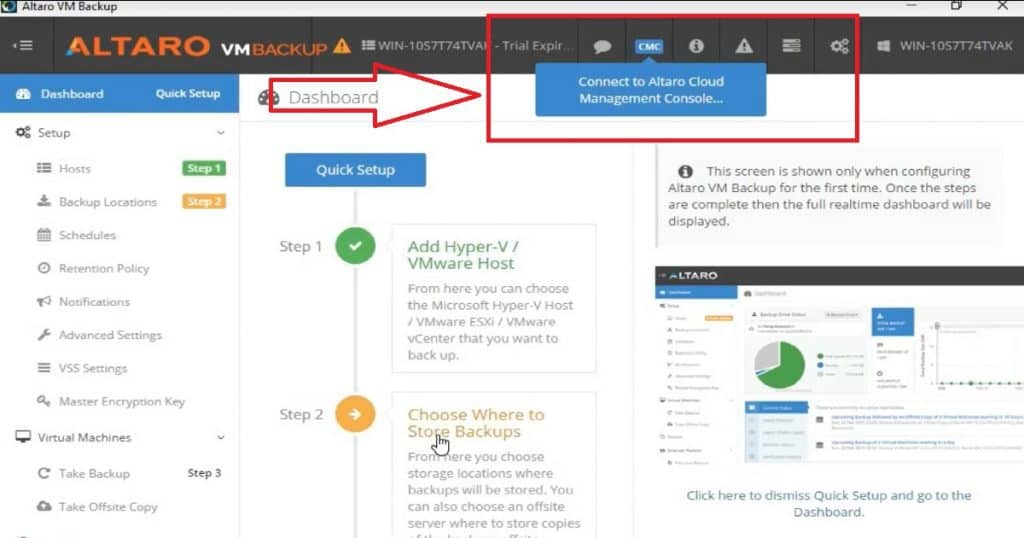
Recently, Altaro released Altaro VM Backup v7 with vSphere 6.5 and Windows Server 2016 support, concurrency update, and the new Cloud Management Console; more details. They have included other features into the latest Altaro VM backup v7 boot VM from Backup and Augmented Inline Deduplication. The new Unlimited Plus Edition also comes with a new online console.

Hyper-V Backup Step by Step Installation Configuration Video Guide Altaro Backup Guide

This version generally provides considerably increased backup concurrency per Hypervisor. With Altaro’s inline deduplication technology, the user can benefit from huge storage space savings and much better backup speeds.

Hyper-V Backup Step by Step Installation Configuration Video Guide Altaro Backup Guide - Fig.1
Hyper-V Backup Step by Step Installation Configuration Video Guide Altaro Backup Guide – Fig.1

Step1 – Connecting to Hyper-V and Discovering VMS

Hosts—This is the step where the Hyper-V machines were discovered via Altaro VM backup. I have an SCCM infrastructure setup with this Hyper-V lab, so Altaro was able to find the 3 VMs as part of the STEP 1 discovery.

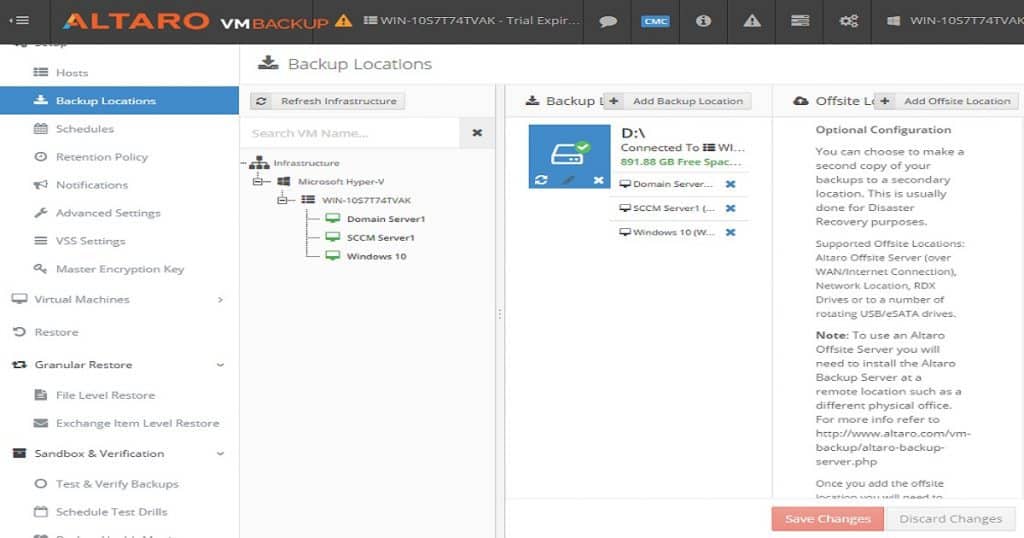
STEP 2 – Setting up Backup locations for VM backups

Backup Locations—This is where we set up a backup location for each Hyper-V VM. You can provide a network location and external hard disk. Setting up a backup site is easy. Altaro backup automatically discovers the external hard disk or USBs connected to your Hyper-V server. You can drag and drop your VMs to a particular backup location, and that is it!

Hyper-V Backup Step by Step Installation Configuration Video Guide Altaro Backup Guide - Fig.2
Hyper-V Backup Step by Step Installation Configuration Video Guide Altaro Backup Guide – Fig.2

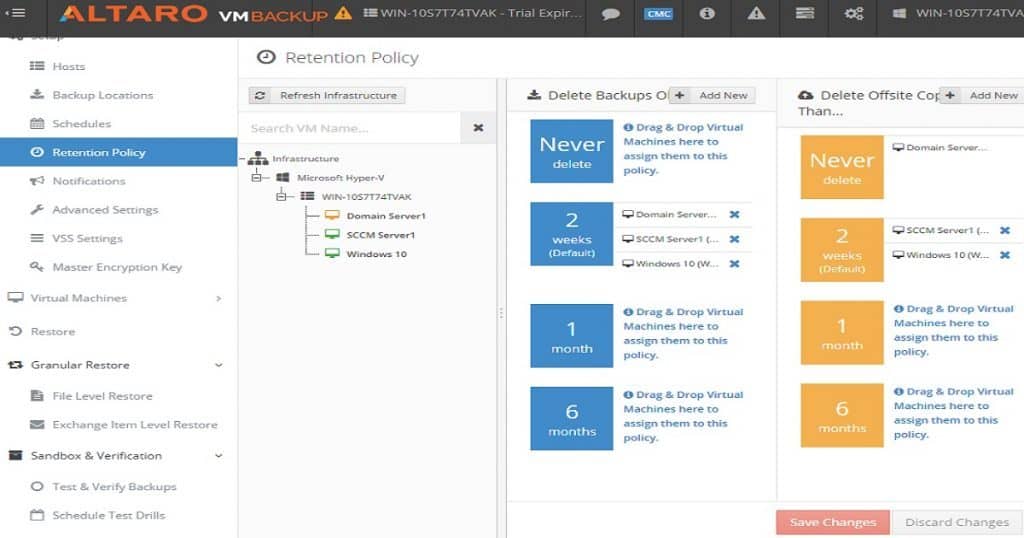
Scheduling backup tasks for Hyper-V VMs via Altaro Hyper-V backup is very easy. You can also set up a retention policy for Hyper-V VM backups according to your organizational requirements.

Advanced settings allow you to customize and skip IOS files from Hyper-V VM backups. If your organization requires encryption while backing up VMs, Altaro has an out-of-the-box setting to configure the encryption of VMs.

STEP 3 – Hyper-V VM Backup, Retention Schedules, and Reports

Step 3 is the last stage I will cover in this post. It involves backing up Hyper-V VMs using the Altaro backup solution. When you click on the “+” symbol on the right side of your VM and click on the “Take Backup” button, Altaro will send the instructions to the hypervisor. You can also schedule the Hyper-V VM backups to automate the backup process.

Hyper-V Backup Step by Step Installation Configuration Video Guide Altaro Backup Guide - Fig.3
Hyper-V Backup Step by Step Installation Configuration Video Guide Altaro Backup Guide – Fig.3

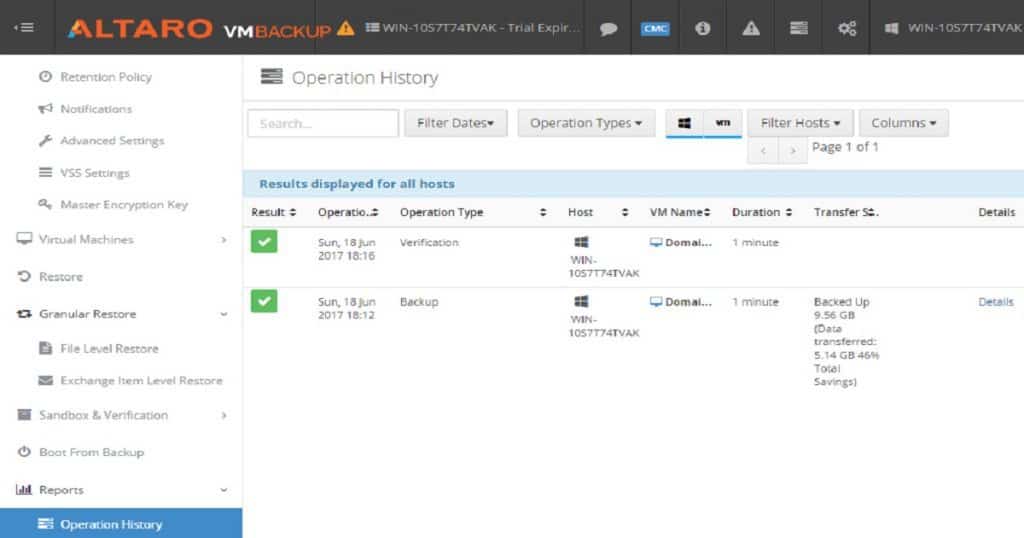
You can also check and verify the backup that has already been completed. The Schedule Test Drills and Test – Verify Backups options automate the validation of Hyper-V VM backups. Some helpful out-of-box reports will provide details about the Altaro Backup jobs completed.

Retention policies help automate deleting old Hyper-V VM backups on a particular schedule. In my testing, this is very useful for better storage management. Watch the video tutorial to learn more about Altaro services and file systems. Eight Altaro Services are running on the Hyper-V server.

Hyper-V Backup Step by Step Installation Configuration Video Guide Altaro Backup Guide - Fig.4
Hyper-V Backup Step by Step Installation Configuration Video Guide Altaro Backup Guide – Fig.4

Conclusion:-

This post covered installation, configuration, VM backup, backup retention, and VM backup health check. In a later post, I will cover the recovery options of the Altaro VM Backup solution in detail. Overall, I had a great user experience with the installation, configuration, and VM backup of Altaro VM Backup. The drag-and-drop options for VMs are my favorite option in Altaro VM backup. Stay tuned for the next post-restore topic.

We are on WhatsApp now. To get the latest step-by-step guides, news, and updates, Join our Channel. Click here. HTMD WhatsApp.

Author

Anoop C Nair is Microsoft MVP! He is a Device Management Admin with more than 20 years of experience (calculation done in 2021) in IT. He is a Blogger, Speaker, and Local User Group HTMD Community leader. His main focus is on Device Management technologies like SCCM 2012, Current Branch, and Intune. He writes about ConfigMgr, Windows 11, Windows 10, Azure AD, Microsoft Intune, Windows 365, AVD, etc.