

Windows 10 Quality Feature Update Policies for Intune Step by Step Guide 1

Windows 10 Quality Feature Update Policies for Intune Step by Step Guide

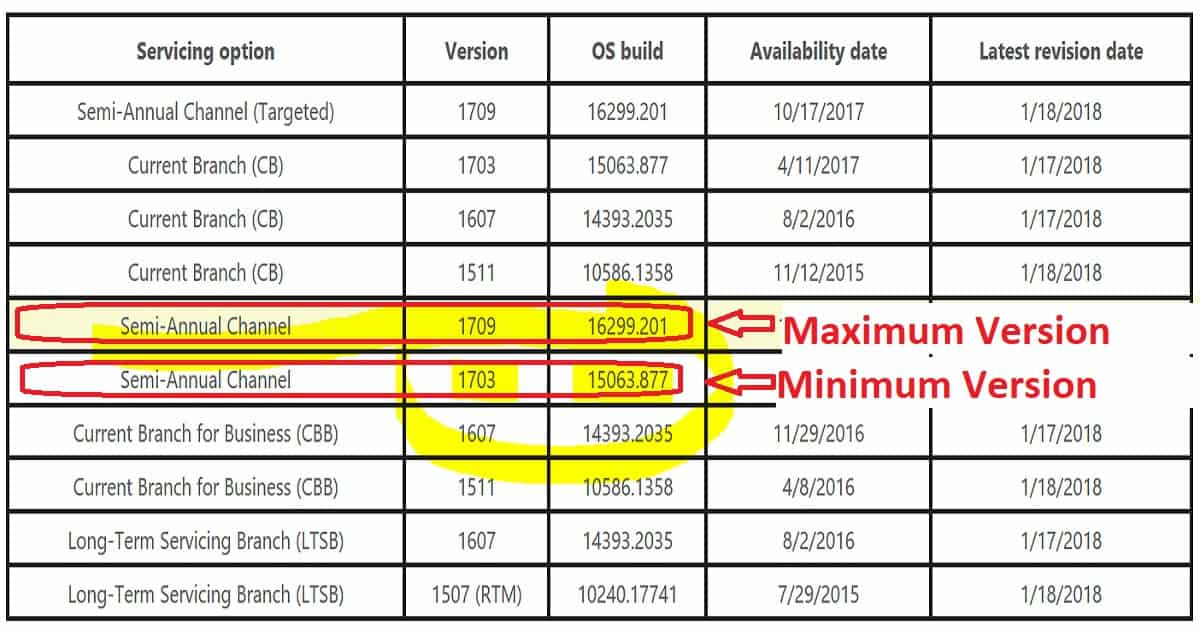
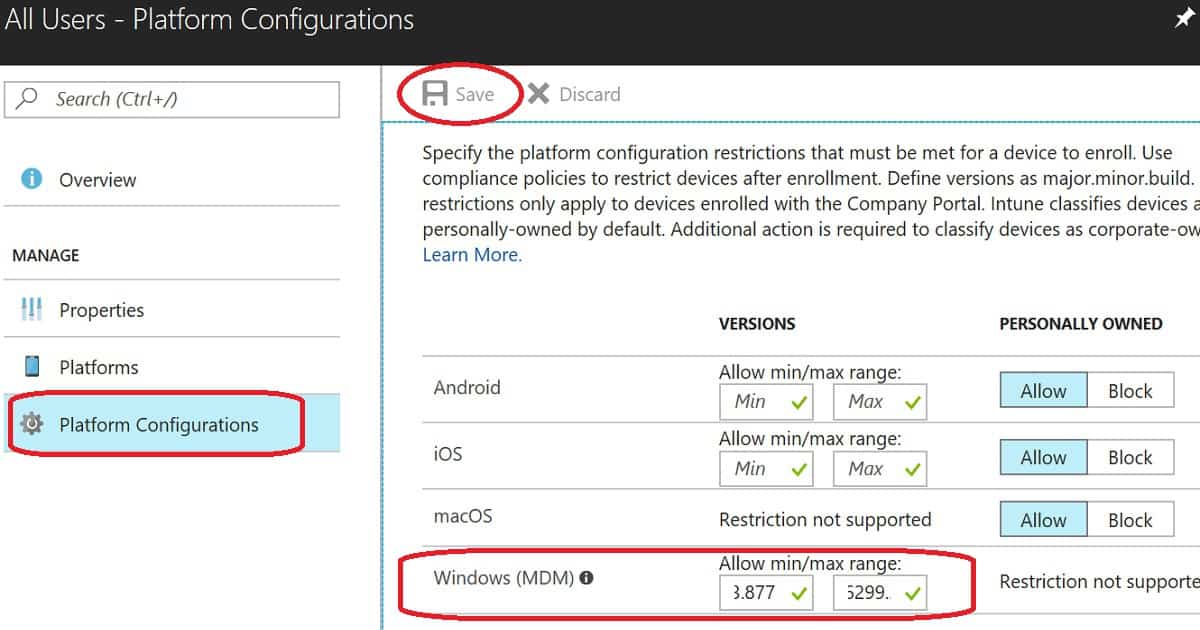
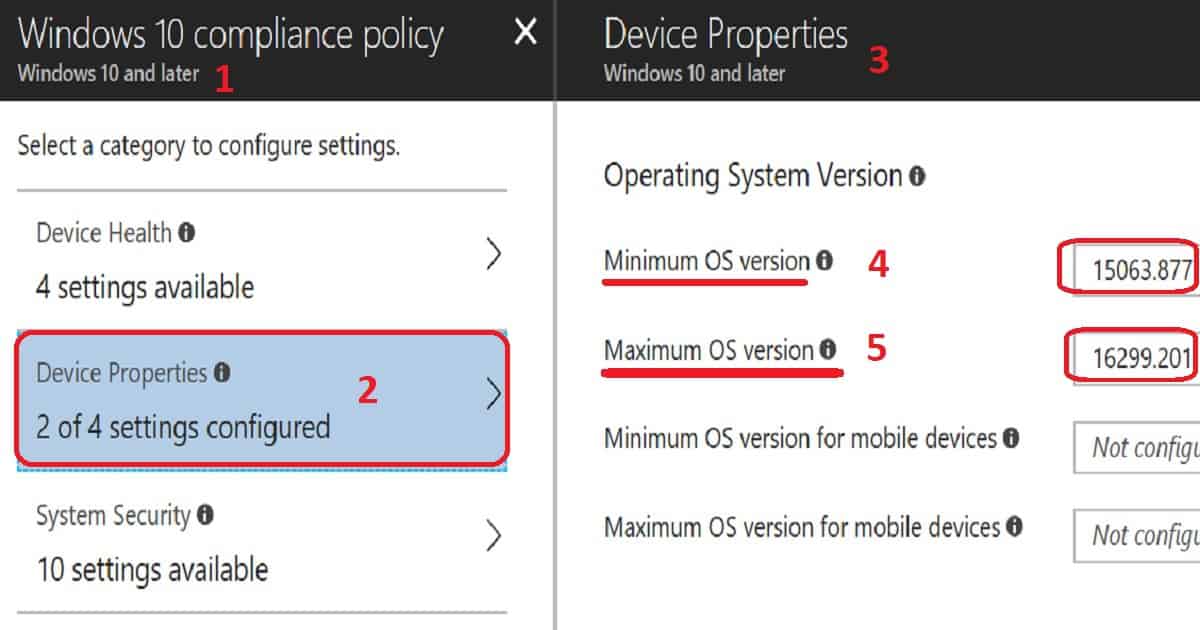
Let’s discuss Windows 10 Quality Feature Update Policies for Intune Step-by-Step Guide. Microsoft released Windows 10 1709, the fall Creators update. Devices in the current branch (Semi-Annual Targeted) should be updated in Settings—Update and Security—Windows Update.

Intune Windows 10 Quality Update Policies. Microsoft Intune manages this Windows 10 device. This post will see “Windows 10 1709 Fall Creators Update Upgrade with Intune Update Rings.”

Many methods exist to upgrade the Windows 10 version to the latest version, 1709. You can upgrade to Windows 10 with an ISO file available in Visual Studio Subscriptions (previously known as MSDN) or VLSC (Volume Licensing Service Center).

If Microsoft Intune manages your devices, a software update policy ring will manage Windows 10 feature updates.

Windows 10 Quality Feature Update Policies for Intune  Step by Step Guide
Windows 10 Quality Feature Update Policies for Intune Step by Step Guide

Another Related Post on Windows 10 Update Rings

Navigate via Microsoft Azure—Microsoft Intune—Software Updates to “Windows 10 Update Rings.” Here, you can create Windows 10 Semi-Annual Targeted and Semi-Annual update rings.

These two update rings in Intune can control your organization’s Windows 10 upgrade behavior. Intune Windows 10 Quality Update Policies.

  • Windows 10 Semi-Annual Targeted Update Ring – All the devices in the Current Branch.
  • Windows 10 Semi-Annual Update Ring – All the devices in the Current Branch for Business
  • FIX CBB Ring Devices are Getting CB Updates Intune Windows 10 Update Rings
  • Windows 10 1709 Fall Creators Update Upgrade with Intune Update Rings
Windows 10 Quality Feature Update Policies for Intune Step by Step Guide - Fig.1
Windows 10 Quality Feature Update Policies for Intune Step by Step Guide – Fig.1

Create Windows 10 Update Rings in Intune?

In my previous posts, I explained the details of the Intune policy, “How to Setup Windows 10 Software Update Policy Rings in Intune Azure Portal.”

Navigate via the Intune console to access Windows 10 Update Rings – Create Update Ring – Settings. We must select the “Servicing Branch” options according to your requirements. Feature update deferral period (days) is another set we want to set up as part of the Create Update Ring policy.

  • For example:- If we set Service Branch = CB and Feature update deferral period (days) = 0 days, then the device will get the Windows 10 1709 updates on the 0 days of the release.
  • As I mentioned in the above paragraph, there are two types of Servicing Branches for Windows 10: Semi-Annual Targeted and Semi-Annual.
  • Select the CB servicing branch (Semi-Annual Targeted) to set the devices for the first wave of deployment of Windows 10 feature upgrades. The latest Windows 10 1709 Fall Creators update is released only for the Semi-Annual Targeted branch.

How Do Windows 10 Update Rings Work?

Windows 10 update rings work flawlessly under the hood. I have not uploaded Windows 10 1709 ISO or files to Intune to deliver the updates to the devices. Intune helps to set up 2 MDM policies in Windows 10 1607 or later devices.

So, Devices, are you getting the Windows 10 feature update binaries from any other Microsoft cloud service? Windows 10 devices are getting these feature update content/binaries from Windows Update for Business (WUfB).

Another essential feature of Windows 10 is Delivery Optimization. Delivery optimization helps to find the binaries from the peer devices. These peer devices could be either from the same network or the internet.

Windows 10 Update Ring MDM Policies?

The following are the two MDM policies that Intune sets on Windows 10 devices. Intune Windows 10 Quality Update Policies.

CB/CBB Options:- MDM for version 1607 and above: MDM for version 1607 and above: ../Vendor/MSFT/Policy/Config/Update/BranchReadinessLevel \Microsoft\PolicyManager\default\Update\BranchReadinessLevel

Deferral Period Days:- MDM for version 1607 and above: ../Vendor/MSFT/Policy/Config/Update/DeferFeatureUpdatesPeriodInDays \Microsoft\PolicyManager\default\Update\DeferFeatureUpdatesPeriodInDays

Windows 10 Upgrade End User Experience

The following video delivers the Windows 10 1709 fall creator update through Windows Update for Business. The next video will give you an end-to-end experience for the Windows 10 1709 fall creators’ upgrade process via Software Update for Business (WUfB).

As you can see in the video, the Windows 10 device is in the CB (Semi-Annual Target) channel and the differed period policy is set to zero days—Intune Windows 10 Quality Update Policies.

Windows 10 Quality Feature Update Policies for Intune Step by Step Guide

References

We are on WhatsApp now. To get the latest step-by-step guides, news, and updates, Join our Channel. Click here. HTMD WhatsApp.

Author

Anoop C Nair is Workplace Technology solution architect with 25+ years of experience in global enterprise organizations such as JP Morgan, Capgemini, etc. He is Microsoft Certified Trainer. Microsoft MVP from 2015 onwards for consecutive 11 years! He also conducts Intune and modern workplace tech training for enterprise organizations. He is Blogger, Speaker, and Founder of HTMD Community and HTMD Conference. His focus is on Device Management technologies such as Intune, Windows, Cloud PC, He writes about technologies like Intune, SCCM, Windows, Cloud PC, Windows, Entra, Microsoft Security.

How to Take Backup and Restore Office 365 Mailboxes Veeam 2

How to Take Backup and Restore Office 365 Mailboxes Veeam

Let’s discuss How to Take Backup and Restore Office 365 Mailboxes Veeam. Microsoft Office 365 is a SaaS solution used by many organizations worldwide. As of the last report, there were 24.9 million total subscribers, confirming that many people use Office 365 to help manage their businesses.

Do we need a backup for a SaaS solution like Office 365? I think so. This post will show how to Backup and Restore Office 365 Mailboxes.

Veeam Backup for Microsoft Office 365 is a solution that stores mailbox items from Office 365 Online organization to an offline backup repository. Office 365 admin can restore single or multiple emails using Veeam Explorer.

These items (mailboxes, folders, messages, tasks, contacts, and so on) can be restored via Veeam Explorer. We can get a FREE temporary license for Veeam Backup for Office 365.

Backup and Restore Office 365 Mailboxes

This temporary license is available for the first six months. Recovered e-mail can be saved as a file, e-mailed as an attachment, or exported as a PST file. The Content of this post is explained below.

  • Do We Require Office 365 Backup?
  • How to Install Veeam Backup Office 365
  • Connect to Office 365 with Veeam Backup?
  • Create Backup Job for Office 365 Backup
  • Advanced Search Option – Veeam Explorer
  • How to Restore Deleted Office 365 Mails?
  • Veeam Backup Office 365 Troubleshooting
  • Veeam Backup Office 365 PowerShell Commands
How to Take Backup and Restore Office 365 Mailboxes Veeam - Fig.1
How to Take Backup and Restore Office 365 Mailboxes Veeam – Fig.1

Do We Require Office 365 Backup?

What happens if the user accidentally deletes data from Office 365 mailboxes? The Office 365 service provides several options for restoring Deleted items, and manual recovery is also possible.

The following are Microsoft’s retention policies. However, I don’t think Microsoft provides granularity in backing up and recovering emails. Veeam Backup for Office 365 has more granular loads.

Veeam Backup for Microsoft Office 365 provides recovery options. Recovered e-mail can be saved as a file, emailed as an attachment, or exported as a PST file. I don’t think Microsoft provides all these options.

How to Install Veeam Backup Office 365

You can download Veeam Backup for Microsoft Office 365 from here. It contains 2 MSI files: VeeamBackupOffice365_1.5.0.1099.MSI and VeeamExplorerExchange_9.6.0.1099.MSI. We need to install VeeamBackupOffice365 and then VeeamExplorerExchange.

  • The installation is straightforward, and there is no prerequisite when installing these on Windows Server 2016.
  • The video tutorial here provides more details.
  • Once Veeam Backup for Microsoft Office 365, You have three shortcuts on your Windows Server 2016.
  • Veeam Backup for Microsoft Office 365
  • Veeam Explorer for Microsoft Exchange
  • Veeam Backup for Microsoft Office 365 connects to

Connect to Office 365 with Veeam Backup?

In the background, Veeam Backup for Microsoft Office 365 uses the Power-Shell command to connect to Office 365. To join Office 365 from Veeam Backup, Click the Add Organization” button. There are 3 Organization deployment types available for Veeam Backup for Microsoft Office 365.

Connect to Office 365 with Veeam Backup
Microsoft Office 365
Hybrid Deployment
On-Prem Microsoft Exchange
How to Take Backup and Restore Office 365 Mailboxes Veeam – Table 1

I selected Microsoft Office 365 to add my organization’s mailbox to the Veeam backup solution. The “Microsoft Office 365 connection settings” page has multiple region options, such as Default, China, US Govt, and US Govt-DOD.

Enter the Office 365 admin username and password to complete the ADD ORGANIZATION wizard. You can see more details in the video tutorial here.

How to Take Backup and Restore Office 365 Mailboxes Veeam - Fig.2
How to Take Backup and Restore Office 365 Mailboxes Veeam – Fig.2

Following are the Veeam Backup for Office 365 Connection Parameters.

  • Connect to EWS
  • Connect to Power-Shell
  • Check View-Only Configuration Role
  • Check View-Only Recipients Role
  • Check Application Impersonation Role
  • Check Role Management Role
  • Check Organization Customization
  • Check Organization Configuration Role
  • Enable Organization Customization

Create Backup Job for Office 365 Backup

Click the Backup button to create and schedule a backup job for Office 365 mailboxes. The backup job wizard allows us to select all individual mailboxes. I have chosen one Office 365 mailbox for the backup job.

We must also select the Backup proxy and repository as part of the backup job wizard. Veeam Backup for Microsoft Office 365 has granular schedule options. This backup job is a recurring incremental backup task.

The backup job GUI provides an excellent experience. It gives all LIVE details in the Veeam Backup for Office 365 GUI. What was the transfer rate of the backup job, etc.? The backup job status page has three segregations: 1. Status, 2. Data, and  3. Summary.

How to Take Backup and Restore Office 365 Mailboxes Veeam - Fig.3
How to Take Backup and Restore Office 365 Mailboxes Veeam – Fig.3

Veeam Backup Job has the Following Actions

The Veeam Backup Job has the following actions.

  • Created Backup Job
  • Connected to organization
  • Found One mailbox
  • Processing mailbox:Anoop@devices.com
  • Transferred:400 MB (4300 items) at 639.3 KB/s (7 items/s)
  • Job finished at 14-10-2017 10:52:00

Advanced Search Option – Veeam Explorer

Veeam Explorer for Microsoft Exchange provides numerous granular options with Advanced Search mailboxes. Using Veeam Explorer, we can search mailboxes with advanced find options. Veeam Explorer offers many search criteria.

  • Category
  • Field
  • Condition
  • Value

How to Restore Deleted Office 365 Mails?

Recover the Office 365 mailboxes and individual emails. Veeam Explorer provides options for exporting the Office 365 mailbox to the PST file. Also, there are other options to save personal mail to “.MSG” files. You can also send recovered emails to another email id. You can see more details in the video tutorial here.

  • Following are the options recovery options available in Veeam Explorer
  • Open
  • Restore to Mailbox anoop@devices.com
  • restore to….
  • Export to Desktop\Inbox.pst
  • Export to .pst file
  • Save to Desktop
  • Save to .msg file
  • Send to anu@devices.com
  • Send to…

Veeam Backup Office 365 Troubleshooting

C:\ProgramData\Veeam\Backup365\Logs is the place where you can find the log files of Veeam Backup for Microsoft Office 365. Veeam.Archiver.Proxy_2017_10_14_10_31_41.log file contains the details about the Database connectivity. It also includes connectivity errors.

  • 14-10-2017 10:31:41 5 (2904) Loading ESE library: C:\Windows\system32\esent.dll…
  • 14-10-2017 10:31:41 5 (2904) Module file version: 10.0.14393.0 (rs1_release.160715-1616)
  • 14-10-2017 10:31:41 5 (2904) Resolving DLL entry points…
  • 14-10-2017 10:31:41 5 (2904) Setting a maximum number of instances to 1024…
  • 14-10-2017 10:31:41 5 (2904) Creating ESE instance VEEAM_ARCHIVER_PROXY_9333c395-7a2b-43da-b776-295b574b1099
  • 14-10-2017 10:31:41 5 (2904) Setting instance parameter MaxVerPages to 1073741824…
  • 14-10-2017 10:31:41 5 (2904) Setting instance parameter MaxOpenTables to 15000…
  • 14-10-2017 10:31:41 5 (2904) Setting instance parameter MaxSessions to 1000…
  • 14-10-2017 10:31:41 5 (2904) Initializing ESE instance…
  • 14-10-2017 10:31:42 5 (2904) Setting ESE maximum cache size to 2147248128 bytes…
  • 14-10-2017 10:31:42 5 (2904) Creating database: C:\ProgramData\Veeam\Backup365\ProxyDb\config.edb…
  • 14-10-2017 10:31:42 5 (2904) Creating database schema…

How can Veeam Backup Office 365 be used in a Programmatic way?

Using Veeam Backup for Microsoft Office 365 PowerShell Toolkit, we can automate the Veeam Backup Microsoft Office 365 tool.

How to Take Backup and Restore Office 365 Mailboxes Veeam - Fig.4
How to Take Backup and Restore Office 365 Mailboxes Veeam – Fig.4

The following are the PowerShell commands that are available for Veeam Backup Office 365 mailboxes.

Name
Add-VBOJob
Add-VBOOrganization
Add-VBOProxy
Add-VBORepository
Connect-VBOServer
Disable-VBOJob
Disconnect-VBOServer
Enable-VBOJob
Get-VBOEmailSettings
Get-VBOFolderExclusions
Get-VBOHistorySettings
Get-VBOJob
Get-VBOJobSession
Get-VBOLicense
Get-VBOOrganization
Get-VBOOrganizationMailbox
Get-VBOProxy
Get-VBORepository
Get-VBORestAPISettings
Get-VBORestorePoint
Install-VBOLicense
New-VBOBackupWindowSettings
New-VBOJobSchedulePolicy
Remove-VBOJob
Remove-VBOOrganization
Remove-VBOProxy
Remove-VBORepository
Set-VBOBackupWindowSettings
Set-VBOEmailSettings
Set-VBOFolderExclusions
Set-VBOHistorySettings
Set-VBOJob
Set-VBOJobSchedulePolicy
Set-VBOOrganization
Set-VBOProxy
Set-VBORepository
Set-VBORestAPISettings
Start-VBOJob
Stop-VBOJob
Sync-VBOEntity
How to Take Backup and Restore Office 365 Mailboxes Veeam – Table 2

We are on WhatsApp now. To get the latest step-by-step guides, news, and updates, Join our Channel. Click here. HTMD WhatsApp.

Author

Anoop C Nair is Workplace Technology solution architect with 25+ years of experience in global enterprise organizations such as JP Morgan, Capgemini, etc. He is Microsoft Certified Trainer. Microsoft MVP from 2015 onwards for consecutive 11 years! He also conducts Intune and modern workplace tech training for enterprise organizations. He is Blogger, Speaker, and Founder of HTMD Community and HTMD Conference. His focus is on Device Management technologies such as Intune, Windows, Cloud PC, He writes about technologies like Intune, SCCM, Windows, Cloud PC, Windows, Entra, Microsoft Security.

How to Delete Windows.OLD Folder from Windows 10 Device 3

How to Delete Windows.OLD Folder from Windows 10 Device

Don’t try to delete Windows.OLD folder from Windows 10 device via Windows Explorer. You won’t be able to remove Windows. Old folder via Windows Explorer.

I have tried to delete this folder via Windows Explorer many times but have never succeeded. In this post, we will see the method for Deleting the Windows.OLD Folder from a Windows 10 Device.

The Windows.OLD folder is where the previous installation Windows version is stored. It is created when we upgrade from one version of Windows 10 to another.

For example, when you perform an in-place upgrade of Windows 10 1703 to Windows 10 1709, the Windows.OLD folder will be created.

How to Remove Clean Delete Window.OLD Folder from Windows 10 Machine

In this post, you will get all the details on how to delete Windows.OLD folder. Free up C drive space. Don’t try to delete by right-clicking on Windows.OLD folder and delete. It won’t work very well.

How to Delete Windows.OLD Folder from Windows 10 Device – Video 1

What is there in Windows.OLD Folder?

I will give you the answer to this question depending on your answer to the following question: Are you planning to restore the device’s previous version of Windows 10?

How to Delete Windows.OLD Folder from Windows 10 Device - Fig.1
How to Delete Windows.OLD Folder from Windows 10 Device – Fig.1

Is it Safe to Delete Windows.OLD Folder from Windows 10 Device?

For example, If you have upgraded to Windows 10 1709 and want to restore the previous version of Windows 10 (1703), In this scenario, you need to have the Windows.OLD folder. Otherwise, you won’t be able to restore your device to the previous version of Windows 10.

How to Free up More Space in the C Drive of a Windows 10 Machine?

Check whether you have a folder named Windows.OLD in C drive. If so, you can remove or delete that Windows.OLD folder to get more free space on your C drive. You should get around 25 GB of free space on your Windows 10 machine’s C drive.

How to Delete Windows.OLD Folder from Windows 10 Device - Fig.2
How to Delete Windows.OLD Folder from Windows 10 Device – Fig.2

How to Clean-up / Delete / Remove Windows.OLD Folder from Windows 10 Device?

Open Windows Explorer, Click “This PC,” Right-click on the C drive, and go to properties. In the properties of the C drive, click the Disk Cleanup button.

Disk Cleanup doesn’t have an option to delete the previous installation of Windows 10, so the “previous installation of Windows” option doesn’t appear in the Disk Cleanup option.

Windows.OLD folder contains the System Files of Windows 10. Hence, we need to click on the “Cleanup System Files” button to get the option to delete Windows.OLD folder. Select “Previous Windows Installation(s)” to free up 22.2 GB of space on the C drive. Click on the OK button to start deleting the Windows.OLD folder from the C drive.

How to Delete Windows.OLD Folder from Windows 10 Device - Fig.3
How to Delete Windows.OLD Folder from Windows 10 Device – Fig.3

Will Windows Automatically Delete the Windows. Old Folder?

Windows won’t delete the Windows old folder. I tested this on my production machine after the Fall Creator Update of Windows 10. The content of Windows. The old folder has been removed, and the folder is zero sizes, but the Windows. The old folder is still present.

Do you want to delete the folder manually? There is no need to do that because it is not beneficial. Per my testing, this clean-up action occurred 11 days after the folder’s creation date.

Windows .old PropertiesDetails
Contains0 Files and 673 Folders
Created19th October 2017
How to Delete Windows.OLD Folder from Windows 10 Device – Table 1
How to Delete Windows.OLD Folder from Windows 10 Device - Fig.4
How to Delete Windows.OLD Folder from Windows 10 Device – Fig.4

More details about the programmatic way to remove WIndows.OLD is explained here.

We are on WhatsApp now. To get the latest step-by-step guides, news, and updates, Join our Channel. Click here. HTMD WhatsApp.

Author

Anoop C Nair is Workplace Technology solution architect with 25+ years of experience in global enterprise organizations such as JP Morgan, Capgemini, etc. He is Microsoft Certified Trainer. Microsoft MVP from 2015 onwards for consecutive 11 years! He also conducts Intune and modern workplace tech training for enterprise organizations. He is Blogger, Speaker, and Founder of HTMD Community and HTMD Conference. His focus is on Device Management technologies such as Intune, Windows, Cloud PC, He writes about technologies like Intune, SCCM, Windows, Cloud PC, Windows, Entra, Microsoft Security.

How to Setup SCCM CB Intune Co-Management Configuration Manager ConfigMgr 4

How to Setup SCCM CB Intune Co-Management Configuration Manager ConfigMgr

How to Setup SCCM CB Intune Co-Management Configuration Manager ConfigMgr. Many organizations are looking for more simplified management options for Windows devices.

There are two ways of managing: the traditional way of control and the Modern way of governance. Both are explained in detail below.

They also want an easier transition from SCCM and Domain Join devices (Traditional) to a modern management approach with Intune and Azure AD Join devices (Modern). This post will show How to set up SCCM CB and InTune Co-Management.

Another post covers more “Management strategic” details about co mgmt – Overview Windows 10 Co-Management with Intune and SCCM.

How to Set SCCM CB Intune Co-Management

In this video, you will learn all the details about setting up SCCM CB Intune Co-Management. Below is more information about the SCCM CB 1709 upgrade and Co-Management setup via Video Tutorial.

How to Setup SCCM CB Intune Co-Management Configuration Manager ConfigMgr – Video 1

How to Setup SCCM CB Intune Co-Management Configuration Manager ConfigMgr

The co-management option is available only on a Preview release of SCCM CB 1709. I don’t know whether it will make it to the SCCM CB 1710 Production release in a few months. However, Co-Management will be available in the SCCM CB 1710 production release.

Modern IT
Multiple Devices
User and Business Owned
Cloud Managed & SaaS Apps
Automated
Proactive
Self Service
How to Setup SCCM CB Intune Co-Management Configuration Manager ConfigMgr – Table 1
How to Setup SCCM CB Intune Co-Management Configuration Manager ConfigMgr - Fig.1
How to Setup SCCM CB Intune Co-Management Configuration Manager ConfigMgr – Fig.1

What is Co-Management?

In simple terms, SCCM CB co-management is a dual management capability offered for Windows 10 1709 (Fall Creators Update) devices. InTune and SCCM can manage Windows 10 1709 devices simultaneously.

For example, eligible Windows 10 devices will be managed via the SCCM client, and the Intune MDM channel will handle other workloads. The section below this post provides more details about the Workloads.

This co-management is only available for the Intune subscriptions; set INTUNE as MDM authority.

How to Setup SCCM CB Intune Co-Management Configuration Manager ConfigMgr - Fig.2
How to Setup SCCM CB Intune Co-Management Configuration Manager ConfigMgr – Fig.2

You might wonder how we can handle policy conflicts in the SCCM Co-Management scenario. Yeah, disputes regarding configuration/compliance policies will be controlled via Co-Management Configuration policies in SCCM CB.

You can select which workloads can be managed via Intune. All other SCCM workloads will be handled through the SCCM management method.

Where Can We Set up SCCM Co-Management Policies?

Install or Upgrade SCCM CB 1709 or a later version of SCCM. Navigate the SCCM CB 1709 (or later) console via \Administration\ Overview\ Cloud Services\Co-management. Click on the button “Configure Co-Management” to create Co-management Production or Co-Management Pilot policies.

SCCM CB Co-Management Configuration Wizard – STAGING Options?

There are 2 staging options available in SCCM CB co-management. Following are the 2 options:-

  1. Co-Management Production Policies (CoMgmtSettingsProd)
  2. Co-Management Pilot Policies (CoMgmtSettingsPilot)

Configure Roll-out Groups – Pilot Collection

Configuring co-management will only be enabled for a selected pilot collection.  Selected Window 10 1709 or later devices will be in the pilot group for Co-Management.  This pilot group of this collection can be used for a staged co-management roll-out.

We can initiate automatic enrollment or move workloads to InTune for devices in the pilot group before you roll out co-management to all supported Windows 10 devices in your production environment.

Configure Co-management for Production Collection with Exclusion Collection

Configure co-management policy for production. You may select an exclusion group that will be excluded from co-management in your production environment. Exclusion groups can be any collection of Windows 10 devices.

How to Setup SCCM CB Intune Co-Management Configuration Manager ConfigMgr - Fig.3
How to Setup SCCM CB Intune Co-Management Configuration Manager ConfigMgr – Fig.3

How Can SCCM Co-Management for SCCM Clients and Intune Managed Devices be Enabled?

There are two ways to enable SCCM co-management for Windows 10 1709 devices.

  1. Enable Co-management for SCCM Clients
  2. Enable Co-management for Intune-managed devices

Enable Co-management for SCCM Clients

You must select the following option to enable co-management for SCCM-managed devices with Intune: To enable co-management for devices managed by SCCM and configured, select ALL or Pilot from the drop-down menu to manage all/pilot SCCM clients via Intune.

Enable Co-management for Intune Managed Devices

You must create an Intune application to enable co-management for Intune-managed devices with SCCM. This application will install the SCCM client onto Intune-managed devices.

The SCCM team provided a sample command line to install the SCCM client. Following is the sample command line provided in the wizard

  • CCMSETUPCMD=”/mp:https:// CCMHOSTNAME= SMSSiteCode= SMSMP=https:// AADTENANTID= AADTENANTNAME= AADCLIENTAPPID= AADRESOURCEURI= SMSPublicRootKey=”
How to Setup SCCM CB Intune Co-Management Configuration Manager ConfigMgr - Fig.4
How to Setup SCCM CB Intune Co-Management Configuration Manager ConfigMgr – Fig.4

What are SCCM Co-Management Workloads?

SCCM Co-Management workloads are functionalities/features of device management. For example, the Compliance policies, Configuration Policies, Software Updates, Resource Access policies (WiFi Profiles/VPN Profiles, etc..), Application deployment, etc., are co-management workloads.

How Do You Configure/Select Workloads for Co-management?

SCCM continues to manage all device management workload functionalities even after enabling the co-management option. When you decide you are ready for co-management, you can use Intune to manage available workloads.

Co-Management Configuration Wizard provides the ability to select these functionalities /features. Following are the 3 features enabled for co-management

  • Compliance Policies (this will work with Conditional Access)
  • Resource Access Policies (WiFi, SCEP, etc..Anything comes under the SCCM console Company Resource Access node)
  • Windows Update Policies (Patching without on-prem WSUS/SUP)

For Windows 10 devices that are in a co-management state. You can have Microsoft Intune start managing different workloads/features. Choose pilot Intune to have Microsoft Intune start managing different workloads.

Choose Pilot Intune to have Intune manage the workloads for only clients in the pilot groups. If you want to manage these workloads with SCCM, select ConfigMgr/SCCM. If you’re going to manage these workloads with Intune, select Intune.

How to Setup SCCM CB Intune Co-Management Configuration Manager ConfigMgr - Fig.5
How to Setup SCCM CB Intune Co-Management Configuration Manager ConfigMgr – Fig.5

Resources

  • Co-management for Windows 10 devices – SCCM 1709 Preview – here
  • Migrate hybrid MDM users and devices to Intune standalone – here
  • Microsoft 365 and SCCM Windows 10 Co-Management – here

We are on WhatsApp now. To get the latest step-by-step guides, news, and updates, Join our Channel. Click here. HTMD WhatsApp.

Author

Anoop C Nair is Microsoft MVP! He is a Device Management Admin with more than 20 years of experience (calculation done in 2021) in IT. He is a Blogger, Speaker, and Local User Group HTMD Community leader. His main focus is Device Management technologies like SCCM 2012, Current Branch, and Intune. He writes about ConfigMgr, Windows 11, Windows 10, Azure AD, Microsoft Intune, Windows 365, AVD, etc.

SCCM to Deploy and Install Office 365 ProPlus Updates 5

SCCM to Deploy and Install Office 365 ProPlus Updates

SCCM’s latest version (SCCM 1902) introduced many new ways to manage Office 365 ProPlus updates better. SCCM uses the existing Software Update workflow to update Office 365 ProPlus update management.

IMP – Office 365 ProPlus Bandwidth Consideration PostsLean/HybridBuilding dynamic, lean & universal packages for Office 365 ProPlus & Office 365 ProPlus Deployment and Proxy Server Guidance

SCCM’s latest version has a unique dashboard for Office 365 Client management. This dashboard can be used to manage your organization’s Office 365 ProPlus apps.

This post will show how to Deploy and Install Office 365 Software Updates with the SCCM Automatic Deployment Rule (ADR). The video tutorial provides more details.

How to Deploy and Install Office 365 Software Updates with SCCM CB ADR

SCCM has the ability to manage Office 365 client updates and patching. SCCM uses the Software Update workflow to update using the Software Update management workflow. Configuration Manager can update Office 365 ProPlus, Visio Pro for Office 365, Project Online Desktop Client, and Office 365 Business.

SCCM to Deploy and Install Office 365 ProPlus Updates – Video 1

What is the High-level Workflow of O365 ProPlus Updates Deployment via SCCM?

SCCM Office 365 ProPlus Automatic Deployment rule can create an end-to-end workflow. This will help us to automate Office 365 app installation and management. I have another post on How to Deploy and Install Office 365 Applications via SCCM CB.

1. Office publishes Office 365 app update metadata to Microsoft Update service
2. SCCM gets the notification about the updates from Microsoft update services via scheduled WSUS sync
3. SCCM refers to office CDN for file lists and downloads required files for on-prem SCCM server sharing. This can be done using SCCM ADR (Automatic Deployment Rule) or a normal Software update process.
4. SCCM Clients get a new policy to deploy the latest updates for Office 365 apps as per the scheduled deployment

SCCM to Deploy and Install Office 365 ProPlus Updates - Fig.1
SCCM to Deploy and Install Office 365 ProPlus Updates – Fig.1

What are the Prerequisites to Managing Office 365 ProPlus Updates via SCCM CB?

There are 3 prerequisites to manage Office 365 updates/patches via SCCM CB at a high level. I assume all the devices are managed via SCCM CB and all the SCCM client prerequisites have already been met.

#1 and #2 – Enable Classification and Product for Office 365 Updates

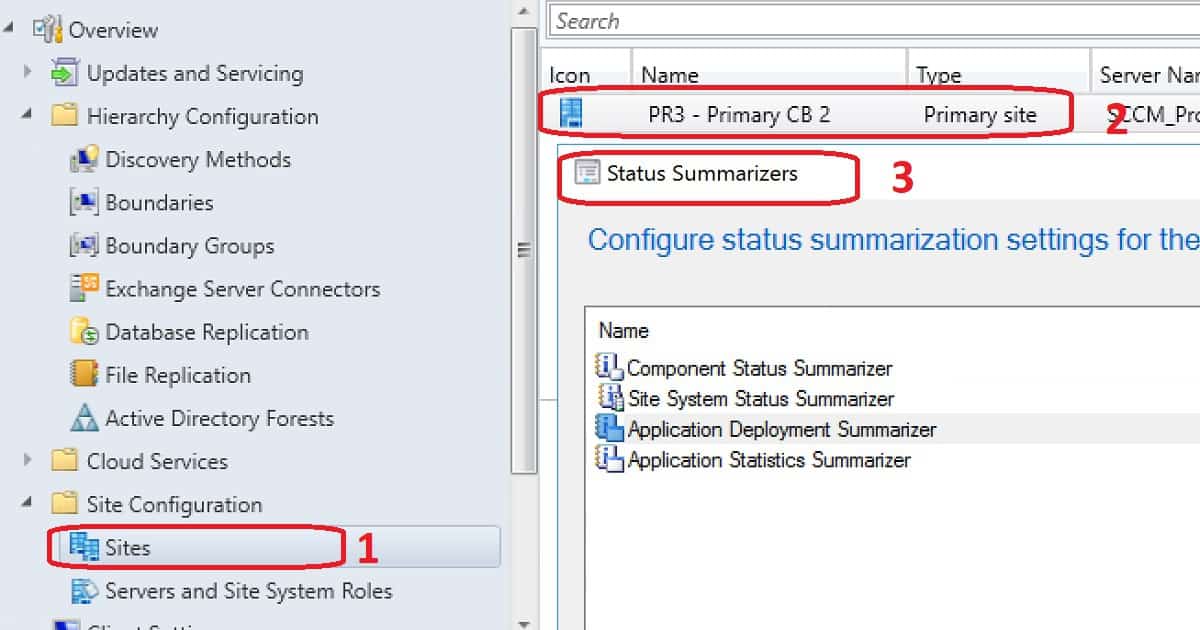
We must enable the following classification and product to manage Office 365 updates via SCCM CB. Navigate via SCCM console – \Administration\Overview\Site Configuration\Sites. Click on Settings – Configure Site Components – Software Update point component – Properties. Go to the Classification tab and enable Updates.

Once updates from the classification tab are enabled (to support Office 365 updates), you can go to the Products tab to enable “Office 365 Client“. More details are available in the video tutorial here.

SCCM to Deploy and Install Office 365 ProPlus Updates - Fig.2
SCCM to Deploy and Install Office 365 ProPlus Updates – Fig.2

#3 – Enable Client Settings for Office 365 Updates 

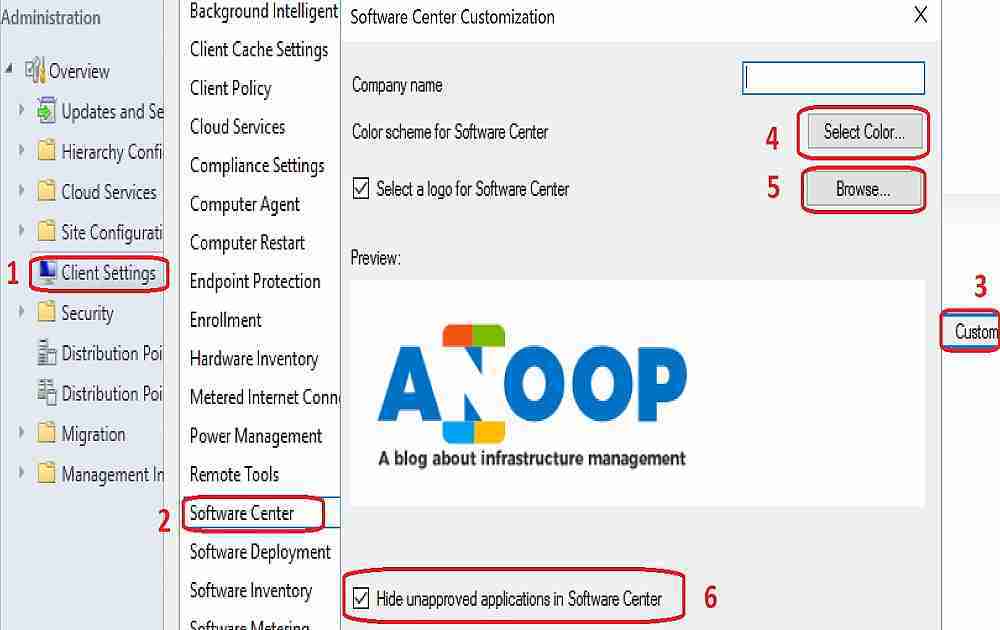
We must enable the following settings to manage Office 365 updates via SCCM CB. Navigate the SCCM console via \Administration\Overview\Client Settings. Go to Client Settings – Software Updates tab – Enable Management of Office 365 Clients = YES.

How to Create Automatic Deployment Rule for Office 365 ProPlus Updates?

Use Automatic Deployment Rule Wizard (from Office 365 Client Management node) to automate Office 365 application updates/patches through SCCM CB. Using ADR, you can eliminate the repetitive process of creating a Software Update Group, Packages, and Deployments.

You can automatically deploy software updates by adding new ones to an update group associated with an active deployment. You can use an automatic deployment rule (ADR) to create a new deployment for complex scenarios.

Be very careful before creating and implementing SCCM ADR. I recommend testing ADR in a pre-prod environment before implementing it in production. The video tutorial here has end-to-end details about this process.

SCCM to Deploy and Install Office 365 ProPlus Updates - Fig.3
SCCM to Deploy and Install Office 365 ProPlus Updates – Fig.3

What Should Be the Search Criteria for Office 365 ProPlus Updates?

Search Criteria are the brain of SCCM ADR. When selecting the criteria to add new updates to the existing Software Updates group, it would be best to be careful. In this post, I said the search criteria should include Monthly channel updates for the last month.

Software updates that meet the specified criteria are added to the associated software update group. I have included details of the requirements that I selected below.

  • Date Released or Revised ==> Last Month
  • Product ==> Office 365 Client
  • Title ==> Update – Monthly Channel
Other Office 365 Update Channels as well in the Criteria
Monthly Channel (formerly Current Channel)
Monthly Channel (Targeted)
Semi-Annual Channel (Differed Channel)
Semi-Annual Targeted (formerly First Release for Deferred Channel)
SCCM to Deploy and Install Office 365 ProPlus Updates – Table 1

Remember to hit the PREVIEW button to check whether you get the expected search results. The video tutorial provides more details. Specify the settings for the Automatic Deployment Rule, automatically deploy all software updates found, and approve any license agreement.

SCCM to Deploy and Install Office 365 ProPlus Updates - Fig.4
SCCM to Deploy and Install Office 365 ProPlus Updates – Fig.4

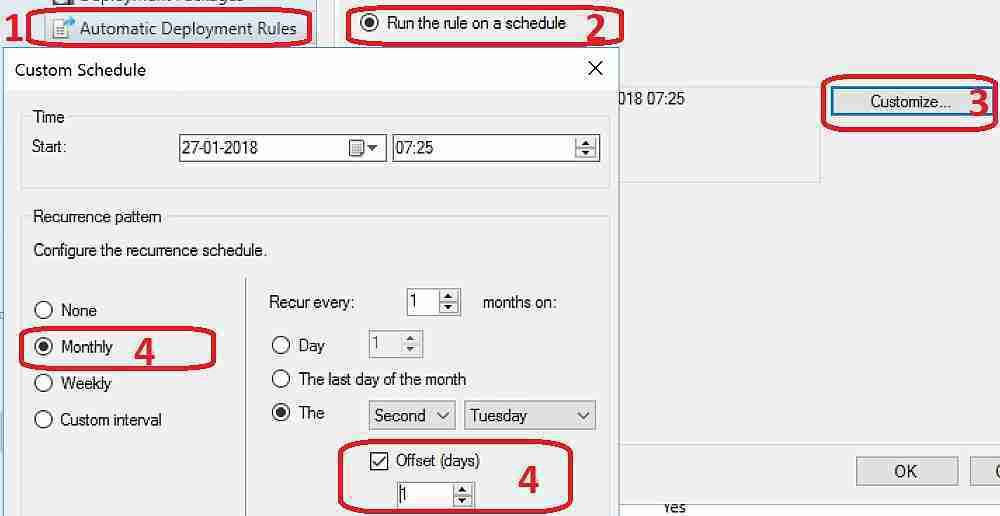
Specify the Recurring Schedule for the Office 365 ProPlus Updates ADR

You can select “Run the rule after any software update point synchronization” or SCCM CB ADR according to your schedule.

Configure Schedule Details for the Deployment

In this ADR wizard, you need to confirm whether the ADR rule for the Office 365 App update has been completed. The package has been deployed to DPs, the deployment has been scheduled, etc. I selected all the default settings.

Specify the scheduled deployment time. There are 2 options for setting the deployment time. The time can be the client’s local or Universal Coordinated Time (UTC). The default setting is Local client Time. The video tutorial provides more details.

SCCM to Deploy and Install Office 365 ProPlus Updates - Fig.5
SCCM to Deploy and Install Office 365 ProPlus Updates – Fig.5

Configure Office 365 ProPlus Update Available Time 

Specify when software updates should be available for users in the Software Center. Once this ADR rule is run, software updates will be distributed to the DP servers.

Office 365 ProPlus Updates are available to install as soon as possible or per the schedule. I usually set this as ASAP so the user can go into the SCCM CB software center and run.

Installation Deadline for SCCM CB Office 365 ProPlus Updates

In this section of the ADR wizard, you can specify a deadline for required Office 365 updates. The deadline is determined by adding the deadline time to the installation time.

When the deadline is reached, the required Office 365 software updates will be installed on the device. I have selected the Deadline of 7 days from the deployment available time. You can also have a deadline as soon as possible, which will help you deploy apps as quickly as possible on the device.

You have another granular option while setting up the installation deadline. According to user preferences, this deployment is delayed up to the grace period defined in client settings.

More details are available in the video tutorial here.

User Experience – SCCM ADR for Office 365 ProPlus Updates

The default user experience behavior is Hide in Software Center and All notifications. There are loads of granularity options in setting up the deadline behaviour, Device restart behaviour, Write filter handling for Windows Embedded (IoT) devices, and Software updates deployment re-evaluation behaviour upon restart.

If any Office 365 software update in this deployment requires a system restart, run the updates deployment evaluation cycle after the restart.

SCCM to Deploy and Install Office 365 ProPlus Updates - Fig.6
SCCM to Deploy and Install Office 365 ProPlus Updates – Fig.6

As you can see in the above picture, Office 365 updates are stuck at 50% downloading on Windows 10 machines. I couldn’t find a solution while writing this post. I will update this post whenever I have an update on the resolution or fix for this issue.

References

  • Ignite Video Deploy Microsoft Office 365 Client using SCCM – here
  • Manage Office 365 ProPlus with SCCM – here
  • Manage updates to Office 365 ProPlus with SCCM – here
  • Troubleshooting Office 365 ProPlus patching through SCCM – here

We are on WhatsApp now. To get the latest step-by-step guides, news, and updates, Join our Channel. Click here. HTMD WhatsApp.

Author

Anoop C Nair is Workplace Technology solution architect with 25+ years of experience in global enterprise organizations such as JP Morgan, Capgemini, etc. He is Microsoft Certified Trainer. Microsoft MVP from 2015 onwards for consecutive 11 years! He also conducts Intune and modern workplace tech training for enterprise organizations. He is Blogger, Speaker, and Founder of HTMD Community and HTMD Conference. His focus is on Device Management technologies such as Intune, Windows, Cloud PC. He writes about technologies like Intune, SCCM, Windows, Cloud PC, Windows, Entra, Microsoft Security.

Deploy Office 365 ProPlus Microsoft 365 Apps using SCCM 6

Deploy Office 365 ProPlus Microsoft 365 Apps using SCCM

Let’s find the best way to Deploy Office 365 ProPlus Microsoft 365 Apps using SCCM. This is the best and easiest method to deploy and install all the Microsoft 365 apps to Windows 11 or 10 devices.

The latest version of SCCM makes creating Office 365 ProPlus client packages accessible. In this post, you will learn how to create an Office 365 ProPlus client application. I have already created a video tutorial to explain the wizard’s process (Install Office 365 ProPlus).

SCCM Learn How to Deploy Install Office 365 ProPlus Applications Configuration Manager ConfigMgr. We can deploy Office 365 ProPlus apps (Word, Excel, PowerPoint, Outlook, etc..) to clients using SCCM CB.

You can start the Office 365 ProPlus application Installer from SCCM version 1702, starting from the Office 365 ProPlus Client Management dashboard.

The new feature will let us configure Office 365 ProPlus installation settings, download files from Office Content Delivery Networks (CDNs), and deploy the files as an application.

This post will show the greenfield approach to deploying and installing O365 ProPlus applications. I have another post that explains “How to Deploy and Install Office 365 ProPlus Software Updates (patches) with SCCM CB ADR“.

**UpdateHow to Deploy MS Teams Using ConfigMgr Step by Step Guide|SCCM

IMP – Office 365 ProPlus Bandwidth Consideration PostsLean/HybridBuilding dynamic, lean & universal packages for Office 365 ProPlus & Office 365 ProPlus Deployment and Proxy Server Guidance!

What is Office 365 ProPlus Microsoft 365 Apps Client Installer?

The Office 365 client installer is nothing but an installer for Office 365 client applications. Is that a bit clearer? So, which are those Office 365 Client applications? Word, Excel, PowerPoint, OneDrive, Outlook, etc.

OFFICE 365 ProPlus or Microsoft 365 Apps Client installer will help install all these applications to end-user devices like Windows 11, Windows 10, Windows 8, and Windows 7.

Deploy Office 365 ProPlus Microsoft 365 Apps using SCCM

Start the Office 365 client installation wizard from the SCCM console – \Software Library\Overview\Office 365 Client Management dashboard. Click on the + Office 365 Installer to launch the Office 365 installer from the SCCM CB console.

Office 365 client installation files will be downloaded to this location if they do not already exist. Without the internet, you can’t proceed to the 2nd page of this wizard. This is in case you have not downloaded the Office 365 configuration files.

Application Settings
• Application name: Office 365 Client Install
Administrator comments:
• Content-Location: \\DC1\Sources\Office365\Client Install Pre Prod

Deploy Office 365 ProPlus Microsoft 365 Apps using SCCM - Fig.1
Deploy Office 365 ProPlus Microsoft 365 Apps using SCCM – Fig.1

You can set up all the client settings using the Import Client settings” option in Office 365 Client Installation Wizard. You can import the configuration.xml file to automatically configure all the Word, Excel, PowerPoint, Outlook settings, etc.

Otherwise, you can select the option to manually configure all the settings via the Office 365 or Microsoft 365 apps installation wizard.

Select the List of Office 365 Applications You Want to Install

Select the Office Suite as part of the O365 or Microsoft 365 apps installation wizard. There are four office suites available as part of the installation wizard.

Four Office Suites Available as Part of the Installation Wizard
Microsoft 365 Business Basic
Microsoft 365 Business Standard.
Microsoft 365 Business Premium
Microsoft 365 Apps
Deploy Office 365 ProPlus Microsoft 365 Apps using SCCM – Table 1

You will also get an option to select Office 365 ProPlus or Microsoft 365 Applications, including installation. I don’t want to install OneDrive for Business (Groove) application as it’s the old sync client.

The rest of the apps will be installed on the Windows device based on the application selected from the wizard.

Deploy Office 365 ProPlus Microsoft 365 Apps using SCCM - Fig.2
Deploy Office 365 ProPlus Microsoft 365 Apps using SCCM – Fig.2
  • Access
  • Excel
  • OneDrive for Business
  • OneNote
  • Outlook
  • PowerPoint
  • Publisher
  • Skype for Business
  • Word

You have an option to select additional office products like Visio and Project. For those two products, there is a special licensing option.

Those license options are available in Office 365 Subscription Standard Edition—Volume License and Professional Edition —Volume License. The video tutorial provides more details.

Office 365 Settings
• Suite: Office 365 ProPlus
• Excluded Applications: Groove
• Additional Office Products: None
• Edition: 64-Bit
• Channel: Current
• Languages: English (United States) default, Hindi (India), Malayalam (India)
• Version: 16.0.8326.2107
• Shared Computer Activation: False
• Pin Icons To Taskbar: True
• Autoactivate: False
• Accept EULA: True

Deploy Office 365 ProPlus Microsoft 365 Apps using SCCM - Fig.3
Deploy Office 365 ProPlus Microsoft 365 Apps using SCCM – Fig.3

Select Office 365 ProPlus Microsoft 365 Apps Architecture using SCCM

Select the Architecture for Office 365 applications like Word, Excel, PowerPoint, etc. There are two versions: 32bit Vs. 64bit. There are 4 update channels available in the SCCM Office 365 client to install the wizard.

However, these updated models have recently changed. The following are the latest Office365 update models: Monthly Channel (formerly Current Channel), Monthly Channel (Targeted), Semi-Annual Channel (Differed Channel), and Semi-Annual Targeted (formerly First Release for Deferred Channel).

Deploy Office 365 ProPlus Microsoft 365 Apps using SCCM – Video 1

You can select different languages for Office 365 applications. You can choose the language of applications depending on your preference or region. This wizard will help you download the languages that will be downloaded for Office 365.

You can also configure it to “Accept EULA” and auto-activate the applications. You can also have Pin Icons in the Windows 8 and Windows 7 taskbar. The pin option is not applicable for Windows 10 devices. More details are provided in the video tutorial here.

Deploy Office 365 ProPlus Microsoft 365 Apps using SCCM - Fig.4
Deploy Office 365 ProPlus Microsoft 365 Apps using SCCM – Fig.4

Deployment and Scheduling Options for Office 365 ProPlus Microsoft 365 Apps using SCCM

Deployment options/settings are also part of the Office 365 Client Installation Wizard. You must select the collection you want to deploy the Office 365 client on your SCCM CB environment. Select the content locations or DPs from the Content page.

There are two Office 365 client installation options: mandatory and Optional deployments. You can schedule the deployment according to your organization’s requirements.

General
Collection: All Desktop and Server Clients
• Use default distribution point groups associated with this collection: False
• Automatically distribute content for dependencies: True

Success: Content (1):
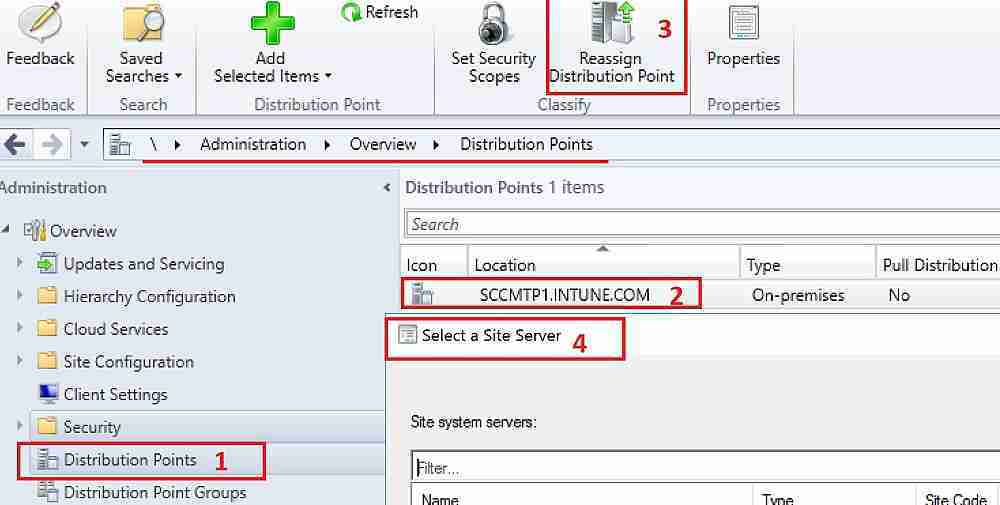
SCCMTP1.INTUNE.COM

Deployment Settings
Action: Install
Purpose: Required
• Pre-deploy software to the user’s primary device: False
• Send wake-up packets: False
• Allow clients to use a metered Internet connection to download content: False

Scheduling
• Time based on: UTC
• Available Time: As soon as possible
• Deadline Time: Disabled
• Delayed enforcement on deployment Disabled

Deploy Office 365 ProPlus Microsoft 365 Apps using SCCM - Fig.5
Deploy Office 365 ProPlus Microsoft 365 Apps using SCCM – Fig.5

End-User Experience of Office 365 App on Windows 10 Devices

You can see the Office 365 app listed in the Software Center. It was a mandatory deployment and was automatically installed on Windows 10.

All O365 Applications were installed on Windows 10 or Windows 11 Devices. The Office365 update channel is the Current Channel (Monthly channel).

Excel, PowerPoint, Outlook, etc., apps are installed successfully on Windows 10 or 11 devices. However, the Windows 10 device had no internet connection, so the activation didn’t happen automatically.

The License will automatically be assigned according to the user’s subscription. After the installation, you can launch all the applications (Word, Excel, PowerPoint, OneDrive, etc.) from your Windows 10 machine.

Deploy Office 365 ProPlus Microsoft 365 Apps using SCCM - Fig.6
Deploy Office 365 ProPlus Microsoft 365 Apps using SCCM – Fig.6

The Office 365 Client Management dashboard details the number of managed O365 clients in your SCCM CB hierarchy. The video tutorial provides more details on creating an Office 365 ADR and deploying Office 365 Software Updates.

Example of Office 365 Microsoft 365 Client Installation Wizard Configuration

Now, let’s learn how to Deploy and Install Office 365 ProPlus or Microsoft 365 Apps using SCCM or Configuration Manager.

User Experience
User notifications: Display in the Software Center and show all notifications
• Ignore Maintenance Windows: False
• System restart (if required to complete the installation): False
• Commit changes at the deadline or during a maintenance win&dow (requires restarts): True

Alerts
• Enable System Center Operations Manager maintenance mode: False
• Generate System Center Operations Manager alert when a software installation fails: False
• Create a deployment alert when the threshold is lower than the following: False
• Create a deployment alert when the threshold is higher than the following: False

Sample Configuration.XML file configuration for Office 365

  • <Configuration>
  • <Add OfficeClientEdition=”64” Channel=”Current” Version=”16.0.8326.2107″ OfficeMgmtCOM=”True“> <Product ID=”O365ProPlusRetail”>
  • <Language ID=”en-US” />
  • <Language ID=”hi-IN” />
  • <Language ID=”ml-IN” />
  • <ExcludeApp ID=”Groove” />
  • </Product>
  • </Add>
  • <Display AcceptEULA=”TRUE” />
  • <Property Name=”SharedComputerLicensing” Value=”0″ />
  • <Property Name=”PinIconsToTaskbar” Value=”TRUE” />
  • <Property Name=”AUTOACTIVATE” Value=”0″ />
  • </Configuration>

New Application Installation Technologies

There are a few new application installations, maintenance, and removal technologies. In this post, we are going to see more about Click-to-Run technologies.

Click-to-Run is an alternative to the traditional Windows Installer-based (MSI) method. It uses virtualization technology to run an Office product in a self-contained environment. Click-to-run virtualization capabilities are taken from APP-V.

The UWP application comes with various installation options, the most prominent of which are web-based and Windows store-based. Both use the App Streaming Install method to install the application. Office has a UWP app version, which will be available in the Microsoft store.

UWP is dead? This was one of the news spread on Twitter. And the reason for that Twitter news was because of the information about Progressive Web Applications (PWA).

PWA are Web pages designed to work as applications. PWA is supported by Chrome, Edge, and Safari (Apple has also started working on it). PWA is one of the new app technology which I’m excited about.

Office Click-to-Run Installation Options with SCCM

I have a post that explains the step-by-step method for installing Office using Click to Run technology: “How to Deploy and Install Office 365 Applications via SCCM CB.”

This click-to-run installation technology used in SCCM CB is an alternative to traditional MSI installation. Click-to-run Office client installation is independent of SCCM SUP and WSUS software updates.

As mentioned above, the SCCM console requires an internet connection to download the latest updates from Office CDN. More details about creating a Click to Run Office App in SCCM are available.

Deploy Office 365 ProPlus Microsoft 365 Apps using SCCM – video 2

Office updates via SCCM SUP and WSUS depend on Click-to-Run client installations. If the office is installed using a click to run the installation, you can have office updates or upgrades through SCCM/SUP.

Software update component requirements are explained in the following step-by-step guide. “How to Deploy and Install Office 365 Software Updates (patches) with SCCM CB ADR“.

Best Practices – Office 365 ProPlus Updates (Install Office 365 ProPlus)

#1 – You should have the latest version of SCCM Current Branch to get a better experience and integration of Office 365 client package creation and Office 365 patches/updates.

#2—You must build two Office 365 ProPlus installation packages in SCCM. One is a Semi-Annual channel, and the other is a Semi-Annual Channel (Targeted).

#3 – Deploy to two deployment groups: a pilot group that receives the Semi-Annual Channel (Targeted) and a broad group that receives the Semi-Annual Channel.

Prerequisites of Office 365 ProPlus Client Package (Install Office 365 ProPlus)

#1 – You should have SCCM 1806 or later to create Office 365 proplus package with an office customization tool. If you have not upgraded to the 1806 version, I recommend reading my previous post, “How to Deploy and Install Office 365 Applications via SCCM CB“.

#2 – The SCCM client Application installation wizard has integrated with the Office Customization Tool.  This tool needs an internet connection on the machine where the console is running. This office customization tool renders the online website in the background to create a Configuration.XML file.

Deploy Office 365 ProPlus Microsoft 365 Apps using SCCM - Fig.7
Deploy Office 365 ProPlus Microsoft 365 Apps using SCCM – Fig.7

#3 – You should have required RBAC permissions on the SCCM console to perform Office 365 ProPlus client package creation.

Video Tutorial – Office 365 ProPlus Client Package Creation

The video below provides more details about creating the Office 365 ProPlus package. You can also learn SCCM, Intune, and other device management topics via videos from my new Video Blog website, https://howtomanagedevices.com/.

Deploy Office 365 ProPlus Microsoft 365 Apps using SCCM – Video 3

How to Create Office 365 ProPlus Client Package (Install Office 365 ProPlus)

The following steps will help you create your organisation’s Office 365 Proplus client package. As recommended above, it would be great to create two packages (Semi-Annual and Semi-Annual Targeted) for the Office 365 ProPlus client package.

  • Launch the SCCM console from an internet-connected machine
  • Navigate to \SoftwareLibrary\Overview\Office 365 Client Management dashboard
  • Click on the + Office 365 Installer from the Office 365 Client Management Dashboard
  • Give the NAME of the Office 365 ProPlus Client Package and the Description of the package
  • Browse to a location mainly on the file server or SCCM server package source folder

Click on the Next button

This is the primary step in the Office 365 proplus client configuration. Click on the Office Customization tool (More details about the tool are in the section below this post) to customize and import your XML to the SCCM application engine.

As you can see in the screenshot above, you must complete all the above sections to create a configuration.xml file for the Office 365 proplus client package.

Ensure you have a tick mark symbol for all the sections in the Office Customization tool; otherwise, it won’t be able to create the XML file. The video tutorial above provides more details.

In the General section, you need to give a name and Organization details and click the Next button to go to the next section.

You can select the Office 365 product and architecture (x64) you want to deploy in the Product and Releases section. I selected Office ProPlus and Clicked on the Add button. You must also choose which update channel and Version you wish to use for your Office 365 clients. I selected the Semi-Anual Channel for updates.

Select the Language of the Office 365 ProPlus Client you want to deploy. You also need to select the installation options, such as shortcut behavior. Click on NEXT to proceed to the next section of the wizard.

Select the upgrade options from the Update and Upgrade section of the office customization tool. I have enabled the toggle for the Upgrade Office Click-to-run products. Also allows options to Uninstall any MSI versions of the office including visio and project. Click on NEXT.

  • Complete the Licensing and Activation settings and click on NEXT.
  • Application Preferences gives IT pros a wide range of customization options for each office product, such as Word and Excel.
  • Click the Finish button to complete and Review the Office 365 ProPlus client.
  • Click on the SUBMIT button to IMPORT configuration.xml to the application package. 
  • Click the NEXT, NEXT, NEXT, and CLOSE buttons to finish the Microsoft Office 365 Client Installation Wizard. This wizard takes 30-40 minutes to complete depending on the internet connection.
  • Deploy this Office 365 ProPlus client package to test machines.

Learn More about The Office Customization Tool

The Office Customization Tool for creating a configuration.XML file that controls Office 365 Proplus client behavior. This tool is an Azure-based cloud service that allows you to create XML configuration files that are used with the Office Deployment Tool. Install Office 365 ProPlus.

Previously, you needed to create the configuration files in Notepad or another text editor. The Office Customization Tool makes this part of the deployment process more accessible and less likely to introduce errors. Now, this tool is also integrated with SCCM version 1806 or later.

Review – https://config.office.com/

Deploy Office 365 ProPlus Microsoft 365 Apps using SCCM - Fig.8
Deploy Office 365 ProPlus Microsoft 365 Apps using SCCM – Fig.8

How to Update or Patch Office 365 ProPlus Client

If you are looking for a solution to update the Office 365 ProPlus client with the latest patches, the following post will help. I also have another post that explains “How to Deploy and Install Office 365 Software Updates (patches) with SCCM ADR. ” Install Office 365 ProPlus.

References

We are on WhatsApp now. To get the latest step-by-step guides, news, and updates, Join our Channel. Click here. HTMD WhatsApp.

Author

Anoop C Nair is Workplace Technology solution architect with 25+ years of experience in global enterprise organizations such as JP Morgan, Capgemini, etc. He is Microsoft Certified Trainer. Microsoft MVP from 2015 onwards for consecutive 11 years! He also conducts Intune and modern workplace tech training for enterprise organizations. He is Blogger, Speaker, and Founder of HTMD Community and HTMD Conference. His focus is on Device Management technologies such as Intune, Windows, Cloud PC, He writes about technologies like Intune, SCCM, Windows, Cloud PC, Windows, Entra, Microsoft Security.

How to Deploy Dell Bios Firmware Updates Via SCUP and SCCM CB Configuration Manager ConfigMgr 7

How to Deploy Dell Bios Firmware Updates Via SCUP and SCCM CB Configuration Manager ConfigMgr

How to Deploy Dell Bios Firmware Updates Via SCUP and SCCM CB Configuration Manager. SCUP 2017 has four 3rd party software update catalogs.

Dell, HP, Fujitsu, and Adobe are the four third-party software update catalog providers in the SCUP 2017 Preview version.

In previous blog posts and video tutorials, I explained the installation, configuration, and integration process of SCUP with SCCM.

This post will show how “How to Deploy Dell Bios Firmware Updates Via SCUP and SCCM CB“. We must follow the same process for publishing HP and Fujitsu software updates.

How to Publish Dell BIOS Firmware Updates Via SCUP and SCCM CB

Dell Software updates Catalog (Bios, Drivers and Applications, Firmware) are added to the SCUP console. Click on the Dell Folder and expand the Dell folder to see subfolders.

How to Deploy Dell Bios Firmware Updates Via SCUP and SCCM CB Configuration Manager ConfigMgr – Video 1

How to Add Dell Software Update Catalog to SCUP

Open the SCUP 2017 console. Navigate to “Update Workspace—Overview” and click Add Partner Software Updates catalogs. Select Dell and click on the Add button.

This will add the Dell updates to the SCUP database. Dell updates include Dell Bios, Drivers, Applications, and Firmware updates.

How to Deploy Dell Bios Firmware Updates Via SCUP and SCCM CB Configuration Manager ConfigMgr
How to Deploy Dell Bios Firmware Updates Via SCUP and SCCM CB Configuration Manager ConfigMgr – Fig.1

How Do you Publish Dell Software Updates to SCUP, WSUS, and SCCM CB?

Dell Software updates Catalog (Bios, Drivers and Applications, Firmware) are added to the SCUP console. Click on Dell Folder. Expand the Dell folder to see subfolders. Select the updates from the right pane of the SCUP console that you want to publish to SCCM CB.

Specify the publish option—There are three options while posting updates: Automatic, Full content, and Metadata Only. I usually recommend selecting the Automatic option. The reasons for choosing the Automatic option are given below. This has been shown in the video here.

Click Automatic to all updates publisher to query SCCM to determine whether the selected software updates are published with full content or only metadata.

In this mode, software updates are only published when they meet the client request count and package source size thresholds specified on the SCCM server page of the Options dialog box. Automatic is available only when SCCM integration is selected on the SCCM server page.

Select the checkbox at the bottom of the SCUP publish wizard. When published software updates have not changed, but their certificate has changed, this checkbox will sign all software updates with a new publishing certificate.

How to Deploy Dell Bios Firmware Updates Via SCUP and SCCM CB Configuration Manager ConfigMgr - Fig.2
How to Deploy Dell Bios Firmware Updates Via SCUP and SCCM CB Configuration Manager ConfigMgr – Fig.2

How to Select Dell Products from SUP Component Properties in SCCM? How to Deploy Dell Bios Firmware Updates Via SCUP and SCCM CB Configuration Manager ConfigMgr

Once the updates are published from the SCUP console, you can go to the SCCM CB console to configure the rest. Navigate SCCM console – \Administration\Overview\Site Configuration\Sites.

Click on Settings—Configure Site Components—Software Update point component—Properties. Go to the Products tab and Select Dell, Bios, Drivers and Applications, and Firmware. This is the same thing I showed in the video.

Dell
Bios
Drivers and Applications
Firmware
How to Deploy Dell Bios Firmware Updates Via SCUP and SCCM CB Configuration Manager ConfigMgr – Table 1
How to Deploy Dell Bios Firmware Updates Via SCUP and SCCM CB Configuration Manager ConfigMgr - Fig.3
How to Deploy Dell Bios Firmware Updates Via SCUP and SCCM CB Configuration Manager ConfigMgr – Fig.3

Once the appropriate products are selected, navigate \Software Library\ Overview\Software Updates in the SCCM CB console. Right-click on the Software Updates node & select Synchronize Software Updates.

This will help sync and get the Dell updates to the SCCM CB console. WsyncMgr.log will provide you with the details about Dell updates.

How to Deploy Dell Updates via the Software Updates Deployment Method?

In the following post, I have already blogged about the SCCM Software Update process, “Step by Step Guide SCCM ConfigMgr CB Software Update Patching Process“. Deploying Dell software updates to Windows 10 devices is similar to any other software update deployment.

As shown in the video, select all the Dell Bios and Firmware updates you want to deploy from the All Software Updates node. Once selected, right-click those updates and click on Deploy.

How to Deploy Dell Bios Firmware Updates Via SCUP and SCCM CB Configuration Manager ConfigMgr - Fig.4
How to Deploy Dell Bios Firmware Updates Via SCUP and SCCM CB Configuration Manager ConfigMgr – Fig.4

For Dell software updates, you must provide the Deployment name and software update group name. On the next screen, select the collection name from the list.

The members of that collection will get the Dell software updates deployment. Schedule the deployment and make sure you set a good user experience.

Also, provide the new Dell software update package name and the shared folder location to store the Dell software updates. You also need to select the DPs to distribute this package.

Example of the Dell Software Update Deployment via SCUP and SCCMHow to Deploy Dell Bios Firmware Updates Via SCUP and SCCM CB Configuration Manager ConfigMgr

It would be best to have an internet connection to the server to download the Dell updated from Dell. Otherwise, you must have already downloaded the binaries from Dell and stored them in a shared location, as shown in the video here.

Do you want to download these Dell software updates in different languages? If so, you can select other languages on the Language Selection page.

• Dell Latitude 10 ST2 System BIOS,A09 0XM7C(Article ID)
• Dell Latitude 10 ST2e System BIOS,A07 T47W6(Article ID)
• Dell Latitude 12 Rugged Extreme 7204 System BIOS,A11 J6PG2(Article ID)
• Dell Latitude 12 Rugged Tablet,A15 X2GXX(Article ID)
• Dell Latitude 3180/3189 System BIOS,1.1.1 M6HF7(Article ID)
• Dell Latitude 3330 System BIOS,A08 800F5(Article ID)
• Dell Latitude 3340 System BIOS,A13 48CH6(Article ID)
• Dell Latitude 3350 System BIOS,A09 0468G(Article ID)
Success: General:
• Deployment Name: 3rd Party Updates SCUP - Dell Software Updates
• Collection: All Desktop and Server Clients
Deployment Settings:
Send wake-up packets: No
• Verbosity Level: Only success and error messages
Scheduling:
• Deployment schedules will be based on: Client local time
• Available to target computers: 23-09-2017 07:25:00
• Deadline for software update installation: 30-09-2017 07:23:00
• Delayed enforcement on deployment: False
User Experience:
• User Notifications: Display in Software Center and show all notifications
• Install software updates outside the maintenance window when deadline is reached: No
• Restart system outside the maintenance window when deadline is reached: Suppressed
• If a restart is required it will be: Allowed
• Commit changes at deadline or during a maintenance window (requires restarts): Yes
• If any update in this deployment requires a system restart, run updates deployment evaluation cycle after restart: No
Alerts:
• On software update installation error generate a Window Event: No
• Disable Window Event while software updates install: No
Download Settings:
• Computers can retrieve content from remote distribution points: No
• Download and install software updates from the fallback content source location: Yes
Package:
Success: The software updates were placed in a new package:
• 3rd Party Updates SCUP - Dell Software Updates
Success: Content (1):
• SCCMTP1.INTUNE.COM
Software updates downloaded from the internet
Success: Dell Latitude 10 ST2 System BIOS,A09
Success: Dell Latitude 10 ST2e System BIOS,A07
Success: Dell Latitude 12 Rugged Extreme 7204 System BIOS,A11
Success: Dell Latitude 12 Rugged Tablet,A15
Success: Dell Latitude 3180/3189 System BIOS,1.1.1
Success: Dell Latitude 3330 System BIOS,A08
Success: Dell Latitude 3340 System BIOS,A13
Success: Dell Latitude 3350 System BIOS,A09
Language Selection:
English

References

We are on WhatsApp now. To get the latest step-by-step guides, news, and updates, Join our Channel. Click here. HTMD WhatsApp.

Author

Anoop C Nair is Microsoft MVP! He is a Device Management Admin with more than 20 years of experience (calculation done in 2021) in IT. He is a Blogger, Speaker, and Local User Group HTMD Community leader. His main focus is Device Management technologies like SCCM 2012, Current Branch, and Intune. He writes about ConfigMgr, Windows 11, Windows 10, Azure AD, Microsoft Intune, Windows 365, AVD, etc.

SCCM Management Insights Configuration Manager ConfigMgr Details 8

SCCM Management Insights Configuration Manager ConfigMgr Details

Let’s discuss the SCCM Management Insights Configuration Manager ConfigMgr Details. SCCM team introduced a new feature called Management Insights with SCCM CB 1708 preview version.

I mentioned the management insights feature in my previous post, “SCCM CB 1708 Preview Upgrade Video Guide and New Features”. In this post, we will look at the details of management insights, and you will get some ideas about SCCM CB Management insights. Video tutorial here.

Management Insights will help you gain valuable insights into the current state of the SCCM CB environment based on data analysis in the site database.

One of the scenarios in the management insight would be useful for better understanding your environment and taking action based on that insight.

What are SCCM ConfigMgr CB Management Insights? – SCCM Management Insights Configuration Manager ConfigMgr Details

SCCM CB Management Insights will provide the details of EMPTY collections & applications without any deployments in your SCCM environment.

[New Post – Read this post to get the latest details about SCCM Management Insights]

I hope the SCCM team will include loads of other data or details into management insights in future releases of SCCM CB. You don’t have to dig into the SQL Database and run SQL queries to find out these details anymore!

SCCM Management Insights Configuration Manager ConfigMgr Details - Fig.1
SCCM Management Insights Configuration Manager ConfigMgr Details – Fig.1

Where Can You Find the Node for SCCM CB Management Insights?

Navigate through SCCM CB 1708 preview console – \Administration\Overview\Management Insights\All Insights. I have explained this in the video tutorial here.

How Do We Find Applications without Deployments in the SCCM CB Environment?

You can find the details or list of applications without deployments from the SCCM CB console. This is under \Administration\Overview\Management Insights\All Insights – Application without deployments node.

I have explained the scenario in the video tutorial here. From the Application without the deployment node, you will get an option to delete the application directly.

You don’t have to go to the Software Library—Applications node to delete a particular application without deployment.

The last run time tab will tell you the last time the rule ran against your SCCM CB site database. To simplify the list of applications, we can find the list of undeployed applications.

How to Find Out Applications without Deployments in the SCCM CB Environment?
Administration
Overview
Management Insights
All Insights
SCCM Management Insights Configuration Manager ConfigMgr Details – Table 1
SCCM Management Insights Configuration Manager ConfigMgr Details - Fig.2
SCCM Management Insights Configuration Manager ConfigMgr Details – Fig.2

How Do You Find Empty Collections in the SCCM CB Environment?

The details or list of Empty collections can be found in the SCCM CB console. This is beneficial information, as you no longer need to dig into SQL DB and run SQL queries to find these details.

This is under \Administration\Overview\Management Insights\All Insights – EMPTY Collections node.

In the following screenshot, you can see the list of empty collections of the SCCM CB environment from the management insights node in the SCCM console.

You may also delete the empty collections from the “Management Insights – All Insights – Empty Collections” node.

You can Right-click on the empty collection and delete it. Otherwise, you can select the collection you want to delete and click the “Delete” button from the ribbon menu of the SCCM CB console. More details in the video tutorial are here.

SCCM Management Insights Configuration Manager ConfigMgr Details - Fig.3
SCCM Management Insights Configuration Manager ConfigMgr Details – Fig.3

Is SCCM CB Management Insights not Working as Expected?

Check out the log SMS_CLOUDCONNECTION.log and look for any error in the log file. Registry Key details of SCCM CB management insights component:- HKEY_LOCAL_ MACHINE \SOFTWARE \Microsoft\SMS\Components\SMS_CLOUDCONNECTION.

ERROR: Found exception System.IO.FileLoadException: Could not load file or assembly 'Microsoft.ConfigurationManager.ManagementInsights.MIWorker, Version=5.0.0.0, Culture=neutral, PublicKeyToken=31bf3856ad364e35' or one of its dependencies. Strong name validation failed. (Exception from HRESULT: 0x8013141A)~~File name: 'Microsoft.ConfigurationManager.ManagementInsights.MIWorker, Version=5.0.0.0, Culture=neutral, PublicKeyToken=31bf3856ad364e35' ---> System.Security.SecurityException: Strong name validation failed. (Exception from HRESULT: 0x8013141A)~~The Zone of the assembly that failed was:~~MyComputer~~ at System.Reflection.RuntimeAssembly._nLoad(AssemblyName fileName, String codeBase, Evidence assemblySecurity, RuntimeAssembly locationHint, StackCrawlMark& stackMark, IntPtr pPrivHostBinder, Boolean throwOnFileNotFound, Boolean forIntrospection, Boolean suppressSecurityChecks)~~ at System.Reflection.RuntimeAssembly.InternalLoadAssemblyName(AssemblyName assemblyRef, Evidence assemblySecurity, RuntimeAssembly reqAssembly, StackCrawlMark& stackMark, IntPtr pPrivHostBinder, Boolean throwOnFileNotFound, Boolean forIntrospection, Boolean suppressSecurityChecks)~~ at System.Reflection.RuntimeAssembly.InternalLoad(String assemblyString, Evidence assemblySecurity, StackCrawlMark& stackMark, IntPtr pPrivHostBinder, Boolean forIntrospection)~~ at System.Reflection.RuntimeAssembly.InternalLoad(String assemblyString, Evidence assemblySecurity, StackCrawlMark& stackMark, Boolean forIntrospection)~~ at System.Reflection.Assembly.Load(String assemblyString)~~ at Microsoft.ConfigurationManager.TaskExecutionManager.TaskExecution.InvokeWorker(String assemblyToLoad, String typeToLoad, String componentName)

What is SCCM CB Management Insights – Find Out Unused Collections and Applications

The Management Insights node in the SCCM CB console. This feature will help you maintain SCCM infra. At the moment, it will help you get the details of EMPTY collections and Applications without deployments.

SCCM Management Insights Configuration Manager ConfigMgr Details – Video 1

References

  • SCCM CB 1708 Preview Upgrade Video Guide and New Features – Here
  • Update 1708 for Configuration Manager Technical Preview Branch – Available Now! – here

We are on WhatsApp now. To get the latest step-by-step guides, news, and updates, Join our Channel. Click here. HTMD WhatsApp.

Author

Anoop C Nair is Workplace Technology solution architect with 25+ years of experience in global enterprise organizations such as JP Morgan, Capgemini, etc. He is Microsoft Certified Trainer. Microsoft MVP from 2015 onwards for consecutive 11 years! He also conducts Intune and modern workplace tech training for enterprise organizations. He is Blogger, Speaker, and Founder of HTMD Community and HTMD Conference. His focus is on Device Management technologies such as Intune, Windows, Cloud PC, He writes about technologies like Intune, SCCM, Windows, Cloud PC, Windows, Entra, Microsoft Security.

Troubleshooting-Intune-Issues

How to Start Troubleshooting Intune Issues and Fix them with Easy Steps

Key Takeaways

  • Start troubleshooting from the Help and Support page in Microsoft Intune.
  • Use the Microsoft Azure portal for built-in diagnostics and guided troubleshooting.
  • Identify whether the issue is user-based or device-based before proceeding.
  • Check policy assignments, deployment status, and error codes first.
  • Verify device check-in and manual sync status if policies are not applying.

Follow a structured troubleshooting approach to quickly resolve the root cause of issues in Microsoft Intune. Start with diagnostics, verify assignments and deployment status, and review error details before moving to advanced analysis. Getting guidance available through the Microsoft Azure portal helps ensure consistent and effective troubleshooting.

Table of Content

Latest Intune Troubleshooting Strategies for App and Policy Deployment

In this video, you will learn the latest troubleshooting strategies in Microsoft Intune to simplify app and policy deployment issues. The session covers practical techniques to identify deployment failures, analyze logs, re view device and user status, and use built-in reporting tools effectively.

How to Start Troubleshooting Intune Issues and Fix them with Easy Steps – Video 1

How to Start Troubleshooting Intune Policy Deployment Issues

Let’s discuss how to start troubleshooting Intune Policy Deployment Issues. In this video, you will learn the step-by-step approach to start troubleshooting policy deployment issues in Microsoft Intune.

How to Start Troubleshooting Intune Issues and Fix them with Easy Steps – Video 2

Checking Tenant Status and Service Health in Microsoft Intune

Go to Tenant administration > Tenant status > Service health and message center to review current service incidents, advisories, and recently resolved issues. This section provides visibility into service disruptions, user impact, and restoration updates related to Intune and connected services. Regularly checking the Service health and message center helps IT admins quickly determine whether an issue is tenant-related or service-related before starting detailed troubleshooting steps.

  • Go to Microsoft Intune admin center > Tenant Administration > Tenant Status > Service health and message center.
How to Start Troubleshooting Intune Issues and Fix them with Easy Steps - Fig.1
How to Start Troubleshooting Intune Issues and Fix them with Easy Steps – Fig.1

User Level Troubleshooting in Microsoft Intune Admin Center

In the Microsoft Intune admin center, you can perform detailed user level troubleshooting from the Troubleshooting + support section. Go to Troubleshooting + support > Troubleshoot, then search and select the affected user. This view provides a comprehensive summary of the user’s device compliance status, assigned policies, applications, group memberships, and app protection policies.

How to Start Troubleshooting Intune Issues and Fix them with Easy Steps - Fig.2
How to Start Troubleshooting Intune Issues and Fix them with Easy Steps – Fig.2

Using Help and Support in Microsoft Intune for Troubleshooting

In the Microsoft Intune admin center, the Help and support section under Troubleshooting + support is the recommended starting point when you face any issue. From this page, you can select the relevant support scenario such as Intune, SCCM, Windows Autopatch, or Windows 365. The portal guides you to the most appropriate diagnostics, documentation, or support options based on your selection.

How to Start Troubleshooting Intune Issues and Fix them with Easy Steps - Fig.3
How to Start Troubleshooting Intune Issues and Fix them with Easy Steps – Fig.3

Checking Configuration Profile Status in Intune

You can easily check configuration profile issues in Microsoft Intune. Go to the Intune admin center and navigate to Devices > Configuration profiles. Select the specific profile you want to review, then open the Per-settings status or Device status tab. This view shows whether the policy deployment status is Succeeded, Error, Conflict, or Not applicable for each device or user.

How to Start Troubleshooting Intune Issues and Fix them with Easy Steps - Fig.4
How to Start Troubleshooting Intune Issues and Fix them with Easy Steps – Fig.4

Monitoring Service Health in Microsoft 365 Admin Center

Checking the Service health dashboard helps IT admins quickly determine whether an issue is caused by a Microsoft service outage or an internal configuration problem, allowing faster and more accurate troubleshooting decisions.

  • In the Microsoft 365 admin center, you can monitor overall service status by navigating to Health > Service health.
How to Start Troubleshooting Intune Issues and Fix them with Easy Steps - Fig.5
How to Start Troubleshooting Intune Issues and Fix them with Easy Steps – Fig.5

Reviewing User Details in the Intune Troubleshooting Tab

I selected Anoop Nair as the user. All the details of this user will be available in the troubleshooting tab. This will help the Intune admin to confirm whether we have targeted all the applications and policies to correct AAD groups. You can check and confirm whether the user.

You can check and confirm whether the user
Does the user have a valid Intune license or not
Is the user part of the correct AAD group or not
Is the Device compliant or not
Status of Company Data Removal/wipe from a device
How to Start Troubleshooting Intune Issues and Fix them with Easy Steps – Table 1

Another set of user details you can check in the troubleshooting tab of Intune Blade is the Principal name of the selected user and Email ID. All the other information available in the Intune troubleshooting blade are

  • Intune license assigned to a user or not
  • Whether Devices compliant status
  • Whether apps are in a compliant state or not
  • Azure AD Group membership for the user
  • Mobile Apps Assignment to the user
  • Compliance policies deployed or assigned to users
  • App protection status for the devices
  • Configuration profile deployment status for the user
  • List of the devices for that user and status of devices

There are some red icons, as seen in the video tutorial and the screenshot below. Those red icons could indicate potential issues with application or policy deployments. I could see problems with Anoop’s Android device. The app protection status does not look suitable for Android devices. The Intune troubleshooting blade provides a valuable report that “31 apps non-compliant“.

Intune Troubleshooting Blades has six (6) Assignment categories. Each type provides details about the user assignments. If some terms are missing, we need to examine the targeting AAD groups of those policies.

  • Mobile Apps
  • Compliance Policies
  • Configuration Profiles
  • App Protection Policies
  • Windows 10 Update Rings
  • Enrollment Restrictions
How to Start Troubleshooting Intune Issues and Fix them with Easy Steps - Fig.6
How to Start Troubleshooting Intune Issues and Fix them with Easy Steps – Fig.6

The above information is essential to start Intune troubleshooting from the Azure portal. From the troubleshooting tab, we can directly access details of each assigned policy for that user. We can also look at the device properties and hardware information for more detailed troubleshooting.

For example, you have started a company data wipe action for a device, but the device or user can still access the corporate mail from the device. Intune admin can directly search for the user from the Intune troubleshooting session and get all the user’s device details. Once the device is identified, you can check the following information about it.

Device name, Managed by, Azure AD join type, Ownership, Intune compliant, Azure AD compliant, OS, OS version, and Last check-in.

How to Start Troubleshooting Intune Issues and Fix them with Easy Steps - Fig.7
How to Start Troubleshooting Intune Issues and Fix them with Easy Steps – Fig.7

References

  • How to get support for Microsoft Intune – here
  • How to Troubleshoot Windows 10 MDM Policy Deployments – here
  • Intune Support Case Severity Levels and Response time – here

Need Further Assistance or Have Technical Questions?

Join the LinkedIn Page and Telegram group to get the latest step-by-step guides and news updates. Join our Meetup Page to participate in User group meetings. Also, join the WhatsApp Community  and the Whatsapp channel to get the latest news on Microsoft Technologies. We are there on Reddit as well.

Author

Anoop C Nair has been Microsoft MVP for 10 consecutive years from 2015 onwards. He is a Workplace Solution Architect with more than 22+ years of experience in Workplace technologies. He is a Blogger, Speaker, and Local User Group Community leader. His primary focus is on Device Management technologies like SCCM and Intune. He writes about technologies like Intune, SCCM,  Windows, Cloud PC, Windows, Entra, Microsoft Security, Career, etc.

How to Schedule iOS Automatic Updates Using Intune Policies 9

How to Schedule iOS Automatic Updates Using Intune Policies

Let’s discuss how to Schedule iOS Automatic Updates Using Intune Policies. Do you have supervised iOS devices managed through Intune?

If so, you may know that iOS software updates will force installation updates on supervised mode iOS devices. Intune has a new policy to prevent/delay these force updates.

This option will also give more granular control over iOS software updates. This post will discuss how to Prevent iOS Automatic Updates Using Intune Policies.

New options have been added to the automatic iOS and iPad OS updates. The following are the exciting options available for this update.

  • Update policy schedule settings
    • Update During the scheduled time
    • Updates Outside the scheduled time

If you are looking for Windows 10 update ring policies with Intune, I have a blog post titled “How to Setup Windows 10 Software Update Policy Rings in Intune Azure Portal.”

How to Create iOS Software Update Policies in Intune? iOS Automatic Updates Using Intune

This Intune policy will help delay iOS automatic updates. iOS devices should be part of the Apple DEP program and managed through supervised mode. Create a profile to force assigned devices to automatically install the latest iOS/iPadOS updates.

These settings determine how and when software updates deploy. This profile doesn’t prevent users from updating the OS manually, which can be controlled for up to 90 days with a device configuration restriction policy. Updates will only apply to devices enrolled through Apple’s Automated Device Enrollment (ABM or ASM).

How to Create iOS Software Update Policies in Intune
Login to the MEM Admin Center portal
Navigate via the Devices – iOS/iPad Update Policies (Update policies for iOS/iPadOS)
Click on + Create update policy
From the Update Policy Settings page for iOS/iPad OS update – The version of iOS/iPadOS to install on devices at the time of update
How to Schedule iOS Automatic Updates Using Intune Policies – Table 1

You can create a new policy with a proper name and description of the policy. This policy will prevent iOS Automatic Updates from forcefully getting installed on supervised iOS devices.

How to Schedule iOS Automatic Updates Using Intune Policies - Fig.1
How to Schedule iOS Automatic Updates Using Intune Policies – Fig.1

Update Policy Schedule Settings for iOS/iPad OS Devices

Update policy schedule settings: By default, when an iOS/iPadOS Software Updates policy is assigned to a device, Intune deploys the latest updates at device check-in (approximately every 8 hours).

You can instead create a weekly schedule with customized start and end times. If you choose to update outside the scheduled time, Intune won’t deploy updates until the scheduled time ends.

  • Select Type and Schedule for iOS update (When the updates will occur. Additional input is required to schedule updates during or outside of scheduled times)
    • Update at next check-in
    • Update During the scheduled time
    • Update Outside of the scheduled time
How to Schedule iOS Automatic Updates Using Intune Policies - Fig.2
How to Schedule iOS Automatic Updates Using Intune Policies – Fig.2

Update During the scheduled time, stop updates from being installed at any random time. By configuring this policy, you can delay the software update (automatic update) of iOS on the device.

Weekly Schedule -> TimeZone, Start Day, Start Time, End Day, End Time

You can select the Time zone, Date, and time for iOS/iPad OS updates. Select the time zone of the targeted devices – In this section, you must select the Time Zone of the devices you want to target for this policy. For the India Time Zone, I selected UTC+5:30.

Start Time—Select the beginning of the interval to stop iOS software updates from Installing on supervised iOS devices. You usually don’t want to install software updates on iOS devices during business hours. This will help you schedule iOS phone updates via Intune policies.

End Time – Select the end of the interval to stop iOS software updates from installing on supervised iOS devices.

Start Day of the update: You can select any day of the week from the start and end day options, from Sunday to Saturday. End the Day of the iOs/iPad OS update by selecting any day between Sunday and Saturday.

How to Schedule iOS Automatic Updates Using Intune Policies - Fig.3
How to Schedule iOS Automatic Updates Using Intune Policies – Fig.3

You can select the iOS/iPad updates outside the scheduled time. You must set a scheduled time when you don’t want this update to happen on iOS devices. The update will be initiated outside the scheduled time configured below.

How to Schedule iOS Automatic Updates Using Intune Policies - Fig.4
How to Schedule iOS Automatic Updates Using Intune Policies – Fig.4

How to Deploy or Assign Intune iOS Software Update Prevention Policy?

Once the Intune iOS Automatic Updates prevention Intune Policy is created, you can start assigning this policy to Azure AD Device groups. Deploy Updates Prevention Policy to iOS Devices. 

Select Assignments—Click on Select Groups to find the appropriate Azure AD group to target the iOS update prevention policy. Once the policy is deployed to devices, the iOS software update will be postponed.

It would help to be careful about the policy settings while targeting the AAD device groups. In the policy configuration, there is an option to configure the devices’ time zones. Time zone configuration in this policy is a bit tricky.

It seems we need to segregate devices according to their time zones. I have not tested this, but it is my assumption regarding this policy setting. Learn how To Create Azure AD Dynamic Groups For Managing Devices Using Intune.

Reporting options for iOS update policies in Intune are coming soon.

How to Schedule iOS Automatic Updates Using Intune Policies – Video 1

We are on WhatsApp now. To get the latest step-by-step guides, news, and updates, Join our Channel. Click here. HTMD WhatsApp.

Author

Anoop C Nair is Workplace Technology solution architect with 25+ years of experience in global enterprise organizations such as JP Morgan, Capgemini, etc. He is Microsoft Certified Trainer. Microsoft MVP from 2015 onwards for consecutive 11 years! He also conducts Intune and modern workplace tech training for enterprise organizations. He is Blogger, Speaker, and Founder of HTMD Community and HTMD Conference. His focus is on Device Management technologies such as Intune, Windows, Cloud PC, He writes about technologies like Intune, SCCM, Windows, Cloud PC, Windows, Entra, Microsoft Security.

Anoop C Nair is Workplace Technology solution architect with 25+ years of experience in global enterprise organizations such as JP Morgan, Capgemini, etc. He is Microsoft Certified Trainer. Microsoft MVP from 2015 onwards for consecutive 11 years! He also conducts Intune and modern workplace tech training for enterprise organizations. He is Blogger, Speaker, and Founder of HTMD Community and HTMD Conference. His focus is on Device Management technologies such as Intune, Windows, Cloud PC. He writes about technologies like Intune, SCCM, Windows, Cloud PC, Windows, Entra, Microsoft Security.

SCCM Package Vs Application 32 Vs 64 Context 10

SCCM Package Vs Application 32 Vs 64 Context

Let’s understand the differences between SCCM Package Vs Application 32 Vs 64 Context. Discussing the differences between SCCM CB packages and the application model is not new.

I have seen several posts and discussions about the advantages of using an application model rather than “classic” packages. Let’s see more details about the SCCM Package Vs. Application.

I recommend using applications rather than packages for several reasons. I’m not getting into the details of the advantages of using the SCCM CB application model.

In this post, we will see a video experience of the SCCM CB package running in 32-bit and the application running in a 64-bit context. SCCM 2007 was a 32-bit application, and if I understand correctly, SCCM 2007 packages always run in a 32-bit context.

SCCM CB Package Runs in 32 Bit Context and Application in 64-bit – SCCM Package Vs Application 32 Vs 64 Context

In this video, you will get all the details about the SCCM CB Package Runs in 32 Bit Context and Application in 64 Bit. Create and RUN Powershell script almost in real-time through the SCCM CB version. Real-time example scenarios are explained in the video.

SCCM Package Vs Application 32 Vs 64 Context – Video 1

History of SCCM Packages?

This could be because the package implementation is simply a 32-bit code. The packages can’t run in a 64-bit context. Is this true for SCCM CB as well?

SCCM Package Vs Application
SCCM Package Vs Application 32 Vs 64 Context – Fig.1

Per my testing and video tutorial here, the packages in SCCM CB always run in a 32-bit context. This statement is true for Windows 10 32-bit and 64-bit machines. It won’t be easy to understand and reproduce this scenario when deploying MSI or EXE applications as a package.

The MSI/EXE applications, packaged to run only with 32-bit, will work fine with SCCM CB packages. However, these apps will fail when trying to convert these 32-bit packages into a new application model.

To fix this issue, we need to enable an option in the SCCM app model (Deployment type properties) called “Run installation and uninstall the program as 32-bit process on 64-bit clients“.

Programs
Run installation and uninstall the program as 32-bit process on 64-bit clients
SCCM Package Vs Application 32 Vs 64 Context – Table 1
SCCM Package Vs Application 32 Vs 64 Context - Fig.2
SCCM Package Vs Application 32 Vs 64 Context – Fig.2

How to Confirm SCCM Packages Run with a 32bit Code?

I created a PowerShell script to use package options in SCCM CB. Navigate \ Software Library \ Overview\Application Management\Packages” and right-click and create a package with the PowerShell script. Deploy the script to a Windows 10 64bit machine.

When we deploy the PowerShell script to a Windows 10 64-bit machine, the Windows PowerShell 32-bit application is executed, as shown in the video above. This proves that the SCCM CB package uses 32-bit code, which can’t run in a 64-bit context.

You can deploy 64-bit MSI/EXE/Scripts using SCCM packages. The best method is to run the package from the SysNative context. Sysnative is a virtual folder that will help us access the 64-bit System32 folder from a 32-bit application or script.

SCCM Package Vs Application 32 Vs 64 Context - Fig.3
SCCM Package Vs Application 32 Vs 64 Context – Fig.3

SCCM CB Software Center client is still a 32-bit application. The app SCClient(32-bit) is visible in the above picture. This proves that the new software center is a 32-bit client on a Windows 10 64-bit machine.

How to Confirm SCCM Applications Run with 64-bit Code?

SCCM CB application always runs in a 64-bit context. By default, all the applications created using the SCCM CB app model use 64-bit context to start the execution. Your 32-bit application will fail if you create and deploy an SCCM application to clients.

When a specific requirement to run within a 32-bit context exists, you need to enable the following option: “Run installation and uninstall the program as a 32-bit process on 64-bit clients.” You can find this option in Application—deployment type properties.

To prove SCCM applications use 64bit context to run MSI/EXE/Scripts, I have created an application via \Software Library\Overview\Application Management\Applications. I used the same PowerShell script (which I used to develop the SCCM package). Deployed application to Windows 10 device.

As you can see in the video here, I initiated the PowerShell execution from the software center. The PowerShell script (Windows PowerShell) runs within a 64-bit context. When deployed as an SCCM package, the same PowerShell script ran in a 32-bit context.

SCCM CB Task Sequence Runs within a 64bit Context

The Task Sequence in SCCM CB runs within a 64-bit context. However, the SCCM CB TS engine provides a similar option for applications to run 32-bit applications/scripts.

The option is to enable the following: “Run installation and uninstall the program as 32-bit process on 64-bit clients“.

References – SCCM Package Vs. Application

  • SCCM Application Versus Package – here
  • ConfigMgr 2012 and 32-bit Application Installers – here
  • PowerShell App Deployment Toolkit – here

We are on WhatsApp now. To get the latest step-by-step guides, news, and updates, Join our Channel. Click here. HTMD WhatsApp.

Author

Anoop C Nair is Workplace Technology solution architect with 25+ years of experience in global enterprise organizations such as JP Morgan, Capgemini, etc. He is Microsoft Certified Trainer. Microsoft MVP from 2015 onwards for consecutive 11 years! He also conducts Intune and modern workplace tech training for enterprise organizations. He is Blogger, Speaker, and Founder of HTMD Community and HTMD Conference. His focus is on Device Management technologies such as Intune, Windows, Cloud PC, He writes about technologies like Intune, SCCM, Windows, Cloud PC, Windows, Entra, Microsoft Security.