Windows 10 Quality Feature Update Policies for Intune Step by Step Guide 1

Windows 10 Quality Feature Update Policies for Intune Step by Step Guide

Let’s discuss Windows 10 Quality Feature Update Policies for Intune Step-by-Step Guide. Microsoft released Windows 10 1709, the fall Creators update. Devices in the current branch (Semi-Annual Targeted) should be updated in Settings—Update and Security—Windows Update.

Intune Windows 10 Quality Update Policies. Microsoft Intune manages this Windows 10 device. This post will see “Windows 10 1709 Fall Creators Update Upgrade with Intune Update Rings.”

Many methods exist to upgrade the Windows 10 version to the latest version, 1709. You can upgrade to Windows 10 with an ISO file available in Visual Studio Subscriptions (previously known as MSDN) or VLSC (Volume Licensing Service Center).

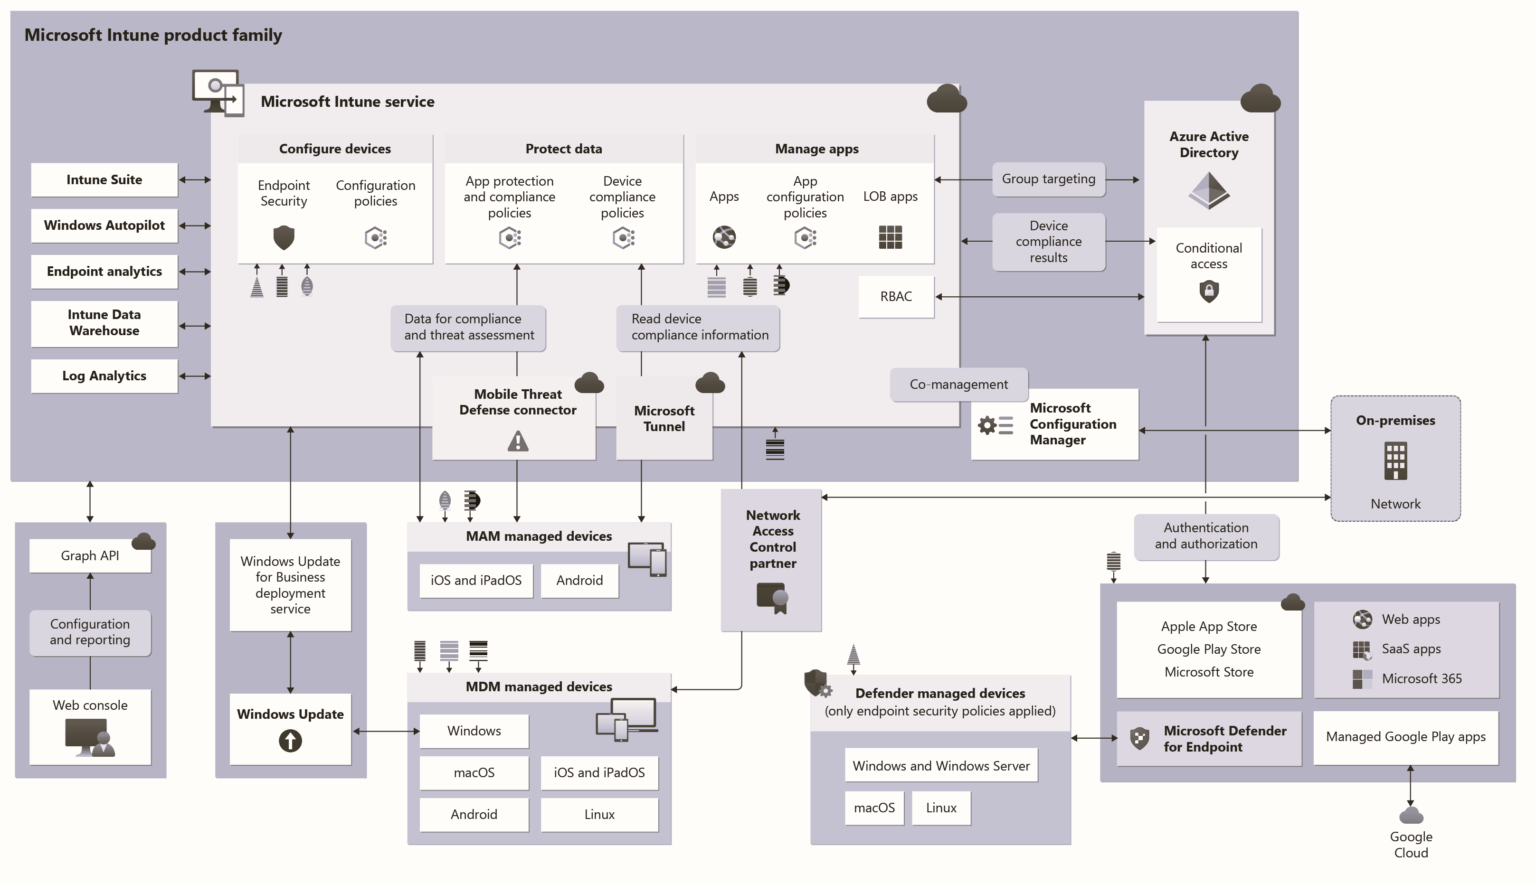
If Microsoft Intune manages your devices, a software update policy ring will manage Windows 10 feature updates.

Windows 10 Quality Feature Update Policies for Intune  Step by Step Guide
Windows 10 Quality Feature Update Policies for Intune Step by Step Guide

Another Related Post on Windows 10 Update Rings

Navigate via Microsoft Azure—Microsoft Intune—Software Updates to “Windows 10 Update Rings.” Here, you can create Windows 10 Semi-Annual Targeted and Semi-Annual update rings.

These two update rings in Intune can control your organization’s Windows 10 upgrade behavior. Intune Windows 10 Quality Update Policies.

  • Windows 10 Semi-Annual Targeted Update Ring – All the devices in the Current Branch.
  • Windows 10 Semi-Annual Update Ring – All the devices in the Current Branch for Business
  • FIX CBB Ring Devices are Getting CB Updates Intune Windows 10 Update Rings
  • Windows 10 1709 Fall Creators Update Upgrade with Intune Update Rings
Windows 10 Quality Feature Update Policies for Intune Step by Step Guide - Fig.1
Windows 10 Quality Feature Update Policies for Intune Step by Step Guide – Fig.1

Create Windows 10 Update Rings in Intune?

In my previous posts, I explained the details of the Intune policy, “How to Setup Windows 10 Software Update Policy Rings in Intune Azure Portal.”

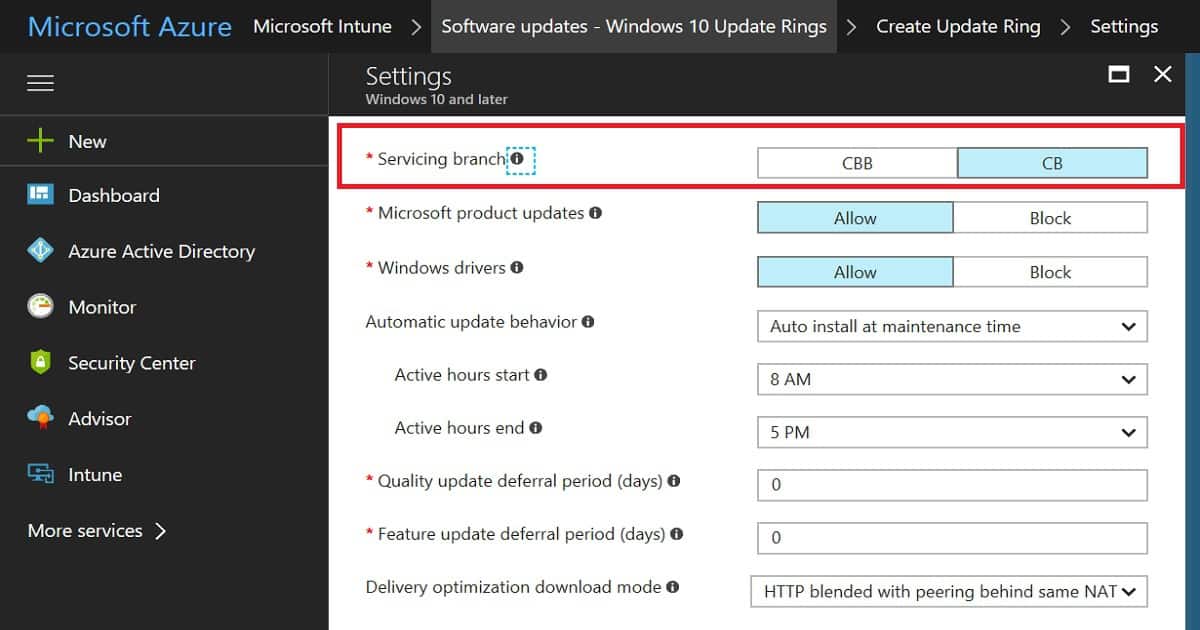
Navigate via the Intune console to access Windows 10 Update Rings – Create Update Ring – Settings. We must select the “Servicing Branch” options according to your requirements. Feature update deferral period (days) is another set we want to set up as part of the Create Update Ring policy.

  • For example:- If we set Service Branch = CB and Feature update deferral period (days) = 0 days, then the device will get the Windows 10 1709 updates on the 0 days of the release.
  • As I mentioned in the above paragraph, there are two types of Servicing Branches for Windows 10: Semi-Annual Targeted and Semi-Annual.
  • Select the CB servicing branch (Semi-Annual Targeted) to set the devices for the first wave of deployment of Windows 10 feature upgrades. The latest Windows 10 1709 Fall Creators update is released only for the Semi-Annual Targeted branch.

How Do Windows 10 Update Rings Work?

Windows 10 update rings work flawlessly under the hood. I have not uploaded Windows 10 1709 ISO or files to Intune to deliver the updates to the devices. Intune helps to set up 2 MDM policies in Windows 10 1607 or later devices.

So, Devices, are you getting the Windows 10 feature update binaries from any other Microsoft cloud service? Windows 10 devices are getting these feature update content/binaries from Windows Update for Business (WUfB).

Another essential feature of Windows 10 is Delivery Optimization. Delivery optimization helps to find the binaries from the peer devices. These peer devices could be either from the same network or the internet.

Windows 10 Update Ring MDM Policies?

The following are the two MDM policies that Intune sets on Windows 10 devices. Intune Windows 10 Quality Update Policies.

CB/CBB Options:- MDM for version 1607 and above: MDM for version 1607 and above: ../Vendor/MSFT/Policy/Config/Update/BranchReadinessLevel \Microsoft\PolicyManager\default\Update\BranchReadinessLevel

Deferral Period Days:- MDM for version 1607 and above: ../Vendor/MSFT/Policy/Config/Update/DeferFeatureUpdatesPeriodInDays \Microsoft\PolicyManager\default\Update\DeferFeatureUpdatesPeriodInDays

Windows 10 Upgrade End User Experience

The following video delivers the Windows 10 1709 fall creator update through Windows Update for Business. The next video will give you an end-to-end experience for the Windows 10 1709 fall creators’ upgrade process via Software Update for Business (WUfB).

As you can see in the video, the Windows 10 device is in the CB (Semi-Annual Target) channel and the differed period policy is set to zero days—Intune Windows 10 Quality Update Policies.

Windows 10 Quality Feature Update Policies for Intune Step by Step Guide

References

We are on WhatsApp now. To get the latest step-by-step guides, news, and updates, Join our Channel. Click here. HTMD WhatsApp.

Author

Anoop C Nair is Microsoft MVP! He is a Device Management Admin with more than 20 years of experience (calculation done in 2021) in IT. He is a Blogger, Speaker, and Local User Group HTMD Community leader. His main focus is on Device Management technologies like SCCM 2012, Current Branch, and Intune. He writes about ConfigMgr, Windows 11, Windows 10, Azure AD, Microsoft Intune, Windows 365, AVD, etc.

How to Start Troubleshooting Intune Issues Fix Intune Issues with Easy Steps 2

How to Start Troubleshooting Intune Issues Fix Intune Issues with Easy Steps

Let’s discuss how to Troubleshoot and Fix Intune Issues with Easy Steps. Intune troubleshooting is easy with the Azure portal. You should start with the “Microsoft Intune—Help and Support” page in the Intune portal whenever you face any issue with Intune.

This post will see “How to start Troubleshooting Intune Policy Deployment Issues from the Intune portal.” For more tips, see Troubleshoot Intune Issues.

You can also check the user-based Intune security policy troubleshooting from the following post – Intune User Policy Troubleshooting Tips For Prevent Changing Theme. One post will help you resolve device-based Intune security policy issuesTroubleshoot Microsoft Edge Security Policy Deployment Issues with Intune.

Update 20-Jan-2018 – When you have an iOS device and want to perform the Intune side of troubleshooting, Microsoft released an excellent document here, “Troubleshooting iOS device enrollment problems in Microsoft Intune.”

Latest Intune Troubleshooting Strategies | Fix Intune Policy Conflicts | Methods IT Admins -Helpdesk

In this video, you will learn about the Latest Intune Troubleshooting strategies to simplify Intune app and policy deployment troubleshooting!

How to Start Troubleshooting Intune Issues Fix Intune Issues with Easy Steps – Video 1

How Do You Check the Status of the Intune Service? – Troubleshooting Intune Issues

When you have a major issue with Intune managed devices, the first place is to look at the current status of the Intune and other dependent services. You can check that from the Intune Tenant Admin – tenant status tab from the MEM Admin Center portal.

Under the Tenant status tab, there is a link to check the status of your Intune and other services for your tenant. Intune service status – See the current level of the service where you can get the position.

You can check Intune service health for your tenant from the Service Health and Message Center tab. The Intune message center also provides details about new changes and related information.

How to Start Troubleshooting Intune Issues Fix Intune Issues with Easy Steps - Fig.1
How to Start Troubleshooting Intune Issues Fix Intune Issues with Easy Steps – Fig.1

How to Start Troubleshooting Intune Policy Deployment?

When you significantly impact all Intune-managed devices/users, ensure that the tenant’s health is OK. Once you are sure there is no issue from the Intune service side for your tenant, it’s time to proceed with your policy assignment and other detailed troubleshooting.

When the issue is NOT impacting all devices or users, it’s better to start with the second stage of Intune troubleshooting.

[Related Posts – How to Troubleshoot Windows 10 Intune MDM Issues]

Troubleshoot +Support is the tab from the MEM admin center portal. Select one of the users having issues with application or policy deployment. For example, when a user is not getting the application assigned to AAD Group. Another example is that the user is not compliant with the configuration policies assigned.

How to Start Troubleshooting Intune Issues Fix Intune Issues with Easy Steps - Fig.2
How to Start Troubleshooting Intune Issues Fix Intune Issues with Easy Steps – Fig.2

I selected Anoop Nair as the user. All the details of this user will be available in the troubleshooting tab. This will help the Intune admin to confirm whether we have targeted all the applications and policies to correct AAD groups. You can check and confirm whether the user.

You can check and confirm whether the user
Does the user have a valid Intune license or not
Is the user part of the correct AAD group or not
Is the Device compliant or not
Status of Company Data Removal/wipe from a device
How to Start Troubleshooting Intune Issues Fix Intune Issues with Easy Steps – Table 1

Another set of user details you can check in the troubleshooting tab of Intune Blade is the Principal name of the selected user and Email ID. All the other information available in the Intune troubleshooting blade are

  • Intune license assigned to a user or not
  • Whether Devices compliant status
  • Whether apps are in a compliant state or not
  • Azure AD Group membership for the user
  • Mobile Apps Assignment to the user
  • Compliance policies deployed or assigned to users
  • App protection status for the devices
  • Configuration profile deployment status for the user
  • List of the devices for that user and status of devices

There are some red icons, as seen in the video tutorial and the screenshot below. Those red icons could indicate potential issues with application or policy deployments. I could see problems with Anoop’s Android device. The app protection status does not look suitable for Android devices. The Intune troubleshooting blade provides a valuable report that “31 apps non-compliant“.

How to Start Troubleshooting Intune Issues Fix Intune Issues with Easy Steps – Video 2

Intune Troubleshooting Blades has six (6) Assignment categories. Each type provides details about the user assignments. If some terms are missing, we need to examine the targeting AAD groups of those policies.

  • Mobile Apps
  • Compliance Policies
  • Configuration Profiles
  • App Protection Policies
  • Windows 10 Update Rings
  • Enrollment Restrictions
How to Start Troubleshooting Intune Issues Fix Intune Issues with Easy Steps - Fig.3
How to Start Troubleshooting Intune Issues Fix Intune Issues with Easy Steps – Fig.3

The above information is essential to start Intune troubleshooting from the Azure portal. From the troubleshooting tab, we can directly access details of each assigned policy for that user. We can also look at the device properties and hardware information for more detailed troubleshooting.

For example, you have started a company data wipe action for a device, but the device or user can still access the corporate mail from the device. Intune admin can directly search for the user from the Intune troubleshooting session and get all the user’s device details. Once the device is identified, you can check the following information about it.

Device name, Managed by, Azure AD join type, Ownership, Intune compliant, Azure AD compliant, OS, OS version, and Last check-in.

How to Start Troubleshooting Intune Issues Fix Intune Issues with Easy Steps - Fig.4
How to Start Troubleshooting Intune Issues Fix Intune Issues with Easy Steps – Fig.4

Last Check-In details are essential in this device retirement or company data wipe troubleshooting scenario. The previous check-in details will tell you when the device was in touch with Intune service for the last time. You can check the Company Data Removal action, Factory reset details, and status from the Intune troubleshooting blade.

[Related Posts – How to Troubleshoot Windows 10 Intune MDM Issues]

The Intune Troubleshooting Blade is a one-stop shop for all the troubleshooting activities related to Intune device management, compliance policies, configuration profile deployments, etc.

How Do You Raise a Free Intune Support Case for Intune Issues?

Microsoft provides an option to raise a support case for Intune issues from the Intune MEM admin center portal’s Help and Support tab. The charges for these support cases are directly linked to your Intune subscription contract.

There is an option to raise an Intune support case with Microsoft’s exclusive contract. I recommend using premier contract support for high-impact Intune issues and if you need immediate help.

How to Start Troubleshooting Intune Issues Fix Intune Issues with Easy Steps - Fig.5
How to Start Troubleshooting Intune Issues Fix Intune Issues with Easy Steps – Fig.5

Severity options are essential while raising an Intune support case. Severity options should be selected based on the impact of the issue. Also, depending on the severity of the problem, the response time will vary. There are three categories, as you can see below:-

  • C- Minimal Impact – The issue impacts only a few users, devices, etc.
  • B—Moderate Impact—These issues can become critical in a couple of days if they aren’t resolved ASAP.
  • A – Critical Impact – Priority issues that are impacting a whole lot of users

[Related Posts – How to Troubleshoot Windows 10 Intune MDM Issues]

References

  • How to get support for Microsoft Intune – here
  • How to Troubleshoot Windows 10 MDM Policy Deployments – here
  • Intune Support Case Severity Levels and Response time – here

We are on WhatsApp now. To get the latest step-by-step guides, news, and updates, Join our Channel. Click here. HTMD WhatsApp.

Author

Anoop C Nair is Microsoft MVP! He is a Device Management Admin with more than 20 years of experience (calculation done in 2021) in IT. He is a Blogger, Speaker, and Local User Group HTMD Community leader. His main focus is on Device Management technologies like SCCM 2012, Current Branch, and Intune. He writes about ConfigMgr, Windows 11, Windows 10, Azure AD, Microsoft Intune, Windows 365, AVD, etc.

How to Schedule iOS Automatic Updates Using Intune Policies 3

How to Schedule iOS Automatic Updates Using Intune Policies

Let’s discuss how to Schedule iOS Automatic Updates Using Intune Policies. Do you have supervised iOS devices managed through Intune?

If so, you may know that iOS software updates will force installation updates on supervised mode iOS devices. Intune has a new policy to prevent/delay these force updates.

This option will also give more granular control over iOS software updates. This post will discuss how to Prevent iOS Automatic Updates Using Intune Policies.

New options have been added to the automatic iOS and iPad OS updates. The following are the exciting options available for this update.

  • Update policy schedule settings
    • Update During the scheduled time
    • Updates Outside the scheduled time

If you are looking for Windows 10 update ring policies with Intune, I have a blog post titled “How to Setup Windows 10 Software Update Policy Rings in Intune Azure Portal.”

How to Create iOS Software Update Policies in Intune? iOS Automatic Updates Using Intune

This Intune policy will help delay iOS automatic updates. iOS devices should be part of the Apple DEP program and managed through supervised mode. Create a profile to force assigned devices to automatically install the latest iOS/iPadOS updates.

These settings determine how and when software updates deploy. This profile doesn’t prevent users from updating the OS manually, which can be controlled for up to 90 days with a device configuration restriction policy. Updates will only apply to devices enrolled through Apple’s Automated Device Enrollment (ABM or ASM).

How to Create iOS Software Update Policies in Intune
Login to the MEM Admin Center portal
Navigate via the Devices – iOS/iPad Update Policies (Update policies for iOS/iPadOS)
Click on + Create update policy
From the Update Policy Settings page for iOS/iPad OS update – The version of iOS/iPadOS to install on devices at the time of update
How to Schedule iOS Automatic Updates Using Intune Policies – Table 1

You can create a new policy with a proper name and description of the policy. This policy will prevent iOS Automatic Updates from forcefully getting installed on supervised iOS devices.

How to Schedule iOS Automatic Updates Using Intune Policies - Fig.1
How to Schedule iOS Automatic Updates Using Intune Policies – Fig.1

Update Policy Schedule Settings for iOS/iPad OS Devices

Update policy schedule settings: By default, when an iOS/iPadOS Software Updates policy is assigned to a device, Intune deploys the latest updates at device check-in (approximately every 8 hours).

You can instead create a weekly schedule with customized start and end times. If you choose to update outside the scheduled time, Intune won’t deploy updates until the scheduled time ends.

  • Select Type and Schedule for iOS update (When the updates will occur. Additional input is required to schedule updates during or outside of scheduled times)
    • Update at next check-in
    • Update During the scheduled time
    • Update Outside of the scheduled time
How to Schedule iOS Automatic Updates Using Intune Policies - Fig.2
How to Schedule iOS Automatic Updates Using Intune Policies – Fig.2

Update During the scheduled time, stop updates from being installed at any random time. By configuring this policy, you can delay the software update (automatic update) of iOS on the device.

Weekly Schedule -> TimeZone, Start Day, Start Time, End Day, End Time

You can select the Time zone, Date, and time for iOS/iPad OS updates. Select the time zone of the targeted devices – In this section, you must select the Time Zone of the devices you want to target for this policy. For the India Time Zone, I selected UTC+5:30.

Start Time—Select the beginning of the interval to stop iOS software updates from Installing on supervised iOS devices. You usually don’t want to install software updates on iOS devices during business hours. This will help you schedule iOS phone updates via Intune policies.

End Time – Select the end of the interval to stop iOS software updates from installing on supervised iOS devices.

Start Day of the update: You can select any day of the week from the start and end day options, from Sunday to Saturday. End the Day of the iOs/iPad OS update by selecting any day between Sunday and Saturday.

How to Schedule iOS Automatic Updates Using Intune Policies - Fig.3
How to Schedule iOS Automatic Updates Using Intune Policies – Fig.3

You can select the iOS/iPad updates outside the scheduled time. You must set a scheduled time when you don’t want this update to happen on iOS devices. The update will be initiated outside the scheduled time configured below.

How to Schedule iOS Automatic Updates Using Intune Policies - Fig.4
How to Schedule iOS Automatic Updates Using Intune Policies – Fig.4

How to Deploy or Assign Intune iOS Software Update Prevention Policy?

Once the Intune iOS Automatic Updates prevention Intune Policy is created, you can start assigning this policy to Azure AD Device groups. Deploy Updates Prevention Policy to iOS Devices. 

Select Assignments—Click on Select Groups to find the appropriate Azure AD group to target the iOS update prevention policy. Once the policy is deployed to devices, the iOS software update will be postponed.

It would help to be careful about the policy settings while targeting the AAD device groups. In the policy configuration, there is an option to configure the devices’ time zones. Time zone configuration in this policy is a bit tricky.

It seems we need to segregate devices according to their time zones. I have not tested this, but it is my assumption regarding this policy setting. Learn how To Create Azure AD Dynamic Groups For Managing Devices Using Intune.

Reporting options for iOS update policies in Intune are coming soon.

How to Schedule iOS Automatic Updates Using Intune Policies – Video 1

We are on WhatsApp now. To get the latest step-by-step guides, news, and updates, Join our Channel. Click here. HTMD WhatsApp.

Author

Anoop C Nair is Microsoft MVP! He is a Device Management Admin with more than 20 years of experience (calculation done in 2021) in IT. He is a Blogger, Speaker, and Local User Group HTMD Community leader. His main focus is on Device Management technologies like SCCM 2012, Current Branch, and Intune. He writes about ConfigMgr, Windows 11, Windows 10, Azure AD, Microsoft Intune, Windows 365, AVD, etc.

How to Block Windows Devices from Enrolling to Intune 4

How to Block Windows Devices from Enrolling to Intune

Let’s discuss how to block How to Block Windows Devices from Enrolling to Intune. I have seen a scenario where Intune exclusively manages iOS and Android devices.

Windows devices are managed through SCCM and must be disabled or prevented from enrolling in Intune. We can achieve this with new Intune Enrollment restriction policies. I have a blog post explaining “How to Use Intune Enrollment Restriction Rules“.

This post covers everything you need to know about stopping Windows devices from enrolling in Intune. It explains each step clearly so you can understand it easily. Whether you’re just starting out or want to improve your setup, this post will guide you through keeping your devices out of Intune’s management system.

I tested Windows 10 enrollment to Intune via “Add Work or School Account.” This was tested successfully before restricting Windows 10 devices from the Intune console. Check out the following message after the Windows 10 device is successfully enrolled. More details are in the video below.

How to Restrict Windows 10 Devices from Intune Management

This video provides a step-by-step guide on restricting Windows 10 devices from being managed through Intune. It covers all the necessary details, including the settings and configurations required to ensure proper restriction.

How to Block Windows Devices from Enrolling to Intune – Video 1

Add Work or School Account

“We’ve added your account successfully, and you can now access your organization’s apps and Services. The last step is setting up your new PIN to unlock this device.”

How to Block Windows Devices from Enrolling to Intune - Fig.1
How to Block Windows Devices from Enrolling to Intune – Fig.1

Change the Intune Device Enrollment Policy to Restrict Windows Device

Navigate through the New Azure portal Microsoft Intune – Device Enrollment – Enrollment restrictions. You will be able to see two Intune enrollment restriction policies: 1.

Device Type Restrictions and 2. Device Limit Restrictions. Device Type restriction is where we can restrict Windows (8.1 +) devices from enrolling on Intune.

This policy will prevent Windows 8.1 and later devices from Intune management and restrict Windows 10 device enrollment. Windows 10 mobile devices will also be blocked when we configure this policy.

How to Block Windows Devices from Enrolling to Intune - Fig.2
How to Block Windows Devices from Enrolling to Intune – Fig.2

End-User Experience of Windows 10 Device Restriction

I successfully added a Work or School account to a Windows 10 1703 device. The one change I noticed through the enrollment process is that it didn’t prompt for MFA. After this enrollment, the message I received differed from the one I got above.

We’ve successfully added your account, and you can access your organization’s apps and Services. Moreover, the machine was NOT available in the company portal application under the “My Devices” list. So, the device enrollment never failed as I expected. The device was enrolled without any error.

However, the main question is whether this device would be managed via Intune. Did the device receive Intune policies? The answer is in the paragraph below.

How to Block Windows Devices from Enrolling to Intune - Fig.3
How to Block Windows Devices from Enrolling to Intune – Fig.3

Experience on Azure – Intune Portal for Windows 10 Restriction

The Windows 10 enrolled device was NOT listed in Intune – All Devices (Microsoft AzureMicrosoft Intune – Devices – All Devices). However, the device was listed in Azure AD, as shown in the video tutorial.

The Windows 10 device was listed under Azure AD against the user’s devices (Microsoft Azure—Users and groups—All users > Kaith Nair). But, as you can see in the screenshot below, the Windows device is NOT MANAGED by INTUNE.

Hence, the device won’t receive any Intune policies or be managed through Intune. It also won’t have access to corporate mail, SharePoint, OneDrive, and Skype for Business.

NAMEENABLED/DISABLEDPLATFORMTRUST TYPEIS COMPLIANTMANAGED BY
Windows10_BYODEnabledWindows 10.0.15063.0WorkplaceNoneNone
How to Block Windows Devices from Enrolling to Intune – Table 1
How to Block Windows Devices from Enrolling to Intune - Fig.4
How to Block Windows Devices from Enrolling to Intune – Fig.4

References

  • Set Intune enrollment restrictions policies – here
  • How to configure device restriction settings in Microsoft Intune – here

We are on WhatsApp now. To get the latest step-by-step guides, news, and updates, Join our Channel. Click here. HTMD WhatsApp.

Author

Anoop C Nair is Microsoft MVP! He is a Device Management Admin with more than 20 years of experience (calculation done in 2021) in IT. He is a Blogger, Speaker, and Local User Group HTMD Community leader. His main focus is on Device Management technologies like SCCM 2012, Current Branch, and Intune. He writes about ConfigMgr, Windows 11, Windows 10, Azure AD, Microsoft Intune, Windows 365, AVD, etc.

Intune MSI Application Deployment Video Guide Microsoft Endpoint Manager Step-by-Step Guide 5

Intune MSI Application Deployment Video Guide Microsoft Endpoint Manager Step-by-Step Guide

Let’s discuss the Intune MSI Application Deployment Video Guide Microsoft Endpoint Manager Step-by-Step Guide. How to upload and deploy MSI applications to Windows 10 machines with Intune via Azure console?  MSI application deployment could be one of the most used features in Intune (at least for a couple of years).

This video post will show the step-by-step process of MSI application deployment (Intune LOB application deployment).

NOTE! – Do not include the msiexec command or arguments, such as /i or /x, as they are automatically used. For more information, see Command-Line Options. If the .MSI file needs additional command-line options, consider using Win32 app management.

This post is also an end-to-end guide to creating MSI applications in Intune via the Azure portal. In the following post, “How to Deploy MSI App to Intune MDM Using SCCM CB and Intune“, I already blogged about MSI MDM deployment via the MDM channel. This will include:-

  • Uploading the MSI LOB app to Intune
  • Deployment or Assignment options
  • End-User Experience on Windows 10 machine
  • How to Troubleshooting with event logs and Pending Sync
  • How to get application installation status messages back to the Intune console

How to Deploy MSI LOB App from Intune Azure Console End-to-End Guide

In this video, you will learn how to deploy an MSI Line-of-Business (LOB) application using the Intune Azure Console from start to finish. The guide provides a detailed, step-by-step process covering everything you need.

Intune MSI Application Deployment Video Guide Microsoft Endpoint Manager Step-by-Step Guide – Video 1

Intune MSI Application Deployment Video Guide Microsoft Endpoint Manager Step-by-Step Guide – Upload MSI LOB Application to Intune

Uploading the MSI LOB app to Intune is a very straightforward process. Log in to the Azure portal, navigate via Microsoft Intune -> Mobile Apps -> Apps -> + Add button, and select the app type as “Line-of-Business app.” Click on “App package file,” browse to the MSI source file location, and click on the OK button, as you can see in the video here.

Intune MSI Application Deployment Video Guide Microsoft Endpoint Manager Step-by-Step Guide - Fig.1
Intune MSI Application Deployment Video Guide Microsoft Endpoint Manager Step-by-Step Guide – Fig.1

You must complete the “App information” section before you can proceed with uploading the MSI to Intune. There are a couple of mandatory fields. Command-line options are also available in this section. However, as I have experienced, you can also see in the video.

I have not used any silent switch for MSI, but by default, Intune/MDM on Windows 10 will install the app as silent (without any user interaction or input). Click on the ADD button to complete the MSI app creation process in Intune on the Azure portal.

Deployment or Assignment options of MSI Intune LOB application deployment

It would be best to wait until the application is successfully uploaded to Intune before you can create an assignment (or deployment). An assignment is a method that we use to deploy MSI applications to Windows 10 devices. You can deploy applications to Azure AD dynamic user groups or device groups. In this video/scenario, I used the AAD dynamic user group to target the MSI LOB apps.

  • More details are available in the video here. There are different deployment types available in Intune.

Available – The user needs to go into the company portal and trigger the installation.
Not applicable – Won’t get installed
Required – Forcefully get installed without any user interaction
Uninstall – Remove the application from the device
Available with or Without enrollment  – Mobile Application Management (MAM) without MDM enrollment scenarios.

Intune MSI Application Deployment Video Guide Microsoft Endpoint Manager Step-by-Step Guide - Fig.2
Intune MSI Application Deployment Video Guide Microsoft Endpoint Manager Step-by-Step Guide – Fig.2

End-User Experience on Windows 10 machine

Windows 10 machines will get the new application deployment policy once the assigned user is logged into that machine. What is the option to speed up the application deployment to the machines?  You need to sync with Intune services using the following method (manually).

You can go to “Settings—Access Work or School—Work or School Account—Info (click on this button)” and click on Sync. This will initiate a Windows 10 machine sync with Intune services, and after a successful sync, the machine will get the latest application policies.

How to Troubleshooting with Event Logs and Pending Sync

Unlike SCCM/ConfigMgr deployments, we don’t have log files to look at the application installation status via the MDM channel on Windows 10 machines. So, it would be best if you relied on the Company portal for troubleshooting the MSI application troubleshooting.

  • As you can see in the following picture, the installation is waiting for “Pending Sync.”
  • As mentioned above, you can immediately initiate a manual sync to kick-start the installation process.
  • Event logs – Windows Logs – Applications are where you can get the status of MSI application installation via MDM or Intune channel on to Windows 10 machine.
Intune MSI Application Deployment Video Guide Microsoft Endpoint Manager Step-by-Step Guide - Fig.3
Intune MSI Application Deployment Video Guide Microsoft Endpoint Manager Step-by-Step Guide – Fig.3

How to get application installation status messages back to the Intune console

To get the installation status of the MSI LOB apps to Intune on the Azure portal, you need to sync your work or school accounts with Intune services. The installation status will be blank in the Intune blade unless the device is synced with Intune after the application is installed on the Windows 10 machine.

Initiate thSyncnc via “Settings – Access Work or School – Work or School Account – Info (click on this button)” and click on  Sync. Once thSyncnc is completed successfully, you can try to check the Intune Device Install Status in Intune to check the status.

Intune MSI Application Deployment Video Guide Microsoft Endpoint Manager Step-by-Step Guide - Fig.4
Intune MSI Application Deployment Video Guide Microsoft Endpoint Manager Step-by-Step Guide – Fig.4

Reference:- 

We are on WhatsApp now. To get the latest step-by-step guides, news, and updates, Join our Channel. Click here. HTMD WhatsApp.

Author

Anoop C Nair is Microsoft MVP! He is a Device Management Admin with more than 20 years of experience (calculation done in 2021) in IT. He is a Blogger, Speaker, and Local User Group HTMD Community leader. His main focus is on Device Management technologies like SCCM 2012, Current Branch, and Intune. He writes about ConfigMgr, Windows 11, Windows 10, Azure AD, Microsoft Intune, Windows 365, AVD, etc.

Differences Between Intune Enrollment Restriction Device Restriction Profile 6

Differences Between Intune Enrollment Restriction Device Restriction Profile

Let’s discuss the Differences Between the Intune Enrollment Restriction and Device Restriction Profile. I was going through one of the TechNet documents and got confused between enrollment restriction policies and device restriction policies. I have posted about both of these policies.

In the post-Intune Create Device Restriction Policy Profiles Deploy Security Policies to Windows 10 Devices, you will learn everything you need to create device restriction policy profiles in Intune and deploy security policies to Windows 10 devices. We will guide you step-by-step through setting up these policies to ensure your devices are secure and comply with your organization’s requirements.

How to Restrict Personal Android Devices from Enrolling into Intune post helps you to provide detailed instructions on restricting personal Android devices from enrolling into Intune using Endpoint Manager (MEM). It covers the steps necessary to configure enrollment restrictions, ensuring that only corporate-owned devices can be enrolled and managed through Intune.

Device restrictions are entirely different from Enrollment restrictions. Both options have different use cases, which will be explained in this post. These two policies are used in modern device management solutions like Intune and Azure AD.

Differences Between Intune Enrollment Restriction Device Restriction ProfileEnrollment Device Platform Restrictions

Intune Device restriction profiles (Enrollment Device Platform Restrictions) are policies similar to GPO from the traditional device management world. Most enterprise organizations use GPO to restrict corporate-owned devices.

These are security policies that need to be applied to devices. Intune Device restriction policies control various mobile device settings and features (iOS, Android, macOS, and Windows 10).

  • MDM – Allow or Block
  • Allow – min/max range
  • Personally owned devices – Allow or Block

Device Type Restriction in Intune

Enrollment device platform restrictions make more sense. Navigate to Devices – Enroll Devices – Enrollment Device Platform Restrictions.

Differences Between Intune Enrollment Restriction Device Restriction Profile - Fig.1
Differences Between Intune Enrollment Restriction Device Restriction Profile – Fig.1

This type of policy could apply to different categories, including security, browser, hardware, and data-sharing settings. For example, you could create a device restriction profile policy that prevents Windows users from sharing the internet or using Cortana, etc.

Intune Device Restriction profiles can be deployed to specific users/devices in AAD groups, whereas Intune Enrolment restriction policies can’t be deployed to specific user/device groups in Azure AD. The following section of this post provides more details.

Intune Device Limit Restrictions

Enrollment is the first part of Mobile Device Management (MDM). Why do we need to enroll a mobile device into Intune? Enrollment is the first step for management. When a device is enrolled in Intune, they have issued an MDM certificate, which that device then uses to communicate with the Intune service.

In several scenarios, we need to block employees from enrolling their devices in the corporate management platform. You want to block devices not secured enough to enroll in Intune, such as personal devices.

Also, we could block devices with lower OS versions. How is this possible from Intune? Difference Between Intune Enrollment Restriction Device Restriction Profile | Configuration Manager ConfigMgr.

Navigate to Microsoft Intune—Enroll Devices—Enrollment device limit restrictions. You will see two Intune enrollment restriction policies.

Intune Enrollment Restriction Policies
Device Type Restrictions
Device Limit Restrictions
Differences Between Intune Enrollment Restriction Device Restriction Profile – Table 1

Device Type restriction is where we can define which platforms, versions, and management types can enroll. So, all other devices are blocked from Intune enrollment.

The only problem with Intune enrollment restrictions I can think of is that device type restrictions in Intune are deployed to “All Users, ” we can’t deploy or assign Intune enrollment restriction policies to “specific user group.” At the moment, the device type restrictions policies are tenant-wide configurations.

Device Limit Restrictions in Intune

Navigate to Enroll Devices – Enrollment Device Limit Restrictions to configure the limitation.

Differences Between Intune Enrollment Restriction Device Restriction Profile - Fig.2
Differences Between Intune Enrollment Restriction Device Restriction Profile – Fig.2

We are on WhatsApp now. To get the latest step-by-step guides, news, and updates, Join our Channel. Click here. HTMD WhatsApp.

Author

Anoop C Nair is Microsoft MVP! He is a Device Management Admin with more than 20 years of experience (calculation done in 2021) in IT. He is a Blogger, Speaker, and Local User Group HTMD Community leader. His main focus is on Device Management technologies like SCCM 2012, Current Branch, and Intune. He writes about ConfigMgr, Windows 11, Windows 10, Azure AD, Microsoft Intune, Windows 365, AVD, etc.

How to Setup Android Work Support Step by Step Guide Microsoft Intune 7

How to Setup Android Work Support Step by Step Guide Microsoft Intune

Let’s learn how to Setup Android Work Support Step by Step Guide Microsoft Intune. Google’s strategic approach is to support management only via the Android Work channel, and Microsoft Intune’s strategy is to help Android work. This post will show how to set up Android work support in Intune portal.

Latest Post How To Configure Intune Enrollment Setup For Android Enterprise Device Management – HTMD Blog #2 (howtomanagedevices.com)

I have blogged about enrolling for Android Work Management via Intune: “Intune How to Enroll Android for Work Supported Devices for Management.” The video embedded in the above post explains the process of enabling Android Work support in the Intune Silverlight portal.

As you can see in the embedded video guide attached to this post, we will learn how to unbind or change the Gmail/Google account we used to set up Android work support in the Intune Azure portal. Once the existing Gmail account has been removed, we can use a different Gmail account to configure or set up Android Work support in the Intune Azure console.

How to Unbind Android Work Account from Intune Azure Portal

We must unbind the account from the Intune Azure console to change the Setup Android Work Google account. The Unbind button in Intune Azure removes support for Android Work enrollment and eliminates the relationship between the Android work account Gmail and Intune.

I have seen some delay in unbinding the Gmail account from the Intune blade in the Azure portal. As you can see in the video here, I removed the Gmail account from the Android work setting in the Intune blade in the Azure portal, but it took 2 minutes for these changes to reflect. However, the removal of Android Work was immediately reflected on the Intune Silverlight portal.

How to Setup Android Work Support Step by Step Guide Microsoft Intune - Fig.1
How to Setup Android Work Support Step by Step Guide Microsoft Intune – Fig.1

Setup Android Work Support in Intune Azure Portal

The configuration or setup of Android Work support in the Intune Azure portal is very similar to that in the Silverlight portal. You need to click the Configure button to open a pop-up where you can log in with a new Gmail or Android Work account. The Google configuration wizard will help you set up the connection between Intune and Google APIs like Google Play for Work, Android Work management, etc.

Microsoft Intune
Enrollment
Android for Work Enrollment
How to Setup Android Work Support Step by Step Guide Microsoft Intune – Table 1
How to Setup Android Work Support Step by Step Guide Microsoft Intune - Fig.2
How to Setup Android Work Support Step by Step Guide Microsoft Intune – Fig.2

Setting up Android Work Enrollment & Management via Intune

Android for Work enrollment settings are the same as those in the Intune Silverlight console. In the Intune Azure portal, we have three options for setting up Android work enrollment.

1. Manage all devices as Android – This is opposite to Google’s strategic approach regarding managing the Android devices
2. Manage supported devices as Android for Work—As per my testing, all Android 6.0 and above devices are supported for Android work enrollment and management via Intune. I have a blog post that explains A4W supportability, “Intune Entry Level Low-Cost Device Support for Android for Work Enrollment.” Hence, this is my best bet option for enrollment.
3. Manage supported devices for users only in these groups, such as Android Work. This could be used in the testing or pilot process if your organization doesn’t have a test Intune environment.

How to Setup Android Work Support Step by Step Guide Microsoft Intune - Fig.3
How to Setup Android Work Support Step by Step Guide Microsoft Intune – Fig.3

We are on WhatsApp now. To get the latest step-by-step guides, news, and updates, Join our Channel. Click here. HTMD WhatsApp.

Author

Anoop C Nair is Microsoft MVP! He is a Device Management Admin with more than 20 years of experience (calculation done in 2021) in IT. He is a Blogger, Speaker, and Local User Group HTMD Community leader. His main focus is on Device Management technologies like SCCM 2012, Current Branch, and Intune. He writes about ConfigMgr, Windows 11, Windows 10, Azure AD, Microsoft Intune, Windows 365, AVD, etc.

Create SCEP Certificate Profiles in Intune Deploy SCEP Profiles to Windows 10 Devices 8

Create SCEP Certificate Profiles in Intune Deploy SCEP Profiles to Windows 10 Devices

Let’s discuss how to Create SCEP Certificate Profiles in Intune and Deploy them to Windows 10 Devices. In this post, we will create and deploy an SCEP Certificate to Windows 10 Devices (How to Deploy an SCEP Certificate to Windows Devices).

We must take care of some prerequisites before creating SCEP Certificates in Intune. On-prem infrastructure components must be available before creating SCEP cert profiles in Intune. Related post > Intune SCEP HTTP Errors Troubleshooting Made Easy With Joy – #5 (anoopcnair.com)

NDES setup for SCEP – The NDES connector should be installed on your data center, and the NDES connector should be able to talk to the CA server and use the Azure AD App proxy connector if you are using the Azure app proxy.

I won’t cover the setup of NDEs and the Azure AD App proxy connector. Those two configurations are very complex and well explained in other blogs.

Intune SCEP Certificate Deployment for Windows 10 Devices – SCEP Certificates to Users Devices

Before creating a Windows 10 SCEP Certificate in Intune, you need to create and deploy a certificate chain. The certificate chain includes the Root CA certificate and the Intermediate /Issuing CA certificate. Intune offers three certificate profiles: TRUSTED Certificate, SCEP Certificate, and PKCS Certificate. We are not going to use the PKCS certificate for SCEP profile deployment.

Create SCEP Certificate Profiles in Intune Deploy SCEP Profiles to Windows 10 Devices – Video 1

Create SCEP Certificate Profiles in Intune Deploy SCEP Profiles to Windows 10 Devices

Deploying SCEP Certificates to Windows 10 Devices will help connect corporate resources like Wi-Fi and VPN profiles. Before making a Windows 10 SCEP Certificate in Intune, you must create and deploy a certificate chain. The certificate chain includes the Root CA and Intermediate /Issuing CA certificates.

Intune offers 3 certificate profiles: TRUSTED Certificate, SCEP Certificate, and PKCS Certificate. We will not use the PKCS certificate for SCEP profile deployment.

Create SCEP Certificate Profiles in Intune Deploy SCEP Profiles to Windows 10 Devices - Fig.1
Create SCEP Certificate Profiles in Intune Deploy SCEP Profiles to Windows 10 Devices – Fig.1

Intune Create SCEP Certificate Profiles in Endpoint Manager Deploy SCEP profiles to Windows 10 Devices. Following are the high-level tasks for deploying the SCEP Certificate to Windows10 Devices via Intune:-

Create and Deploy iOS Root CA certificate using Intune Azure Portal
Create and Deploy iOS Intermediate/Issuing CA Certificate using Intune Azure Portal
Create and Deploy SCEP Certificate to iOS Devices using Intune Azure Portal.

Create and Deploy Windows 10 Root CA, Windows 10 Intermediate/Issuing CA Certificate Profiles

As the first step, we need to create a Root CA cert profile. To create a Root CA cert, navigate through Microsoft Intune—Device Configuration—Profiles—Create a profile. Select the platform as Windows 10 and the profile type as Trusted Certificate. You must then browse and upload your ROOT CA cert (the Name of the cert = ACN-Enterprise-Root-CA.CER)from your CA server.

We need to select a destination store in the Windows 10 Trusted certificate profile. For the root certificate profile, we must select Computer Certificate store—root. Once the settings are saved, you must deploy the root certificate profile to the required Windows 10 devices.

PlatformProfile type
Windows 8.1 and laterTrusted Certificate
Create SCEP Certificate Profiles in Intune Deploy SCEP Profiles to Windows 10 Devices – Table 1
Create SCEP Certificate Profiles in Intune Deploy SCEP Profiles to Windows 10 Devices - Fig.2
Create SCEP Certificate Profiles in Intune Deploy SCEP Profiles to Windows 10 Devices – Fig.2

We must follow the same process for deploying the Intermediate/Issuing CA certificate profile via Intune. Make sure that you upload the issuing CA cert (Name of cert = ACN-Issuing-CA-PR1.CER) from your CA server.

Another point we need to take care of is the destination store. We need to select the destination store as Computer Certificate Store—Intermediate. Click OK—Create to finish creating the Issuing cert profile.

Deploy Windows 10 Root CA and Intermediate/Issuing CA Certificate Profiles to the same group of Windows 10 devices. We can deploy these profiles using either an AAD user or device group. However, I would prefer to use AAD dynamic device groups wherever possible.

Create and Deploy Windows 10 SCEP Profile via Intune – Intune Create SCEP Certificate Profiles

To create and deploy a SCEP profile on Windows 10 devices, navigate to Microsoft Intune—Device Configuration—Profiles—”Create a profile.” Select the platform as Windows 10 and the profile type as SCEP Certificate.

When you create a SCEP profile for a Windows 10 device, you need to make some specific settings. The load of these configurations can differ between the CA server setup and another on-prem component setup.

Create SCEP Certificate Profiles in Intune Deploy SCEP Profiles to Windows 10 Devices - Fig.3
Create SCEP Certificate Profiles in Intune Deploy SCEP Profiles to Windows 10 Devices – Fig.3

The certificate validity period is 1 year, which is the industry standard. There are four options for the Key storage provider (KSP): Enrol to trusted platform Module(TPM) KSP if present Software KSP, Enrol to Trusted platform module(TPM), otherwise fail, Enrol to passport, otherwise fail, and Enrol to Software KSP.

In this scenario, I have selected Enrol to Trusted Platform Module(TPM) KSP if the Software KSP is present. We must choose the subject name format value depending on your organizational requirement. In this scenario, I selected a familiar name as an email. The subject alternative name is UPN. Key usage is a digital signature and key encipherment. The key Size value is 2048. If your CA supports the same, the hash algorithm value (SHA-2) should be the latest one.

Another critical point is linking the SCEP profile with the ROOT cert profile you created. If you have not created any ROOT cert and intermediate/issuing CA cert profiles in Intune, it won’t allow you to create an SCEP profile. Extended key usage is another setting, and it should automatically get populated. One example here is “Client Authentication—1.3.6.1.5.5.7.4.3.”

Create SCEP Certificate Profiles in Intune Deploy SCEP Profiles to Windows 10 Devices - Fig.4
Create SCEP Certificate Profiles in Intune Deploy SCEP Profiles to Windows 10 Devices – Fig.4

Enrollment Settings is the last set of settings for Windows 10 SCEP profiles in Intune. I recommend keeping the certificate renewal threshold at the default value of 20%. SCEP server URLs (e.g., https://acnndes-sccz.msappproxy.net/certsrv/mscep/mscep.dll) are very important. These are the URLs to which Windows 10 devices will go and request SCEP certs.

This should be reachable from the Internet. As I mentioned above, you can use Azure AD app proxy URLs. In this scenario, I will use Azure AD app proxy settings.

SCEP profile cert will be deployed to users’ stores in the format “ACN-Issuing-CA-PR5“.

End-User Windows 10 Certificate Store Experience Intune Create SCEP Certificate Profiles

SCEP profile will be deployed to Current User\Personal\Certificates = “ACN-Issuing-CA-PR5

Root and Intermediate CA cert will be deployed to Local Computer\Intermediate Certification Authorities\Certificates = ACN-Enterprise-Root-CA.CER and ACN-Issuing-CA-PR1.CER

Create SCEP Certificate Profiles in Intune Deploy SCEP Profiles to Windows 10 Devices - Fig.5
Create SCEP Certificate Profiles in Intune Deploy SCEP Profiles to Windows 10 Devices – Fig.5

Resources

We are on WhatsApp now. To get the latest step-by-step guides, news, and updates, Join our Channel. Click here. HTMD WhatsApp.

Author

Anoop C Nair is Microsoft MVP! He is a Device Management Admin with more than 20 years of experience (calculation done in 2021) in IT. He is a Blogger, Speaker, and Local User Group HTMD Community leader. His main focus is on Device Management technologies like SCCM 2012, Current Branch, and Intune. He writes about ConfigMgr, Windows 11, Windows 10, Azure AD, Microsoft Intune, Windows 365, AVD, etc.

Create SCEP Certificate Profiles Deploy SCEP Profiles to iOS Devices using Intune 9

Create SCEP Certificate Profiles Deploy SCEP Profiles to iOS Devices using Intune

Let’s discuss creating SCEP Certificate Profiles and Deploying them to iOS Devices using Intune. Before obtaining an SCEP certificate in Intune, we must consider some prerequisites.

It would be best if you also had on-prem infrastructure components available. NDES connector is supposed to be installed on your Data Center, and the NDES connector should be able to talk to the CA server and Azure AD App proxy connector if you are using the Azure app proxy.

In “Intune SCEP HTTP Errors Troubleshooting Made Easy With Joy – #5,” Joymalya Basu Roy provides a comprehensive guide on diagnosing and resolving HTTP errors encountered during SCEP (Simple Certificate Enrollment Protocol) certificate deployments using Microsoft Intune. The post focuses on various HTTP errors, particularly the HTTP 500 Internal Server Error, and offers detailed steps to effectively identify and troubleshoot these issues.

I won’t cover the setup of NDEs and Azure AD App proxy connectors. Those two configurations are complex and well explained in loads of other blogs. This post will cover how to create and deploy a SCEP Profile for iOS Devices via Intune Blade in the Azure portal.

How to Create and Deploy SCEP Certificate with Intune for iOS Devices

Deployment of SCEP Certificates to iOS devices will help them connect to corporate Wi-Fi and VPN profiles, etc.… You must create and deploy the certificate chain before creating an iOS SCEP Certificate in Intune.

The certificate chain includes the Root CA and Intermediate/Issuing CA certificates. There are 3 certificate profiles available in Intune: the TRUSTED Certificate, the SCEP Certificate, and the PKCS certificate. We are not going to use the PKCS certificate for SCEP profile deployment.

Create SCEP Certificate Profiles Deploy SCEP Profiles to iOS Devices using Intune – Video 1

Introduction – Create SCEP Certificate Profiles Deploy SCEP Profiles to iOS Devices using Intune

Deploying a SCEP Certificate to iOS devices will help them connect to corporate Wi-Fi, VPN profiles, etc. Before creating an iOS SCEP Certificate in Intune, you need to develop and deploy a certificate chain. The certificate chain includes the Root CA and Intermediate/Issuing CA certificates.

There are 3 certificate profiles available in Intune: TRUSTED Certificate, SCEP Certificate, and PKCS certificate. We are not going to use the PKCS certificate for SCEP profile deployment. The following is the high-level task list for deploying SCEP Profile to iOS Devices (Deploy SCEP profiles to iOS Devices).

Create SCEP Certificate Profiles Deploy SCEP Profiles to iOS Devices using Intune
Create and Deploy iOS Root CA certificate using Intune Azure Portal
Or Create and Deploy an iOS Intermediate CA certificate using Intune Azure Portal
Create and Deploy SCEP Certificate to iOS Devices using Intune Azure Portal
Create SCEP Certificate Profiles Deploy SCEP Profiles to iOS Devices using Intune – Table 1
Create SCEP Certificate Profiles Deploy SCEP Profiles to iOS Devices using Intune - Fig.1
Create SCEP Certificate Profiles Deploy SCEP Profiles to iOS Devices using Intune – Fig.1

Create and Deploy iOS Root CA, iOS Intermediate/Issuing CA Certificate Profiles

As the first step, we need to create a Root CA cert profile. To create a Root CA cert, navigate through Microsoft IntuneDevice ConfigurationProfilesCreate a profile (Deploy SCEP profiles to iOS Devices). Select the platform iOS and profile type Trusted Certificate. You must browse and upload your ROOT CA cert (Name of the cert = ACN-Enterprise-Root-CA.CER) from your CA server.

Once settings are saved, you must deploy the root cert profile to the required iOS devices. The exact process must follow for Intermediate/Issuing CA certificate profile deployment via Intune. Intune Create SCEP Certificate Profiles Deploy SCEP profiles to iOS Devices using Intune.

Make sure that you are uploading the issuing CA cert (Name of cert = ACN-Issuing-CA-PR1.CER) from your CA server. The video above explains all these configurations; you can watch them here.

Create and Deploy iOS SCEP Certificate Profile for iOS Devices

To create a SCEP certificate profile, navigate to Microsoft Intune – Device Configuration – Profiles – Create a profile. While making an iOS SCEP Certificate, we must select the Profile type as “SCEP certificate” and the platform as iOS.

The next step is configuring the settings. These settings are critical, and we need to consult with your CA team when you create a SCEP Certificate. Loads of these configurations can differ between the CA server setup and another on-prem component setup (Deploy SCEP profiles to iOS Devices).

The certificate validity period is 1 year, which is the industry standard. The subject name format also depends on your organization’s preference. In this scenario, I selected a familiar name as email and a subject alternative name as UPN. The key usage is a digital signature and critical decipherment. The key Size is 2048.

Another critical point is linking the SCEP Certificate with the ROOT cert profile you created. If you have not earned any ROOT certification in Intune, you won’t be able to develop an SCEP Certificate. Extended key usage is another setting, and it should automatically get populated.

One example here is Client Authentication – 1.3.6.1.5.5.7.4.3. Intune Create SCEP Certificate Profiles Deploy SCEP profiles to iOS Devices using Intune.

Create SCEP Certificate Profiles Deploy SCEP Profiles to iOS Devices using Intune - Fig.2
Create SCEP Certificate Profiles Deploy SCEP Profiles to iOS Devices using Intune – Fig.2

Enrollment Settings is the last set of settings for iOS SCEP profiles in Intune. I recommend keeping the renewal threshold of certificates as the default value of 20%. SCEP server URLs are critical. These are the URLs to which iOS devices will request SCEP certifications.

So, this should be reachable from the Internet. As mentioned above, you can use Azure AD App proxy URLs here (e.g., https://acnndes-sccz.msappproxy.net/certsrv/mscep/mscep.dll ). In this scenario, I will use Azure AD App proxy settings. All these configuration details are explained in the video here.

SCEP certificate will be in the following format: “ACN-Issuing-CA-PR5“.

Resources

We are on WhatsApp now. To get the latest step-by-step guides, news, and updates, Join our Channel. Click here. HTMD WhatsApp.

Author

Anoop C Nair is Microsoft MVP! He is a Device Management Admin with more than 20 years of experience (calculation done in 2021) in IT. He is a Blogger, Speaker, and Local User Group HTMD Community leader. His primary focus is Device Management technologies like SCCM 2012, Current Branch, and Intune. He writes about ConfigMgr, Windows 11, Windows 10, Azure AD, Microsoft Intune, Windows 365, AVD, etc.

Learn How to Create and Deploy Security Policies for Android Devices using Intune 10

Learn How to Create and Deploy Security Policies for Android Devices using Intune

Let’s learn how to Create and Deploy Security Policies for Android Devices using Intune. Android for Work Device Restriction Policies Deployment is the Security Policy for Android Devices. Security policies are important to secure the corporate data and applications on those devices.

In this post, we will explain how to create and deploy security policies for Android devices using the Intune blade in the Azure portal. These security policies help protect your devices and data.

Additionally, we will cover Intune compliance policies, which are crucial for ensuring your Android devices meet your organization’s security standards. Follow along to learn the steps for setting up both types of policies to enhance the security of your Android devices.

I have a post about setting up compliance policies for Android devices “How to Plan and Design Intune Compliance Policy for Android Devices“. Latest post – How To Configure Intune Enrollment Setup For Android Enterprise Device Management.

Learn How to Create and Deploy Security Policies for Android Devices using Intune

You can create the Intune device restriction policy for Android for Work from Microsoft Intune – Device Configuration profiles – Create New Profile. I selected Android for Work as the platform, and the platform selection is very important.

Also, it would help if you had to select the profile type while creating an Intune Configuration Restriction policy. In my scenario, it’s the Device restriction policy, which is named the Android Restriction policy, as seen in the video.

PlatformProfile Type
Android for WorkDevice Restrictions
Learn How to Create and Deploy Security Policies for Android Devices using Intune – Table 1
Learn How to Create and Deploy Security Policies for Android Devices using Intune - Fig.1
Learn How to Create and Deploy Security Policies for Android Devices using Intune – Fig.1

There are two categories for configuring device restriction settings for Android: Work profile settings and Device password. Again, I won’t suggest setting up a device password policy as part of the configuration policy when you have a compliance policy setting for the Device password.

Data sharing between work and personal profile settings specify whether work profiles can share data with apps in the personal profile. Microsoft Intune recommended that the value of this setting is to prevent any sharing across boundaries.

We can block the Work profile notifications while the device is locked. Default app permission is another Android for the Work security setting. I don’t recommend configuring the password settings as part of Intune configuration policies. Password settings should be part of compliance policies for Android for Work devices.

Learn How to Create and Deploy Security Policies for Android Devices using Intune - Fig.2
Learn How to Create and Deploy Security Policies for Android Devices using Intune – Fig.2

Deploy Security Policy for Android Devices

Deploying the Android for Work device restriction policy is straightforward. However, it’s essential to consider some of the points before deploying the security policy for Android devices. After setting up the policy, click on the assignment and select the AAD User/Device group.

Click on the Save button, ton and you are done. The best-recommended way is to assign policies to the Azure AD dynamic device group for Android devices. However, the AAD device groups are still in preview; we may be better off using user group deploy device restriction policies for Android devices.

One thing to remember is that you can’t apply Android device platform policies to Android for Work devices. You should instead use Android for Work device platform policies for A4W. The EXCLUDE option is another helpful option while deploying device restriction policies in Intune.

This is useful when excluding devices or users from these security policies.

Learn How to Create and Deploy Security Policies for Android Devices using Intune - Fig.3
Learn How to Create and Deploy Security Policies for Android Devices using Intune – Fig.3

User Experience of Security Policy for Android Devices

The user experience of Android for Work devices can vary depending on the manufacturer of the devices. As mentioned in the previous post, Samsung and Nexus are the best-experienced devices I have tested.

But I would admit the user experience of Android for Work is far better than that of an Android device! As Android devices have different variants, it’s better to ensure that all the security policies for the Android device experience are excellent for all manufacturers.

Learn How to Create and Deploy Security Policies for Android Devices using Intune – Video 1

Resources

Intune SCEP HTTP Errors Troubleshooting Made Easy With Joy

How To Configure Intune Enrollment Setup For Android Enterprise Device Management

We are on WhatsApp now. To get the latest step-by-step guides, news, and updates, Join our Channel. Click here. HTMD WhatsApp.

Author

Anoop C Nair is Microsoft MVP! He is a Device Management Admin with more than 20 years of experience (calculation done in 2021) in IT. He is a Blogger, Speaker, and Local User Group HTMD Community leader. His primary focus is Device Management technologies like SCCM 2012, Current Branch, and Intune. He writes about ConfigMgr, Windows 11, Windows 10, Azure AD, Microsoft Intune, Windows 365, AVD, etc.

Intune Create Device Restriction Policy Profiles Deploy Security Policies to Windows 10 Devices 11

Intune Create Device Restriction Policy Profiles Deploy Security Policies to Windows 10 Devices

Let’s discuss the Intune Create Device Restriction Policy Profiles Deploy Security Policies to Windows 10 Devices. Intune configuration restriction policies are critical in modern device management strategy. Intune device restriction policy is the security settings applied on your Windows 10 CYOD device.

As part of your organization’s security policies, you may need to lock down mobile or Windows devices with corporate data and app access. Yes, Intune configuration restriction policies help you lock down Windows devices as per your organization’s security requirements.

In this post, you will learn everything you need to create device restriction policy profiles in Intune and deploy security policies to Windows 10 devices. We will guide you step-by-step through setting up these policies to ensure your devices are secure and comply with your organization’s requirements.

Whether you’re new to Intune or looking to enhance your device management skills, this guide will provide clear and straightforward instructions to help you effectively manage and protect your Windows 10 devices.

Intune Configuration Restriction Policy Deployment with Windows 10

In this video, you’ll learn all about deploying Intune Configuration Restriction Policies on Windows 10. We’ll show you each process step, making it easy to follow. Whether setting up new policies or adjusting existing ones, this video will help you understand how to use Intune to keep your Windows 10 devices secure and well-managed.

Intune Create Device Restriction Policy Profiles Deploy Security Policies to Windows 10 Devices – Video 1

Create Intune Device Restriction Policy for Windows 10 Devices

You can create an Intune device restriction policy for Windows 10 from Microsoft Intune—Device Configuration—Profiles—Create New Profile. I selected Windows 10 as the platform, and platform Selection is essential.

Also, it would be best to select the profile type while creating an Intune Configuration Restriction policy. In my scenario, the Device restriction policy is named “Windows 10 CYOD Restrictions.”

PlatformProfile Type
Windows 10 and LaterDevice Restrictions
Intune Create Device Restriction Policy Profiles Deploy Security Policies to Windows 10 Devices – Table 1
Intune Create Device Restriction Policy Profiles Deploy Security Policies to Windows 10 Devices - Fig.1
Intune Create Device Restriction Policy Profiles Deploy Security Policies to Windows 10 Devices – Fig.1

As shown below, the Windows platform Intune device restriction policy for out-of-box settings is segregated into 16 sections. This list is comprehensive, and we can lock down Windows 10 machines as required.

Is this Intune device restriction policy a replacement for group policies? No, it’s still not a replacement for AD group policies.

  1. General
  2. Password
  3. Personalization
  4. Locked screen experience
  5. App Store
  6. Edge Browser
  7. Search
  8. Cloud and Storage
  9. Cellular and Connectivity
  10. Control Panel and Settings
  11. Defender
  12. Defender Exclusions
  13. Network Proxy
  14. Windows Spotlight
  15. Display
  16. Start

Deploy Windows 10 Intune Device Restriction Policy

You can deploy the Windows 10 Intune Device Restriction Policy to either Windows 10 CYOD dynamic devices or Windows 10 user groups. Dynamic device groups are still in preview, and the group typos are not always stable. So, at least for the next two months, I will prefer to deploy policies to user groups rather than dynamic device groups.

Windows 10 End-user Experience of Intune Device Restriction Policy

As you can see in the video tutorial at the top of this post, I’ve enabled the time settings to disable the option as part of the initial Windows 10 device restriction policy. The end-user logged in to the Windows 10 machine can’t change the time on the system.

After that, I changed the Windows time setting policy again, and after applying the new policy, the user can change the time on the Windows 10 system.

Intune Create Device Restriction Policy Profiles Deploy Security Policies to Windows 10 Devices - Fig.2
Intune Create Device Restriction Policy Profiles Deploy Security Policies to Windows 10 Devices – Fig.2

We are on WhatsApp now. To get the latest step-by-step guides, news, and updates, Join our Channel. Click here. HTMD WhatsApp.

Author

Anoop C Nair is Microsoft MVP! He is a Device Management Admin with more than 20 years of experience (calculation done in 2021) in IT. He is a Blogger, Speaker, and Local User Group HTMD Community leader. His main focus is on Device Management technologies like SCCM 2012, Current Branch, and Intune. He writes about ConfigMgr, Windows 11, Windows 10, Azure AD, Microsoft Intune, Windows 365, AVD, etc.

How to Enable Intune Company Portal Browser Access for Conditional Access Enabled Web Apps 12

How to Enable Intune Company Portal Browser Access for Conditional Access Enabled Web Apps

Let’s discuss how to Enable Intune Company Portal Browser Access for Conditional Access Enabled Web apps. I have been testing and developing a solution for Android device management with Intune. I have shared my Android for Work learning experiences in my previous posts – Android.

In this post, we will see and learn how to enable Intune Company Portal Browser Access for Android devices. What is the need for enabling company portal browser access?.

To put it in simple words, if your organization is using Azure AD Conditional Access (CA) enabled internal web applications, then we need to enable the Company portal browser access option.

This post will provide a comprehensive guide on enabling Intune Company Portal browser access for conditional access-enabled web apps. We will walk you through the necessary steps to configure your settings, ensuring easy access control and security compliance.

How to Enable Intune Company Portal Browser Access

The above video recording gives you the same user experience when you have CA access-enabled web applications and you have not enabled company portal browser access. As you can see in the video, the managed browser for Android devices gives an error stating that the device is not enrolled.

Yes, the managed browser application can’t understand whether the device is already enrolled. When you perform an action like “Intune Company Portal Browser Access, ” the app will try to install the Microsoft work account certificate on an Android device. There is a known issue with the previous version of the Company Portal application on Android devices.

How to Enable Intune Company Portal Browser Access
Open the Company Portal app.
Go to the Settings page from the ellipsis (…) or hardware menu button.
Press the Enable Browser Access button.
How to Enable Intune Company Portal Browser Access for Conditional Access Enabled Web Apps – Table 1

Microsoft Work Account Certificate Installation Error

Allow the Company portal and Intune-managed apps to record future actions in greater detail, which may help your IT administrator better identify and solve issues.

How to Enable Intune Company Portal Browser Access for Conditional Access Enabled Web Apps - Fig.1
How to Enable Intune Company Portal Browser Access for Conditional Access Enabled Web Apps – Fig.1

End-User Experience of ENROLL Device Error

The solution to the Microsoft mentioned above “work account certificate installation” error is to update the company portal application for Android devices. Are you getting an ENROL error on your device (as you can see in the following screen capture)?

Does this error appear when you try to access Conditional Access-enabled web applications through the managed browser? The web apps without CA are working fine? If so, you must perform the following action from your Android device: “Intune Company Portal Browser Access.”

How to Enable Intune Company Portal Browser Access for Conditional Access Enabled Web Apps - Fig.2
How to Enable Intune Company Portal Browser Access for Conditional Access Enabled Web Apps – Fig.2

Microsoft Work Account Certificate Installation

Now, it’s time to update the company portal application on Android for work-enabled devices. Once the device is updated with the latest version of the company portal app, then open up the company portal app and go to settings – tap on the button “Enable Browser Settings.”

This action opens a popup for installing a Microsoft Work Account certificate. The user must select the cert and tap on the ALLOW button. The video tutorial at the top of this post explains this process.

How to Enable Intune Company Portal Browser Access for Conditional Access Enabled Web Apps - Fig.3
How to Enable Intune Company Portal Browser Access for Conditional Access Enabled Web Apps – Fig.3

End USER Experience of CA-enabled Web Application Access

Once the managed browser has a certificate, the web applications opened in the Managed browser can use the Microsoft Work account cert. This will allow the managed browser to securely open conditional access-enabled internal web applications. In my experience, the user doesn’t require a tap on the INSTALL button; rather, the user must tap on the ALLOW button to complete this configuration.

How to Enable Intune Company Portal Browser Access for Conditional Access Enabled Web Apps - Fig.4
How to Enable Intune Company Portal Browser Access for Conditional Access Enabled Web Apps – Fig.4

We are on WhatsApp now. To get the latest step-by-step guides, news, and updates, Join our Channel. Click here. HTMD WhatsApp.

Author

Anoop C Nair is Microsoft MVP! He is a Device Management Admin with over 20 years of IT experience (calculation done in 2021). He is a Blogger, Speaker, and leader of the Local User Group HTMD Community. His main focus is on Device Management technologies like SCCM 2012, Current Branch, and Intune. He writes about ConfigMgr, Windows 11, Windows 10, Azure AD, Microsoft Intune, Windows 365, AVD, etc.