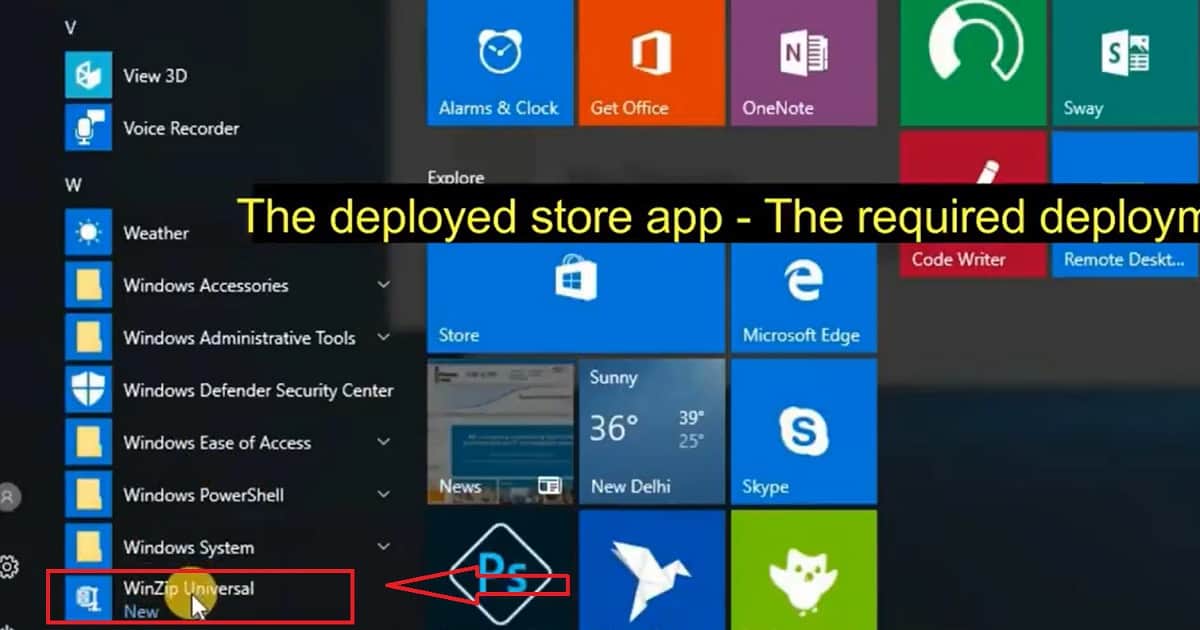


Intune MSI Application Deployment Video Guide Microsoft Endpoint Manager Step-by-Step Guide 1

Intune MSI Application Deployment Video Guide Microsoft Endpoint Manager Step-by-Step Guide

Let’s discuss the Intune MSI Application Deployment Video Guide Microsoft Endpoint Manager Step-by-Step Guide. How to upload and deploy MSI applications to Windows 10 machines with Intune via Azure console?  MSI application deployment could be one of the most used features in Intune (at least for a couple of years).

This video post will show the step-by-step process of MSI application deployment (Intune LOB application deployment).

NOTE! – Do not include the msiexec command or arguments, such as /i or /x, as they are automatically used. For more information, see Command-Line Options. If the .MSI file needs additional command-line options, consider using Win32 app management.

This post is also an end-to-end guide to creating MSI applications in Intune via the Azure portal. In the following post, “How to Deploy MSI App to Intune MDM Using SCCM CB and Intune“, I already blogged about MSI MDM deployment via the MDM channel. This will include:-

  • Uploading the MSI LOB app to Intune
  • Deployment or Assignment options
  • End-User Experience on Windows 10 machine
  • How to Troubleshooting with event logs and Pending Sync
  • How to get application installation status messages back to the Intune console

How to Deploy MSI LOB App from Intune Azure Console End-to-End Guide

In this video, you will learn how to deploy an MSI Line-of-Business (LOB) application using the Intune Azure Console from start to finish. The guide provides a detailed, step-by-step process covering everything you need.

Intune MSI Application Deployment Video Guide Microsoft Endpoint Manager Step-by-Step Guide – Video 1

Intune MSI Application Deployment Video Guide Microsoft Endpoint Manager Step-by-Step Guide – Upload MSI LOB Application to Intune

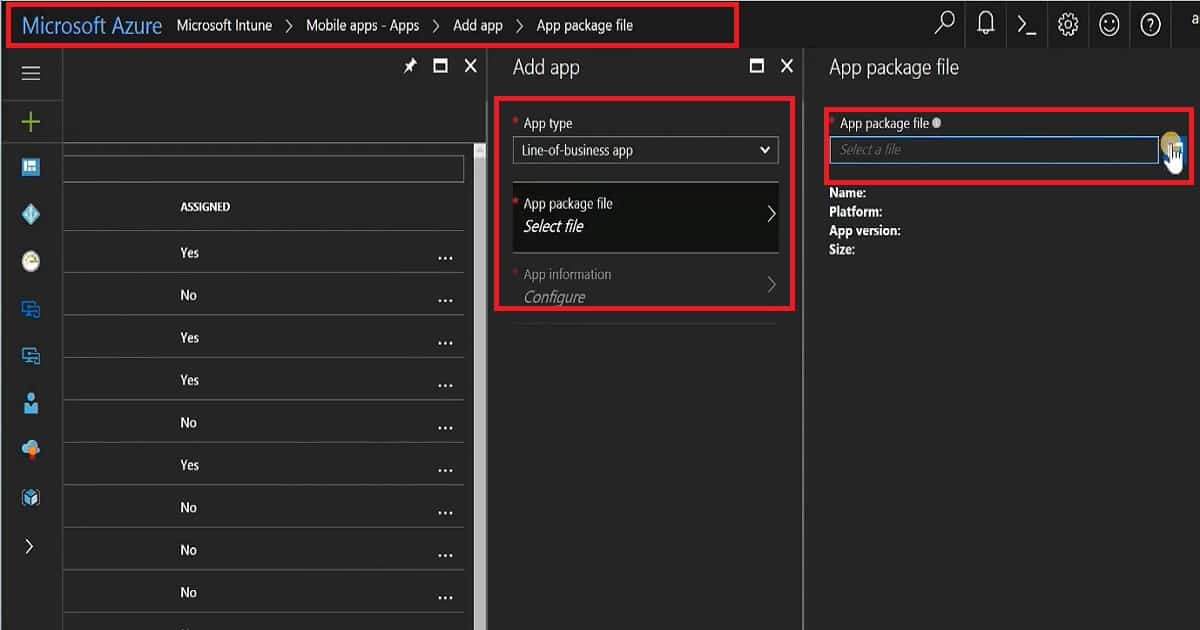
Uploading the MSI LOB app to Intune is a very straightforward process. Log in to the Azure portal, navigate via Microsoft Intune -> Mobile Apps -> Apps -> + Add button, and select the app type as “Line-of-Business app.” Click on “App package file,” browse to the MSI source file location, and click on the OK button, as you can see in the video here.
Intune MSI Application Deployment Video Guide Microsoft Endpoint Manager Step-by-Step Guide - Fig.1
Intune MSI Application Deployment Video Guide Microsoft Endpoint Manager Step-by-Step Guide – Fig.1

You must complete the “App information” section before you can proceed with uploading the MSI to Intune. There are a couple of mandatory fields. Command-line options are also available in this section. However, as I have experienced, you can also see in the video.

I have not used any silent switch for MSI, but by default, Intune/MDM on Windows 10 will install the app as silent (without any user interaction or input). Click on the ADD button to complete the MSI app creation process in Intune on the Azure portal.

Deployment or Assignment options of MSI Intune LOB application deployment

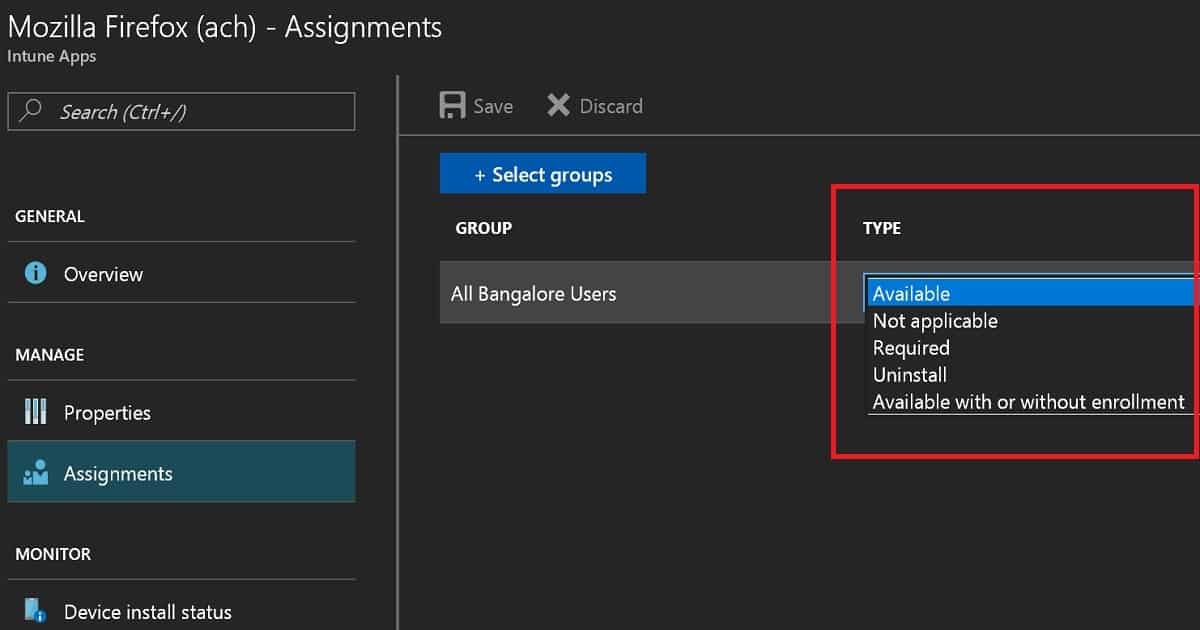
It would be best to wait until the application is successfully uploaded to Intune before you can create an assignment (or deployment). An assignment is a method that we use to deploy MSI applications to Windows 10 devices. You can deploy applications to Azure AD dynamic user groups or device groups. In this video/scenario, I used the AAD dynamic user group to target the MSI LOB apps.

  • More details are available in the video here. There are different deployment types available in Intune.

Available – The user needs to go into the company portal and trigger the installation.
Not applicable – Won’t get installed
Required – Forcefully get installed without any user interaction
Uninstall – Remove the application from the device
Available with or Without enrollment  – Mobile Application Management (MAM) without MDM enrollment scenarios.
Intune MSI Application Deployment Video Guide Microsoft Endpoint Manager Step-by-Step Guide - Fig.2
Intune MSI Application Deployment Video Guide Microsoft Endpoint Manager Step-by-Step Guide – Fig.2

End-User Experience on Windows 10 machine

Windows 10 machines will get the new application deployment policy once the assigned user is logged into that machine. What is the option to speed up the application deployment to the machines?  You need to sync with Intune services using the following method (manually).

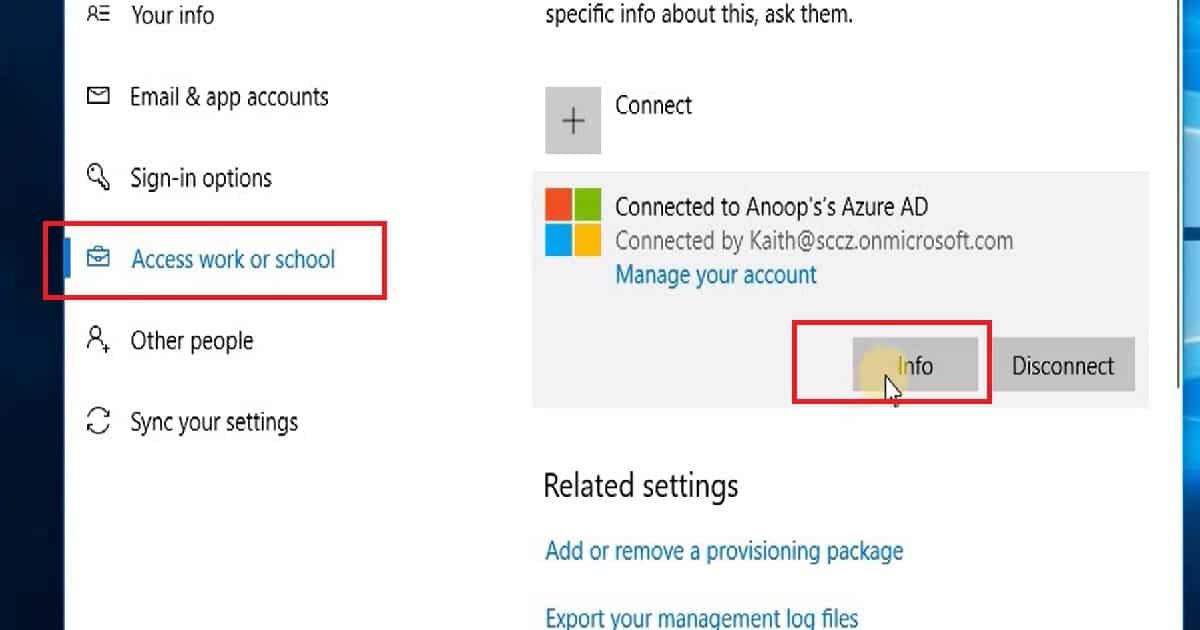
You can go to “Settings—Access Work or School—Work or School Account—Info (click on this button)” and click on Sync. This will initiate a Windows 10 machine sync with Intune services, and after a successful sync, the machine will get the latest application policies.

How to Troubleshooting with Event Logs and Pending Sync

Unlike SCCM/ConfigMgr deployments, we don’t have log files to look at the application installation status via the MDM channel on Windows 10 machines. So, it would be best if you relied on the Company portal for troubleshooting the MSI application troubleshooting.

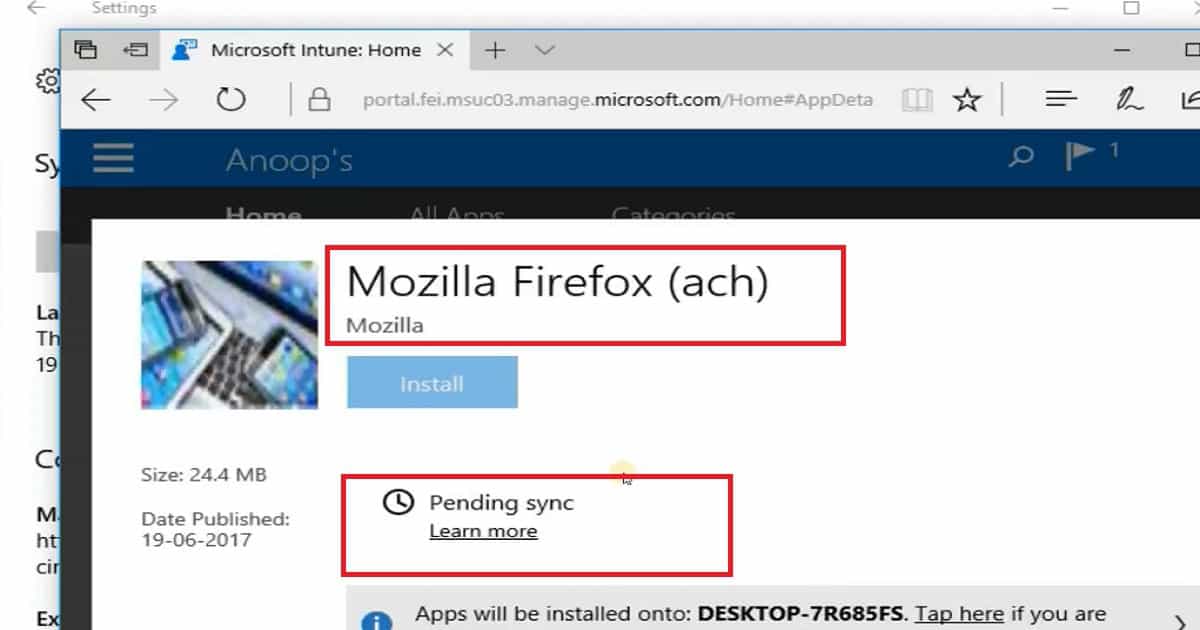
  • As you can see in the following picture, the installation is waiting for “Pending Sync.”
  • As mentioned above, you can immediately initiate a manual sync to kick-start the installation process.
  • Event logs – Windows Logs – Applications are where you can get the status of MSI application installation via MDM or Intune channel on to Windows 10 machine.
Intune MSI Application Deployment Video Guide Microsoft Endpoint Manager Step-by-Step Guide - Fig.3
Intune MSI Application Deployment Video Guide Microsoft Endpoint Manager Step-by-Step Guide – Fig.3

How to get application installation status messages back to the Intune console

To get the installation status of the MSI LOB apps to Intune on the Azure portal, you need to sync your work or school accounts with Intune services. The installation status will be blank in the Intune blade unless the device is synced with Intune after the application is installed on the Windows 10 machine.

Initiate thSyncnc via “Settings – Access Work or School – Work or School Account – Info (click on this button)” and click on  Sync. Once thSyncnc is completed successfully, you can try to check the Intune Device Install Status in Intune to check the status.
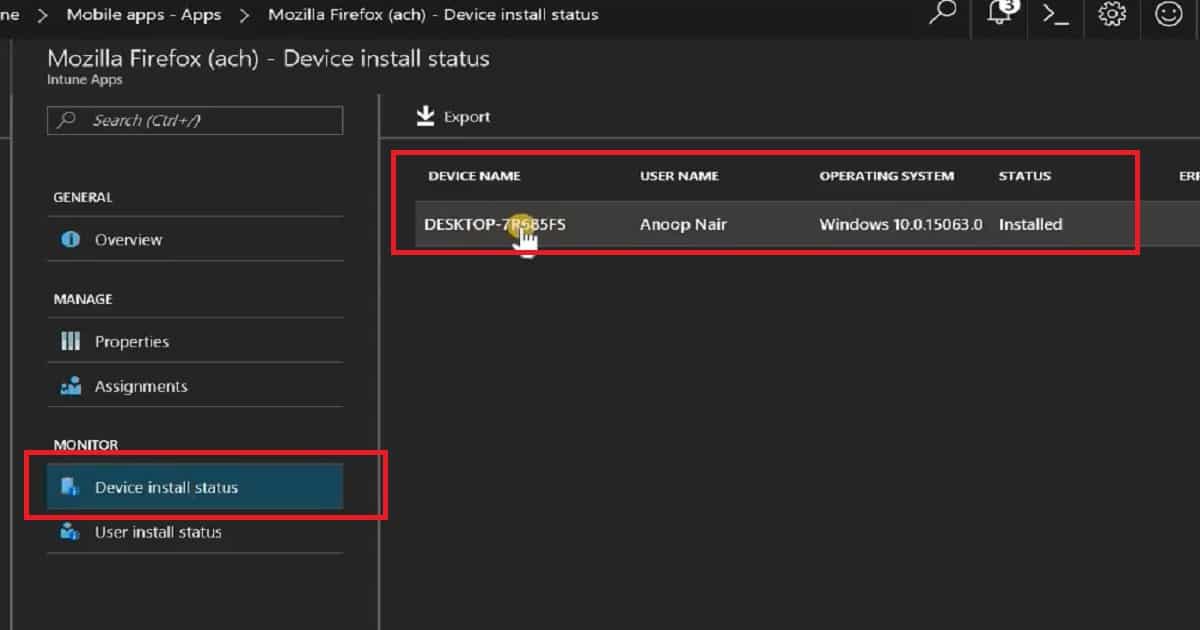
Intune MSI Application Deployment Video Guide Microsoft Endpoint Manager Step-by-Step Guide - Fig.4
Intune MSI Application Deployment Video Guide Microsoft Endpoint Manager Step-by-Step Guide – Fig.4

Reference:- 

We are on WhatsApp now. To get the latest step-by-step guides, news, and updates, Join our Channel. Click here. HTMD WhatsApp.

Author

Anoop C Nair is Microsoft MVP! He is a Device Management Admin with more than 20 years of experience (calculation done in 2021) in IT. He is a Blogger, Speaker, and Local User Group HTMD Community leader. His main focus is on Device Management technologies like SCCM 2012, Current Branch, and Intune. He writes about ConfigMgr, Windows 11, Windows 10, Azure AD, Microsoft Intune, Windows 365, AVD, etc.
Differences Between Intune Enrollment Restriction Device Restriction

Key Takeaways

  • Enrollment Restrictions control whether a device can enroll into Intune.
  • Device Restriction Profiles manage settings on devices after enrollment.
  • Enrollment Restrictions help control device platforms, ownership types, OS versions, and device limits.
  • Device Restriction Profiles configure security, hardware, browser, privacy, and user experience settings.

Let’s discuss the Differences Between the Intune Enrollment Restriction and Device Restriction. These policies manage device settings and user experiences by enabling, disabling, or configuring features such as browsers, security settings, data sharing, and system functionality. Understanding the differences between these policy types helps administrators implement effective device management and security controls. Enrollment Restrictions control whether a device is allowed to enroll into Intune.

Table of Contents

Differences Between Intune Enrollment Restriction Device Restriction

If a device does not meet the enrollment requirements, it is prevented from joining the Intune management environment. Device Restriction Profiles, on the other hand, are configuration policies applied after enrollment. How to Restrict Personal Android Devices from Enrolling into Intune post helps you to provide detailed instructions on restricting personal Android devices from enrolling into Intune using Endpoint Manager (MEM).

It covers the steps necessary to configure enrollment restrictions, ensuring that only corporate-owned devices can be enrolled and managed through Intune. Device restrictions are entirely different from Enrollment restrictions. Both options have different use cases, which will be explained in this post.

Differences Between Intune Enrollment Restriction Device RestrictionEnrollment Device Platform Restrictions

Intune Device restriction profiles (Enrollment Device Platform Restrictions) are policies similar to GPO from the traditional device management world. Most enterprise organizations use GPO to restrict corporate-owned devices. These are security policies that need to be applied to devices. Intune Device restriction policies control various mobile device settings and features (iOS, Android, macOS, and Windows 10).

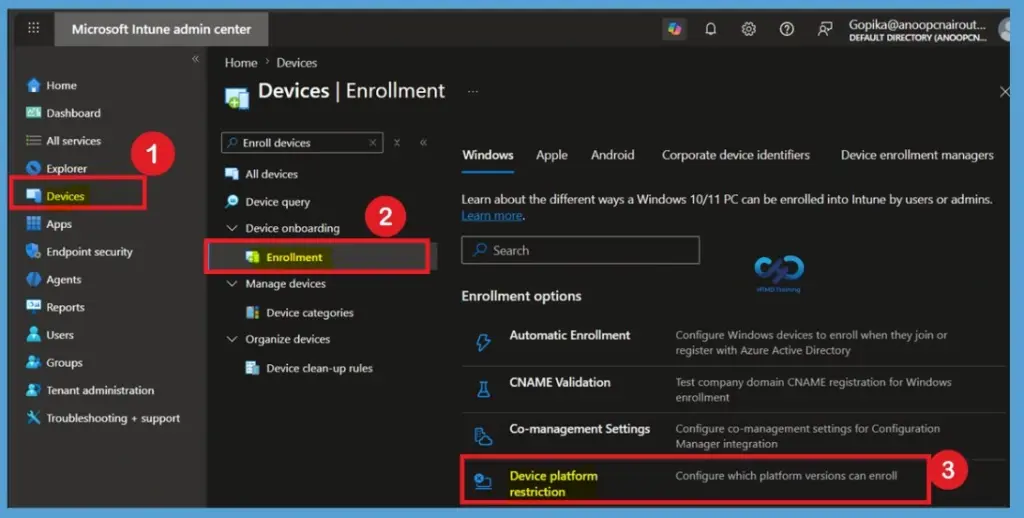
Enrollment device platform restrictions make more sense. Navigate to Devices – Enrollment – Device Platform Restrictions.

Differences Between Intune Enrollment Restriction Device Restriction -Fig.1
Differences Between Intune Enrollment Restriction Device Restriction – Fig.1

This type of policy could apply to different categories, including security, browser, hardware, and data-sharing settings. For example, you could create a device restriction profile policy that prevents Windows users from sharing the internet or using Cortana, etc. Intune Device Restriction profiles can be deployed to specific users/devices in AAD groups, whereas Intune Enrolment restriction policies can’t be deployed to specific user/device groups in Azure AD. The following section of this post provides more details.

  • From the Enrollment page, select Device platform restriction to configure which platforms, ownership types, and operating system versions are allowed to enroll into Intune.
  • These restrictions are evaluated during the enrollment process and can help organizations block unsupported devices or restrict enrollment to corporate-owned devices only.
The Device Platform Restrictions policy allows administrators to
Allow or block specific device platforms.
Restrict personal device enrollment.
Configure minimum and maximum OS versions.
Control enrollment based on device ownership.
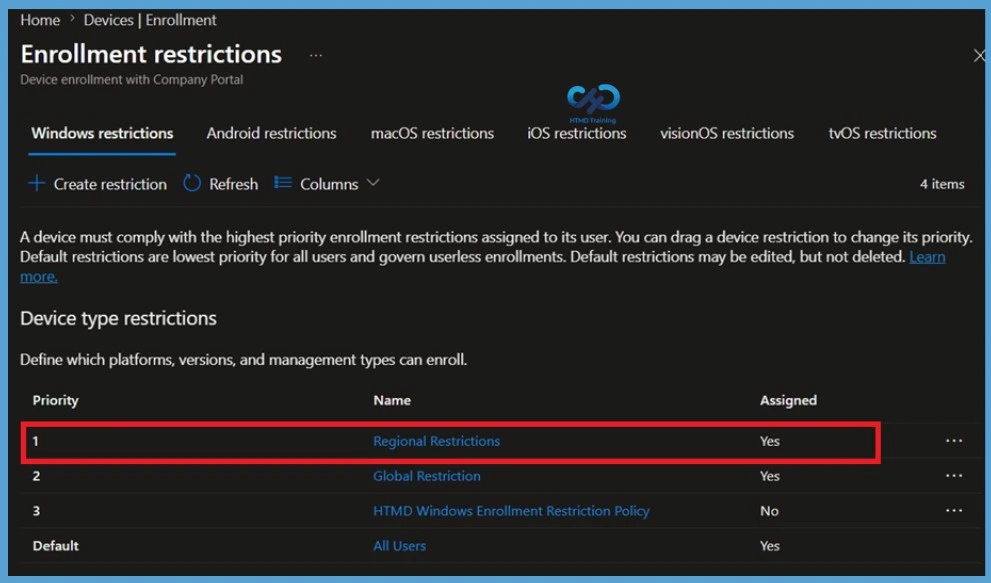
Differences Between Intune Enrollment Restriction Device Restriction – Table.1
Differences Between Intune Enrollment Restriction Device Restriction -Fig.2

Intune Device Limit Restrictions

Enrollment is the first part of Mobile Device Management. Why do we need to enroll a mobile device into Intune? Enrollment is the first step for management. When a device is enrolled in Intune, they have issued an MDM certificate, which that device then uses to communicate with the Intune service.

In several scenarios, we need to block employees from enrolling their devices in the corporate management platform. You want to block devices not secured enough to enroll in Intune, such as personal devices. Also, we could block devices with lower OS versions. How is this possible from Intune? Difference Between Intune Enrollment Restriction Device Restriction Profile | Configuration Manager ConfigMgr.

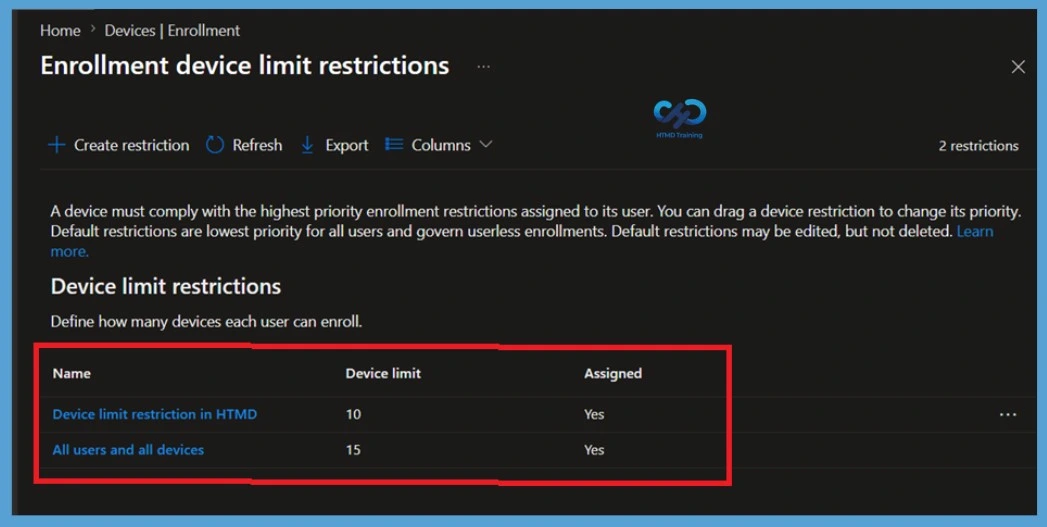
  • Navigate to Microsoft Intune >Enroll Devices>Enrollment device limit restrictions. You will see two Intune enrollment restriction policies.
Differences Between Intune Enrollment Restriction Device Restriction - Fig.3
Differences Between Intune Enrollment Restriction Device Restriction- Fig.3
Intune Enrollment Restriction Policies
Device Type Restrictions
Device Limit Restrictions
Differences Between Intune Enrollment Restriction Device Restriction Profile – Table 2

Device Type restriction is where we can define which platforms, versions, and management types can enroll. So, all other devices are blocked from Intune enrollment. The only problem with Intune enrollment restrictions I can think of is that device type restrictions in Intune are deployed to “All Users, ” we can’t deploy or assign Intune enrollment restriction policies to “specific user group.” At the moment, the device type restrictions policies are tenant-wide configurations.

  • This policy is useful for preventing excessive device enrollments and maintaining better control over managed devices within the organization.
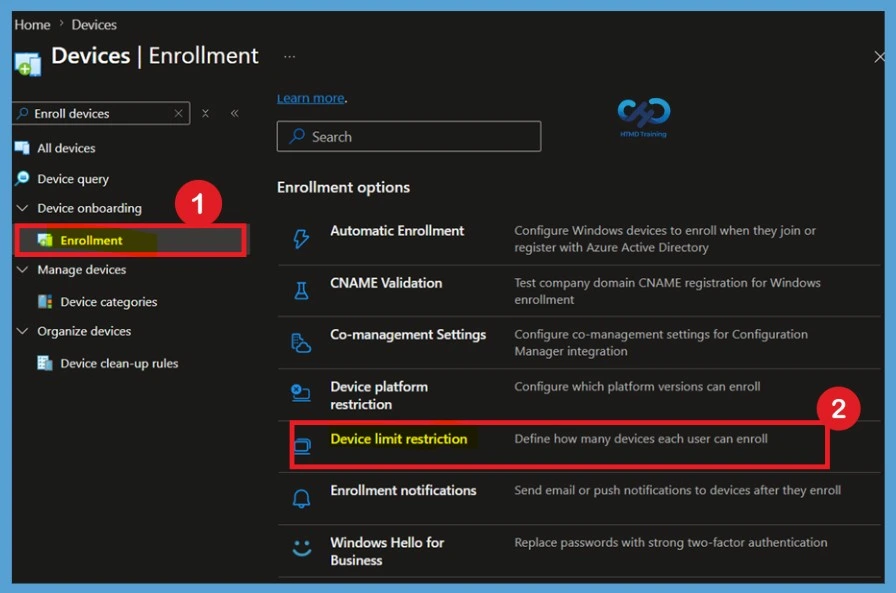
  • From the Enrollment page, select Device limit restriction to view or create enrollment limit policies.
  • The Device Limit Restrictions page displays all configured policies along with their assigned device limits. Administrators can create multiple policies and assign them to different user groups based on organizational requirements.
Differences Between Intune Enrollment Restriction Device Restriction - Fig.4
Differences Between Intune Enrollment Restriction Device Restriction – Fig.4

Need Further Assistance or Have Technical Questions?

Join the LinkedIn Page and Telegram group to get the latest step-by-step guides and news updates. Join our Meetup Page to participate in User group meetings. Also, join the WhatsApp Community  and the Whatsapp channel to get the latest news on Microsoft Technologies. We are there on Reddit as well.

Author

Anoop C Nair is a Workplace Technology solution architect with 25+ years of experience. Microsoft Certified Trainer. Microsoft MVP from 2015 onwards for consecutive 11+ years! He is a blogger, Speaker, and Founder of HTMD Community and HTMD Conference. His main focus is on Device Management technologies like Intune, Windows, and Cloud PC. He writes about technologies like Intune, SCCM, Windows, Cloud PC, Entra, and Microsoft Security.

How to Setup Android Work Support Step by Step Guide Microsoft Intune 2

How to Setup Android Work Support Step by Step Guide Microsoft Intune

Let’s learn how to Setup Android Work Support Step by Step Guide Microsoft Intune. Google’s strategic approach is to support management only via the Android Work channel, and Microsoft Intune’s strategy is to help Android work. This post will show how to set up Android work support in Intune portal.

Latest Post How To Configure Intune Enrollment Setup For Android Enterprise Device Management – HTMD Blog #2 (howtomanagedevices.com)

I have blogged about enrolling for Android Work Management via Intune: “Intune How to Enroll Android for Work Supported Devices for Management.” The video embedded in the above post explains the process of enabling Android Work support in the Intune Silverlight portal.

As you can see in the embedded video guide attached to this post, we will learn how to unbind or change the Gmail/Google account we used to set up Android work support in the Intune Azure portal. Once the existing Gmail account has been removed, we can use a different Gmail account to configure or set up Android Work support in the Intune Azure console.

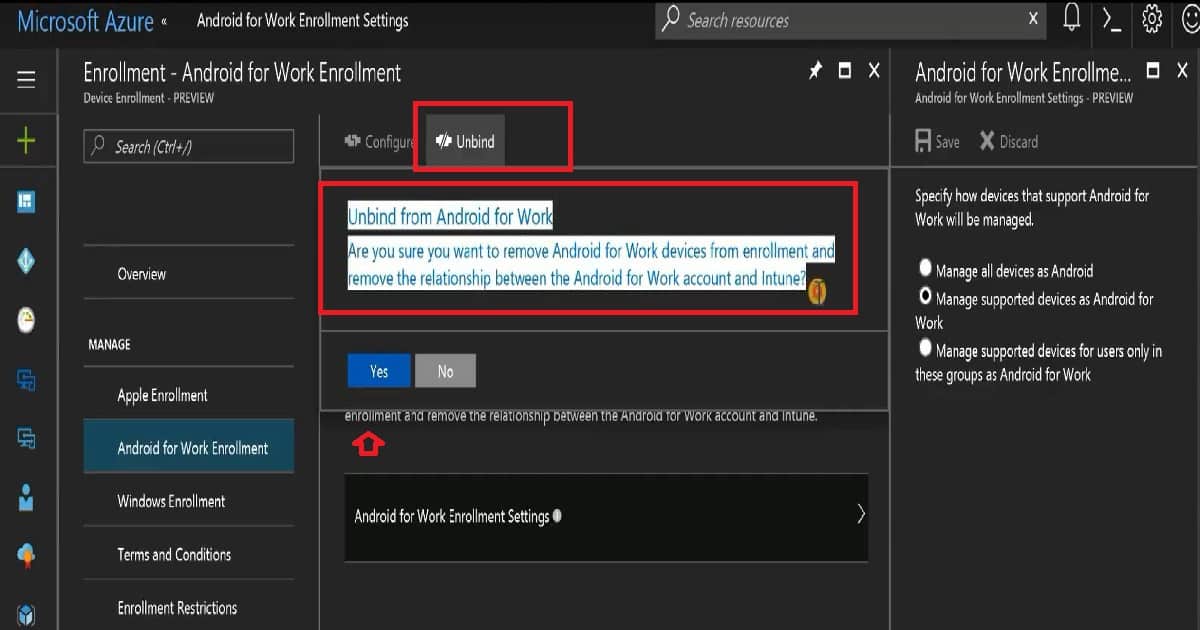
How to Unbind Android Work Account from Intune Azure Portal

We must unbind the account from the Intune Azure console to change the Setup Android Work Google account. The Unbind button in Intune Azure removes support for Android Work enrollment and eliminates the relationship between the Android work account Gmail and Intune.

I have seen some delay in unbinding the Gmail account from the Intune blade in the Azure portal. As you can see in the video here, I removed the Gmail account from the Android work setting in the Intune blade in the Azure portal, but it took 2 minutes for these changes to reflect. However, the removal of Android Work was immediately reflected on the Intune Silverlight portal.

How to Setup Android Work Support Step by Step Guide Microsoft Intune - Fig.1
How to Setup Android Work Support Step by Step Guide Microsoft Intune – Fig.1

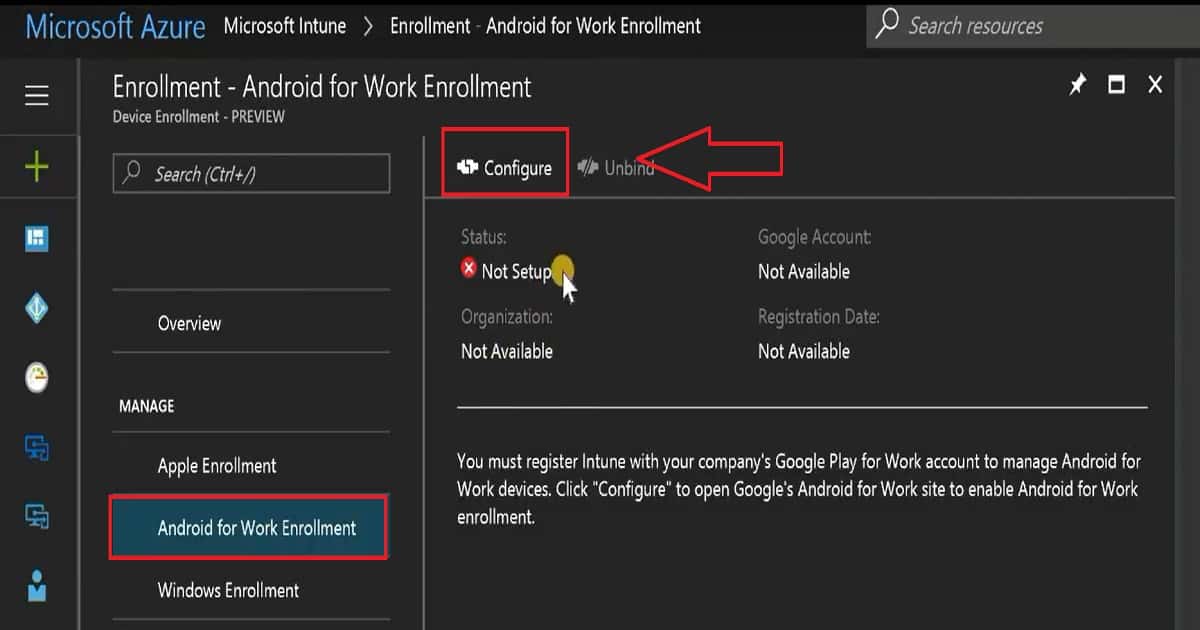
Setup Android Work Support in Intune Azure Portal

The configuration or setup of Android Work support in the Intune Azure portal is very similar to that in the Silverlight portal. You need to click the Configure button to open a pop-up where you can log in with a new Gmail or Android Work account. The Google configuration wizard will help you set up the connection between Intune and Google APIs like Google Play for Work, Android Work management, etc.

Microsoft Intune
Enrollment
Android for Work Enrollment
How to Setup Android Work Support Step by Step Guide Microsoft Intune – Table 1
How to Setup Android Work Support Step by Step Guide Microsoft Intune - Fig.2
How to Setup Android Work Support Step by Step Guide Microsoft Intune – Fig.2

Setting up Android Work Enrollment & Management via Intune

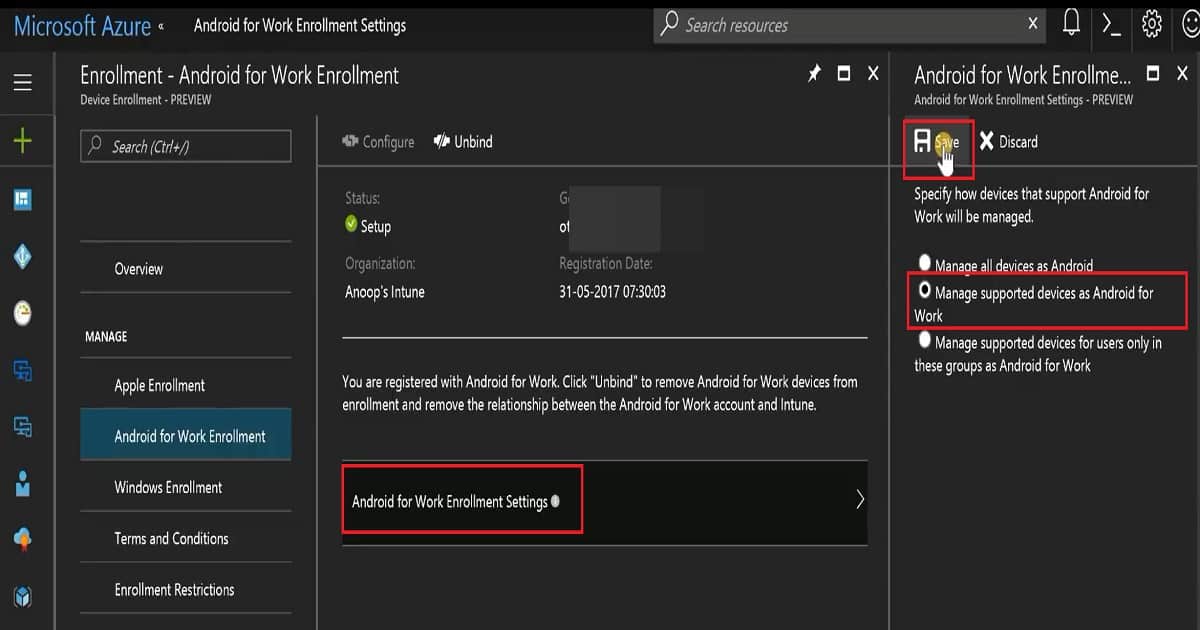
Android for Work enrollment settings are the same as those in the Intune Silverlight console. In the Intune Azure portal, we have three options for setting up Android work enrollment.

1. Manage all devices as Android – This is opposite to Google’s strategic approach regarding managing the Android devices
2. Manage supported devices as Android for Work—As per my testing, all Android 6.0 and above devices are supported for Android work enrollment and management via Intune. I have a blog post that explains A4W supportability, “Intune Entry Level Low-Cost Device Support for Android for Work Enrollment.” Hence, this is my best bet option for enrollment.
3. Manage supported devices for users only in these groups, such as Android Work. This could be used in the testing or pilot process if your organization doesn’t have a test Intune environment.

How to Setup Android Work Support Step by Step Guide Microsoft Intune - Fig.3
How to Setup Android Work Support Step by Step Guide Microsoft Intune – Fig.3

We are on WhatsApp now. To get the latest step-by-step guides, news, and updates, Join our Channel. Click here. HTMD WhatsApp.

Author

Anoop C Nair is Microsoft MVP! He is a Device Management Admin with more than 20 years of experience (calculation done in 2021) in IT. He is a Blogger, Speaker, and Local User Group HTMD Community leader. His main focus is on Device Management technologies like SCCM 2012, Current Branch, and Intune. He writes about ConfigMgr, Windows 11, Windows 10, Azure AD, Microsoft Intune, Windows 365, AVD, etc.
Create SCEP Certificate Profiles in Intune Deploy SCEP Profiles to Windows 10 Devices 3

Create SCEP Certificate Profiles in Intune Deploy SCEP Profiles to Windows 10 Devices

Let’s discuss how to Create SCEP Certificate Profiles in Intune and Deploy them to Windows 10 Devices. In this post, we will create and deploy an SCEP Certificate to Windows 10 Devices (How to Deploy an SCEP Certificate to Windows Devices).

We must take care of some prerequisites before creating SCEP Certificates in Intune. On-prem infrastructure components must be available before creating SCEP cert profiles in Intune. Related post > Intune SCEP HTTP Errors Troubleshooting Made Easy With Joy – #5 (anoopcnair.com)

NDES setup for SCEP – The NDES connector should be installed on your data center, and the NDES connector should be able to talk to the CA server and use the Azure AD App proxy connector if you are using the Azure app proxy.

I won’t cover the setup of NDEs and the Azure AD App proxy connector. Those two configurations are very complex and well explained in other blogs.

Intune SCEP Certificate Deployment for Windows 10 Devices – SCEP Certificates to Users Devices

Before creating a Windows 10 SCEP Certificate in Intune, you need to create and deploy a certificate chain. The certificate chain includes the Root CA certificate and the Intermediate /Issuing CA certificate. Intune offers three certificate profiles: TRUSTED Certificate, SCEP Certificate, and PKCS Certificate. We are not going to use the PKCS certificate for SCEP profile deployment.

Create SCEP Certificate Profiles in Intune Deploy SCEP Profiles to Windows 10 Devices – Video 1

Create SCEP Certificate Profiles in Intune Deploy SCEP Profiles to Windows 10 Devices

Deploying SCEP Certificates to Windows 10 Devices will help connect corporate resources like Wi-Fi and VPN profiles. Before making a Windows 10 SCEP Certificate in Intune, you must create and deploy a certificate chain. The certificate chain includes the Root CA and Intermediate /Issuing CA certificates.

Intune offers 3 certificate profiles: TRUSTED Certificate, SCEP Certificate, and PKCS Certificate. We will not use the PKCS certificate for SCEP profile deployment.

Create SCEP Certificate Profiles in Intune Deploy SCEP Profiles to Windows 10 Devices - Fig.1
Create SCEP Certificate Profiles in Intune Deploy SCEP Profiles to Windows 10 Devices – Fig.1

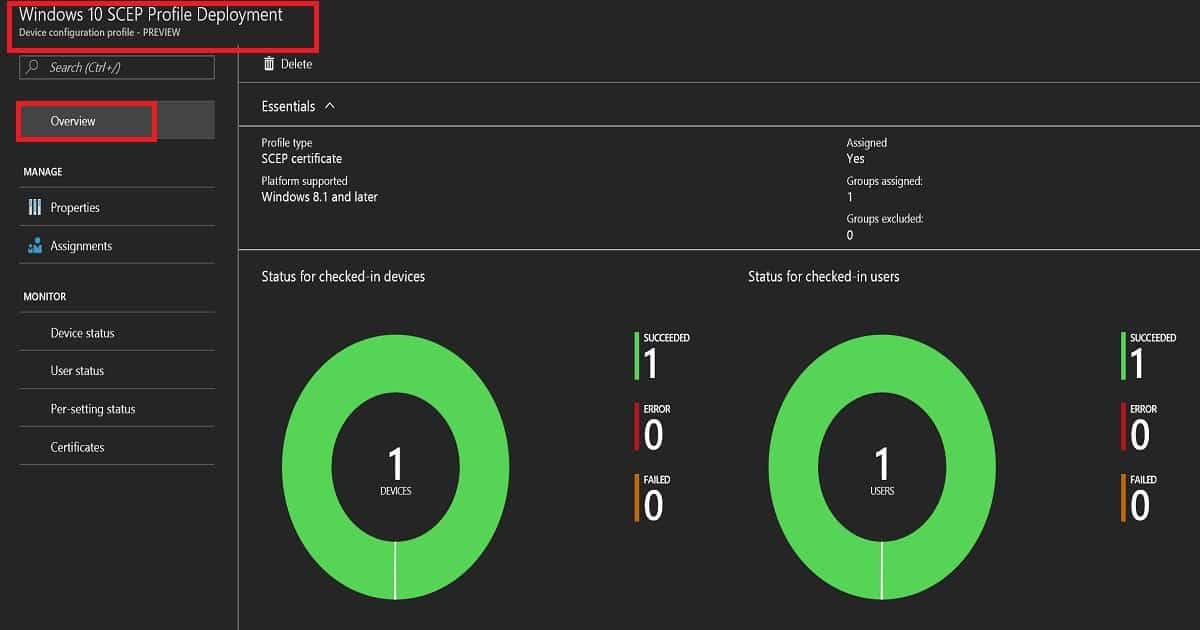
Intune Create SCEP Certificate Profiles in Endpoint Manager Deploy SCEP profiles to Windows 10 Devices. Following are the high-level tasks for deploying the SCEP Certificate to Windows10 Devices via Intune:-

Create and Deploy iOS Root CA certificate using Intune Azure Portal
Create and Deploy iOS Intermediate/Issuing CA Certificate using Intune Azure Portal
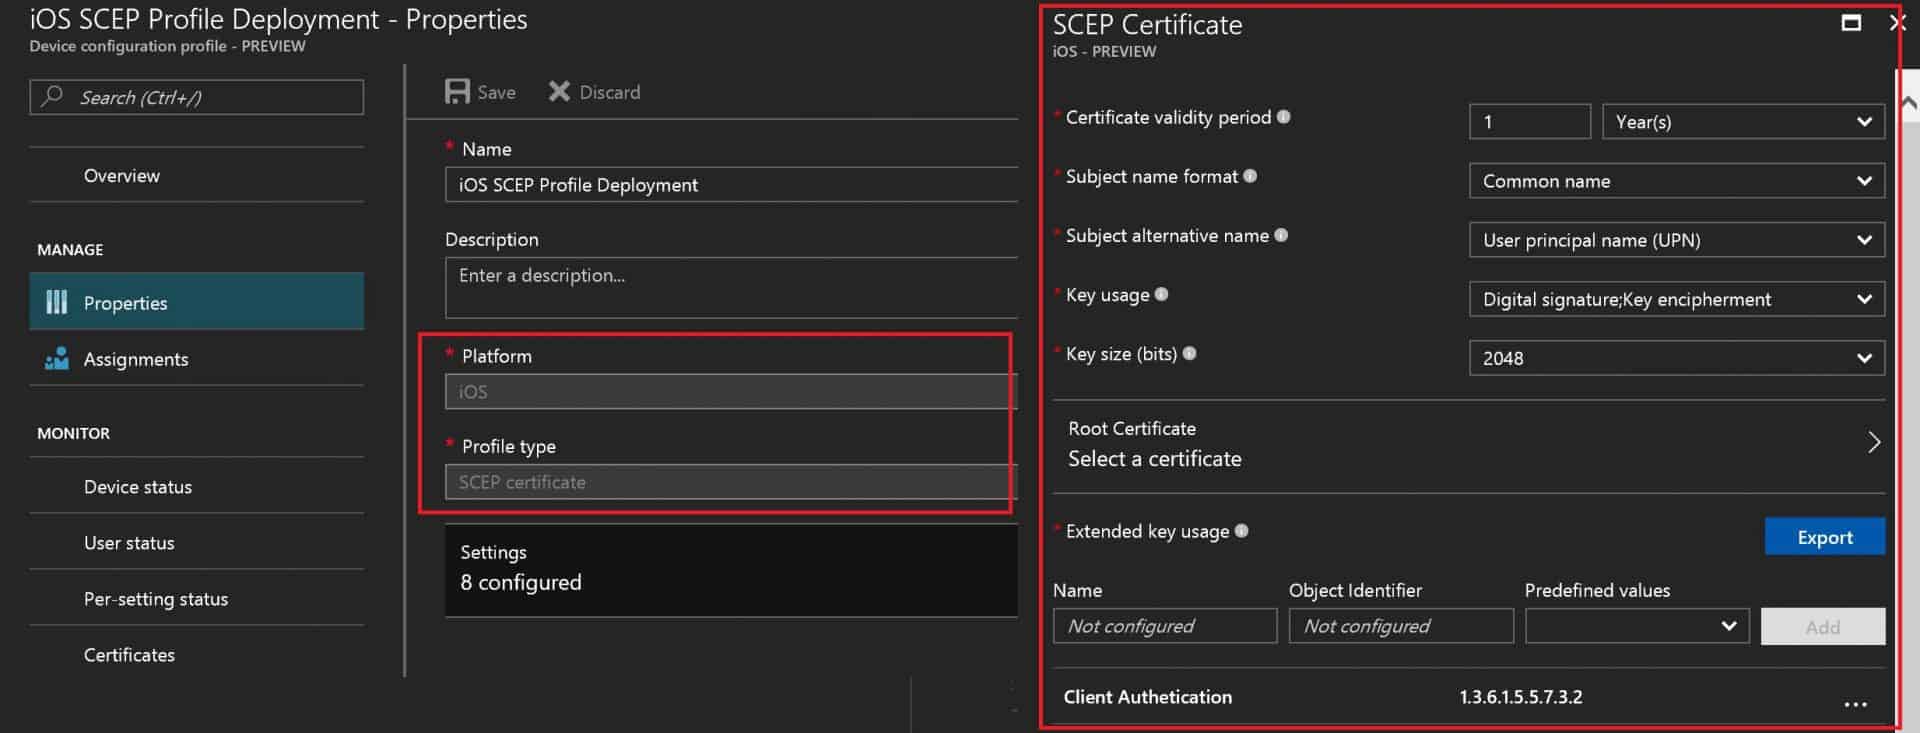
Create and Deploy SCEP Certificate to iOS Devices using Intune Azure Portal.

Create and Deploy Windows 10 Root CA, Windows 10 Intermediate/Issuing CA Certificate Profiles

As the first step, we need to create a Root CA cert profile. To create a Root CA cert, navigate through Microsoft Intune—Device Configuration—Profiles—Create a profile. Select the platform as Windows 10 and the profile type as Trusted Certificate. You must then browse and upload your ROOT CA cert (the Name of the cert = ACN-Enterprise-Root-CA.CER)from your CA server.

We need to select a destination store in the Windows 10 Trusted certificate profile. For the root certificate profile, we must select Computer Certificate store—root. Once the settings are saved, you must deploy the root certificate profile to the required Windows 10 devices.

PlatformProfile type
Windows 8.1 and laterTrusted Certificate
Create SCEP Certificate Profiles in Intune Deploy SCEP Profiles to Windows 10 Devices – Table 1
Create SCEP Certificate Profiles in Intune Deploy SCEP Profiles to Windows 10 Devices - Fig.2
Create SCEP Certificate Profiles in Intune Deploy SCEP Profiles to Windows 10 Devices – Fig.2

We must follow the same process for deploying the Intermediate/Issuing CA certificate profile via Intune. Make sure that you upload the issuing CA cert (Name of cert = ACN-Issuing-CA-PR1.CER) from your CA server.

Another point we need to take care of is the destination store. We need to select the destination store as Computer Certificate Store—Intermediate. Click OK—Create to finish creating the Issuing cert profile.

Deploy Windows 10 Root CA and Intermediate/Issuing CA Certificate Profiles to the same group of Windows 10 devices. We can deploy these profiles using either an AAD user or device group. However, I would prefer to use AAD dynamic device groups wherever possible.

Create and Deploy Windows 10 SCEP Profile via Intune – Intune Create SCEP Certificate Profiles

To create and deploy a SCEP profile on Windows 10 devices, navigate to Microsoft Intune—Device Configuration—Profiles—”Create a profile.” Select the platform as Windows 10 and the profile type as SCEP Certificate.

When you create a SCEP profile for a Windows 10 device, you need to make some specific settings. The load of these configurations can differ between the CA server setup and another on-prem component setup.

Create SCEP Certificate Profiles in Intune Deploy SCEP Profiles to Windows 10 Devices - Fig.3
Create SCEP Certificate Profiles in Intune Deploy SCEP Profiles to Windows 10 Devices – Fig.3

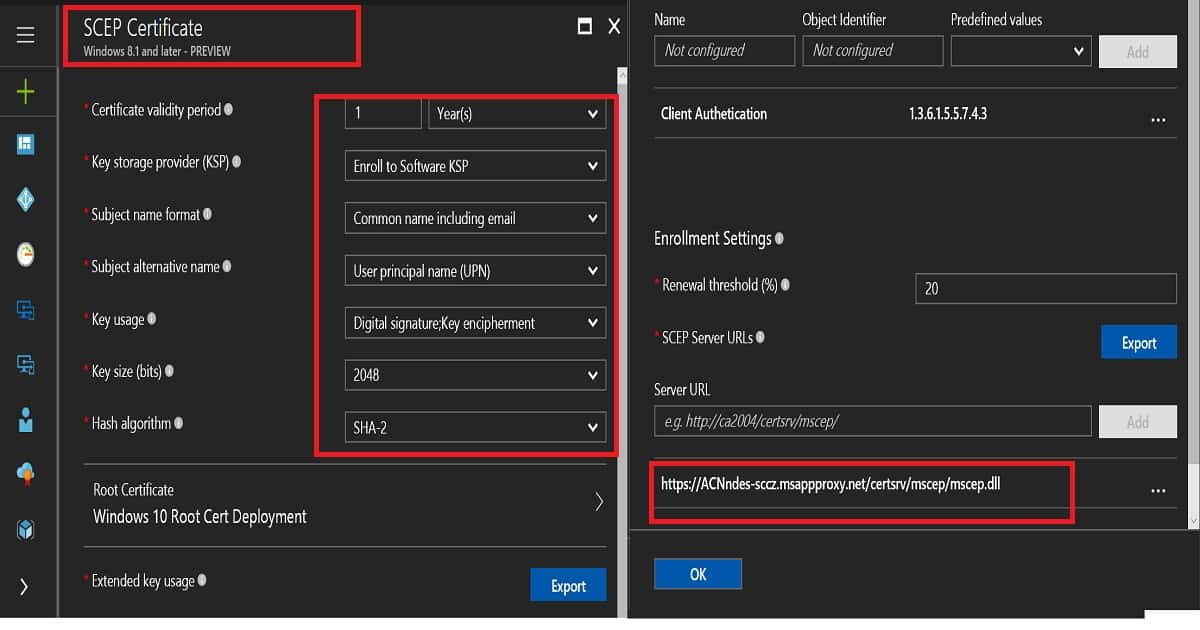
The certificate validity period is 1 year, which is the industry standard. There are four options for the Key storage provider (KSP): Enrol to trusted platform Module(TPM) KSP if present Software KSP, Enrol to Trusted platform module(TPM), otherwise fail, Enrol to passport, otherwise fail, and Enrol to Software KSP.

In this scenario, I have selected Enrol to Trusted Platform Module(TPM) KSP if the Software KSP is present. We must choose the subject name format value depending on your organizational requirement. In this scenario, I selected a familiar name as an email. The subject alternative name is UPN. Key usage is a digital signature and key encipherment. The key Size value is 2048. If your CA supports the same, the hash algorithm value (SHA-2) should be the latest one.

Another critical point is linking the SCEP profile with the ROOT cert profile you created. If you have not created any ROOT cert and intermediate/issuing CA cert profiles in Intune, it won’t allow you to create an SCEP profile. Extended key usage is another setting, and it should automatically get populated. One example here is “Client Authentication—1.3.6.1.5.5.7.4.3.”

Create SCEP Certificate Profiles in Intune Deploy SCEP Profiles to Windows 10 Devices - Fig.4
Create SCEP Certificate Profiles in Intune Deploy SCEP Profiles to Windows 10 Devices – Fig.4

Enrollment Settings is the last set of settings for Windows 10 SCEP profiles in Intune. I recommend keeping the certificate renewal threshold at the default value of 20%. SCEP server URLs (e.g., https://acnndes-sccz.msappproxy.net/certsrv/mscep/mscep.dll) are very important. These are the URLs to which Windows 10 devices will go and request SCEP certs.

This should be reachable from the Internet. As I mentioned above, you can use Azure AD app proxy URLs. In this scenario, I will use Azure AD app proxy settings.

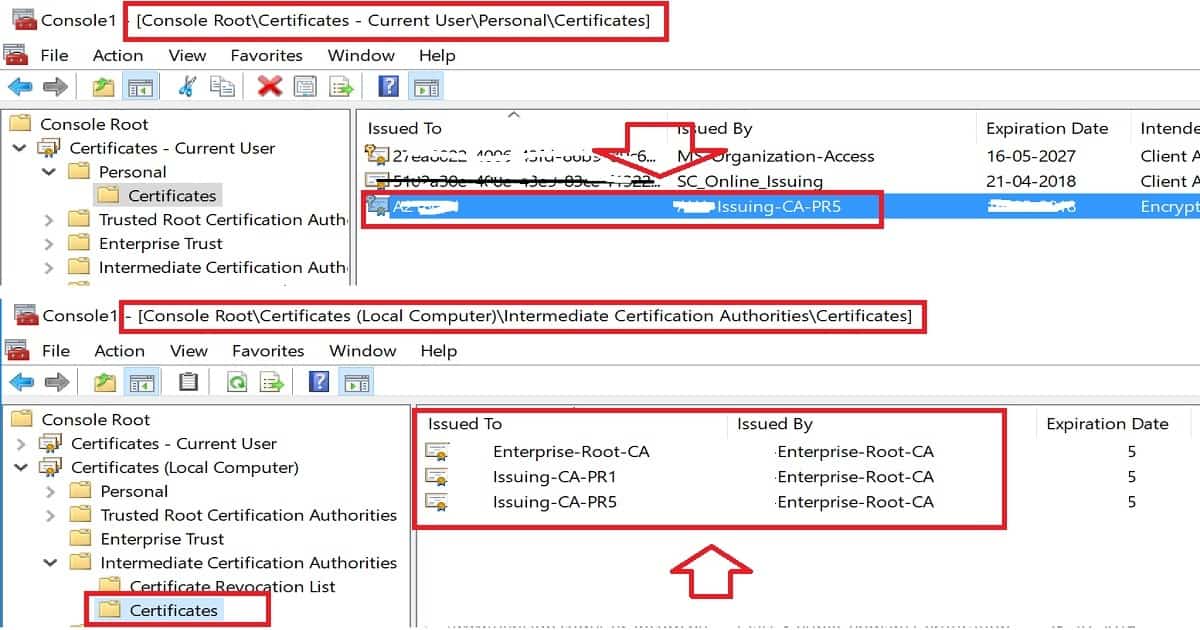
SCEP profile cert will be deployed to users’ stores in the format “ACN-Issuing-CA-PR5“.

End-User Windows 10 Certificate Store Experience Intune Create SCEP Certificate Profiles

SCEP profile will be deployed to Current User\Personal\Certificates = “ACN-Issuing-CA-PR5

Root and Intermediate CA cert will be deployed to Local Computer\Intermediate Certification Authorities\Certificates = ACN-Enterprise-Root-CA.CER and ACN-Issuing-CA-PR1.CER

Create SCEP Certificate Profiles in Intune Deploy SCEP Profiles to Windows 10 Devices - Fig.5
Create SCEP Certificate Profiles in Intune Deploy SCEP Profiles to Windows 10 Devices – Fig.5

Resources

We are on WhatsApp now. To get the latest step-by-step guides, news, and updates, Join our Channel. Click here. HTMD WhatsApp.

Author

Anoop C Nair is Microsoft MVP! He is a Device Management Admin with more than 20 years of experience (calculation done in 2021) in IT. He is a Blogger, Speaker, and Local User Group HTMD Community leader. His main focus is on Device Management technologies like SCCM 2012, Current Branch, and Intune. He writes about ConfigMgr, Windows 11, Windows 10, Azure AD, Microsoft Intune, Windows 365, AVD, etc.
Create SCEP Certificate Profiles Deploy SCEP Profiles to iOS Devices using Intune 4

Create SCEP Certificate Profiles Deploy SCEP Profiles to iOS Devices using Intune

Let’s discuss creating SCEP Certificate Profiles and Deploying them to iOS Devices using Intune. Before obtaining an SCEP certificate in Intune, we must consider some prerequisites.

It would be best if you also had on-prem infrastructure components available. NDES connector is supposed to be installed on your Data Center, and the NDES connector should be able to talk to the CA server and Azure AD App proxy connector if you are using the Azure app proxy.

In “Intune SCEP HTTP Errors Troubleshooting Made Easy With Joy – #5,” Joymalya Basu Roy provides a comprehensive guide on diagnosing and resolving HTTP errors encountered during SCEP (Simple Certificate Enrollment Protocol) certificate deployments using Microsoft Intune. The post focuses on various HTTP errors, particularly the HTTP 500 Internal Server Error, and offers detailed steps to effectively identify and troubleshoot these issues.

I won’t cover the setup of NDEs and Azure AD App proxy connectors. Those two configurations are complex and well explained in loads of other blogs. This post will cover how to create and deploy a SCEP Profile for iOS Devices via Intune Blade in the Azure portal.

How to Create and Deploy SCEP Certificate with Intune for iOS Devices

Deployment of SCEP Certificates to iOS devices will help them connect to corporate Wi-Fi and VPN profiles, etc.… You must create and deploy the certificate chain before creating an iOS SCEP Certificate in Intune.

The certificate chain includes the Root CA and Intermediate/Issuing CA certificates. There are 3 certificate profiles available in Intune: the TRUSTED Certificate, the SCEP Certificate, and the PKCS certificate. We are not going to use the PKCS certificate for SCEP profile deployment.

Create SCEP Certificate Profiles Deploy SCEP Profiles to iOS Devices using Intune – Video 1

Introduction – Create SCEP Certificate Profiles Deploy SCEP Profiles to iOS Devices using Intune

Deploying a SCEP Certificate to iOS devices will help them connect to corporate Wi-Fi, VPN profiles, etc. Before creating an iOS SCEP Certificate in Intune, you need to develop and deploy a certificate chain. The certificate chain includes the Root CA and Intermediate/Issuing CA certificates.

There are 3 certificate profiles available in Intune: TRUSTED Certificate, SCEP Certificate, and PKCS certificate. We are not going to use the PKCS certificate for SCEP profile deployment. The following is the high-level task list for deploying SCEP Profile to iOS Devices (Deploy SCEP profiles to iOS Devices).

Create SCEP Certificate Profiles Deploy SCEP Profiles to iOS Devices using Intune
Create and Deploy iOS Root CA certificate using Intune Azure Portal
Or Create and Deploy an iOS Intermediate CA certificate using Intune Azure Portal
Create and Deploy SCEP Certificate to iOS Devices using Intune Azure Portal
Create SCEP Certificate Profiles Deploy SCEP Profiles to iOS Devices using Intune – Table 1
Create SCEP Certificate Profiles Deploy SCEP Profiles to iOS Devices using Intune - Fig.1
Create SCEP Certificate Profiles Deploy SCEP Profiles to iOS Devices using Intune – Fig.1

Create and Deploy iOS Root CA, iOS Intermediate/Issuing CA Certificate Profiles

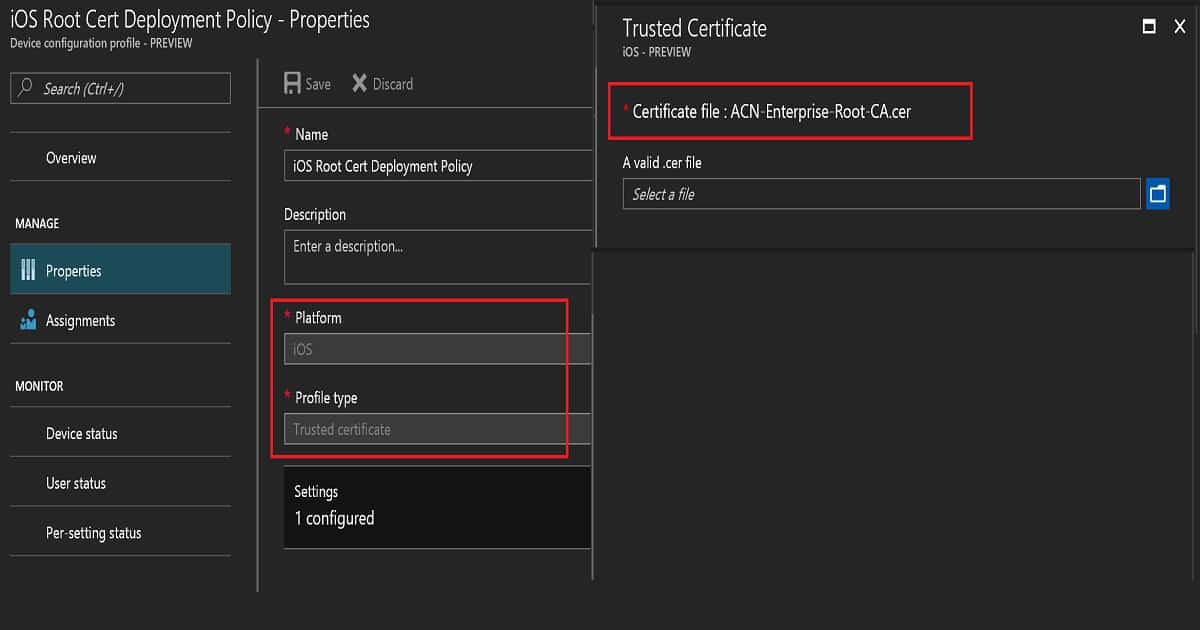
As the first step, we need to create a Root CA cert profile. To create a Root CA cert, navigate through Microsoft IntuneDevice ConfigurationProfilesCreate a profile (Deploy SCEP profiles to iOS Devices). Select the platform iOS and profile type Trusted Certificate. You must browse and upload your ROOT CA cert (Name of the cert = ACN-Enterprise-Root-CA.CER) from your CA server.

Once settings are saved, you must deploy the root cert profile to the required iOS devices. The exact process must follow for Intermediate/Issuing CA certificate profile deployment via Intune. Intune Create SCEP Certificate Profiles Deploy SCEP profiles to iOS Devices using Intune.

Make sure that you are uploading the issuing CA cert (Name of cert = ACN-Issuing-CA-PR1.CER) from your CA server. The video above explains all these configurations; you can watch them here.

Create and Deploy iOS SCEP Certificate Profile for iOS Devices

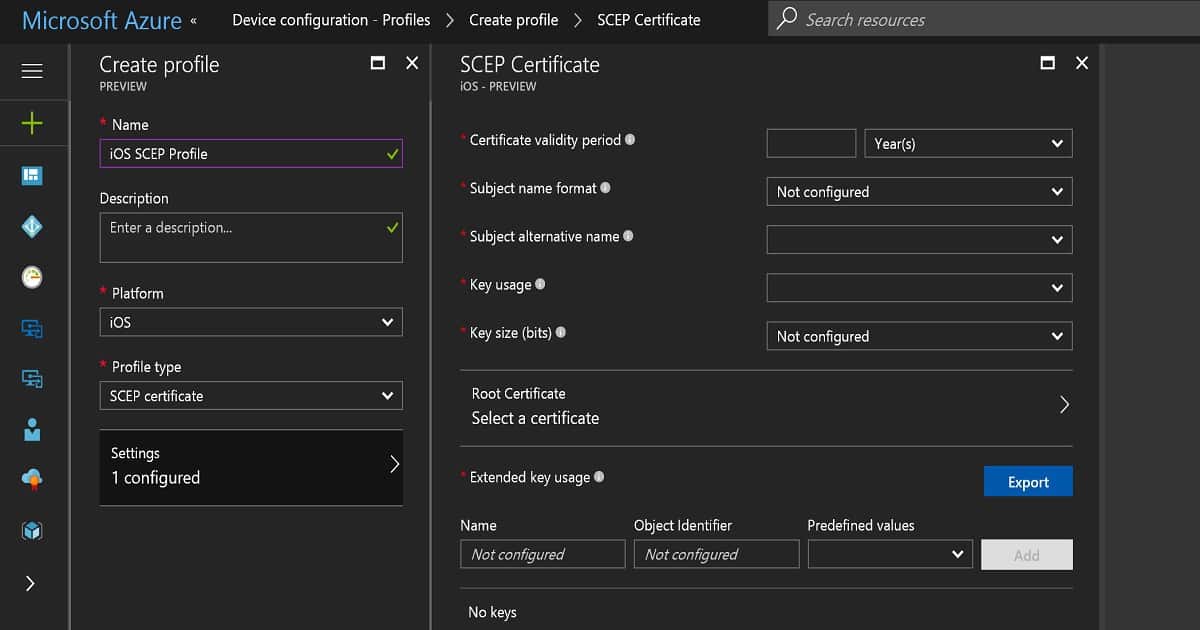
To create a SCEP certificate profile, navigate to Microsoft Intune – Device Configuration – Profiles – Create a profile. While making an iOS SCEP Certificate, we must select the Profile type as “SCEP certificate” and the platform as iOS.

The next step is configuring the settings. These settings are critical, and we need to consult with your CA team when you create a SCEP Certificate. Loads of these configurations can differ between the CA server setup and another on-prem component setup (Deploy SCEP profiles to iOS Devices).

The certificate validity period is 1 year, which is the industry standard. The subject name format also depends on your organization’s preference. In this scenario, I selected a familiar name as email and a subject alternative name as UPN. The key usage is a digital signature and critical decipherment. The key Size is 2048.

Another critical point is linking the SCEP Certificate with the ROOT cert profile you created. If you have not earned any ROOT certification in Intune, you won’t be able to develop an SCEP Certificate. Extended key usage is another setting, and it should automatically get populated.

One example here is Client Authentication – 1.3.6.1.5.5.7.4.3. Intune Create SCEP Certificate Profiles Deploy SCEP profiles to iOS Devices using Intune.

Create SCEP Certificate Profiles Deploy SCEP Profiles to iOS Devices using Intune - Fig.2
Create SCEP Certificate Profiles Deploy SCEP Profiles to iOS Devices using Intune – Fig.2

Enrollment Settings is the last set of settings for iOS SCEP profiles in Intune. I recommend keeping the renewal threshold of certificates as the default value of 20%. SCEP server URLs are critical. These are the URLs to which iOS devices will request SCEP certifications.

So, this should be reachable from the Internet. As mentioned above, you can use Azure AD App proxy URLs here (e.g., https://acnndes-sccz.msappproxy.net/certsrv/mscep/mscep.dll ). In this scenario, I will use Azure AD App proxy settings. All these configuration details are explained in the video here.

SCEP certificate will be in the following format: “ACN-Issuing-CA-PR5“.

Resources

We are on WhatsApp now. To get the latest step-by-step guides, news, and updates, Join our Channel. Click here. HTMD WhatsApp.

Author

Anoop C Nair is Microsoft MVP! He is a Device Management Admin with more than 20 years of experience (calculation done in 2021) in IT. He is a Blogger, Speaker, and Local User Group HTMD Community leader. His primary focus is Device Management technologies like SCCM 2012, Current Branch, and Intune. He writes about ConfigMgr, Windows 11, Windows 10, Azure AD, Microsoft Intune, Windows 365, AVD, etc.
Configure Password Policies for Android Enterprise Work Profile using Intune 5

Configure Password Policies for Android Enterprise Work Profile using Intune

Key Takeaways

  • Secure Android Enterprise devices with Device Restrictions policies.
  • Protect corporate data by controlling device features and settings.
  • Restrict data sharing between work and personal profiles.
  • Manage work profile behavior to improve security.

Let’s learn Configure Password Policies for Android Enterprise Work Profile using Intune. Android for Work Device Restriction Policies Deployment is the Security Policy for Android Devices. Security policies are important to secure the corporate data and applications on those devices. Microsoft Intune provides Device Restrictions policies to help organizations secure Android Enterprise devices by controlling device features and restricting user actions.

Table of Contents

Configure Password Policies for Android Enterprise Work Profile using Intune

In this guide, you’ll learn how to create and deploy an Android Enterprise Device Restrictions policy using the Microsoft Intune admin center. We’ll walk through the policy creation process, configure the available restriction settings, and assign the policy to Microsoft Entra ID groups.

By implementing Device Restrictions policies, administrators can control work profile behavior, limit data sharing, manage hardware features, and enhance the overall security of Android Enterprise devices. Following these best practices helps organizations maintain a secure and compliant mobile environment.

Get Start the Profile Creation

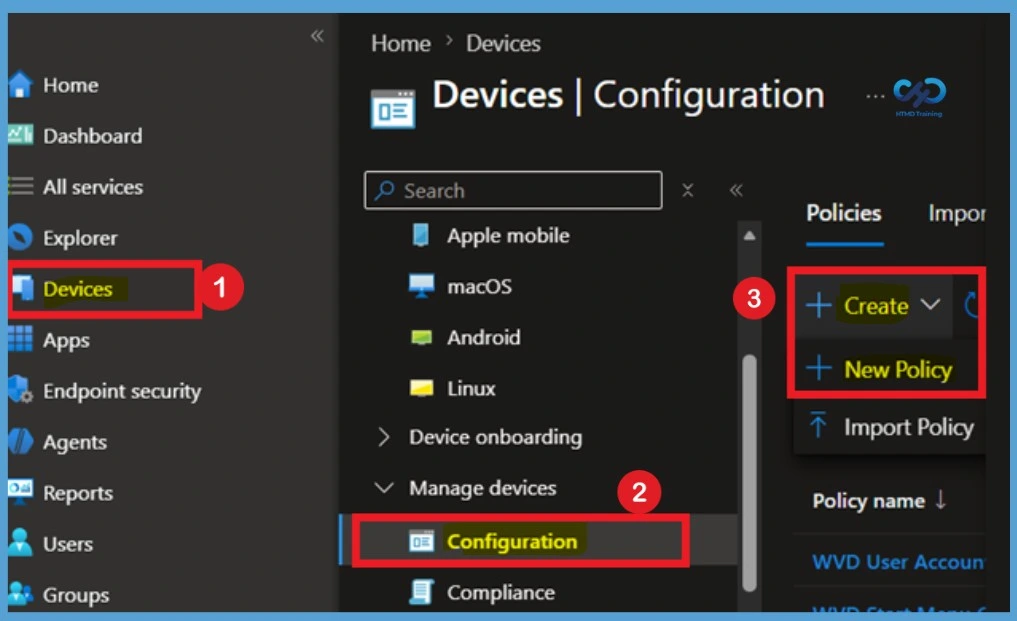
To begin, sign in to the Microsoft Intune admin center with an account that has the required administrative permissions. From the left navigation pane, select Devices, and then click Configuration to access the list of device configuration policies.

  • On the Configuration page, click + Create, and then select + New policy.
Configure Password Policies for Android Enterprise Work Profile using Intune - Fig.1
Configure Password Policies for Android Enterprise Work Profile using Intune – Fig.1

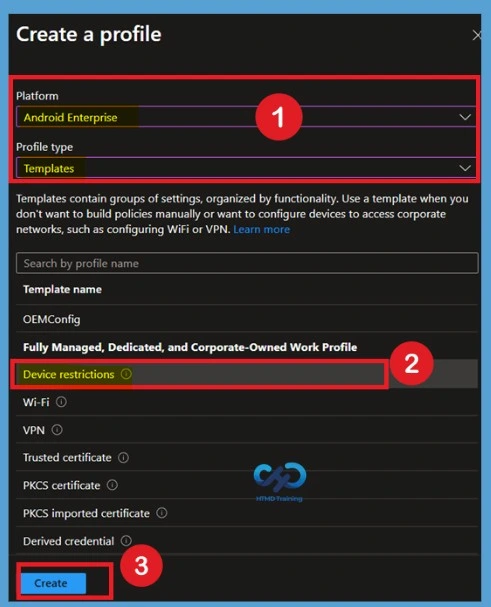
When you select + New policy, the Create a profile window opens. Here, choose Android Enterprise as the Platform, Templates as the Profile type, and then select Device restrictions from the list of available templates. Templates provide a preconfigured collection of settings organized by functionality, making it easier to create policies without manually selecting individual settings.

They help administrators quickly configure common device management and security settings for managed devices. After selecting Device restrictions, click Create to begin configuring the policy.

PlatformProfile Type
Android Enterprise Device Restrictions
Configure Password Policies for Android Enterprise Work Profile using Intune – Table 1
Configure Password Policies for Android Enterprise Work Profile using Intune - Fig.2
Configure Password Policies for Android Enterprise Work Profile using Intune – Fig.2

Basic Tab

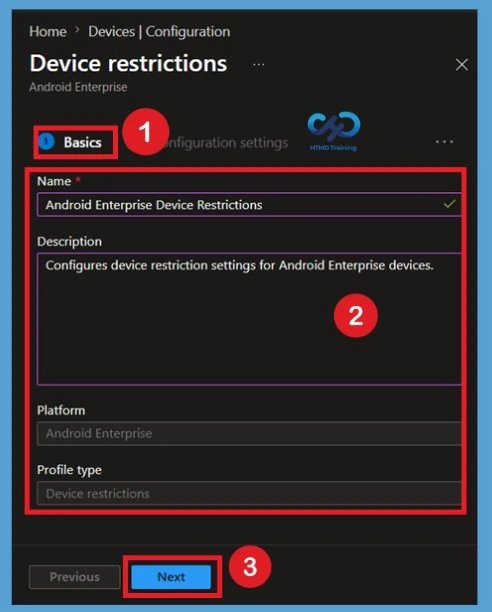
On the Basics page, provide a meaningful Name and an optional Description for the Device Restrictions policy. Using a descriptive policy name makes it easier to identify and manage the policy in the Microsoft Intune admin center, especially when multiple configuration profiles are deployed.

For this example, enter Android Enterprise Device Restrictions as the policy name and Configures device restriction settings for Android Enterprise devices as the description. Verify that the Platform is set to Android Enterprise and the Profile type is Device restrictions, then click Next to continue.

Configure Password Policies for Android Enterprise Work Profile using Intune - Fig.3
Configure Password Policies for Android Enterprise Work Profile using Intune – Fig.3

Configuration Settings

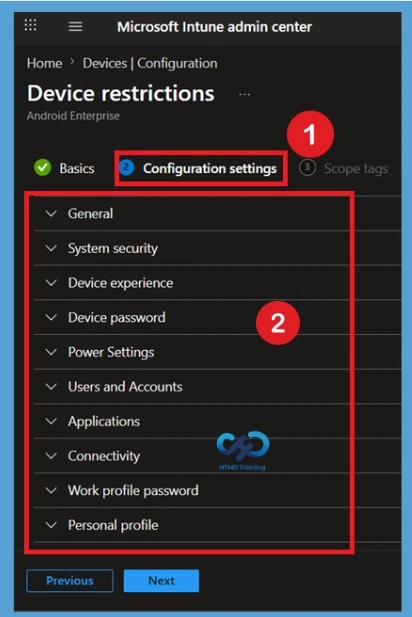
On the Configuration settings page, you’ll find several categories of device restriction settings, including General, System security, Device experience, Device password, Power Settings, Users and Accounts, Applications, Connectivity, Work profile password, and Personal profile. These categories allow you to configure security and device management settings based on your organization’s requirements.

CategoryPurpose
GeneralControls core device behaviors such as screen capture, camera access, date or time changes, and roaming data
System securityDefines encryption, certificate, and security patch requirements. Strengthens device integrity and compliance.
Device experienceManages user interface and experience settings like status bar visibility, notifications, and accessibility features. Ideal for kiosk or frontline devices.
Power SettingsControls power menu access, sleep behavior, and battery optimization. Prevents unauthorized shutdowns or tampering.
Users and AccountsRestricts account additions, sync settings, and user management.
ApplicationsManages app installation permissions, updates, and restrictions. Supports app whitelisting or blacklisting for compliance.
ConnectivityControls Bluetooth, Wi‑Fi, USB, and hotspot access. Prevents data leakage and enforces secure network usage.
Work profile passwordEnforces password rules specifically for corporate‑owned work profiles, expiry, and wipe thresholds. Protects enterprise data within work containers.
Personal profileControl camera, screen capture, and app installation from unknown sources. Balances privacy and control.
Custom support informationDisplays IT helpdesk contact or support portal details on the device. Improves user self‑service and compliance.
Configure Password Policies for Android Enterprise Work Profile using Intune – Table.2
Configure Password Policies for Android Enterprise Work Profile using Intune - Fig.4
Configure Password Policies for Android Enterprise Work Profile using Intune – Fig.4

Configure Work Profile Device Restriction Settings

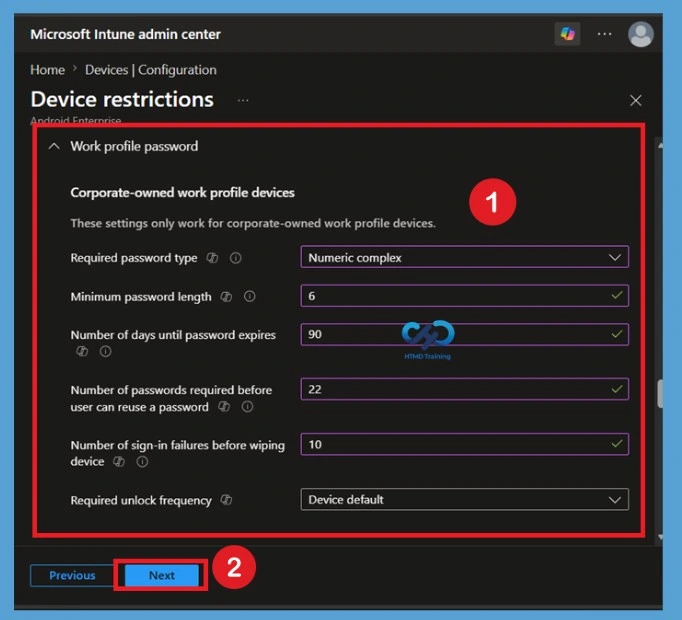
Expand the required category to configure its available settings. In this example, the Work profile password section is used to define password requirements for corporate-owned work profile devices, including the required password type, minimum password length, password expiration period, password history, sign-in failure threshold, and unlock frequency.

  • Expand each category and configure the appropriate settings for your Android Enterprise devices.
  • Review the configured options carefully before proceeding. After completing the required configurations, click Next to continue to the next step.
SettingInfo
Required password typeNumeric complex
Minimum password length6
Number of days until password expires90
Number of passwords required before reuse22
Number of sign‑in failures before wiping device10
Required unlock frequencyDevice default
Configure Password Policies for Android Enterprise Work Profile using Intune – Table 3
Configure Password Policies for Android Enterprise Work Profile using Intune - Fig.5
Configure Password Policies for Android Enterprise Work Profile using Intune – Fig.5

Scope Tags Settings

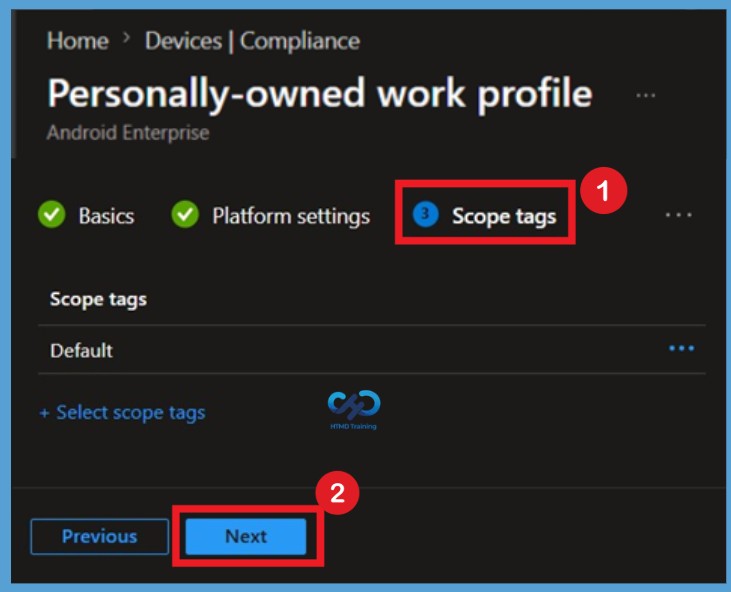
Scope tags help limit which administrators can view and manage this Device Restrictions policy based on their assigned roles. Click Select scope tags to choose one or more scope tags, or leave the default configuration if your organization doesn’t use RBAC. After completing this step, click Next to continue.

Configure Password Policies for Android Enterprise Work Profile using Intune - Fig.6
Configure Password Policies for Android Enterprise Work Profile using Intune – Fig.6

Importance of Assignments

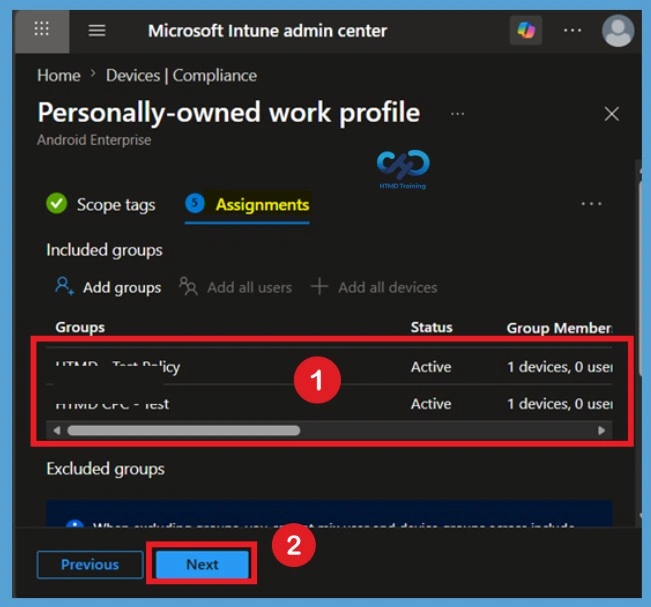
The Assignments page determines which users or devices receive the Android Enterprise Device Restrictions policy. Under Included groups, click Add groups and select the Microsoft Entra ID user or device groups that should receive the policy. If necessary, you can also configure Excluded groups to prevent the policy from applying to specific users or devices.

  • After selecting the appropriate groups, review the assignment configuration and click Next.
Configure Password Policies for Android Enterprise Work Profile using Intune - Fig.7
Configure Password Policies for Android Enterprise Work Profile using Intune – Fig.7

Review + Create Options

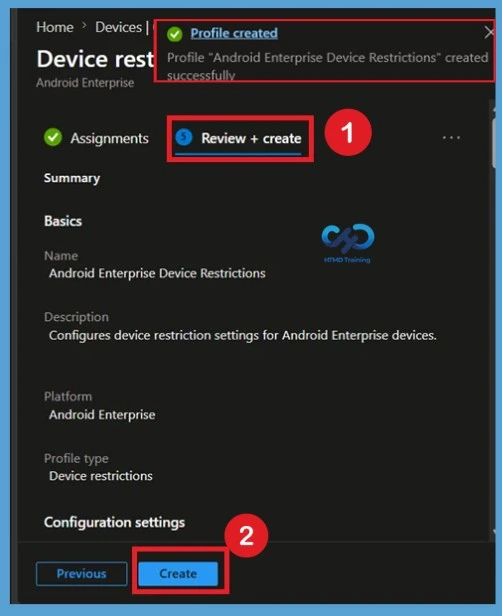
The Review + create page displays a summary of the policy configuration, including the platform, profile template, configured device restriction settings, scope tags, and assignments. Carefully review all settings to ensure they match your organization’s security requirements before creating the policy.

If you need to make any changes, click Previous to return to the relevant step. When you’re satisfied with the configuration, click Create to deploy the Android Enterprise Device Restrictions policy.

Configure Password Policies for Android Enterprise Work Profile using Intune - Fig.8
Configure Password Policies for Android Enterprise Work Profile using Intune – Fig.8

Monitor Device Restrictions Policy Deployment Status

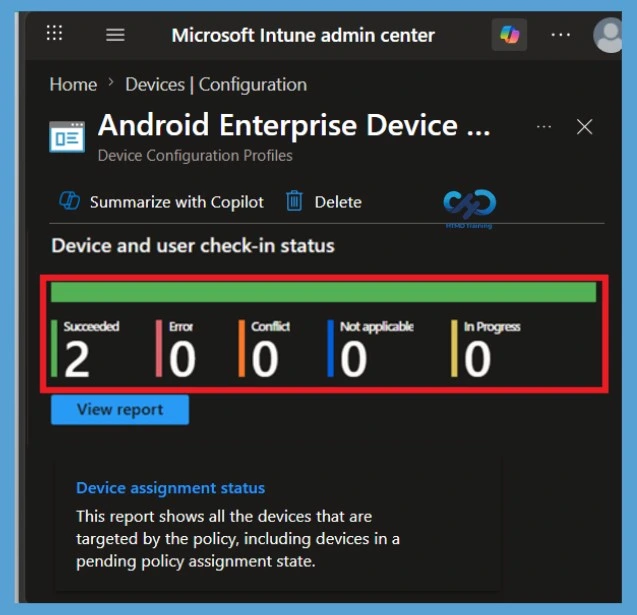
After creating the Android Enterprise Device Restrictions policy, you can monitor its deployment status from the Microsoft Intune admin center. Navigate to Devices > Configuration, and then select the Android Enterprise Device Restrictions policy you created.

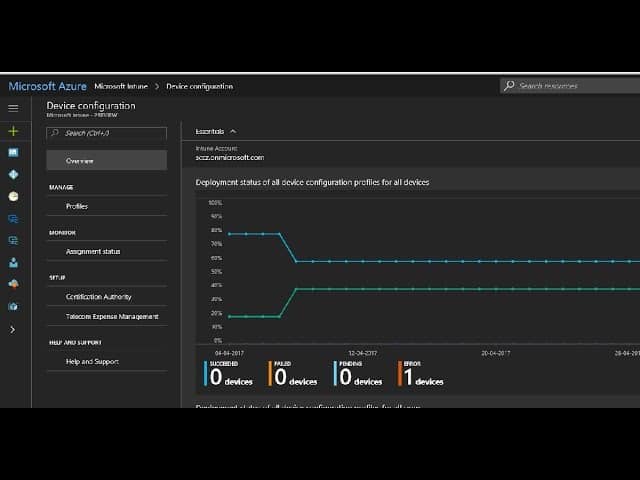
Open the Device and user check-in status or Overview page to review the deployment results. Here, you can verify whether the policy was successfully applied to the targeted devices and identify any devices with Pending, Error, Conflict, or Not applicable statuses. This information helps troubleshoot deployment issues and confirm that the policy is being enforced correctly.

Configure Password Policies for Android Enterprise Work Profile using Intune - Fig.9
Configure Password Policies for Android Enterprise Work Profile using Intune – Fig.9

Delete the Device Restrictions Policy

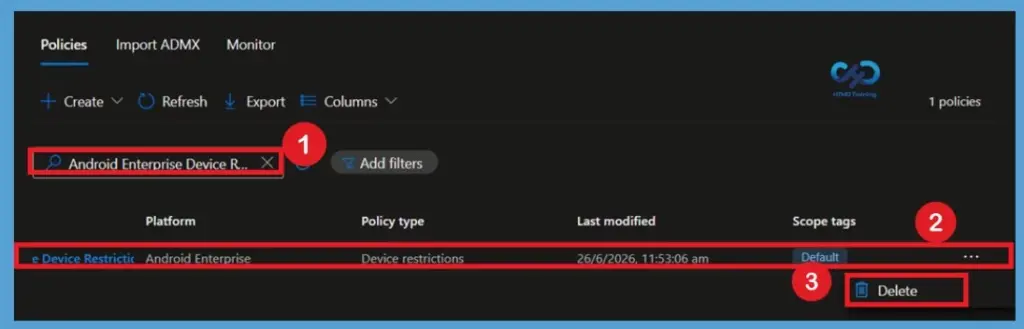
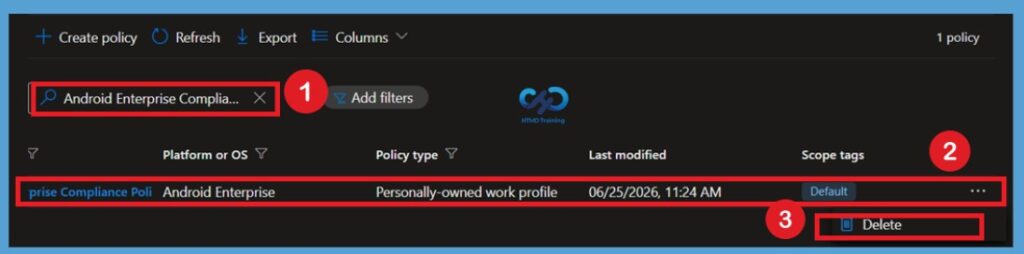
If the Device Restrictions policy is no longer required, you can permanently delete it from Microsoft Intune. Go to Devices > Configuration, locate the Android Enterprise Device Restrictions policy, and select it.

Click the 3-dot (More) menu or Delete option from the command bar, and then confirm the deletion when prompted. Once deleted, the policy is permanently removed from Intune and will no longer be applied to managed Android Enterprise devices.

For detailed information, you can refer to our previous post – Learn How to Delete or Remove App Assignment from Intune using by Step-by-Step Guide.

Configure Password Policies for Android Enterprise Work Profile using Intune - Fig.10
Configure Password Policies for Android Enterprise Work Profile using Intune – Fig.10

Remove Assigned Groups from the Device Restrictions Policy

If you no longer want the Device Restrictions policy to apply to specific users or devices, you can remove the assigned groups from the policy. Open the policy, select Properties, and click Edit next to Assignments.

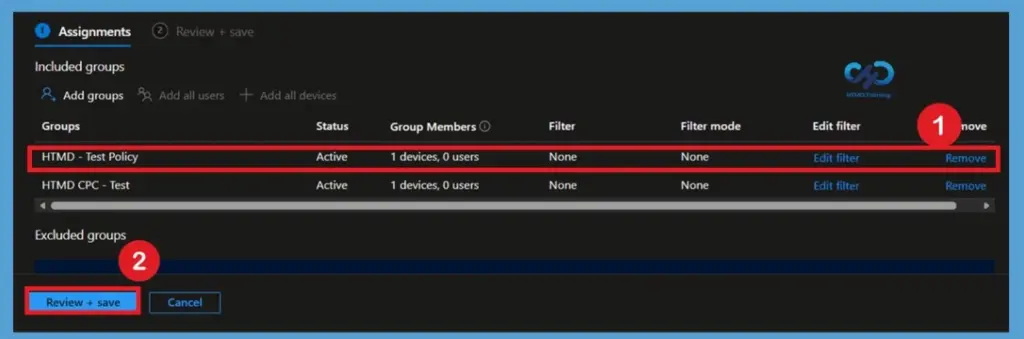
Under Included groups, remove the Microsoft Entra ID groups that are currently assigned to the policy. Review the updated assignments and click Review + save, After the policy is updated, it will no longer be deployed to the removed groups.

For detailed information, you can refer to our previous post – How to Delete Allow Clipboard History Policy in Intune Step by Step Guide.

Configure Password Policies for Android Enterprise Work Profile using Intune - Fig.11
Configure Password Policies for Android Enterprise Work Profile using Intune – Fig.11

User Experience of Security Policy for Android Devices

The user experience of Android for Work devices can vary depending on the manufacturer of the devices. As mentioned in the previous post, Samsung and Nexus are the best-experienced devices I have tested.

But I would admit the user experience of Android for Work is far better than that of an Android device! As Android devices have different variants, it’s better to ensure that all the security policies for the Android device experience are excellent for all manufacturers.

Configure Password Policies for Android Enterprise Work Profile using Intune – Video 1

Need Further Assistance or Have Technical Questions?

Join the LinkedIn Page and Telegram group to get the latest step-by-step guides and news updates. Join our Meetup Page to participate in User group meetings. Also, Join the WhatsApp Community and WhatsApp Channel to get the latest news on Microsoft Technologies. We are there on Reddit as well.

Author

Anoop C Nair has been Microsoft MVP from 2015 onwards for 10 consecutive years! He is a Workplace Solution Architect with more than 22+ years of experience in Workplace technologies. He is also a Blogger, Speaker, and Local User Group Community leader. His primary focus is on Device Management technologies like SCCM and Intune. He writes about technologies like Intune, SCCM,  Windows,  Cloud PC, Windows, Entra, Microsoft Security, Career, etc.

Intune Create Device Restriction Policy Profiles Deploy Security Policies to Windows 10 Devices 6

Intune Create Device Restriction Policy Profiles Deploy Security Policies to Windows 10 Devices

Let’s discuss the Intune Create Device Restriction Policy Profiles Deploy Security Policies to Windows 10 Devices. Intune configuration restriction policies are critical in modern device management strategy. Intune device restriction policy is the security settings applied on your Windows 10 CYOD device.

As part of your organization’s security policies, you may need to lock down mobile or Windows devices with corporate data and app access. Yes, Intune configuration restriction policies help you lock down Windows devices as per your organization’s security requirements.

In this post, you will learn everything you need to create device restriction policy profiles in Intune and deploy security policies to Windows 10 devices. We will guide you step-by-step through setting up these policies to ensure your devices are secure and comply with your organization’s requirements.

Whether you’re new to Intune or looking to enhance your device management skills, this guide will provide clear and straightforward instructions to help you effectively manage and protect your Windows 10 devices.

Intune Configuration Restriction Policy Deployment with Windows 10

In this video, you’ll learn all about deploying Intune Configuration Restriction Policies on Windows 10. We’ll show you each process step, making it easy to follow. Whether setting up new policies or adjusting existing ones, this video will help you understand how to use Intune to keep your Windows 10 devices secure and well-managed.

Intune Create Device Restriction Policy Profiles Deploy Security Policies to Windows 10 Devices – Video 1

Create Intune Device Restriction Policy for Windows 10 Devices

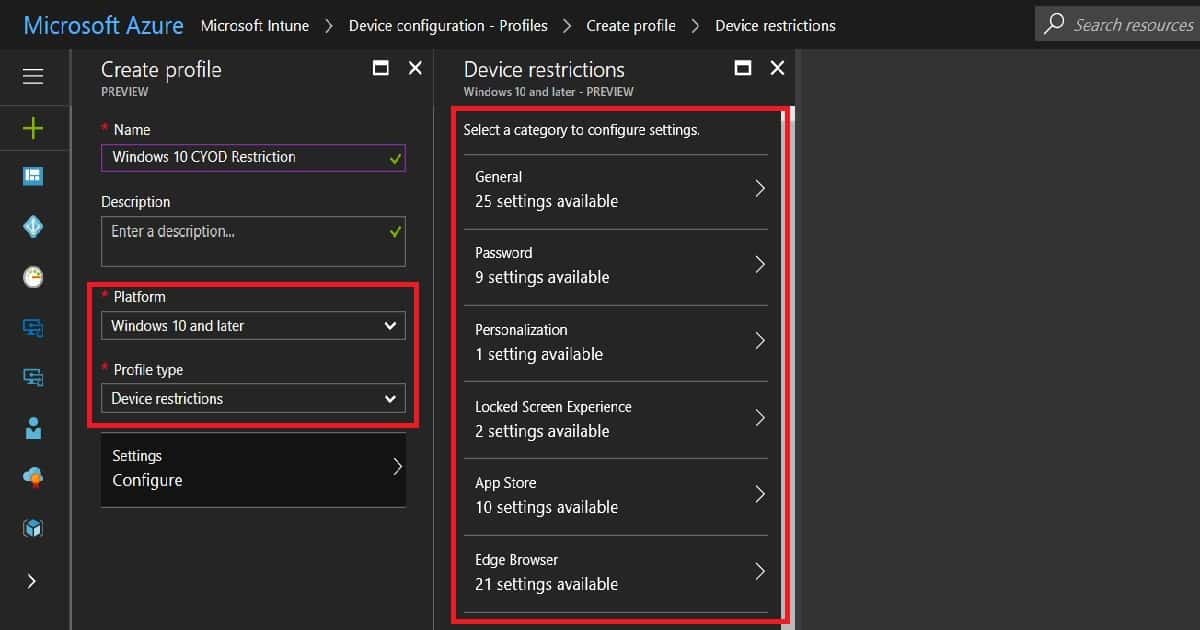
You can create an Intune device restriction policy for Windows 10 from Microsoft Intune—Device Configuration—Profiles—Create New Profile. I selected Windows 10 as the platform, and platform Selection is essential.

Also, it would be best to select the profile type while creating an Intune Configuration Restriction policy. In my scenario, the Device restriction policy is named “Windows 10 CYOD Restrictions.”

PlatformProfile Type
Windows 10 and LaterDevice Restrictions
Intune Create Device Restriction Policy Profiles Deploy Security Policies to Windows 10 Devices – Table 1
Intune Create Device Restriction Policy Profiles Deploy Security Policies to Windows 10 Devices - Fig.1
Intune Create Device Restriction Policy Profiles Deploy Security Policies to Windows 10 Devices – Fig.1

As shown below, the Windows platform Intune device restriction policy for out-of-box settings is segregated into 16 sections. This list is comprehensive, and we can lock down Windows 10 machines as required.

Is this Intune device restriction policy a replacement for group policies? No, it’s still not a replacement for AD group policies.

  1. General
  2. Password
  3. Personalization
  4. Locked screen experience
  5. App Store
  6. Edge Browser
  7. Search
  8. Cloud and Storage
  9. Cellular and Connectivity
  10. Control Panel and Settings
  11. Defender
  12. Defender Exclusions
  13. Network Proxy
  14. Windows Spotlight
  15. Display
  16. Start

Deploy Windows 10 Intune Device Restriction Policy

You can deploy the Windows 10 Intune Device Restriction Policy to either Windows 10 CYOD dynamic devices or Windows 10 user groups. Dynamic device groups are still in preview, and the group typos are not always stable. So, at least for the next two months, I will prefer to deploy policies to user groups rather than dynamic device groups.

Windows 10 End-user Experience of Intune Device Restriction Policy

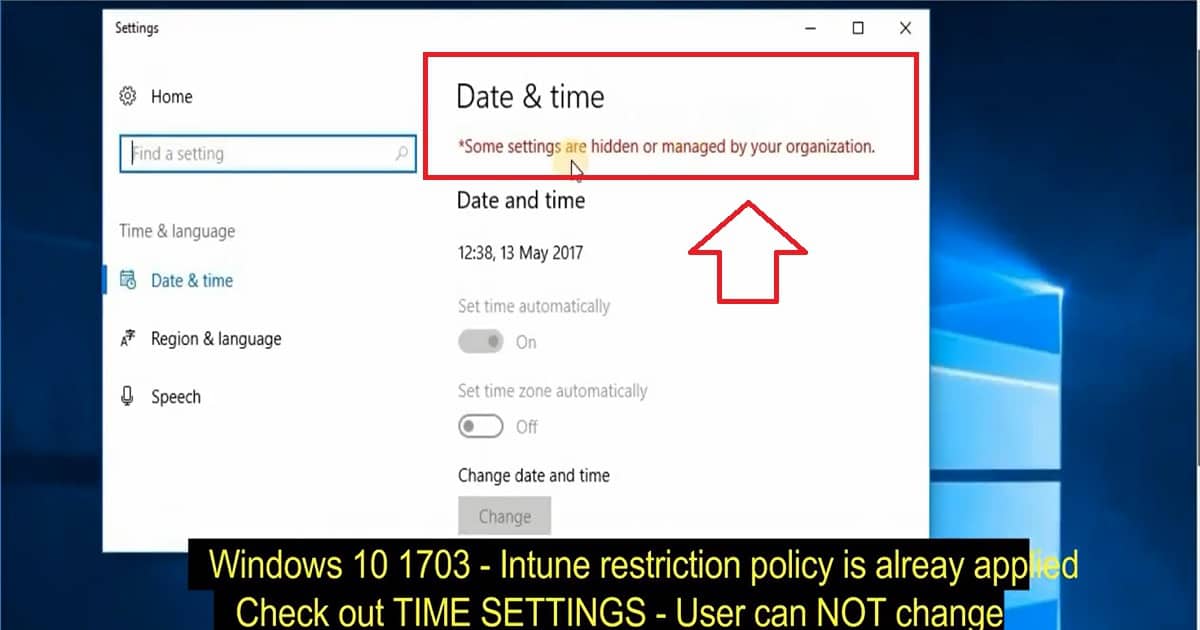
As you can see in the video tutorial at the top of this post, I’ve enabled the time settings to disable the option as part of the initial Windows 10 device restriction policy. The end-user logged in to the Windows 10 machine can’t change the time on the system.

After that, I changed the Windows time setting policy again, and after applying the new policy, the user can change the time on the Windows 10 system.

Intune Create Device Restriction Policy Profiles Deploy Security Policies to Windows 10 Devices - Fig.2
Intune Create Device Restriction Policy Profiles Deploy Security Policies to Windows 10 Devices – Fig.2

We are on WhatsApp now. To get the latest step-by-step guides, news, and updates, Join our Channel. Click here. HTMD WhatsApp.

Author

Anoop C Nair is Microsoft MVP! He is a Device Management Admin with more than 20 years of experience (calculation done in 2021) in IT. He is a Blogger, Speaker, and Local User Group HTMD Community leader. His main focus is on Device Management technologies like SCCM 2012, Current Branch, and Intune. He writes about ConfigMgr, Windows 11, Windows 10, Azure AD, Microsoft Intune, Windows 365, AVD, etc.
How to Enable Intune Company Portal Browser Access for Conditional Access Enabled Web Apps 7

How to Enable Intune Company Portal Browser Access for Conditional Access Enabled Web Apps

Let’s discuss how to Enable Intune Company Portal Browser Access for Conditional Access Enabled Web apps. I have been testing and developing a solution for Android device management with Intune. I have shared my Android for Work learning experiences in my previous posts – Android.

In this post, we will see and learn how to enable Intune Company Portal Browser Access for Android devices. What is the need for enabling company portal browser access?.

To put it in simple words, if your organization is using Azure AD Conditional Access (CA) enabled internal web applications, then we need to enable the Company portal browser access option.

This post will provide a comprehensive guide on enabling Intune Company Portal browser access for conditional access-enabled web apps. We will walk you through the necessary steps to configure your settings, ensuring easy access control and security compliance.

How to Enable Intune Company Portal Browser Access

The above video recording gives you the same user experience when you have CA access-enabled web applications and you have not enabled company portal browser access. As you can see in the video, the managed browser for Android devices gives an error stating that the device is not enrolled.

Yes, the managed browser application can’t understand whether the device is already enrolled. When you perform an action like “Intune Company Portal Browser Access, ” the app will try to install the Microsoft work account certificate on an Android device. There is a known issue with the previous version of the Company Portal application on Android devices.

How to Enable Intune Company Portal Browser Access
Open the Company Portal app.
Go to the Settings page from the ellipsis (…) or hardware menu button.
Press the Enable Browser Access button.
How to Enable Intune Company Portal Browser Access for Conditional Access Enabled Web Apps – Table 1

Microsoft Work Account Certificate Installation Error

Allow the Company portal and Intune-managed apps to record future actions in greater detail, which may help your IT administrator better identify and solve issues.

How to Enable Intune Company Portal Browser Access for Conditional Access Enabled Web Apps - Fig.1
How to Enable Intune Company Portal Browser Access for Conditional Access Enabled Web Apps – Fig.1

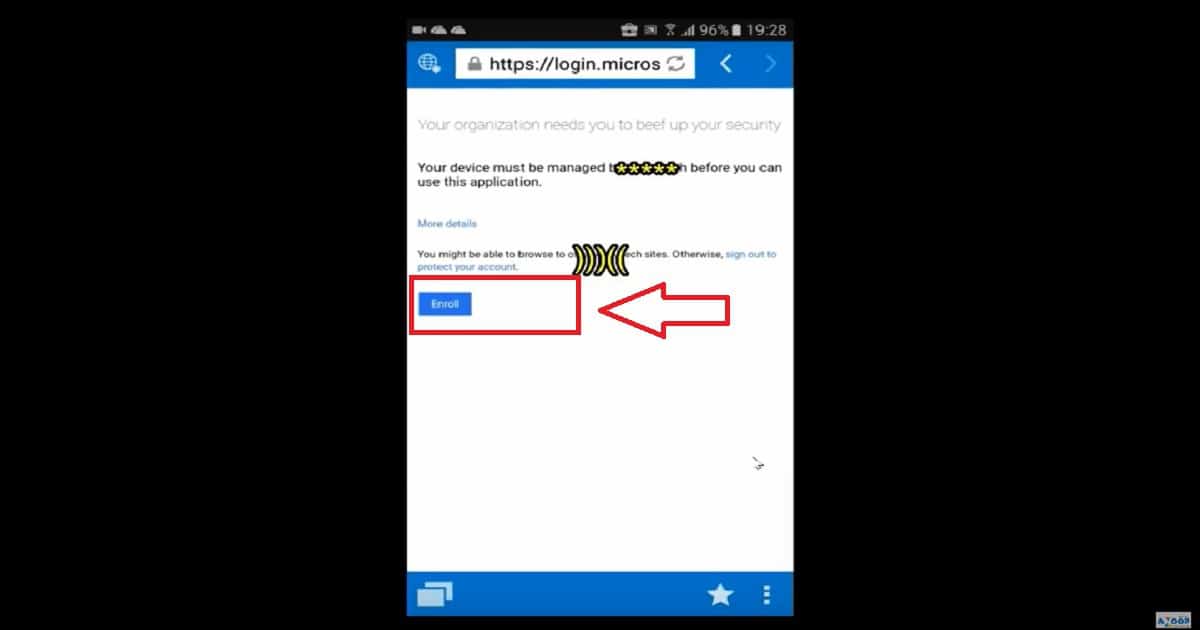
End-User Experience of ENROLL Device Error

The solution to the Microsoft mentioned above “work account certificate installation” error is to update the company portal application for Android devices. Are you getting an ENROL error on your device (as you can see in the following screen capture)?

Does this error appear when you try to access Conditional Access-enabled web applications through the managed browser? The web apps without CA are working fine? If so, you must perform the following action from your Android device: “Intune Company Portal Browser Access.”

How to Enable Intune Company Portal Browser Access for Conditional Access Enabled Web Apps - Fig.2
How to Enable Intune Company Portal Browser Access for Conditional Access Enabled Web Apps – Fig.2

Microsoft Work Account Certificate Installation

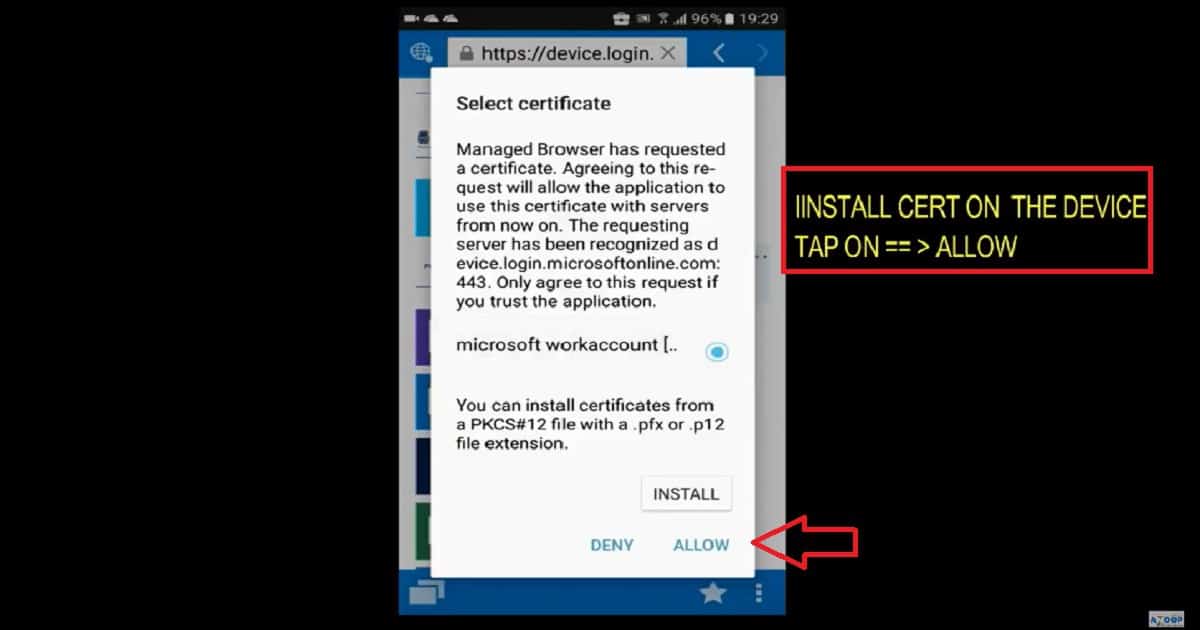
Now, it’s time to update the company portal application on Android for work-enabled devices. Once the device is updated with the latest version of the company portal app, then open up the company portal app and go to settings – tap on the button “Enable Browser Settings.”

This action opens a popup for installing a Microsoft Work Account certificate. The user must select the cert and tap on the ALLOW button. The video tutorial at the top of this post explains this process.

How to Enable Intune Company Portal Browser Access for Conditional Access Enabled Web Apps - Fig.3
How to Enable Intune Company Portal Browser Access for Conditional Access Enabled Web Apps – Fig.3

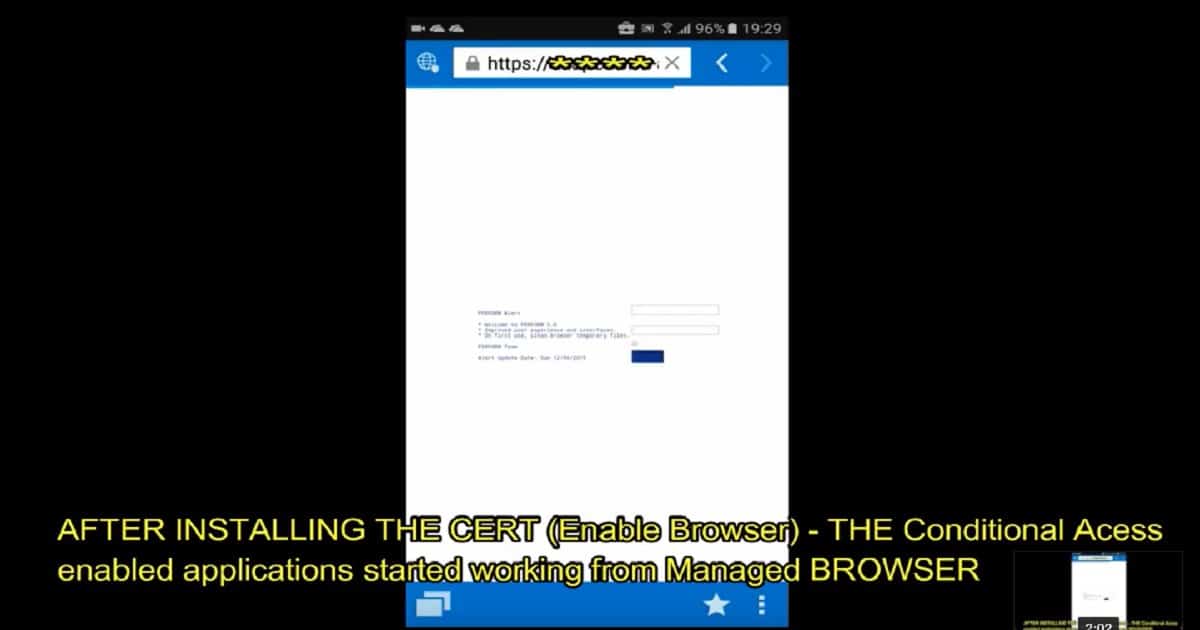
End USER Experience of CA-enabled Web Application Access

Once the managed browser has a certificate, the web applications opened in the Managed browser can use the Microsoft Work account cert. This will allow the managed browser to securely open conditional access-enabled internal web applications. In my experience, the user doesn’t require a tap on the INSTALL button; rather, the user must tap on the ALLOW button to complete this configuration.

How to Enable Intune Company Portal Browser Access for Conditional Access Enabled Web Apps - Fig.4
How to Enable Intune Company Portal Browser Access for Conditional Access Enabled Web Apps – Fig.4

We are on WhatsApp now. To get the latest step-by-step guides, news, and updates, Join our Channel. Click here. HTMD WhatsApp.

Author

Anoop C Nair is Microsoft MVP! He is a Device Management Admin with over 20 years of IT experience (calculation done in 2021). He is a Blogger, Speaker, and leader of the Local User Group HTMD Community. His main focus is on Device Management technologies like SCCM 2012, Current Branch, and Intune. He writes about ConfigMgr, Windows 11, Windows 10, Azure AD, Microsoft Intune, Windows 365, AVD, etc.
How to Deploy Microsoft Store for Business Apps using Intune 8

How to Deploy Microsoft Store for Business Apps using Intune

Let’s discuss how to Deploy Microsoft Store for Business Apps using Intune. Microsoft Store for business apps is part of your organization’s private store apps.

Only one way to deploy Store apps using Intune is required deployment. Microsoft Store for business apps can be deployed as “Available,” “Required,” or “Uninstall” apps to Windows 10 or Windows 11 devices.

On September 15, 2023, Microsoft Store for Business and Education apps will be removed from the Intune admin center. Apps on the device will remain until intentionally removed.

About a month later, the Microsoft Graph API microsoftStoreForBusinessApp will no longer be available. Use New Store to Deploy New Microsoft Store Apps Type From Intune with Winget.

How to Deploy Microsoft Store for Business Apps using Intune - Fig.1
How to Deploy Microsoft Store for Business Apps using Intune – Fig.1

The logic behind NOT having an “available” deployment option is very understandable. The user doesn’t need an available deployment via Intune because the user always has private store access to install the apps manually.

Let’s check how to deploy the WhatsApp application from the Microsoft store to Windows 10/11 devices, which Microsoft Intune manages.

NOTE! – Microsoft Store for Business retirement has been announced, and Microsoft Store will retire by early 2023. Read More Use Winget Windows Package Manager Tool To Install Microsoft Store Apps Using Intune.

Requirements – Microsoft Store for Business Application Deployment using Intune

Let’s quickly look at the requirements for Microsoft Store for Business Application Deployment using Intune.

  • Browser compatible with Microsoft Store for Business
  • The administrator account needed to integrate MSfB with SCCM
  • Employees need Azure AD accounts when they access the content from MSfB
  • Proxy configuration requirements for MSfB
  • Devices must be registered with Azure AD or joined to the same Azure AD tenant where you registered the MSfB for online app deployment.
  • Azure AD Global admin (or appropriate) access to create Applications to connect ConfigMgr site to Azure AD and MSfB

Decide Offline or Online Applications using Intune

The MSfB supports two types of application licenses, and you should be very careful with the license type of application you want to add. You don’t need devices Hybrid Azure AD registered or joined for Offline apps.

  • Online: Windows 10 devices must be joined to Azure Active Directory (Azure AD) or hybrid Azure AD-joined.
  • Offline: Devices don’t need to connect to the store or have a connection to the internet.

Read More -> Offline Application deployment example – Install Windows Company Portal Offline Version Using Intune.

Search Store Applications from MSfB for Intune App Deployment

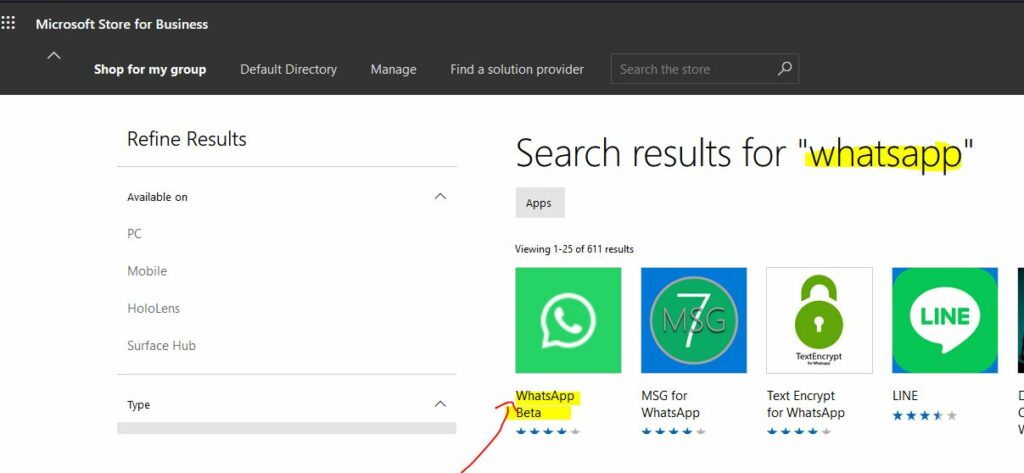
Let’s log in to the Microsoft Store for Business and search for the apps you want to add to Configuration Manager. Try to add WhatsApp to the private store and deploy it to managed Intune Windows 10/11 devices.

NOTE! – Microsoft Store for Business will retire in the first quarter 2023.

  • Login to MSfB with Azure AD admin account https://businessstore.microsoft.com/
  • Search for the ” WhatsApp ” Microsoft Store application you want to add.
  • Search URL https://businessstore.microsoft.com/en-us/store/search?q=whatsapp
How to Deploy Microsoft Store for Business Apps using Intune - Fig.2
How to Deploy Microsoft Store for Business Apps using Intune – Fig.2

Add Apps to Private Store

You have already found the required app (above section): WhatsApp. Now, let’s add it to the organization’s private store.

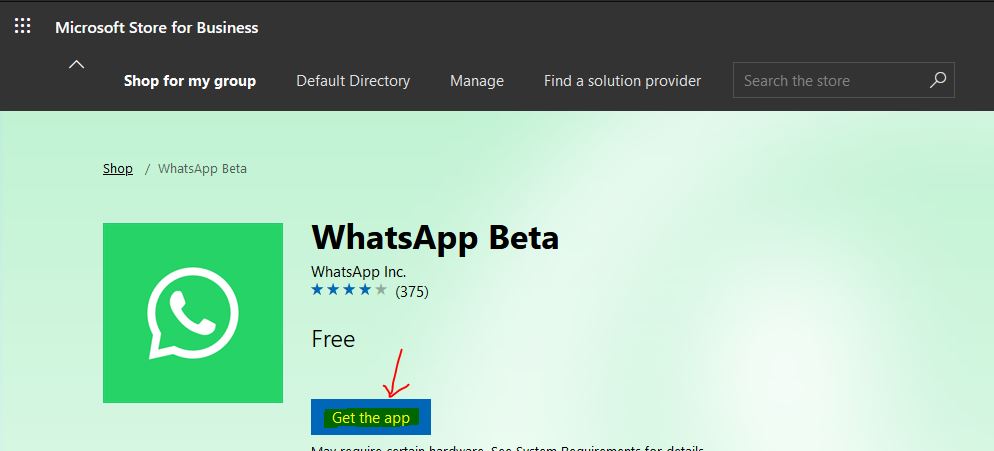
  • Click on any application – WhatsApp
  • Select License type: Offline
  • Click on Get the app
How to Deploy Microsoft Store for Business Apps using Intune - Fig.3
How to Deploy Microsoft Store for Business Apps using Intune – Fig.3

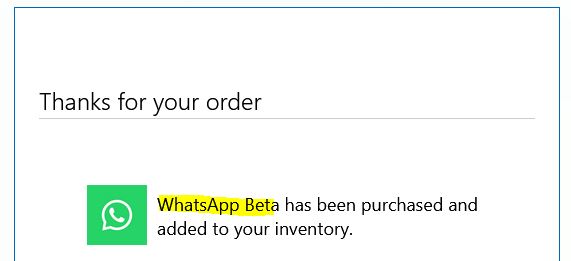
Once you click the Get the App button, the WhatsApp application will be purchased and added to your Microsoft private store.

  • You have successfully added the WhatsApp Beta app to the private store.
  • This app will be available in the admin console after the next MSfB sync with Intune.
  • Click Close to continue.
How to Deploy Microsoft Store for Business Apps using Intune - Fig.4
How to Deploy Microsoft Store for Business Apps using Intune – Fig.4

Initiate a Manual Sync between Intune Portal and Microsoft Store for Business

Let’s Initiate a Manual Sync between Intune Portal and Microsoft Store for Business. If I’m not mistaken, the schedule sync will happen every 24 hours.

  • Login to Endpoint.Microsoft.com
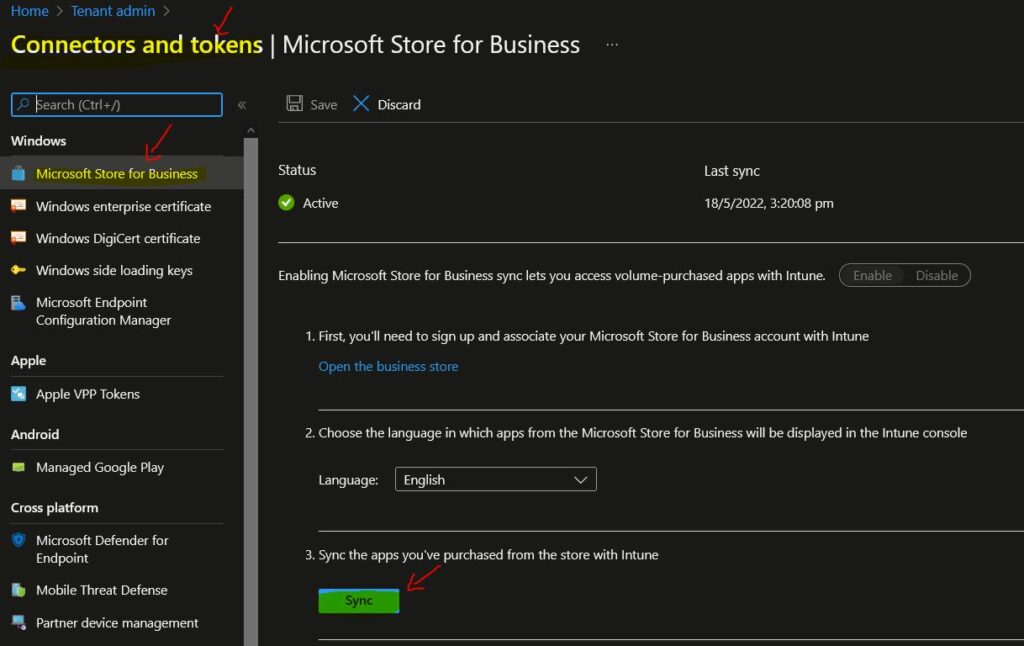
  • Navigate to Tenant Administration – Connectors and Tokens.

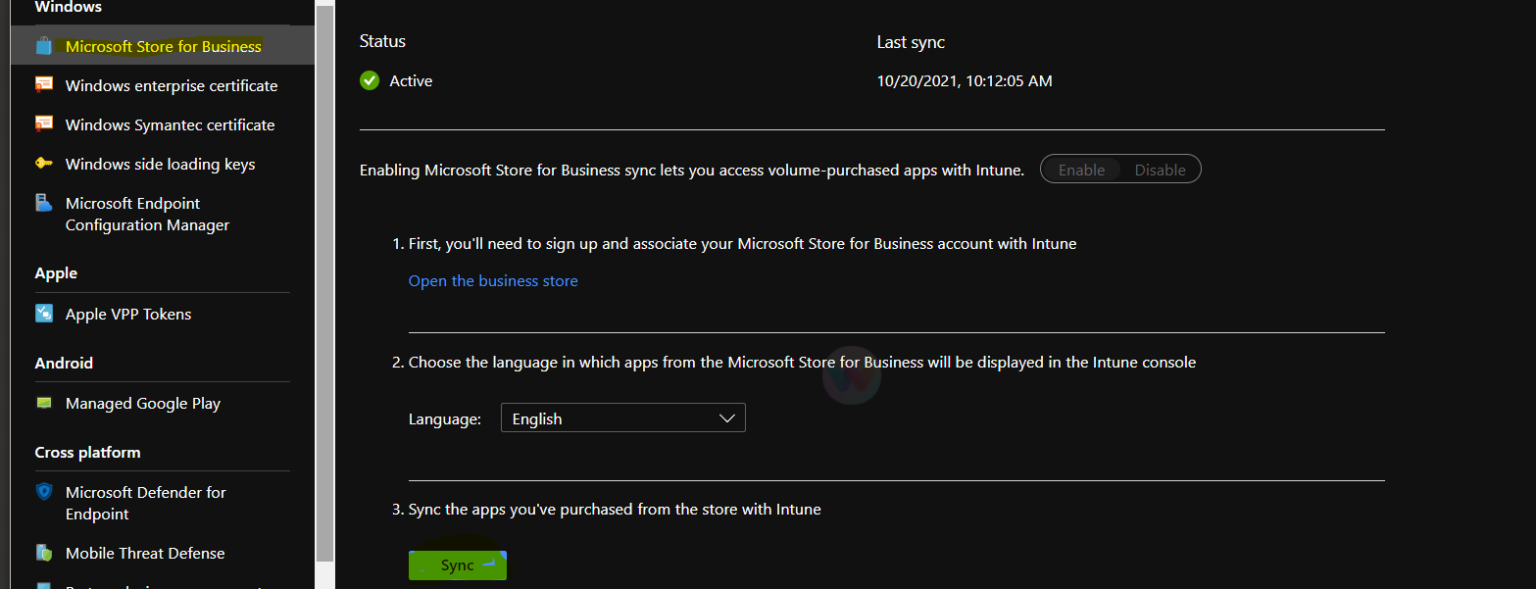
Enabling Microsoft Store for Business sync lets you access volume-purchased apps with Intune. Two options must always be enabled for this scenario.

  1. First, you must sign up and associate your Microsoft Store for Business account with Intune. Open the business store
  2. Choose the language in which apps from the Microsoft Store for Business will be displayed in the Intune console Language:
  • Enable
  • Disable

Sync the apps you’ve purchased from the store with Intune. To reflect the newly purchased application WhatsApp, click the SYNC button on the client and wait for the sync to complete.

How to Deploy Microsoft Store for Business Apps using Intune - Fig.5
How to Deploy Microsoft Store for Business Apps using Intune – Fig.5

Deploy Microsoft Store App to Windows 11/10 using Intune

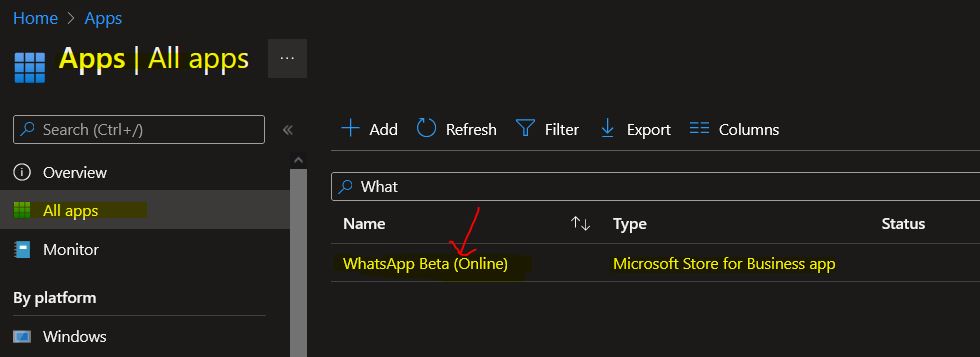
Let’s check how to Deploy the Microsoft Store App to Windows 11/10 using Intune. Let’s head over to Apps and check for the WhatsApp Beta application.

Deploy Microsoft Store App to Windows 11/10 using Intune
Open Intune portal.
Navigate to All Apps and Search for WhatsApp.
How to Deploy Microsoft Store for Business Apps using Intune – Table 1
How to Deploy Microsoft Store for Business Apps using Intune - Fig.6
How to Deploy Microsoft Store for Business Apps using Intune – Fig.6

Click on the WhatsApp application to start the deployment process. This is the typical deployment process for the Intune application. The application is created automatically when you sync Intune and Microsoft Store for Business.

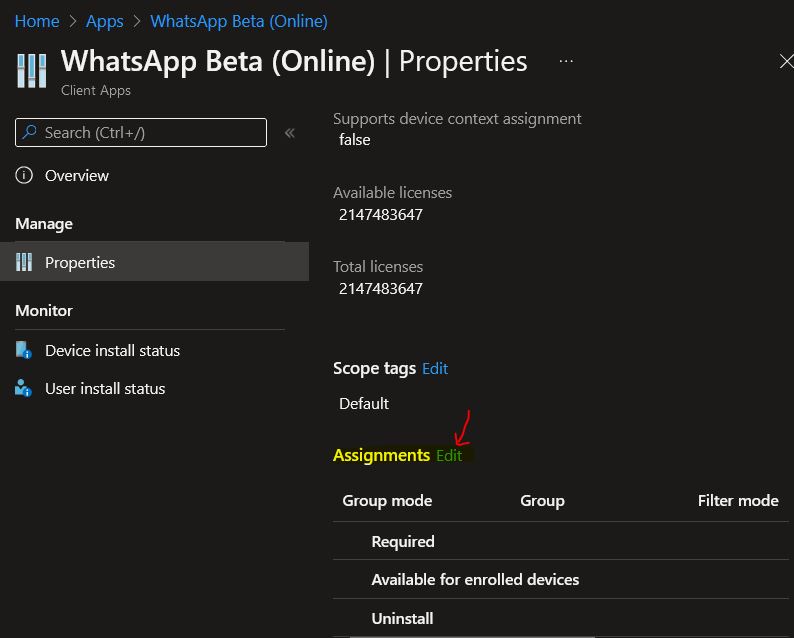
You can assign applications to at least one group. Click ‘Properties‘ and edit ‘Assignments‘ to start the assignment.

How to Deploy Microsoft Store for Business Apps using Intune - Fig.7
How to Deploy Microsoft Store for Business Apps using Intune – Fig.7

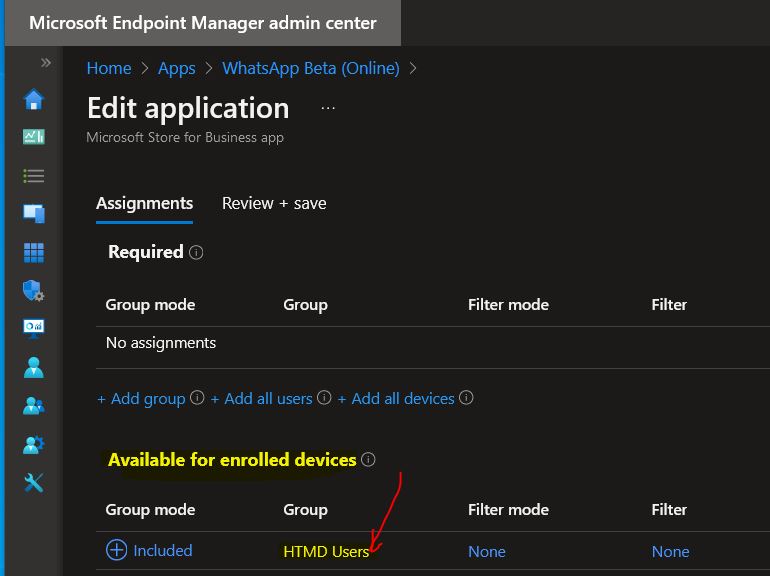
I have deployed this as an available application to an Azure AD group of USERS.

How to Deploy Microsoft Store for Business Apps using Intune - Fig.8
How to Deploy Microsoft Store for Business Apps using Intune – Fig.8

Video Tutorial (Outdated one)

This post and the video tutorial, Intune Configure Windows Store for Business & Deploy Application to Windows 10, have three sections.

  1. Enable and Configure Windows Store for Business
  2. Sync the applications and Deploy applications
  3. End-User Experience of App installation on Windows 10 device
How to Deploy Microsoft Store for Business Apps using Intune – Video 1

Enable and Configure Microsoft Store for Business

First, we must sign up and associate the Microsoft Store for Business (MSfB) account with Intune. Then, we must accept the agreement and consent for Windows Store for Business.

How to Deploy Microsoft Store for Business Apps using Intune - Fig.9
How to Deploy Microsoft Store for Business Apps using Intune – Fig.9

Intune and Microsoft Store for Business Connection

You must open the Intune portal (Azure) to enable and configure Microsoft Store for Business. Microsoft Intune – Mobile Apps- Windows Store for Business. Choose the language in which Windows Store for Business apps will be displayed in the Intune console.

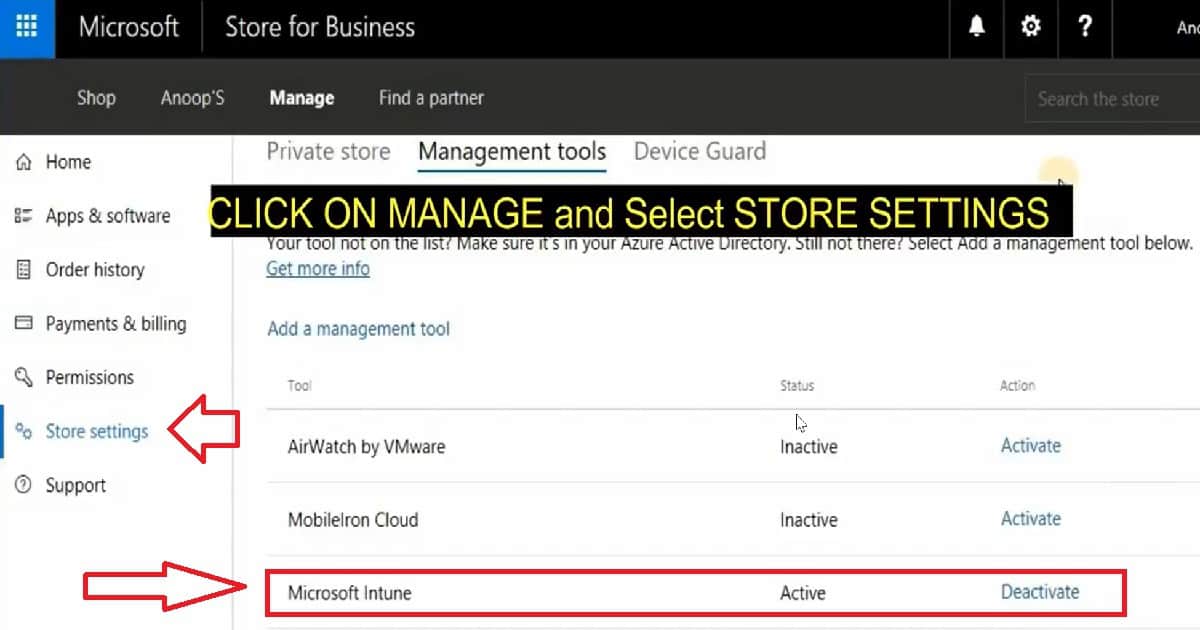
Once you sign up for the Windows Store for Business, you need to connect Intune with the store. This is required to Deploy Windows Store Apps via Intune. Click on the Manage tab and select Store Settings.

Once you are in store settings, you can see three out-of-box connections configured to deploy Windows Store for business apps via MDM solutions. Airwatch, MobileIron Cloud, and Microsoft Intune were the three connections created. Click on the Intune activate button to set up the connection between the store and Intune.

How to Deploy Microsoft Store for Business Apps using Intune - Fig.10
How to Deploy Microsoft Store for Business Apps using Intune – Fig.10

Sync the Applications and Deploy Applications via Intune

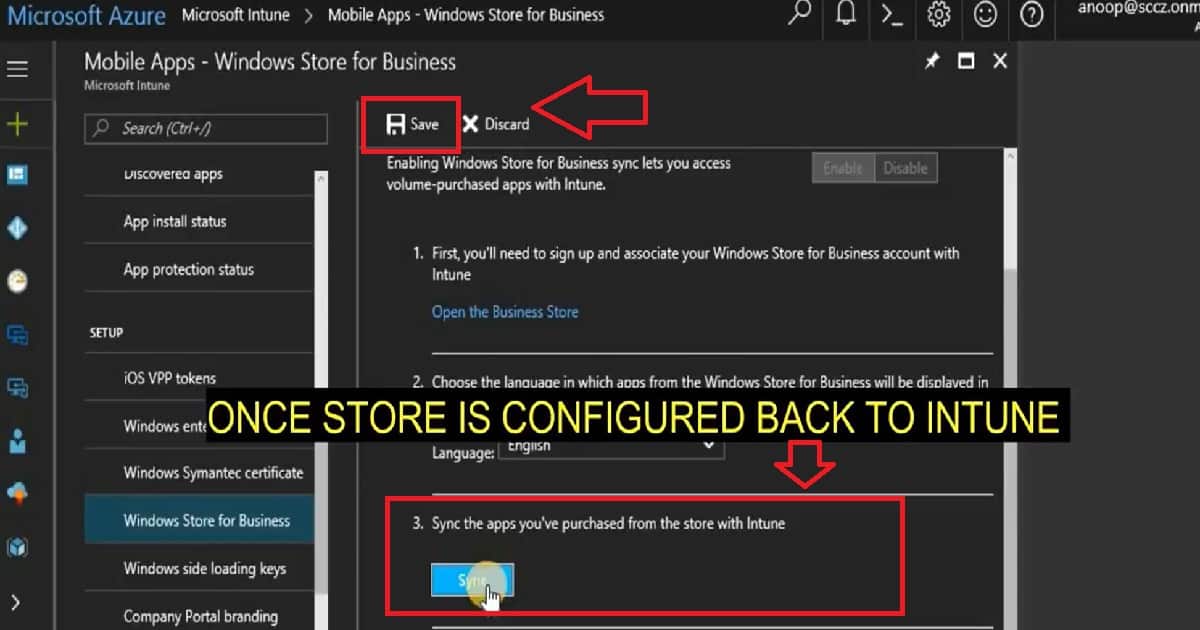
Once the Intune connection is activated, we must shop the apps and add them to your organization’s private store. It could take 24 hours (it’s pretty fast nowadays. Within minutes, it will be available) to reflect the newly added apps appearing in the private store. You can sync Intune to get the newly added apps into Intune.

We need to save the settings after the app syncs successfully.

Updated NOTE! You can now log in to the Microsoft Endpoint Manager Admin center and head to Tenant Administration—Connectors and Tokens. Then, click the SYNC button to make the application available in Intune applications.

  • Login to Endpoint.Microsoft.com and Navigate to Tenant Administration – Connectors and Tokens.
How to Deploy Microsoft Store for Business Apps using Intune - Fig.11
How to Deploy Microsoft Store for Business Apps using Intune – Fig.11

After a successful connection, you can see the following settings in Microsoft Store for Business.

How to Deploy Microsoft Store for Business Apps using Intune 9
How to Deploy Microsoft Store for Business Apps using Intune – Fig.12

How to Deploy Microsoft Store for Business App from Intune

Learn How to Deploy Microsoft Store for Business Apps from Intune. It would help if you headed to Apps – Windows node in the MEM Admin center portal (Intune) to search for application availability there. After the successful sync between Intune and Microsoft Store for Business, the Firefox browser app will be available in the MEM Intune portal.

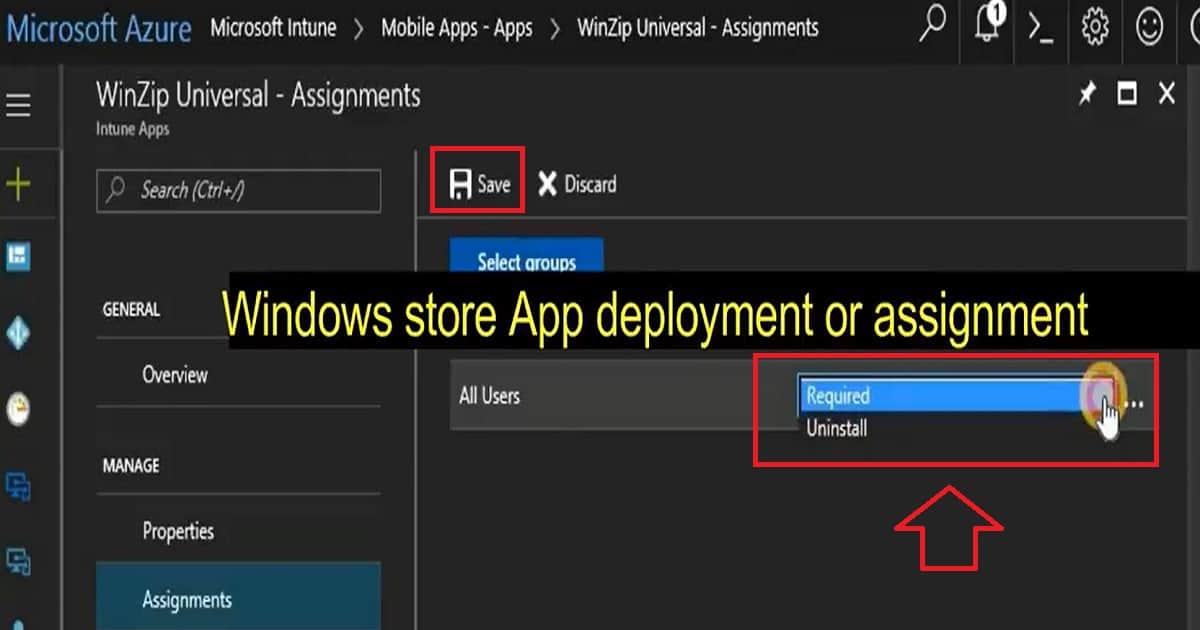
Select the Windows Store apps you want to deploy to AAD user groups. We only have two options when deploying the Windows Store app via Intune. And those are REQUIRED and UNINSTALL.

So, there is no option to deploy the Windows Store app as an available deployment via Intune because the users already have access to the Windows Private Store.

How to Deploy Microsoft Store for Business Apps using Intune - Fig.12
How to Deploy Microsoft Store for Business Apps using Intune – Fig.12

End-User Experience of App Installation on Windows 10 Device

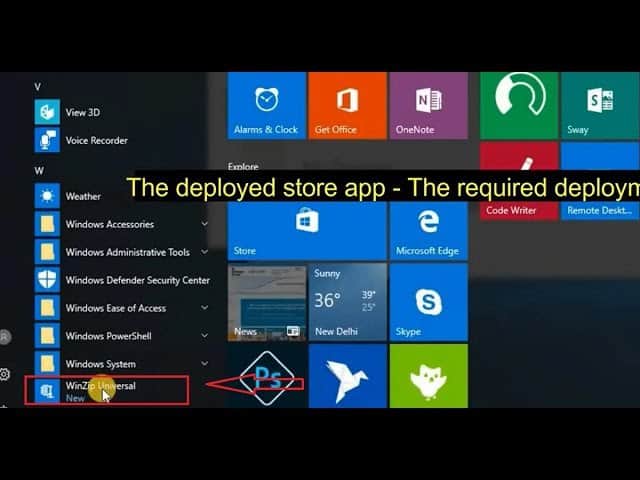
The end-user experience for Windows 10 1703 users is flawless. The deployment of the Windows Store app via Intune happened in the background, and the user’s name came to know about the installation on their Windows 10 device.

How to Deploy Microsoft Store for Business Apps using Intune - Fig.13
How to Deploy Microsoft Store for Business Apps using Intune – Fig.13

We are on WhatsApp now. To get the latest step-by-step guides, news, and updates, Join our Channel. Click here. HTMD WhatsApp.

Author

Anoop C Nair is Microsoft MVP! He is a Device Management Admin with more than 20 years of experience (calculation done in 2021) in IT. He is a Blogger, Speaker, and Local User Group HTMD Community leader. His main focus is Device Management technologies like SCCM 2012, Current Branch, and Intune. He writes about ConfigMgr, Windows 11, Windows 10, Azure AD, Microsoft Intune, Windows 365, AVD, etc.
Microsoft Intune Android Work Apps User Experience Explained 10

Microsoft Intune Android Work Apps User Experience Explained

Let’s discuss the Microsoft Intune Android Work Apps User Experience Explained. The android operating system has several variants, and fragmentation is very high. What are the reasons for this?  With the open standards, every smartphone manufacturer has the freedom and option to customize the operating system according to their preference.

So, all the Android mobile device manufacturers grabbed the opportunity to push their apps and tweak their versions of Android. So, what is the biggest problem with the Intune Android Work app’s user experience? I will see the details in this post. Also, I have explained the same in the below video.

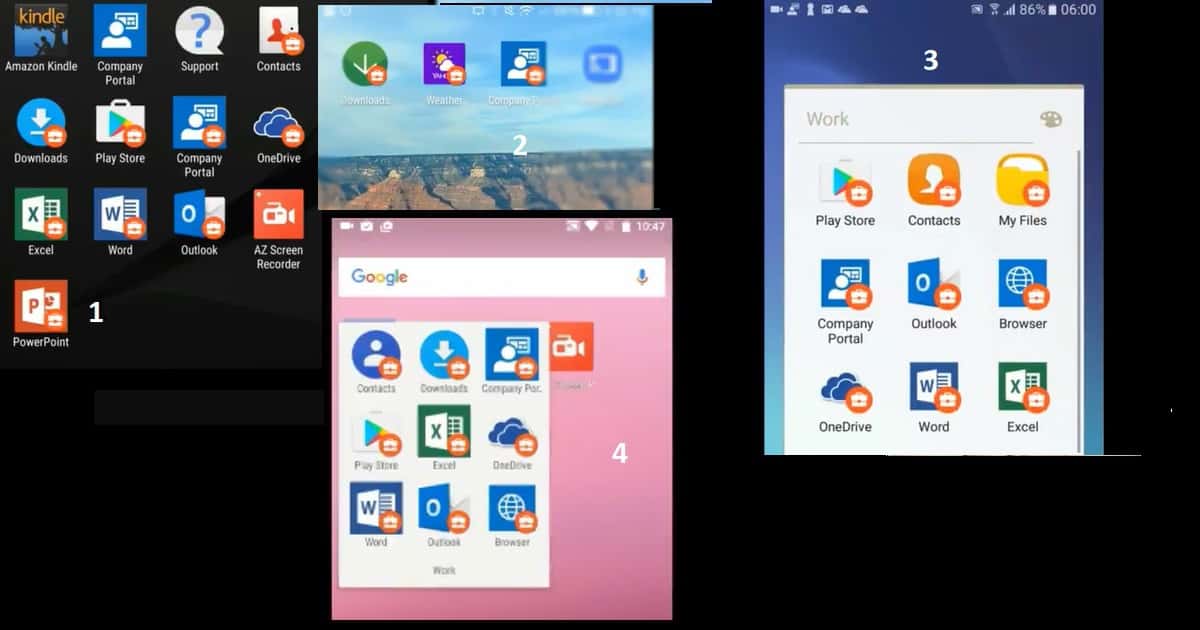
There is no standard user experience, and different mobile manufacturers, like Samsung, Sony, and LetV, have their own way of arranging Android Work applications. Once you have enabled Android for Work support, you can enrol the Android devices into Intune for management, as I explained in the post “How to Enroll Android for Work Supported Devices into Intune.”

In this post, we explain the user experience of Microsoft Intune Android Work Apps in all its details. This comprehensive guide delves into the user experience of Microsoft Intune Android Work Apps.

Intune Android Work Apps User Experience

In this post, we will examine the difference between a good and a bad Intune Android for Work user experience. I wanted to make it clear that Intune cannot do much to improve the user experience because this is a necessary OS capability.

Microsoft Intune Android Work Apps User Experience Explained - Fig.1
Microsoft Intune Android Work Apps User Experience Explained – Fig.1

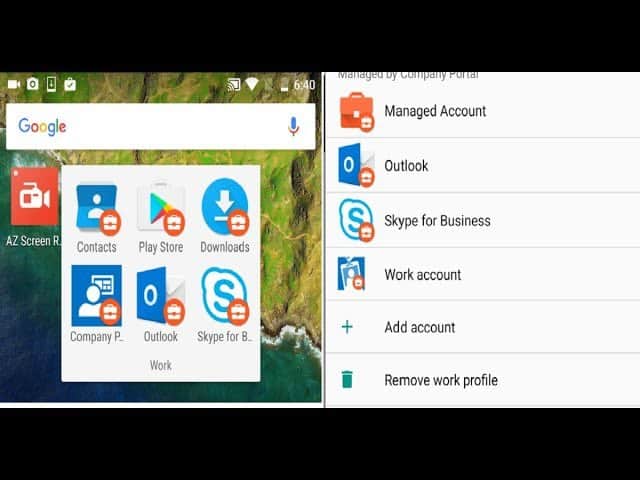
I have tested Intune Android for Work enrollment with devices like Nexus 6P, Sony, Samsung, etc. The Intune Android Work Apps user experience is good for all the tested devices. However, the problem is the placement of badged applications on the devices.

  • Each Android mobile manufacturer has its own way of placing badged Android Work applications.
  • I like how a manufacturer places all the badged apps into a folder.
  • This is very useful for the user to switch from work applications to personal ones. In my testing, if the manufacturer does not create a group for work applications after Intune Android for Work enrollment, it does not provide a good user experience.
  • Per my testing on several Android devices, I liked the Intune Android for the Work user experience of Samsung and Google Nexus the most.

Intune Android for Work End User Device Experience Video LetV Samsung Nexus Sony

Initially, the Intune Android for Work enrollment experience with the company portal was not flawless. However, the enrollment process has greatly improved with the latest version of the Intune company portal. Suppose you enroll the device with the latest company portal app. You don’t have to close the existing company portal app and open the company portal app for the work app (with a badge/briefcase symbol) to continue the enrollment process.

Microsoft Intune Android Work Apps User Experience Explained – Video 1

Intune Android for Work Nexus 6s Enrollment Experience

In this video, we’ll walk you through the comprehensive enrollment experience of Intune Android for Work on the Nexus 6s. From the initial setup to the final configuration, we’ll guide you step-by-step to ensure a smooth and efficient process.

Microsoft Intune Android Work Apps User Experience Explained – Video 2

I like the Samsung and Google Nexus user experience because all the Android work applications are placed or stored in a separate WORK folder. The work folder helps users better segregate their apps from work apps.

That user experience is excellent. Microsoft Endpoint Manager Intune Android Work Apps User Experience Explained? The Android work apps’ user experience of Sony and LetV Android devices is not so good if you compare the UX of Samsung and Nexus.

The bad user experience is that those devices won’t create a separate folder for WORK apps. The video tutorial in the first part of this project explains the more detailed experience. Intune Android Work Apps User Experience Explained in the above video.

Resources

Intune SCEP HTTP Errors Troubleshooting Made Easy With Joy – #5 (anoopcnair.com)

We are on WhatsApp now. To get the latest step-by-step guides, news, and updates, Join our Channel. Click here. HTMD WhatsApp.

Author

Anoop C Nair is Microsoft MVP! He is a Device Management Admin with more than 20 years of experience (calculation done in 2021) in IT. He is a Blogger, Speaker, and Local User Group HTMD Community leader. His main focus is on Device Management technologies like SCCM 2012, Current Branch, and Intune. He writes about ConfigMgr, Windows 11, Windows 10, Azure AD, Microsoft Intune, Windows 365, AVD, etc.

Windows 10 Azure AD Join Automatic Intune Enrollment 11

Windows 10 Azure AD Join Automatic Intune Enrollment

Let’s discuss the Windows 10 Azure AD Join Automatic Intune Enrollment. In this post, I will provide you with the experience of Windows 10 1703 (RS2) Azure AD join and automatic MDM (Intune) enrollment.

As you can see in the above video tutorial, this is a real-time experience of Windows 10 1703 Azure AD join and Intune auto-enrollment.

Windows 10 1703 is the latest version of the Windows 10 production build, also known as the Red Stone 2(RS2) release. The Windows team has done great work to improve the Out-of-Box Experience(OOBE) of Windows 10 1703. A previous post explains the in-depth process of AADJ and MDM auto-enrollment: “How to Join Windows 10 1607 Machines to Domain or Azure AD.”

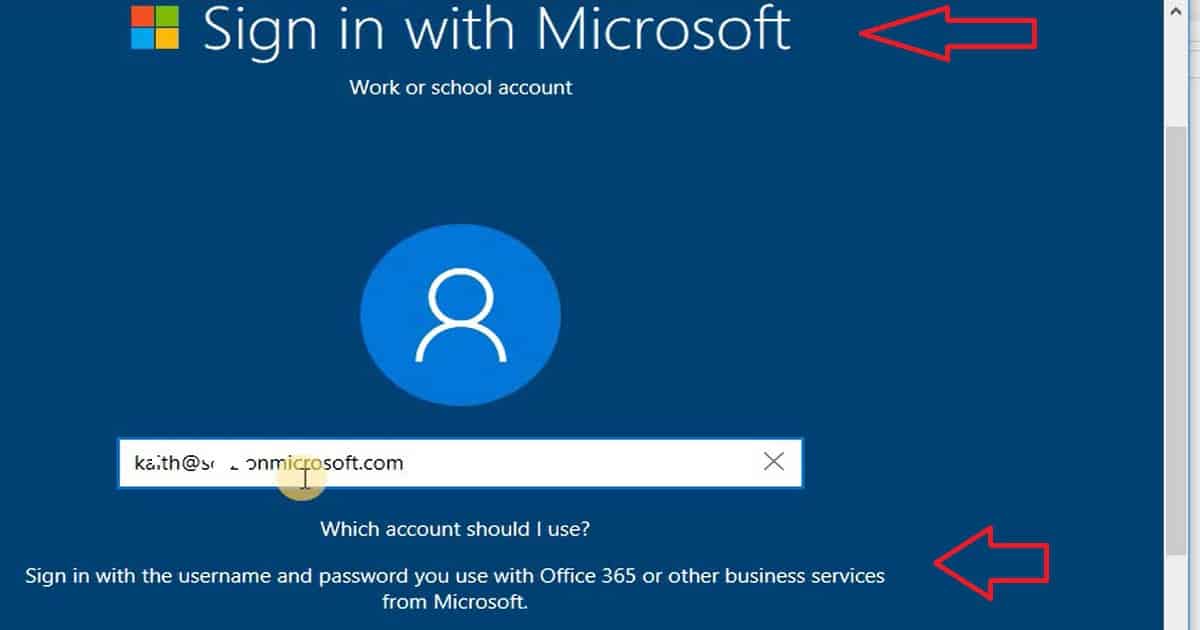
Signing in with a Microsoft School or Work account is the first screen in the Windows 10 1703 Azure AD join OOBE. A note on the same screen helps users select the account they want to use “Sign in with the username and password you use with Office 365 or business services from Microsoft”.

Yes, this is a generic kind of message. It would be more helpful if Microsoft could explain to the user how to use their corporate account rather than using technical terms like Office 365 and Business Services from Microsoft.

How to Perform Windows 10 1703 AAD Join and Intune Enrollment

The video below offers a comprehensive, step-by-step guide on performing a Windows 10 1703 Azure Active Directory (AAD) join and enroll your device in Microsoft Intune. It covers all the necessary steps, from initiating the AAD join process to successfully completing the Intune enrollment, ensuring that your device is properly managed and secured within your organization’s network.

Windows 10 Azure AD Join Automatic Intune Enrollment – Video 1

Windows 10 Azure AD Join Automatic Intune Enrollment

This is the sign-in screen. Please sign in using the username and password associated with your Office 365 account or any other Microsoft business services.

Windows 10 Azure AD Join Automatic Intune Enrollment - Fig.1
Windows 10 Azure AD Join Automatic Intune Enrollment – Fig.1

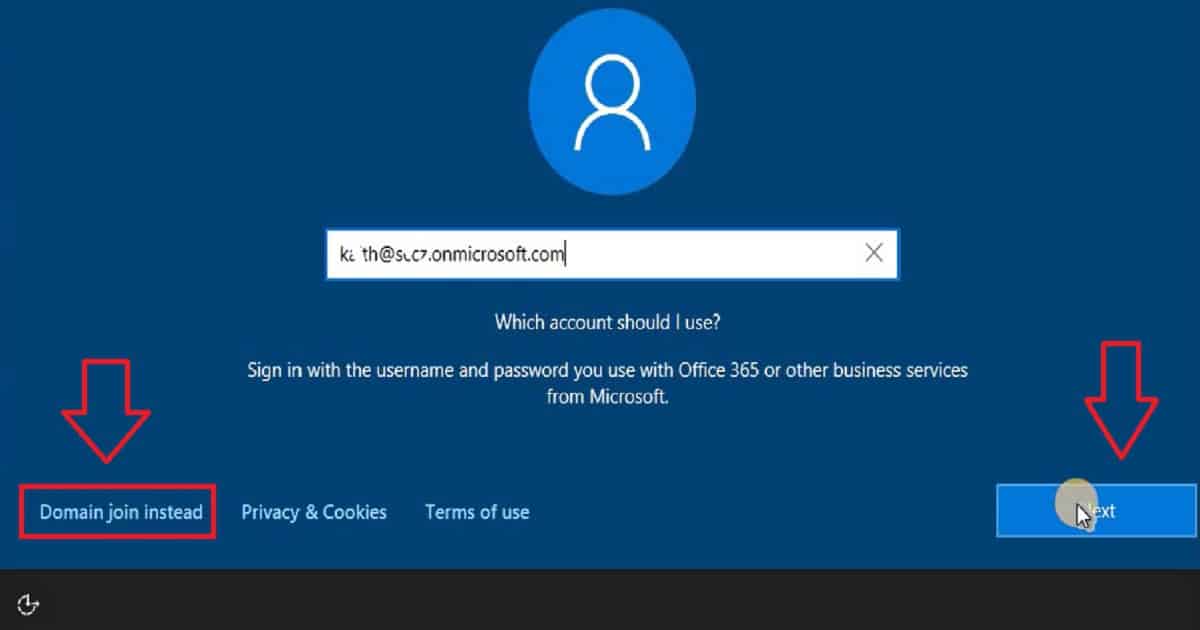
The Windows 10 1703 OOBE screen allows the user to choose a traditional domain join option. It also allows the user to create a local user account and log in with that account. The Windows 10 1703 OOBE experience has been greatly improved.

It will ask to connect to a Wi-Fi network and allow the user to connect to web-based authenticated Wi-Fi routers (not all? I need to test this further). Once connected to the internet, it will check for the latest software updates available and install them.

Windows 10 Azure AD Join Automatic Intune Enrollment - Fig.2
Windows 10 Azure AD Join Automatic Intune Enrollment – Fig.2

Windows 10 Azure AD Join Experience?

Windows 10 1703 Azure AD join is almost fully automated once users enter their user name and password in the OOBE mentioned above screen. However, user input is required on one particular screen: the screen for privacy settings.

Once the user has Windows 10 1703 privacy settings, the device will automatically log in with the user name and password. Is this a new SSO for Windows 10 1703 Azure AD join? You can confirm the AAD Join from the Settings—Accounts section in Windows 10 1703.

Your Informations
Email and App Accounts
Sign in Options
Access work or school
Other people
Sync your Settings
Windows 10 Azure AD Join Automatic Intune Enrollment – Table 1
Windows 10 Azure AD Join Automatic Intune Enrollment - Fig.3
Windows 10 Azure AD Join Automatic Intune Enrollment – Fig.3

Windows 10 MDM Intune Auto Enrollment Experience

Once the Windows device is joined to Azure AD, it should automatically enroll in Intune management. To get this experience, you should have enabled the MDM auto-enrollment option in your Azure AD. In my experience with Windows 10 1703, I got the encryption policy popup from the Intune compliance policy within a few minutes of the first login to the device.

The user can also check the Intune enrollment from the School or Work Account section in the Windows 10 settings menu. The Windows 10 MDM stack’s GUI has changed regarding School or Work account settings. The Windows 10 work account added to the device does not have a manage tab. Don’t worry about that because that is a new design for Windows 10 1703. The Windows 10 work/school account setting has only two tabs: Info and Disconnect.

How do you manually sync or check for the new Intune policies in a Windows 10 1703 device? The option is to click on Settings—Accounts—Access Work or School Account—Info—Sync. This will initiate an immediate policy sync with Intune services in the cloud. Afterwards, the user’s Windows 10 device will receive the latest policies from Intune.

Windows 10 Azure AD Join Automatic Intune Enrollment - Fig.4
Windows 10 Azure AD Join Automatic Intune Enrollment – Fig.4

We are on WhatsApp now. To get the latest step-by-step guides, news, and updates, Join our Channel. Click here. HTMD WhatsApp.

Author

Anoop C Nair is Microsoft MVP! He is a Device Management Admin with more than 20 years of experience (calculation done in 2021) in IT. He is a Blogger, Speaker, and Local User Group HTMD Community leader. His main focus is on Device Management technologies like SCCM 2012, Current Branch, and Intune. He writes about ConfigMgr, Windows 11, Windows 10, Azure AD, Microsoft Intune, Windows 365, AVD, etc.
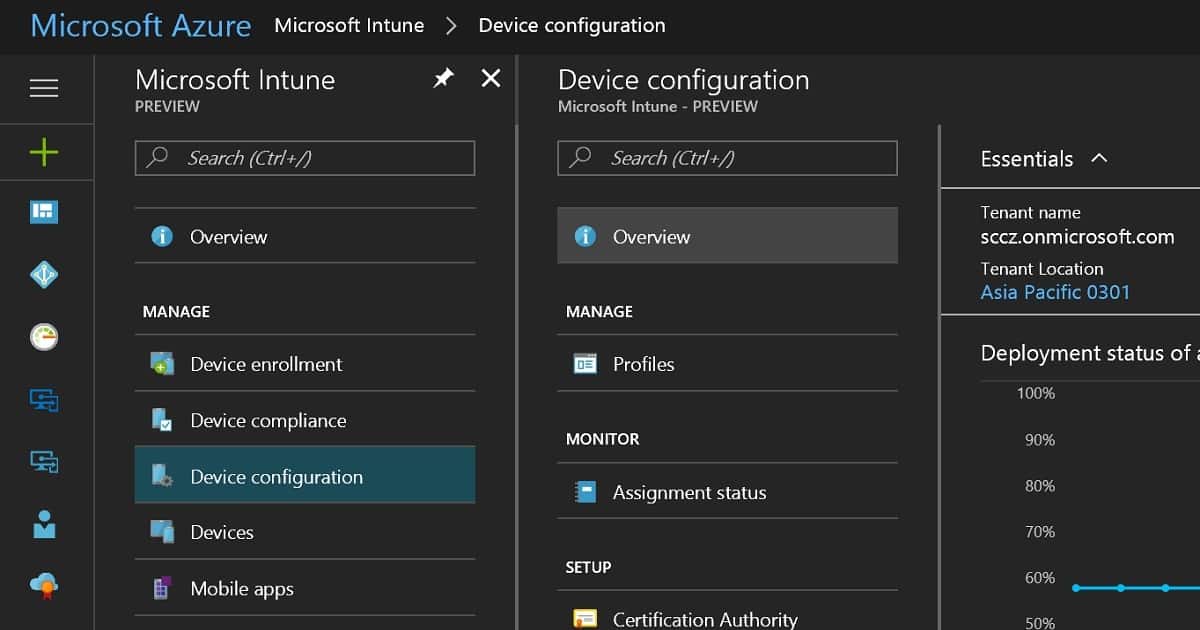
Software Update Policy Rings in Intune MEM 12

Software Update Policy Rings in Intune MEM

Let’s see how to configure Software Update Policy Rings in Intune MEM. How do you set up Windows 10 Software Update Policy Rings in the Intune?

Managing software updates for Windows 10 with Intune is straightforward, but there is a catch: you can’t expect the granular controls you have with SCCM/ConfigMgr. We must configure the Windows Software update policy and deploy that policy to Windows 10 devices.

I have an updated post on Intune monthly patching guide, troubleshooting, etc. Cloud PC Monthly Patching Process Using Intune. Another guide on Intune patching – Software Update Patching Options With Intune Setup Guide (anoopcnair.com)

Windows 10 devices will receive software updates directly from Microsoft Update services. Unlike SCCM, there is no need to download the updates, create a package, and deploy them to the devices (as seen in this video post here).

Windows Update for Business will give us more options to configure and control the behavior of Windows 10 updates and Servicing. Update:- FIX CBB Ring Devices are Getting Windows 10 CB (SAC-T) Updates Intune Windows 10 Update Rings.

Intune Video Software Update Rings Setup Design Decisions

This video guide is about Software Update Policy Rings in Intune MEM. It explains how to set up and manage these policy rings to control when and how updates are applied to your devices. This guide will teach you to update and secure your devices using Intune MEM.

Software Update Policy Rings in Intune MEM – Video 1

Software Update Policy Rings in Intune MEM

We have an out-of-the-box Software Update (Automatic Update) policy as part of the Intune Silverlight portal configuration policy. However, I have noticed that this policy has stopped working in the last few months. Now, there are two options to control the behavior of Windows 10 updates and Windows servicing.

If your Silverlight portal has not yet been migrated to the MEM portal, the first choice is to use custom policies in the Intune Silverlight portal. I have a post here about Intune Silverlight migration blockers.

The second choice is to control Windows Update for business via the Software Updates button in the Intune blade in the MEM portal. We will cover this in this post.

Software Update Policy Rings in Intune MEM
Software Update Policy Rings in Intune MEM – Fig.1

Basic Test Rings for Windows 10 Software Update

As a fundamental requirement, we may need to create at least two Windows 10 Software Update Policy Rings for your organization. One Windows 10 Update ring is for Windows 10 machines in the Current Branch (CB).

The second Windows 10 update ring is for Windows 10 machines in the Current Branch for Business (CBB). Windows 10 update rings evolve as you progress with your organization’s testing and development. But this is the first stage of your testing of Software update deployments.

Windows 10 CBB Update Ring - All the devices in Current Branch
Windows 10 CB Update Ring - All the device in Current Branch for Business

Pilot and Production Rings for Windows 10 or Windows 11 Servicing

Another recommendation is to create different Windows 10 Software Update Policy Rings for deferrals of Windows 10 servicing branches CB and CBB. The rings can be delayed for a maximum of 30 days.

These two update rings would help with the latest Windows 10 CB/CBB servicing updates (e.g., upgrading from 1607 to 1703) with some pilot devices rather than simultaneously deploying servicing updates to all the devices.

During the CB pilot testing, if you find any problems with the upgrade and don’t want to deploy the update to the CBB ring, you can PAUSE the updates for the production ring.

Pilot Windows 10 CBB Updates Ring - Pilot Servicing Ring for CBB 
Production Windows 10 CBB Updates Ring - Production Servicing Ring for CBB  
Pilot Windows 10 CB Updates Ring - Pilot Servicing Ring for CB
Production Windows 10 CB Updates Ring - Production Servicing Ring for CB

Pilot and Production Rings for Windows 10 or Windows 11 Monthly Security Patches

I would also recommend creating different Windows 10 Software Update Policy Rings for Windows 10 CBB  and Windows 10 CB quality updates (monthly security and other patches). So, Windows 10 CBB machines will have a minimum of 2 rings.

One ring is for the pilot machines running Windows 10 CBB, and the second ring is for the production machines running Windows 10 CBB. The same applies to Windows 10 CB devices, and the CB machines should also have two rings.

Pilot Windows 10 CB Quality Updates Ring - Monthly patch pilot ring
Production Windows 10 CB Quality Updates Ring - Monthly patch production ring
Pilot Windows 10 CBB Quality Updates Ring - Monthly patch pilot ring
Production Windows 10 CBB Quality Updates Ring - Monthly patch production ring
Software Update Policy Rings in Intune MEM - Fig.2
Software Update Policy Rings in Intune MEM – Fig.2

How to Create Advanced Windows 10 Software Update Rings?

There could be other complex scenarios of Windows 10 Software Update Policy Rings. These rings could depend purely on the requirements of your organisation’s region or business group. Some of the other essential options you have in Windows 10 Software Update Policy Rings are.

  • Windows 10 Automatic update behavior – How do you want to perform scan, download, and install updates? Scheduling options for Windows updates.
  • Do you want to update Windows 10 drivers as part of your patch deployment rings?
  • What kind of Delivery optimization (Build a caching solution with Windows 10) do you want to use?
Delivery Optimization Download Mode
HTTP blended with peering behind same NAT
Software Update Policy Rings in Intune MEM – Table 1
Software Update Policy Rings in Intune MEM - Fig.3
Software Update Policy Rings in Intune MEM – Fig.3

Deployment – Assignment of Windows 10 Software Update Rings

Windows 10 Software Update Policy Ring deployments/assignments are critical decisions. I recommend using dynamic device groups wherever possible, but at the moment, this is not possible for all scenarios. In some scenarios, we need to use static device/user groups. I hope Microsoft will develop assignment exclusion group options (similar to AAD Conditional Access policies).

Exclusion groups would be instrumental in Software Update ring deployment scenarios. For example, you want to exclude pilot devices from the production software update ring deployments, which is impossible without exclusion options.

We are on WhatsApp now. To get the latest step-by-step guides, news, and updates, Join our Channel. Click here. HTMD WhatsApp.

Author

Anoop C Nair is Microsoft MVP! He is a Device Management Admin with more than 20 years of experience (calculation done in 2021) in IT. He is a Blogger, Speaker, and leader of the Local User Group HTMD Community. His main focus is Device Management technologies like SCCM 2012, Current Branch, and Intune. He writes about ConfigMgr, Windows 11, Windows 10, Azure AD, Microsoft Intune, Windows 365, AVD, etc.
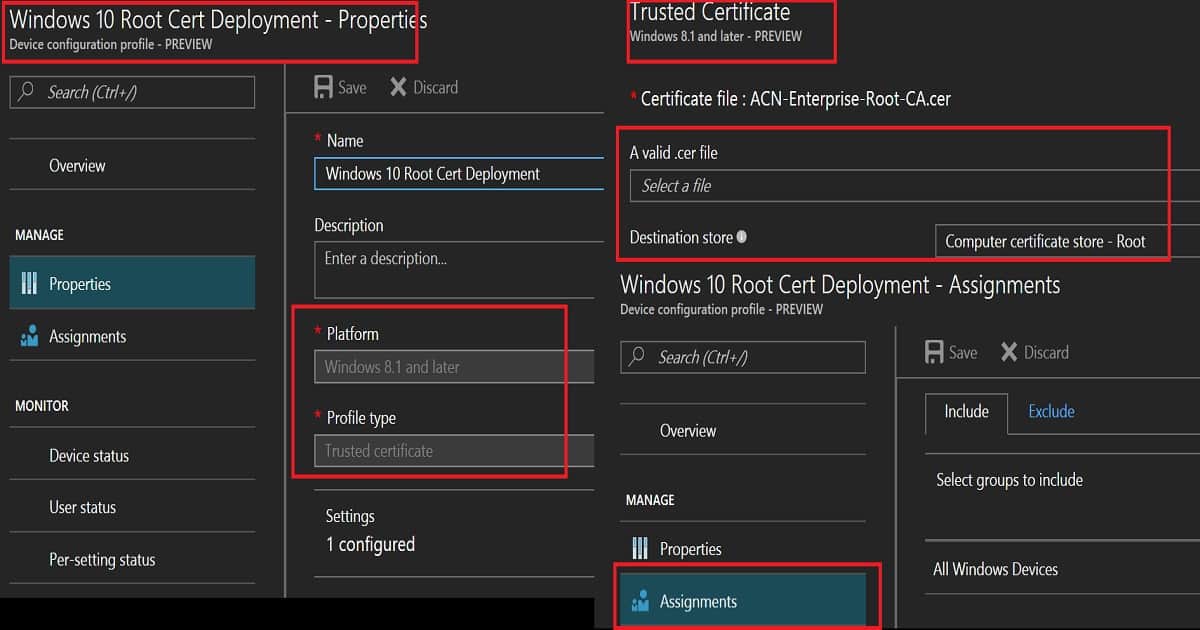
Android-compliance-policies

How to Configure Android Compliance Policies in Microsoft Intune

Key Takeaways

  • Strengthen organizational security by ensuring only compliant Android devices can access corporate resources.
  • Enforce password, encryption, and device security requirements to protect sensitive business data.
  • Improve endpoint compliance by defining operating system, security patch, and device health requirements.
  • Monitor compliance status and quickly identify noncompliant devices for faster remediation.

Let’s discuss How to Configure Android Compliance Policies in Microsoft Intune. This post will provide more details about planning and implementing the policy. Intune compliance policies are the first step of the protection before giving access to corporate apps and data. Planning and designing compliance policies for Android devices is essential as Android is more vulnerable than other operating systems

Table of Contents

How to Configure Android Compliance Policies in Microsoft Intune

Microsoft Intune compliance policies help organizations ensure that Android devices meet predefined security and compliance requirements before they can access corporate apps, services, and organizational data. These policies evaluate device settings against configured rules and identify whether a device is compliant or noncompliant.

Creating Android compliance policy is an essential part of endpoint security. Administrators can enforce requirements such as password complexity, operating system versions, encryption, security patch levels, and device health checks to reduce security risks and maintain compliance across managed Android devices.

Get Started to Configure Android Compliance Policies

Sign in to the Microsoft Intune admin center using an account with your credentials. From the left navigation pane, select Devices, expand Compliance policies, and then click Create Policies. This page displays all existing compliance policies configured in your Intune tenant.

How to Configure Android Compliance Policies in Microsoft Intune - Fig.1
How to Configure Android Compliance Policies in Microsoft Intune – Fig.1

In the Create a policy window, select Android Enterprise as the Platform, choose the appropriate Profile type (such as Personally-owned work profile), and then click Create to begin configuring the policy.

How to Configure Android Compliance Policies in Microsoft Intune - Fig.2
How to Configure Android Compliance Policies in Microsoft Intune – Fig.2

Start With Bascis

On the Basics page, enter a descriptive Name and an optional Description for the compliance policy to help identify its purpose. For example, use Android Enterprise Compliance Policy as the policy name and This policy defines compliance requirements for Android Enterprise personally owned work profile devices to ensure they meet organizational security standards before accessing corporate resources as the description. After entering the required information, click Next to continue to the Compliance settings page.

How to Configure Android Compliance Policies in Microsoft Intune - Fig.3
How to Configure Android Compliance Policies in Microsoft Intune – Fig.3

Compliance Settings

The Device Health section contains settings that evaluate the health and integrity of Android devices. Configure the available options according to your organization’s security requirements. The Compliance settings page includes four configuration categories: Microsoft Defender for Endpoint, Device Health, Device Properties, and System Security. Each category provides different options to evaluate the security and compliance status of Android devices.

CategorySetting
Microsoft Defender for EndpointRequire device at or under machine risk score
Device Health: Rooted devicesRooted devices
Require device at or under Device Threat LevelMedium
Google Play ProtectGoogle Play Services configured –Require
Up‑to‑date security provider-Require
Play Integrity Verdict –Check basic integrity & device integrity
Device PropertiesMinimum OS version -6.0
System Security – EncryptionRequire encryption of data storage-Require
System Security – Device SecurityBlock apps from unknown sources – Block
Company Portal app runtime integrity- Require
How to Configure Android Compliance Policies in Microsoft Intune – Table.1
How to Configure Android Compliance Policies in Microsoft Intune - Fig.4
How to Configure Android Compliance Policies in Microsoft Intune – Fig.4

Expand the Microsoft Defender for Endpoint section by clicking the drop-down arrow to view the available settings. For this example, configure Require the device to be at or under the machine risk score and set the value to Medium. This setting helps ensure that only devices with an acceptable Microsoft Defender for Endpoint risk level are considered compliant.

  • Device Health is where the compliance engine checks whether Android devices should be reported. The device health attestation service has many checks, including TPM 2.0 and BitLocker encryption.
  • Device Properties is where Intune Admins define minimum and maximum versions of operating system details for corporate application access. I would keep the minimum version as Android version 6 wherever possible.
    • Operating System Version
    • Minimum Android OS version
    • Maximum Android OS version
  • System Security is the setting where Intune Admins define password policies for Windows devices. These settings have three sections: Password, Encryption, and Device Security.
Password Compliance Policy for Android
Require a password to unlock mobile devices.
Minimum password length
Required password type
Maximum minutes of inactivity before the password is required
Password expiration (days)
Number of previous passwords to prevent reuse
How to Configure Android Compliance Policies in Microsoft Intune – – Table 2
How to Configure Android Compliance Policies in Microsoft Intune - Fig.5
How to Configure Android Compliance Policies in Microsoft Intune – Fig.5

The Actions for noncompliance page allow you to define what happens when an Android device fails to meet the configured compliance requirements. By default, Intune marks a device as noncompliant immediately (0 days), but you can modify the schedule based on your organization’s security policies.

  • The recommended setup is to mark the device noncompliant immediately (0 days) and send a push notification at 0 days, ensuring instant enforcement and user awareness.
How to Configure Android Compliance Policies in Microsoft Intune - Fig.6
How to Configure Android Compliance Policies in Microsoft Intune – Fig.6

Scope Tags

The Scope tags page is optional and is used to control which administrators can view and manage the compliance policy. If your organization does not use custom scope tags, leave the Default scope tag selected and click Next to continue

How to Configure Android Compliance Policies in Microsoft Intune - Fig.7
How to Configure Android Compliance Policies in Microsoft Intune – Fig.7

Assignments for the Compliance Policy

In the Assignments step of your Intune compliance policy, you specify which users or device groups the policy applies to, and the best practice for personally‑owned Android Enterprise. You can also configure exclusion groups if specific users should not receive the policy.

How to Configure Android Compliance Policies in Microsoft Intune - Fig.8
How to Configure Android Compliance Policies in Microsoft Intune – Fig.8

Review + Create Option

Review all configured settings on the Review + Create page to verify that they meet your organization’s compliance requirements. If necessary, return to previous pages to make changes. Once you’ve confirmed the configuration, click Create to deploy the Android compliance policy.

How to Configure Android Compliance Policies in Microsoft Intune - Fig.9
How to Configure Android Compliance Policies in Microsoft Intune – Fig.9

After the policy is successfully created, Microsoft Intune displays a notification confirming that the Android Enterprise compliance policy has been created successfully. You are then redirected to the policy’s Overview or Monitoring page, where you can review the policy details and monitor its compliance status.

How to Configure Android Compliance Policies in Microsoft Intune - Fig.10
How to Configure Android Compliance Policies in Microsoft Intune – Fig.10

Review the Policy Status

After the policy is created, open the newly created compliance policy to review its status. The Monitor tab displays the deployment and compliance status of the policy. Administrators can view the number of compliant, noncompliant, and not evaluated devices, and select the available reports to access detailed compliance information for individual Android devices.

  • Here you can see that the policy Assigned to the groups successfully.
How to Configure Android Compliance Policies in Microsoft Intune - Fig.11
How to Configure Android Compliance Policies in Microsoft Intune – Fig.11

Delete the Android Enterprise Compliance Policy

To delete an Android Enterprise compliance policy, sign in to the Microsoft Intune admin center and navigate to Devices > Compliance policies > Policies. Search for the Android Enterprise compliance policy you want to remove and select it from the list. Click the 3-dot (More) menu next to the policy, and then select Delete. When prompted, confirm the deletion to permanently remove the compliance policy from Microsoft Intune.

How to Configure Android Compliance Policies in Microsoft Intune - Fig.12
How to Configure Android Compliance Policies in Microsoft Intune – Fig.12

How to Setup Intune Compliance Policies for Android

This video guide shows you how to set up Intune compliance policies for Android devices. It provides easy-to-follow instructions for creating policies that ensure your devices meet security standards before accessing company apps and data.

How to Plan Design Intune Compliance Policy for Android Devices – Video 1

Need Further Assistance or Have Technical Questions?

Join the LinkedIn Page and Telegram group to get the latest step-by-step guides and news updates. Join our Meetup Page to participate in User group meetings. Also, Join the WhatsApp Community and WhatsApp Channel to get the latest news on Microsoft Technologies. We are there on Reddit as well.

Author

Anoop C Nair has been Microsoft MVP from 2015 onwards for 10 consecutive years! He is a Workplace Solution Architect with more than 22+ years of experience in Workplace technologies. He is also a Blogger, Speaker, and Local User Group Community leader. His primary focus is on Device Management technologies like SCCM and Intune. He writes about technologies like Intune, SCCM,  Windows,  Cloud PC, Windows, Entra, Microsoft Security, Career, etc

How to Setup Intune Compliance Policy for Windows 10 Devices 13

How to Setup Intune Compliance Policy for Windows 10 Devices

Let’s discuss Setting up an Intune Compliance Policy for Windows 10 Devices. This post will show how to do so. Managing Windows 10 devices is critical in modern device management.

Intune compliance policies are the initial safeguard in securing access to corporate applications. These policies help ensure that devices meet predefined security and compliance standards, preventing unauthorized or non-compliant devices from accessing sensitive corporate resources.

The Intune Compliance Policy for Windows 10 helps protect company data. The organization must ensure that the devices that access company apps and data comply with specific rules. These rules might include using a password/PIN to access devices and encrypting data stored on devices.

This set of such rules is called a compliance policy. The best option is to use a compliance policy with Azure AD Conditional Access.

How to Setup Intune Compliance Policies for Windows10

This video guide shows you how to set up Intune compliance policies for Windows 10. It walks you through each step clearly and simply, making it easy to follow.

How to Setup Intune Compliance Policy for Windows 10 Devices – Video 1

How to Setup Intune Compliance Policy for Windows 10 Devices

Sign in to the MEM portal with an Intune admin access account. Select More services, enter Intune in the text box, and then select Enter.

How to Setup Intune Compliance Policy for Windows 10 Devices - Fig.1
How to Setup Intune Compliance Policy for Windows 10 Devices – Fig.1

Select Intune—Device ComplianceCompliancePolicies and click on the +Create policy button to create a new compliance policy. Select the platform as “Windows 10.” Settings configurations are really important for compliance policies. There have been some improvements in Azure portal Windows 10 compliance policies.

The 3 categories in Windows 10 compliance policies are shown in the table below.

Windows 10 Compliance Policies
Device Health
Device Properties
System Security
How to Setup Intune Compliance Policy for Windows 10 Devices – Table 1
How to Setup Intune Compliance Policy for Windows 10 Devices - Fig.2
How to Setup Intune Compliance Policy for Windows 10 Devices – Fig.2

Device Health is the setting where the compliance engine will check whether Windows 10 devices are reported as healthy by the Windows device Health Attestation Service (HAS). The device health attestation service includes loads of checks, such as TPM 2.0 (the requirement for the latest build of Windows 10 is TPM 1.0), BitLocker encryption, etc.
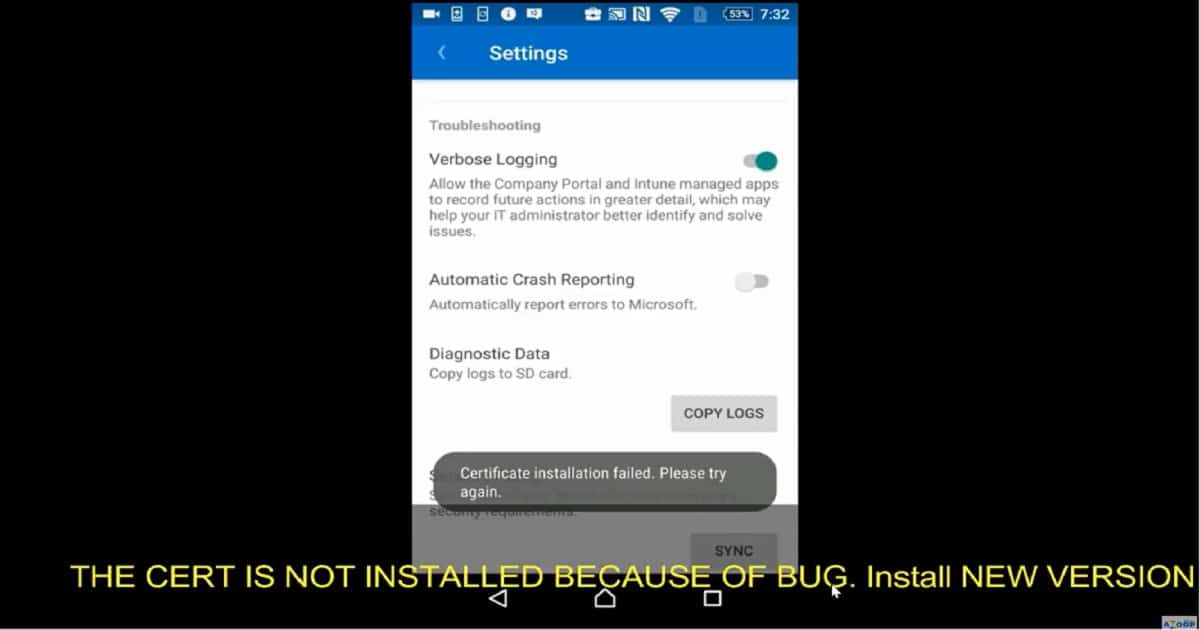
  • Device Properties is the setting where Intune Admins define the minimum and the maximum versions of operating system details for the corporate application access. Operating System Version.
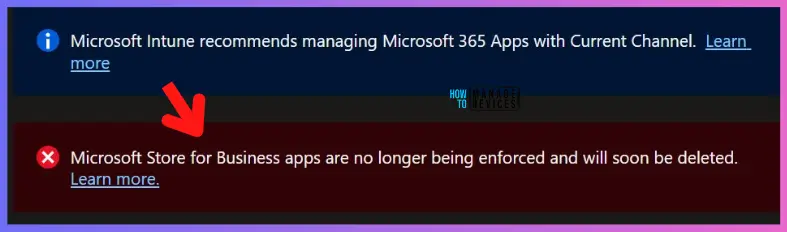
    • Minimum OS version
    • Maximum OS version
    • Minimum OS version for mobile devices
    • Maximum OS version for mobile devices

System Security is the setting where Intune Admins define password policies for Windows devices. These settings have two sections: Password and Encryption. Password Policy—We don’t need to set the Windows password policy here if you already use “Windows Hello for Business.”

  • Require a password to unlock mobile devices. Simple passwords
  • Password type
  • Device default device defaultAlphanumericNumeric
  • Minimum password length
  • Maximum minutes of inactivity before the password is required
  • Password expiration (days)
  • Number of previous passwords to prevent reuse
  • A password is required when the device returns from an idle state (mobile only). Encryption – If you have enabled HAS in the above policy, you don’t need to enable this encryption policy.  
  • Encryption of data storage on a device.
How to Setup Intune Compliance Policy for Windows 10 Devices - Fig.3
How to Setup Intune Compliance Policy for Windows 10 Devices – Fig.3

Deploy Windows 10 compliance to All Windows devices’ dynamic device groups. (Update Device Groups are not supported for Compliance policies—hence, use user groups for Intune compliance policies.)

  • Click on Assignment and select the dynamic device group.
  • I would use AAD dynamic device groups rather than user groups to deploy compliance policies.
How to Setup Intune Compliance Policy for Windows 10 Devices - Fig.4
How to Setup Intune Compliance Policy for Windows 10 Devices – Fig.4

We are on WhatsApp now. To get the latest step-by-step guides, news, and updates, Join our Channel. Click here. HTMD WhatsApp.

Author

Anoop C Nair is Microsoft MVP! He is a Device Management Admin with more than 20 years of experience (calculation done in 2021) in IT. He is a Blogger, Speaker, and Local User Group HTMD Community leader. His main focus is on Device Management technologies like SCCM 2012, Current Branch, and Intune. He writes about ConfigMgr, Windows 11, Windows 10, Azure AD, Microsoft Intune, Windows 365, AVD, etc.